BlueStork BS-EHD-35/COMBO/30 User manual

BSEHD35/COMBO/30
External Hard Drive Enclosure
Users’ manual p.2
Manuel utilisateur p.4
Manual del usuario p.6
Manuale dell’utente s.7
Gebruikershandleiding p.8
Bedienungsanleitung p.9
Manual do utilizador p.10
Εγχειρίδιο χρήστη p.11

ENGLISH
USERS’ MANUAL
3.5’’ HDD ENCLOSURE
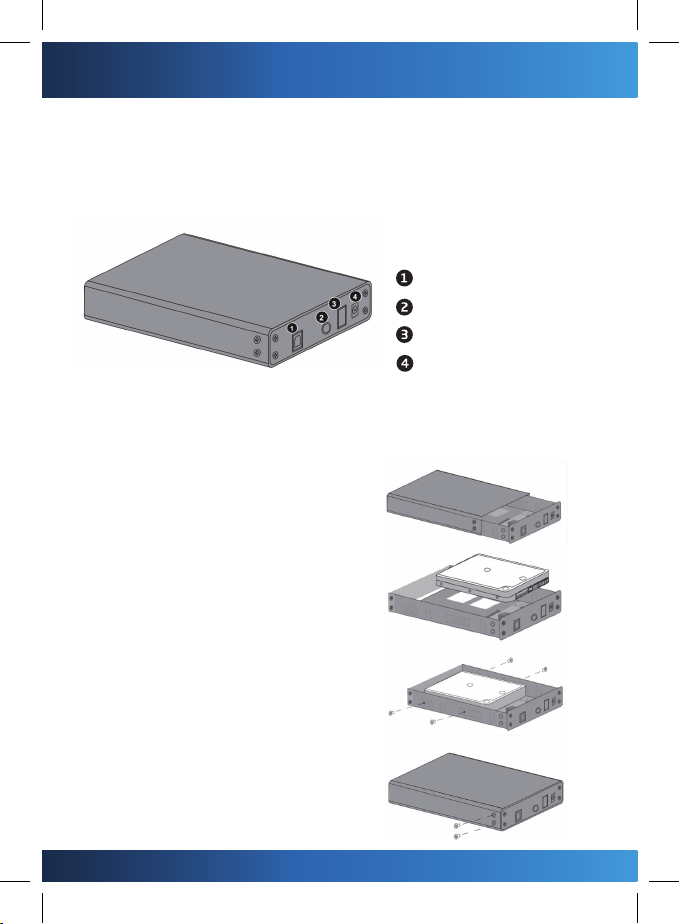
USB 3.0 port
LED
OFF/ON
DC power
HARD DRIVE INSTALLATION:
FOR ENCLOSURE PURCHASE ONLY
STEP 1: Open the enclosure by
draw out the bottom metal panel.
STEP 2: Place the hard drive into
the enclosure frame. Make sure
the pins are aligned and push
forward to connect.
STEP 3: Screw in the large screws
included (Phillips head screwdriver
needed).
STEP 4: Replace the bottom panel
and screw in the included small
screw.
2

EU DECLARATION OF CONFORMITY
We, the manufacture/ Importer, AXS,
99-101 Avenue Louis Roche – Peripark, Bâtiment A6
92230 Gennevilliers, France
Declare that the product:
- Kind of product: 3.5 Inch USB3.0 to IDE+SATA HDD Enclosure
-Brand: BLUESTORK
-Model: BS-EHD-35/COMBO/30
-EAN: 3760162060195
Is in compliance with the essential requirements and other rele-
vant provisions of the following directives:
- Directive (2014/30/EU)
The product is compatible with the following norms/standards:
EN55032:2015
EN61000-3-2:2014
EN61000-3-3:2013
EN55024:2010/A1: 2015
Is in compliance with the essential requirements and other rele-
vant provisions of the following directives: ROHS 2.
99-101 Avenue Louis Roche – Peripark Bâtiment A6
92230 GENNEVILLIERS - FRANCE
Tel :+ 33 (0) 1 47 86 98 88 – Fax :+ 33 (0) 1 56 83 22 37
SAS au capital de 500 000 €
Siret : 490 985 801 00045 – RCS Nanterre
Pascal PIBOULEAU
President
21/02/2017

FRANÇAIS
MANUEL D’UTILISATEUR
BOÎTIER POUR DISQUE DUR 3,5 POUCES
Port USB 3.0
Témoin lumineux (LED)
Interrupteur Marche/Arrêt
Alimentation courant
continu
INSTALLATION DU DISQUE DUR :
NE CONCERNE QUE LE BOÎTIER ACHETÉ
ÉTAPE 1 : Ouvrir le boîtier en
retirant le panneau métallique
supérieur.
ÉTAPE 2 : Placer le disque dur dans
le boîtier. Vérier le bon alignement
des broches et pousser vers l’avant
pour connecter l’appareil.
ÉTAPE 3 : Visser les grandes vis
fournies (utiliser un tournevis
cruciforme Philips).
ÉTAPE 4 : Replacer le panneau
inférieur et le xer à l’aide des
petites vis.
4

DECLARATION UE DE CONFORMITE
Nous, AXS, sis au 99-101 Avenue Louis Roche – Peripark
Bâtiment A6, 92230 Gennevilliers, France.
Déclarons que les produits désignés ci-dessous :
-Type de produit : 3.5 Inch USB3.0 to IDE+SATA HDD Enclosure
-Marque : BLUESTORK
-Modèle : BS-EHD-35/COMBO/30
-EAN : 3760162060195
Sont conformes aux dispositions des directives Européennes
suivantes :
- Directive (2014/30/EU)
Et que les normes et/ou spécications techniques mention-
nées ont été appliquées sur un modèle type :
EN55032:2015
EN61000-3-2:2014
EN61000-3-3:2013
EN55024:2010/A1: 2015
Sont également conformes aux dispositions des directives
ROHS 2.
99-101 Avenue Louis Roche – Peripark Bâtiment A6
92230 GENNEVILLIERS - FRANCE
Tel :+ 33 (0) 1 47 86 98 88 – Fax :+ 33 (0) 1 56 83 22 37
SAS au capital de 500 000 €
Siret : 490 985 801 00045 – RCS Nanterre
Pascal PIBOULEAU
President
21/02/2017

ESPAÑOL
MANUAL DEL USUARIO
CARCASA EXTERNA DE DISCO DURO
DE 3.5’’
Puerto USB 3.0
LED
ON/OFF
Alimentación de CC
INSTALACIÓN DEL DISCO DURO:
SÓLO CON ADQUISICIÓN DE LA CAJA
PASO 1 : Abra la caja extrayendo el
panel metálico inferior.
PASO 2 : Coloque el disco duro
dentro de la estructura de la caja.
Asegúrese de que los contactos
estén alineados y empuje hacia
delante para conectarlos.
PASO 3 : Atornille los tornillos
largos incluidos (se necesita un
destornillador de cabeza Philips).
PASO 4 : Vuelva a colocar el panel
inferior y atornille el tornillo
pequeño incluido.
6

DEUTSCH
BEDIENUNGSANLEITUNG
3,5’’ FESTPLATTENGEHÄUSE
USB 3.0 Anschluss
LED
ON / OFF
4-Gleichstrom
INSTALLATION DER FESTPLATTE:
NUR BEI FESTPLATTENKAUF
SCHRITT 1 : Önen Sie das
Gehäuse, indem Sie die untere
Metallplatte herausziehen.
SCHRITT2:Legen SiedieFestplatte
in den Gehäuserahmen. Stellen
Sie sicher, dass die Pins korrekt
ausgerichtet sind, und schieben Sie
die Festplatte nach bis zum Kontakt
nach vorne.
SCHRITT 3 : Setzen Sie die große
mitgelieferteSchraubeeinundziehen
diese fest (Kreuzschraubenzieher
erforderlich).
SCHRITT 4 : Setzen Sie die
Metallplatte wieder auf und
schrauben diese mit der kleinen
Schraube fest.
7
NEDERLANDS
GEBRUIKERSHANDLEIDING
3,5’’ HDDBEHUIZING
USB 3.0-poort
LED
ON/OFF
Gelijkstroom
INSTALLATIE HARDE SCHIJF:
ALLEEN VOOR AANKOOP BEHUIZING
STAP 1 : Open de behuizing door
aan de onderkant het metalen
paneel te verwijderen.
STAP 2 : Plaats de harde schijf in het
frame van de behuizing. Zorg ervoor
dat de pinnetjes zijn uitgelijnd en
druk naar voren voor verbinding.
STAP 3 : Schroef de meegeleverde
grote schroeven vast. (Met een
schroevendraaier van Philips)
STAP 4 : Plaats het onderpaneel
terug en schroef het bijbehorende
schroee vast.
8

ITALIANO
MANUALE DELL’UTENTE
INVOLUCRO PER HDD 3.5’’
Porta USB 3.0
LED
ON/OFF
Alimentazione DC
INSTALLAZIONE DISCO RIGIDO:
SOLO PER L’ACQUISTO DELL’INVOLUCRO
PUNTO 1 : Aprite l’involucro
togliendo il pannello di metallo
inferiore.
PUNTO 2 : Sistemate il disco rigido
nella struttura dell’involucro.
Assicuratevi che i perni siano
allineati e spingete per collegare.
PUNTO 3 : Fissate le viti fornite. (È
necessario un cacciavite Philips)
PUNTO 4 : Riposizionate il
pannello inferiore e ssate la vite
piccola fornita.
9

PORTUGUÊS
MANUAL DO UTILIZADOR
RECEPTÁCULO DE UNIDADE DE DISCO
RÍGIDO DE 3,5’’
Porta USB 3.0
LED
ON / OFF (Ligar / desligar)
Alimentação CC
INSTALAÇÃO DO DISCO RÍGIDO:
APENAS PARA COMPRA DA CAIXA
PASSO 1 : Abra a caixa removendo o
painel metálico inferior.
PASSO 2 : Coloque o disco rígido na
estrutura da caixa. Certique- se
de que os pinos estão alinhados e
empurre para conectar.
PASSO 3 : Aparafuse os parafusos
grandes incluídos. (É necessária
uma chave Philips.)
PASSO 4 : Volte a colocar o painel
inferior e aparafuse o parafuso
pequeno incluído.
10

ΕΛΛΗΝΙΚΆ
ΕΓΧΕΙΡΙΔΙΟ ΧΡΉΣΤΉ
ΚΕΛΥΦΟΣ ΓΙΆ ΣΚΛΗΡΟ ΔΙΣΚΟ 3.5 ΙΝΤΣΏΝ
Θύρα USB 3.0
Φως (LED)
Διακόπτης On / Off
DC τροφοδοτικό
ΕΓΚΆΤΆΣΤΆΣΗΣ ΣΚΛΗΡΟΥ ΔΙΣΚΟΥ:
(ΔΕΝ ΑΦΟΡΑ ΠΑΡΑ ΜΟΝΟ ΤΟ ΚΕΛΥΦΟΣ ΠΟΥ ΑΓΟΡΑΣΤΉΚΕ)
ΒΗΜΆ 1 : Ανοίξτε το κέλυφος
αφαιρώντας το άνω μεταλλικό πλαίσιο.
ΒΗΜΆ 2 : Τοποθετήστε το σκληρό
δίσκο μέσα στο κέλυφος. Ελέγξτε
την καλή ευθυγράμμιση των ακίδων
και σπρώξτε προς τα εμπρός για να
συνδέσετε τη συσκευή.
ΒΗΜΆ 3 : Βιδώστε τις παρεχόμενες
μεγάλες βίδες (χρησιμοποιήστε ένα
σταυροκατσάβιδο Philips).
ΒΗΜΆ 4 : Τοποθετείστε το κάτω
πλαίσιο πίσω στη θέση του και
σταθεροποιήστε το βοηθούμενοι από
τις μικρές βίδες.
11

This manual suits for next models
1
Table of contents
Languages:
Other BlueStork Enclosure manuals


Popular Enclosure manuals by other brands

Hama
Hama 2.5" Hard disk Enclosure installation guide

Gembird
Gembird EE2-U3S-3 user manual

Icy Box
Icy Box IB-183M2 Quick installation guide

ST Engineering Electronics
ST Engineering Electronics DigiSAFE DISKCRYPT M100 user manual

Promise
Promise SmartStor DS4600 product manual

Sonnet
Sonnet fusion d500p user guide