Bluestorm ZH1H User manual

SAILING (38g cylinder)
WARNING!
This PFD will not float you without inflation! Each CO2
inflator body will only inflate the PFD once. You must
rearm this PFD after each use of the CO2.
NOTICE: For initial arming of the PFD. See instructions
provided with the cylinder.
ZH1H Type V/II Automatic/Manual Inflatable
PFD with Sailing Harness
OWNER’S MANUAL
DO NOT REMOVE PRIOR TO SALE
INFLATABLE PERSONAL FLOTATION DEVICE (PFD)
POWER BOATING (38g cylinder)
Z1H Type II Automatic/Manual Inflatable PFD
ZD1H Type II Automatic/Manual Inflatable PFD
(with dual side adjustment)

This inflatable PFD is approved by the U.S. Coast Guard for use as a Type
indicated on the cover. It is not approved for water skiing or other high impact,
high speed activities. This inflatable was designed to be more comfortable and
less restrictive to wear than inherently buoyant PFDs. When worn, used, and
serviced according to this owner’s manual, this PFD can greatly increase your
chances of survival in the water. NOT recommended for non-swimmers or weak
swimmers. Users of inflatable PFDs must be at least 16 years old.
Approval Conditions and Carriage Regulations
Federal regulations in 33 CFR 175-1993 require you to carry Coast Guard
approved personal flotation devices (PFDs) legibly marked with the Coast Guard
approval number which are in good and serviceable condition and are the
correct size for each person on board. To be considered serviceable, this PFD
shall not exhibit deterioration that could diminish its performance such as broken
or deformed hardware, detached webbing, rotted structural components, air
leaks, or non-functional oral inflation tube. Unless worn inflated, this PFD must
also be properly armed with a full CO2 cylinder, inflation system status indicator,
and an accessible manual inflation lanyard. A PFD which is “approved only
when worn” or “required to be worn” must be worn under the specified
conditions.
Mandatory Carriage Requirements
WARNING! Use only the rearming kit stipulated above for use
with your PFD. Rearming kits and parts are not interchangeable.
Substitution may damage or cause your PFD to malfunction.
Specifications:
User Weight:
Chest size:
Age Limitation:
More than 80 pounds
30 to 56 inches
16 years of age and older
ZH1H: Rearming Kit V95000-86202Z
Z1H: Rearming Kit V95000-86202Z
P.1
ZD1H: Rearming Kit V95000-86202Z

ZH1H includes an integrated safety harness, making the USCG approval
conditions different for this model.
Features: 38 lbs design buoyancy
Halkey-Roberts Corp. single point indicator automatic inflation system (1H).
Deluxe Automatic: ZH1H and Z1H
P.2
Model ZD1H
Same as model as Z1H
with dual side adjustment
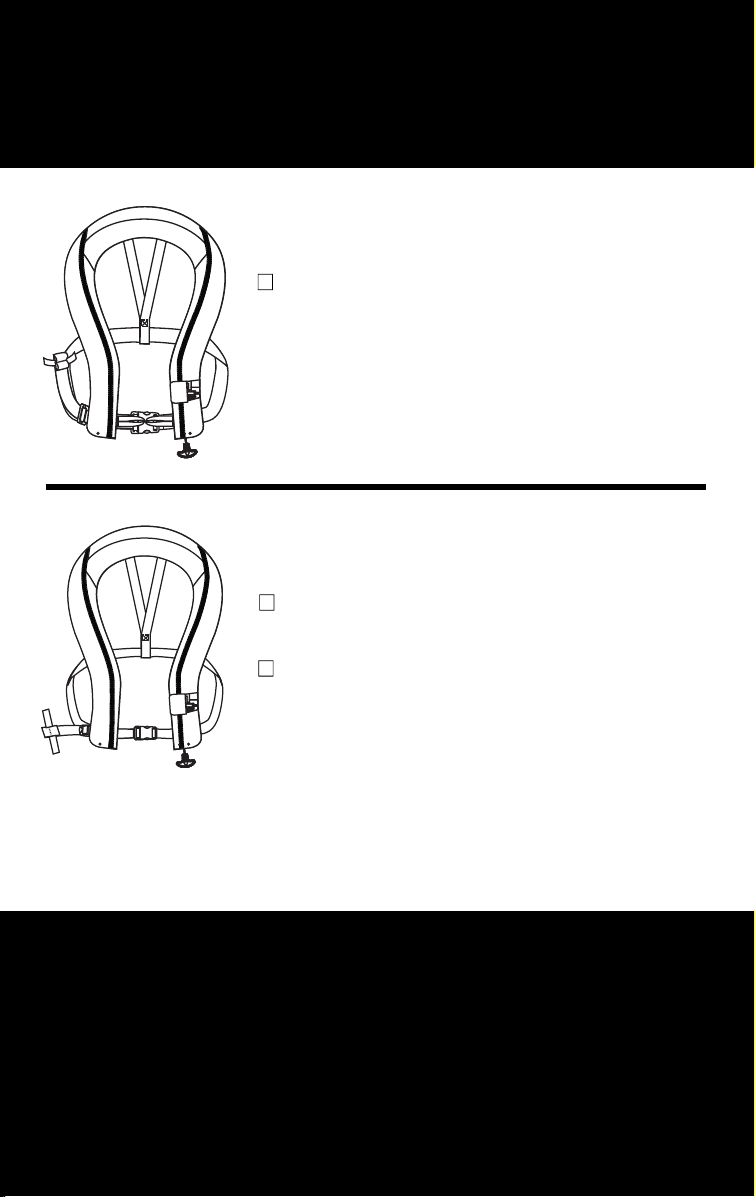
Model ZH1H Model Z1H

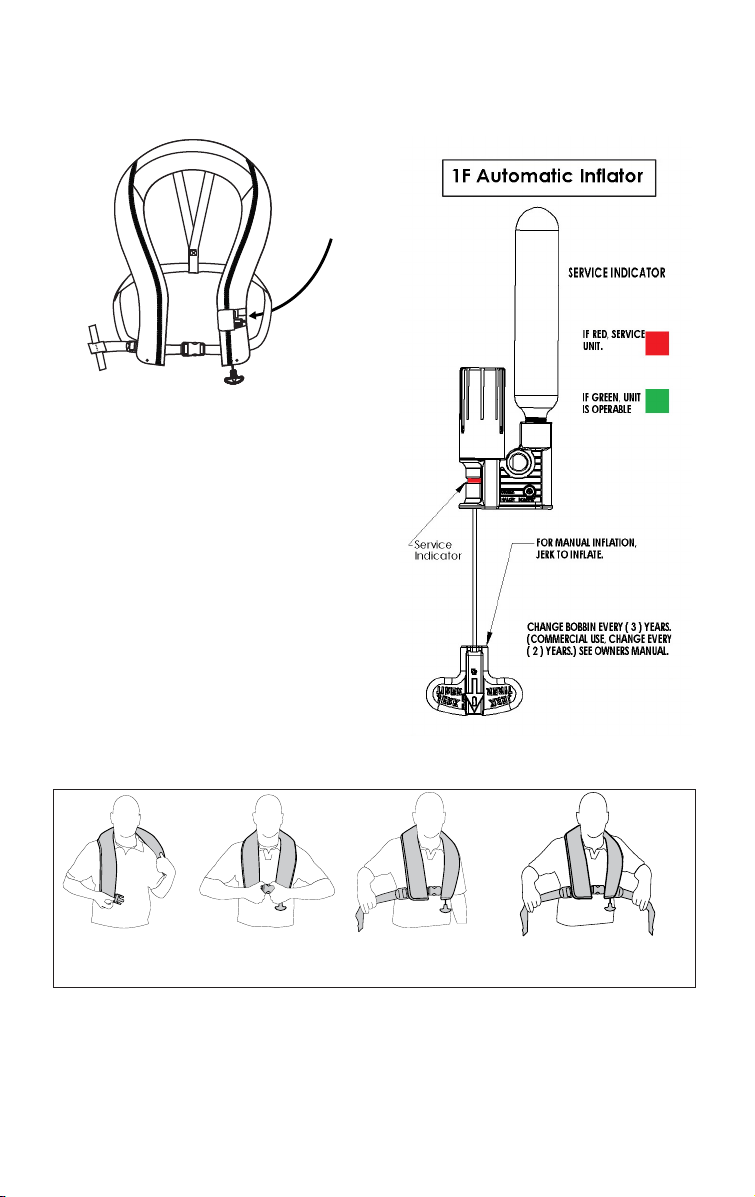
1. Where and How to Check Inflation System Status Indicators:
INSTRUCTIONS FOR USE
P.3
Location:
ZH1H
Z1H
ZD1H
2. Donning Instructions: DON LIKE A VEST
It’s imperative that the inflatable PFD is properly adjusted to fit the person
wearing it. An incorrect fit, or improper donning can inhibit the
effectiveness of the device, or result in injury. Do not wear inflatable
PFDs underneath any type of clothing, serious injury may result.
1
Don like a jacket.
Insert arms between
straps and PFD.
Buckle to close.
Jerk to Inflate Tab
should be visible on
the lower left.
2
Detach Velcro T-tab
from waist belt and
adjust strap for
a snug fit.
3 4
(For models with dual side adjustment)
Use adjustments on both sides of the
vest to secure waist strap for a snug fit.

CO2 Inflation (Automatic/Manual PFD) The PFD will
inflate when fully immersed in water. Automatic/Manual
PFDs can be manually inflated by grasping the manual
inflation pull tab and pulling sharply downward.
3. Inflation and Deflation
INFLATION
DEFLATION
CO2 inflation (Manual Inflation PFD)
The PFD is manually inflated by
grasping the manual inflation pull tab
and pulling sharply downward.
Oral Inflation: The oral inflation tube is located inside the
cover on the wearer’s left side. To inflate orally, access the
inflation tube by opening the top portion of the cover, remove
the dust cap, and blow air into the tube until the inflatable is
firm.
Note: Oral inflation can be used to test for air leakage or as a back-up in the
event that the CO2 cylinder fails to operate. CO2 gas permeates the bladder
more quickly than air, and therefore oral inflation can be used to refill the
bladder in the event the wearer is in the water for an extended period. Do not
fully inflate the PFD orally and then inflate with CO2 cylinder as bladder
could incur damage.
The deflation tab is located on top of the dust cap. Turn
the dust cap upside down and insert the deflation
mechanism into the oral tube. Hold the deflation
mechanism in place with your finger and gently squeeze
all the air out of the PFD. If the PFD has inflated while
being worn, it may be necessary to partially deflate the
PFD in order to remove it.
To remove all air, roll the PFD into a ball and squeeze while operating the
deflation mechanism. The PFD will be difficult to fold and re-pack properly if not
completely deflated.
PRACTICE wearing and adjusting your inflatable PFD in the water in order to be
prepared for an emergency!
Practice wearing and inflating your PFD using different types of clothing. Wade
into the water and manually inflate, or allow your PFD to inflate automatically.
Practice until you have complete confidence in the and performance of your PFD.
P.4
PRESS DOWN
ON ORAL TUBE
PRESS DOWN
ON ORAL TUBE
Oral Inflation
tube
Oral Inflation
tube
Manual Inflation
pull tab
Manual Inflation
pull tab
Jerk Tab
to Inflate
Blow into
Oral Tube
Blow into
Oral Tube

P.5
Step 1
Step 2
Discard cylinder.
Step 3
Step 4
Discard bobbin
REARMING
.
Step 5
Step 6
IMPORTANT
HOUSING
Step 7
Step 8
IMPORTANT
Step 9
WARNING: PFD WILL ONLY INFLATE IF
CYLINDER IS TURNED TO FULL STOP.
Step 10
GREEN.
Halkey-Roberts Pro 1F® V95000
Service Instructions

P.6
C02 CYLINDER
STEP 2.
CAP
STEP 3.
HOUSING
STEP 6.
HOUSING
SHOULDER
STEP 7.
SERVICE
INDICATOR
STEP 10.
BOBBIN
STEP 4.
If green, unit is
operable.
If red, stop and
service unit.

P.7
PRESS DOWN ON ORAL TUBE.
PRESS ON BLADDER TO DEFLATE
ALL THE AIR.
2
4
1
3
RETURN ZIPPER TO
THE PIN BOX ON THE
OPPOSITE SIDE OF
THE VEST.
WHEN STARTING TO CLOSE
ZIPPER MAKE SURE “JERK
TO INFLATE” CORD IS PLACED
BENEATH ZIPPER PIN BOX .
WHILE FOLDING BLADDER
ZIP SHELL FULLY CLOSED.
5
ZIPPER SHOULD BE FULLY
CLOSED. MAKE SURE INFLATER
MECHANISM IS VISIBLE
THROUGH THE WINDOW.
6
RE-PACKING INSTRUCTIONS
TUCK OUTSIDE EDGES
OF BLADDER UNDER.
POSITION THE INFLATOR
MECHANISM SO IT IS VISIBLE
ON THE TOP OF THE BLADDER.

The gas in a CO2 cartridge expands in hot weather and contracts in
cold weather.
created at 70 degrees F (22 degrees C).
buoyancy.
breaths of air through the oral tube.
Check your PFD between outings to be sure that it is properly armed;
that it is free of rips, tears or holes; that all seams are securely sewn;
and that the fabric, straps and hardware are still strong. Inspect the
Maintenance Instructions below.
Perform this leakage test at the beginning of each season and at least
every 2 months during usage.
IS YOUR PFD IN GOOD AND SERVICEABLE CONDITION?
1.Visually Inspect and Check for Leaks
2. Rearming Instructions: Page 5 & 6.
3. Refolding Instructions: Page 7.
CARE AND MAINTENANCE INSTRUCTIONS
P.8
4. FOR ALL MODELS, THE CO2 CARTRIDGE MAY BE USED ONLY
ONE TIME TO INFLATE THE PFD.
5. USE ONLY THE REARMING KIT INDICATED FOR YOUR
PFD MODEL. SEE PAGE 1.
6. Store in well-ventilated area away from direct sunlight.
・Hand wash in clear water and hang to dry
・DO NOT DRY CLEAN or use solvent based cleaners
the PFD.
PRECAUTIONS FOR USE IN
FREEZING TEMPERATURES

Drownings are the leading cause of fatalities involving recreational boating. A
PFD provides flotation to help keep your head above water, help you to stay
face up in the water, and increase your chances for survival and rescue. Most
adults only need an extra 7 to 12 pounds of flotation to keep their heads above
water. The proper size PFD will properly support the weight of the wearer.
Since this inflatable PFD does not have inherent buoyancy, it provides inflation
only when inflated. Familiarize yourself with the use of this PFD so you know
what to do in an emergency.
The U.S. Coast Guard recommends that you purchase two rearming
kits. One to be used immediately to test the inflation system and the
other to carry onboard as a spare.
Note: Since you should replace the water sensing element each year, the U.S.
Coast Guard recommends you test the automatic inflation system in-the-water
at the beginning of each season. By doing this, you demonstrate that the
automatic inflation system is still working properly and reduce the likelihood of
premature inflation and its associated dangers. The only check of the manual
inflation system (with CO2 cylinder and green indicator tab removed) would be
to determine that the lever arm and piercing pin move freely when moving the
lever several times down and up.
HOW AND WHY TO TEST YOUR PFD?
P.9
WHY ARE PFDs REQUIRED SAFETY EQUIPMENT?
Inflate your PFD and try it out in the water to:
•Make sure it floats you:
- Comfortably (when worn properly)
- Adequately for expected wave conditions (Body shapes/
densities affect performance)
•Make sure it works:
- A flow of bubbles should not appear (See “Visually Inspect and
Leak Test your PFD on page 8)
- It should inflate quickly and easily
•Learn how it works by:
- Activating the CO2 inflation system
- Rearming the CO2 inflation system
- Using the Oral inflator tube

P.10
HOW DO YOU TEST YOUR PFD USING THE AUTOMATIC INFLATOR?
1. To test your inflatable PFD, you will need:
• Your fully armed PFD, and
• Rearming kit approved for your PFD
1. To test your inflatable PFD, you will need:
• Your fully armed PFD, and
• Rearming kit approved for your PFD
2. Put on the PFD.
2. Put on the PFD.
3. Get into shallow water, just deep enough that you can stand with your head
above the surface. Once the inflator is under water the PFD should
automatically, fully inflate within 10 seconds.
3. Actuate the inflation system by jerking firmly downward on the pull tab.
The PFD should inflate within 5 seconds.
4. Get into shallow water, just deep enough that you can stand with your head
above the surface.
5. See if the PFD will float you on your back or just slightly back of vertical.
In a relaxed floating position, verify that your mouth is well above the water’s
surface. Note the effect of where you hold your legs on how you float.
6. Get out of the water and remove the PFD. Remove the used CO2 cylinder
from the PFD inflator. Deflate the PFD using the oral inflator.
7. Let the PFD dry thoroughly. REARM and REPACK the PFD in accordance
with the instructions on page 5, 6 and 7.
4. See if the PFD will float you on your back or just slightly back of vertical.
In a relaxed floating position, verify that your mouth is well above the water’s
surface. Note the effect of where you hold your legs on how you float.
5. Get out of the water and remove the PFD. Remove the used CO2 cylinder
and the used water sensing element from the PFD inflator. Deflate the PFD
using the oral inflator.
6. Let the PFD dry thoroughly. REARM and REPACK the PFD in accordance
with the instructions on page 5, 6 and 7.
HOW DO YOU TEST YOUR PFD USING THE MANUAL INFLATOR?

P.11
HOW DO YOU TEST YOUR PFD USING THE ORAL INFLATOR?
1. To test your inflatable PFD, you will not need any spare parts, or
rearming kits.
2. Remove the CO2 cylinder, to prevent inadvertent activation of the
manual inflation system which could potentially damage the PFD.
Inspect the threaded end to confirm that it is unused.
2a. If mechanism is automatic, remove bobbin.
3. Put on the PFD
4. Get into shallow water, just deep enough that you can stand with your
head above the surface.
6. Fully inflate the PFD using the oral inflator.
7. See if the PFD will float you on your back or just slightly back of
vertical. In a relaxed floating position, verify that your mouth is well
above the water’s surface. Note the effect of where you hold your
legs on how you float.
8. Get out of the water and remove the PFD. Completely deflate the
PFD using the oral inflator.
In approximately 80% of all boating fatalities, the victims were not
wearing a PFD. Most fatal accidents happen on calm sunny days.
This inflatable PFD is much more comfortable to wear than other
PFD types. Get into the habit of wearing this PFD. Non-swimmers
and children especially should wear a hybrid or non-inflatable PFD
at all times when on or near the water.
9. Let the PFD dry thoroughly. REARM AND REPACK the PFD in
accordance with the instructions on page 5, 6 and 7.
WEAR YOUR PFD!
5. If you are a weak swimmer or non-swimmer, inflate the PFD partially
so that you are supported well enough to be able to complete inflation
without touching bottom, either orally or manually. Note this level of
inflation because it is the minimum needed for you to safely use this
inflatable PFD.

P.12
HYPOTHERMIA
Prolonged exposure to cold water causes a condition known as
hypothermia – a substantial loss of body heat which leads to exhaustion
and unconsciousness. Most drowning victims first suffer from
hypothermia. The following chart shows the effects of hypothermia:
HOW HYPOTHERMIA AFFECTS MOST ADULTS
Exhaustion or
Unconsciousness Expected Time
of Survival
UNDER 15 to 45 MIN
30 to 90 MIN
1 to 3 HOURS
1 to 6 HOURS
2 to 40 HOURS
3 HOURS to INDEFINITE
INDEFINITE
UNDER 15 MIN
15 to 30 MIN
30 to 60 MIN
1 to 2 HOURS
2 to 7 HOURS
2 to 12 HOURS
INDEFINITE
0.3 (32.5)
0.3 to 4 (32.5 to 40)
4 to 10 (40 to 50)
10 to 16 (50 to 60)
16 to 21 (60 to 70)
21 to 27 (70 to 80)
over 27 (over 80)
PFDs can increase survival time because they allow you to float without using
energy treading water and because of their insulating properties. Naturally, the
warmer the water, the less insulation you will require. When operating in cold
water below 60 F (15.6 C) you should consider using a coat or jacket style PFD
or a Type V Thermal Protective PFD as they cover more of the body than the
vest or belt style PFDs.
Some points to remember about Hypothermia Protection:
1. Always wear your PFD. Even if you become incapacitated due to hypothermia,
the PFD will keep you afloat and greatly improve your chances of rescue.
2. Do not attempt to swim unless it is to reach a nearby craft, fellow survivor, or
a floating object on which you can lean or climb. Swimming increases the rate
of body heat loss. In cold water, drown-proofing
methods that require putting your head in the water
are not recommended. Keep your head out of the
water. This will lessen heat loss and increase your
survival time.
3. Use the standard H.E.L.P. position when wearing
an inflatable PFD, drawing the legs up to a seated
position, because doing so will help you conserve
body heat.
4. Keep a positive attitude about your survival and rescue. This will
improve your chances of extending your survival time until rescued
Your will-to-live does make a difference!
5. If there is more than one person in the water, huddling is
recommended while waiting to be rescued. This action tends to
reduce the rate of heat loss and thus increase the survival time.
Water Temperature
C (F)

WARNING: Safety harnesses are designed to be worn at the chest
area, to provide the wearer with the least injury potential, should the user
be subject to sudden high shock loads. The harness belt must always
be worn at least 2” ABOVE the lowest rib measured from the top of the
belt. Failure to correctly wear the safety harness may result in serious
injury, or even death.
1. Minimum height = 5 ft 5”
2. Permissible chest range = 30” to 56”
NOTE: The harness must be worn snugly about the body to insure
proper fit under all conditions. Failure to do so, materially increases the
possibility of injury to the user.
ALERT! Under no circumstances should the safety harness be used in
any climbing task or activity. Failure to comply with this restriction in use
may result in serious injury or death.
Use of a safety harness to prevent
falls overboard presents additional
risks in case of capsizing or
sinking. Do not attach the harness
to the boat with a tether greater
than 6 ft. 6 in. (200cm) Use only
quick-release-under-load
hardware. To release the tether
from the harness, pull the
quick-release pin out and away
from the tether buckle.
SAFETY HARNESS MAINTENANCE: Check harness parts and
attachment stitching carefully before each use. Do not use harness if
there is indication of damage or deterioration.
U.S. Coast Guard Approval does
not apply to this harness!
P.13
IMPORTANT SAFETY HARNESS INFORMATION:
PERMISSIBLE SAFE BODY SIZES
FOR MODEL ZH1H
INFLATABLE PFD
WITH
INTEGRAL SAFETY HARNESS
WAIST BUCKLE
WAIST BELT
QUICK-RELEASE
SNAP SHACKLE
QUICK-RELEASE
LANYARD
WEBBING
D RING


EACH OF THESE DEVICES IS INTENDED
TO HELP YOU SAVE YOUR OWN LIFE:
1. Check the inflation mechanism status indicators before each use.
For your PFD to function properly, follow these suggestions to verify
that it fits, floats, and remains in good condition.
2. Get in the habit of rearming the inflation mechanism right after each
inflation.
3. Try your wearable PFD on and adjust it until it fits comfortably in and
out of the water.
4. Mark your PFD with your name if you are the only wearer.
6. Your PFD is not intended for use as a fender or kneeling pad.
7. If your PFD is wet, allow it to dry thoroughly before storing it. Store it
in a well-ventilated area.
8. Do not dry your PFD in front of a radiator or other source of direct
heat.
DO NOT ATTACH PFD’S TO THE BOAT*
5. Do not alter your PFD. If it doesn’t fit properly, get one that does.
An altered device is not longer Coast Guard approved.
ADDITIONAL INFORMATION:
If you need more information about PFDs and safe recreational boating,
contact your state boating authority, U.S. Coast Guard Auxiliary, U.S.
Power Squadron, Red Cross, or your nearest unit of the U.S. Coast
Guard; or the free boating course number 1-800-336-BOAT (in VA,
1-800-245-BOAT).
*Safety harness D-rings on models ZH1H is designed to be
attached to be fastened to the boat. See instructions on page 13 of the
Manual.
Each PFD has straps, hooks, buckles, or other means for securing the
device in place on the wearer. Some PFDs also incorporate decorative
dee rings or tabs. Such items are not to be used to attach the device to
the boat. Attaching the device to the boat will not permit it to perform as
needed.
This manual suits for next models
2
Table of contents