Bluewheel PS200 User manual
PS200 Bedienungsanleitung PS200 Instruction Manual Manual de instrucciones de PS200
Lieferumfang Scope of delivery Volumen de suministro
1. 2x Knieschoner
2. 2x Ellenbogenschoner
3. 2x Handgelenkschoner
1. 2x knee protector pads
2. 2x elbow protector pads
3. 2x wrist protector pads
1. 2x Rodilleras
2. 2x Coderas
3. 2x Muñequeras
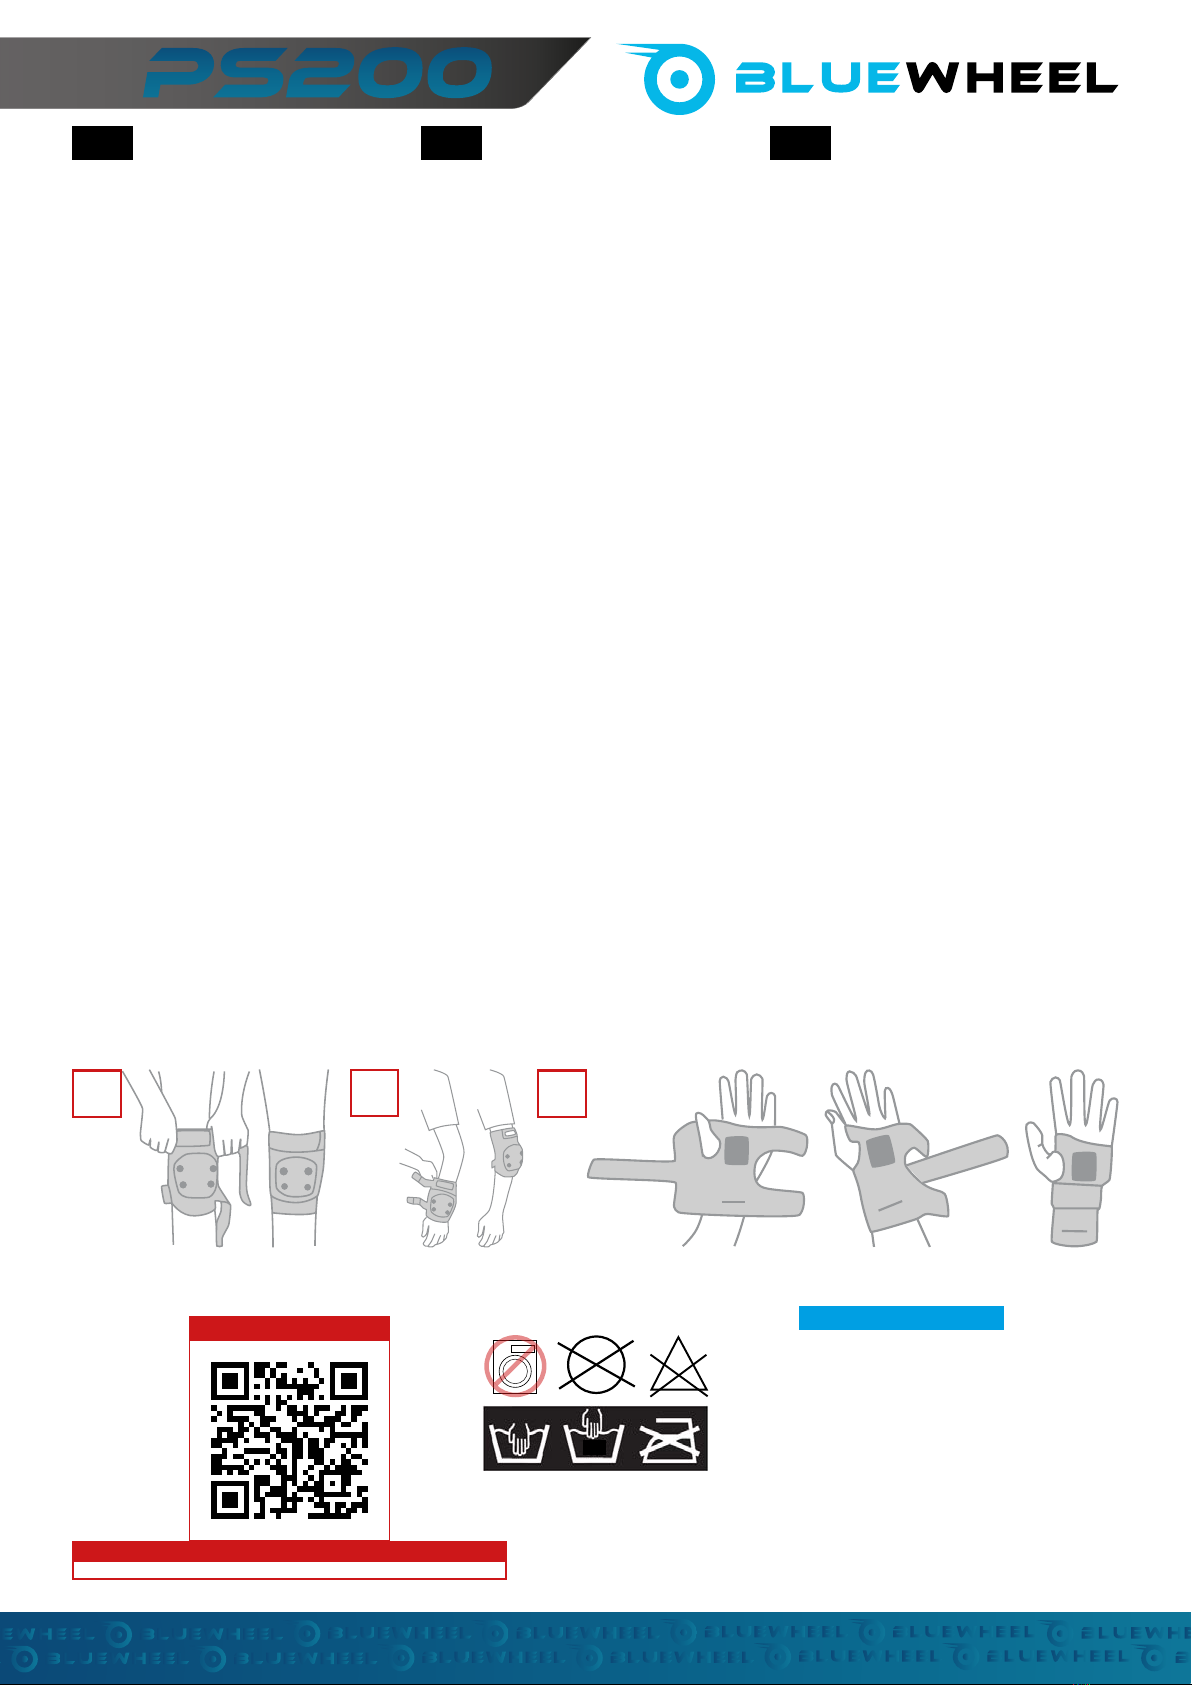
Anwendung Application Uso
1. Ziehen Sie die größeren Schoner über die Füße, bis hin-
auf zu den Kniegelenken, sodass die Schutzplatten nach
vorne zeigen und über den Spitzen der Knie liegen. Zie-
hen Sie die Schlaufe durch die Öse und schließen Sie den
Klettverschluss.
2. Die kleineren Schoner sind für die Ellenbogen gedacht.
Ziehen Sie diese über die Hände, bis hinauf zum Ellen-
bogen, sodass die Schutzplatte nach außen zeigt und
über der Spitze des Gelenkes sitzt. Ziehen Sie die Schlau-
fe durch die Öse und schließen Sie den Klettverschluss.
3. Bei den Handgelenkschonern stecken Sie den Daumen
durch die runde Aussparung und legen die stark gewölb-
te Schutzplatte in die Handinnenfläche. Die integrierte
Schutzplatte mit dem Klettverschluss befindet sich auf der
Handaußenseite. Befestigen Sie die zwei Schlaufen um
die Handkante herum am Klettverschluss und die einzelne
Schlaufe von der Daumenseite am Klettverschluss.
1. Pull the larger protectors over your feet up to the knee joints
so that the protectors point forward and over the tips of
your knees. Pull the loop through the eyelet and close the
Velcro fastener.
2. The smaller protectors are designed for the elbows. Pull this
over your hands up to your elbow so that the protectors face
outwards and sit over the tip of the elbow joints. Pull the loop
through the eyelet and close the velcro fastener.
3. With the wrist guards, put your thumb through the round
recess and place the strongly curved protectors in the palm
of your hand. The integrated protectors with the velcro fas-
tener is now on the outside of the hand.Attach the two loops
around the edge of the hand to the velcro fastener and the
single loop from the thumb side to the velcro fastener.
1. Introduzca los protectores más grandes por los pies hasta
llegar a las rodillas, de forma que las placas protectoras
estén orientadas hacia fuera justo en el pico de las rodillas.
Tire del lazo a través del ojal y cierre el cierre autoad-
herente.
2. Los protectores más pequeños son para los codos. Intro-
dúzcalos por las manos hasta llegar al codo de forma que
la placa protectora mire hacia afuera y se asiente sobre
el pico de la articulación. Tire del lazo a través del ojal y
cierre el cierre autoadherente.
3. Para las muñequeras, inserte el pulgar a través de la hen-
didura redonda y coloque la placa protectora curvada en
la palma de la mano. La placa protectora integrada con el
cierre autoadherente se encuentra en la parte exterior de
la mano. Ate los dos presillas alrededor del borde de la
mano con el cierre autoadherente, al igual que el que se
encuentra en el pulgar.
Sicherheitshinweise Safety Advice Consejos de seguridad
• Tragen Sie zu Ihrer eigenen Sicherheit bei jedem Gebrauch
persönliche Sicherheitsausrüstung.
• Achten Sie darauf, dass die Klettverschlüsse so festge-
zogen sind, dass die Schoner nicht verrutschen und den-
noch ein angenehmes, nicht abschnürendes Tragegefühl
gegeben ist.
• For your own safety, wear personal safety equipment every
time you use it.
• Make sure that the velcro fasteners are tightened so that the
protectors do not slip and yet still give you a comfortable,
non-pinching feel.
• Por su propia seguridad, use equipo de seguridad personal
cada vez que lo use.
• Asegúrese de que los cierres estén apretados para que los
protectores no se deslicen y aún así sean cómodos de usar.
Produktpflege Product care Mantenimiento
• Waschen Sie die Schoner nicht in der Waschmaschine
und ohne andere Sachen!
• Die Schoner lassen sich bei 30° mit der Hand und milder
Seifenlauge waschen.
• Verwenden Sie keine aggressiven Reinigungs- oder Blei-
chungsmittel! Sie können die Schoner mit einem leicht
feuchten Tuch abwischen.
• Do not wash the protector pads in the washing machine and
do not wash them with other things!
• The protector pads can be washed at 30 ° by hand with
mild soapy water.
• Do not use aggressive cleaning or bleaching agents! You can
wipe the protector pads dry with a slightly damp cloth and
then leave a few minutes to dry fully naturally.
• ¡No laves los protectores en la lavadora y sin otros objetos!
• Los protectores se pueden lavar a mano a 30° con un de-
tergente suave.
• No utilice productos agresivos o lejía. Puede limpiar los pro-
tectores con un paño ligeramente húmedo.
DE EN ES
4. 1x Tragebeutel 4. 1x carry bag 4. 1x bolsa de transporte
30°
123
PS200PS200
Sportstech Brands Holding GmbH | Karl-Liebknecht-Str. 7 | 10178 Berlin | Germany | Tel. 030 23 59 60018.01.2021
CONFORMITY
https://service.innovamaxx.de/ps200_video
At the following link you will find the video tutorial:
VIDEO TUTORIAL
Hiermit erklärt Sportstech Brands Holding, dass das
PS200 Protection Set der Verordnung 2016/425 über
persönliche Schutzausrüstungen PSA entspricht.
Der vollständige Text der EU-Konformitätserklärung
ist unter der folgenden Internetadresse verfügbar:
https://service.innovamaxx.de/ps200_conformity
Hereby, Sportstech Brands Holding declares that
the PS200 protection set complies with the Regu-
lation 2016/425 on personal protective equipment
PPE. The full text of the EU Declaration of Confor-
mity is available at the following internet address:
https://service.innovamaxx.de/ps200_conformity

Manuel d‘instructions du PS200 Manuale di istruzioni per la PS200 PS200 bedieningshandleiding
Contenu de la livraison Dotazione di fornitura Omvang van de levering
1. 2x genouillères
2. 2x coudières
3. 2x protège-poignets
1. 2x ginocchiere
2. 2x gomitiere
3. 2x protezioni per i polsi
1. 2 kniebeschermers
2. 2 elleboogbeschermers
3. 2 polsbeschermers
Utilisation Applicazione Toepassing
1. Tirez les plus grandes protections par-dessus les pieds,
jusqu‘aux articulations des genoux, de manière que les
plaques de protection pointent vers l‘avant et recouvrent
la partie saillante des genoux. Passez la bride dans l‘œillet
et fermez le velcro.
2. Les protections plus petites sont destinées aux coudes.
Tirez-les par-dessus vos mains, jusqu‘au coude, de telle
sorte que la plaque de protection soit tournée vers l‘exté-
rieur et positionnée au-dessus de la partie saillante de l‘ar-
ticulation. Passez la bride dans l‘œillet et fermez le velcro.
3. Pour les protège-poignets, passez votre pouce à travers
la cavité ronde et placez la plaque de protection fortement
incurvée dans la paume de votre main. La plaque de pro-
tection intégrée avec sa fermeture Velcro est située sur la
face externe de la main. Attachez les deux brides autour
du tranchant de la main à la fermeture velcro et la bride
simple du pouce à la fermeture velcro.
1. Portare le protezioni più grandi verso i piedi fino alle articola-
zioni del ginocchio in modo che le piastre protettive puntino
in avanti e sopra la punta delle ginocchia. Tirare il passante
attraverso l‘occhiello e chiudere la chiusura in velcro.
2. Le protezioni più piccole sono progettate per i gomiti. Portale
sopra le mani fino al gomito in modo che la piastra protettiva
sia rivolta verso l‘esterno e si trovi sopra la punta dell‘artico-
lazione. Tirare il passante attraverso l‘occhiello e chiudere la
chiusura in velcro.
3. Protezioni per i polsi: mettere il pollice nella rientranza roton-
da e posizionare la piastra protettiva nel palmo della mano.
La piastra di protezione integrata con chiusura in velcro si
trova all‘esterno della mano. Attaccare i due anelli attorno al
bordo della mano alla chiusura in velcro e il singolo anello dal
lato del pollice alla chiusura in velcro.
1. Trek de grotere beschermers over je voeten tot aan de
kniegewrichten, zodat de beschermplaten naar voren en
over de uiteinden van de knieën zijn gericht. Trek de lus
door het oogje en sluit de klittenband.
2. De kleinere beschermers zijn voor de ellebogen. Trek ze
over je handen tot aan de ellebogen, zodat de bescherm-
plaat naar buiten is gericht en over de punt van het gew-
richt zit. Trek de lus door het oogje en sluit de klittenband.
3. Voor de polsbeschermers steek je je duim door de ronde
uitsparing en plaats je de sterk gebogen beschermplaat
in de palm van je hand. De geïntegreerde beschermplaat
met de klittenbandsluiting zit aan de buitenkant van de
hand. Bevestig de twee lussen rond de rand van de hand
aan de klittenbandsluiting en de enkele lus van de duimzij-
de aan de klittenbandsluiting.
Instructions de sécurité Istruzioni di sicurezza Veiligheidsaanwijzingen
• Pour votre propre sécurité, portez un équipement de sé-
curité personnel chaque fois que vous l‘utilisez.
• Veillez à ce que les fermetures Velcro soient suffisamment
resserrées afin que les protections ne glissent pas tout en
offrant un confort de port confortable et sans l’impression
d’avoir les mains coincées.
• Per la propria sicurezza, indossare l‘equipaggiamento di si-
curezza personale ogni volta che lo si utilizza.
• Assicuratevi che le chiusure in velcro siano serrate in modo
che le protezioni non scivolino e vi diano comunque una
sensazione confortevole.
• Draag voor uw eigen veiligheid elke keer dat u het gebruikt
persoonlijke veiligheidsuitrusting.
• Zorg ervoor dat de klittenbandsluitingen goed vastzitten, zo-
dat de bescherming niet wegglijdt en toch een comfortabel
en behaaglijk draagcomfort biedt.
Entretien du produit cura del prodotto Productonderhoud
• Ne lavez pas les protection en machine de plus lavez-les
seuls, sans autres vêtements !
• Les protection doivent être lavés à la main à 30° avec de
l‘eau légèrement savonneuse.
• N‘utilisez pas de détergents ou d’agents blanchissants
agressifs ! Vous pouvez nettoyer les protection avec un
chiffon légèrement humide.
• Non lavare i protezioni in lavatrice e lavarli da soli senza altri
capi!
• I protezioni possono essere lavati a 30 ° a mano e con
acqua saponata delicata.
• Non utilizzare detergenti aggressivi o sbiancanti! Si possono
pulire i protezioni con un panno leggermente umido.
• Was de beschermers niet samen met andere kleren in de
wasmachine!
• De beschermers kunnen met de hand op 30° gewassen
worden met zacht zeepwater.
• Gebruik geen agressieve reinigings- of bleekmiddelen! Je
kunt de beschermers afvegen met een licht vochtige doek.
FR IT NL
4. 1x sac de transport 4. 1x borsa per il trasporto 4. 1 draagtas
PS200PS200
30°
123
18.01.2021
https://service.innovamaxx.de/ps200_video
At the following link you will find the video tutorial:
VIDEO TUTORIAL CONFORMITY
Hiermit erklärt Sportstech Brands Holding, dass das
PS200 Protection Set der Verordnung 2016/425 über
persönliche Schutzausrüstungen PSA entspricht.
Der vollständige Text der EU-Konformitätserklärung
ist unter der folgenden Internetadresse verfügbar:
https://service.innovamaxx.de/ps200_conformity
Hereby, Sportstech Brands Holding declares that
the PS200 protection set complies with the Regu-
lation 2016/425 on personal protective equipment
PPE. The full text of the EU Declaration of Confor-
mity is available at the following internet address:
https://service.innovamaxx.de/ps200_conformity
Sportstech Brands Holding GmbH | Karl-Liebknecht-Str. 7 | 10178 Berlin | Germany | Tel. 030 23 59 600
Popular Safety Equipment manuals by other brands

Lanex
Lanex PB-20 instruction manual

SKYLOTEC
SKYLOTEC ANCHOR ROPES Instructions for use

Besto
Besto Buoyancy Aid 50N Instructions for use

TEUFELBERGER
TEUFELBERGER NODUS Manufacturer's information and instructions for use

Troy Lee Designs
Troy Lee Designs Tbone Product owners manual

Innova
Innova Xtirpa Instruction and safety manual

bolle SAFETY
bolle SAFETY B810 quick start guide

SHENZHEN FANHAI SANJIANG ELECTRONICS
SHENZHEN FANHAI SANJIANG ELECTRONICS A9060T instruction manual

Hiltron security
Hiltron security POWER8E Installation and use manual

Salewa
Salewa MTN SPIKE user manual

Hatco
Hatco B-950P installation guide

Sitec
Sitec TX MATIC operating manual


