Blumfeldt Greenkeeper Solar User manual

Greenkeeper Solar
Bewässerungssystem
Irrigation System
Sistema de riego
Système d‘irrigation
Sistema di irrigazione
100034626


3
DE
Sehr geehrter Kunde,
wir gratulieren Ihnen zum Erwerb Ihres Gerätes.
Lesen Sie die folgenden Hinweise sorgfältig durch und
befolgen Sie diese, um möglichen Schäden vorzubeugen.
Für Schäden, die durch Missachtung der Hinweise und
unsachgemäßen Gebrauch entstehen, übernehmen wir
keine Haftung. Scannen Sie den folgenden QR-Code,
um Zugriff auf die aktuellste Bedienungsanleitung und
weitere Informationen rund um das Produkt zu erhalten:
INHALTSVERZEICHNIS
Lieferumfang 4
Installation 4
Bedienung des Steuergerätes 6
Hinweise zur Entsorgung 8
Konformitätserklärung 8
TECHNISCHE DATEN
Artikelnummer 10034626
Stromversorgung Lithium-Akku
English 9
Español 15
Français 21
Italiano 27

4
DE
LIEFERUMFANG
Solarpanel und
Steuergerät
Schlauch (7/9) Schlauch (4/6) Y-förmige
Viererkupplung
1x 18 m 12 m 1x
Viererkupplung Tropfer Schlauch-Stopfen Filter
20x 40x 3x 1x
INSTALLATION
1 Schneiden Sie den dicken Schlauch entsprechend der Tiefe des Wasser-
Behälters zu und setzen Sie den Filter in den Schlauch ein.
2 Stecken Sie das andere Ende des Schlauches in den Eingang des
Steuergerätes.
3 Schneiden Sie ein weiteres Stück dicken Schlauch entsprechend des
Abstandes zwischen Steuergerät und den erstem Panzen zu. Befestigen
Sie die Y-förmige Viererkupplung am Ende des Schlauchs.
4 Schneiden Sie dann den dicken und den dünnen Schlauch entsprechend
der Abstände zwischen den Panzen zu. Verwenden Sie die
Schlauchanschlüsse, um alle Topfpanzen zu verbinden. Verbinden Sie
eines der Schlauchende mit einem Tropfer und stecken Sie den Tropfer in
die Blumenerde. Wenn die Panze sehr groß ist, verwenden Sie mehr als
einen Tropfer, um genügend Wasser zu erhalten.
5 Stecken Sie zum Schluss die Schlauch-Stopfen in die offenen
Schlauchenden.

5
DE
Installationsschema
Hinweis: Die abgebildeten Teile können vom tatsächlichen Lieferumfang
abweichen.
1Solarbewässerungssystem 6Schlauchstopfen
2Filter 7Anti-Siphon
3Y-förmige vierteilige
Kupplung 8Schlauch (7/9 mm)
4Vierteilige Kupplung 9Schlauch (4/6 mm)
5Tropfer
Wichtig: Platzieren Sie den Anti-Siphon an einer Stelle, die höher ist, als das
Wasserfass.

6
DE
BEDIENUNG DES STEUERGERÄTES
Hinweis: Das Steuergerät ist für den Außeneinsatz in Gärten und auf
Balkonen vorgesehen. Es kann an der Wand montiert oder in den Boden
gesteckt werden.
Funktionsweise
Sie können das Steuergerät so einstellen, dass es Ihre Blumen und Panzen
früh am Morgen oder spät in der Nacht bewässert und befeuchtet, wenn das
Wasser am wenigsten verdunstet. Das Steuergerät bewässert Ihren Garten
und Ihre Blumenkästen vollautomatisch nach dem von Ihnen eingestellten
Programm. So können Sie sicherstellen, dass Ihre Panzen auch dann
bewässert werden, wenn Sie im Urlaub sind.
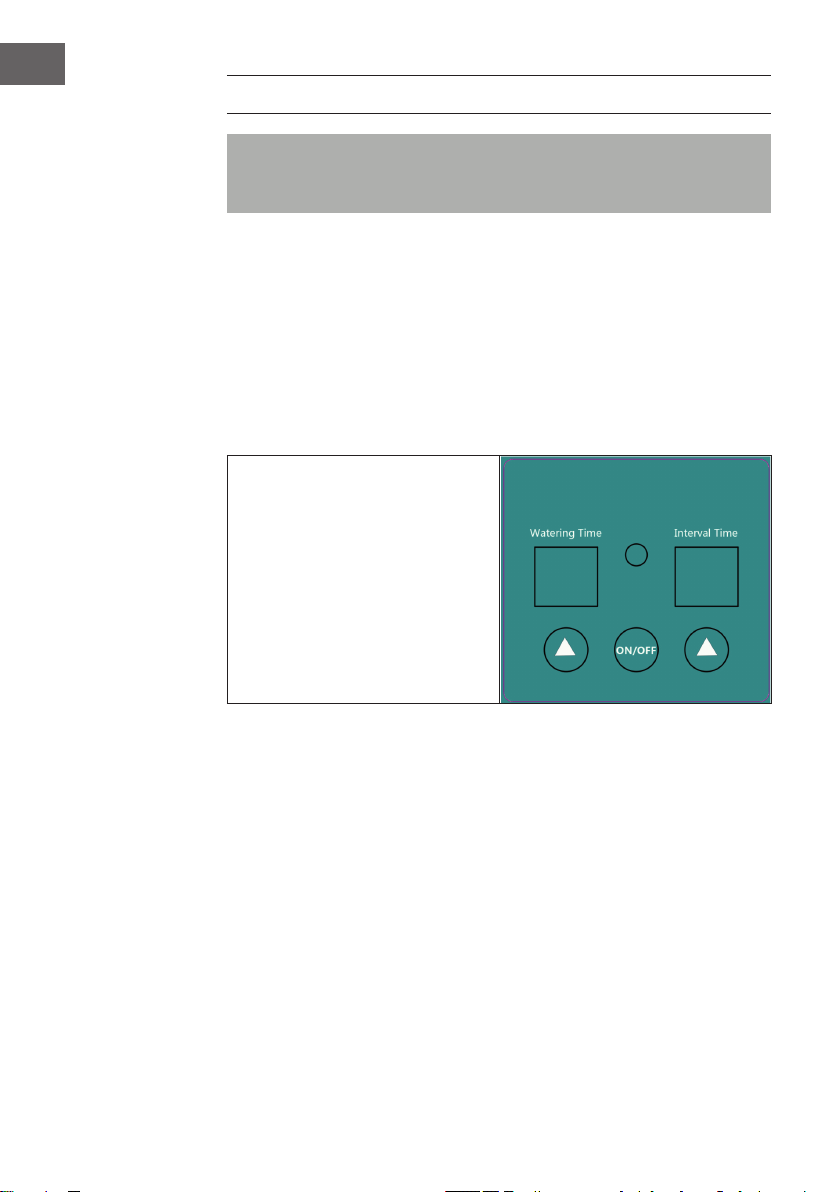
Anzeigen
• Das Fenster [Watering Time]
zeigt an, wie lange die Pumpe
arbeitet. Die Zahlen 10-50
stehen für 10-50 Sekunden. H1-
H9 für 1-9 Minuten.
• Das Fenster [Interval Time]
zeigt die Zeitintervalle an. HH
bedeutet alle 12 Stunden, die
Zahlen 1-15 stehen für alle 1-15
Tage.
Zustände der Kontroll-Leuchte auf dem Steuergerät
• Die Kontroll-Leuchte blinkt langsam (alle 10 Sekunden): Das Steuergerät
wurde programmiert.
• Die Kontroll-Leuchte blinkt schnell: Die Pumpe arbeitet.
• Die Kontroll-Leuchte leuchtet durchgängig: Das Steuergerät wartet auf
die Programmierung.
• Die Kontroll-Leuchte leuchtet rot: Die Batterie ist leer. Die Pumpe stoppt
und wartet, bis die Batterien wieder aufgeladen wurden. Sobald die
Batterien aufgeladen sind, leuchtet die Kontroll-Leuchte grün.

7
DE
So benutzen Sie die Tasten
• Drücken Sie auf die Taste ON/OFF, um das Pumpe manuell ein- und
auszuschalten.
• Drücken Sie während der Programmierung auf die Taste ON/OFF, um die
Bewässerungszeit (Watering Time) und die Zeitintervalle (Interval Time)
zu erhöhen oder zu verringern.
• Drücken Sie auf die Pfeiltaste, um die Zeit einzustellen.
• Drücken Sie beide Pfeiltasten gleichzeitig, um alle Tasten zu blockieren
oder wieder freizuschalten.
Hinweis: Wenn sich zu wenig Wasser im Wasser-Behälter bendet, ertönt
ein Alarm. Drücken Sie auf eine beliebige Taste, um den Alarm zu beenden.
Programmierbeispiel
Drücken Sie eine der Tasten. Das Licht geht an und das Steuergerät ist bereit
für die Programmierung.
Beispiel: Sie möchten, dass Ihre Panzen jeden Morgen um 9 Uhr für 50
Sekunden bewässert werden.
• Beginnen Sie die Programmierung um 9 Uhr.
• Drücken Sie die linke Pfeiltaste und stellen sie die Bewässerungszeit
(Watering Time) auf 50 (= 50 Sekunden).
• Drücken Sie die rechte Pfeiltaste und stellen Sie das Zeitintervall
(Interval Time) auf 1 (= täglich)
• Warten Sie dann 5 Sekunden, bis die Einstellung automatisch gespeichert
wird. Die Bewässerung beginnt und ihre Panzen werden 50 Sekunden
lang bewässert. Die nächste Bewässerung erfolgt um 9 uhr am nächsten
und den drauf folgenden Tagen.

8
DE
HINWEISE ZUR ENTSORGUNG
Bendet sich die linke Abbildung (durchgestrichene
Mülltonne auf Rädern) auf dem Produkt, gilt die
Europäische Richtlinie 2012/19/EU. Diese Produkte
dürfen nicht mit dem normalen Hausmüll entsorgt
werden. Informieren Sie sich über die örtlichen
Regelungen zur getrennten Sammlung elektrischer und
elektronischer Gerätschaften. Richten Sie sich nach
den örtlichen Regelungen und entsorgen Sie Altgeräte
nicht über den Hausmüll. Durch die regelkonforme
Entsorgung der Altgeräte werden Umwelt und
die Gesundheit Ihrer Mitmenschen vor möglichen
negativen Konsequenzen geschützt. Materialrecycling
hilft, den Verbrauch von Rohstoffen zu verringern.
Das Produkt enthält Batterien, die der Europäischen
Richtlinie 2006/66/EG unterliegen und nicht mit dem
normalen Hausmüll entsorgt werden dürfen. Bitte
informieren Sie sich über die örtlichen Bestimmungen
zur gesonderten Entsorgung von Batterien. Durch
regelkonforme Entsorgung schützen Sie die Umwelt
und die Gesundheit Ihrer Mitmenschen vor negativen
Konsequenzen.
HERSTELLER
Chal-Tec GmbH, Wallstraße 16, 10179 Berlin, Deutschland.

9
EN
Dear Customer,
Congratulations on purchasing this device. Please read
the following instructions carefully and follow them to
prevent possible damages. We assume no liability for
damage caused by disregard of the instructions and
improper use. Scan the QR code to get access to the
latest user manual and more product information.
CONTENT
Scope of Delivery 10
Installation 10
Operation of the Control Unit 12
Hints on Disposal 14
Declaration of Conformity 14
TECHNICAL DATA
Item number 10034626
Power supply Lithium battery

10
EN
SCOPE OF DELIVERY
Solar panel and
control unit
Hose (7/9) Hose (4/6) Y-shaped four-
piece coupling
1x 18 m 12 m 1x
Four-piece
coupling
Dropper Hose plug Filter
20x 40x 3x 1x
INSTALLATION
1 Cut the thick hose according to the depth of the water container and
insert the lter into the hose.
2 Insert the other end of the hose into the inlet of the control unit.
3 Cut another piece of thick hose according to the distance between the
control unit and the rst plant. Attach the Y-shaped four-piece coupling to
the end of the hose.
4 Then cut the thick and thin tubes according to the distances between the
plants. Use the hose connections to connect all the potted plants. Connect
one end of the tube to a drip and insert the drip into the potting soil. If the
plant is very large, use more than one dripper to get enough water.
5 Finally, insert the hose plugs into the open hose ends.

11
EN
Installation diagram
Note: The parts shown may differ from the actual scope of delivery.
1Solar Irrigation System 6Hose plug
2Filter 7Anti-siphon
3Y-shaped four-piece coupling 8Hose (7/9 mm)
4Four-piece coupling 9Hose (4/6 mm)
5Dropper
Important: Place the Anti-Siphon in a place higher than the water barrel.

12
EN
OPERATION OF THE CONTROL UNIT
Note: The control unit is intended for outdoor use in gardens and on
balconies. It can be mounted on the wall or plugged into the oor.
How it works
You can set the controller to water and humidify your owers and plants early
in the morning or late at night when the water evaporates least. The control
unit will water your garden and ower boxes fully automatically according to
the program you set. This way you can ensure that your plants are watered
even when you are on holiday.
Display
• The [Watering Time] window
displays how long the pump is
running. The numbers 10-50
stand for 10-50 seconds. H1-H9
for 1-9 minutes.
• The [Interval Time] window
displays the time intervals.
HH means every 12 hours, the
numbers 1-15 stand for every
1-15 days.
Status of the control lamp on the control unit
• The indicator light ashes slowly (every 10 seconds): The control unit has
been programmed.
• The indicator light ashes quickly: The pump is working.
• The indicator light lights up continuously: The control unit is waiting for
programming.
• The indicator light illuminates red: The battery is empty. The pump stops
and waits until the batteries are recharged. As soon as the batteries are
charged, the indicator light illuminates green.

13
EN
How to use the keys
• Press the ON/OFF button to manually turn the pump on and off.
• During programming, press the ON/OFF button to increase or decrease
the Watering Time and Interval Time.
• Press the arrow key to set the time.
• Press both arrow keys simultaneously to lock or unlock all keys.
Note: If there is too little water in the water tank, an alarm sounds. Press any
button to stop the alarm.
Programming example
Press one of the buttons. The light turns on and the control unit is ready for
programming.
Example: You want your plants to be watered every morning at 9 am for 50
seconds.
• Start programming at 9 am.
• Press the left arrow key and set the Watering Time to 50 (= 50 seconds).
• Press the right arrow key and set the watering time to 50 (= 50 seconds).
• (Interval Time) to 1 (= daily)
• Wait 5 seconds for the setting to be saved automatically. Watering will
start and your plants will be watered for 50 seconds. The next watering
will take place at 9 a.m. next day and the following days.

14
EN
HINTS ON DISPOSAL
According to the European waste regulation 2012/19/EU
this symbol on the product or on its packaging indicates
that this product may not be treated as household waste.
Instead it should be taken to the appropriate collection
point for the recycling of electrical and electronic
equipment. By ensuring this product is disposed of
correctly, you will help prevent potential negative
consequences for the environment and human health,
which could otherwise be caused by inappropriate waste
handling of this product. For more detailed information
about recycling of this product, please contact your local
council or your household waste disposal service.
Your product contains batteries covered by the European
Directive. 2006/66/EC, which cannot be disposed
of with normal household waste. Please check local
rules on separate collection of batteries. The correct
disposal of batteries helps prevent potentially negative
consequences on the environment and human health.
PRODUCER
Chal-Tec GmbH, Wallstraße 16, 10179 Berlin, Germany.

15
ES
Estimado cliente,
Le felicitamos por la adquisición de este producto.
Lea atentamente las siguientes instrucciones y sígalas
para evitar posibles daños. No asumimos ninguna
responsabilidad por los daños causados por el
incumplimiento de las instrucciones y el uso inadecuado.
Escanee el siguiente código QR para obtener acceso
a la última guía del usuario y más información sobre el
producto.
ÍNDICE
Alcance de suministro 16
Instalacón 16
Funcionamiento de la unidad de control 18
Retirada del aparato 20
Fabricante 20
DATOS TÉCNICOS
Número de artículo
10034626
Fuente de alimentación
Batería de litio

16
ES
ALCANCE DE SUMINISTRO
Panel solar y
unidad de control
Tubo Tubo Acoplamiento de
cuatro en forma
de Y
1x 18 m 12 m 1x
Acoplamiento de
cuatro
Goteo Tapón del tubo Filtro
20x 40x 3x 1x
INSTALACÓN
1 Corte la manguera gruesa según la profundidad del contenedor de agua e
inserte el ltro en la manguera.
2 Inserte el otro extremo de la manguera en la entrada de la unidad de
control.
3 Corta otro trozo de manguera gruesa según la distancia entre la unidad
de control y las primeras plantas. Conecta el acoplamiento cuádruple en
forma de Y al nal de la manguera.
4 Luego corta la manguera gruesa y na de acuerdo a la distancia entre
las plantas. Utiliza los conectores de manguera para conectar todas las
plantas en maceta. Conecta un extremo de la manguera a un gotero e
inserta el gotero en la tierra de la maceta. Si la planta es muy grande, use
más de un gotero para obtener suciente agua.
5 Finalmente, inserte los tapones del tubo en los extremos del tubo abierto.

17
ES
Esquema de instalación
Nota: Las piezas mostradas pueden diferir del alcance real de la entrega.
1Sistema de irrigación solar 6Tapón del tubo
2Filtro 7Anti-Sifón
3Acoplamiento de cuatro
partes en forma de Y 8Tubo (7/9 mm)
4Acoplamiento de cuatro
partes 9Tubo (4/6 mm)
5Goteo
Importante: Coloca el antisifón en una posición más alta que el barril de
agua.

18
ES
FUNCIONAMIENTO DE LA UNIDAD DE
CONTROL
Nota: La unidad de control está destinada al uso en exteriores, en jardines y
balcones. Puede ser montado en la pared o enchufado en el suelo.
Funcionalidad
Puede congurar la unidad de control para que riegue y humedezca sus
ores y plantas temprano en la mañana o tarde en la noche cuando el agua se
evapora menos. La unidad de control riega tu jardín y tus jardineras de forma
totalmente automática según el programa que hayas establecido. De esta
manera puedes asegurarte de que tus plantas sean regadas incluso cuando
estás de vacaciones.
Pantalla
• La ventana [Tiempo de riego]
muestra cuánto tiempo
funcionará la bomba. Los
números 10-50 se mantienen
durante 10-50 segundos. H1-H9
durante 1-9 minutos.
• La ventana [Intervalo de
tiempo] muestra los intervalos
de tiempo. HH signica cada
12 horas, los números 1-15
representan cada 1-15 días.
Estado de la luz indicadora de la unidad de control
• La luz de control parpadea lentamente (cada 10 segundos): la unidad de
control ha sido programada.
• La luz de control parpadea rápidamente: La bomba está funcionando.
• La lámpara de control está encendida continuamente: La unidad de control
está esperando la programación.
• La lámpara de control se ilumina en rojo: La batería está agotada. La
bomba se detiene y espera hasta que las baterías se hayan recargado.
Tan pronto como las baterías se han recargado, la lámpara de control se
enciende en verde.

19
ES
Así se usan las teclas
• Presione el botón ON/OFF para encender y apagar la bomba
manualmente.
• Durante la programación, pulse el botón ON/OFF para aumentar o
disminuir el tiempo de riego y el tiempo de intervalo.
• Presione el botón de la echa para ajustar la hora.
• Presione ambas teclas de echa simultáneamente para bloquear o
desbloquear todas las teclas.
Nota: Si hay muy poca agua en el tanque de agua, sonará una alarma.
Presione cualquier botón para detener la alarma.
Ejemplo de programación
Presiona uno de los botones. La luz se enciende y la unidad de control está lista
para la programación.
Ejemplo: Quieres que tus plantas sean regadas todas las mañanas a las 9 am
por 50 segundos.
• Empieza a programar a las 9 en punto.
• Presione la tecla de echa izquierda y ajuste el tiempo de riego
a 50 (= 50 segundos).
• Presione la tecla de echa derecha y ajuste el tiempo de intervalo
a 1 (= diario)
• Entonces espera 5 segundos hasta que el ajuste se guarde
automáticamente. El riego comienza y sus plantas son regadas durante 50
segundos. El siguiente riego es a las 9 en punto del día siguiente y los días
siguientes.

20
ES
RETIRADA DEL APARATO
Si el aparato lleva adherida la ilustración de la izquierda
(el contenedor de basura tachado) entonces rige
la normativa europea, directiva 2012/19/UE. Este
producto no debe arrojarse a un contenedor de basura
común. Infórmese sobre las leyes territoriales que
regulan la recogida separada de aparatos eléctricos y
electrónicos. Respete las leyes territoriales y no arroje
aparatos viejos al cubo de la basura doméstica. Una
retirada de aparatos conforme a las leyes, contribuye
a proteger el medio ambiente y a las personas a su
alrededor frente a posibles consecuencias perjudiciales
para la salud. El reciclaje ayuda a reducir el consumo de
materias primas.
Este producto contiene pilas que según la Normativa
europea 2006/66/CE no deben ser arrojadas al cubo
de la basura común. Infórmese sobre la legislación de
su país que regula la retirada y eliminación de las pilas
y baterías. La retirada y eliminación de pilas conforme
a la ley, protege el medio ambiente y a las personas
frente a posibles riesgos para la salud.
FABRICANTE
Chal-Tec GmbH, Wallstraße 16, 10179 Berlín, Alemania.
This manual suits for next models
1
Table of contents
Languages:
Other Blumfeldt Irrigation System manuals