bluthner e-KLAVIER 1 User manual

Made in Germany
THE GOLDEN TONE
D I G I T A L
e
-Klavier 1
e
K
la
vi
lavila
er
1
Montage- /Aufbauanleitung
Assembly Instructions
Instructions de montage
Montage_ALL_eK1.indd 1 01.03.2017 13:08:57

Made in Germany
Aufbauanleitung DIGITAL
2
DeutschFrançais English
MONTAGE- / AUFBAUANLEITUNG des e-KLAVIER 1
ACHTUNG!
Montieren Sie das Piano nur auf einem ebenen Boden. Alle Teile müssen
in der richtigen Reihenfolge montiert werden. Verwenden Sie nur die
Originalteile (Schrauben, Halter etc.). Falsche Schrauben oder Teile können
zur Beschädigung des Blüthner e - Klaviers führen. Für den optimalen Aufbau
werden 2 Personen benötigt. Sie sollten alle Teile auf Stückzahl, wie in der
Aufbau- und Montage Anleitung beschrieben, abzählen und sortiert bereit
legen.
WARNUNG!
Lesen Sie bitte zuerst sorgfältig die mitgelieferte Montage-/ Aufbauanleitung,
die den genauen Zusammenbau des Instrumentes beschreibt.
Bei Nichtbeachten der Hinweise in der Montageanleitung kann es zu
Beschädigungen kommen oder gar Verletzungen hervorrufen.
Zubehörliste:
4 - Holzdübel 6 x 35 mm (Art.-Nr. SPN 01627)
2 - Senkschrauben 5 x 70 mm (Art.-Nr. SPN 210175070)
4 - Holzdübel 8 x 30 mm (Art.-Nr. SPN 01631)
4 - Zylinderschrauben M 6 x 50 mm (Art.-Nr. 00656 - schwarz, 00657 - weiß)
6 - Senkschrauben 4 x 30 mm (Art-Nr. VIT 00587 - schwarz, VIT 00588 - weiß)
6 - Rundkopfschrauben 3,9 x 13,5 mm
(Art.-Nr. 250990018 - schwarz, 250990017 -weiß)
4 - Senkkopfschrauben M 4 x 20 mm
(Art.-Nr. VIT 00586 - schwarz; VIT 00535 -weiß)
8 - Zylinderschrauben M 6 x 50 mm (Art.-Nr. VIT00656 - schwarz; VIT 00657 - weiß)
1 - Schraubendreher (Art.-Nr. 394000142)
2 - Metall-Rückwandwinkel (Art.-Nr. schwarz STF00200; weiß STF00201)
Montage_ALL_eK1.indd 2 01.03.2017 13:08:57

Made in Germany 3
Aufbauanleitung
e-Klavier 1
Deutsch FrançaisEnglish
1. Je 2 Stück Holzdübel 6 x 35 mm
(Art.-Nr. SPN 01627) in die vorgebohrten
Löcher der Untersaülen stecken.
2. Die Untersaüle auf den Sockelfuss
setzen und mit je einer Senkschraube 5
x 70 mm (Art.-Nr. 210175070) befestigen.
Verwenden Sie dazu den beiliegenden
Schraubendreher (Art. Nr. 394000142).
3. Je 2 Stück Holzdübel 8 x 30 mm
(Art.-Nr. SPN 01631) in die vorgebohrten
Löcher der Seite stecken.
4. Die beiden vormontierten Seitenteile
mit je 2 Stück Zylinderschrauben M 6 x 50
mm (Art.-Nr. -schwarz VIT 00656, weiß VIT
00657) an das Sockelteil anschrauben.
4. Die beiden vormontierten Seitenteile
mit je 2 Stück Zylinderschrauben M 6 x 50
mm (Art.-Nr. -schwarz VIT 00656, weiß VIT
00657) an das Sockelteil anschrauben.
Montage_ALL_eK1.indd 3 01.03.2017 13:08:58

Made in Germany
Aufbauanleitung DIGITAL
4
DeutschFrançais English
5. Sichtrückwand
zwischen die Seiten auf
die Sockelfüße setzen
und mit 6 Stück Senk-
schrauben 4 x 80 mm
(Art.-Nr. -schwarz VIT
00587, weiß VIT 00588)
an das Sockelteil an-
schrauben.
6. Metall-Rückwandwinkel mit je 3 Stück Rundkopfschrauben 3,9 x 13,5 mm
(Art.-Nr. -schwarz 250990018, -weiß 250990017) an die Seite anschrauben.
7. Rückwand von hinten mit je 2 Stück Senkkopfschrauben M 4 x 20 mm (Art.-
Nr. -schwarz VIT 00586, -weiß VIT 00535) an die Metall-Rückwandwinkel (Art.-Nr.
-schwarz STF0200, -weiß STF0201) anschrauben.
5. Sichtrückwand
zwischen die Seiten auf
die Sockelfüße setzen
und mit 6 Stück Senk-
schrauben 4 x 80 mm
(Art.-Nr. -schwarz VIT
00587, weiß VIT 00588)
an das Sockelteil an-
schrauben.
Montage_ALL_eK1.indd 4 01.03.2017 13:08:59

Made in Germany 5
Aufbauanleitung
e-Klavier 1
Deutsch FrançaisEnglish
8. Kompletten Piano-
kasten auf die Holz-
dübel in den Seiten
aufsetzen, dabei die
Holzdübel der Un-
tersäulen in die Dü-
bellöcher im Kasten-
boden stecken.
9. Beidseitig je 4 Stück
Zylinder- schrauben
M 6 x 50 mm (Art.-Nr.
-schwarz VIT 0656, -weiß
VIT 0657) durch die
Seiten in den Piano-
kasten schrauben.
10. Anschliessen
des Pedalkabels
am Anschlussfeld
(Tablettboden).
11. Netzkabel anschliessen, anschalten und Spaß haben.
8. Kompletten Piano-
kasten auf die Holz-
dübel in den Seiten
aufsetzen, dabei die
Holzdübel der Un-
tersäulen in die Dü-
bellöcher im Kasten-
boden stecken.
9. Beidseitig je 4 Stück
Zylinder- schrauben
M 6 x 50 mm (Art.-Nr.
-schwarz VIT 0656, -weiß
VIT 0657) durch die
Seiten in den Piano-
kasten schrauben.
10. Anschliessen
des Pedalkabels
am Anschlussfeld
(Tablettboden).
Montage_ALL_eK1.indd 5 01.03.2017 13:09:00

Made in Germany
Assembly Instructions DIGITAL
6
DeutschFrançais English
ASSEMBLY INSTURCTIONS for e-KLAVIER 1
ATTENTION!
Please assemble the piano on a level oor. All parts must be assembled in the
correct order. Use only the original parts (screws, brackets, etc.)
Using the wrong parts or screws can cause damage to the Blüthner e-Klavier.
For optimal setup, two people are required to assemble to Blüthner e-Klavier 1.
It is recommended that you ensure all the assembly parts are accounted for
and prepared in their proper quantity, as listed below, before beginning the
assembly process.
WARNING!
Please read the attached installation and assembly instructions carefully,
which describes the precise assembly of the instrument. Failure to observe the
instructions in the installation chapter of this manual may cause damage or
even injury.
LIST OF ASSEMBLY PARTS:
4 - wooden dowels 6 x 35 mm (Part No. SPN 01627)
2 - countersunk screws 5 x 70 mm (Part No. SPN 210175070)
4 - wooden dowels 8 x 30 mm (Part No. SPN 01631)
4 - socket head screws M6 x 50 mm (Part No. 00656 - black; 00657 - white)
6 - countersunk screws 4 x 30 mm (Part No. VIT 00587 - black; VIT 00588 - white)
6 - round head screws 3,9 x 13,5mm (Part No. 250990018 - black; 250990017 -
white)
4 - countersunk screws M4 x 20 mm (Part No. VIT 00586 - black; VIT 00535 - white)
8 - socket head screws M6 x 50 mm (Part No. VIT 00656 - black; VIT 00657 - white)
2 - metal corner brackets (Part No. STF00200 - black; STF00201 - white)
1 - allen wrench (Part. No. 394000142)
Montage_ALL_eK1.indd 6 01.03.2017 13:09:00

Made in Germany 7
Assembly Instructions
e-Klavier 1
Deutsch FrançaisEnglish
1. Insert two (2) wood dowels, each 6x35
mm (Part. No. SPN 01627) into the pre-
drilled holes in the bottom of the lower
column.
2. Fasten the lower column to the base,
inserting one (1) countersunk screw, 5 x
70 mm (Part. No. SPN 210175070) through
the bottom of the cabinet foot. Use
the enclosed allen wrench (Part. No.
394000142).
3. Insert two (2) wood dowels, 8 x 30 mm
(Part No. SPN 01631) in the pre-drilled
holes on the side cabinet.
4. Screw the two (2) pre-assembled side panels into the connecting base
board with two socket head screws on each side, M6 x 50 mm (Black Cabinet:
Part. No. VIT 00656, White Cabinet: Part. No. VIT 00657).
Montage_ALL_eK1.indd 7 01.03.2017 13:09:01
Made in Germany
Assembly Instructions DIGITAL
8
DeutschFrançais English
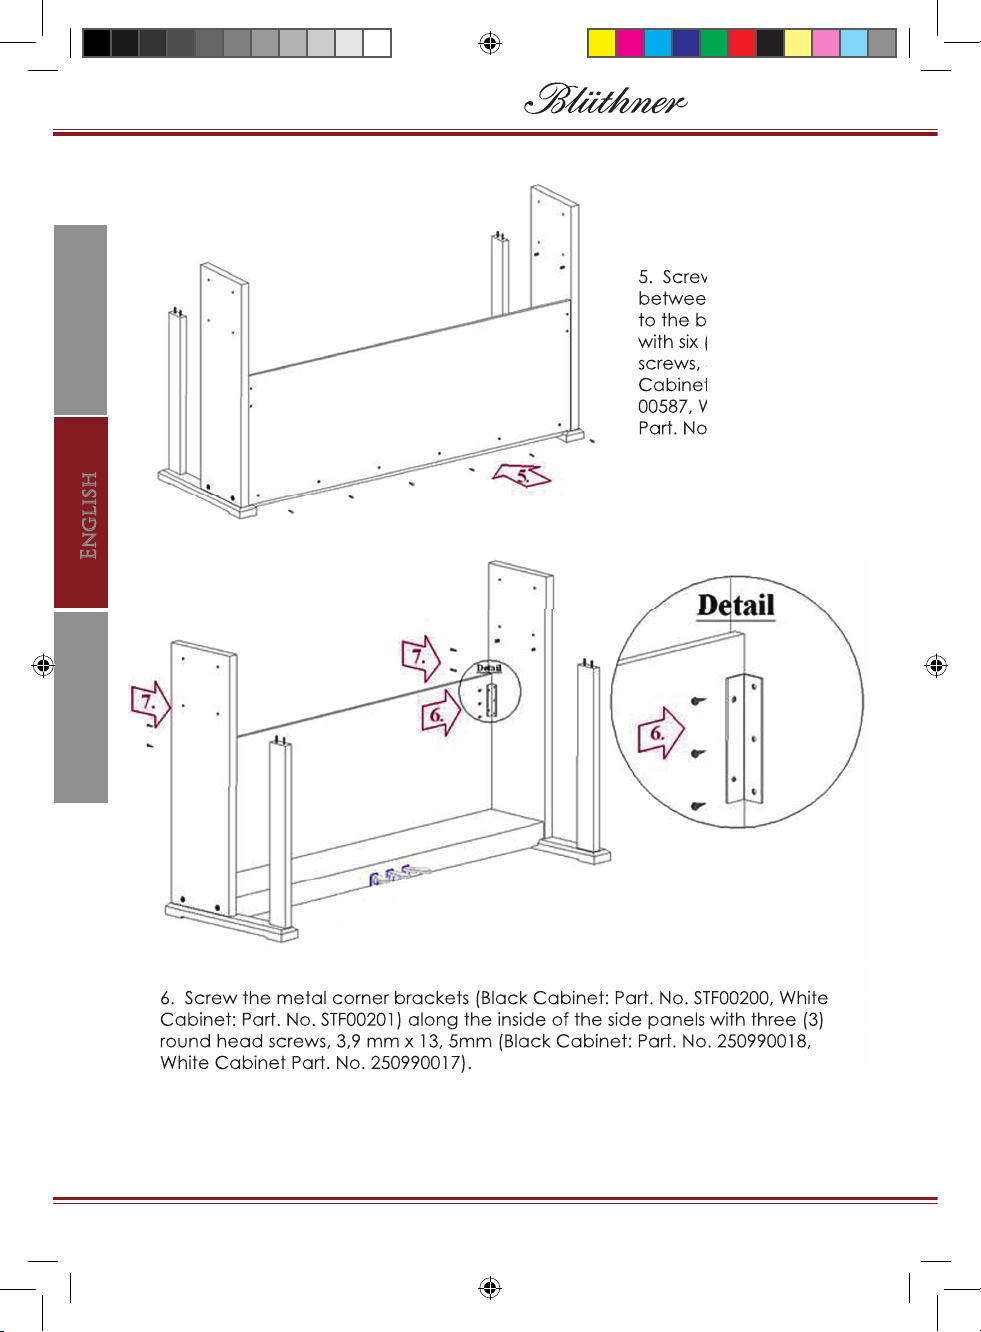
5. Screw the back panel
between the side panels
to the base board
with six (6) countersunk
screws, 4 x 30 mm (Black
Cabinet Part. No. VIT
00587, White Cabinet:
Part. No. VIT 00588).
6. Screw the metal corner brackets (Black Cabinet: Part. No. STF00200, White
Cabinet: Part. No. STF00201) along the inside of the side panels with three (3)
round head screws, 3,9 mm x 13, 5mm (Black Cabinet: Part. No. 250990018,
White Cabinet Part. No. 250990017).
7. From the rear of the back panel, insert two (2) countersunk screws, M4 x 20
mm (Black Cabinet: Part. No. VIT 00586, White Cabinet: Part. No. VIT 00535),
through to the metal corner brackets placed in Step 6.
5. Screw the back panel
between the side panels
to the base board
with six (6) countersunk
screws, 4 x 30 mm (Black
Cabinet Part. No. VIT
00587, White Cabinet:
Part. No. VIT 00588).
6. Screw the metal corner brackets (Black Cabinet: Part. No. STF00200, White
Cabinet: Part. No. STF00201) along the inside of the side panels with three (3)
round head screws, 3,9 mm x 13, 5mm (Black Cabinet: Part. No. 250990018,
White Cabinet Part. No. 250990017).
Montage_ALL_eK1.indd 8 01.03.2017 13:09:01

Made in Germany 9
Assembly Instructions
e-Klavier 1
Deutsch FrançaisEnglish
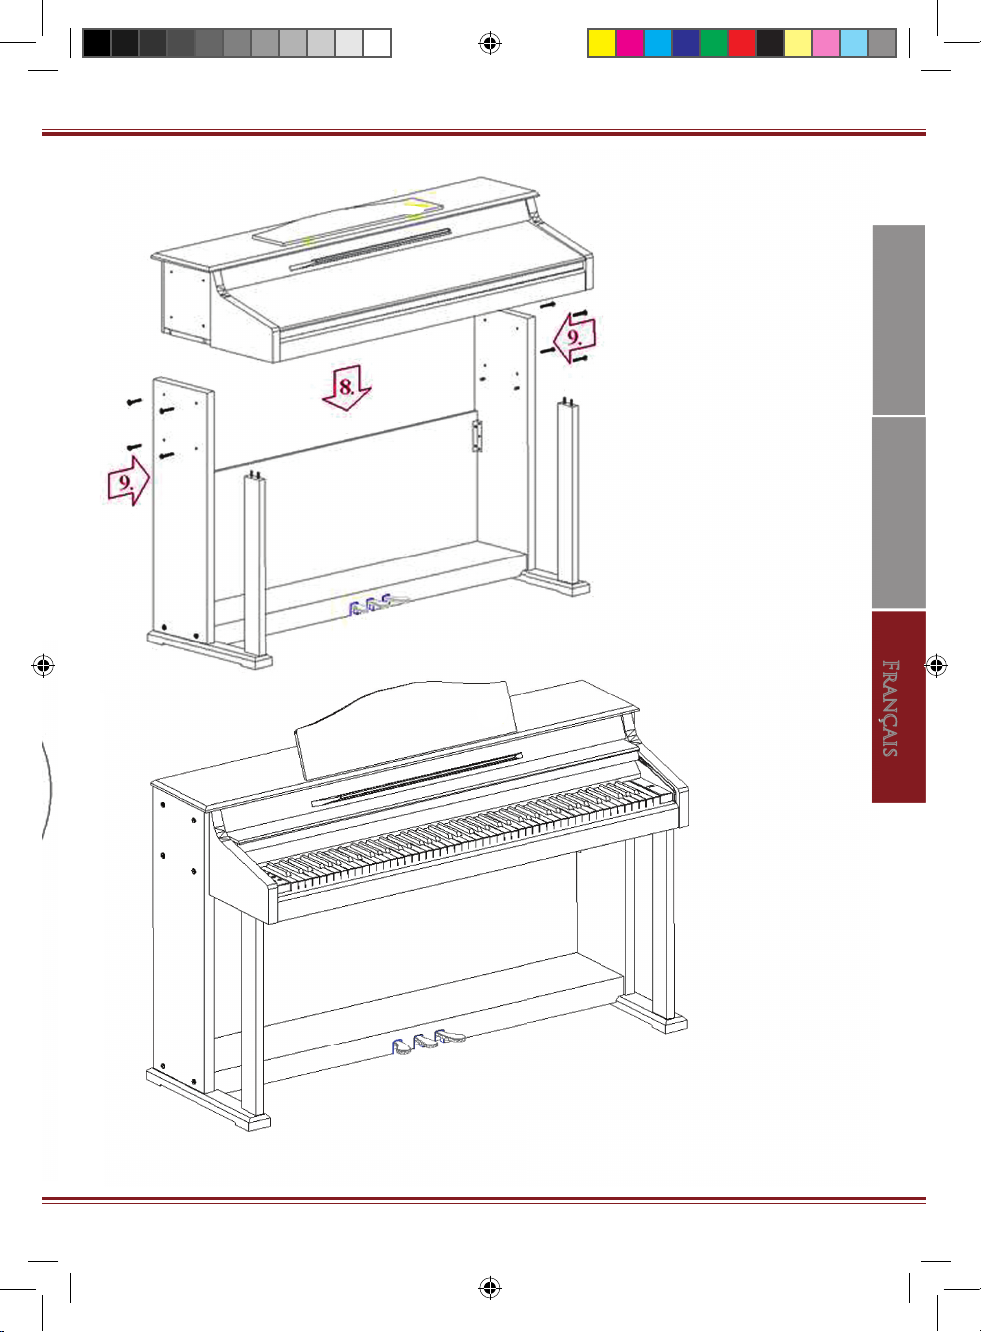
8. Place the entire top
piano case onto the
wooden dowels atop the
front columns, inserting
the dowels into the dowel
holes found along the
underside of the piano
case.
9. Screw the four (4)
socket head screws, M6
x 50 mm (Black Cabinet:
Part No. VIT 00656, White
Cabinet: Part No. VIT
00657), through each side
panel and into the piano
case.
11. Plug the power cord in… and you are ready to play!
8. Place the entire top
piano case onto the
wooden dowels atop the
front columns, inserting
the dowels into the dowel
holes found along the
underside of the piano
case.
9. Screw the four (4)
socket head screws, M6
x 50 mm (Black Cabinet:
Part No. VIT 00656, White
Cabinet: Part No. VIT
00657), through each side
panel and into the piano
case.
10. Plug the pedal cable
into the socket beneath
the keybed.
Montage_ALL_eK1.indd 9 01.03.2017 13:09:02
Made in Germany
DeutschFrançais English
Manuel d’montage DIGITAL
10
INSTRUCTIONS DE MONTAGE POUR e-KLAVIER 1
ATTENTION
Assemblez le piano sur un sol plat. Tous les éléments doivent être assemblés
dans l’ordre. Utilisez exclusivement les pièces d’origine (vis, xations, etc…)
L’utilisation de mauvaises pièces ou vis peut endommager le Blüthner e-Klavier.
Pour monter aisément le Blüthner e-Klavier 1 il est souhaitable d’être 2. Il est
recommandé de s’assurer que les pièces sont au complet, en utilisant la liste
ci-dessous, avant de commencer le montage.
MISE EN GARDE
Merci de lire avec soin les instructions de montage jointes, elles décrivent
précisément le montage de l’instrument. Un manque de respect de ces
instructions peut causer des dégâts ou même des blessures.
Zubehörliste:
4- goujons de bois 6x 35mm (pièce n° SPN 01627)
2- vis noyées de 5 x 70mm (pièce n° SPN 210175070)
4- goujons de bois 8 x 30 mm (pièce n° SPN 01631)
4-vis allen M 6 x 50 mm (pièce n° 00656 - noir, 00657 - blanc)
6- vis noyées 4 x 30 mm (pièce n° VIT 00587 - noir, VIT 00588 - blanc)
6-vis tête ronde 3,9 x 13,5 mm
(pièce n° 250990018 - noir, 250990017 -blanc)
4-vis noyées M 4 x 20 mm
(pièce n° VIT 00586 - noir; VIT 00535 -blanc)
8-vis allen M 6 x 50 mm (pièce n° VIT00656 - noir; VIT 00657 - blanc)
1-clé allen (pièce n° 394000142)
2-supports d’angle métalliques (pièce n° noir STF00200; blanc STF00201)
Montage_ALL_eK1.indd 10 01.03.2017 13:09:02

Made in Germany 11
Deutsch FrançaisEnglish
Manuel d’montage
e-Klavier 1
FrançaisFrançais
1. Insérez deux goujons en
bois de 6 x 35 mm (pièce n° SPN
01627) dans les trous pré percés au
bout de la console.
2. Fixez la console sur la base
en insérant une vis noyée 5 x 70mm
(pièce n° SPN 210175070) à travers le
le fond du pied de meuble. Utilisez la
clé allen (pièce n° 394000142).
3. Insérez deux goujons de
bois de 8 x 30mm (pièce n° SPN
01631) dans les trous pré percés du
côté de meuble.
4. Vissez les deux côtés pré assemblés au plateau de
base avec deux vis allen de M6 x 50 mm (pièce n° 00656
- noir, 00657 - blanc) de chaque côté.
Montage_ALL_eK1.indd 11 01.03.2017 13:09:03

Made in Germany
DeutschFrançais English
Manuel d’montage DIGITAL
12
5. Vissez le panneau arrière entre les panneaux de côté sur le
plateau de base avec six vis noyées de 4 x 30mm (pièce n° VIT 00587
- noir, VIT 00588 - blanc).
6. Vissez les supports d’angle métalliques (pièce n°
noir STF00200; blanc STF00201) à l’intétieur des côtés de
meuble avec trois vis tête ronde de 3,9 x 13,5mm (pièce n°
250990018 - noir, 250990017 -blanc).
7. Depuis l’arrière du panneau arrière, insérez deux vis noyées M4 x 20mm
(pièce n° VIT 00586 - noir; VIT 00535 -blanc), à travers les supports d’angle
métalliques montés au point 6.
Montage_ALL_eK1.indd 12 01.03.2017 13:09:04
Made in Germany 13
Deutsch FrançaisEnglish
Manuel d’montage
e-Klavier 1
Français
Français
Français
8. Placez le meuble piano
entièrement sur les goujons de
bois au haut des consoles, en
insérant les goujons dans les
logements du dessous du meuble
piano.
9. Vissez les quatre vis
allen M6 x 50mm (pièce n° VIT
00656 – noir; VIT 00657- blanc)
à travers chaque panneau de côté,
dans le meuble piano.
11. Branchez le cordon d’alimentation… vous êtes prêts à jouer!
10. Branchez le câble de pédales dans la prise
au dessous du plateau de clavier.
Montage_ALL_eK1.indd 13 01.03.2017 13:09:05

Kunden-Service Sollten Sie wider Erwarten einmal Schwierigkeiten mit dem
Produkt haben und Beratung oder Unterstützung benötigen, können Sie sich auf
bestmögliche Hilfe verlassen. www.e-klavier.com
Rechtlicher Hinweis Blüthner Digital Piano Manufaktur hat das Recht, Funktionen,
Technische Daten, ohne Hinweis zu ändern.
Hinweis zur WEEE Richtlinie Die WEEE-Richtlinie (von engl.: Waste
Electrical and Electronic Equipment; deutsch: (Elektro- und
Elektronikgeräte-Abfall) ist die EG-Richtlinie 2002/96/EG zur
Reduktion der zunehmenden Menge an Elektronikschrott aus
nicht mehr benutzten Elektro- und Elektronikgeräten. Ziel ist das
Vermeiden, Verringern sowie umweltverträgliche Entsorgen der
zunehmenden Mengen an Elektronikschrott durch eine erweiterte
Herstellerverantwortung.
Customer Service If you have dif culties with our product and need advice
or assistance, you can rely on the best possible help. www.e-klavier.com
Legal notice The Blüthner Digital Piano Manufacture has the right to change the
features, and/ or speci cations without notice.
Information on WEEE Directive/The WEEE directive (Waste Electrical
and Electronic Equipment) is the EC directive 2002/96/EC to reduce
the growing amount of electronic waste from electrical and
electronic equipment that is no longer in use. The aim is to avoid
and reduce the increasing amounts of electronic waste through
extended producer responsibility and environmentally sound
disposal.
service apres vente Si vous avez de dif cultés avec notre produit et avez
besoin d’un conseil ou d’une aide, soyez assurés de notre aide la plus entière.
www.e-klavier.com
Avertissement légal: La manufacture Blüthner pianos numériques se réserve
le droit de modi er les caractéristiques, et/ou les spéci cations sans avertissement
préalable.
Information sur la directive WEEE La directive WEEE( sur les rebuts
d’équipements électriques et électroniques) est la directive
européenne 2002/96/EC destinée à réduire la quantité sans cesse
croissante de déchets d’équipements électriques et électroniques,
en étendant la responsabilité des fabricants aux problèmes
environnementaux liés à la destruction des matériels de son.
THE GOLDEN TONE
D I G I T A L
Julius Blüthner Pianofortefabrik GmbH Dechwitzer Straße 12
D-04463 Großpösna b. Leipzig, Germany Tel: +49 (0) 34297-75130
Montage_ALL_eK1.indd 14 01.03.2017 13:09:05
Other manuals for e-KLAVIER 1
2
Table of contents
Languages:
Other bluthner Musical Instrument manuals

bluthner
bluthner PIANETTE User manual

bluthner
bluthner e-Klavier 1 Art Style User manual

bluthner
bluthner e-Klavier 2 PRO-88 User manual

bluthner
bluthner e-Klavier 3 User manual

bluthner
bluthner e-KLAVIER 1 User manual

bluthner
bluthner Homeline e-Klavier User manual

bluthner
bluthner e-KLAVIER 1 User manual

bluthner
bluthner PRO-88 EX User manual


