Blyss KPT-2000B 5203L User manual

Model EAN
KPT-2000B 5203L 2000W 3663602690986
This product is only suitable for well
insulated spaces or occasional use.
GB
IE
Wall hung heater
Version : 09

2
This instruction manual is important to your safety.
Read the entire manual carefully before using the appliance and
keep it for future reference.
Getting started...
Safety 3-4
Before you start 5-6
Quick start 7-12
In more detail…
Maintenance and cleaning 13
Environmental protection 13
Installation 16-19
Let’s
get started...

3
PLEASE READ THE SAFETY ADVICE CAREFULLY
BEFORE USING THE APPLIANCE
material damage.
SAFETY ADVICE (Use)
- This appliance can be used by children aged from 8
sensory or mental capabilities or lack of experience
and knowledge if they have been given supervision or
instruction concerning use of the appliance in a safe way
and understand the hazards involved. Children shall not
play with the appliance. Cleaning and user maintenance
shall not be made by children without supervision.
- Children of less than 3 years should be kept away unless
continuously supervised.
- Children aged from 3 years and less than 8 years shall
been placed or installed in its intended normal operating
position and they have been given supervision or
instruction concerning use of the appliance in a safe way
and understand the hazards involved.
Children aged from 3 years and less than 8 years shall
user maintenance.
- CAUTION : Some parts of this product can become very
hot and cause burns. Particular attention has to be given
where children and vulnerable people are present.
-
cover the heater.
in order to avoid a hazard.
- The appliance must not be used outdoors.
Safety
...

4
PLEASE READ THE SAFETY ADVICE CAREFULLY
BEFORE USING THE APPLIANCE
- The appliance is intended for domestic use only. Do not use
this appliance for anything other than its intended purpose.
contain any parts that can be used separately.
- Keep plastic packaging out of the reach of children.
SAFETY ADVICE (Installation)
- Information on appliance installation is provided in the
Installation section on pages 16 to 19.
- The heater must not be located immediately below a socket-
outlet.
- WARNING : Means for disconnection having a contact
wiring in accordance with the wiring rules.
- CAUTION : In order to avoid a hazard due to inadvertent
appliance. It must be attached vertically and securely to a
vertical wall. Any other position is potentially dangerous.
- The heater must be installed so that switches and other con-
trols cannot be touched by a person in the bath or shower.
IMPORTANT : KEEP THIS INFORMATION FOR
FUTURE REFERENCE. READ CAREFULLY.
Safety
5
Points to check before beginning
For domestic use only.
Children or any other persons incapable of using the appli-
ance safely must not use this appliance.
Please discard of plastic packaging appropriately and keep
it out of reach of children.
The appliance is conceived to be used as a supplementary
IMPORTANT : When in use never cover the heater in any
way or place it close to combustible materials. The heater
-
dren and pets at a safe distance and never leave unsuper-
vised in a room with a heater that is working..
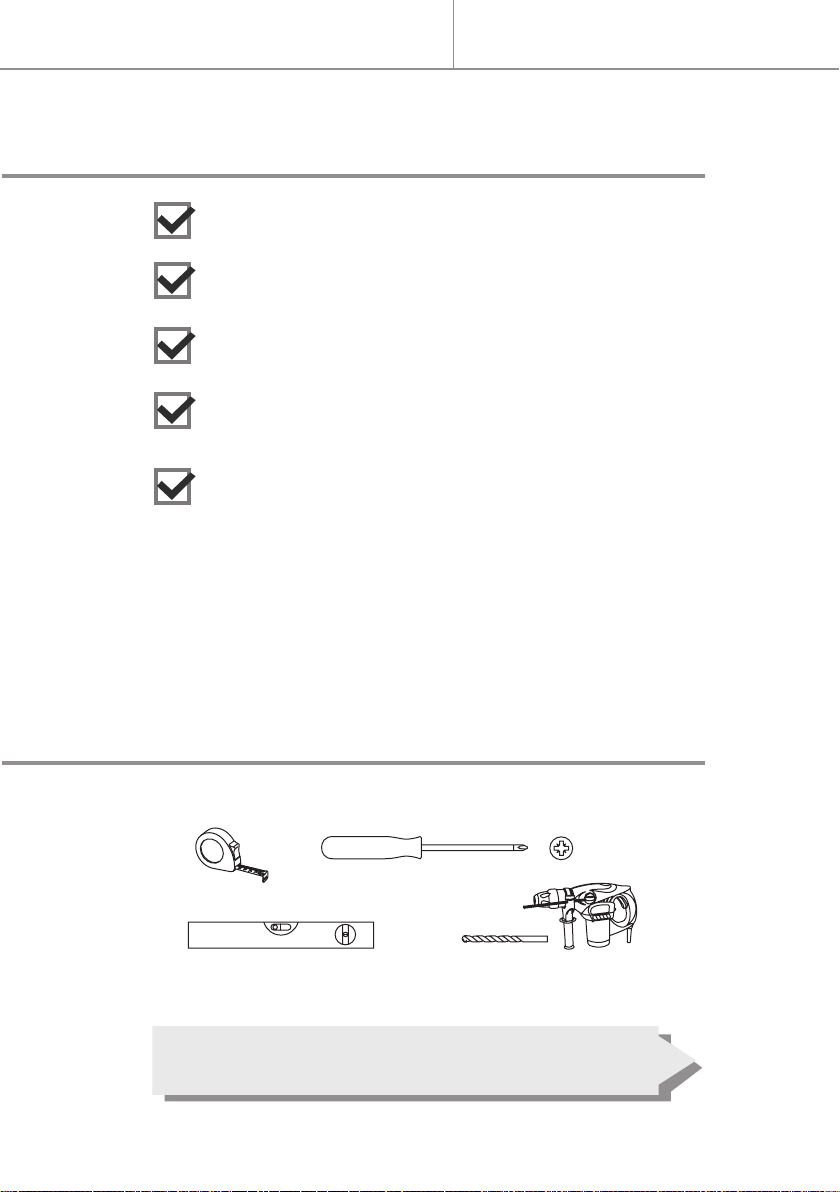
Before you start
To install your product, please read the installation
guidelines at the end of the instruction manual.
You need (no included)
1 screwdriver
1 measuring tape
1 spirit level 1 drill and bit

6
Air inlet
Air outlet
Control Switch Remote control
panel ON/OFF
2x Wall mounting screws
2x Pegs
The screws and wall plugs supplied are suitable for solid walls. For all
Your product
Before you start

7
The controls
Quick start
ON-OFF
- Press the ON-OFF switch to switch the
appliance ON (I) or OFF (O).
= Power
= Fan
I = Heating on half power (1000W)
II = Heating on full power (2000W) Stand-by mode
P= Weekly programming
= Open window mode
°C = Setting temperature
FAN and HEATING (by control panel)
Stops by going into standby Fan without heating
(the fan stops 30 seconds
after the stand-by).
Heating 2000W Heating 1000W
.The default setting temperature is 23°C when the light °C is o.

8
FAN and HEATING (ONLY by remote control)
- Press to switch on the appliance.
- Press
≡
to select one of the following modes :
≡
≡
Fan without heating Heating on half power
≡
Heating on full power
- Press
Stops by going into standby (the fan stops
30 seconds after the stand-by).
TEMPERATURE CONTROL (ONLY by remote control)
- Press to switch on the appliance.
- Press +or -to set the setting temperature
from 15°C to 35°C (the light °C is on).
- Press
≡
to cancel the temperature setting
(the light °C
on half power ( I ) or full power ( II ).
.The heater working on full power when the room temperature is 4°C lower
than the setting temperature.
.The heater working on half power when the room temperature is between
0° and 2°C lower than the setting temperature.
.The heater switches o when the room temperature is 2°C higher than the
setting temperature.
.The heater switches on again when the room temperature falls 2°C below
the setting temperature.
Quick start
9
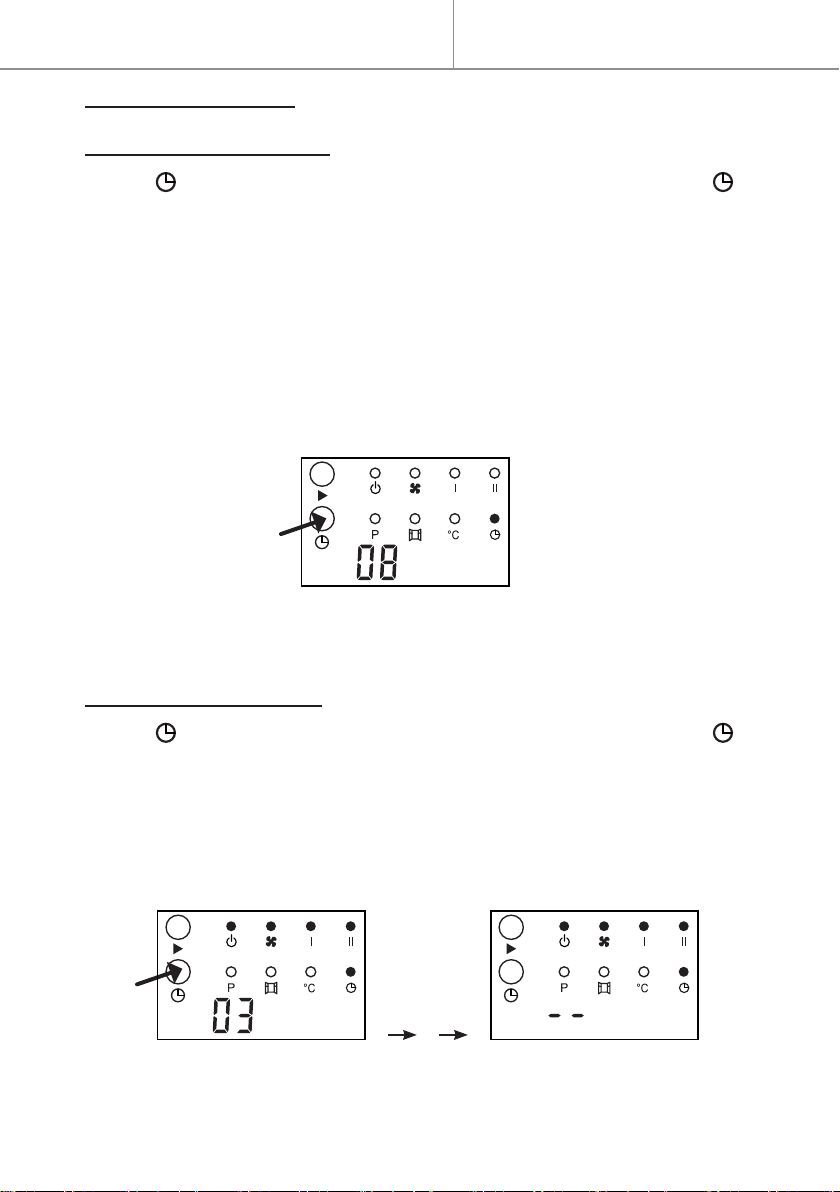
TURN-ON, TURN-OFF (by control panel and remote control)
Turn-on in stand-by mode :
- Press to set the appointment turn-on time in 1-12 hours (the light is
on).
.The display automatically decreases 1 hour for each hour passed. When
the appointment power-on time arrived, the product will automatically turns
on. The default setting temperature is 23°C.
.If not setting the setting temperature and weekly program, the unit will au-
tomatically turn-o after continuous working 12 hours, and enter into stand-
by.
For example to set appointment turn-on time to 8 hours :
Turn-o in running mode :
- Press is
on).
.When the appointment power-o time arrived, the product will automatical-
ly turns o. The default setting temperature is 23°C.
For example to set appointment turn-o time to 3 hours :
5 seconds
Quick start
10
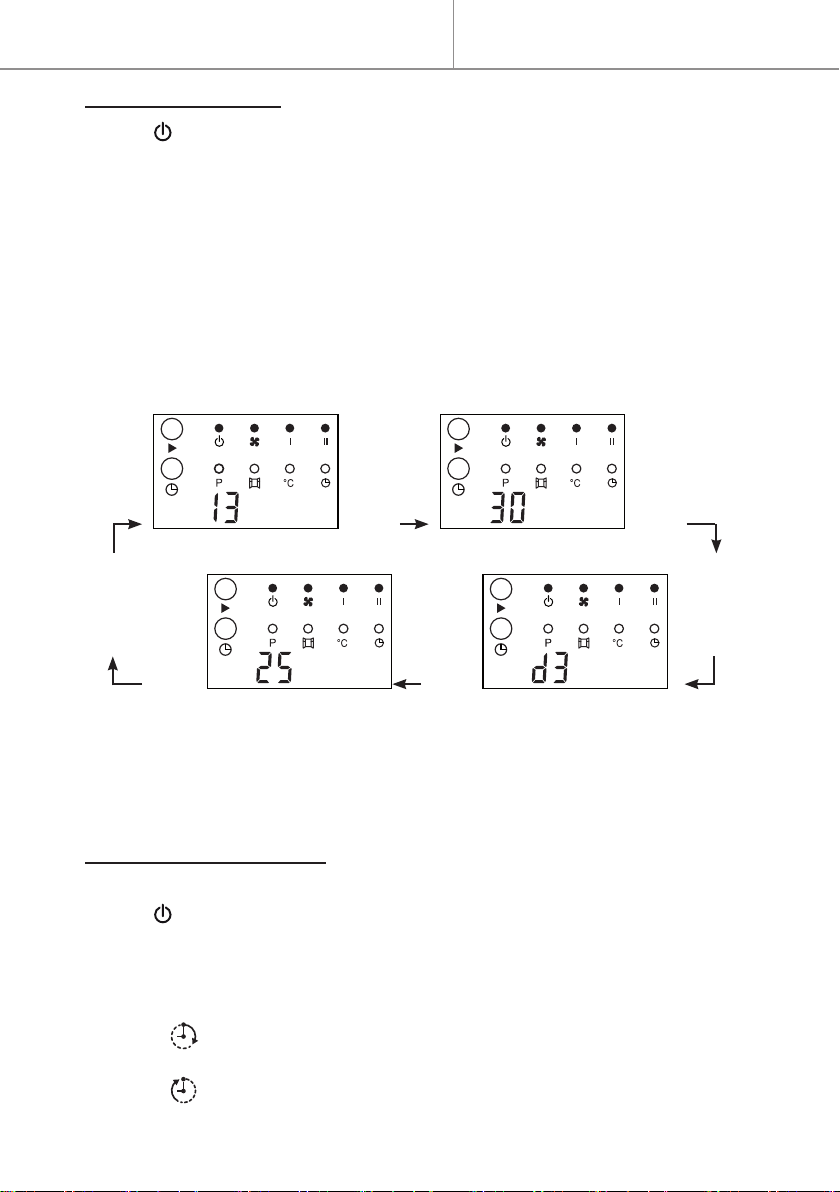
SET CURRENT TIME (ONLY by remote control)
- Press to switch on the appliance.
- Press SET to display the hour.
- Press +or -to set the current hour (00 to 23).
- Press SET again to display the minute.
- Press +or -to set the current minute (00 to 59).
- Press SET again to display the day of week.
- Press +or -to set the current day (d1 d2 d3 =
d4 d5d6d7 = Sunday).
- Press
For example, Wednesday 13:30 , Setting temperature = 25°C :
SET SET
Hour Minute
SET SET
Setting temperature Day
.To check the current time and setting temperature, press SET again.
.If main switch o or power cut o, it need reset the time.
SET WEEKLY PROGRAM (ONLY by remote control)
.The current time must be set before any programming.
- Press to switch on the appliance.
1- Press Pto enter into weekly program setting (the light P is on).
2- Press DAY to set the day of program activation (d1d2d7)
3- Press EDIT to set the time period number (P1P2P6)
4- Press (TIME/ON) to set the turn-on time (00010224)
Cannot set to minutes.
5- Press 00010224)
Cannot set to minutes.TIME/OFF can not be less than TIME/ON.
Quick start
11
6- Press +or -to set the setting temperature of this time period.
7- Press
8- Repeat steps 3 to 7 to set another time period number for the same day.
Up to 6 programs are available for each day of the week.
9- Repeat steps 2 to 8 to set the others days of the week.
- Press Pto active the weekly program (the light P
light P
- After the above setting are completed and P
DAYEDIT and to check the setting time of each day and time
period.
.When the turn-on time is same as the turn-o time, the appliance is in
stand by mode.
.If the setting temperature is not set, the default setting temperature is 23°C.
.The weekly program is erased when the switch is o.
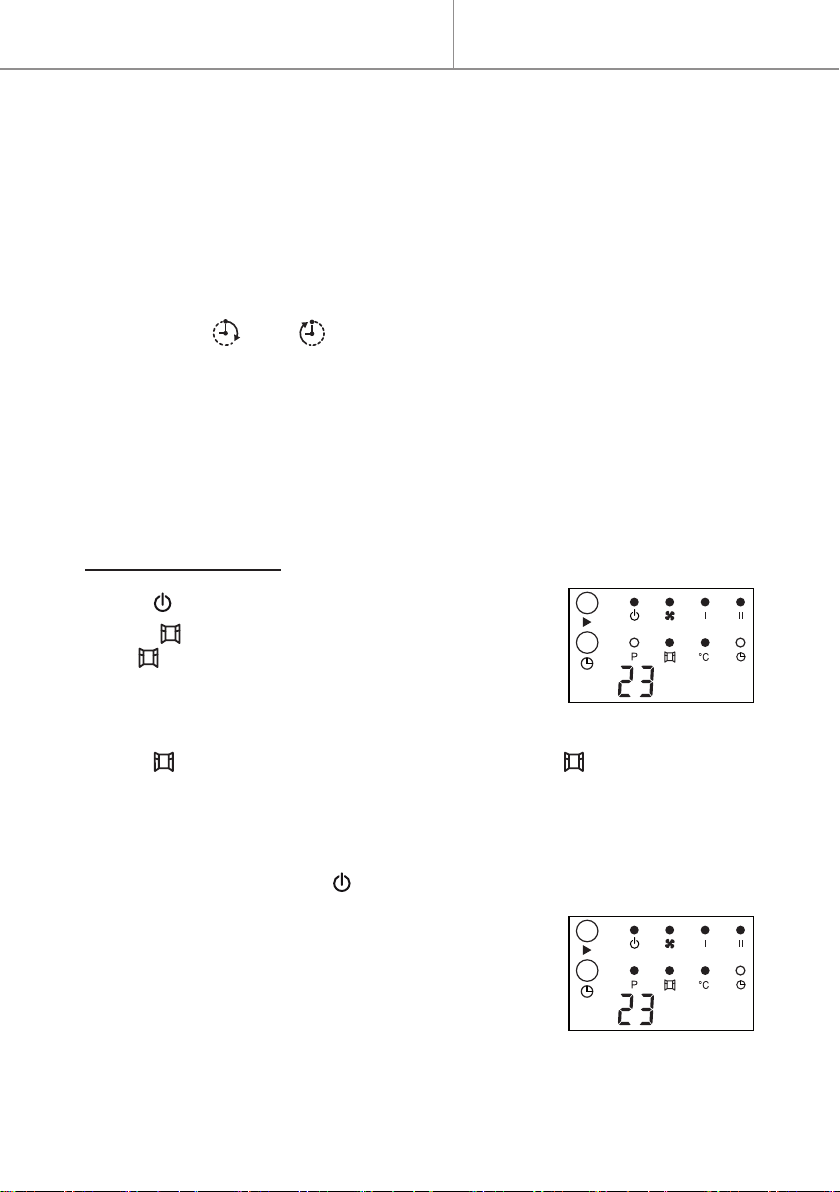
SET OPEN WINDOW (ONLY by remote control)
- Press to switch on the appliance.
- Press to active the open window mode (the
light is on).
- Press +or -to set the setting temperature for the
open windows function.
- Press to disable the open window mode (the light
The appliance will resume to previous working mode.
.During open window mode, if the room temperature drops from about 5°C
to 10°C in less than 10 minutes, the appliance will stop working and enter
into stand by mode. Press again to switch on the appliance.
.If open-window mode and weekly timer program
simultaneously, if the appliance turn o in weekly
time, the appliance is not turned on. If it already
turn on in weekly timer, the appliance working
as the setting temperature under open-window
mode.
Quick start

12
REMOTE CONTROL
The remote control requires 1 CR2025 3V lithium battery
(not included)
Important: Follow the instructions of use and the recycle
rules given on the battery packaging.
1- Open the battery compartment by sliding the cover down.
2- Insert the battery into the compart-
-
gram (see below drawing).
3- Close the battery compartment.
CR2025
Pull
Push
Remote
control
Quick start
13
Environmental protection
Maintenance and cleaning
- Warning
damage plastic parts.
- WARNING : Let the appliance cool down completely before handling or
cleaning.
inside the appliance.
- Regularly clean the air inlet and outlet vents of the fan.
Maintenance and cleaning
Environmental protection
IMPORTANT : Always disconnect from the power
supply before cleaning or maintenance.
This symbol is known as the ‘Crossed-out Wheelie Bin
Symbol’. When this symbol is marked on a product or
general household waste. Some chemicals contained within
electrical/electronic products or batteries can be harmful
to health and the environment. Only dispose of electrical/
which cater for the recovery and recycling of materials
contained within. Your co-operation is vital to ensure the
success of these schemes and for the protection of the
environment.
Disposal of an exhausted batteries
batteries properly.
Consult your local waste authority for information regarding available
recycling and /or disposal options.
yyWxx : Manufacturing date code ; year of manufacturing (20yy)
and week of manufacturing (Wxx).
14
Technical specications
- Reference : KPT-2000B 5203L
- Power : 2000W
- Dimensions (WxHxD) : 52x22x11.7 cm
- Weight : 2.2 kg
- Power : 220-240V ~ 50Hz
- Class II
- IP21 : Protected against vertically falling drops of water (condensation).
- 2-wire power cable without power plug.
: Complies with all relevant European Directives.
Technical specications Technical specications

15
Information requirements for electric local space heaters
KPT-2000B 5203L
Item Sym-
bol Value Unit
Heat output
Nominal heat output Pnom kW
Minimum heat output
(indicative) Pmin 0 kW
Maximum continuous
heat output Pmax,c kW
Auxiliary electricity consumption
At nominal heat
output elmax 0 kW
At minimum heat
output elmin 0 kW
In standby mode elSB 0 kW
Contact details
Rapenburgerstraat 175E 1011 VM
Amsterdam
The Netherlands
Item Unit
Type of heat input, for electric storage local space
heaters only (select one)
thermostat no
manual heat charge control with room and/or
outdoor temperature feedback no
electronic heat charge control with room and/or
outdoor temperature feedback no
fan assisted heat output no
Type of heat output/room temperature control
(select one)
single stage heat output and no room
temperature control no
temperature control no
with mechanic thermostat room temperature
control no
with electronic room temperature control no
electronic room temperature control plus day
timer no
electronic room temperature control plus week
timer yes
Other control options (multiple selections
possible)
detection no
detection yes
with distance control option no
with adaptive start control no
with working time limitation yes
with black bulb sensor no
Technical specications

16
toward the ground without inclining it. Another position is
hazardous.
Minimum distances without obstruction :
The screws and wall plugs supplied are suitable for solid walls. For all
IMPORTANT : Please follow the safety advice set out on pages 3 to 4.
Installation
2x Screws
2x Pegs

17
434mm
1
2
3
5mm
Power cable
Mounting holes
521 mm
52mm 434 mm 35mm
220 mm
15mm
IMPORTANT : Please follow the safety advice set out on pages 3 to 4.
Installation

18
ELECTRICAL CONNECTION
- Warning : you need to connect the two conductors of
the supply cable to a connection block in respecting the
polarities as following :
- IMPORTANT : The wires in the mains lead are coloured
in accordance with the following code :
Blue – Neutral
Brown – Live
- The blue wire must be connected to the terminal marked
with an N or coloured black.
- The brown wire must be connected to the terminal marked
with an L or coloured red.
- WARNING : Never connect live or neutral wires to the
earth terminal.
- This product is double insulated and must not be earthed.
is to ensure earth continuity throughout your property.
FLEX OUTLET METHOD - METAL FRONTPLATES
Connect the cables as shown in the diagram :
ALL EARTH WIRES MUST BE
SLEEVED AND TERMINATED
TO BACK BOX
E E
to Appliance :
Live Neutral
from Supply :
Neutral
Live
Earth LN
LN
IMPORTANT : Please follow the safety advice set out on pages 3 to 4.
Installation

19
accordance with the current IET Wiring Regulations
Bathroom (dry) Outside Volume only (see diagram below
and current IET Wiring Regulations for details). It is not
a bathroom a 30mA RCD must be used. This appliance
- Always refer to the Reference Drawing for Bathroom
Installation.
Note : the below drawing is for reference only.
- Full details can be found in the current IET Wiring
Regulations (BS7671).
0,60 m
Volume 2 Volume 1
2,25 m
Volume 0
Outside volume
Ground
Hidden volume
IMPORTANT : Please follow the safety advice set out on pages 3 to 4.
Installation
20
Manufacturer:
Kingsher International Products Limited
EU Manufacturer:
Kingsher International Products B.V.
Rapenburgerstraat 175E
1011 VM
Amsterdam
The Netherlands
GB-IE
SO53 3LE United Kingdom
www.diy.com
SFD Limited
Yeovil
United Kingdom
This manual suits for next models
1
Table of contents
Languages:
Other Blyss Heater manuals

Blyss
Blyss 3663602870579 User manual

Blyss
Blyss 3663602845027 User manual

Blyss
Blyss WDH-122E User manual

Blyss
Blyss Wickham User manual

Blyss
Blyss 3663602844624 User manual

Blyss
Blyss Ellesmere 3663602844822 User manual

Blyss
Blyss NPO User manual

Blyss
Blyss Thorpe 3663602847595 User manual

Blyss
Blyss Faringdon 3663602847434 User manual

Blyss
Blyss NE10FB User manual


