BMC YH-600B Pro User manual

Portable Diagnostic System
YH-600B Pro
User Manual

YH‐600BProUserManualV1.0
Table of Contents
CHAPTER 1: DEVICE INTRODUCTION AND OPERATION ................................................................ 1
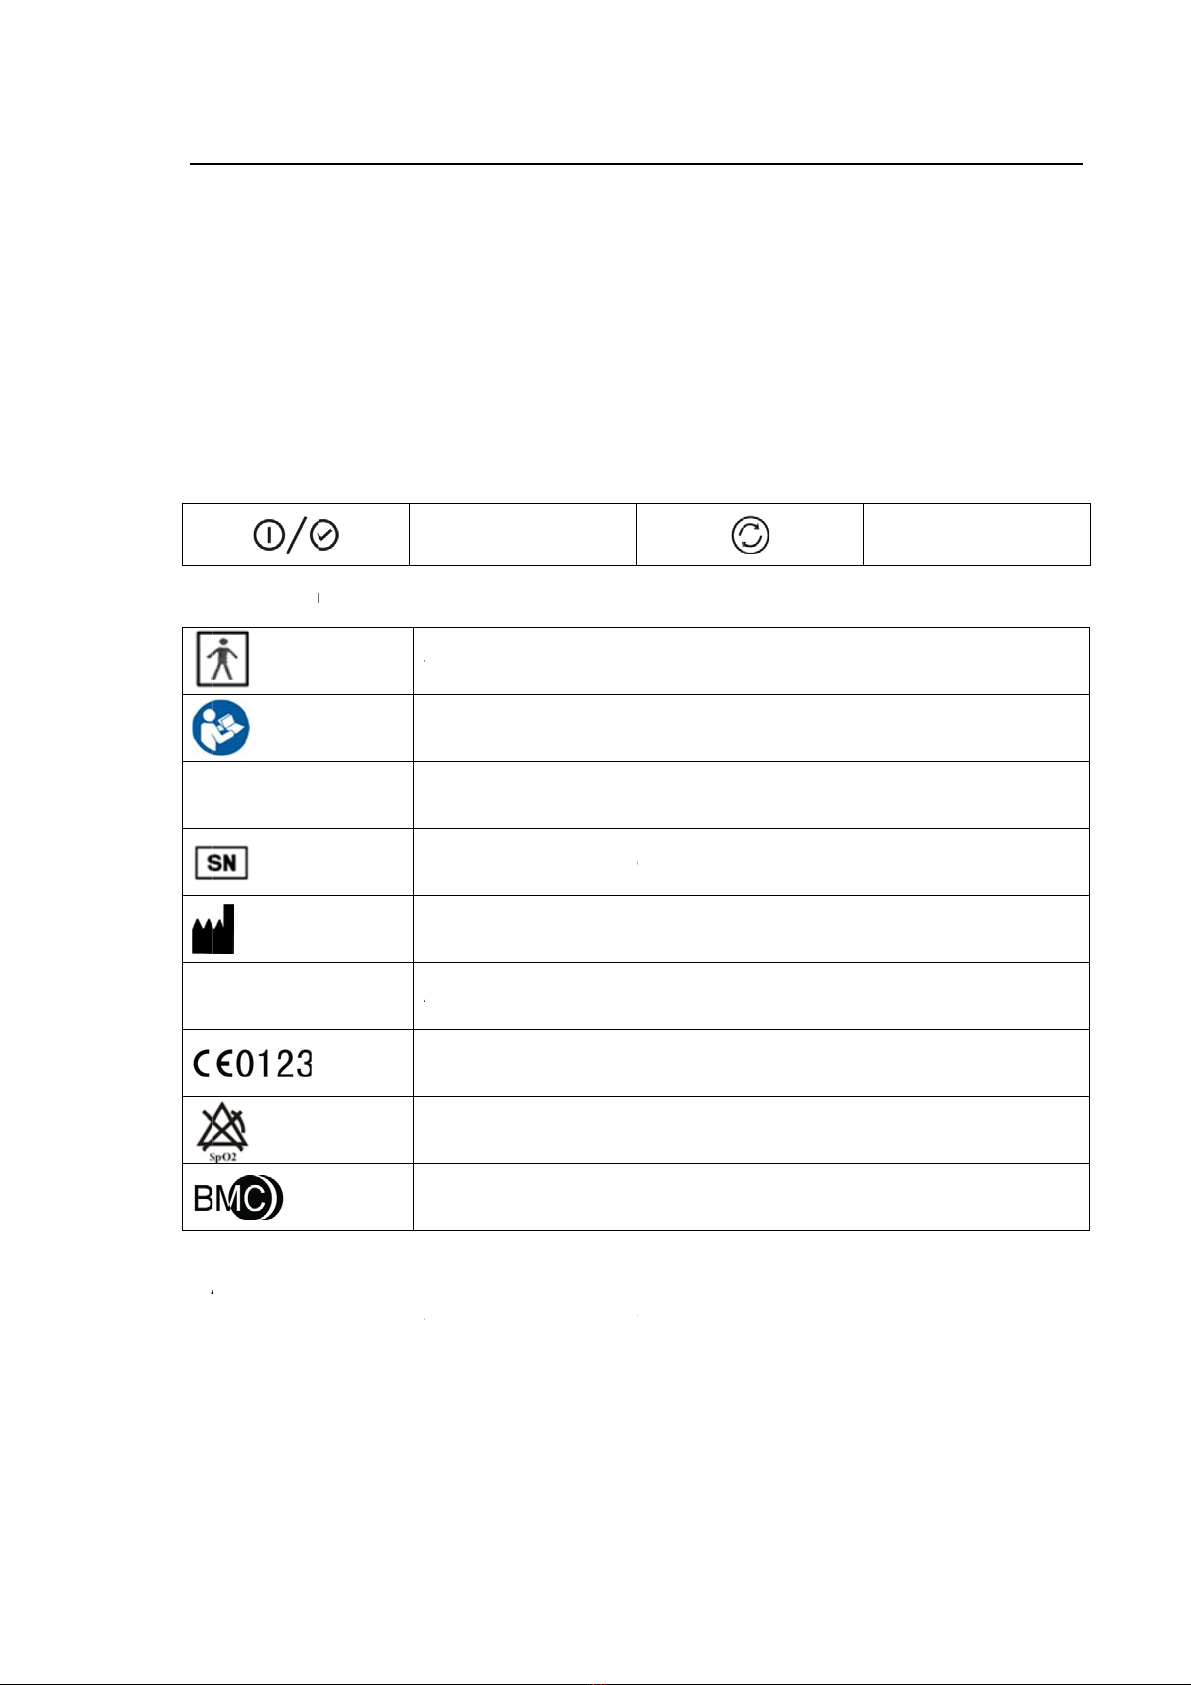
1. Symbols .............................................................................................................................................. 1
1.1 Control Buttons.......................................................................................................................... 1
1.2 Device Symbols......................................................................................................................... 1
2. Warnings, Cautions and Important Tips............................................................................................. 1
3. Contraindications................................................................................................................................ 2
4. Specifications...................................................................................................................................... 2
5. Intended Use ...................................................................................................................................... 4
6. Glossary.............................................................................................................................................. 5
7. Model .................................................................................................................................................. 6
8. Package Contents .............................................................................................................................. 7
9. System Features ................................................................................................................................ 8
9.1 General Introduction.................................................................................................................. 8
9.2 Main Device Structure............................................................................................................... 8
10. Instructions for Use........................................................................................................................... 9
10.1 Setting up and Wearing the Device ...................................................................................... 10
10.1.1 Installing the TF Card and Battery ..................................................................... 10
10.1.2 Wearing the Main Device................................................................................... 12
10.1.3 Connecting the Respiration Kit .......................................................................... 12
10.1.4 Wearing the Airflow Cannula.............................................................................. 13
10.1.5 Wearing the Pulse Oximeter Sensor ................................................................. 14

YH‐600BProUserManualV1.0
10.1.6 Connecting the Main Device with the Respiration Kit........................................ 14
10.2 Operation............................................................................................................................... 14
10.2.1 Accessing the Initial Interface ............................................................................ 15
10.2.2 Accessing the Standby Interface ....................................................................... 15
10.2.3 Accessing the “Record” Interface....................................................................... 16
10.2.4 Accessing the “Setup” Interface......................................................................... 18
10.2.5 Accessing the “Archives” Interface .................................................................... 19
10.2.6 Accessing the “Tools” Interface.......................................................................... 20
10.2.7 Turning Off the Device ....................................................................................... 22
11. Troubleshooting .............................................................................................................................. 23
12. Cleaning and Disinfection............................................................................................................... 24
12.1 Cleaning ................................................................................................................................ 24
12.2 Disinfection............................................................................................................................ 25
13. Disposal .......................................................................................................................................... 26
14. EMC Requirements ........................................................................................................................ 27
CHAPTER 2: POLYLOGIC SLEEP ANALYSIS SOFTWARE .............................................................. 30
1. Installation......................................................................................................................................... 30
1.1 Software Installation................................................................................................................ 30
1.2 Driver Installation..................................................................................................................... 30
2. Patient Information Setup................................................................................................................. 30
3. Data Reception................................................................................................................................. 32
3.1 Run Software........................................................................................................................... 32

YH‐600BProUserManualV1.0
3.2 Connection of YH-600B Pro and Computer............................................................................ 32
3.3 Data Transmission .................................................................................................................. 33
3.3.1 TF Card Data Transmission ................................................................................. 35
3.3.2 Bluetooth Data Transmission............................................................................... 35
4. Data File Management ..................................................................................................................... 39
5. Data Playback .................................................................................................................................. 40
5.1 Opening and Closing the Data File ......................................................................................... 40
5.2 Display of Recorded Data and Analysis Result ...................................................................... 40
6. Print Preview and Output ................................................................................................................. 47
7. Help................................................................................................................................................... 48
8. Exit Program ..................................................................................................................................... 48
CHAPTER 3: SERVICE........................................................................................................................ 49
1. Technical Support ............................................................................................................................. 49
2. Limited Warranty............................................................................................................................... 49
C
H
T
h
of
im
I
m
th
e
1.
1.
1
1.
2
IP
2
2
.
W
A
In
d
C
A
In
d
I
M
Pl
a
W
a
H
APTER 1:
D
h
e informatio
n
continued p
r
provements
m
ages shown
e
actual pro
d
Symbols
1
Control B
u
2
Device S
ym
2
2
Warnin
g
s,
C
A
RNING!
d
icate the p
o
A
UTION!
d
icate the p
o
M
PORTANT
T
a
ce emphas
i
a
rnings, Ca
u
D
EVICE INT
n
in this man
r
oduct devel
o
to this man
u
here are in
d
d
uct shall go
v
u
ttons
mbols
T
A
C
autions a
n
o
ssibility of in
j
o
ssibility of d
a
T
IP!
i
s on an ope
r
u
tions, and I
m
Y
H
RODUCTIO
N
ual has bee
n
o
pment, BM
C
u
al and the p
r
d
icative only.
v
ern.
On-Off/O
K
T
ype BF Ap
p
Follow Instr
u
≥12.5 mm
D
Serial Numb
Manufactur
e
A
uthorized
R
European U
n
No SpO
2
A
l
a
Logo of BM
C
n
d Importan
t
j
ury to the u
s
a
mage to th
e
r
ating chara
c
m
portant Tip
s
H
‐600BProUs
1
/
N
AND OPE
n
carefully c
h
C
Medical C
o
r
oducts it de
s
If there is in
K
Button
p
lied Part
u
ctions for U
s
D
iameter, Dri
p
er of the Pr
o
er
R
epresentati
v
n
ion Approv
a
a
rms
C
Medical C
o
t
Tips
s
er or operat
e
device.
c
teristic.
s
appear thr
o
erManualV1
/
49
RATION
h
ecked and i
s
o
., Ltd. reser
v
s
cribes at an
consistency
s
e
p
ping (15ºtilt
e
o
duct
v
e in the Eur
o
a
l
o
., Ltd.
t
or.
o
ughout this
m
.0
s
believed to
v
es the right
y time, with
o
between the
e
d)
o
pean Com
m
m
anual as t
h
be accurate
.
to make ch
a
o
ut notice or
o
image and
a
Shi
f
m
unity
h
ey apply.
.
In the inter
e
a
nges and
o
bligation.
a
ctual produ
c
f
tButton
e
st
c
t,

YH‐600BProUserManualV1.0
2/49
3. Contraindications
Depending on the skin condition or general state of health, the patient may experience sensitivity to the
wrist belt or the self-adhesive pulse oximeter sensor. Discontinue use if an allergic reaction to the
skin-contact materials occurs.
4. Specifications
SpO2
Range
Accuracy
0%~100%
≤±3%(70%~85%),≤±2%(85%~100%)
≤±3% (70%~85%), ≤±2% (85%~100%)
Pulse rate
Range
Accuracy
30~250 bpm
≤2 bpm (30~100 bpm)
≤2% (100 bpm~250 bpm)
Wavelengths
Red 663 nanometers
Infrared 890 nanometers
Maximal Optical Output Power Less than 1.5mw maximum average
Airflow waveform
Frequency
Margin of error
10~40 times per minute
≤±1 time
CPAP pressure
Range
Margin of error
4~20 hPa
≤±1 hPa
Snore 150~300 Hz
Thorax/Abdomen effort
Range
Margin of error
10~40 times per minute
≤±3 times per minute
Body position Supine position, sleep on left or right side, and
prone positons can be detected
Wrist movement (sleep/awake) Automatic sleep-awake identification from wrist
movement
Temperature
Operation
Storage/Transportation
5°C~35°C
-20°C~55°C
Humidit
y
Operation
Storage/Transportation
≤80% (non-condensing)
≤93% (non-condensing)

YH‐600BProUserManualV1.0
3/49
Atmospheric pressure
Operation
Storage/Transportation
860~1,060 hPa
700~1,060 hPa
Power supply DC 1.5 V ±0.15 V(1×1.5 V R6 AA)
Minimum record duration No less than 8 hours
Data storage 64 records can be stored on TF card
Dimensions 78 mm × 60 mm × 21 mm (main device)
Weight 75 g (main device without battery)
Type of protection against electrical shocks Internal power supply
Classification of protection against
electrical shocks
Type BF applied part
Waterproof rating IP22
Working mode Continuous operation

YH‐600BProUserManualV1.0
4/49
5. Intended Use
YH-600B Pro records the following data: patient respiratory nasal airflow, snoring, blood oxygen
saturation, pulse, respiratory effort, body position and wrist movement during sleep. It can also be
connected to a CPAP system to record and display continuous positive airway pressure. The device
uses these recordings to produce a report that may aid in the diagnosis of sleep-disordered breathing or
for further clinical investigation. The device is intended for the hospital/institutional environment
(supervised) and the home environment (unsupervised) for adults.
WARNING!
•When using consumables and accessories, please read the manufacturer’s information supplied
with the products.
•This device is intended for adult use only. Do not use the device on infant or neonatal patients.
•Do not use the device in situations where alarms are required. The device has no audible alarms.
•Keep all parts away from children.
•YH-600B Pro and its accessories are for the specified intended use only.
•Do not smoke while wearing YH-600B Pro.
•Risk of explosion. Never use the device in the vicinity of flammable gases (e.g. anesthetics).
•No modification of this equipment is allowed.
CAUTION!
•Heavy smokers with a high level of carbon monoxide (CO) in blood cannot use YH-600B Pro.
•YH-600B Pro cannot be used on a water bed or a bed with an electric blanket, because these
electrical equipment will disturb the operation of YH-600B Pro.
•Federal law restricts these devices to sale by or on the order of a physician.
•YH-600B Pro meets requirements of electromagnetic compatibility. If you doubt YH-600B Pro may
disturb the operation of other electrical equipments, such as televisions, radios and mobile phones,
or if YH-600B Pro does disturb the operation, you should move YH-600B Pro far away from these
equipment.
•YH-600B Pro must be able to measure the pulse properly to obtain accurate SpO2 measurement.
Make sure that nothing is hindering the pulse measurement before relying on the SpO2
measurement.
•YH-600B Pro measures the percentage of arterial oxygen saturation of functional hemoglobin.
Significant levels of dysfunctional hemoglobin such as carboxyhemoglobin or methemoglobin may
affect the accuracy of the measurement.
•FCC Caution: Any changes or modifications not expressly approved by the party responsible for
compliance could void the user’s authority to operate this device.

YH‐600BProUserManualV1.0
5/49
6. Glossary
Snore Because of the respiratory tract’s airway limitation, sound is made
when respiratory airflow gets through the narrow respiratory tract,
which usually indicates that the patient is likely to have suffered in
years from sleep apnea syndrome along with the increase of age.
Apnea The performance of respiratory intermission during sleep is that the
respiratory airflow drops to lower than 10% of the normal range and
lasts for at least 10 seconds. The recurrent intermission during
sleep is easy to cause severe oxygen-deficit to brain and blood,
form hypoxemia and induce hypertension, brain-heart disease,
arrhythmia, myocardial infarction and angina, which then can induce
multi-system diseases of the human body.
Hypopnea The reduction range of respiratory airflow is more than 50% of the
normal, accompanied with more than 4% of oxyhemoglobin
saturation reduction.
SAHS The SAHS means at least 30 times of apnea in 7 hours of nightly
sleep time of adults and each apnea lasts for more than 10 seconds.
Or the apnea hypopnea index AHI (the number of apneas and
hypopneas per hour) is greater than 5.
OASHS The OSAHS means the sleep apnea hypopnea syndrome caused by
obstruction of the upper respiratory tract (including the collapse of
pharyngeal mucosa).
AI The AI means the number of apneas per hour, which is equal to the
number of times apnea has occurred the whole night divided by the
sleep time of whole night (awakening and invalid time are not
contained). The unit of time is hour.
HI The HI means the number of hypopneas per hour, which is equal to
the number of times hypopnea has occurred the whole night divided
by the sleep time of whole night (awakening and invalid time are not
contained). The unit of time is hour.
AHI The AHI means the number of apneas and hypopneas per hour
which is equal to the total times of apneas and hypopneas during
the whole night divided by the sleep time of whole night (awakening
and invalid time are not contained),and the unit of time is hour.
SNI The SNI means the average number of times the snore has occurred
every hour which is equal to the number of times snore has occurred
the whole night divided by the sleep time of whole night (awakening
and invalid time are not contained). The unit of time is hour.
ODI The ODI means the number of times when the oxyhemoglobin
saturation reduction is more than 3% or 4% every hour.
CPAP The CPAP means feeding continuous positive airflow into air
passage by face mask.

YH‐600BProUserManualV1.0
6/49
7. Model
Table 1-1 Monitoring Parameters and Components
Model Monitoring Parameters Components
YH-600B
Pro
SpO2, pulse rate, airflow
waveform, thorax/abdomen
effort, body position, snore, wrist
movement (sleep/wake), CPAP
pressure
Main Device, Respiration Kit, Respiration
Effort Belt, Effort Lead Cable, USB Data
Cable and Bluetooth Data Transmission, TF
Card, Pulse Oximeter Sensor, CPAP
Pressure Tube, Airflow Cannula, Wrist Belt,
Computer Software

YH‐600BProUserManualV1.0
7/49
8. Package Contents
Table 1-2 shows package contents.
Table 1-2 Package Contents
Main Device
Pulse
Oximeter
Sensor
USB Data
Cable
Respiration
Kit
Airflow
Cannula
Respiration
Effort Belt
CPAP
Pressure
Tube
Effort Lead
Cable
Quick
Operation
Manual
TF Card
User Manual
Computer
Software
Disk
Carrying
Case
All parts and accessories do not contain latex.
WARNING!
•This device should only be used with the tube and accessories manufactured or recommended by
BMC or with those recommended by your prescribing physician. The use of inappropriate tubes
and accessories may affect the performance of the device and impair monitoring effects.
CAUTION!
•The use of non-BMC-certified accessories may undermine system security, so it is recommended
that users only use the pulse oximeter sensor and other accessories provided by BMC.
•It is recommended to use Airflow Cannula with the registration certification for medical device.
•This device and its accessories are for intended use only.
①The belt on the main device is in accordance with the biological evaluation of medical devices.
YH‐600BProUserManualV1.0
8/49
②The finger sheath and cannula are CE marking approved, indicating compliance to the Medical
Device Directive.
③Several accessories are available for using YH-600B Pro. To ensure a safe and effective therapy,
adopt only BMC accessories. All accessories do not contain latex.
9. System Features
9.1 General Introduction
The performance and functional characteristics of YH-600B Pro include all the user-friendly features of
the predicate device.
YH-600B Pro is powered by one 1.5 V AA battery. Testing was performed to demonstrate that the
performance of YH-600B Pro in its intended environment is as safe and effective as that of the legally
marketed predicate devices. The safety and effectiveness of YH-600B Pro have been verified through
performance-related testing that consisted of Electrical Safety, Electromagnetic Compatibility,
Mechanical and Environment Testing.
The recorded data, such as SpO2, pulse rate, airflow waveform, snore and CPAP pressure, can be
replayed on a computer via the PolyLogic Sleep Analysis Software which is provided with YH-600B Pro.
The device can be used as a standalone unit for recording data. It can also interact with a commercially
available IEC60950-1 compliant computer, which can be used to review data. The device does not have
any audible alarms, and, therefore, should not be used for continuous monitoring.
Patient is an intended operator, who can safely use all functions and can perform all maintenances
mentioned in the User Manual.
All parts of the device are applied parts.
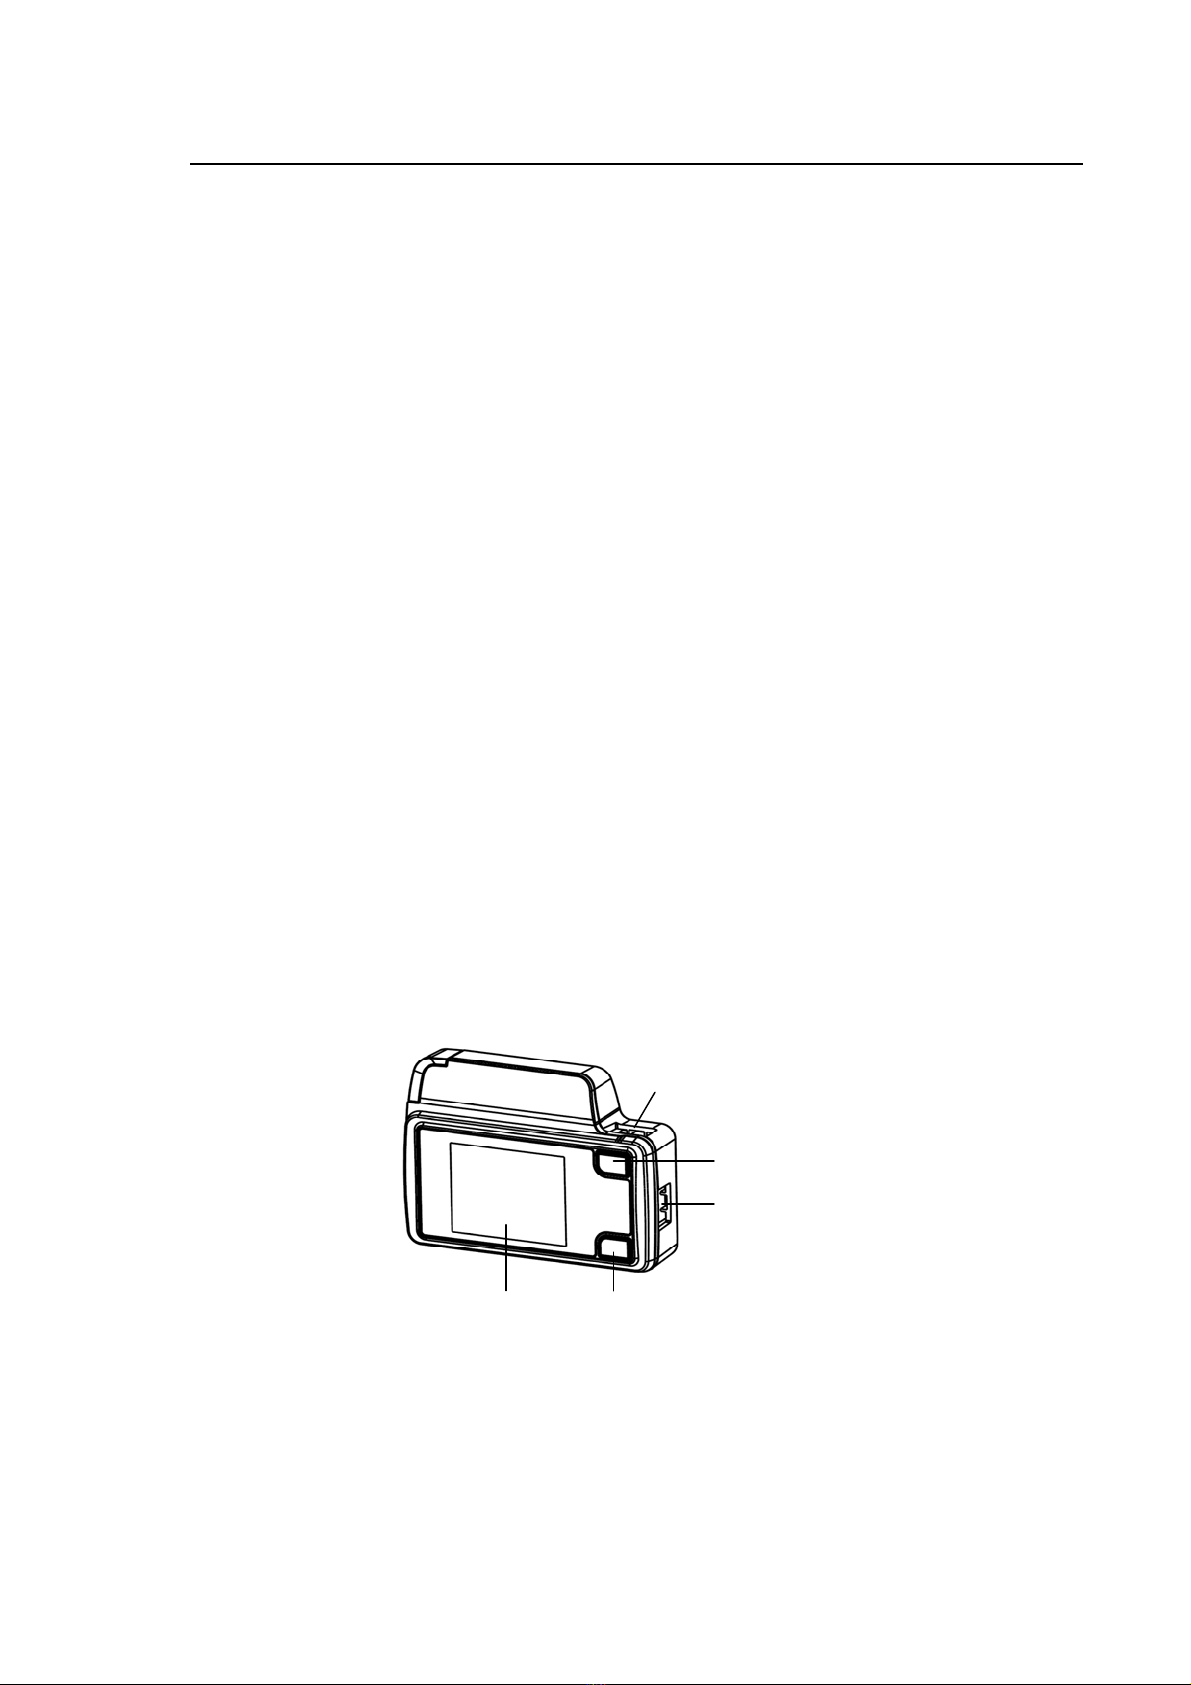
9.2 Main Device Structure
Display Screen Shift Button
On-Off/OK Button
Flow/COM Port
SpO2Port
Figure 1-1 Main device structure

YH‐600BProUserManualV1.0
9/49
Table 1-3 shows Component and Function.
Table 1-3 Component and Function
Component Function
Display Screen Display the menu, alerts and data monitored
Shift Button Switch interfaces and options
On-Off/OK Button Turn on/off the device, and confirm adjustment
SpO2Port Connect to the pulse oximeter sensor to collect data on SpO2and
pulse rate
Flow/COM Port
Connect to the respiration kit to collect data on the airflow waveform
and snore; connect to the computer with a USB data cable to transfer
data.
10. Instructions for Use
CAUTION!
•Avoid exposure to sources of direct airflow such as fans during recording.
•Avoid using this device in an MRI environment or in close proximity to a high EMI emission source.
•Do not attempt to take the main device apart. No user-serviceable parts are inside.
•If any unexplained changes are noticed in the performance of this device, if the device is dropped
or mishandled, if water is spilled into the enclosure, or if the enclosure is broken, discontinue use
and contact BMC.
YH‐600BProUserManualV1.0
10/49
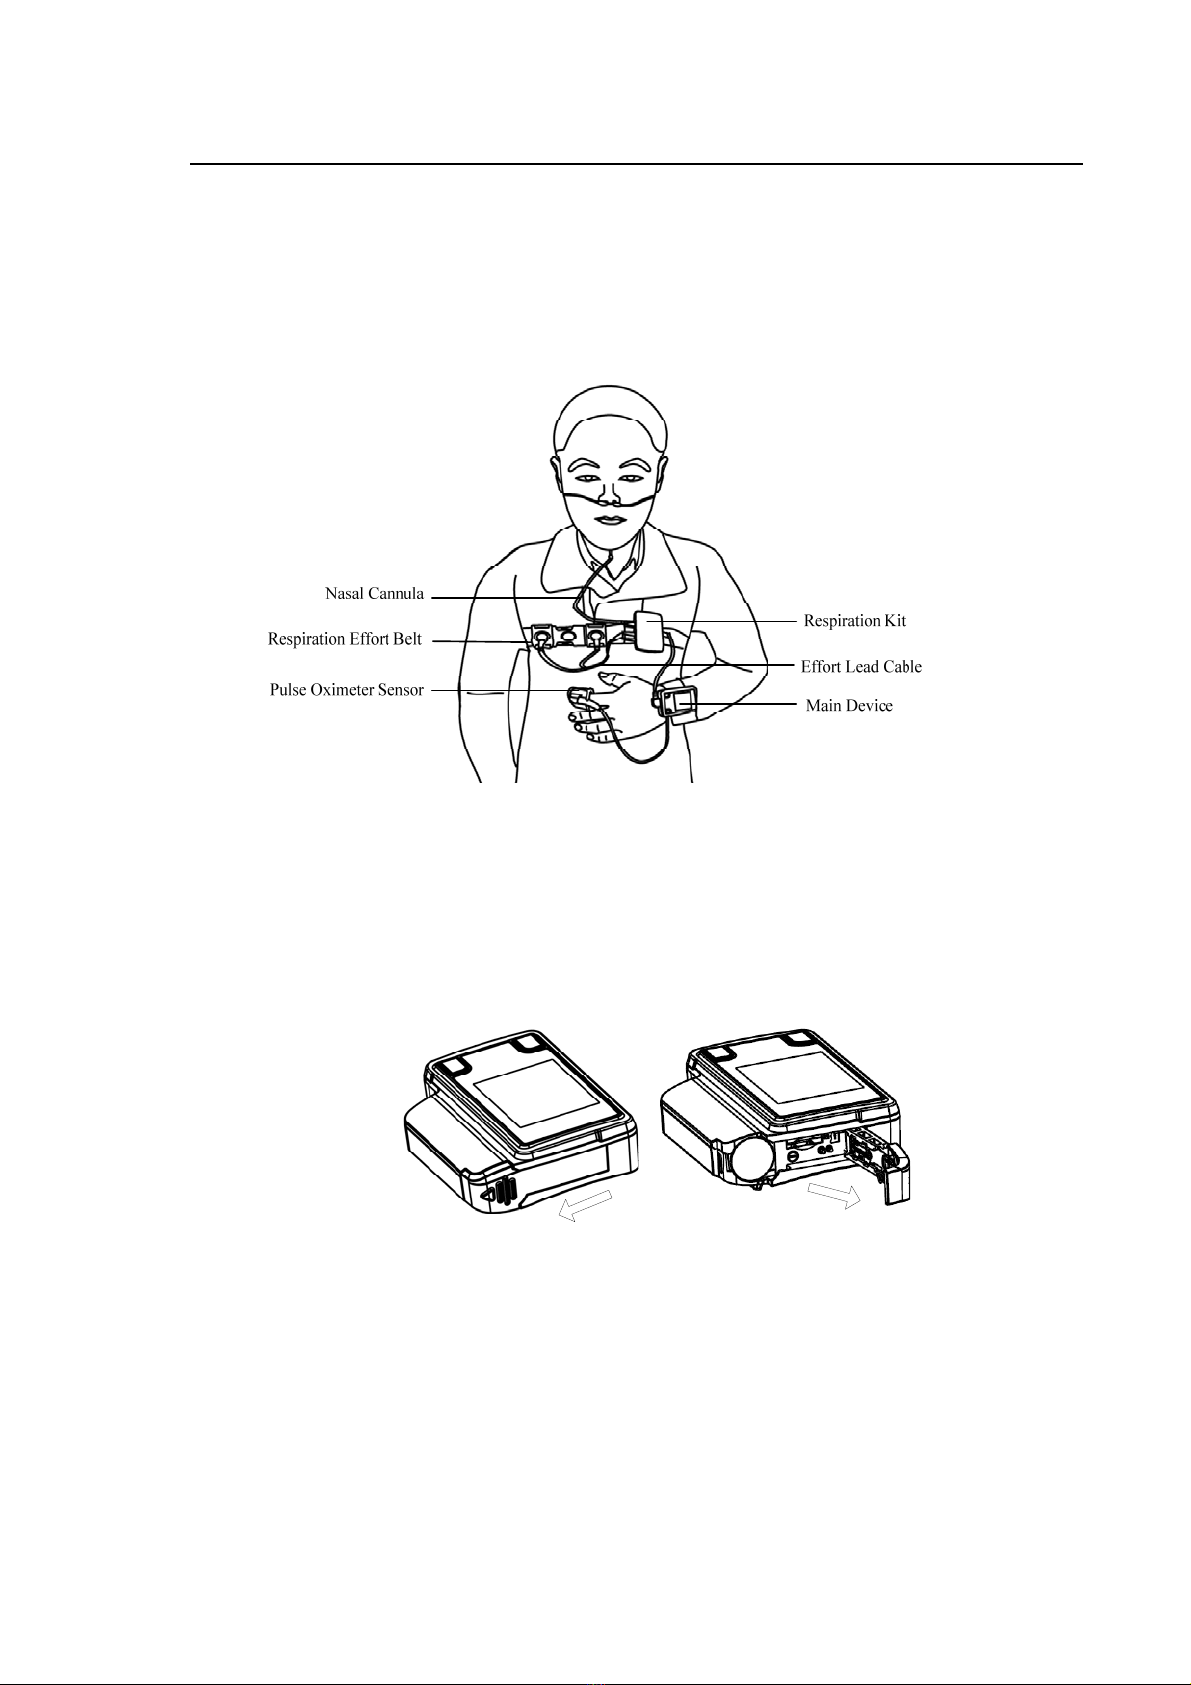
10.1 Setting up and Wearing the Device
Figure 1-2 shows a user wearing YH-600B Pro. See sections 10.1.1~10.1.6 for detailed wearing
instructions.
Figure 1-2 Wearing YH-600B Pro
10.1.1 Installing the TF Card and Battery
Push and pull the battery door according to Step 1. Insert the TF card into the slot and put a new AA
battery with the positive and negative terminals on the correct sides according to Step 2. Close the
battery door according to Step 3 (Figure 1-3).
Step 1: Opening battery door

YH‐600BProUserManualV1.0
11/49
Figure 1-3 Inserting the TF card and battery
WARNING!
The battery may leak or explode if used or disposed of improperly.
When the TF card and battery are correctly inserted into the device, a symbol indicating correct
insertion of the TF card will appear in the standby interface, as shown in Figure 1-4.
Figure 1-4 Symbol indicating correct insertion of TF card
If the TF card is inserted incorrectly or not inserted, a red “X” symbol will appear on the “TF card” icon in
the standby interface, as shown in Figure1-5, indicating “incorrect insertion or absence of TF card”.

YH‐600BProUserManualV1.0
12/49
Figure 1-5 Symbol indicating incorrect insertion or absence of TF card
CAUTION!
•When there is a red “X” symbol on the “TF card” icon in the standby interface, the user should
check whether the TF card is inserted incorrectly or not inserted. If it is inserted correctly, the TF
card may be broken.
•Please place a fully charged or new AA battery every time before recording. Use only the specified
types of battery or rechargeable battery.
•Replace the battery when the battery quantity drops below 1.2 V, as the icon shows or when the
screen flickers.
•If the device has not been used for a long time, remove and put away the battery to prevent
electrolyte leakage from damaging the device.
10.1.2 Wearing the Main Device
Wear the main device on the wrist as a watch, and fasten the wrist belt when the device is properly
positioned, as shown in Figure 1-6.
Figure 1-6 Wearing the main device
CAUTION!
Make sure the wrist belt is neither too loose nor too tight; otherwise normal device operation will be
affected.
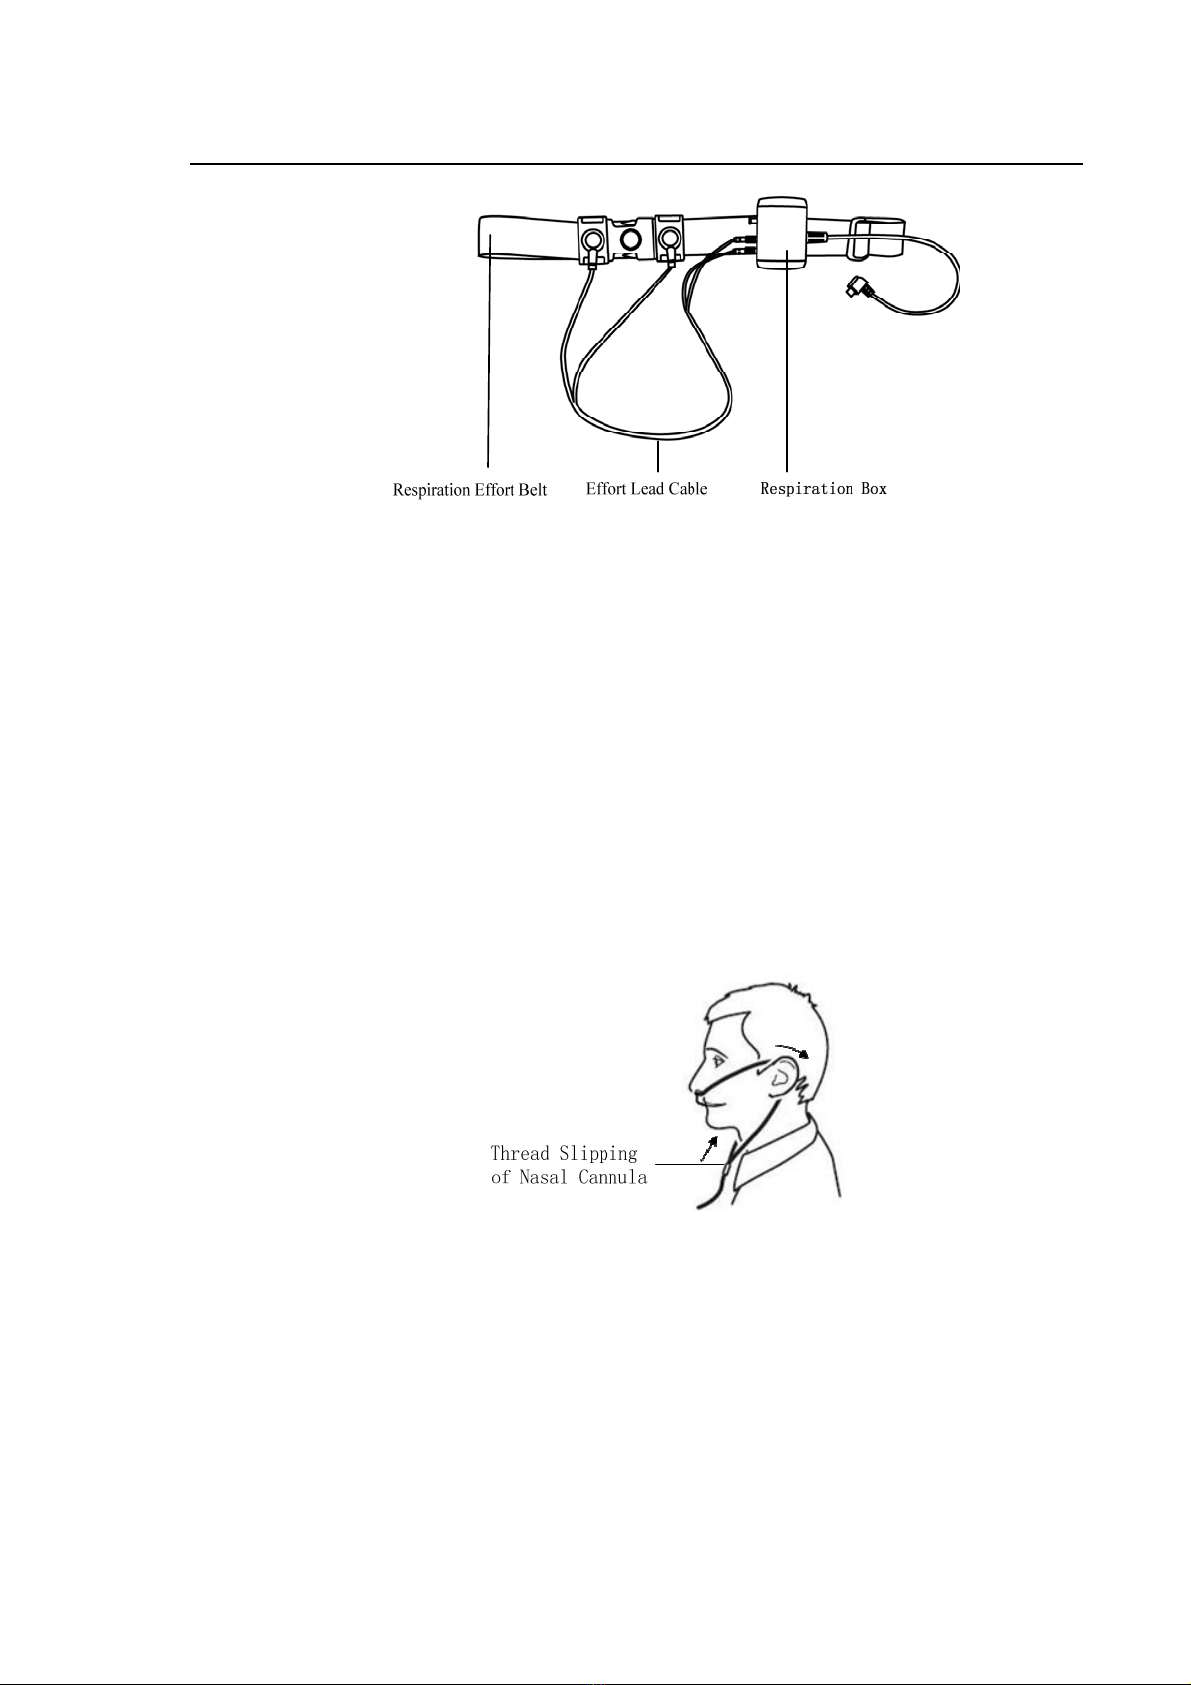
10.1.3 Connecting the Respiration Kit
Connect the respiration kit according to steps 1~3, as shown in Figure 1-7.
YH‐600BProUserManualV1.0
13/49
Figure 1-7 Connecting the respiration kit
Step 1 Connect the effort lead cable and respiration effort belt;
Step 2: Fasten the respiration effort belt around the body;
Step 3 Insert the effort lead cable into the holes of the small respiration box, and hang the respiration kit
on the respiration effort belt.
10.1.4 Wearing the Airflow Cannula
As Figure 1-8 shows, place the two prongs of the cannula in the nostrils, hook the cannula around the
ears, and push the slide fastener upward to fix the cannula on the head. Insert the other end of the
cannula into the air pathway interface of the respiration kit.
Figure 1-8 Wearing the Airflow Cannula
WARNING!
•Please read the attached product literature carefully before using the device and accessories.
•The Airflow Cannula is for one time use only, and only Airflow Cannula with original and intact
packaging should be used.
•Please wear the Airflow Cannula correctly to avoid suffocation.
YH‐600BProUserManualV1.0
14/49
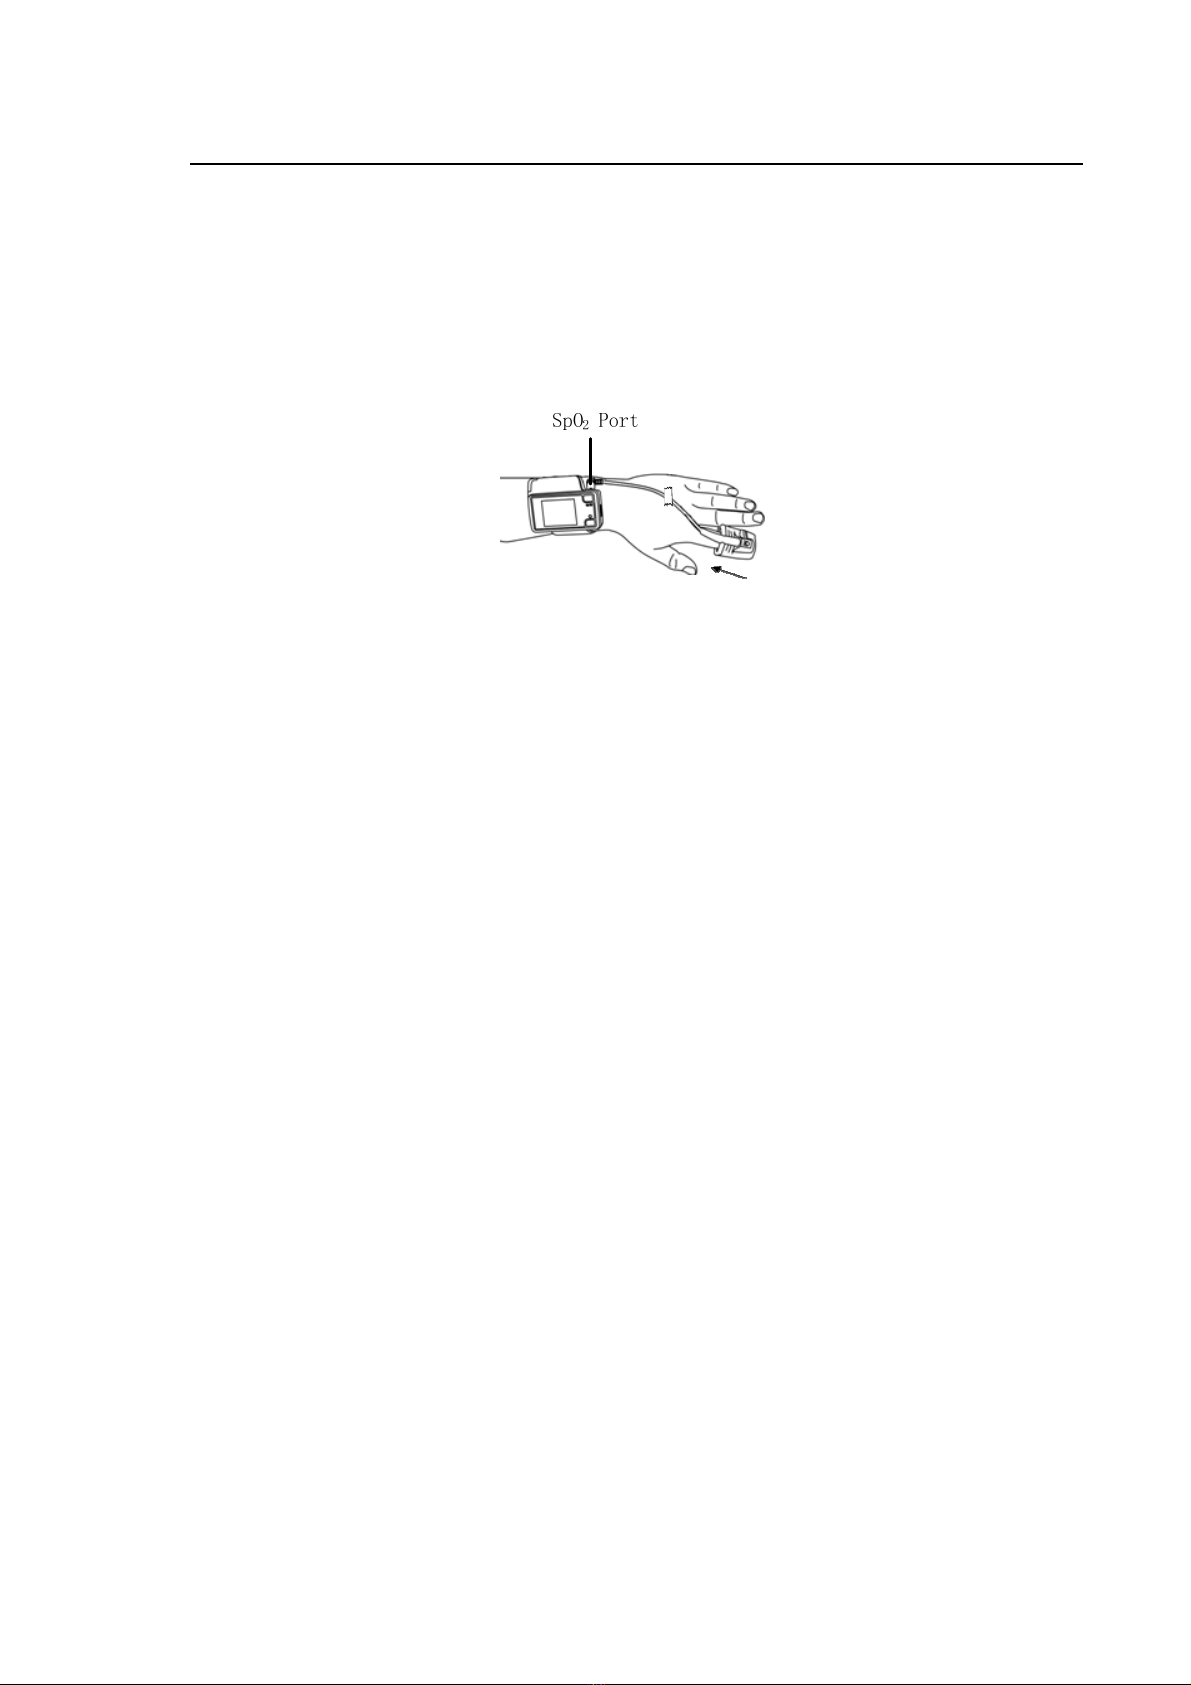
10.1.5 Wearing the Pulse Oximeter Sensor
As Figure 1-9 shows, insert the index finger until it reaches the bottom of the pulse oximeter sensor,
tape the sensor onto the finger, and insert the data connector of the pulse oximeter sensor into the SpO2
port on the top of the main device.
Figure 1-9 Wearing the pulse oximeter sensor
WARNING!
•Change the measured finger regularly according to the patient's conditions after prolonged use. It
must be moved every 8 hours or more often and reapplied to another site according to the user’s
skin integrity and circulatory status.
•Excessive ambient light, excessive motion, use of intravascular dyes, poorly perfused finger,
extreme finger sizes or improper placement may affect the accuracy of the measurement.
•Nail polish or false nails may cause erroneous measurement results.
•Overly low blood pressure, overly low systolic blood pressure, severe anemia, or hypothermia may
cause erroneous measurement results.
•The pulse oximeter sensor is designed for use with this device only.
•Check the compatibility of the device and pulse oximeter sensor before use; otherwise it may
cause injury to the patient.
•A functional tester cannot be used to assess the accuracy of the SpO2measurement result.
•Do not use the pulse oximeter sensor during MRI scanning.
•Do not use a broken pulse oximeter sensor.
•Do not immerse the pulse oximeter sensor in liquid, as it causes short circuit.
•The pulse oximeter sensor may not work on cold extremities due to reduced circulation. Warm or
rub the finger to increase circulation, or reposition the sensor.
•If the pulse oximeter sensor is shared by multi-users, the users may be exposed to the risk of
cross-infection.
•Blood flow must not be impeded during the recording process. The pulse oximeter sensor should
be applied snug and comfortable, but not too tight or subject to any excessive pressure.
10.1.6 Connecting the Main Device with the Respiration Kit
Connect the main device with the respiration kit by inserting the data connector of the kit into the
Flow/COM port on the right side of the device.
10.2 Operation
WARNING!
•Do not smoke when using the device.

YH‐600BProUserManualV1.0
15/49
•Heavy smokers with high carbon monoxide (CO) blood content cannot use YH-600B Pro.
CAUTION!
•The device has no alarm system, and is thus unsuitable for situations that need an alarm system.
•While working, the device should not be directly exposed to airflow sources (e.g. fan), otherwise
the accuracy of airflow monitoring will be affected.
•Do not use the device in nuclear magnetic environments or where there is high electromagnetic
interference.
•If the device performance has unexplainable changes, if water has entered the enclosure, if the
enclosure is broken, or if the device has been dropped from a high place or hand, discontinue use
and contact BMC.
10.2.1 Accessing the Initial Interface
Press and hold the On-Off/OK Button for five seconds, and the initial interface will appear, as
shown in Figure 1-10.
Figure 1-10 Initial interface
CAUTION!
•If the device is not used for a long time, a time setting window will automatically pop up when you
reuse it. Users need to update the date and time according to actual time, then choose “Save and
Exit” to enter the standby interface.
•If the present time displayed on the device is later than the preset record starting time, the device
will immediately begin to record.
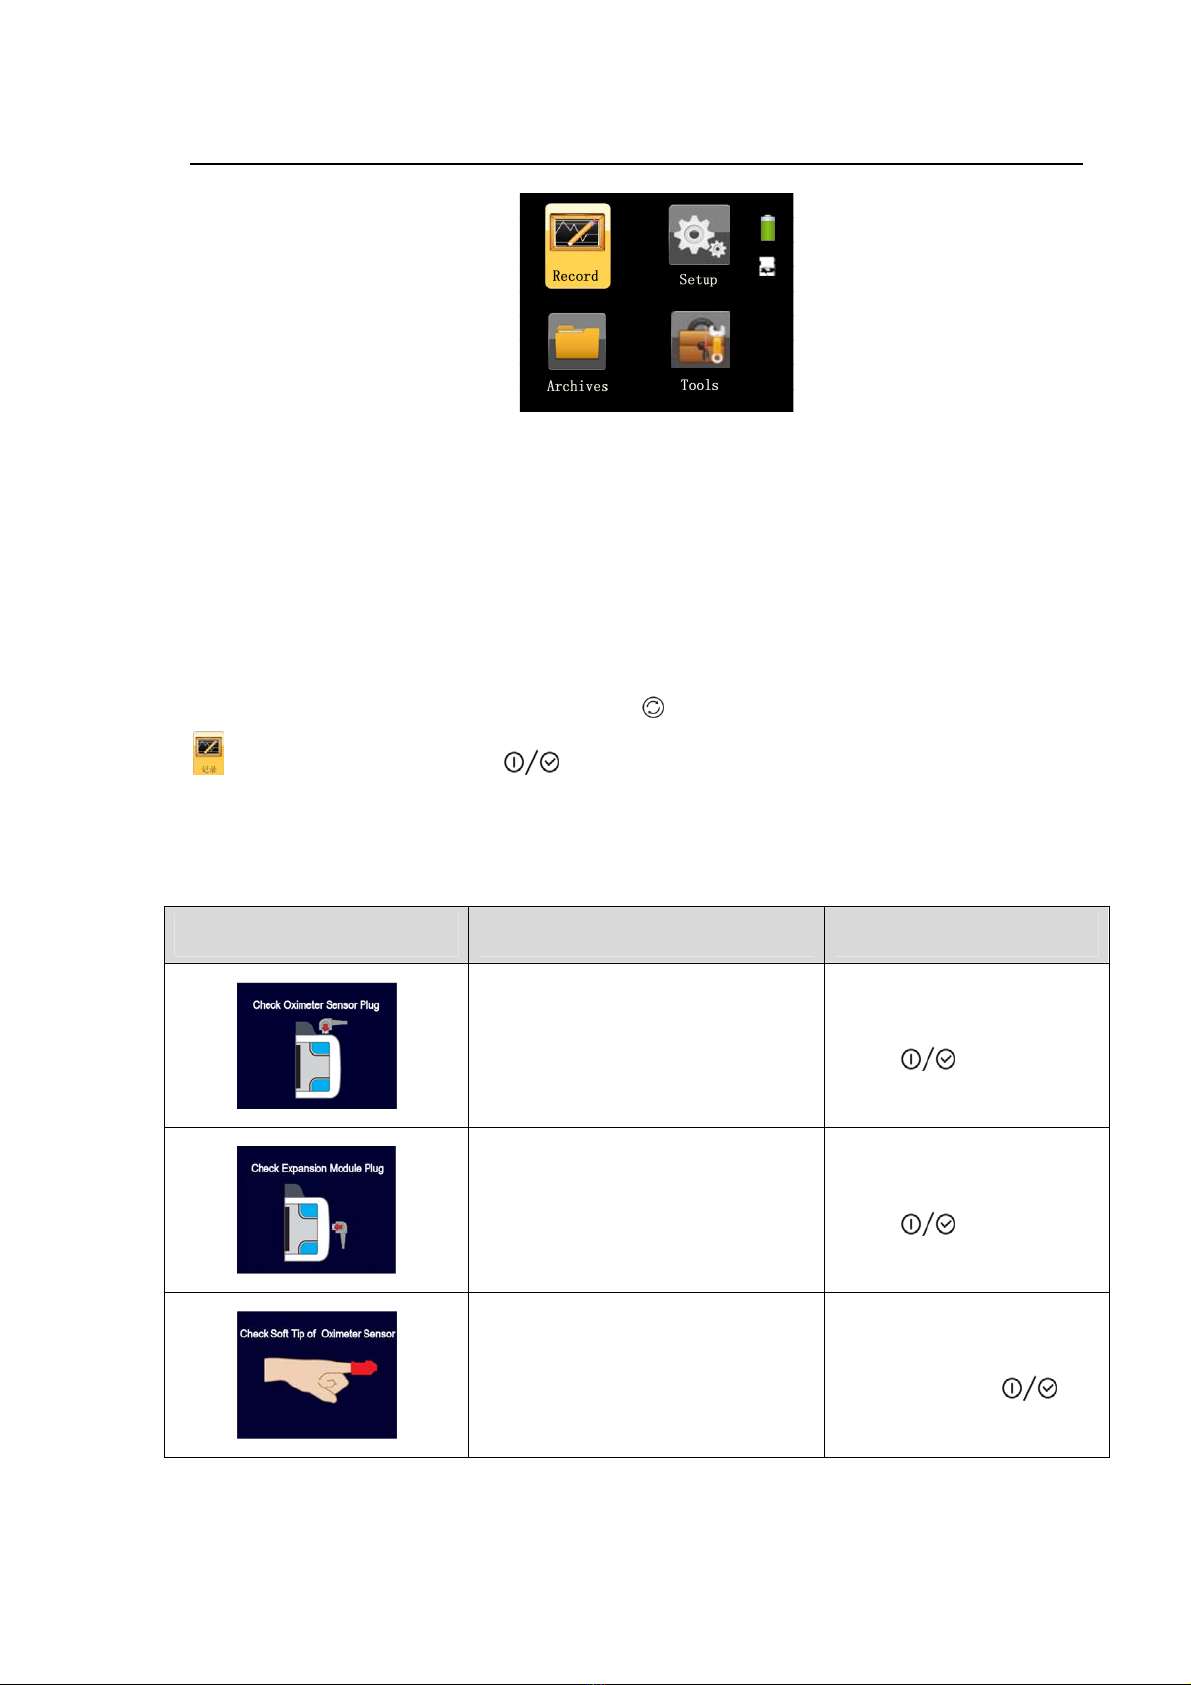
10.2.2 Accessing the Standby Interface
The device automatically enters the standby interface after it is started, as shown in Figure 1-11.
There are six icons in the standby interface: Record , Setup , Archives , Tools ,
Battery and TF card . The yellow frame can switch among the four icons of Record, Setup,
Archives, and Tools, and when it falls on an icon, press the On-Off/OK Button to enter the
corresponding interface. The device can be turned off if the On-Off/OK Button is pressed and
held for five seconds in the standby interface.
YH‐600BProUserManualV1.0
16/49
Figure 1-11 Standby interface
CAUTION!
In all interfaces the screen will dim if there is no operation within the preset screen backlight timeout.
Press any key in five minutes to light up the screen. The device will shut off automatically if there is no
operation for five minutes.10.2.3 Accessing the “Record” Interface
10.2.3.1 Wearing Alert Messages
From the standby interface, press the Shift Button to switch the yellow frame to the “Record” icon
. Press the On-Off/OK Button to enter the “Record” interface. If the device is not worn
properly, a corresponding alert message will appear automatically. See the following Table 1-4 for
detailed information.
Table 1-4 Wearing alert message
Alert Message Causes Alert Removal
When recording starts, the device
cannot detect the SpO2probe
Insert the SpO2probe or
press and hold the On-Off/OK
Button to start
recording compulsorily
When recording starts, the device
cannot detect the expansion module kit
(respiration kit)
Insert the expansion module
kit or press the On-Off/OK
Button to start
recording compulsorily
When recording starts, the device can
detect the SpO2probe, but fails to
collect SpO2information
Wear the SpO2finger cot
properly or long-press the
On-Off/OK Button to
start recording compulsorily
Other manuals for YH-600B Pro
2
Table of contents
Other BMC Diagnostic Equipment manuals


