BMV BestScan S10 User manual

IMPORTANT!
Read and understand this manual before operating
the equipment. After reading, keep this manual in
an easily accessible place.
P12529‐‐17 10/2019
Copyright 2019 by BMV Technology Co., Ltd
All rights reserved.
BestScan® S10
Ultrasound System

Contents
Statement................................................................................................................................... 1
Preface........................................................................................................................................ 2
Chapter 1: Getting Started..........................................................................................................5
About the system....................................................................................................................5
Main Unit................................................................................................................................ 7
Screen layout.......................................................................................................................... 8
Software..................................................................................................................................9
Preparing the system............................................................................................................ 12
Preparing transducers...........................................................................................................13
Intended uses........................................................................................................................13
Chapter 2: System Setup...........................................................................................................14
Operating System..................................................................................................................14
Software Updates................................................................................................................. 14
Charging................................................................................................................................ 14
Goggles..................................................................................................................................15
Chapter 3: Go Imaging.............................................................................................................. 17
Image Adjustment.................................................................................................................17
Imaging modes......................................................................................................................17
Freeze Menu......................................................................................................................... 25
Cine and image......................................................................................................................31
Patient information...............................................................................................................31
Thumbnail image.................................................................................................................. 32
Settings..................................................................................................................................33
Chapter 4: Troubleshooting and Maintenance........................................................................ 37
Chapter 5: Specifications.......................................................................................................... 42
Chapter 6: Accessories..............................................................................................................44

1
Statement
This BestScan® S10 Ultrasound System User Guide provides information on preparing and using the BestScan® S10
ultrasound system and on cleaning and disinfecting the system and transducers. It also provides system
specifications, and safety and acoustic output information.
BMV reserves the right of final interpretation to this Manual.
The content of this Manual is subject to change without prior notice.
Only if the following requirements are met, BMV will be responsible for the safety, reliability and performance of
the product, i.e.:
Assembly, expansion, re‐adjustment, improvement and repair should only be performed by qualified
personnel approved by BMV;
All the replaced parts and supported accessories and consumables relate to the maintenance shall be
originally from BMV or others approved by BMV;
DO NOT make changes or modifications to the software or hardware of this system
The electrical equipment complies with relevant standards and the requirements of this Manual;
The product is operated in accordance with this Manual.
Conventions
The user guide follows these conventions:
• A WARNING describes precautions necessary to prevent injury or loss of life.
• A Caution describes precautions necessary to protect the products.
• Numbered steps in procedures must be performed in order.
• Items in bulleted lists do not require a sequence.

2
Preface
Notice
This User Manual is the necessary instructions for the safe use of this product. This Manual introduces the use,
properties, method of operation, safety information and intended use of the BestScan® ultrasound system in
details. Before using the product, please carefully read and understand the contents of this Manual, and abide by
the method of operation stated in this Manual in order to ensure the safety of Animal patients and operators.
This User Manual is a major component of the product, and should always be placed near the product for easy
reference.
Object of Application
The user guide is for a reader familiar with ultrasound techniques. It does not provide training in sonography or
clinical practices. Before using the system, you must have ultrasound training. See the applicable BMV accessory
user guide for information on using accessories and peripherals. See the manufacturer’s instructions for specific
information about peripherals.
Illustration
All the illustrations in this user Manual are for reference only. The menus, settings and parameters of the
illustrations may be different from your actual currently use system. The content varies depending on the software
version, preset settings and optional configuration.
Customer comments
Questions and comments are encouraged. BMV is interested in your feedback regarding the system and the
user guide.
Please call BMV at +86‐755‐26564580 in the China. Outside the China, call the nearest BMV representative. You ca
n also e‐mail BMV at sales@bmv.cc
For technical support, please contact BMV as follows:
BMV Technical Support
Phone(China ):+86‐755‐26564580
Phone(Outside China): +8613500002887,Or call your
local representative.
Fax:+86‐755‐26564580 ext 886
E‐mail:sales@bmv.cc
Web site: www.bmv.cc
Click Resources > Support& Service.
Distributors contact details can be found at
www.bmv.cc

3
Warranty
The BestScan®S10 system includes 2 years
from shipment, the probes warranty period is
1 year from shipment. BMV does not warrant
against normal wear and tear, nor damage
caused by accident or abuse. Lifetime
warranty is available on request.
To purchase extended warranty programs, go
to www.BMV.cc/contact‐us and contact BMV.
THIS WARRANTY IS EXCLUSIVE AND IS IN LIEU
OF ALL OTHER WARRANTIES, EXPRESSED OR
IMPLIED, INCLUDING WARRANTIES OF
MERCHANTABILITY OR FITNESS FOR ANY
PARTICULAR PURPOSE.
Exemptions
BMV's obligation or liability under this
warranty does not include any transportation
or other charges or liability for direct, indirect
or consequential damages or delay resulting
from the improper use or application of the
product or the use of parts or accessories not
approved by BMV or repairs by people other
than BMV authorized personnel.
This warranty shall not extend to:
•Malfunction or damage caused by improper
use or man-made failure.
•Malfunction or damage caused by unstable
or out-of-range power input.
•Malfunction or damage caused by force
majeure such as fire and earthquake.
•Malfunction or damage caused by improper
operation or repair by unqualified or
unauthorized service people.
•Malfunction of the instrument or part
whose serial number is not legible enough.
•Others not caused by instrument or part
itself.
Product and Model Code
S9/S10 □
NOTE:
The functions described in the basic user
manual may vary depending upon the specific
system you purchased.
Model Code:
S9: 2D ultrasound, International Sales
S10: Color Doppler ultrasound,International
Sales
S9 Plus/ S10 Plus: Reserved
Product code:
RL: Rectal convex scanner, 128 elements
RC: Rectal linear scanner, 128 elements
Dimensions and Weight
Main unit external dimensions:
185mm (L) × 80 mm (W) × 35mm (H)
System weight: 650g (including batteries,
without power adapter)
Goggles Dimensions:
257mm(L)×215mm (W) × 75mm (H)
Goggles weight:370g (without accessories)
Product code.
Mode code.

4
Symbols
This system may uses the symbols listed in the following table, and their meanings are explained
as well.
No.
symbol
Description
1
Type‐BF applied part
2
Caution!
3
General warning sign (Background color: yellow).
4
USB port
5
Battery
6
Please refer to the instruction manual
7
Serial Number
8
Manufacture date
9
Manufacture information
10
This product is provided with a CE marking in accordance with the
regulations stated in Council Directive 93 / 42 / EEC concerning
Medical Devices. The number adjacent to the CE marking (0123) is the
number of the EU‐notified body certified for meeting the
requirements of the Directive.
11
Control Panel
Operator‐system interface or control.
12
Power input
Connect power adapter

5
Chapter 1: Getting Started
About the system
The BestScan® S10 ultrasound system is a
portable, general purpose, software
controlled, diagnostic ultrasound system used
to acquire and display high‐resolution,
real‐time ultrasound dat a through a COTS
(commercial off‐the‐shelf) Android™ device or
Apple iOS(Revised). The BestScan® S10
ultrasound system series of wireless scanners
are Wi‐Fi‐based scanners that communicate
with a traditional tablet/smartphone via
direct Wi‐Fi to allow users to export
ultrasound images and display in different
modes of operation. The scanner houses a
battery and power generator, multichannel
beamformer, prescan converter and Wi‐Fi
components. The battery is internally
installed and comes with a charger.
Indications for Use
The BMV Ultrasound Scanner is a
software‐based ultrasound imaging system
and accessories intended for use in
bovine/equine/Ovine Imaging of farm
Conditions on the general public.
The BestScan®S10 digital ultrasound
diagnostic system supports the following
application:
• Bovine
• Equine
• Ovine
Basic steps
1 Turn the system on. Now BMV Scanner is on
standby waiting for the BMV Ultrasound App to
start.
2 Start the BMV Ultrasound App.
3 Tap Animal Patient, and complete the patient
information form.
4 Select the type of examination you want to
perform.
5 Tap Mode and select an imaging mode.
System features
The fixed high resolution broadband
probe supports a wide application range
from magnified superficial study to deep
penetration pregnancy work;
Easily cleaned; all component parts can
be wiped down to clean;
12 hours continuous use from external
rechargeable battery and even longer
using the power bank;
Lightweight unit for less strain;
The image may be viewed on a choice of
displays;
Images may be stored, for later review.
Stored images may be uploaded to
computer/cloud(reserved) via wifi,
Bluetooth, USB or printed with optional
accessories.
Workflow: Point‐and‐Shoot BestScan®
S10 with simplified workflow with
focused on‐farm animal exams, is almost
as easy to use as the camera on your
smart phone. You don't have to make
adjustments unless you want to.

6
System Configuration
Standard Configuration
Main unit(including probe, battery and dock)
Accessories
Basic user manuals
Belt for S10 main unit
Power adapter and connecting cable
Carrying case
Options
Probes Available
Probe
model
Type
Intended Use
Region Applied
C5‐2
Rectal curve
Reproduction
Transvaginal
L11‐4
Rectal linear
Reproduction
Transvaginal
Other Options
No.
Item
1
Video Converter (HDMI to VGA+S‐Video)
2
Smart Device(Android or iOS)
3
Remote Viewing Display
4
Power bank
7
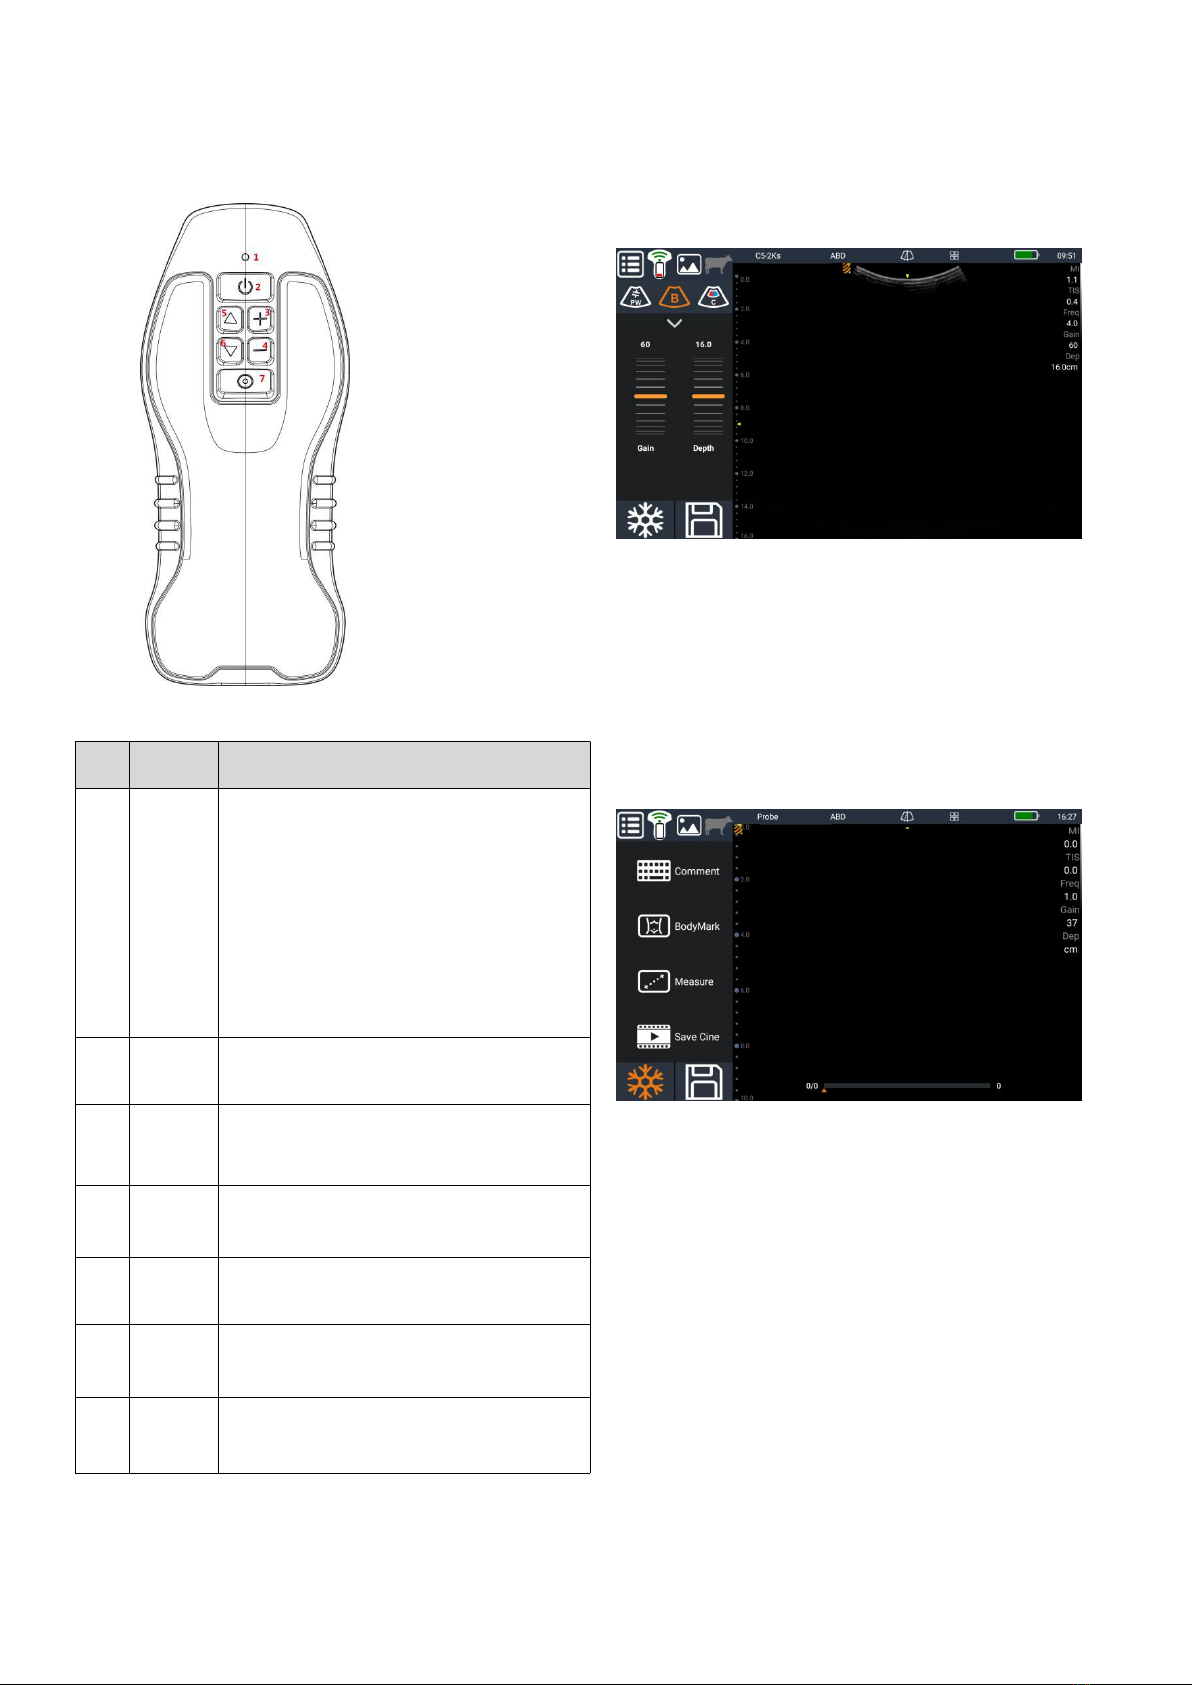
Main Unit
Adjusting gain and depth using the scanner buttons
In live scanning, pressing “Gain+” button will increase
the Gain of image; and pressing “Gain‐” button will
decrease the Gain of image.
In live scanning Pressing “Depth+” button will increase
the depth of image; and Pressing “Depth‐” button will
decrease the depth of image.
Freeze or unfreeze images using the scanner buttons
In live scanning, short pressing “Power Button” will
freeze image; and in freeze status, short pressing
“Power Button” will unfreeze image and return to
living scanning.
NO
.
Item
Description
1
Light
Blue light:
Turn on: Light is flashing quickly
Freeze: Light is flashing slowly
Live scanning: Light is on
Turn off: Light is off
Green light:
Charging: Light is flashing
Charging finished:Light is off
2
Power
button
Long press: Turn on/off the system
Short press: Freeze or unfreeze the image
3
Gain+
button
In Gain/Depth menu: to increase Gain
In parameter menu: to increase the parameter
4
Gain‐
button
In Gain/Depth menu: to decrease Gain
In parameter menu: to decrease the parameter
5
Main
button
Long press: One touch Optimize (Reversed)
Short press: Image mode selection
6
Depth+
button
In Gain/Depth menu: to increase Depth
In parameter menu: to up parameter menu
7
Depth‐
button
In Gain/Depth menu: to decrease Depth
In parameter menu: to down parameter menu

8
Screen layout
NO.
Item
Description
1
Setting
Probe information
Exam list
Preset
Exit
2
Main unit
Press it for wifi connect menu
Wifi connect status: when not connected to gray, after the
connection is Green.
Main unit battery level: After the success of the probe connection,
displays the battery of system
3
Thumbnial
Press it for thumbnail
4
Animal patient
Press it for patient information menu
5
Probe Type
The mode of probe: When the connection is successful according to
the current use of probe type, such as C5‐2Ks
6
Exam Type
Select the exam type: Connect the current type of inspection, such as
the abdomen, etc
7
Guide Line
For puncture (reserved)
8
Battery
Smart device battery level: Show the current terminal display device
9
Time
Scanning time
10
Comment Button
Annotation capabilities into the key

9
11
Body mark Button
For body mark
12
Measure Button
Measuring function into the keys
13
Save Cine
More consecutive frames image storage
14
Freeze Button
Freeze/thaw on the current active window for operation.
15
Save Image
It is effective for implementing scan status and freeze status, and
clicking to save the current single frame image.
16
Depth Scale
Real‐time display depth scale.
17
Gray Scale
Grayscale level display bar.
18
List of parameters
When the instrument is working, the specific working status and
parameters are shown here.
19
Cine bar
The information of Cine
The concept of the BMV Ultrasound Scanner scanners and software is primarily to provide an easy to use,
high‐performance, low‐cost, ultrasound platform for teaching and clinical applications.
Software
Method 1:
If the “BMV Go Scan” App is not installed in your mobile Android device, open the QR code software to scan
below QR code , when the App comes, it is free to install the App.
Method 2:
Download the App software from website http://www.bmv‐vet.com/en/bmv‐go‐scan

10
1. Transfer the App software to your tablet or phone.
2. Open your tablet or phone, click “file”‐ “ internal storage” then install the APP “BMV Go Scan” software
Installation:
1. Download the software to the smart device.
2. Install the software on the smart device following the required steps.
3. Now the APP is ready for scanning.
WARNING:
1. Before installation, please check the operating system to satisfy the requirement of the
system running environment of the version.
2. Before installation, ensure that the storage space is enough.
3. If the installation package can't open the right, may be downloaded files are damaged, the
data error.Please delete after a specified website to download again.
4. The installation process, the user must agree to the installation of the system required
permissions.
5. After the success of the installation, if the application is not open properly, please uninstall
and reinstall the software..
6. Ensure SMS, phone calls, and other features closed, to prevent the application of
interference.
7. For the first time after installation, in view of the running environment is different, the
application runtime related authorization request, users must agree to the request
application, refused permission application may lead to partial function of application
software can't normal use.Than, for example: the Android 6.0 system, have not agreed to
"location service" application will lead to the probe hot WiFi cannot get normally.
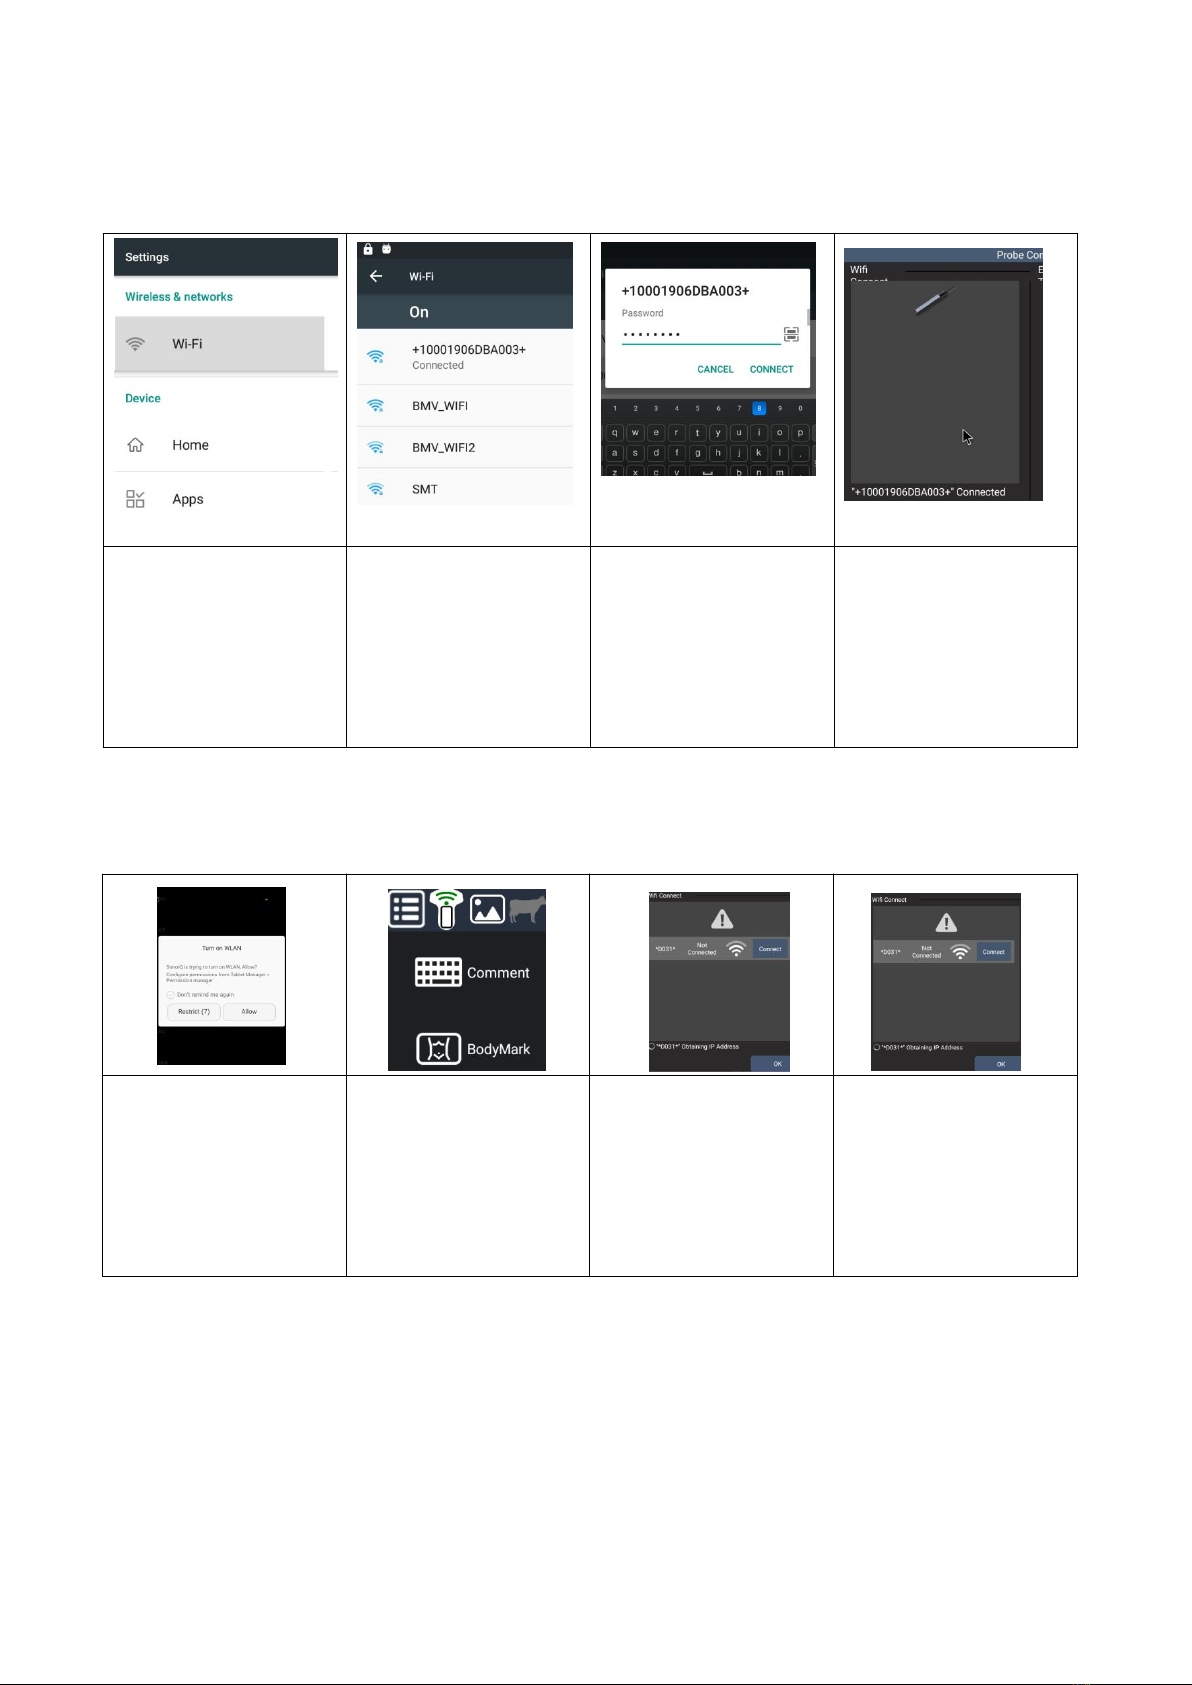
11
To activate the scanner with smart devices (Tablet, Phone and Goggles), ensure that the scanner is charged.
This way of connection is suggested.
To activate the scanner with smart device, ensure that the scanner is charged. As the version of tablet, phone is
various, if it fails to connect by below steps, try to connect by the first way.
1. Press “Power Button”
to switch on the scanner.
Press “Setting” on the
smart device. Then to
link the Wifi from S10.
2.Click the wifi ID of S10
scanner, each scanner
has an ID, but similar
as“ +1001906DBA003+”.
3.Input the password
“ 12345678” to connect
the smart device to S10
scanner.
4.Open the S10 scanner
APP on smart device.
S10 is connected and
ready for scanning
1.Press “Power Button”
to switch on the scanner.
Open app on the smart
device. The app will
request to connect to the
internet, Click Allow.
2.Click “ Probe status“ on
the Top of menu to
enter the “wifi Connect”
menu.
3.Select the right probe
and click “ Connect “ to
connect the probe to
smart devices.
4.After the probe
connected to smart
device, click OK to begin
scanning

12
Preparing the system
Display devices
Smart device (tablet, phone)
Goggles
The battery
Using AC power and charging the system
The battery charges when the system is connected to the AC power supply. A fully discharged battery recharges
in less than five hours.
The system can run on AC power and charge the battery if AC power is connected to the system.
The system can run on battery power for up to 12 hours, depending on the imaging mode and the WIFI
intensity. When running on battery power, the system may not restart if the battery is low. To continue, connect
the system to AC power.
WARNING:
If users in the United States connect the adaptor to a 240V supply system, the equipment shall be
connected to a center‐tapped single phase supply circuit.
Turning the system on or off
Before you begin using the BMV Ultrasound Scanner, make sure you have the scanner, and also your smart device
with the BMV Ultrasound App installed on it.
Battery manufacturer
Shenzhen BoLiMei Co., Ltd Produced for BMV
Model number
TT3845
Technological characteristics
7.4V/4000mAh
Battery chemistry
Li‐ion
Battery management
JEITA guideline compatible charger, in‐pack fuel gauge with
protection circuitry, cell balancing, and temperature monitoring
Battery life
500 ‐ 1000 discharge cycles before reduction in charge
WARNING:
To avoid data loss and to conduct a safe system shutdown, always keep a battery in the
system.

13
To turn on the system:
• Power on the system
• Open the BMV Ultrasound App by swiping the screen up.
• Connect from the Wi‐Fi.
Turn off the system on the opposite routine. If you close the BMV Ultrasound App without ending the exam, the
system pauses the exam. Press the power switch.
WARNING:
In order to ensure the safety of the probe, work effectively, the need for daily
inspection. Once the check to the abnormal situation, should immediately close the
probe and contact with the service representative. If the probe will cause abnormal use
of examination results is not accurate and even harm the patient and damage the probe
itself.
To open the BMV Ultrasound App on your smart device:
Go to your smart device’s home screen and tap . The BMV Ultrasound App opens to the sign‐in screen.
Exiting the BMV Ultrasound App
To wake up the system:
To conserve battery life while the system is on, the system goes into sleep mode if scanning for a preset time.
Preparing transducers
WARNING:
While every attempt has been made to make the probe as rugged as possible the crystal
array remains vulnerable and should be protected from knocks. Even a small knock against
a hard object can cause damage to the probe elements situated behind the thin rubber
coating on the probe face. The probe has a protective sheath covering the length of cable
subject to greatest wear and flexing. Any damage to this sheath or the rest of the cable
should be repaired before further use to prevent moisture ingress that will rapidly damage
the probe. The probe should be checked regularly for such damage.
Intended uses
The system transmits ultrasound energy into various parts of the veterinary patient’s body to obtain ultrasound
images as follows.
Obstetrical Imaging Applications:
You can assess the fetal anatomy, viability, estimated fetal weight, gestational age, amniotic fluid, and
surrounding anatomical structures.
Gynecology and Infertility Imaging Applications:
You can assess the uterus, ovaries, adnexa, and surrounding anatomical structures.
14
Chapter 2: System Setup
The setup pages let you customize the system and set preferences.
Operating System
Using the BMV Ultrasound Scanner on a smart device with Android™ and Apple IOS.
Note: Performance of WIFI varies by model.
• Access to user documentation is dependent on the proper download and installation of the BMV
Ultrasound Scanner on your smart device.
• Using a smart device that is too small may not have the necessary resolution for viewing small
structures.
Updating the BMV Ultrasound Scanner
Software Updates
For software updates, contact BMV or distributor for new software.
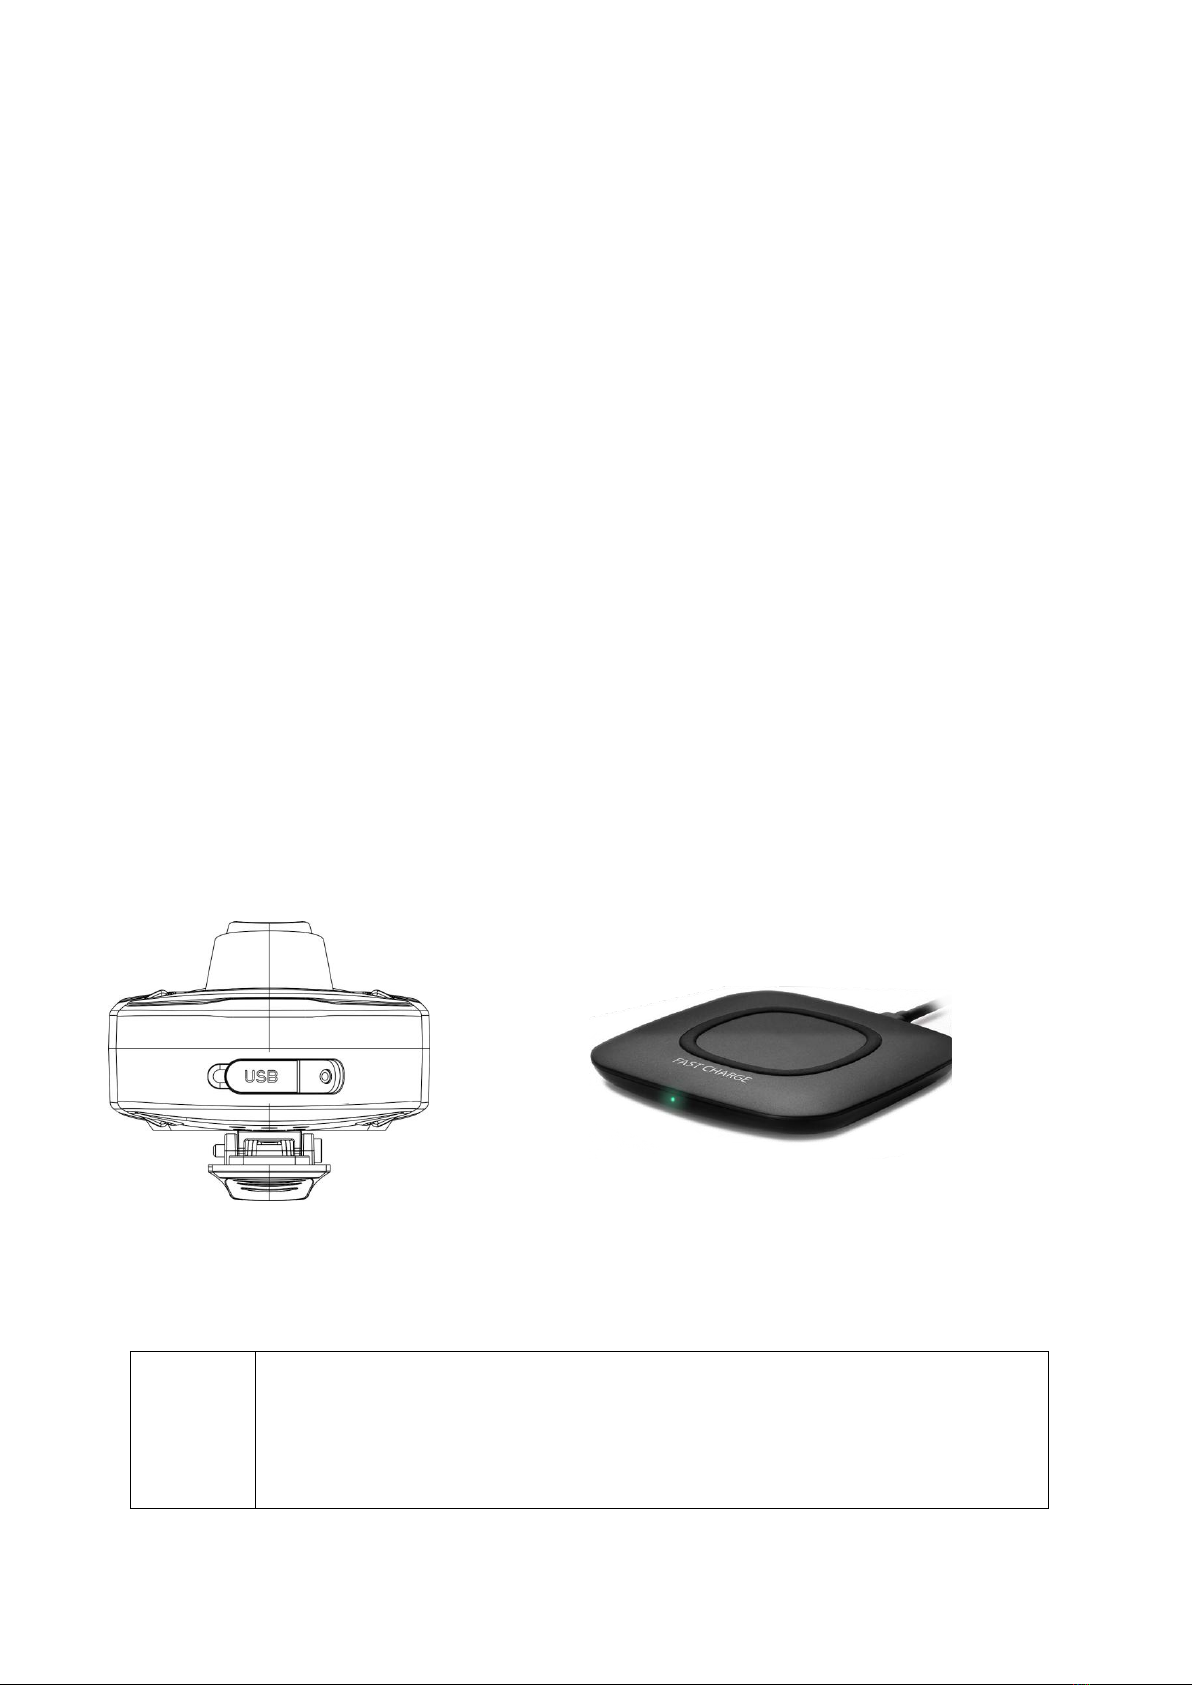
Charging
The battery can be charged with an adaptor type‐C port. It can also be charged with wireless charger.
WARNING:
A full discharged battery should be fully charged within 5 hours. While in a good condition,
the battery run time will be 12hours (assuming 50% idle time between scans).
Electrical connection to the power pack is through the gold pads on battery and scanner.
Power pack output is protected but care should be taken to prevent short circuiting the
gold connector pins and pads.
Type‐C interface: External adapter
power supply. for connecting the
power adapter to charge.
Wireless charger: Put S10 system
flat on the wireless charger. The
light on the charger is on.

15
Goggles
I-Scan Goggles could be used while charged with a
power bank
I-Scan Goggles Menu
I-Scan Goggles wearing
Put the strap in a comfortable Position
Adjust the roller to enlarge the strap
Adjust the roller at the back for comfortable wearing
Power
button
Long press to power on/off the device
Volume
button
Press to up/ down volume
Return key
Press to return to last menu
Headphone
port
The port for headphone
Micro USB
port
The port for charging and export the
images
Notice:
Please wear I‐Scan in a safe place without
obstacle.
Please do not wear I‐Scan when driving or
doing any potential safety hazard.

16
Touch pad on I-Scan Goggles
I‐Scan Goggles could be controlled by the touch pad
on side of Goggles.
Bluetooth controller for I-Scan Goggles
Maintenance
I‐Scan Goggles could be controlled by the touch
pad on side of Goggles
Slide
Select menu
Click
Confirm
TP touch
screen
Slide to select menu
Click to confirm
Return
button
To return to last menu
Power
light
The light is on when power on the
controller
Power
button
To power on/ off the controller
When using, keep your hand clean and
avoid dust on the device and not touch the
mask with hand. Wipe the device with fiber
cloth in the box.

17
Chapter 3: Go Imaging
Image Adjustment
Before optimizing the image by adjusting image parameters, adjust the brightness and contrast of the monitor to
the best.
Imaging modes
Imaging modes available depend on the transducer and exam type.
2D imaging
2D is the systemʹs default imaging mode. The system displays echoes in two dimensions by assigning a brightness
level based on the echo signal amplitude. To achieve the best image quality, properly adjust the screen brightness,
gain, depth, and viewing angle. Also, use a suitable optimization setting and exam type.
To display the 2D image
• Turn on the system.
• Tap B/M Mode to select the image mode
• Adjust the image as needed.
Intension
Action
To modify the brightness
Adjust gain
Adjust TGC
Adjust AP (do try to adjust gain first before increasing the
acoustic power)
To modify gray scale image effect
Adjust DR
Adjust Gray Map
Adjust Persistence
To increase frame rate of gray scale
imaging
Decrease depth
Decrease the Focus Pos in B mode
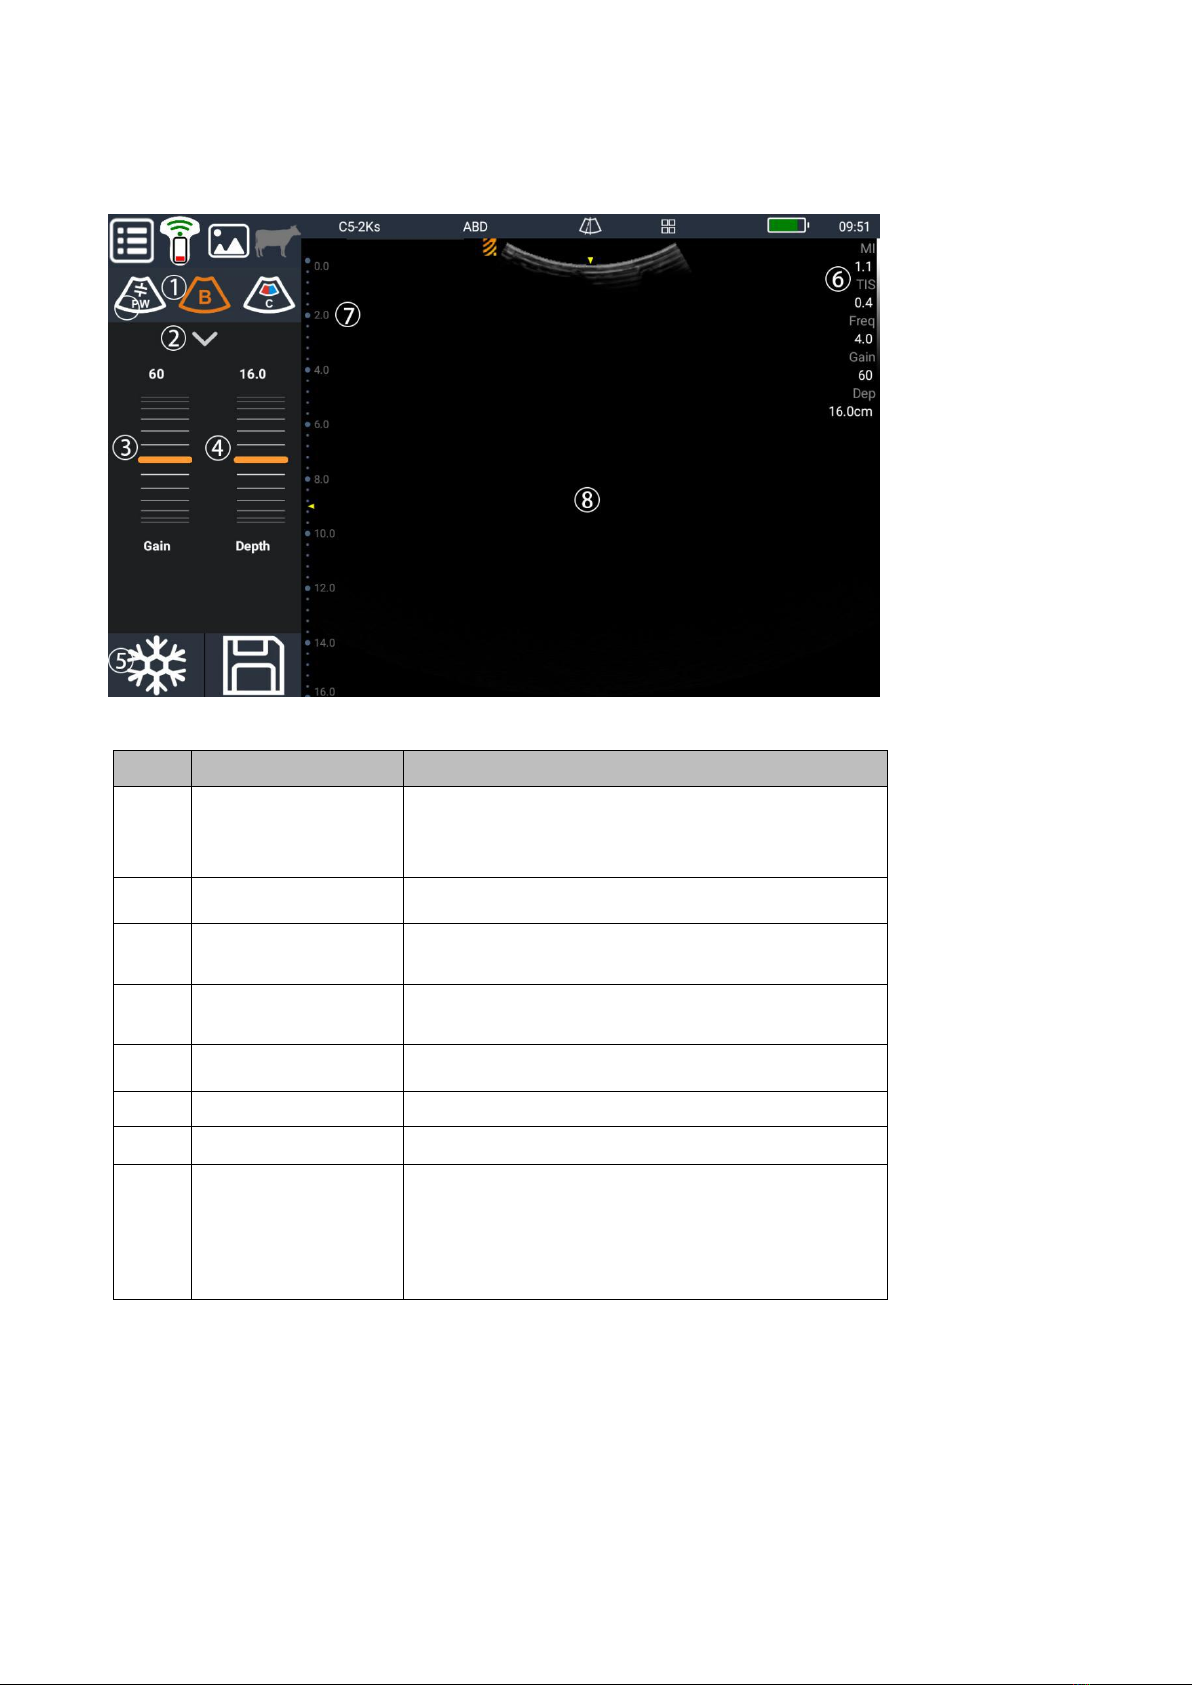
18
Live scanning with B mode
More parameter adjusting: Press Title to decrease the related parameter; Press the Number to increase the
parameter. Press either Title or Parameter to change the On or Off status.
No.
Item
Description
1
Image mode
B/M Mode:When you enter the software interface,
the default mode is B, and you can switch to M mode
by clicking the B icon again.
2
Parameter
For more parameter adjusting
3
Gain adjusting
Up‐and‐down sliding Virtual Roller Adjustment gain
4
Depth adjusting
Up‐and‐down sliding Virtual Roller Adjustment depth
5
Freeze button
To freeze or unfreeze the image
6
Scanning parameter
The setting parameters when scanning
7
Focus
Adjustable focus area, according to different depth
8
Image display area
Display image and direction of each probe mode
identification, time line (M mode), the axis (including
depth axis, time axis), and a gray scale display
comments, measurement, and other information
This manual suits for next models
3
Table of contents
Other BMV Diagnostic Equipment manuals


