Body Craft F760 PRO User manual

F760v1.3
1
LinearLegPress/HackSquat
F760PRO
Owner’sManual
BaseSerialNumber: _____________
PurchasedDate:___/___/______
Dealer’sName:__________________________
Pleaseregisteryourproductsat:
https://www.bodycraft.com/product-registration/
OpenyourCamera
Appandpointitat
theQRCode
Toseein
FULLCOLOR
&additionalinformation,
scanthisQRcode.

CongratulationsandWelcometotheBODYCRAFTFamily
ThankyouforselectingBODYCRAFT.Yourchoicereflectsawiseinvestmentinyouandyour
facility.Wehopeyouuseitformanyhealthyyears!
BODYCRAFToffersacompletearrayofhigh-qualityfitnessequipment.Pleaserefertoourwebsiteat
www.bodycraft.comtoviewmorewaystoenhanceyourlifestyle.
YourBODYCRAFTmachinehasallthequalityanddesignelementstomakeyourworkoutextremelyefficient
andcomfortable.Yournewunitisaseriousstrengthtrainingmachinethatwillkeepyoumotivated,
challengedandwithinreachofyourfitnessgoals.Strength&cardiovasculartrainingisvitalforallageswhich
willprovideaneffectiveworkout,producingresultsthatwillencourageyoutoreachyourfitnessgoalsand
maintainthebodyyouhavealwayswanted.
Spending15to30minutesaday,threetimesaweek,isallyouneedtostartseeingthebenefitsof
aregularexerciseprogram.
Asapremiumexerciseequipmentmanufacturer,wearecommittedtoyourcompletesatisfaction.Ifyou
havequestions,suggestionsorfindmissingordamagedparts,weguaranteeyourcompletesatisfaction
throughourauthorizeddealernetworkorbycontactingusdirectly.Pleasecallyourlocaldealeror
BODYCRAFT.
BODYCRAFT(adivisionofRecreationSupply,Inc.)
7699GreenMeadowsDr.
LewisCenter,OH43035
Phone:800-990-55569am-5pmEST Email: service@bodycraft.com
Proofofpurchasemustbesuppliedtovalidatewarrantyandtheproductmusthavebeen
registeredwithBODYCRAFTviaonlineat www.bodycraft.comorbycalling800-990-5556
or 740-965-2442M-F9a.m.-5p.m.EST.
Forpartsorders,owner’smanuals,software
updatefiles,exerciseguidesandcontact
informationscanthisQRcode.
Orgoto:
https://www.bodycraft.com/customer-support

ProductSafetyInformation
Product Safety ……………………………………………………………...
ImportantNotes,RecommendedTools&Cleaners……………………..
WarningLabels,Maintenance Schedule-Details……………….………..
WarningLabels,Maintenance Schedule-Placements……………………,.
ProductOverview
Machine&ShippingDimensionsw/WeightCapacities……………………
AssemblyPartsList …………………………………………………………
AssemblyPartsHardware…………………………………………………..
ProductAssembly-HowtoAssembletoF760LegPress/HackSquat
PreAssembly Tips ………………………………………………………....
STEP1athruSTEP5d -MainAssemblyProcedures…………………...
STEP6-FinalAssemblyCleanUp,Polish &DoubleChecks ……….
Maintenance&Repairs
DetailedPartsList.………….……………………………………….……..
PartsExplodedView .………………………………….……………………
Strength Maintenance&RoutineSchedule………………………….…
Strength Maintenance-Lubrication………………….……………………
Required InfoBEFOREInitiating aService Case………………………
Warranty
Product Warranty ..........................................................….……...……...
Product Warranty Registration............................................….….……...
Contact UsInformation……………………………………………………..
3
TableofContents
NOTE:WhenyouhavedownloadedtheOwner’sManualintoaPDFreader,godirectly
tothedesiredpagebytouchinganywordsinthisTableofContents.
Page
4
5
6
7
8
9
10
11
12-19
20
21-22
23-24
25
26
27
28
29
30

Thereisariskassumedbyindividualswhousethistypeofequipment.
Amoment’slackofattentioncanresultinanaccident,ascanfailureto
observecertainsimplesafetyprecautions.
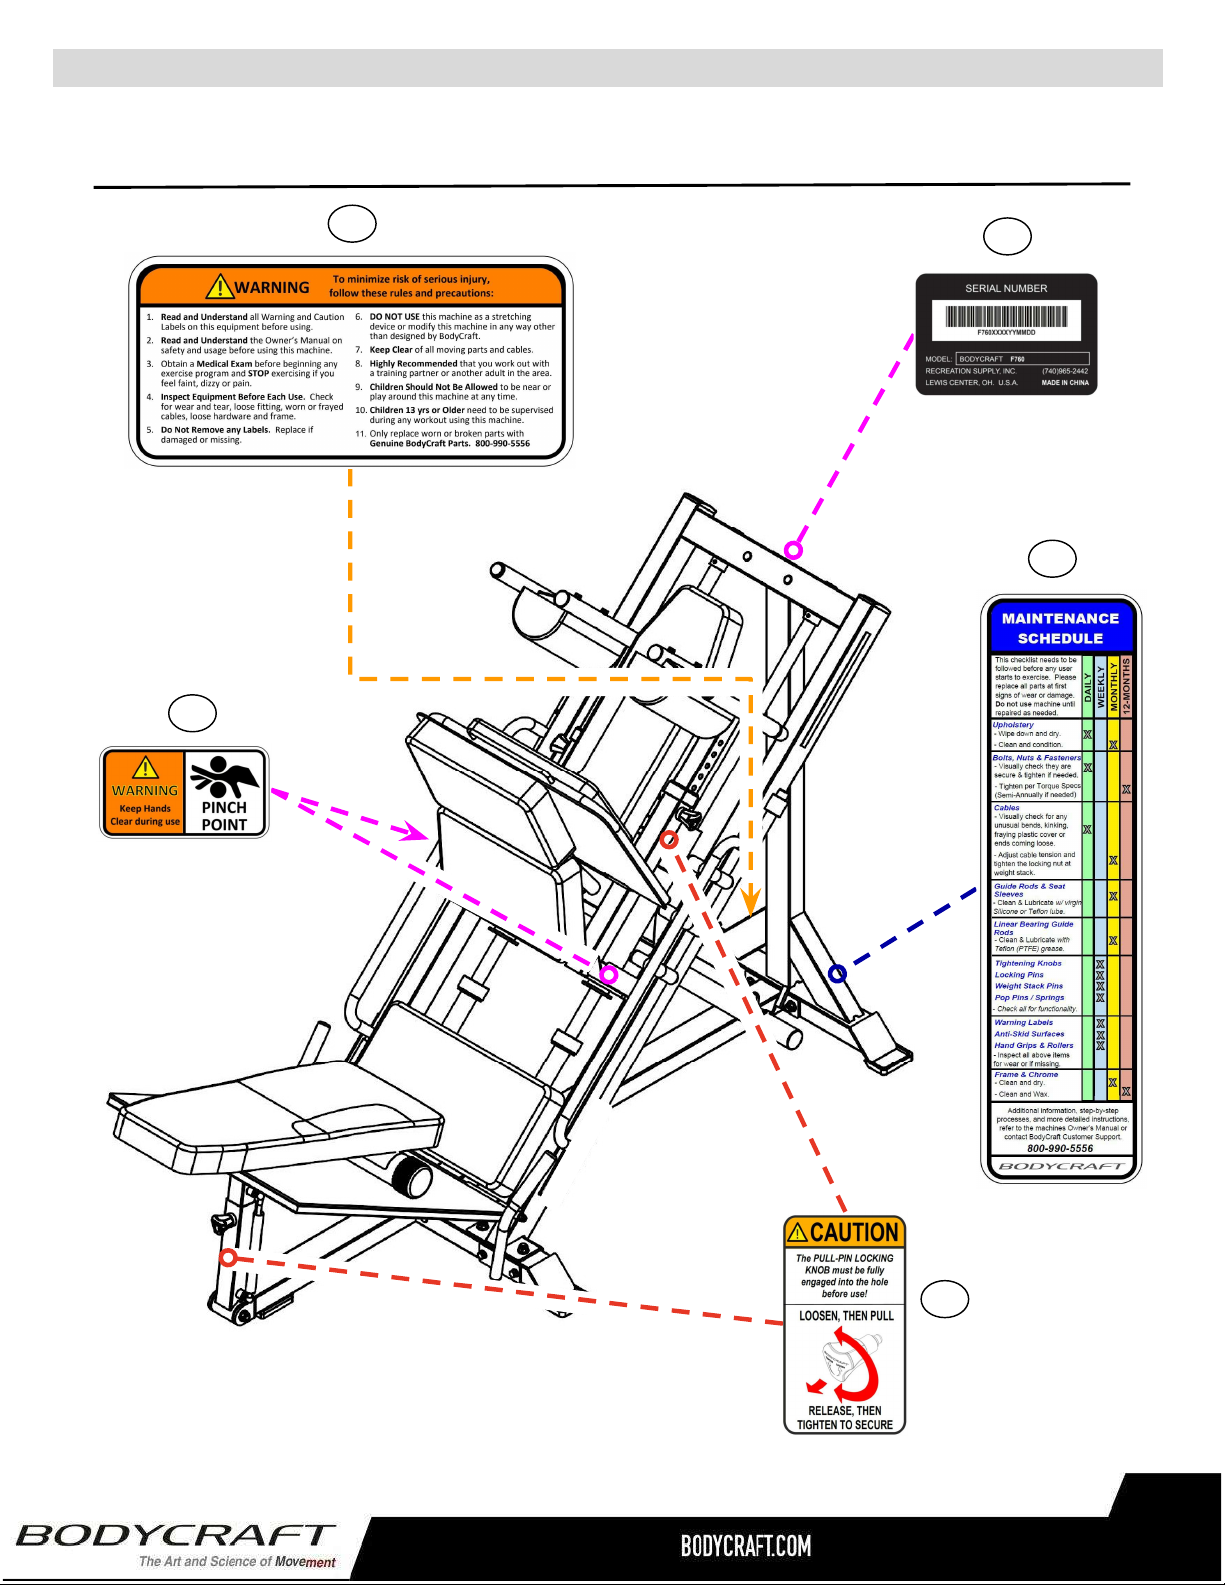
Read,studyandunderstandtheAssemblyInstructionsandallthewarninglabelson
thisproduct.Furthermore,itisrecommendedtofamiliarizeyourselfandotherswith
theproperoperationandworkoutrecommendationsforthisBODYCRAFTproduct
priortouse.
● Beforebeginningthisoranyotherexerciseprogram,consultyourphysician.Thisis
especiallyimportantforindividualsovertheageof35orpersonswithpreexistinghealth
problems.RecreationSupply,Inc.assumesnoresponsibilityforpersonalinjuryor
propertydamagesustainedbyorthroughuseofthisproduct.
● Exercisewithcaretoavoidinjury.Donotattempttoliftmoreweightthanyoucancontrol
safely.
● Thisproductmustbeassembledonaflat,levelsurfacetoassureitsproperfunction.
● Cleanpadsandframeonaregularbasis.Werecommendwarm,soapywater.Donot
useharshorabrasivechemicals.
● Inspectandtightenallpartsbeforeeveryuse.Replaceanywornpartsimmediately.
Failuretodosomayresultinseriousinjury.
● KeepchildrenawayfromanyBODYCRAFTstrength
machinesatalltimes.
● Keepyourhandsawayfromcablesandpulleysduring
operation,otherthanthedesignatedhandles.
● Keephands,limbs,looseclothingandlonghairwelloutofthewayofmovingparts.
● Inspecttheunitforanysignofwearonparts,hardwarebecominglooseorcrackson
welds.Ifaproblemisfound,donotuseorallowthemachinetobeuseduntilthedefective
partisrepairedorreplaced.
● ItisimperativethatyouretaintheseAssemblyInstructionsandbesureallwarninglabels
arelegibleandintact.ReplacementAssemblyInstructionsandlabelsareavailablefrom
BODYCRAFT.IfyouareunsureabouttheproperuseoftheBODYCRAFTstrength
machinecallyourlocalBODYCRAFTdealerorourCustomerServiceDepartment.
ContactBODYCRAFTat800-990-5556orsupport@bodycraft.com
ProductSafety-Benches&Racks
4

ImportantNotesandTips:
1.Beforeassembly,readallinstructionsthoroughlyandpreviewdiagramstohelpmakethe
installationeasier.
2.Makesureallpartsareaccountedforandinproperconditionbeforebeginningassembly.
Seethepartslist.
3.Becautiousnottodamagetheflooringwhenassembling.Placeaprotectantdownsuchasa
rubbermatorshippingblanket.
4. Letplasticsandweightstacksacclimatetoroomtemperaturebeforeyoubeginassembly.
5. Twopeoplearerecommendedforthesafeassemblyofthisequipment.
6. Insertallboltsinthesamedirectionwhenpossible.Donottightenuntilinstructed.
7. Carefullyinstallplasticcapsusingarubbermallet.
8. Whenmeasuringboltlengths,onlymeasuretheshank.
9. Whentheinstallationiscomplete,besureto
regularlycheckforrustordamage,and
performpreventativemaintenance.
ImportantNotes,RecommendedTools&Cleaners
TIPONFRAMEONLY:Forextra
protectionfromfingerprints,
sweatstainsorjustplaindirt,
applyanautomotivegrade
cleanerwaxifdesired. Also
makesfuturecleaningeasier.
THEFOLLOWINGISRECOMMENDED FOR CLEANING:
100%COTTON
CLEANINGCLOTHS (DoNotUseontheUpholstery)
MILDCLEANING
SOLUTION 5
SOCKETSET3/8DRIVE&6”EXT
(Only1/2,9/16 &3/4Sockets
areneeded)
OPEN,CLOSED&
ADJUSTABLEWRENCHES
(Only1/2,9/16&3/4
areneeded)
TORQUEWRENCH
3/8 DRIVE
(w/7/32Allen
HexBitSocket)
THEFOLLOWINGTOOLSARERECOMMENDED FOR ASSEMBLY:
ALLENWRENCHSET
(Only7/32isneeded)

WarningLabels,MaintenanceSchedule&SerialNumber-F760PRO
6
CarefullyreadALLwarning,caution&maintenanceschedulelabels
81
79
80
83
82

WarningLabels,MaintenanceSchedule&SerialNumberPlacement-F760PRO
7
CarefullyreadALLWarning,Caution&MaintenanceSchedulelabels
BothRt
&LtSides
82
79 83
81
80

Machine&ShippingDimensions-F760PRO
8
F760
OverallDimensions
40.9”Wx82.5”Dx50.2”H
WeightCapacity: 1,000lbs.
StartingWeight: 80lbs.
Box#1: 68-3/4"Wx 30-1/2“Dx9”H(1,750mmWx775mmDx 227mmH)
ShippingWeight GrossWeight: 180.4lbs(82kg)
NetWeight: 171.6lbs(78kg)
Box#2: 49-1/2"Wx30-1/2"Dx5-1/2"H(1,260mmWx775mmDx142mmH)
ShippingWeight GrossWeight: 110.0lbs(50kg)
NetWeight: 101.2lbs(46kg)
Box#3: 42-1/2"Wx28-3/4"Dx10-1/2"H(1,080mmWx730mmDx267mmH)
ShippingWeight GrossWeight: 145.2lbs(66kg)
NetWeight: 136.4lbs(62kg)
Front View
SideView
TopView
StartingWeight:
80lbs(36kg)
WeightCapacity:
1,000lbs(454kg)

AssemblyParts-F760PRO 1of2
9
NOTE:Partsarenottoscale
Part# AssemblyPartsList QTY
F760-001-ASM Frame,Main-Assembly 1
F760-002-ASM Frame,Front,Stabilizer-Assembly 1
F760-003-ASM Frame,Rear,Upright-Assembly 1
F760-004 Frame,Bottom,Connector 1
F760-005-ASM Frame,RightShoulder,Adjusting-Assembly 1
F760-006-ASM Frame,LeftShoulder,Adjusting-Assembly 1
F760-007 Plate,LegPress 1
F760-008 FootPlatform 1
F760-009-ASM Plate,BackPad-Assembly 1
F760-010-ASM WeightPlateHolder-Assembly 1
F760-011-ASM FootTube-Assembly 1
F760-012 WeightHolderSupport 1
F760-013-ASM FootPlatformAdjusterSleeve-Assembly 1
F760-014 Hinge,forFootPlatform 2
F760-015-ASM Handle,Right-Assembly 1
F760-016-ASM Handle,Left-Assembly 1
F760-017 Pad,Seat 1
F760-018 Pad,BackandHip 3
F760-019 Pad,Back,Lower 1
F760-020 Pad,Back,Upper 1
F760-021 Pad,Shoulder,Right 1
F760-022 Pad,Shoulder,Left 1
F760-035 SpringClip 2
F760-036 Plug,Roundφ25 2

AssemblyParts-Hardware-F760PRO 2of2
10
HardwareKit
InsideBox#2
Owner’sManual
InsideBox#2
NOTE:Partsarenottoscale
Part# AssemblyHardware QTY
F760-058 Bolt,Hex1/2″x3-1/4″L-BLACK 2
F760-059 Bolt,Hex1/2″x4″L-BLACK 2
F760-060 Bolt,Hex3/8″x1″L-BLACK 4
F760-061 Bolt,Hex3/8″x3″L-BLACK 2
F760-062 Bolt,Hex5/16″x2-1/2″L-BLACK 4
F760-064
Bolt,HexButtonHead3/8″x1-1/4″
L-BLK 8
F760-069 Washer,Flat3/8″-BLACK 18
F760-070 Washer,Flat1/2″-BLACK 21
F760-071 Washer,Flat5/16″-BLACK 4
F760-072 Washer,Spring3/8"-BLACK 14
F760-073 Washer,Spring5/16"-BLACK 4
F760-074 Washer,Spring1/2"-BLACK 1
F760-075 Nut,NylonLock1/2″-BLACK 17
F760-076 Nut,NylonLock3/8″-BLACK 4
F760-077
Bolt,HexRecessedCountersunk
Head3/8″x1"L-BLK 4
F760-078 Wrench,Hex7/32" 1

ProductAssembly-PreassemblyTips-F760PRO
PREASSEMBLYTIP#1–“StageRight”.
DuringtheassemblyprocesswewillbestatingRight,Left,Front,Back,Top,orBottom. These
allareintheperspectiveoftheuserinthemachinefacingoutwardwithfeetfacingtheground.
Seebelowimagesasexamples.
PREASSEMBLYTIP#2–Unpackaging&organizing.
PREASSEMBLYTIP#3–Keephardwarelooseuntilaskedtotighten.
Duringtheassembly,hardwareneedstobefingertightuntiltheSTEPSof“TorqueTime”. Thiswill
ensuresub-frameandotherpartswilleasilyfittogetherandnotstripoutboltthreadsduringassembly.
11
Thebestpracticeinassemblyistotakeallthe
partsoutoftheboxes&bagsandlineupinorder
ofassembly. Thisenablesamindsetofwhatyou
willbeassembling,theirphysicalsizesandwhat
challengesyoumightfaceBEFOREyoubegin.
RightSide
Back
Front
LeftSide

ProductAssembly-F760PRO-STEP1a,1b
12
3/4SOCKET&
6”EXTENSION
RecommendedTools
3/4WRENCH
STEP1a:InstallationoftheBaseFrames
AttachtheFrame,Bottom,Connector(4) totheFrame,Front
Stabilizer-Assembly(2-ASM)andtheFrame,Rear,Upright-
Assembly(3-ASM)using:
● FourWASHERS,Flat1/2"(70)
● FourNUTS,NylonLock1/2"(75)
PleaseHandTightenAllBoltsUntilSTEP1d
STEP1b:Installationofthe
MainFrameAssembly(172lbs)
AttachtheFrame,Main-
Assembly(1-ASM)totheFrame,
FrontStabilizer-Assembly
(2-ASM)andtheFrame,Rear,
Upright-Assembly(3-ASM)using:
● SixWASHERS,Flat
1/2"(70)
● SixNUTS,Nylon
Lock1/2"(75)
CAUTION: MainFrameAssembly(1-ASM)weighs172lbs.
MinimumtwopersonliftduringSTEP1b.

ProductAssembly-F760PRO-STEP1c,1d
13
PleaseHandTightenAllBoltsUntilSTEP1d
STEP1d: “TorqueTime”
● Tightenall1/2”lockingnutstotheframewelded-onbolts,startingatthebottomandworking
yourwayup,totherecommendedtorquespecsof20ft-lbs(+/-2lbs)
● All4bolts(#60)godirectlyintoatappedframe,tothetorquespecsof17ft-lbs(+/-2lbs).
TORQUEWRENCH
w/9/16 &3/4SOCKETS
RecommendedTools:
20ft-lbs
(+/-2lbs)
20ft-lbs
(+/-2lbs)
20ft-lbs
(+/-2lbs)
17 ft-lbs
(+/-2lbs)
S
TEP1c:Installationofthe
HandleAssemblies
AttachtheHandle,Right-
Assembly(15-ASM)&theHandle,
LeftAssembly(16-ASM)tothe
Frame,Front,Stabilizer-Assembly
(2-ASM)using:
● FourBOLTS,Hex3/8"x1”(60)
● FourWASHERS,Spring3/8"(72)
● FourWASHERS,Flat3/8"(69)
RecommendedTool
9/16WRENCH

ProductAssembly-F760PRO-STEP2a,2b
14
PleaseHandTightenAllBoltsUntilSTEP3c
STEP2b:InstallationoftheWeightHolder
AttachtheWeightPlateHolder-Assembly
(10-ASM)totheFrame,MainAssembly(1-ASM)
onthebottomside,lowercrossframe,Moving
Carriage(23)&theWeightHolderSupport(12)
using:
● TwoWASHERS,Flat1/2"(70)
● TwoNUTS,NylonLock1/2"(75)
3/4SOCKET&
6”EXTENSION
RecommendedTools
3/4WRENCH
STEP2a:InstallationoftheWeightHornSupport
AttachtheWeightHolderSupport(12)totheFrame,
MainAssembly(1-ASM)onthebottomside,uppercross
frame,MovingCarriage(23)using:
TotheMainFrameAssembly(1-ASM)
● TwoWASHERS,Flat1/2"(70)
● TwoNUTS,NylonLock1/2"(75)
TotheWeightHolderSupport(12)
● TwoBOLTS,Hex1/2“x3-1/4“(58)
● ThreeWASHERS,Flat1/2"(70)
● OneWASHER,Spring1/2"(74)
● OneNUT,NylonLock1/2"(75)
NOTE:BottomBolt#58uses
theSpringWasherandthe
FlatWasherwhenNOTusing
theNylonLockingNut.
23
23

ProductAssembly-F760PRO-STEP3a,3c
15
STEP3a:InstallationoftheShoulderAssemblies
AttachthePad,Shoulder,Right&Left(21,22)tothe
Frame,RightShoulder,Adjusting-Assembly(5-ASM)and
theFrame,LeftShoulder,Adjusting-Assembly(6-ASM)
using:
STEP3c: “TorqueTime”
● TightentheWeightHornSupport&Holder1/2”
Bolts&LockingNuts,startingatthebottomand
workingyourwayup,totherecommended
torquespecsof20ft-lbs(+/-2lbs)
● All4bolts(#62)godirectlyintothepads,to
thetorquespecsof8ft-lbs(+/-1lbs).
PleaseHandTightenAllBoltsUntilSTEP3c
● FourBOLTS,Hex
5/16"x2-1/2”(62)
● FourWASHERS,
Spring5/16"(73)
● FourWASHERS,
Flat5/16""(71)
STEP3b: InstallbothShoulder
AssembliesonthetheMainFrame
Assembly
LoosenthePull-Pinlockingknobsto
slipdown,thentightenPull-Pins.
RecommendedTool
1/2WRENCH
8 ft-lbs
(+/-1lbs)
20ft-lbs
(+/-2lbs)
20ft-lbs
(+/-2lbs)
TORQUEWRENCH
w/1/2 &3/4SOCKETS
RecommendedTools:

ProductAssembly-F760PRO-STEP4a,4b
16
STEP4a:InstallationoftheFootPlatform
AttachtheFootPlatform(8)totheFrame,Main-Assembly(1-ASM)withtheAxle,Long(27),then
pushforward. ContinuewiththeinstallationoftheFootPlatformAdjusterSleeve-Assembly
(13-ASM)totheFrame,Front,Stabilizer-Assembly(2-ASM). FinishbyconnectiontheFootPlatform
AdjusterSleeve-AssemblyupperparttothebaseoftheFootPlatform. Usethefollowinghardware:
NOTE:TheLongAxle(27)&ShortAxle(31)arepre-assembledintheMainFrameAssembly(1-ASM).
TakebothouttostartSTEP4aandSTEP4cbyusinga9/16wrenchorsocketontheNuts(76).
**GentlytapouttheAxlewiththeNutorwithblockofwoodontheend,sonottodamagethetreads.**
First:FootPlatformtotheMainFrameAssembly
● TwoWASHERS,Flat3/8"(69)
● TwoNUTS,NylonLock 3/8"(76)
Second:AdapterSleevetoFrontFrame&
FootPlatform
● TwoBOLTS,Hex1/2“x4”(59)
● FourWASHERS,Flat1/2"(70)
● TwoNUTS,NylonLock1/2"(75)
9/16&3/4SOCKETSw/
6”EXTENSION
RecommendedTools
9/16&3/4
WRENCHES
STEP4b:“TorqueTime”
● Nuts,NylonLock 3/8”(76)to
15ft-lbs+/-2lb.
● BOLTS,HexHead1/2“(59)to
20ft-lbs+/-2lbs.
NOTE:Oncetightened,testtheFootPlatform(8)travel.Itshouldmoveeasily.Ifyoufindthatitis
not,slightlyloosenthe1/2"x4"BOLTS(59),andrecheck.

ProductAssembly-F760PRO-STEP4c,4d
17
STEP4c:InstallationoftheLegPressAssembly
AttachthePlate,LegPress(7)totheFrame,Main-Assembly(1-ASM)withtheAxle,Short(31),then
lockinwiththePull-Pin#1(32). ContinuewithinstallationofthePad,Back(18)tothePlate,LegPress
Assembly(7-ASM).FinishwiththePlug,Round25mm(36)ontheright&leftbottomsidesonthePlate,
LegPressAssembly. Usethefollowinghardware:
ALLEN WRENCH
7/32
RecommendedTool
Second:BackPadtotheLegPressAssembly
● TwoBOLTS,HexRecessedCountersunk
Head3/8″x1" (77)
STEP4d:“TorqueTime”
● Nuts,NylonLock 3/8”(76)to
15ft-lbs+/-2lb.
● BOLTS,HexCountersunkHead
3/8”(64)to8ft-lbs+/-1lbs.
First:LegPresstotheMainFrameAssembly
● TwoWASHERS,Flat3/8"(69)
● TwoNUTS,NylonLock 3/8"(76)
9/16SOCKET&
6”EXTENSION
RecommendedTools
9/16WRENCH
NOTE:TheLongAxle(27)&ShortAxle(31)arepre-assembledintheMainFrameAssembly(1-ASM).
TakebothouttostartSTEP4aandSTEP4cbyusinga9/16wrenchorsocketontheNuts(76).
**GentlytapouttheAxlewiththeNutorwithblockofwoodontheend,sonottodamagethetreads.**

ProductAssembly-F760PRO-STEP5a,5b
18
Second:BackPadstotheBackPlate
● FourBOLTS,Hex3/8"x1-1/4”(64)
● FourWASHERS,Spring3/8"(72)
● FourWASHERS,Flat3/8"(69)
STEP5b:“TorqueTime”
● BOLTS,Hex&ButtonHead3/8”
(61,64)to8ft-lbs+/-1lbs.
First:UpperBackPadtotheMainFrame
Assembly
● TwoBOLTS,Hex3/8"x3”(61)
● TwoWASHERS,Spring3/8"(72)
● TwoWASHERS,Flat3/8"(69)
9/16SOCKET&
6”EXTENSION
RecommendedTools
9/16WRENCH
STEP5a:InstallationoftheBackPads
AttachthePad,Back,Upper(20)totheFrame,Main-Assembly(1-ASM).Continuewithinstallation
ofthePads,Back(18)tothePlate,BackPad-Assembly(9-ASM),theninsertintothePlate,Leg
Press-Assembly(7-ASM),seeimagebelow..FinishwiththeSpringClips(35)ontheright&left
bottomsidesontheWeightPlateHolder-Assembly(10-ASM).Usethefollowinghardware:
ALLEN WRENCH
7/32
RecommendedTool

ProductAssembly-F760PRO-STEP5c,5d
19
STEP5c:InstallationoftheSeat&LowerBackPads
AttachthePad,Seat(17)totheFrame,Main-Assembly(1-ASM).Continuewithinstallationwiththe
Pad,Back,Lower(19)totheFootPlatform(8). FinishwiththeFootTube-Assembly(11-ASM)onthe
FootPlatform.Usethefollowinghardware:
Second:BackPadtotheFootPlate
● TwoBOLTS,Hex3/8"x1-1/4”(64)
● TwoWASHERS,Spring3/8"(72)
● TwoWASHERS,Flat3/8"(69)
● TwoBOLTS,HexRecessed
countersunkHead3/8"x1”(77)
STEP5d:“TorqueTime”
● BOLTS,Hex&ButtonHead3/8”
(61,64,77)to8ft-lbs+/-1lbs.
First:SeatPadtotheMainFrameAssembly
● TwoBOLTS,Hex3/8"x1-1/4”(64)
● TwoWASHERS,Spring3/8"(72)
● TwoWASHERS,Flat3/8"(69)
ALLEN WRENCH
7/32
RecommendedTool

ProductAssembly-F760PRO-STEP6
STEP6c:
Doublecheckatthistime:
● AllBolts,NutsandPop-Pinsare
tightened
● AllSafetyArmsandBarCatches
movesmoothly
● AllPop-Pinsfullyengageintothe
Uprightholes
● Machineisfullyoperational.
STEP6a-6c: FinalAssemblyCleanUp,PolishandDoubleChecks
STEP6a:Removeallassemblystickers, i.e.partnumbers&
rightleftcircles.
● Easytoremovewithfingernailorplasticscraper
● Ifadhesiveresidueisonframe:
○ Userubbingalcohol
○ Thenmildcleaningsolution
○ Finishingwithadry100%cottoncleaningcloth
100%COTTON
CLEANINGCLOTHS
MILDCLEANING
SOLUTION
TIPONFRAMEONLY:Forextra
protectionfromfingerprints,
sweatstainsorjustplaindirt,
applyanautomotivegrade
cleanerwaxifdesired. Also
makesfuturecleaningeasier.
(DoNotUseontheUpholstery)
STEP6b:Framecleanup.
● Wipedownframewithmildcleaningsolution
● Dryframewith100%cottoncleaningcloth
● Goodpracticetodobeforefirstuseandyearly:
○ Lightlyapplyanautomotivegradecleanerwax
○ Thenfollowupbywipingexcessesoffwith100%
cottoncleaningcloth
● DONOTUSEABRASIVECLEANINGSCRUBBINGPADS
● DONOTUSEAMMONIAORCITRICCLEANERS
● DONOTUSEANYFORMOFPAINTTHINNERS
20
Table of contents
Popular Power Tools manuals by other brands

Nitto Kohki
Nitto Kohki DLV8100 Series Maintenance manual

Jet
Jet JDPE-20EVS-PDF Operating instructions and parts manual

King Canada
King Canada KSB-110N-LED instruction manual

Milwaukee
Milwaukee 5615 Series Operator's manual

Ingersoll-Rand
Ingersoll-Rand 150 D Series Maintenance manual

Hitachi
Hitachi N 5008AB instruction manual