Body flex BK06 User manual

Magnetic Bike BK06
art.N: BF8310
IMPORTANT !
Please read all instructions carefully before using this product.
Retain this manual for future reference.
The specifications of this product may vary slightly from the illustrations and are subject to change without
notice.

Owner’s Manual
1) Read all the instructions in this manual and do warm up exercises before using this e uipment.
2) This upright bike is home stationary fitness e uipment, and also aerobic training e uipment that can help you to
develop your cardiovascular function.
3) Please make sure all parts are not damaged and well fixed before use. The e uipment should be placed on a flat
surface when using. Using a carpet or other covering material on the ground is recommended.
4) Please wear proper clothes and shoes when using this magnetic upright bike; do not wear clothes that might catch any
part of the e uipment; remember to tighten the pedaling straps.
5) Consult your physician and make a suitable exercise schedule before exercise. This is particularly important to
people who are over 35 years old or who have prior medical history. In order to attain the ideal exercise result,
besides executing a suitable amount of exercise, it is also very important to insist on doing exercise every day.
6) Before exercise, in order to avoid injuring the muscle, warm-up exercise of every position of the body is necessary.
Refer to Warm Up Exercises. After exercise, relaxation of the body is suggested for cool-down.
7) Keep children and pets away from the e uipment while operating the e uipment. This machine is
designed for adults only. The minimum free space re uired for safe operation is not less than two
meters.
8) Do not use this e uipment one hour before or after dinner.
9) If you feel any chest pains, nausea, dizziness, or short of breath, you should stop exercising immediately and consult
your physician before continuing.
10) The maximum weight capacity of the user is 100kgs.
Warning: It will e harmful if you diso ey the a ove-mentioned precautions.

Exploded Diagram


Parts List
No. Description Qty No. Description Qty
1Main frame 1 19 Allen bolt M8X15 4
2Front stabilizer 1 20 Tension controller 1
3Rear stabilizer 1 21 Tension controller cover 1
4Handlebar post 1 22 Flat washer D5 1
5Handlebar 1 23 Cross screw M5X40 1
6Saddle post 1 24 Pulse sensor wire 2
7Saddle 1 25 Spring washer D8 2
8Computer 1 26 Bolt M8X30 2
9L/R Pedal 1/1 27 Handlebar chuck cover 1
10 Crank 1 28 Foam grip 2
11 Front stabilizer end cap 2 29 End cap 2
12 Rear stabilizer end cap 2 30 Computer bracket 1
13 Carriage bolt M10X57 4 31 Knob 1
14 Arc washer D10Xφ25X1.5XR28 4 32 Plastic bushing 1
15 Acorn nut M10 4 33 Flat washer D8 5
16 Tension cable 1 34 Nylon nut M8 3
17 Sensor wire 1 35 Arc washer D8Xφ25X1.5XR25 4
18 Connective wire 1
NOTE:
Most of the listed assembly hardware has been packaged separately, but some hardware items have been preinstalled in
the identified assembly parts. In these instances, simply remove and reinstall the hardware as assembly is re uired.
Please reference the individual assembly steps and make note of all preinstalled hardware.
PREPARATION: Before assembling, make sure that you will have enough space around the item;
Use the present tooling for assembling; before assembling please check whether all needed parts
are available.
It is strongly recommended this machine to be assembled by two or more people to avoid possible
injury.

Assem ly Instructions
Attention:
Please follow these assembly instructions step by step to assemble this bike
1. Install the Front and Rear Sta ilizers
Fix the Front stabilizer (2) and Rear stabilizer (3) to the Main frame (1) with the Carriage bolt (13), Arc
washer (14) and Acorn nut (15).
2. Install the Right and Left Pedals
Attach the right and left Pedals (9L/R) to the Crank (10) respectively. The right Pedal (9R) should be threaded clockwise.
The left Pedal (9L) should be threaded counterclockwise.
NOTE: The right and left Pedals (9L/R) are marked “R” for right & “L” for left.

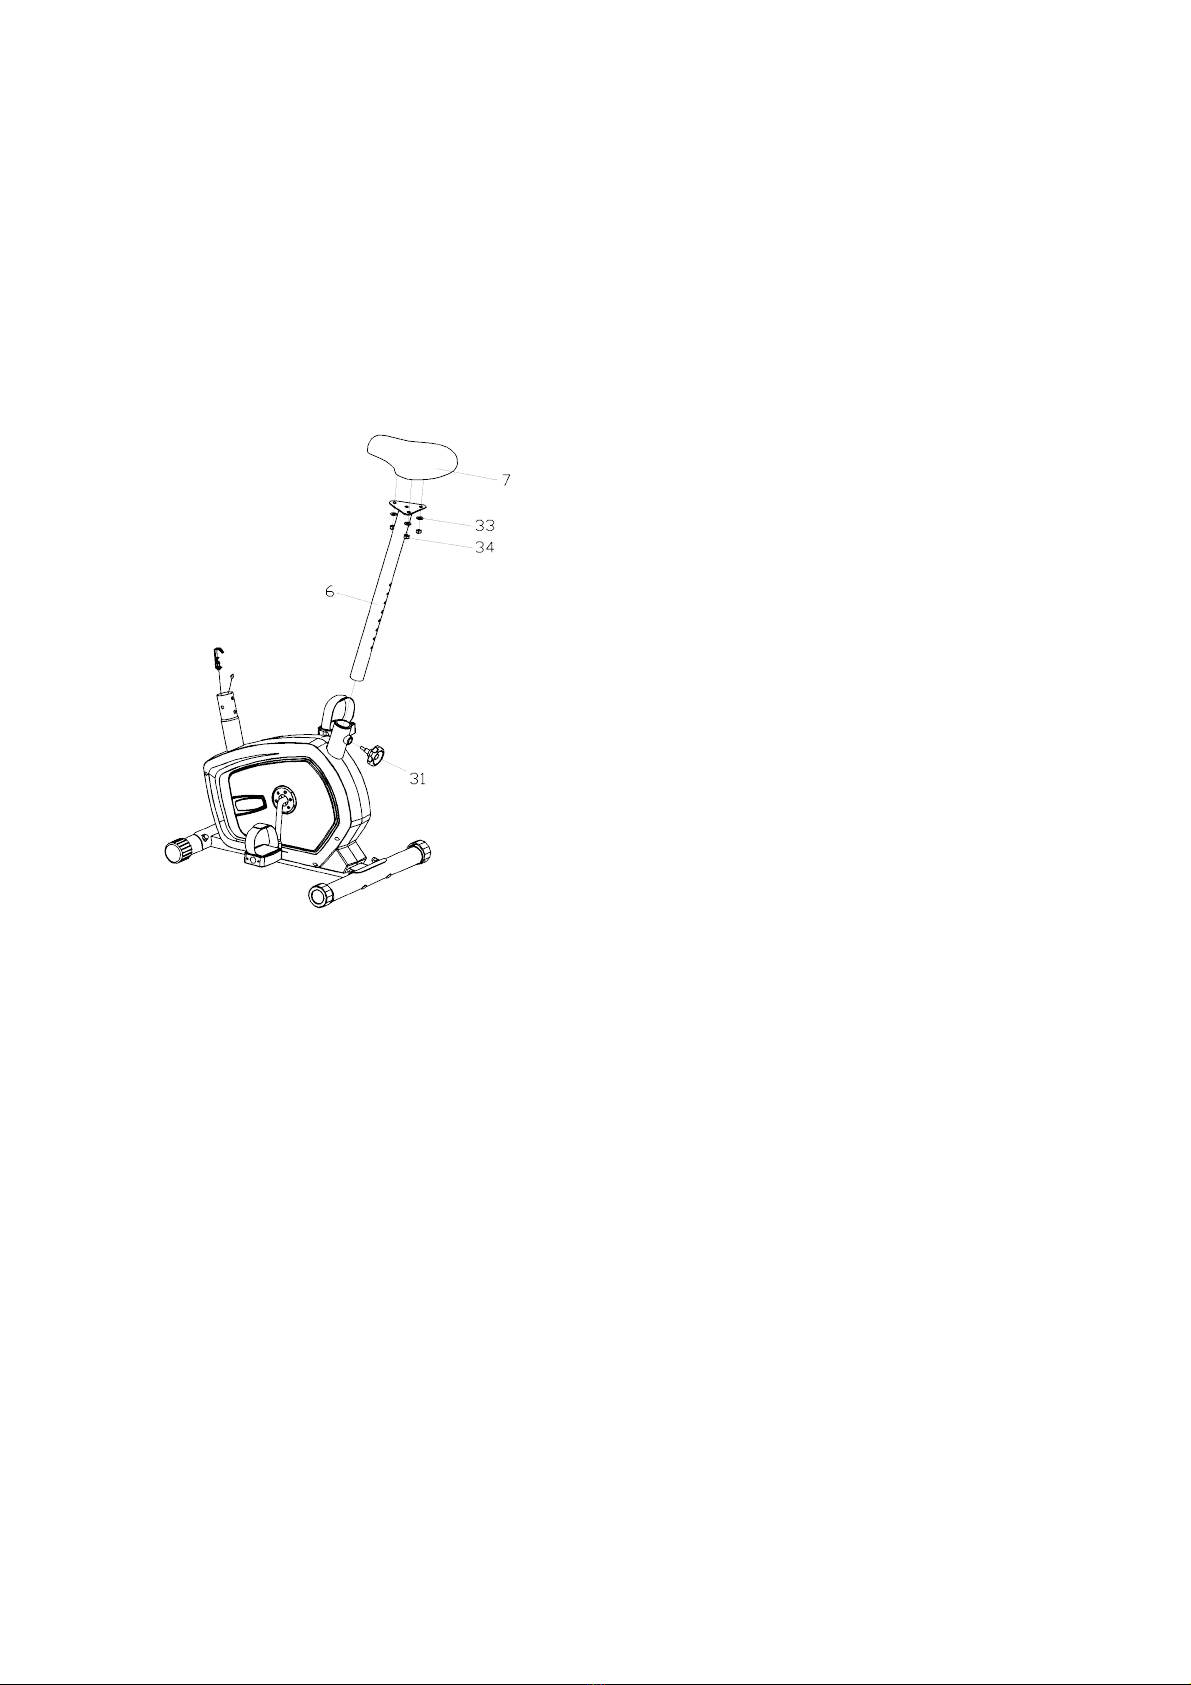
3. Install the Saddle Post
Fix the Saddle (7) to the Saddle post (6) with Flat washer (33) and Nylon nut (34), and then insert the Saddle post (6) with
Saddle into the Main frame (1), tighten with the Knob (31).
Note: When adjusting the height of saddle post, the maximum insert depth mark line cannot be higher
than the edge of the tube of Main Frame section.
4. Install the Handle ar Post
Connect the Sensor wire (17) from the Main frame (1) to the Connective wire (18) from the
Handlebar post (4).
Put the end of Tension controller (20) into the spring hook of Tension cable (16) as Picture shown.
Pull the resistance cable of Tension controller (18) up and force it into the gap of metal bracket of
Tension cable (16).
Finally, insert the Handlebar post (4) to the Main frame (1) and secure with the Allen bolt (19) and
Arc washer (35).

5. Install the Handle ar
Fit the Pulse sensor wires (24) through the hole of Handlebar post (4), and then pull out from the top of the Handlebar
post (4).
Fix the Handlebar (5) onto the Handlebar post (4) with Spring washer (25), Flat washer (33) and Bolt (26). Cover the
Handlebar chuck cover (27) onto the Handlebar (4).
6. Install the computer
Pull the Pulse sensor wires (24) and Connective wire (18) through the hole of Computer bracket (30) and then fit the
bracket(30) onto the Handlebar post(4). Connect the Pulse sensor wires (24) and Connective wire (18) to the wires that
come from the Computer (8), and then attach the Computer (8) to the Computer bracket (30).

EXERCISE COMPUTER INSTRUCTION MANUAL
FUNCTIONAL BUTTONS:
MODE – Press it to select functions.
–Hold it for 3 seconds to reset time, distance and calories.
SET(IF HAVE)– To set value of time, distance and calories when not in scan mode.
RESET (IF HAVE) – Press to reset time, distance and calories.
FUNCTIONS:
1. SCAN: Press MODE button until “▼” appears at SCAN Position (or until “SCAN” appears), computer will rotate through
all the 5 functions: Time, Speed, Distance, Calorie and total distance. Each display will be hold for 4 seconds.
2. TIME: Count the total time from exercise start to end.
3. SPEED: Display current speed.
4. DIST : Count the distance from exercise start to end.
5. CALORIES(CAL): Count the total calories from exercise start to the end.
6. TOTAL DIST(ODO): Count the total distance after installing the batteries.
7. AUTO ON/OFF & AUTO START/STOP: Without any signal for 8 minutes, the power will
turn off automatically. As long as the wheel is in motion or press any button, the computer is in action.
8. PULSE RATE (IF HAVE)
Press MODE button until “▼” appears at PULSE position(or until “ ”appears). Before measuring your pulse rate, please
place both your palms on the contact pads and the computer will show your current heart beat rate in beats per minute
(BPM) on the LCD after 3~4 seconds.
Remark: During the process of pulse measurement, because of the contact jamming, the measurement value may be higher
than virtual pulse rate during the first 2~3 seconds, then it will return to normal level. To ensure testing accuracy, it is
suggested that user test pulse during stop/pause exercise to avoid any possible influence. The measurement value can not
be regarded as the basis of medical treatment.
9. ALARM
The functions of time, distance and calorie can be set countdown, any of above value goes to zero, the computer will alarm
for 15 seconds.
Press MODE to select the function, then press SET to adjust the value.
Note: ● The product with only “MODE” button has no No.9 function.
● The computer can be programmed before delivery with Metric or Imperial system. If you find “M” in right side of
monitor screen, it is with Imperial system and the unit will be mile.
SPECIFICATIONS
FUNCTION Auto Scan Every 4 seconds
Running Time 00:00 ~ 99:59(Minute: Second)
Current Speed The max pick-up signal is 99.9KM/H or
MILE/H (or 1500RPM)
Trip Distance 0.00 ~ 99.99 KM or MILE
Calories 0 ~ 999.9~ 9999 Kcal
Total Distance 0 ~ 9999 KM or MILE
Pulse Rate (IF HAVE) 40-240BPM
Battery Type 2 pcs of SIZE-AAA or UM4

USING YOUR BIKE
Using your bike will provide you with several benefits. It will improve your physical fitness, tone your muscles and in
conjunction with a calorie controlled diet, help you lose weight.
WARM-UP PHASE
The purpose of warming up is to prepare your body for exercise and to minimize injuries. Warm up for two to five
minutes before strength-training or aerobic exercising. Perform activities that raise your heart rate and warm the working
muscles. Activities may include brisk walking, jogging, jumping jacks, jump rope, and running in place.
STRETCHING
Stretching while your muscles are warm after a proper warm-up and again after your strength or aerobic training session
is very important. Muscles stretch more easily at these times because of their elevated temperature, which greatly reduces
the risk of injury. Stretches should be held for 15 to 30 seconds.
DO NOT BOUNCE.
Remember always to check with yo r physician before starting any exercise program.
EXERCISE PHASE
This is the stage where you put the effort in. After regular use, the muscles in your legs will become more flexible. Work
at your own pace and be sure to maintain a steady tempo throughout. The rate of work should be sufficient to raise your
heartbeat into the target zone shown on the graph below.
COOL-DOWN PHASE
The purpose of cooling down is to return the body to its normal or near normal, resting state at the end of each exercise
session. A proper cool-down slowly lowers your heart rate and allows blood to return to the heart.

Наръчник за експлоатация и монтаж
Велоeргометър Bodyflex BK06
Уважаеми клиенти,
Благодарим ви, че избрахте нашият велоергометър. Пожелаваме ви приятни моменти
с него и успех по време на тренировките.
Моля, следвайте стриктно приложените инструкции за монтиране и безопасна
експлоатация на уреда. При възникнали въпроси от ваша страна, моля свържете се с
нашите консултанти.
ИНСТРУКЦИИ ЗА БЕЗОПАСНОСТ:
Преди започване на тренировка с вашият велоергометър, моля прочетете внимателно
инструкциите към него. Пазете списъка с указанията, за да го използвате в случаи на ремонт
и доставка на резервни части.
Велоергометърът е създаден единствено за тренировки в домашни условия и е
тестван до максимално телесно тегло от 110 кг.
Следвайте внимателно инструкциите за сглобяване на уреда.
При сглобяване на уреда използвайте единствено подходящи инструменти и
при необходимост се консултирайте със специалист.
Преди първата тренировка и на всеки 1 месец проверявайте обстойно дали
всички свързващи елементи са в изправно състояние. Незабавно заменяйте
дефектните компоненти и не употребявайте уреда до пълното му ремонтиране.
При ремонт използвайте единствено оригинални части.
При необходимост от ремонт, моля консултирайте се с вашият доставчик.
Не използвайте силни разтворители при почистването на уреда.
Преди тренировка се уверете, че уреда е правилно сглобен и е в отлично
състояние.
Домашният тренажор е създаден за възрастни. Упражнявайте контрол при
употреба от деца.
Консултирайте се с лекар-специалист преди започване на тренировки. Той
може да ви предпази от евентуални травми.
ИНСТРУКЦИИ ЗА СГЛОБЯВАНЕ НА УРЕДА:
Препоръчваме уреда да бъде сглобен от специалист, в противен случай при
неправилно свързване на даден елемент, продавача не поема гаранция
1. Закрепете предния и задния стабилизатор, спазвайки схемата.
2. Свържете горния компютърен кабел и жилото с опорния стълб. Вкарайте
опорния стълб в основното тяло на уреда и поставете закрепящите болтове и
шайби без да ги притягате, а ги завъртете леко с ръка. След цялостното
сглобяване на уреда притегнете силно болтовете.
3. Закрепете педалите. Поставете дръжките за ръцете. Поставете седлото.
4. Следвайте стриктно схемите при монтаж.

ВНИМАНИЕ!
Претоварването и неправилното трениране може да доведе до здравословни
проблеми.
Моля, следвайте зададените инструкции за правилни тренировки.
Натоварващото/работно ниво може да се настрои посредством крана,
монтиран на кормилния стълб.
За постигане на максимално безопасно ниво при работа с велоергометъра,
стриктно спазвайте инструкциите и графиките при сглобяването му.
Моля проверявайте редовно всички свързващи елементи и ги притягайте.
При неправилна работа на уреда се обърнете към оторизирания сервиз веднага.
Забележка.:
По-голямата част от изброения хардуер за сглобяване е опакован отделно, но някои хардуерни
елементи са били предварително инсталирани в идентифицираните части за монтаж. В тези случаи
просто свалете и после повторно инсталирайте хардуера, съгласно изискванията за монтажа.
Моля следвайте индивидуалните стъпки за сглобяване и внимавайте за всичкия предварително
инсталиран хардуер.
ПОДГОТОВКА: Преди сглобяване се уверете, че разполагате с достатъчно пространство около
уреда; използвайте наличната експериментална екипировка за сглобяването; преди сглобяване,
моля, проверете дали всички необходими части са налични.
Силно се препоръчва тази машина да се сглобява от двама или повече души с цел избягване на
възможни наранявания.

Инструкции за монтаж
Внимание:
Моля, следвайте тези инструкции стъпка по стъпка при сглобяване на велоергометъра.
1. Инсталиране на предните и задни стабилизатори
Фиксирайте предния стабилизатор (2) и задния стабилизатор (3) към главната рамка (1) с каретния
болт (13), дъговидната шайба (14) и кухата гайка (15).
2. Инсталиране на задните и леви педали
Закрепете десния и ляв педал (9L/R) съответно към курбела (10). Десният педал (9R) трябва да се
завива по посока на движение на часовниковата стрелка. Левият педал (9L) трябва да се завива в
посока, противоположна на движението на часовниковата стрелка.
Заб. : Десният и левият педал (9L/R) са маркирани с “R” за дясно и “L” за ляво.
3. Инсталиране на държача на седалката
Фиксирайте седалката (7) към държача на седалката (6) с плоска шайба (33) и гайка (34) и след
това махнете пръта на седалката (6) със седалката в основната рамка (1), като затегнете с винта с
обла глава (31).
Заб.: Когато коригирате височината на държача на седалката, линията на маркировката за
максимална дълбочина на вмъкване не може да бъде по-висока от ръба на тръбата на секцията на
основната рамка.

4. Инсталиране на лоста за кормилото
Свържете проводника за датчика (17) от основната рамка (1) към свързващия проводник (18) от
лоста за кормилото (4).
Вкарайте края на контролера за обтягане (20) в пружинната кука на проводника за обтягане (16),
както показва илюстрацията. Издърпайте съпротивителния проводник от контролера за обтягането
(18) нагоре и го пъхнете в междината на металната скоба на проводника за обтягане (16).
Накрая вмъкнете лоста за кормилото (4) в основната рамка (1) и затегнете с шестогранния болт (19)
и дъговидната шайба (35).

5. Монтаж на кормилото
Монтирайте проводниците на датчиците за пулса (24) през отвора на лоста за кормилото (4) и след
това издърпайте от горната част на лоста за кормилото (4).
Фиксирайте кормилото (5) върху лоста за кормилото (4) с пружинна шайба (25), плоска шайба (33)
и болт (26). Покрийте патронника на кормилото (27) върху кормилото (4).
6. Инсталиране на компютъра
Издърпайте проводниците на датчика за пулс (24) и свързващия проводник (18) през отвора на
скобата за компютъра (30) и след това монтирайте скобата (30) към лоста за кормилото (4).
Свържете проводниците на датчика за пулса (24) и свързващия проводник (18), към проводниците,
които излизат от компютъра (8) и след това закрепете компютъра (8) към скобата за компютъра (30).

УПЪТВАНЕ ЗА ИЗПОЛЗВАНЕ НА КОМПЮТЪРА
ФУНЦИИ НА БУТОНИТЕ:
MODE – Натисни, за да избереш фунциии.
–Ако го задържиш 3 секунди всичко се рестартира.
1. Натисни бутон MODE докато “▼” дойде до позиция SCAN , компютърът ще изрежда последователно всички 5
функцииc: Time, Speed, Distance, Calorie. Всяка функциия ще се показва за 4 секунди.
2. TIME: показва времето.
3. SPEED: скорост.
4. DIST : изминато разстояние от началото на упражението.
5. CALORIES(CAL): изгорени калории от началото на упражнението.
6. TOTAL DIST(ODO): тотално изминато разстояне от последния рестарт.
7. AUTO ON/OFF & AUTO START/STOP: автоматично се стартира компютъра след задвиване на педалите
8. PULSE RATE: Измерване на пулса
Задръжте MODE бутона докато “▼” отиде на позиция PULSE . Задръжте двете си ръце на сензорите за пулса
докато се покаже резултатът на дисплея.
Измерването на пулса не може да се използва за медицински цели. Той може да варира.
9. ALARM (ако има)
Може да настроите компютъра да сигнализира при достигане на определни нива на време, разстояние или пулс.
Натиснете MODE, за да избрете функция, после натиснете SET, за да настроите показателя.
Когато мониторът изгуби яркост заменете двете батерии с AAA или UM4
ИЗХ ЪРЛЯНЕ:
Моля, запазете опаковката за случаи на ремонт /гаранционен ремонт . Уредът не трябва да се изхвърля
заедно с домашния боклук.
Уважаеми клиенти, Вие сте длъжни да предадете за рециклиране съответните материали от уреда:
- Външна опаковка (картон)
- Отляти части от полистрол
- Опаковки и торбички от полиетилен
- Електрооборудване
- Каиши от полипропилен
- Уредът не трябва да се изхвърля заедно с домашния боклук
За връзка с фирми за рециклиране на отпадъците се обърнете към вносителя!
НОСИТЕЛ ЗА БЪЛГАРИЯ:
СПОРТЕН СКЛАД БГ
Соларшоп ЕООД
гр. Пазарджик, ул. Димчо Дебелянов 5
тел: 0888 827 355
E-mail: [email protected]
www.sportensklad.bg
Table of contents
Languages:
Other Body flex Exercise Bike manuals


