Body flex SPEEDER X User manual

SPEEDER X
SPINNING BIKE
ART. BF58001
USER MANUAL
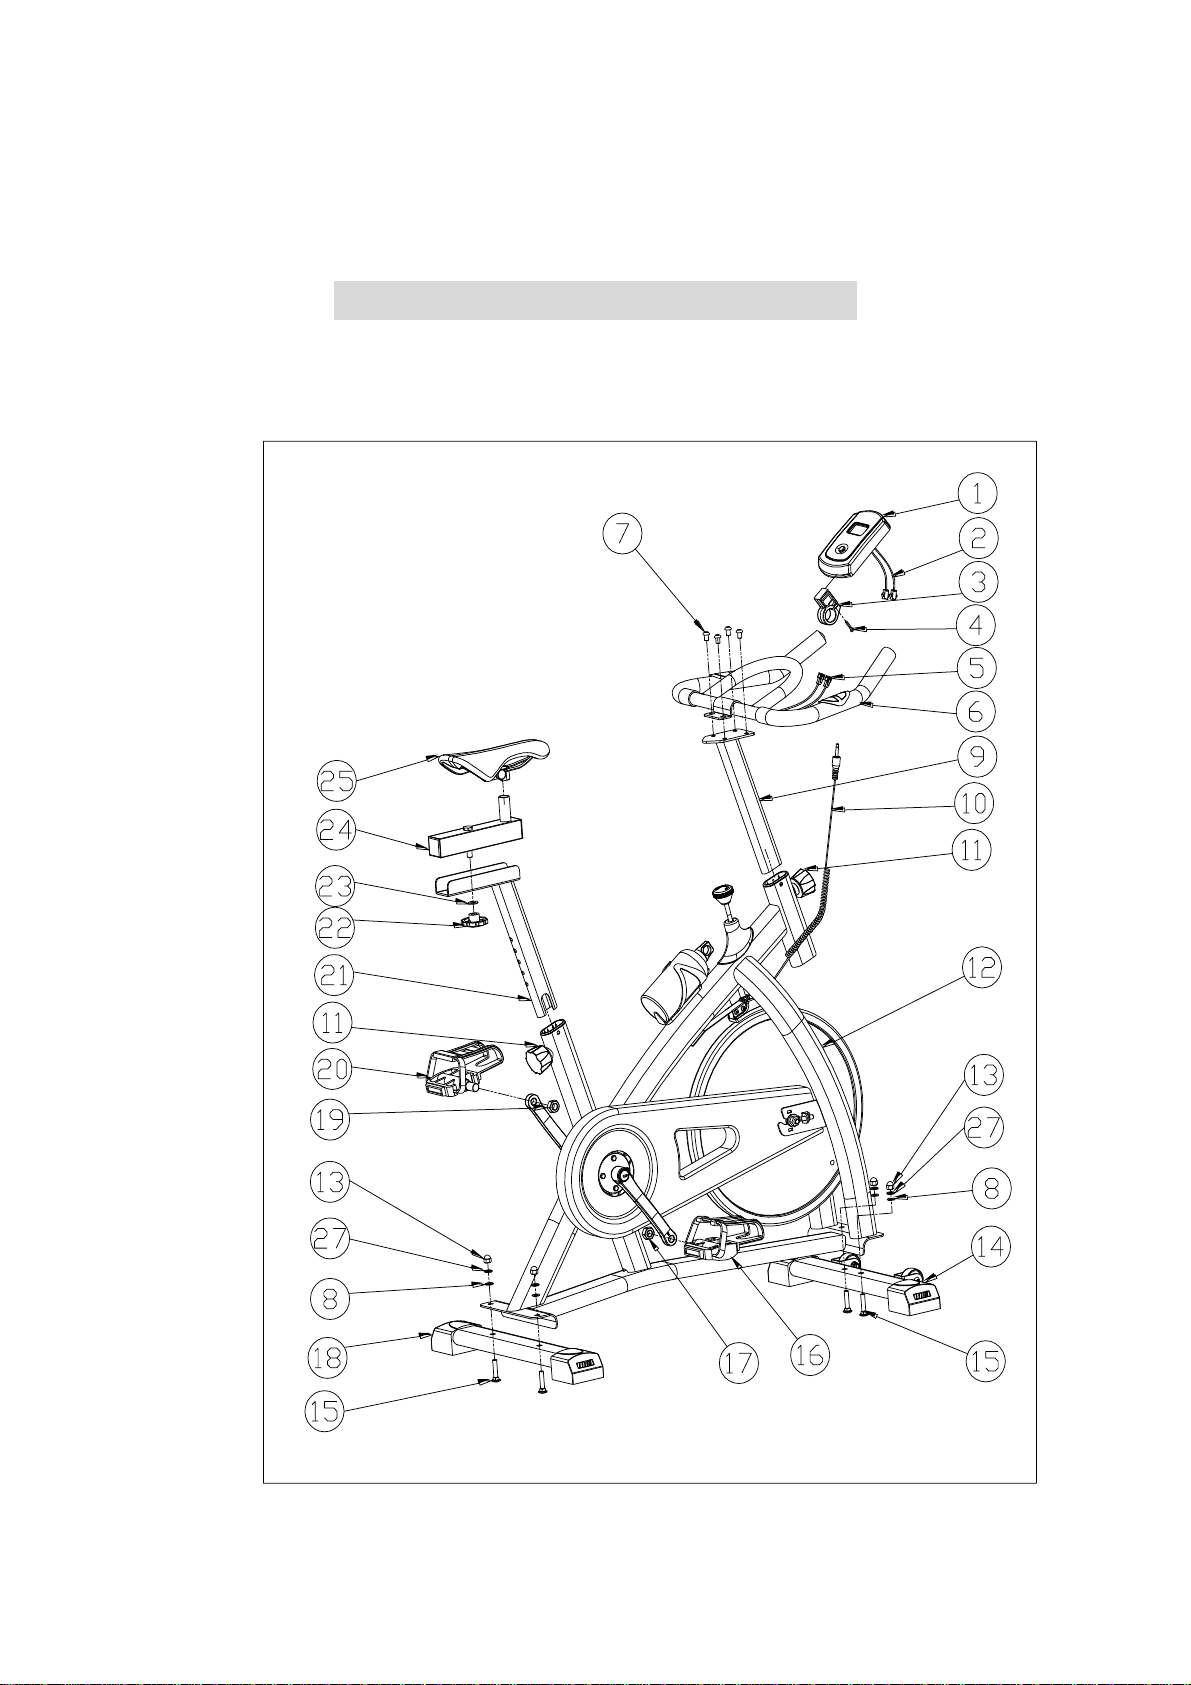
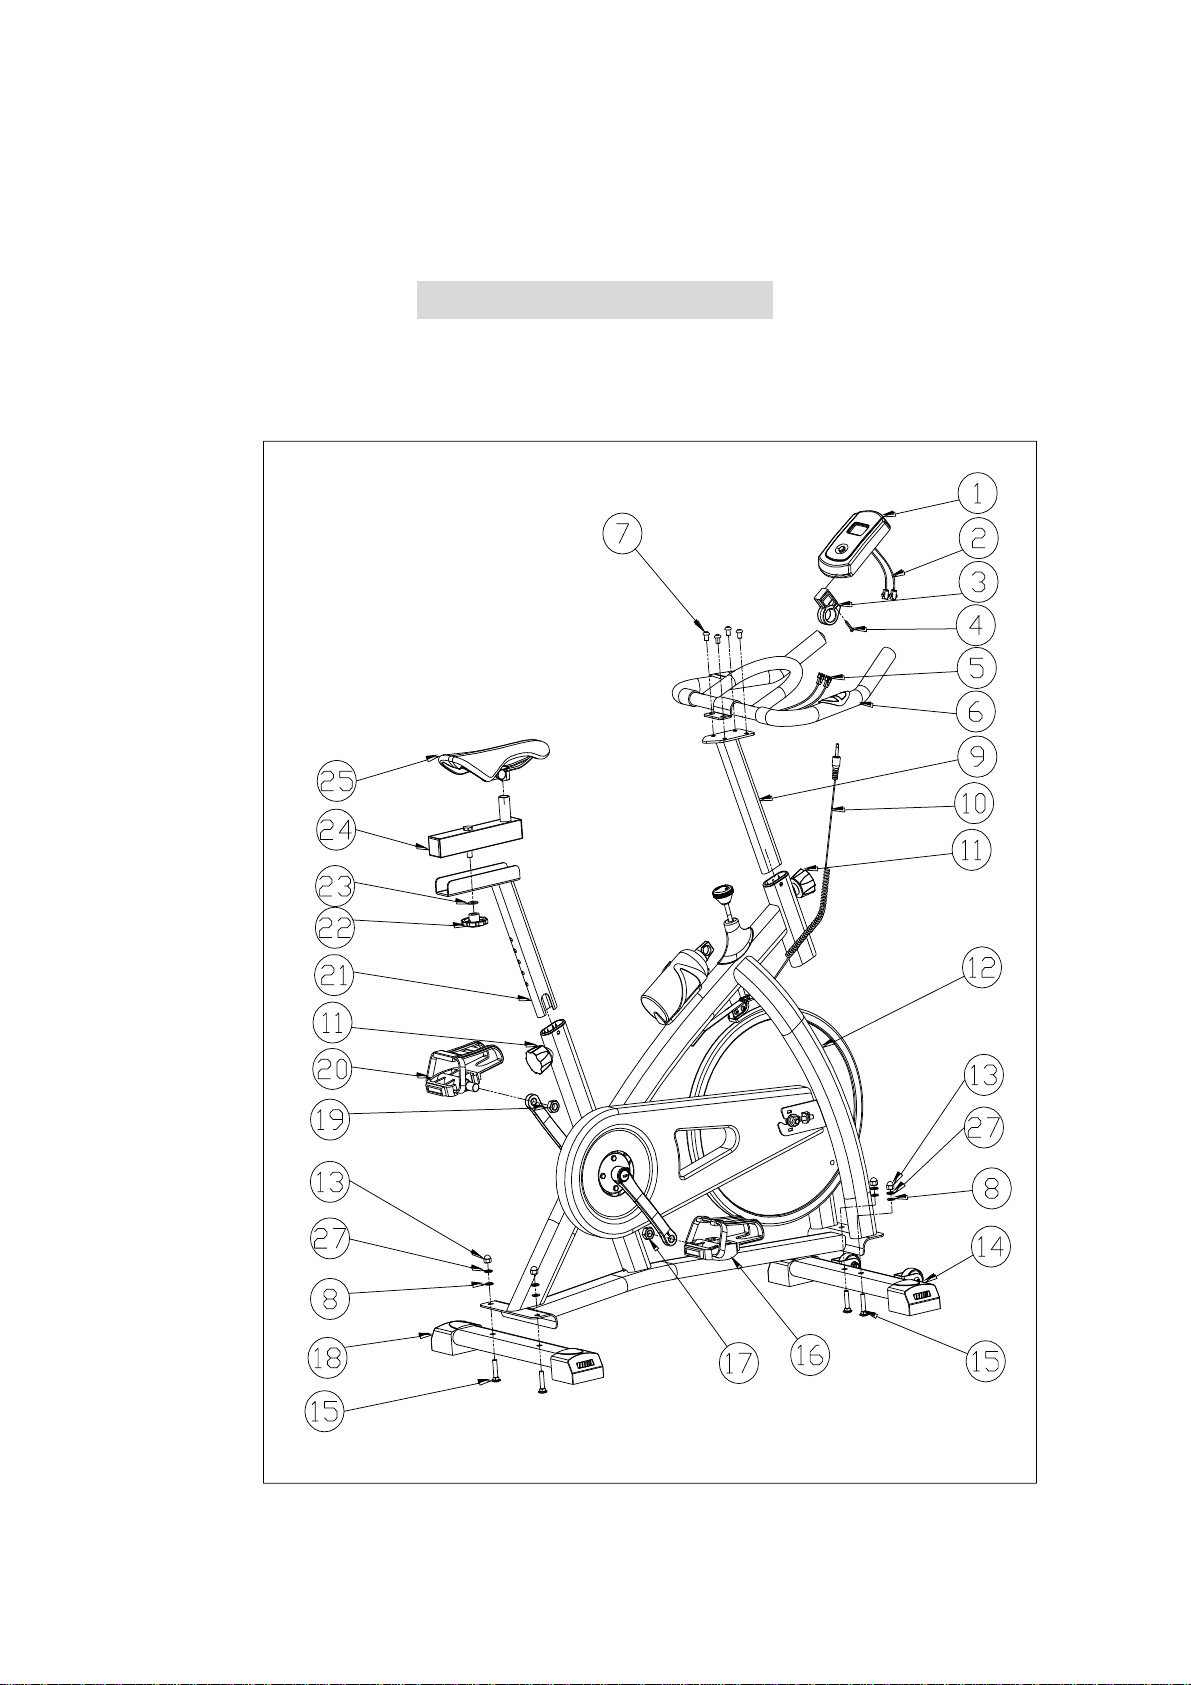
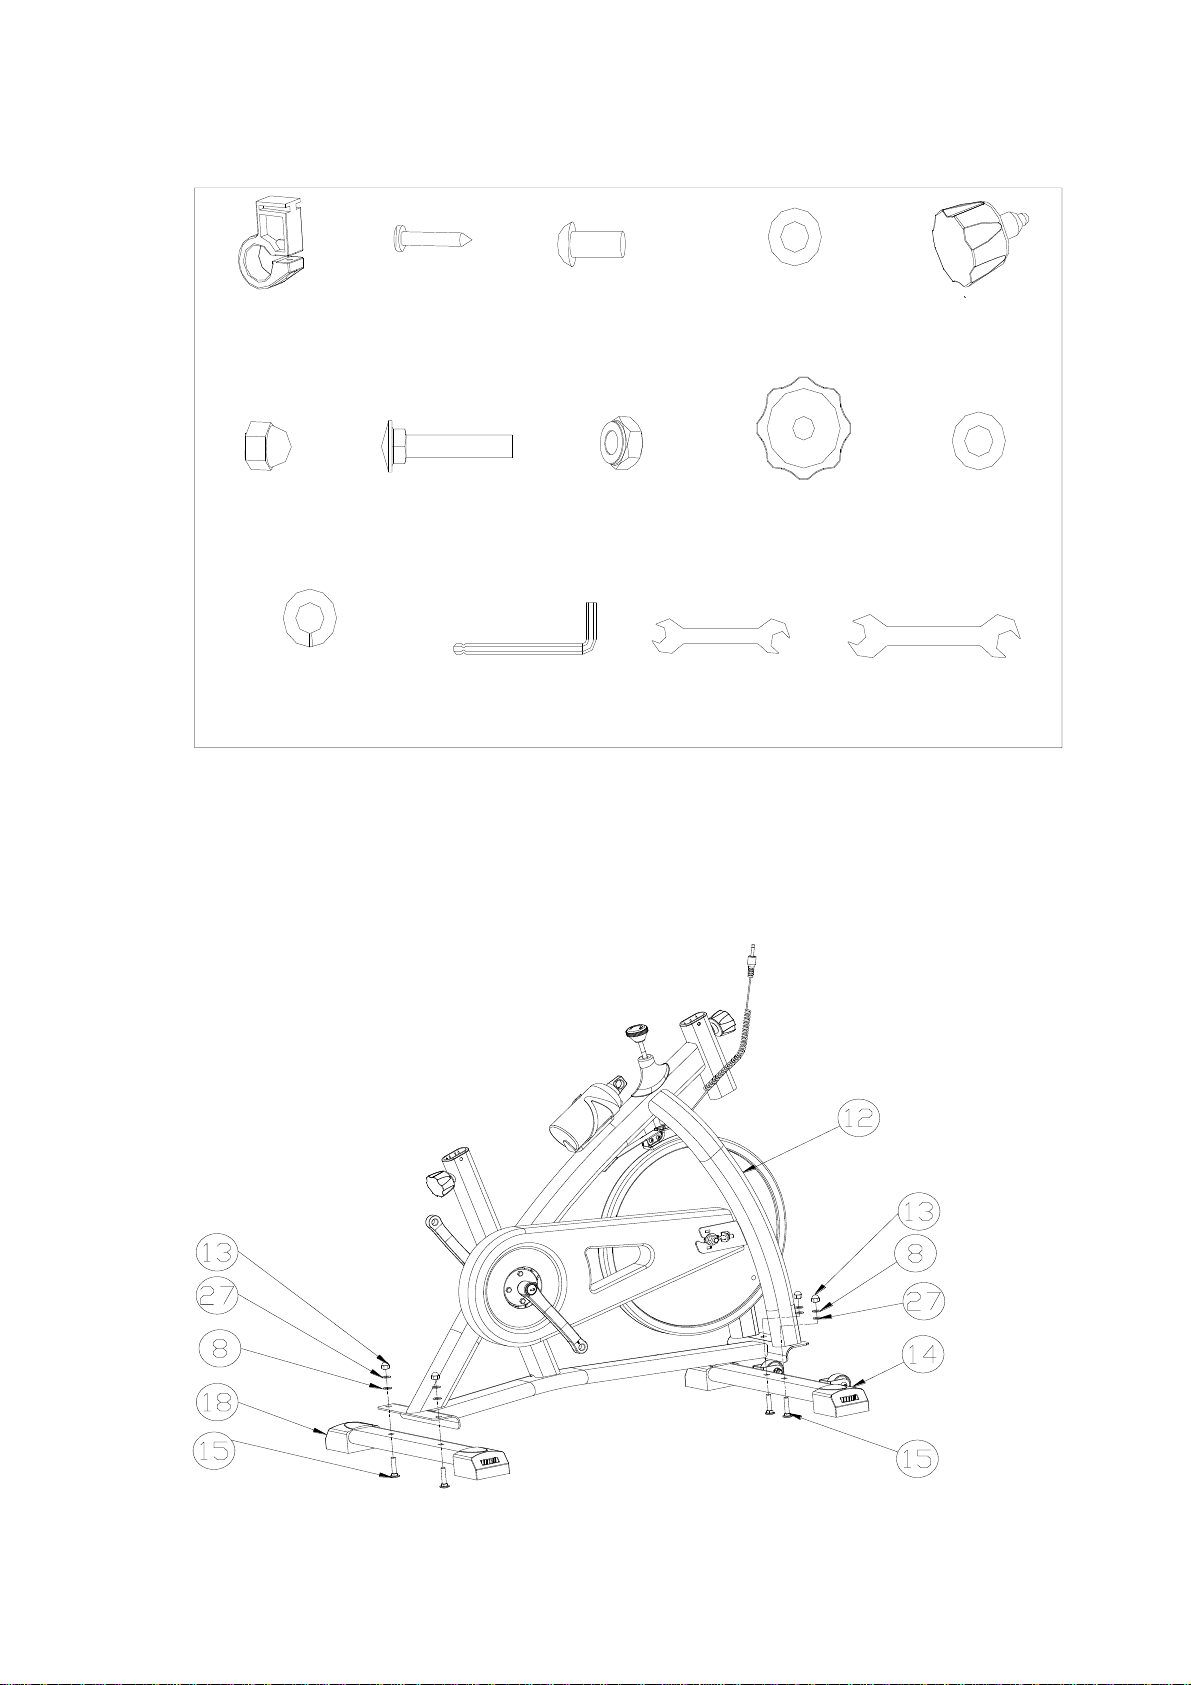
ASSEMBLY EXPLODED DRAWING

PART LIST
No.
DESCRIPTION
SPEC
QTY
1
Computer
1
2
Contact line
3
3
Computer holder
1
4
Screw
ST4*25
1
5
Pulse line
2
6
Handlebar
1
7
Allen key bolt
M6*12
4
8
Flat washer
Ø16*Ø8.5*1.2
4
9
Handle post
1
10
Sensor contact line
1
11
Adjust knob
M16*22
2
12
Main frame
1
13
Domed nut
M8
4
14
Front Base
1
15
Carriage bolt
M8*40
4
16
Pedal(R)
9/16
1
17
Nut for lock Pedal(R)
9/16
1
18
Rear base
1
19
Nut for lock Pedal(L)
9/16
1
20
Pedal(L)
9/16
1
21
Seat post
1
22
Knob2
M10
1
23
Flat washer
Ø20*Ø10.5*1.5
1
24
Saddle slider
1
25
Seat
1
27
Flat washer
Ø16*Ø8.5*1.2
4

3# C om puter
holder
1pc
4# Screw
ST4*25
1pc
7# Allen key bolt
M6*12
4PCS
8# Flat washer
?16*?8.5*1.2 4PCS
13# Domed nut
M8 4pcs
15# Carriage bolt
M8*40 4pcs 17# Nut 9/16 1pc
19# Nut 9/16 1pc
22# Knob2
M10 1pc
23# Flat washer
?20*?10.5*1.5
1pc
Wrench
1pc
11# Adjust knob
M16*22 2PCS
27# Flat washer
?12.5*?8.2*2 4PCS
Wrench
1pc
Wrench
1pc
PRODUCT INSTALLATION
Step 1
Take the Bike Main Frame out from the carton.
Attach the Front Base (14) to the Main Frame(12), using Carriage bolt (15), Washer (8/27) and
Domed nut (13). Tighten it by Wrench.
Attach the Rear Base (18) to the Main Frame too, using Carriage bolt (15), washer (8/27) and
Domed nut (13). Tighten it by Wrench.
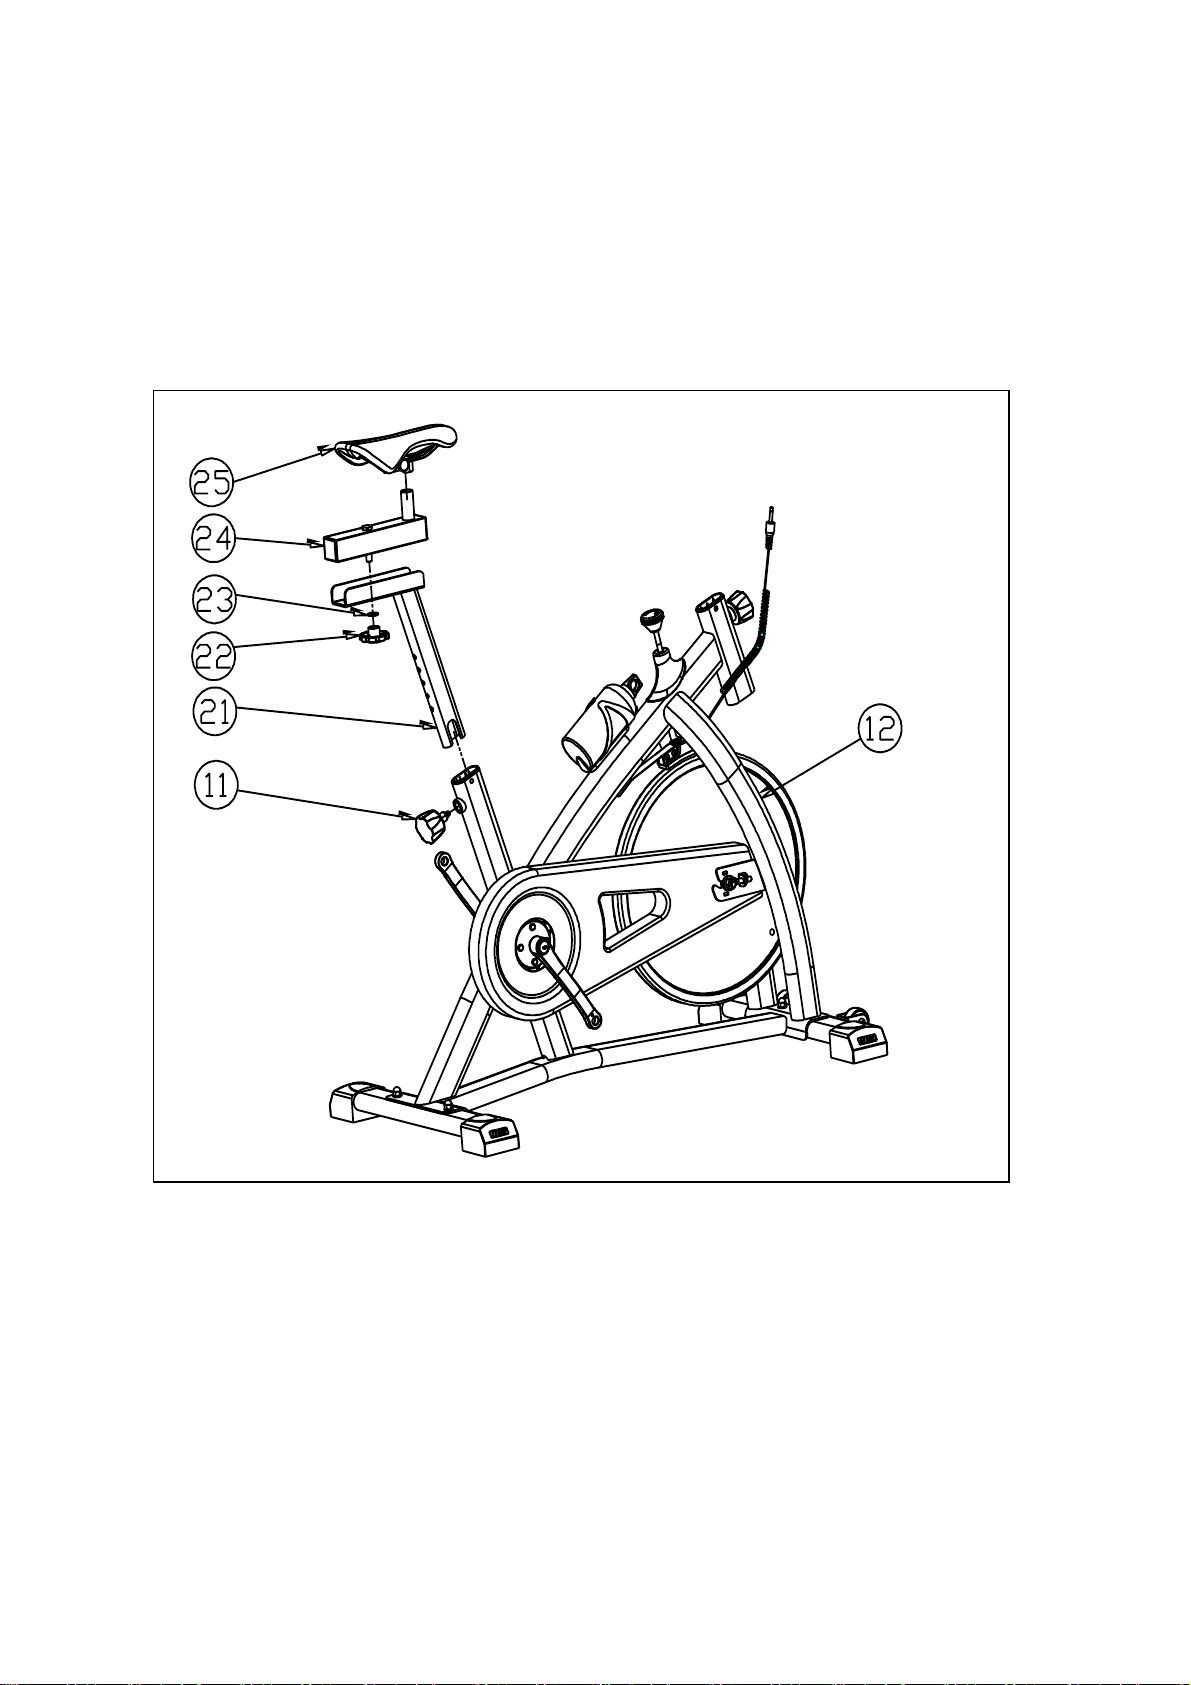
Step 2:
Insert the Saddle Post (21) to the main frame(12), fasten it by adjust knob (11).
Attach saddle slider (24) to the Saddle post (21), fasten it using Washer (23) and knob2 (22).
Tighten the saddle by wrench.
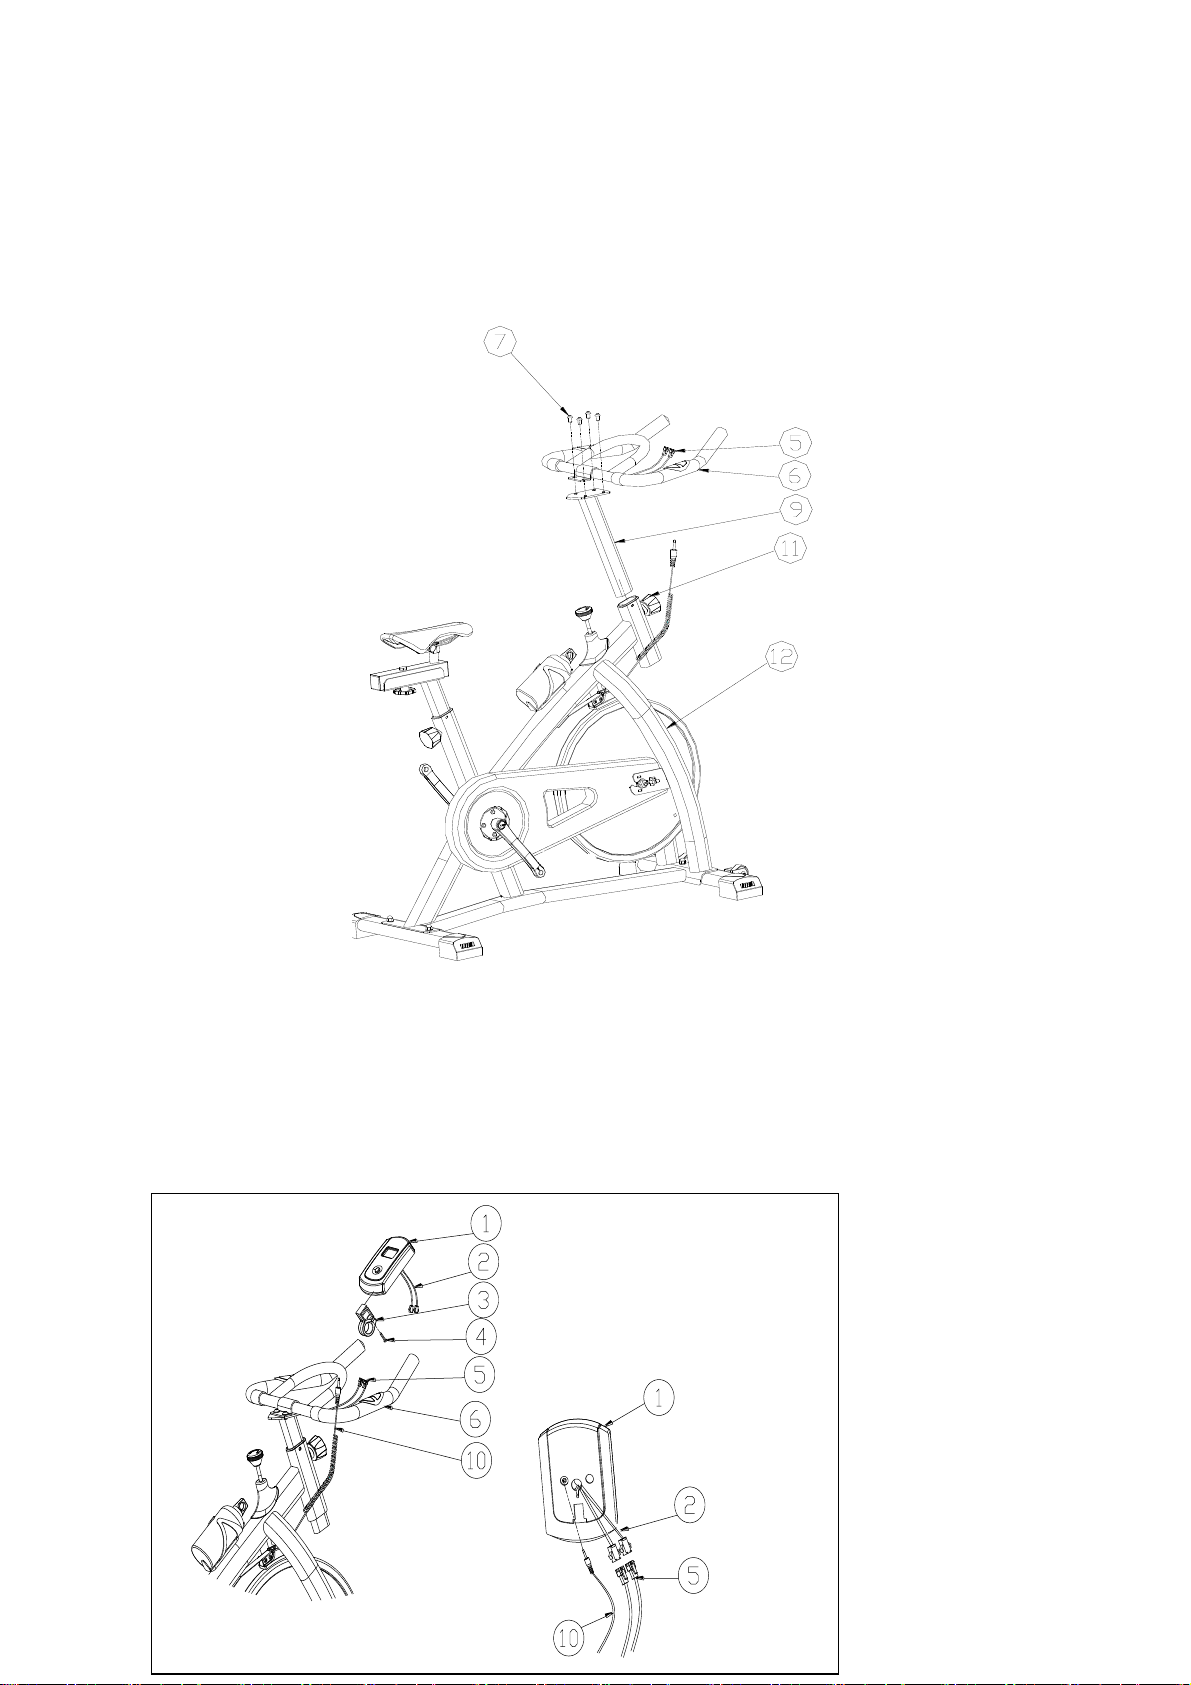
Step 3
Insert Handle Post (9) to the main frame(12). Tighten by adjust knob (11).
Attach handle bar (6) to the Handle Post (9), using Allen key bolt (7) and washer (26). Tighten
by Allen key wrench.
Step 4
Attach Computer Holder (3) to the handle bar, using screw (4).
Slide the computer (1) onto the computer holder (3).
Then contact the lines by corresponding.
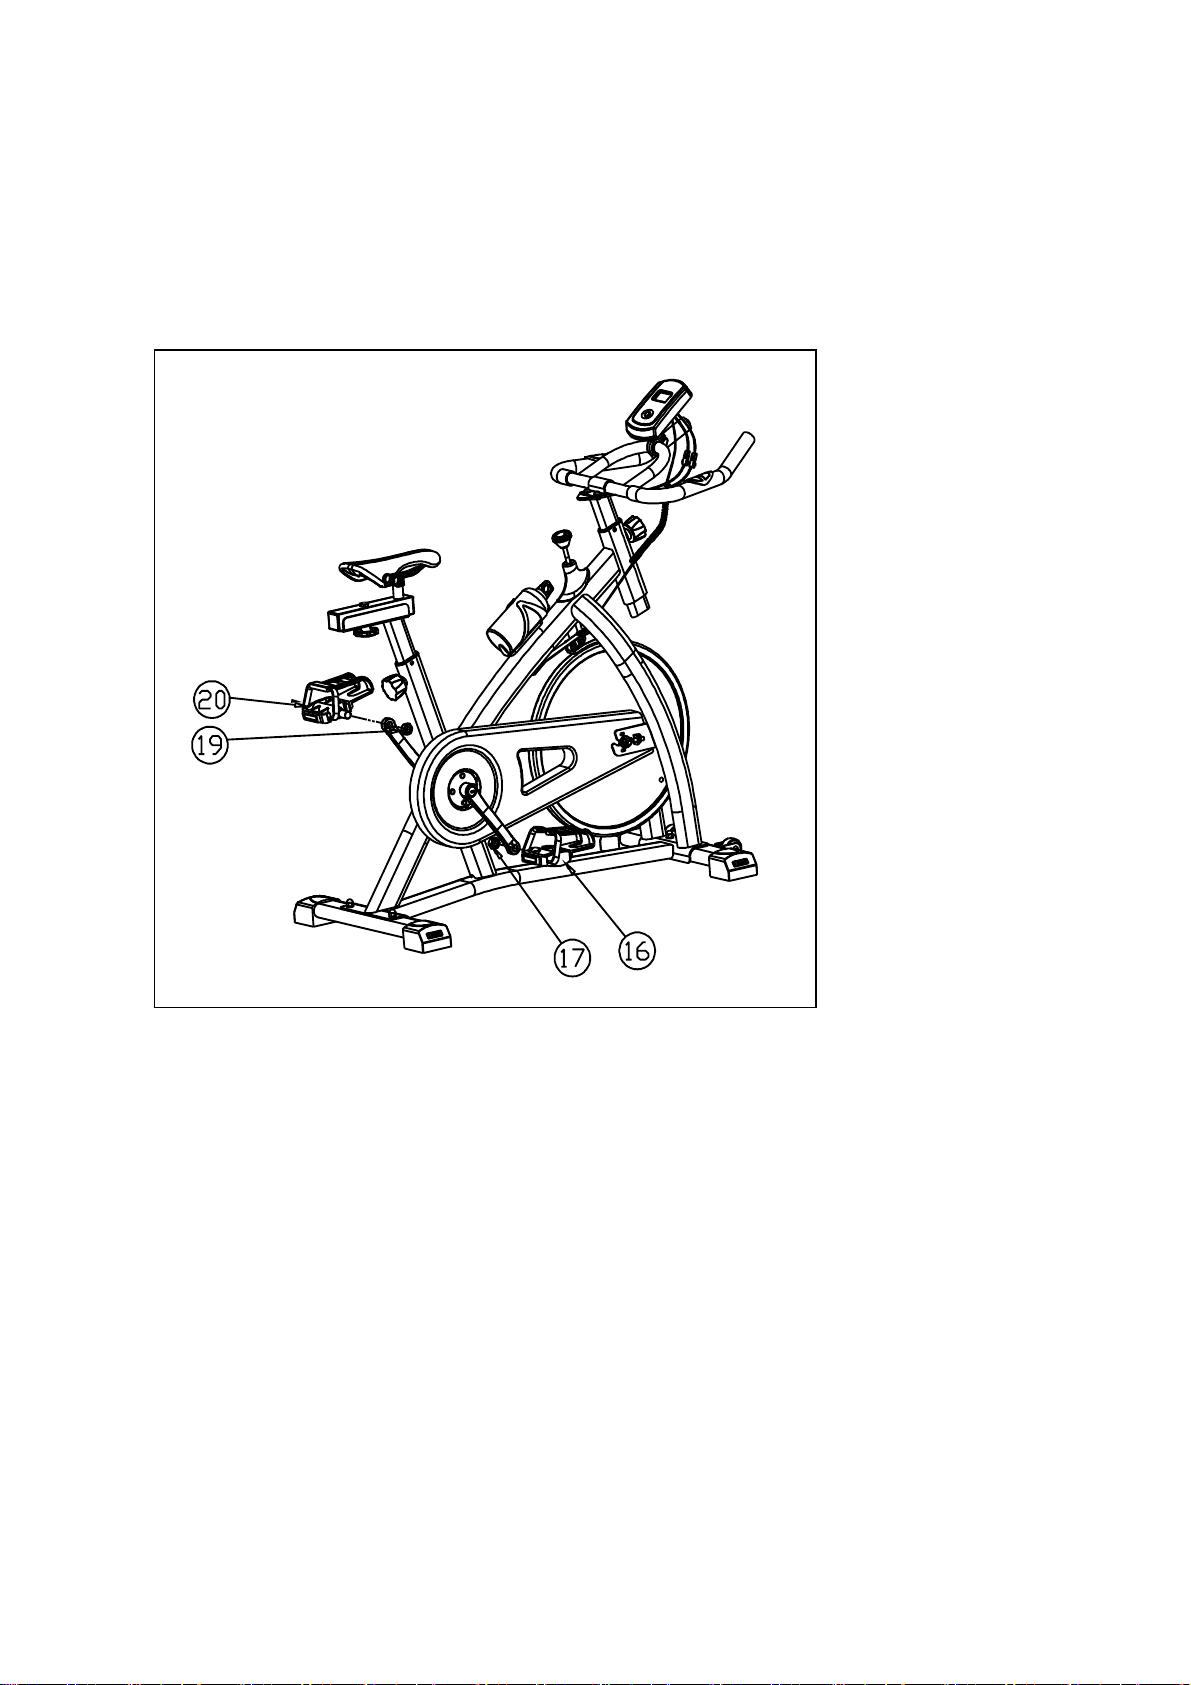
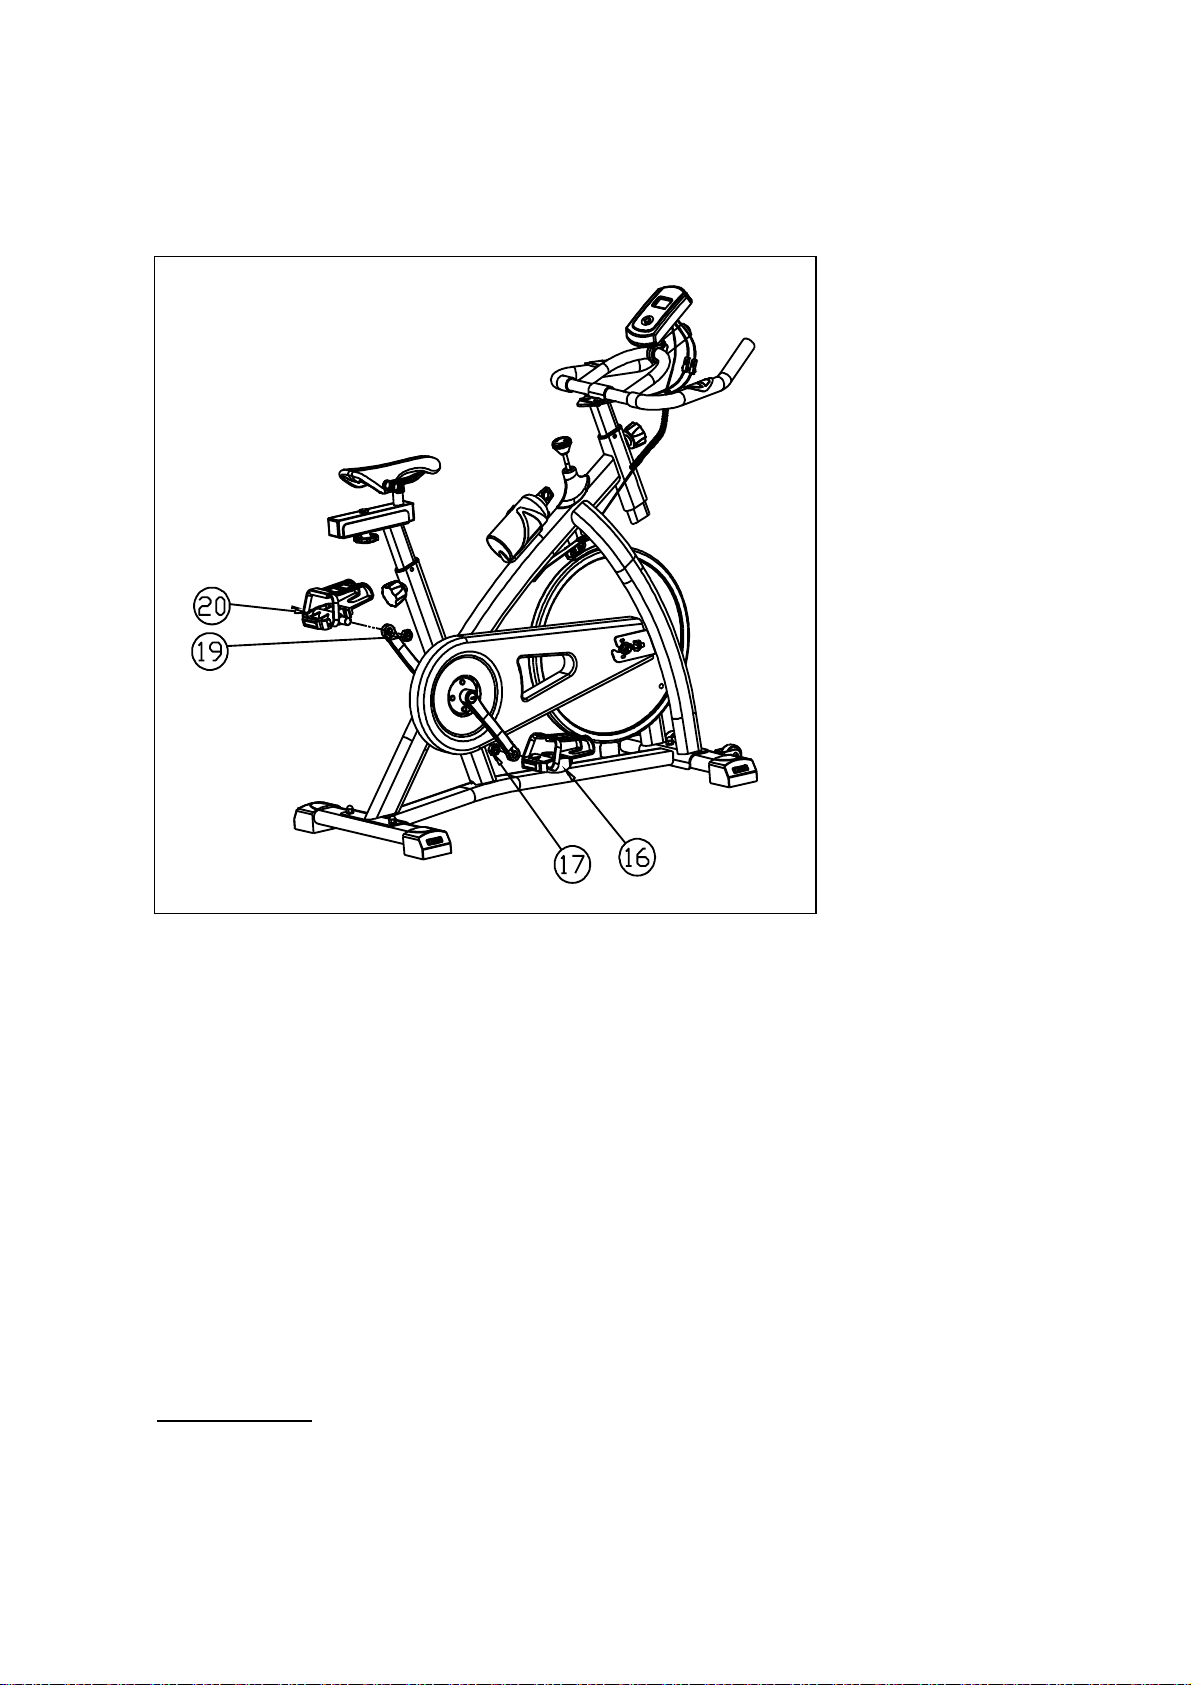
Step 5:
Remove the nut (17) which on the right pedal (16) firstly.
Then attach the right pedal (16) to the main frame (12) tuning by clockwise.
Lock the removed nut (17) back use 17-19 wrench. Completely tighten by wrench.
Remove the nut (19) which on the left pedal firstly.
Then attach the left pedal (20) to the main frame (12) tuning by anti-clockwise.
Lock the removed nut (19) back use 17-19 wrench. Completely tighten by wrench.
IMPORTANT NOTES:
Note that the Right pedal should be threaded on clockwise and the Left pedal
anti-clockwise!
EXERCISE INSTRUCTIONS
Using your EXERCISE CYCLE will provide you with several benefits, it will improve your
physical fitness, tone muscle and in conjunction with calorie controlled diet help you lose
weight.
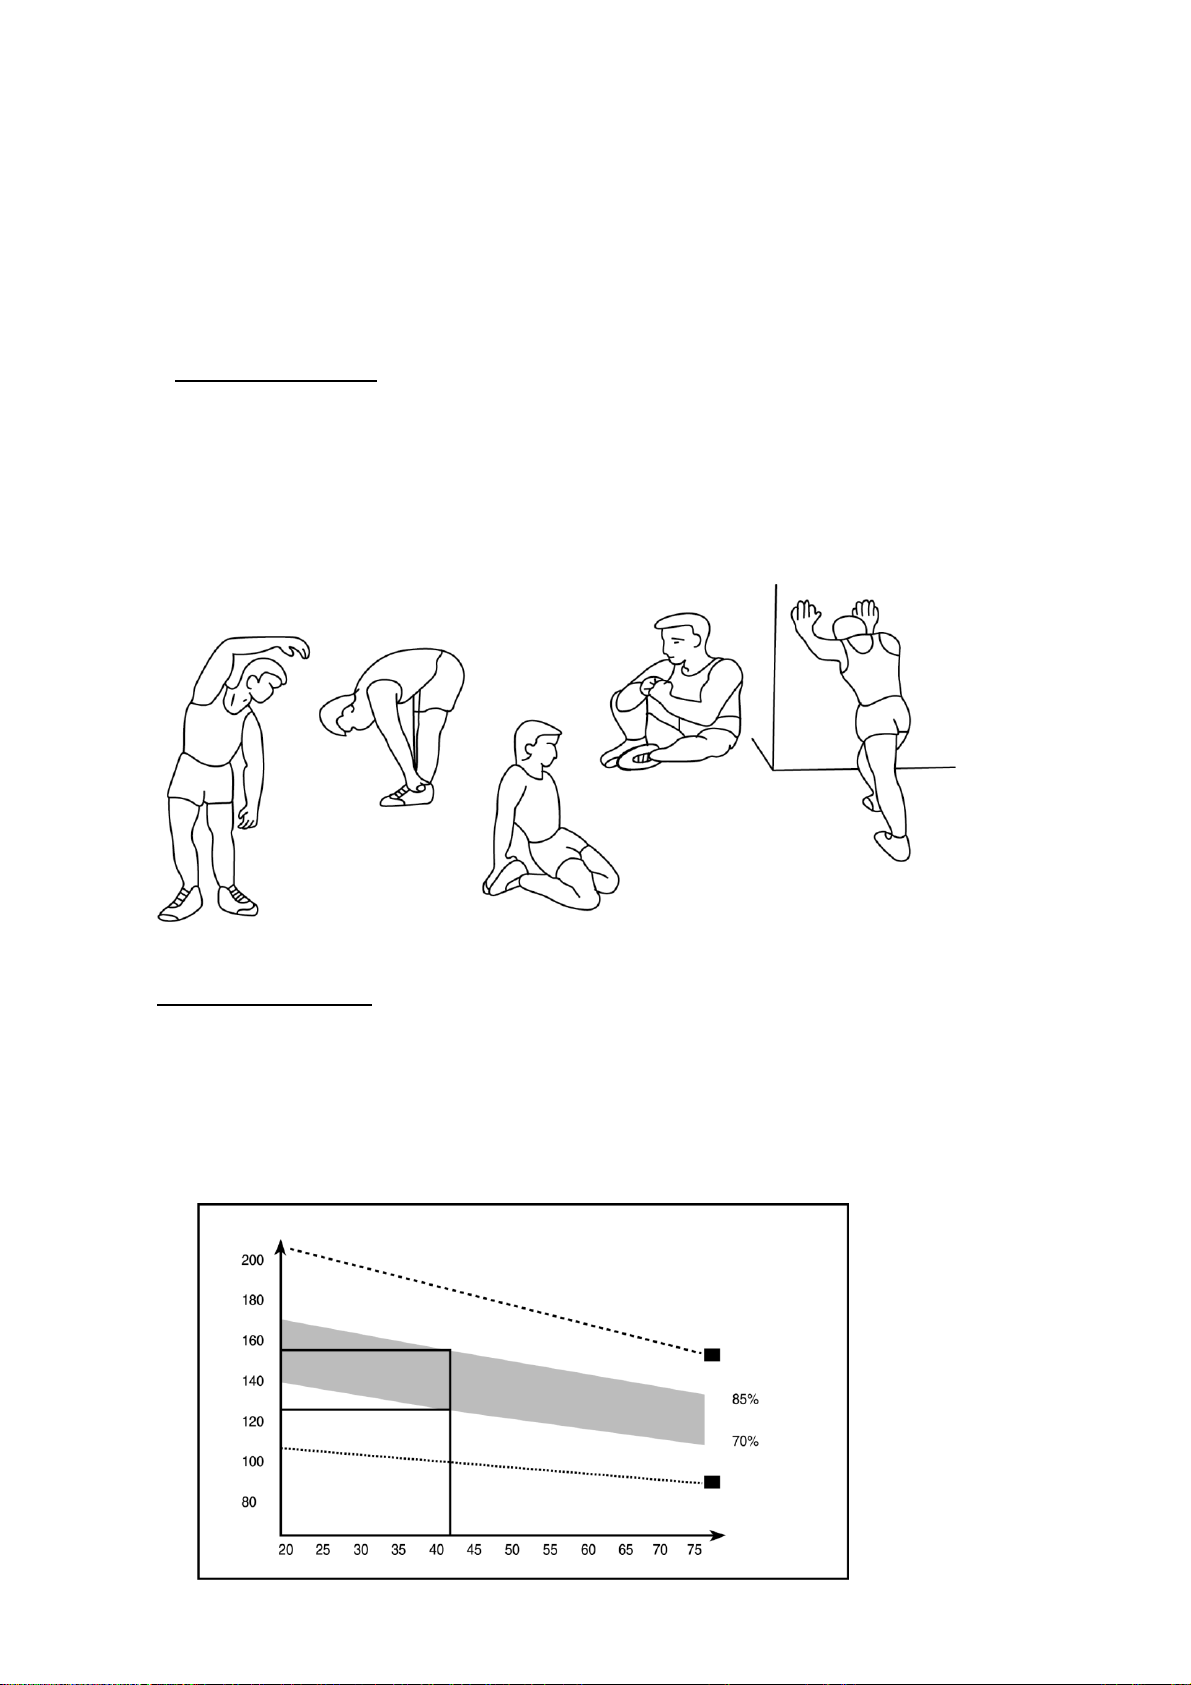
1.The Warm Up Phase
This stage helps get the blood flowing around the body and the musclesworking properly. Itwill
also reduce the risk of cramp and muscle injury. It is advisable to do a few stretching exercises
as shown below. Each stretch should be held for approximately 30 seconds, do not force or
jerk your muscles into a stretch - if it hurts, STOP.
2.The Exercise Phase
This is the stage where you put the effort in. After regular use , the muscles in your legs will
become more flexible. Work to your own pace but it is very important to maintain a steady
tempo throughout. The rate of work should be sufficient to raise your heart beat into the target
zone shown on the graph below.
SIDE BENDS
FORWARD
BENDS
OUTER THIGH
INNER THIGH
CALF / ACHILLES
HEART RATE
MAXIMUM
COOL DOWN
AGE
TARGET ZONE

This stage should last for a minimum of 12 minutes though most people start at about
15-20minutes
3. The Cool Down Phase
This stage is to let your Cardio-vascular System and muscles wind down. This is a repeat of
the warm up exercise e.g. reduce your tempo, continue for approximately 5 minutes. The
stretching exercises should now be repeated, again remembering not to force or jerk your
muscles into the stretch. As you get fitter you may need to train longer and harder. It is
advisable to train at least three times a week, and if possible space your workouts evenly
throughout the week.
4. Fault Finder
1. If you do not receive numbers appearing on your computer, please ensure all connections
are correct.
MUSCLE TONING
To tone muscle while on your EXERCISE CYCLE you will need to have the resistance set quite
high. This will put more strain on your leg muscles and may mean you cannot train for as long
as you would like. If you are also trying to improve your fitness you need to alter your training
program. You should train as normal during the warm up and cool down phases, but towards
the end of the exercise phase you should increase resistance making your legs work harder.
You will have to reduce your speed to keep your heart rate in the target zone.
WEIGHT LOSS
The important factor here is the amount of effort you put in. The harder and longer you work the
more calories you will burn. Effectively this is the same as if you were training to improve your
fitness, the difference is the goal.
USE
The seat height can be adjusted by removing the adjustment knob and raising or lowering the
seat. There are 7 holes in the seat post allowing for a range of heights. Once the correct height
has been chosen, refit the adjustment knob and tighten. The tension control knob allows you to
alter the resistance of the pedals. A high resistance makes it more difficult to pedal, a low
resistance makes it easier. For the best results set the tension while the bike is in use.
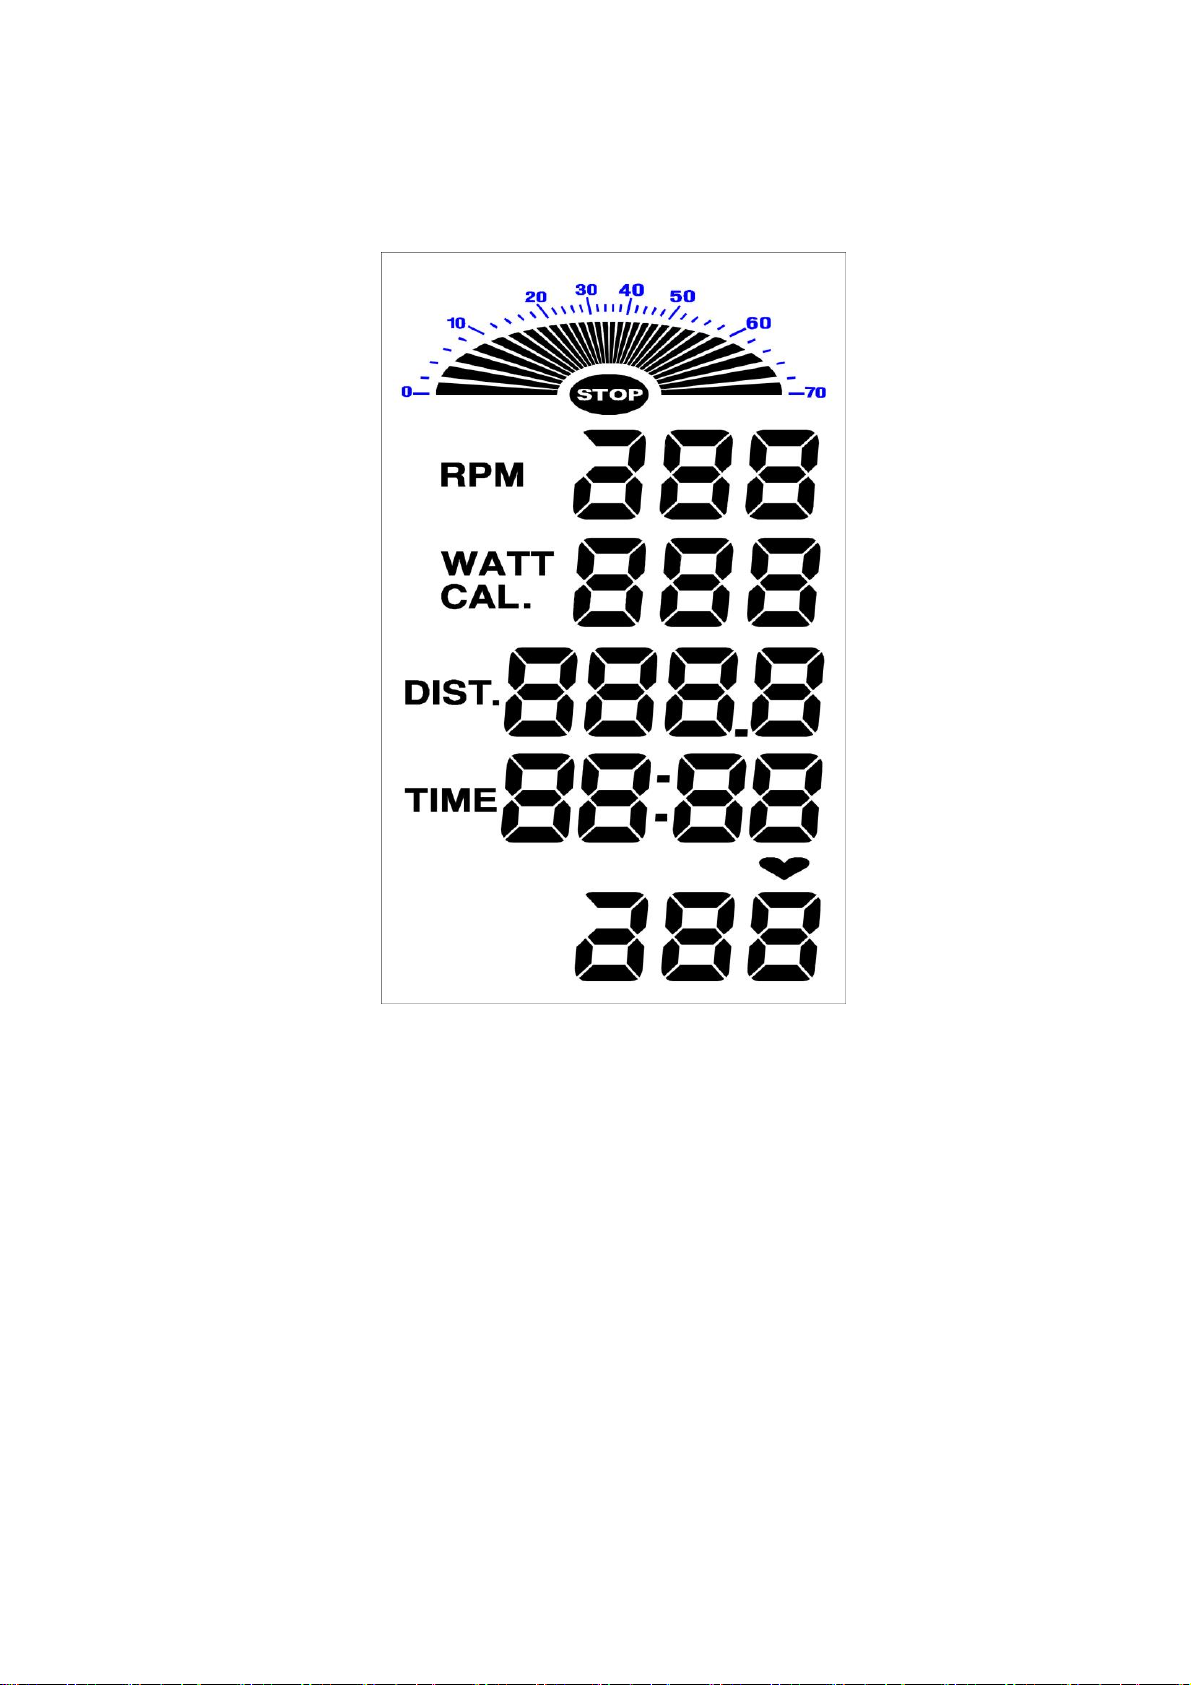
EXERCISE MONITOR INSTRUCTION MANUAL
一.General:
This console has non-backlit LCD which displays Speed, RPM, Calories, Distance, Time
and Pulse.
二.Power On / Off:
The display will be active to show all data upon pedaling. Once pedaling stops, LCD will
remain blinking displaying latest data before pedaling stopped. The display will switch off if
pedal stopped over 45 seconds.
三.Display data:
a. SPEED:
Start from 0 and plus. On Top of the LCD display showing current speed with pointer.
b. TIME:
Start from 0 and plus showing total time of this workout. Range: 00:00~99:59
c. RPM:
Rotation Per Minute. Range: 0~140. If RPM exceeds 140, LCD will show STOP for
safety reason.
d. DISANCE:
Start from 0 and plus. Range: 000.0~999.9 ; Increase: 0.1 KM
e. CALORIES:
Start from 0 and plus showing calories consuming of this workout. Range: 000.0~999.9
f. PULSE:
User’s current heart rate will be displayed in beats per minute. Place the
palms of your hands on both of the contact pads and wait for 30 seconds for
the most accurate reading.
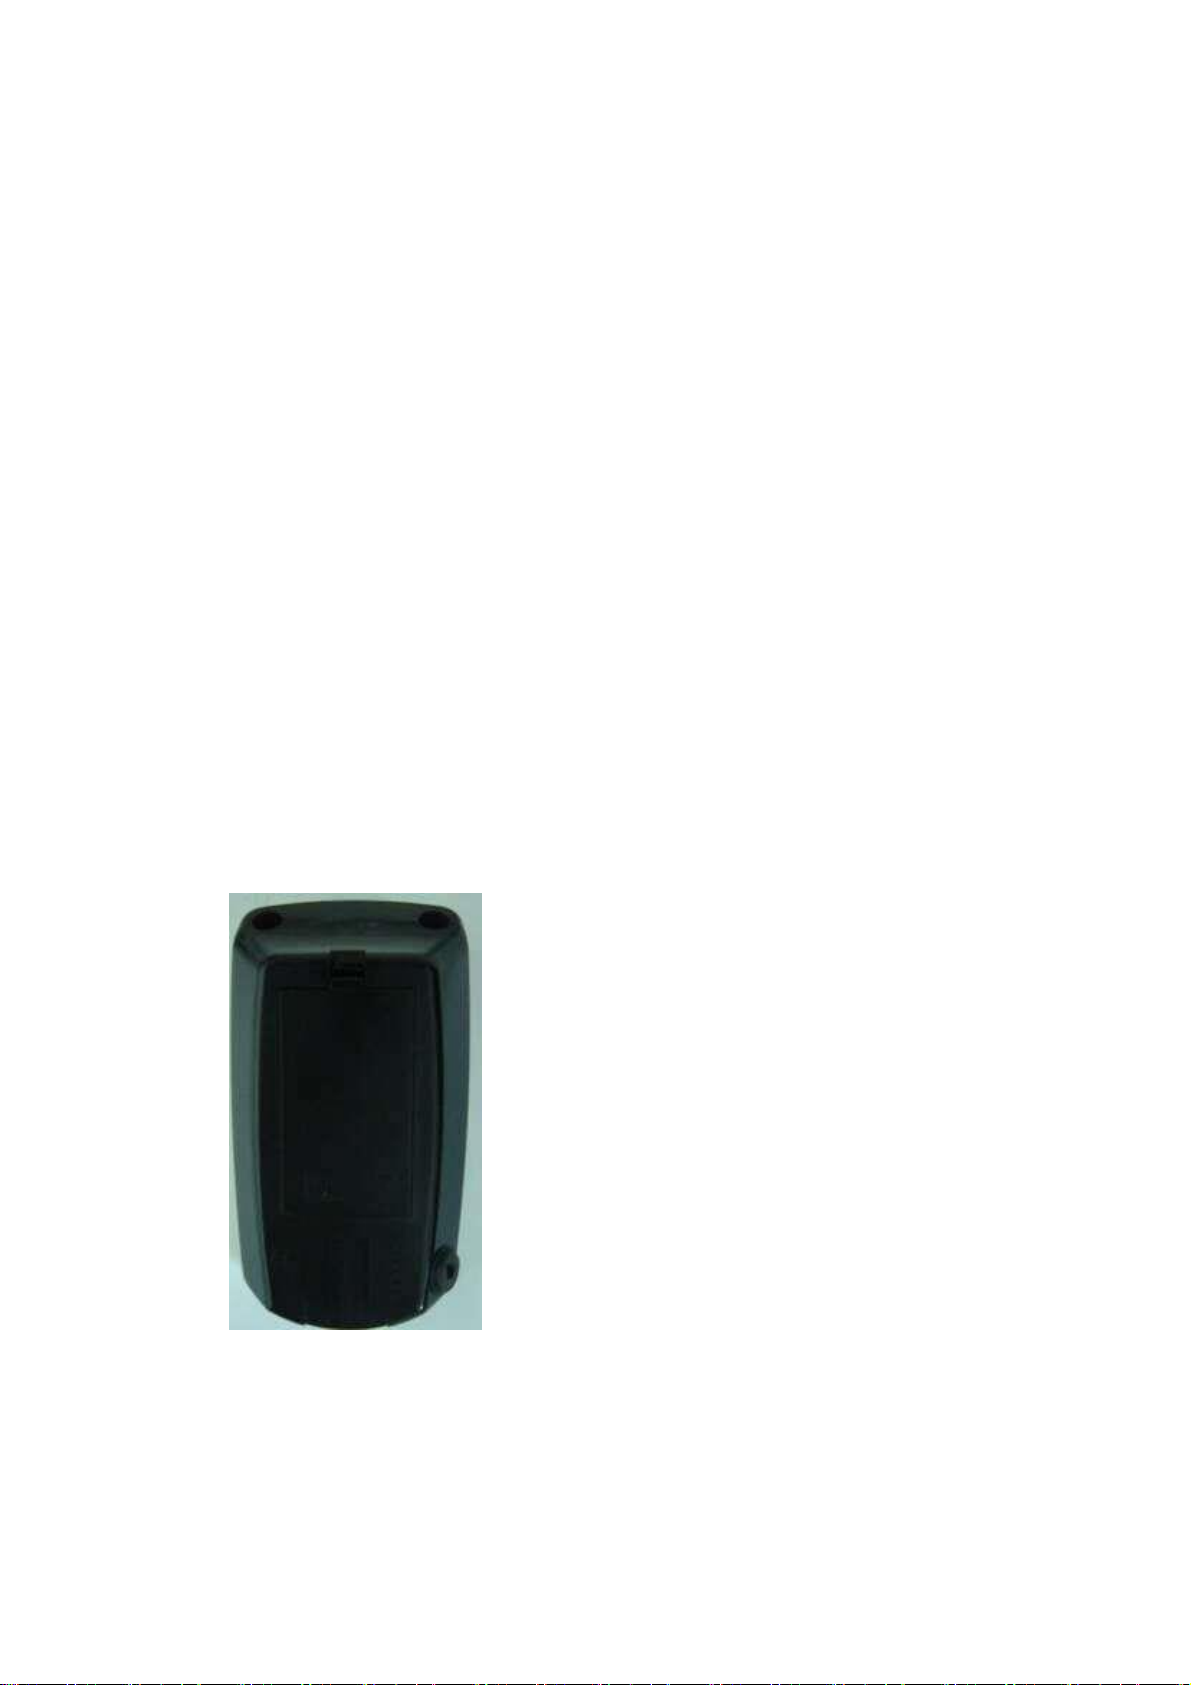
g. Replace the battery
Backside up.
Take the battery cover apart
Be noted both batteries are positive end downward. Put the batteries on and cover the
back cover.

SPEEDER X
СПИНИНГ БАЙК
ART. BF58001
УПЪТВАНЕ
ДИАГРАМА НА УРЕДА

ЧАСТИ НА УРЕДА
No.
ИМЕ
СПЕЦ.
БРОЙ
1
Computer
1
2
Contact line
3
3
Computer holder
1
4
Screw
ST4*25
1
5
Pulse line
2
6
Handlebar
1
7
Allen key bolt
M6*12
4
8
Flat washer
Ø16*Ø8.5*1.2
4
9
Handle post
1
10
Sensor contact line
1
11
Adjust knob
M16*22
2
12
Main frame
1
13
Domed nut
M8
4
14
Front Base
1
15
Carriage bolt
M8*40
4
16
Pedal(R)
9/16
1
17
Nut for lock Pedal(R)
9/16
1
18
Rear base
1
19
Nut for lock Pedal(L)
9/16
1
20
Pedal(L)
9/16
1
21
Seat post
1
22
Knob2
M10
1
23
Flat washer
Ø20*Ø10.5*1.5
1
24
Saddle slider
1
25
Seat
1
27
Flat washer
Ø16*Ø8.5*1.2
4
3# C om puter
holder
1pc
4# Screw
ST4*25
1pc
7# Allen key bolt
M6*12
4PCS
8# Flat washer
?16*?8.5*1.2 4PCS
13# Domed nut
M8 4pcs
15# Carriage bolt
M8*40 4pcs 17# Nut 9/16 1pc
19# Nut 9/16 1pc
22# Knob2
M10 1pc
23# Flat washer
?20*?10.5*1.5
1pc
Wrench
1pc
11# Adjust knob
M16*22 2PCS
27# Flat washer
?12.5*?8.2*2 4PCS
Wrench
1pc
Wrench
1pc
инсталация

Стъпка 1
Извадете основната рамка от картонената опаковка.
Прикрепете предната основа (14) към основната рамка (12), като използвате болт (15), шайба
(8/27) и гайка (13). Затегнете го с гаечен ключ.
Прикрепете и задната основа (18) към основната рамка, като използвате болт (15), шайба (8/27) и
гайка (13). Затегнете го с гаечен ключ.

Стъпка 2:
закрепете го с регулиращо копче (11).
Прикрепете плъзгача на седлото (24) към стойката на седлото (21), закрепете го с помощта на
шайба (23) и копче2 (22). Затегнете с ключ.
Стъпка 3
Поставете дръжка (9) към основната рамка (12). Затегнете с копчето за регулиране (11).
Прикрепете ръкохватката на дръжката (6) към дръжката на дръжката (9), като използвате болт на
ключа на Ален (7) и шайба (26). Затегнете с ключ.
Step 4
Прикрепете компютърния държач (3) към дръжката с помощта на винт (4).
Плъзнете компютъра (1) върху държача на компютъра (3).
След това се свържете с линиите, като съответствате.
Стъпка 5:
Отстранете първо гайката (17), която е на десния педал (16).
След това прикрепете десния педал (16) към настройката на основната рамка (12) по посока на
часовниковата стрелка.
Заключете отстранената гайка (17) назад, използвайте гаечен ключ 17-19. Напълно затегнете с
гаечен ключ.
Отстранете първо гайката (19), която е на левия педал.
След това прикрепете левия педал (20) към настройката на основната рамка (12), обратно на
часовниковата стрелка.
Заключете отстранената гайка (19) назад, използвайте гаечен ключ 17-19. Напълно затегнете с
гаечен ключ.
ВНИМАНИЕ:
Обърнете внимание, че десният педал трябва да бъде с резба по посока
на часовниковата стрелка, а левият педал обратно на часовниковата стрелка!

УПЪТВАНЕ НА КОМПЮТЪРА
二. Включване / изключване :
Дисплеят ще бъде активен, за да показва всички данни при въртене на педалите. След като спре
въртенето, LCD ще остане да мига, показвайки най-новите данни преди спирането на педала.
Дисплеят ще се изключи, ако въртенето спре за 45 секунди.
三. Показване на данни:
а. SPEED (Скорост):
Започнете от 0 и увеличавайте. Отгоре на LCD дисплея показва текущата скорост.
b. Time (Време):
Започнете от 0 и плюс показване на общото време на тази тренировка. Обхват: 00: 00 ~ 99: 59
c. RPM (Обороти):
Въртене на минута. Обхват: 0 ~ 140. Ако RPM надвишава 140, LCD ще покаже STOP от
съображения за безопасност.
d. DISANCE (изминато разстояние):
Започнете от 0 и плюс. Обхват: 000.0 ~ 999.9; Увеличение: 0,1 KM
e. Calories (Kалории):
Започнете от 0 и плюс, показващи консумацията на калории от тази тренировка. Обхват: 000.0 ~
999.9
f. Pulse (ПУЛС):
Настоящият сърдечен ритъм на потребителя ще се показва в удари в минута. Поставете длани на
ръцете си върху двете контактни подложки и изчакайте 30 секунди. Пулсът не може да се
използва за диагностициране.

ИЗХВЪРЛЯНЕ:
Моля, запазете опаковката за случаи на ремонт /гаранционен ремонт . Уредът не трябва да се
изхвърля заедно с домашния боклук.
Уважаеми клиенти, Вие сте длъжни да предадете за рециклиране съответните материали от
уреда:
- Външна опаковка (картон)
- Отляти части от полистрол
- Опаковки и торбички от полиетилен
- Електрооборудване
- Каиши от полипропилен
- Уредът не трябва да се изхвърля заедно с домашния боклук
За връзка с фирми за рециклиране на отпадъците се обърнете към вносителя!
ВНОСИТЕЛ ЗА БЪЛГАРИЯ:
СПОРТЕН СКЛАД БГ
Соларшоп ЕООД
гр. Пазарджик, ул. Димчо Дебелянов 5
тел: 0888 827 355
E-mail: info@sportensklad.bg
www.sportensklad.bg
This manual suits for next models
1
Table of contents
Languages:
Other Body flex Exercise Bike manuals


