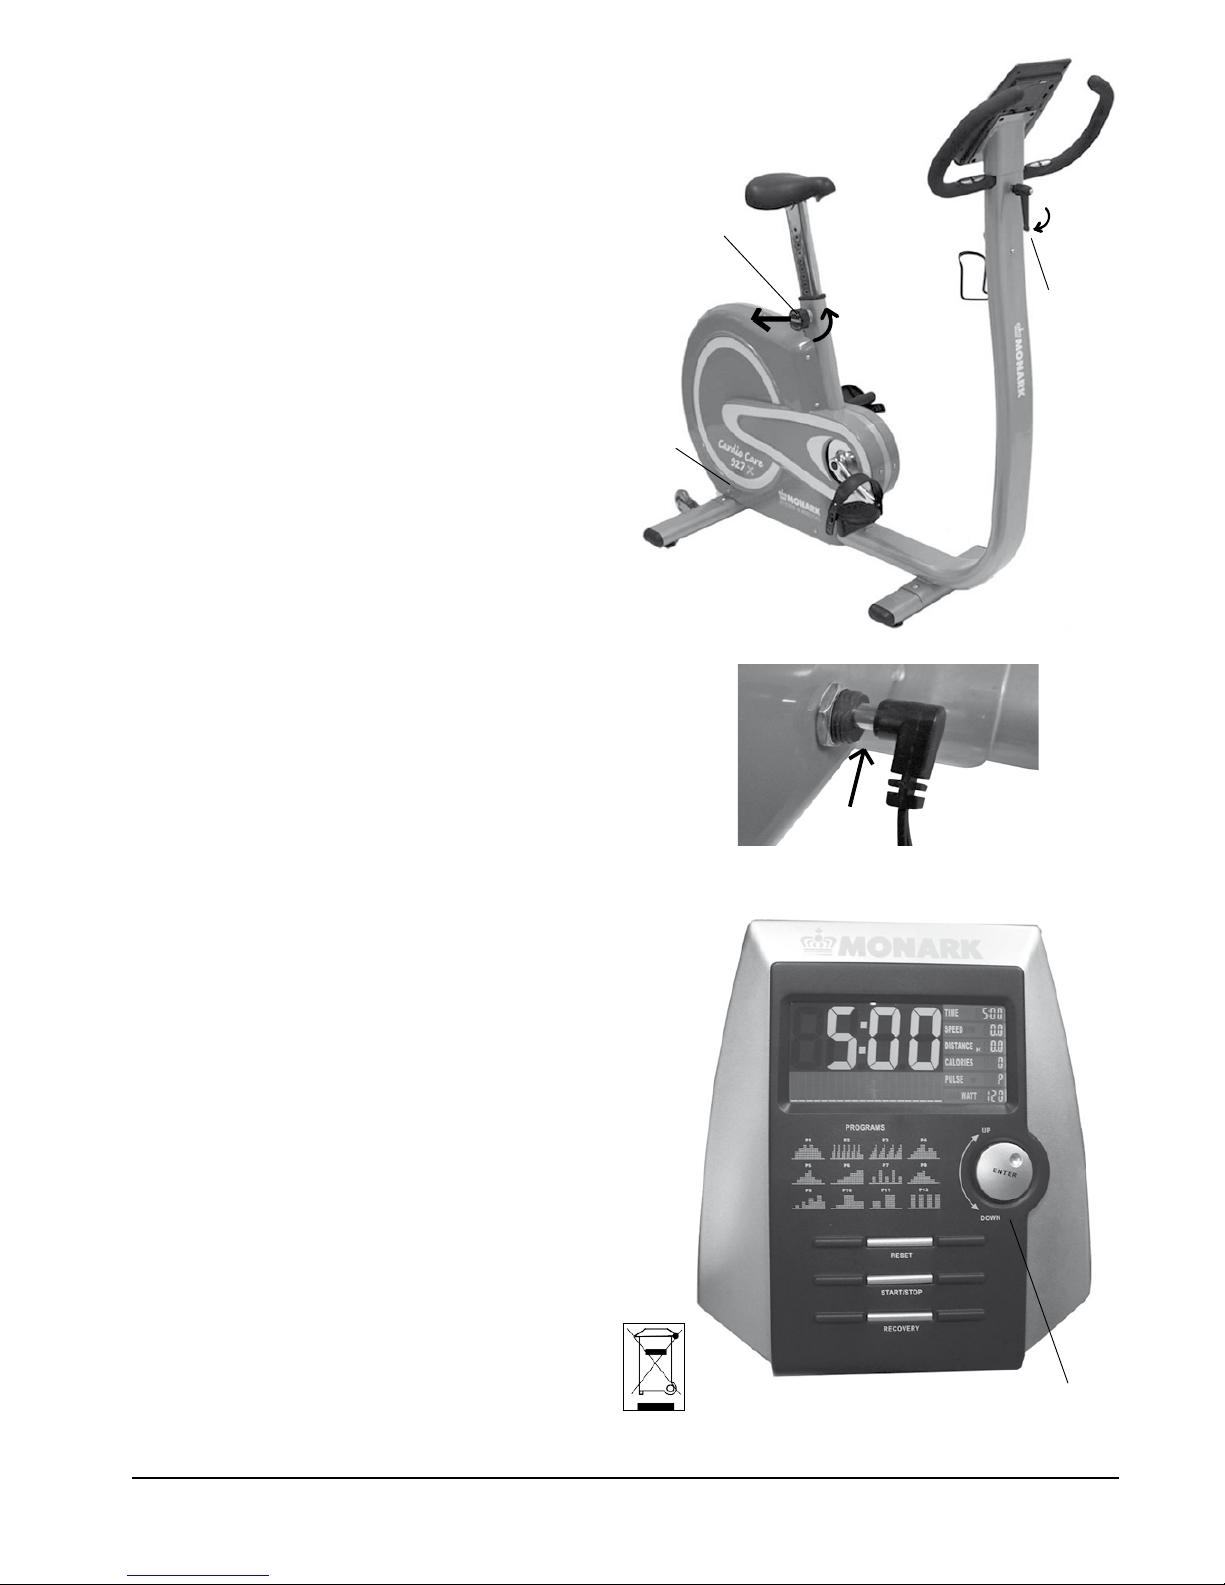
Monark 927 X User manual

EN
Manual 927 X


Product Information ��������������������������������������� 5
Facts ��������������������������������������������������������������������� 5
Serial number�������������������������������������������������������� 5
Operating Instruction ������������������������������������� 6
Cycle adjustments������������������������������������������������� 6
Connection������������������������������������������������������������ 6
Workload adjustment �������������������������������������������� 6
Electronic meter ���������������������������������������������������� 7
Brake force spring adjustment ���������������������������� 10
Trouble shooting guide ������������������������������� 11
Service ���������������������������������������������������������� 12
Warranty ������������������������������������������������������������� 12
Service check and Maintenance ������������������������� 12
Batteries�������������������������������������������������������������� 13
Flywheel bearing������������������������������������������������� 13
Crank bearing ����������������������������������������������������� 13
Transportation ����������������������������������������������������� 13
Replacement of brake belt ���������������������������������� 13
Brake belt contact surface ���������������������������������� 13
Chain 1/2“ x 1/8“ ������������������������������������������������� 14
Freewheel sprocket��������������������������������������������� 15
Spare parts list ��������������������������������������������� 16
2016 MONARK EXERCISE AB, Vansbro, Sweden
Contents
Important
Read the manual carefully before using the cycle
and save it for future use.

Monark 927 X
4
Monark Exercise AB
Monark has 100 years’ experience of bicycle production. The Monark tradition has yielded
know-how, experience, and a real feel for the product and quality. Since the early 1900s,
Monark’s cycles have been living proof of precision, reliability, strength and service. Those
are the reasons why we are now the world leader in cycle ergometers and the market leader
in Scandinavia in transport cycles.
We manufacture, develop and market ergometers and exercise bikes, transport bikes and
specialized bicycles. Our largest customer groups are within health care, sports medicine,
public authorities, industry and postal services.
For more information: http://www.monarkexercise.se

1
Monark 927 X
5
Product Information
Congratulations on your new exercise bike!
Monark Cardio Care 927 X is designed to be used
for exercise and rehabilitation. This model has an
electronic meter with 12 different training programs.
The model provides a constant workload independent
of pedal speed when training in WATT mode. Model
Cardio Care 927 X is equipped with a display showing
Speed in km/h, Distance in km, exercise Time in
minutes, heart rate in beats per minute and workload
in Watts.
Note that 927 X is an exercise model that can not be
calibrated. It is not for testing when the display just
shows an estimate value.
For complete directions please read section ”Electronic
meter”.
Facts
• Large, well-balanced flywheel 20 kg (44 lbs)
• Adjustable saddle with quick release lever
• Adjustable handlebar
• Stable frame, solid steel tube
• Powder painted
• Wheels for easy transport
• Electronic meter with training programs
• Sensors in the handles for heart rate measuring
Width
500 mm (20”) at handlebar
640 mm (25”) at support tubes
Length
1240 mm (48.8")
Height
1260 mm (49.6”) at handlebar
780-1170 mm (30.7"-46”) at seat
Weight
56 kg (123½ lbs)
Max user weight 250 kg (551 lbs)
Included
Power adaptor (12 V max)
Technical data power adaptor
Output voltage: +9V DC
Current: 500 mA
Polarity: Plus (+) in the middle of connector. See Fig:
Polarity.
(Art. No. 9328-178)
Serial number
The serial number is placed according to Fig: Serial
number.
Fig: Serial number (1) Fig: Polarity
NOTE!
Use of the product may involve considerable
physical stress. It is therefore recommended that
people who are not accustomed to cardiovascular
exercise or who do not feel completely healthy,
should consult a physician for advice.

1
1
2
3
Monark 927 X
6
Operating Instruction
Cycle adjustments
Seat height should be adjusted to a comfortable
position. The appropriate height is to have the knee
slightly bent when the sole of the foot is centred over
the pedal axle with the pedal to the bottom position.
When adjusting the saddle height turn the locking
knob (1) located on the seat post and pull it out. See
Fig: Adjustments.
The handlebar setting should be in a comfortable
position when cycling. During longer exercise sessions
it is recommended to occasionally change handlebar
position. To adjust the handlebar, loosen the quick
release lever (2). See Fig: Adjustments, power
connection.
Connection
The bike is powered with the supplied wall adaptor
that connects to a wall outlet. The small round
connector at the end of the adaptor cord is put into
the connector in lower part of the right cover, see Fig:
Adjustments, power connection.
NOTE!
The contact should only be pressed in until it stops.
Do not try to press it further than what is shown in
Fig: Connection.
Workload adjustment
When pedalling the energy is stored in the flywheel.
The flywheel is then braked by means of a brake belt/
cord which runs around the flywheel. The brake belt
tension is controlled by a motor connected to the
electronic meter. Change of the workload is done by
turning the ENTER button on the meter to increase
or decrease the tension of the brake belt against the
flywheel. See Fig: Display
Km/Miles
Km and km/h is the default setting from the factory.
If you want to make a setting in Miles unscrew the
meter from the panel. On the back side is a switch
with two settings – KM and MILES. Select the MILES
mode and fasten the meter in the panel again.
Fig: Adjustments, power connection.
1) Locking knob, saddle
2) Locking handle, handlebar
3) Connection unit
Fig: Display
1) Workload adjustment
Fig: Connection

Monark 927 X
7
Electronic meter
At power on LCD will display all segments for two
seconds with a beep sound. See Fig: 1.
The display shows as in Fig: 2. Turn the ENTER button
to set year / month / day and time. Press ENTER after
each setting. When the settings are finished the display
will go into stand by mode. See Fig: 3.
MAN (manual) is displayed in sleep mode (Fig. 3).
Turn the ENTER button to select training program
MANUAL, PROGRAM, USER, H.R.C. eller WATT
(see Fig: 3-7) and press ENTER to choose. The meter
will enter MANUAL mode for training if no selection
is done.
Training in MANUAL mode
In MANUAL mode you may turn the ENTER button
to select workload level from 1 to 16. The pre-set
level is 1.
After the workload level is selected, set the workout
time by turning the knob and then press ENTER.
Press START to begin training.
Training in PROGRAM mode
In PROGRAM mode you may turn the ENTER
button to select program P01, P02, P03 and so on
up to P12. The chosen program is displayed for two
seconds, see Fig: 8, and then the training profile is
displayed as in Fig: 9.
LOAD 1 (preset value) is glittering after training
program is selected. You may turn UP and DOWN
button to select level from 1 to 16 and press ENTER
to confirm. See Fig: 10.
Work load level can be adjusted during training.
Fig: 1
Fig: 2
Fig: 3 Fig: 4
Fig: 5 Fig: 6
Fig: 7
Fig: 9
Fig: 8
Fig: 10

Monark 927 X
8
Training in USER PROGRAM mode
After USER PROGRAM is selected you may set
preferred program profile by turning the ENTER
button and press ENTER for each flashing column.
There are 20 segments for setting. If you want to
quit during the settings press in ENTER button for 2
seconds to quit. The previous setting will be saved for
unfinished segments.
Training i H.R.C. mode
LOAD 25 (pre-set value) is flashing after H.R.C.
training program is selected. Age can be set by turn
the button until your age is shown. Push ENTER.
The meter will calculate preset heart rate value
automatically according to your age setting. Screen
will show heart rate percentage 55 %, 75 %, 90 %
and target heart rate. You may select heart rate
percentage by turning the ENTER button and then
press the ENTER button, see Fig: 11.
Training in WATT mode
The pre-set watt value 120 is flashing on screen. Turn
the ENTER button until the desired workload is
shown, 10-350 Watt. Press the START button to start
training.
NOTE!
If the training ends and the computer is not detect
any input signal during four minutes, the display will
turning off and show the room temperature, time and
date. Press ENTER for 2 seconds. See Fig: 12. When
meter displays abnormal segments, please turn it off
and then turn it on again.
Fig: 11
Fig: 12

Monark 927 X
9
BUTTONS
ENTER: To set function value for TIME, DIST, CAL, PULSE in sleep mode.
RESET: Return to main function mode in STOP mode and clear all preset function values to
zero.
START / STOP: To start or stop training.
RECOVERY: To test heart rate recovery status.
UP: To select the fitness level and adjust the values upward.
DOWN: To select the fitness level and adjust the values downward.
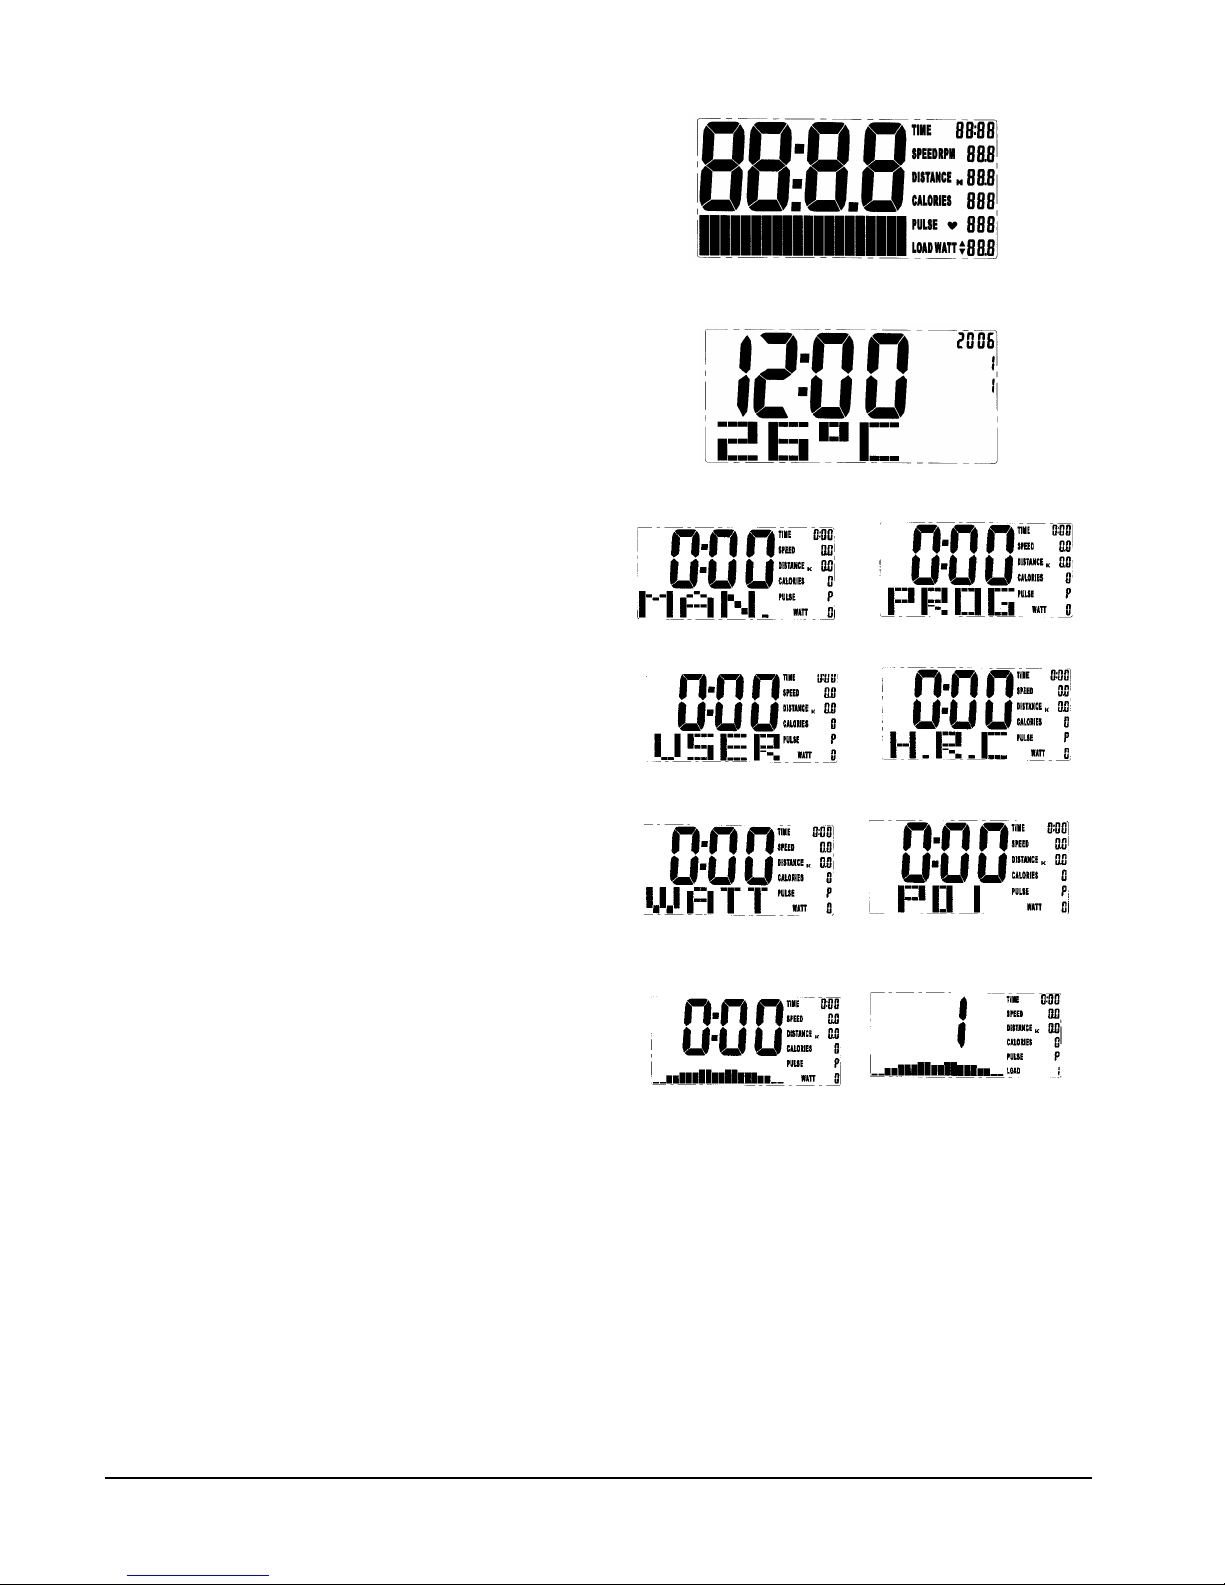
FEATURES
TIME: Count up: No pre-set target, Time will count up from 00:00 to maximum 99:59 where
each increment is one second.
Count down: If training with pre-set Time, the Time will count down from pre-set
value to 00:00.
Each preset increment or decrement is one minute between 99:00 and 1:00.
SPEED: Display current training speed from 0.0 to maximum 99.9 km/h.
RPM: Displays current training rotation per minute.
DISTANCE: Count up: No pre-set target, Distance will count up from 0.00 to maximum 99.90 km
with each increment 0.1 km.
Count down: If training with pre-set target, Distance will count down from the pre-set
value to 0.00. Each pre-set increment or decrement is 0.1 km between 0.00 and 99.90.
CALORIES: Count up: No pre-set target, Calories will count up from 0 to maximum 990 with one
cal increment.
Count down: If training with pre-set target, Calories will count down from the pre-set
value to 0. Each pre-set increment or decrement is 10 cal from 0 to 990 cal.
NOTE! The displayed calorie value is only a calculated value!
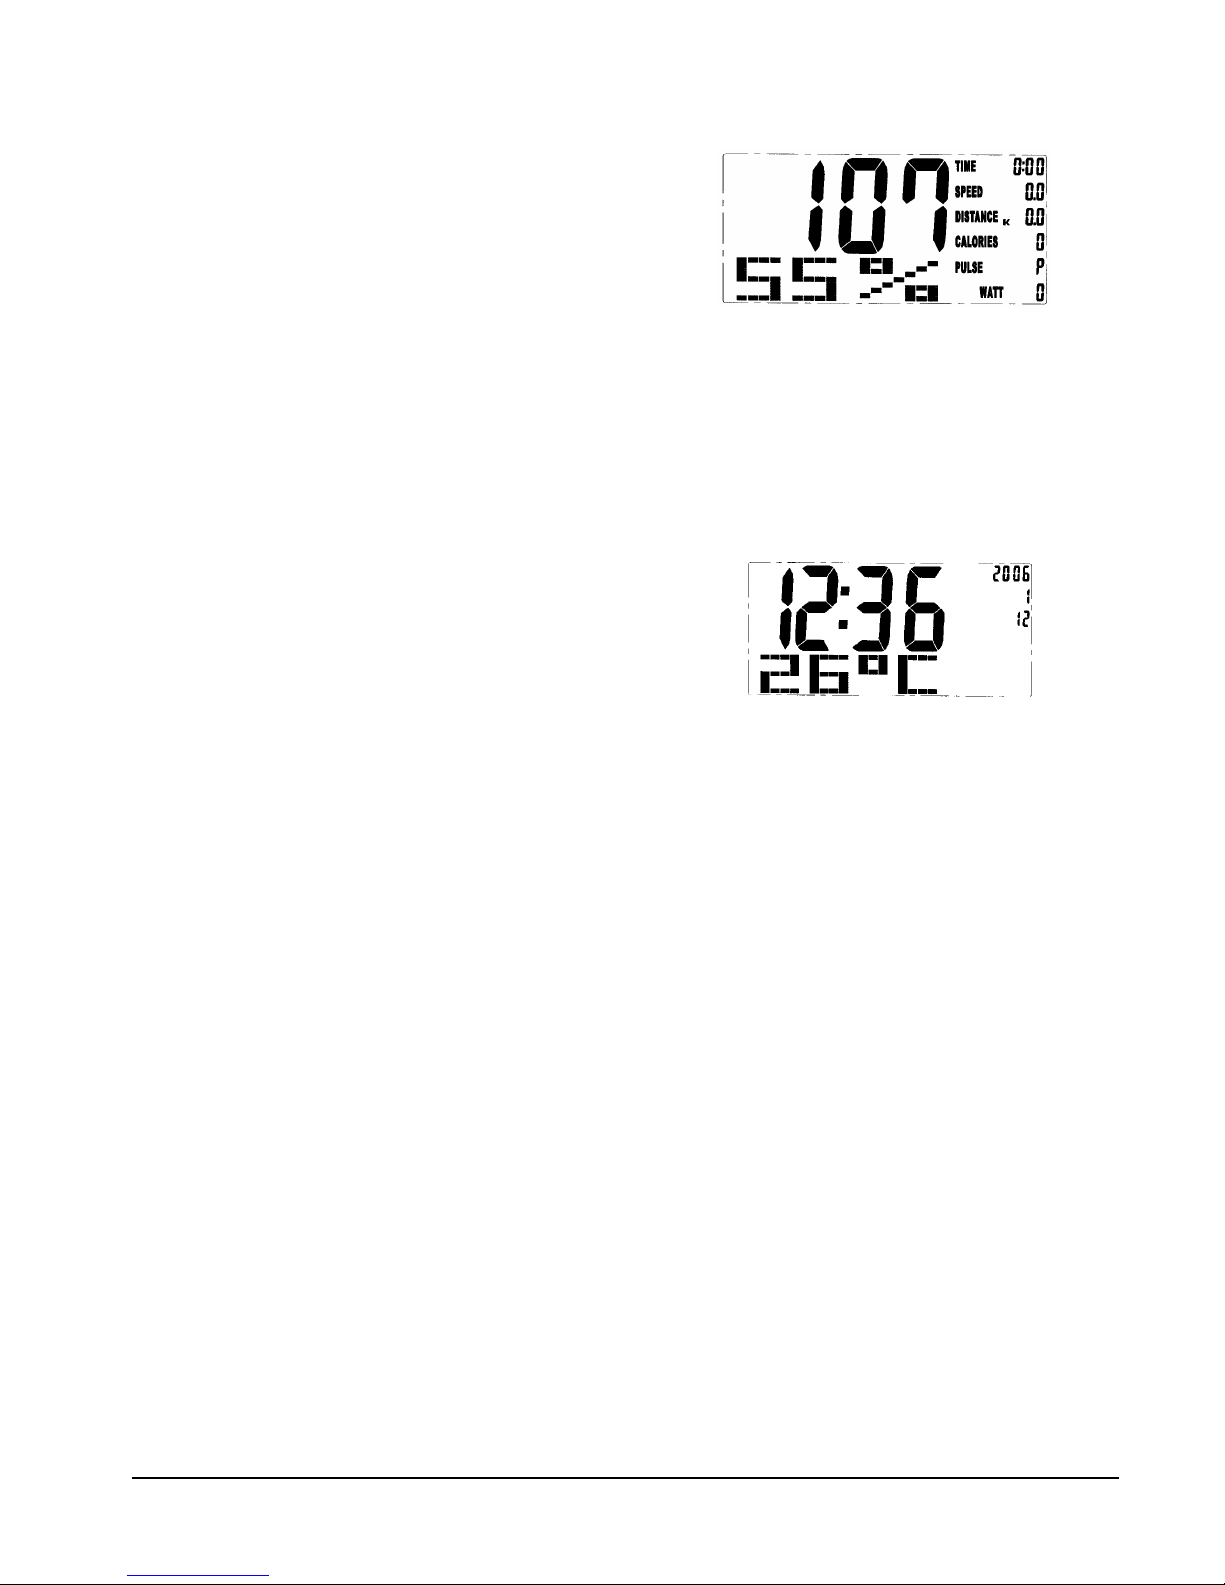
PULSE: Displays current heart rate shortly after the handlebar heart rate sensors begins used.
WATT: Display of current training watt figures.
RECOVERY: After exercising, press RECOVERY button and keep holding on the handlebar heart rate
sensors. All displayed values are stopped except TIME, which starts countdown from
00:60 to 00:00. After it the display shows a recovery value from F1 to F6 where F1 is
best result and F6 is worst result. User may keep exercising to improve the heart rate
recovery status. Press the RECOVERY button again to return to main display.
TEMPERATURE: Screen will display room temperature in sleep mode.
CALENDER: Screen will display year / month / day in sleep mode.
CLOCK: Screen will display time in sleep mode.
MAINTENANCE
Do not expose the meter to direct sunlight or extremely high temperature. Do not use any dissolvents when
cleaning. Use only dry cloth.

1
23
Monark 927 X
10
Brake force spring adjustment
After a service where the bike has been taken apart,
partly or completely, and put together again, the
following check should be performed to be sure the
workload is adjusted according to the display.
Detach the right cover, if it not already done. Connect
power to the bike. On the display adjust WATT to
level 2 (LOAD 2). The spring should now be hanging
straight but not stretched.
If spring is too straight or too loose adjust with the
adjustment screw at the other end of the brake belt
until correct state is reached. See Fig: Workload
spring, adjustment screw. Lock the adjustment screw
and put the cover back. The bike is ready to use.
Note that 927 X is an exercise bike that can not be
calibrated. It is not for testing when the display just
shows an estimate value. Fig: Workload spring,
adjusting screw
1) Spring
2) Snap hook
3) Adjustment screw

2
1
Monark 927 X
11
Trouble shooting guide
Symptoms Probable Cause / Corrective Action
There is a click noise with every pedal
revolution (increases with the weight)
• The pedals are not tight. Tighten them or change pedals.
• The crank is loose. Check, tighten.
• The base bearing is loose. Contact your dealer for service.
Scratching sound is heard when pedalling • Check that the carriage block is taken off and that none of the covers is
scratching.
There is a click noise and a squeak noise
when pedalling
• Loosen the chain.
The workload seems to be going in the
wrong direction, or otherwise behaving
strangely
• The wire on the motor unit may have come out of position. Install the
brake wire as shown in Fig: Brake wire assembly.
Fig: Brake wire assembly
1) Brake wire
2) Flywheel

Service check and Maintenance
It is important to carry out a regular service on your
ergometer, to ensure it is kept in good condition.
Service action:
• We recommend isopropyl alcohol to disinfect the
surface of the bike. Use a damp but not wet cloth to
clean the surface you wish to disinfect.
• Always keep the bike clean and well lubricated
(once a week).
• Periodically wipe the surface with a rust preventative,
especially when it has been cleaned and the surface
is dry. This is done to protect the chrome and
zinc parts as well as the painted parts (4 times per
year).
• Check now and then that both pedals are firmly
tightened. If not the threading in the pedal arms will
be damaged. Also check that pedal arms are firmly
tightened on the crank axle, tighten if necessary.
When the Ergometer is new it is important to tighten
the pedals after 5 hours of pedalling (4 times per
year).
• Check that the pedal crank is secure to the crank
axle (4 times per year).
• Be sure that the pedals are moving smoothly, and
that the pedal axle is clear of dirt and fibres (4 times
per year).
• When cleaning and lubricating be sure to check that
all screws and nuts are properly tightened (twice a
year).
• Check that the chain is snug and there is no play in
the pedal crank (twice a year).
• Check that pedals, chain and freewheel sprocket are
lubricated (twice a year).
• Be sure that the brake belt does not show significant
signs of wear (twice a year).
• Check that the handlebars and seat adjustment
screws are lubricated (2 times per year).
• Be sure that all moving parts, crank and flywheel
are working normally and that no abnormal play or
sound exists. I.e. play in bearings causes fast wearing
and with that follows a highly reduced lifetime.
• Check that the flywheel is placed in the center and
with plane rotation.
Service
Warranty
EU countries - Private use
If you are a consumer living in the EU you will have
a minimum level of protection against defects in
accordance with EC Directive 1999/44/EC. In short,
the directive states for that your Monark Dealer will
be liable for any defects, which existed at the time of
delivery. In case of defects, you will be entitled to have
the defect remedied within a reasonable time, free of
charge, by repair or replacement.
EU countries - Professional use
Monark Exercise products and parts are guaranteed
against defects in materials and workmanship for a
period of one year from the initial date of purchase
of the unit. In the event of a defect in material or
workmanship during that period, Monark Exercise
will repair or replace the product. Monark Exercise will
not, however, refund costs for labour or shipping.
Other countries
Monark Exercise products and parts are guaranteed
against defects in materials and workmanship for a
period of one year from the initial date of purchase
of the unit. In the event of a defect in material or
workmanship during that period above, Monark
Exercise will repair or replace (at its option) the
product. Monark Exercise will as above for labour
or shipping.
NOTE!
Make sure the voltage indicated on the appliance
corresponds to the local mains voltage before
making connections.
Note that the text about service and maintenance is
universal and that all parts may not be relevant to
your bike.
Monark 927 X
12

Batteries
If the meter is battery-operated, the batteries are in a
separate package at delivery. If the storing time has
been long the battery power can be too low to make
the computer act correctly. Batteries must then be
changed.
Transportation
During transport the brake cord should be tightened
to prevent it from falling off the flywheel.
Replacement of brake belt
To replace the brake belt remove covers if necessary.
Make sure that the belt is loose.
Alt. 1: To loosen the brake belt on pendulum bikes
with engine, connect power to the unit and raise the
pendulum to 4 kp. Hold it there until brake belt is
loose. Please note how the belt is assembled. Remove
it from the bike. Attach the new brake belt and
assemble the bike in reverse order.
Alt. 2: To loosen the brake cord on cycles with a
weight basket set the basket to its upper position.
Loosen the lock washer that is holding the cord and
remove it from the tension center. Loosen or cut of
the knot in the other end of the cord and then remove
the hole cord from the bike. When assembling a new
brake cord, first enter one end into the hole in the
tension center, and tie a knot and let the knot fall into
the bigger part of the hole. Lock the end of the cord
with the lock washer.
Brake belt contact surface
Deposits of dirt on the brake belt and on the contact
surface may cause the unit to operate unevenly and will
also wear down the brake belt. The contact surface of
the flywheel should be smoothed with fine sandpaper
and any dust removed with a clean dry cloth.
Remove any potential covers and all workload on
the brake belt and then remove it. Grind with a fine
sand paper. Grinding is easier to perform if a second
individual cautiously and carefully pedals the cycle.
Irregularities on the brake belt contact surface are
removed by means of a fine sand paper or an abrasive
cloth. Otherwise unnecessary wear on the brake belt
may occur and the unit can become noisy.
Always keep the brake belt contact surface clean and
dry. No lubricant should be used. We recommend
replacing the brake belt when cleaning the contact
surface. In regard to assembly and adjustment of the
brake belt, see ”Replacement of brake belt”.
Alt. 3: To loosen the brake belt on the bike remove
all tension. Please note how the belt is assembled.
Remove it from the bike. Attach the new brake belt
and assemble the bike in reverse order.
NOTE!
When replacing the brake belt it is recommended
to clean the brake surface. See ”Brake belt contact
surface”.
Flywheel bearing
The flywheel bearing is long-term greased and requires
no supplementary lubrication. If a problem arises,
please contact your Monark dealer.
Crank bearing
The crank bearing is greased and normally requires
no supplementary lubrication. If a problem arises,
please contact your Monark dealer.
Monark 927 X
13
Fig: Brake belt

Chain 1/2“ x 1/8“
Check the lubrication and tension of the chain at
regular intervals. In the middle of its free length the
chain should have a minimum play (3) of 10 mm (1/4
inch). See Fig: Chain adjustments. When the play in
the chain is about 20 mm (3/4 inch) the chain must
be tightened. Otherwise it will cause abnormal wear
of the chain and sprockets. Therefore it is always
recommended to keep the chain play as little as
possible. Loosen the hub nut (2) on both sides and
tense the chain with the chain adjuster (1) when
needed.
When the chain has become so long that it can no
longer be tightened with the chain adjusters it is worn
out and shall be replaced with a new one.
To adjust or replace the chain, remove covers if
required.
To adjust the chain the hub nuts (2) should be
loosened. Loosening or tightening the nuts on the
chain adjusters (1) will then move the hub and axle
forward or backward. Then tighten the nuts on the
hub axle again. See Fig: Chain adjustments.
To replace the chain, loosen the chain adjusters as much
as possible. Dismantle the chain lock (6) and remove
the chain. Use a pair of tongs for dismantling spring.
Put on a new chain and assemble the chain lock. The
spring of the chain lock should be assembled with the
closed end in the movement direction (5) of the chain.
Use a pair of tongs for dismantling and assembling
the spring (4). See Fig: Chain replacement.
NOTE!
At assembly the flywheel has to be parallell with
the centerline of the frame. Otherwise the chain and
sprockets makes a lot of noise and wears out rapidly.
Then assemble the removed parts as above but in
reverse order.
4
6
5
3
2
1
Monark 927 X
14
Fig: Chain replacement
4) Lock spring
5) Movement direction
6) Chain lock
Fig: Chain adjustments
1) Chain adjuster
2) Axle nut
3) Chain play

Freewheel sprocket
When replacing the freewheel sprocket remove frame
covers if necessary. Remove the chain according to
section ”Chain 1/2” x 1/8””.
Loosen the axle nuts and lift off the flywheel. Remove
the axle nut, washer, chain adjuster and spacer on
the freewheel side. Replace sprocket-adapter and
assemble the new parts in reverse order according to
the above.
NOTE! Do not tighten the axle nut completely. It
must be possible to loosen the adapter-sprocket half
a turn.
The sprocket should be lubricated with a few drops of
oil once a year. Tilt the cycle to make it easier for the
oil to reach the bearing. See Fig: Lubrication.
Monark 927 X
15
Fig: Lubrication
Fig: Hub assembly

Monark 927 X
16
Spare parts list
From serial number WBK 266961D
Pos. Qty. Art. No. Description Pos. Qty. Art. No. Description
1 1 9300-24 Wheel suspension complete set 15 1 9300-430 Steel crank set, complete
2 1 9300-17 -Bush, 23 mm 16 1 9326-55 Chain, 98 L
3 1 9300-18 -Axle 17 1 8966-175 BB cartridge bearing
4 3 19001-6 -Bearing 6001-2z 18 1 9327-39 Motor wire
5 1 9106-14 -Connection 19 1 9328-172 Motor
6 1 9106-13 -Sprocket 20 3 14323 Screw M6x16
7 1 9000-12 -Chain adjuster (pair) 21 1 9327-37 Bracket for servo
8 1 9300-3 Flywheel 22 3 5843 Locking nut M6
9 1 9327-60 Brake belt, complete 23 2 5673-9 Screw M5x12
10 1 9328-178-1 Power adapter 24 1 9328-33 Adaptor M20/M16
11 1 9328-177 Power cable, motor 25 1 8966-176 Support casing for BB-bracket
12 1 9371-16 Magnet 26 1 9328-175 Cable 1700 mm to computer
13 2 8523-2 Dust cover for crank 27 1 9302-5 Frame
14 2 8523-115 Screw M8x1x20

Monark 927 X
17
Pos. Qty. Art. No. Description Pos. Qty. Art. No. Description
1 1 9309-53 Frame cover, left 18 1 9309-3 Joint clamp
2 1 9328-4 Aluminium prole 19 4 9300-12 Screw M8x16
3 1 9309-54 Frame cover, right 20 4 9309-51 Plastic cap
4 8 5675-9 Screw M5 x 6.5 21 4 9328-26 Rubber foot
5 22 5673-9 Screw M5x12 22 4 5845 Locking nut
6 1 4994-7 Saddle 23 1 9328-5 Support tube, front
7 1 5605-1 Screw M8 x 46 24 1 8116-7 Bottle holder
8 1 5864 Washer 25 4 9337-38 Screw M8 x 16
9 1 5844 Locking nut 26 1 9328-181 Meter
10 1 9328-130 Saddle post 27 1 9327-38 Meter holder
11 1 9309-131 Bushing f. saddle post 28 1 9000-105 Screw, M5 x 10
12 1 9308-132 Locking knob 29 1 9328-2 Handlebar clamp
13 1 9328-37 Transport wheel compl. (pair) 30 1 9327-57 Bracket to bottle holder
14 1 9328-6 Support tube, rear 31 1 9326-89 Spacer 17mm
15 1 76424 Foot straps (pair) 32 1 9100-290 Lever, complete
16 1 74435 Pedal (pair) 33 1 5698 Screw M5 x 55
17 1 9328-176 Sensor with 300 mm cable 34 1 9327-77 Handlebar, complete
From serial number WBK 266961D

...........................................................................................................................................................................
...........................................................................................................................................................................
...........................................................................................................................................................................
...........................................................................................................................................................................
...........................................................................................................................................................................
...........................................................................................................................................................................
...........................................................................................................................................................................
...........................................................................................................................................................................
...........................................................................................................................................................................
...........................................................................................................................................................................
...........................................................................................................................................................................
...........................................................................................................................................................................
...........................................................................................................................................................................
...........................................................................................................................................................................
...........................................................................................................................................................................
...........................................................................................................................................................................
...........................................................................................................................................................................
...........................................................................................................................................................................
...........................................................................................................................................................................
...........................................................................................................................................................................
...........................................................................................................................................................................
...........................................................................................................................................................................
...........................................................................................................................................................................
...........................................................................................................................................................................
...........................................................................................................................................................................
...........................................................................................................................................................................
...........................................................................................................................................................................
...........................................................................................................................................................................
...........................................................................................................................................................................
...........................................................................................................................................................................
...........................................................................................................................................................................
Monark 927 X
18
Notes

...........................................................................................................................................................................
...........................................................................................................................................................................
...........................................................................................................................................................................
...........................................................................................................................................................................
...........................................................................................................................................................................
...........................................................................................................................................................................
...........................................................................................................................................................................
...........................................................................................................................................................................
...........................................................................................................................................................................
...........................................................................................................................................................................
...........................................................................................................................................................................
...........................................................................................................................................................................
...........................................................................................................................................................................
...........................................................................................................................................................................
...........................................................................................................................................................................
...........................................................................................................................................................................
...........................................................................................................................................................................
...........................................................................................................................................................................
...........................................................................................................................................................................
...........................................................................................................................................................................
...........................................................................................................................................................................
...........................................................................................................................................................................
...........................................................................................................................................................................
...........................................................................................................................................................................
...........................................................................................................................................................................
...........................................................................................................................................................................
...........................................................................................................................................................................
...........................................................................................................................................................................
...........................................................................................................................................................................
...........................................................................................................................................................................
...........................................................................................................................................................................
Monark 927 X
19
Notes

KROONS VÄG 1, SE-780 50 VANSBRO, SWEDEN | WWW.MONARKEXERCISE.SE | TEL: +46(0)281 59 49 40 | FAX: +46(0)281 719 81
Version 1603
Art. No: 7950-318
Table of contents
Other Monark Exercise Bike manuals

Monark
Monark 928 G2 User manual

Monark
Monark 839 User manual

Monark
Monark Ergomedic 874 E User manual

Monark
Monark LC7TT novo User manual

Monark
Monark LT2 User manual

Monark
Monark 928 User manual

Monark
Monark 927 E Cardio Care User manual

Monark
Monark 939 novo User manual

Monark
Monark 828E User manual

Monark
Monark 827E User manual

Monark
Monark 927 E Cardio Care User manual

Monark
Monark 808 User manual

Monark
Monark 915E User manual

Monark
Monark 939 novo User manual

Monark
Monark cardio care 827 x User manual

Monark
Monark Ergomedi 894 E User manual

Monark
Monark 915E User manual

Monark
Monark LC2 User manual

Monark
Monark homeline C100 User manual

Monark
Monark 808 User manual