BODYFLEX RUN1500 User manual
RUN 1500
MOTORIZED TREADMILL
Art. BF4003
Please read this instruction carefully before using this product and keep it safe

2
1. Directory
Serial
Number
Content
1
Directory
2
Safety Tips
3
Packing details
4
Assembly instructions
5
Electrical controlinstructions
6
Maintenance guidelines
7
General troubleshooting
8
Maintenance clauses
9
Exercise Notes
10
Warming exercise
Welcome to choose this home electric treadmill made-in-china, our products will improve your
health, the more familiar you are with this treadmill, you will find it easy to use, so we ask you
read this manual carefully before using. All parts of this machine are made of high quality
materials, and after strict inspection& testing, the product quality can be guaranteed to the
greatest extent. Refer to this manual to guide you to install, use and maintain this machine
correctly.
2. Safety tips
This machine is designed and manufactured to consider a lot of safety issues, in order to ensure
your safety, before operating this machine, be sure to read all the contents of this manual, just
in case. We do not bear the consequences of any abnormal operation.

3
Danger
Do not hold heart rate devices and other wireless heart rate devices at the same time,
otherwise it will cause electrical interference.
Warning
1. Before using this machine, please ensure that the machine is fully grounded to avoid accidents and
hazards
2. When running, please clip the safety lock (red) clamp in the appropriate position of the clothes to
facilitate the emergency to pull off the safety lock and stop the machine to ensure safety.
3. a、consult your health care doctor before exercise,.
b、wear suitable sportswear for exercise.
c、the room to keep clean and tidy, to avoid electrostatic adsorption into the treadmill, resulting in machine
operation failure.
4. This product is for one person at run time. Do not let children or pets play nearby to avoid accidents.The
minimum spacing requirement (i.e. distance from wall and furniture) is not less than 100 for front and side
respectively CM, and 200 CM. For rear.
5..If the power cord is damaged, do not use this machine.
6. If the machine is damaged and broken, do not use the machine, and immediately contact the local dealer
for maintenance.
7. Do not touch any parts in motion by hand, and do not press or plug any objects into the machine.
8.This machine is applicable to indoor household, not in outdoor and gym use.
9. Please place the machine on a clean and flat ground, keep the ventilation condition of the
machine in good condition, make sure there are no sharp items nearby, do not use it near the water source
and heat source.
10. Please use handrails when up and down the machine, when the walking machine is not completely
stable, do not get off the machine. If you need an emergency jump, you must unplug the safety
lock:the treadmill stopsimmediately.
11. Do not operate the machine when the exerciser is using oxygen equipment or spray near the machine.
12.In order to maintain the normal operation of the machine, do not install any accessories provided by the
factory.
13. All parts of the machine must be firmlyinstalled.
14. After using the treadmill, please turn off the power and unplug in time.

4
3. Packing details
Serial
number
Components
1
Main frame
2
Electronic watch frame
3
Base edge tube
3
Instructions
4
Screw bag
Accessories
Serial
number
Components
Qt’y
A
Safety Key
1pcs
B
6 mm Hexagon wrench
1pcs
C
Lubricating oil
1bottle
D
M8*16 semi-round head hexagonal bolts
4pcs
E
M8 flat washer
10pcs
F
M8*55 Hexagon socket head bolts with semi-round head
4pcs
G
M8 Hexagonal lock nut
4pcs
H
Open-end wrench 13-14 (thickness 2.5mm)
1pcs
I
5mm Allen Wrench
1pcs
J
M8*16 external hexagon bolts
2pcs
K
latch
1pccs

5
NO.
Name
Specification
Qty
NO.
Name
Specification
Qty
1
Base frame
1
42
Cylindrical head
hexagon bolts
M8*25 full tooth electrophoresis
black with 5mm spanner
3
2
Upright tube
1
43
Countersunk head
internal anglebolts
M6*20 full tooth electrophoresis
black
8
3
Motor base
1
44
Ring-shaped
wire-guard plugs
2
4
Running board
support tube
1
45
Phillips pan head
tapping screws
ST4.0*16 full tooth electrophoresis
black
25
5
Running board
t12*497*1025
1
46
Cross washer head
tapping and self-drilling
screws
ST4.2*16 Full tooth Electroplated black
11
6
Running belt
t1.4*403*2325
1
47
Crossed pan head
tapping screws
#2.3*6 full tooth white zinc plated
13
7
Front roller
80*∮42*435*∮
15*464*M8Electrophoresis
1
48
Cross washer head
tapping screws
ST4*16 Full tooth Electroplated black
2
8
Rear roller
∮42*430*∮
15*487*2-M8Electrophoresis
1
49
Cross washer head
tapping screws
ST2.8*8 full tooth white zinc plated
4
9
Refueling pipe
∮8*t0.92*230 Need to curved
1
50
Crossed pan head
tapping screws
#4*10 full teeth electrophoresis black
10
10
Allen wrench
6# :90*90mm One end cross tip
galvanised
1
51
Cross washer head
tapping screws
ST4*10 full teeth electrophoresis black
5
11
Multi-ribbed belt
J140 (356) 4groove 5peak black
1
52
Flat washers
φ8*φ16*1.2
12
12
Electronic watch
upper cover
616*539*123
1
53
Spring washers
φ8.1*φ12.3*T2.1
2
13
Motor upper cover
509*231*75
1
54
Hexagon lock nuts
M8 opposite side 13
7
14
Electronic watch
lower cover
500*99*35
1
55
Hexagon lock nuts
M10
2
15
Left handle bar
rear cover
198*43*65
1
56
Cross washer head
tapping and self-drilling
screws
ST4.2*19 full tooth electrophoresis
black
2
16
Motor lower cover
495*233*42
1
57
Hexagon bolts
M8*50 full tooth electrophoresis black
1
17
Rear protector
cover
5*71.5*81(Left and right )
1pair
58
Hexagon nuts
M8
1
18
Left-side plastic
trim
24*50*1044
1
59
Crossed pan head triple
combination bolts with
flat washers and spring
washers
M4*12 Full tooth White zinc plated
2
19
Right-side plastic
trim
24*50*1044
1
60
Limit spacers
#13*#8.2*10 Electroplated black
2
20
Right handle bar
rear cover
198*43*65
1
61
Caps for bolts
with external hexagonal bolt head M8
(opposite side 13)
1
21
Transport wheel
∮50*∮8.2*22
2
62
Hexagon bolts with
semi-round head
M8*55 half tooth Electroplated black
with 5mm spanner
4
22
R clamp
UC-0 white
2
63
Double-sided adhesive
2
23
Controller
Optional 110V/220V
1
64
Magnetic rings
1
24
Conical foot pad
∮43*∮23*∮4.5*16
8
65
Hexagon socket head
bolts with semi-round
head
M8*16 full tooth electroplated
black with 6mm spanner
4

8
25
Refueling
decorative cover
With ∮16.5round hole
1
66
Butt lock screws
M8*25-M6*12
2
26
Cable ties
2*150
4
67
Counter lock screws
M8*35-M6*12
2
27
Power switch
15A/250V With red light
1
68
Cross countersunk head
self-tapping screws
4*35
4
28
Overload protector
Input 220V:6A,125/250VAC
1
69
Cap nuts
M8 opposite side 13
2
29
Power cable
3*0.75mm2 10/15A 250V Black
Length1500mm
1
70
Pull ring latch
∮8*38
2
71
Conical latch
∮8*50
1
30
Power cable clasp
6N-4 black
1
72
Open-end spanners
13-14
1
31
Single line
3*1.0mm2 10/15A Length200mm
1
73
Cross washer head
tapping screws
ST2.8*8
10
32
Single line
3*1.0mm2 10/15A length200mm
1
74
Cross washer head
tapping screws
ST2.3*10
2
33
Single line
3*1.0mm2 10/15A length100mm
1
75
Cross washer head
tapping screws
ST2.3*8
6
34
DC motor
1
76
Base frame left tube
1
35
Safety key
42*16*14
1
77
Base frame right tube
1
36
Cylindrical head
hexagon bolts
M8*90 half tooth electroplated
black with 6mm spanner
1
78
3-step manual incline
2
37
Cylindrical head
hexagon bolts
M8*90 full tooth electroplated black
with 6mm spanner
2
79
Adjustment wheel
∮28*∮8.2*20
2
38
Cylindrical head
hexagon bolts
M8*40 half tooth electroplated
black with 6mm spanner
1
80
Square inner tube
plug
With 30*30*T1.5 tube
1
39
Hexagon socket
head bolts with
semi-round head
M10*80 half tooth electroplated
black with 6mm spanner
2
81
Cable ties
5*300
1
40
Hexagon socket
head bolts with
semi-round head
M8*35 half tooth electroplated
black with 5mm spanner
2
82
Hexagon socket head
bolts
M8*50 half tooth electroplated
black with 5mm spanner
2
41
Cylindrical head
hexagon bolts
M8*35 full tooth electroplated black
with 5mm spanner
1

9
10
1
2
3
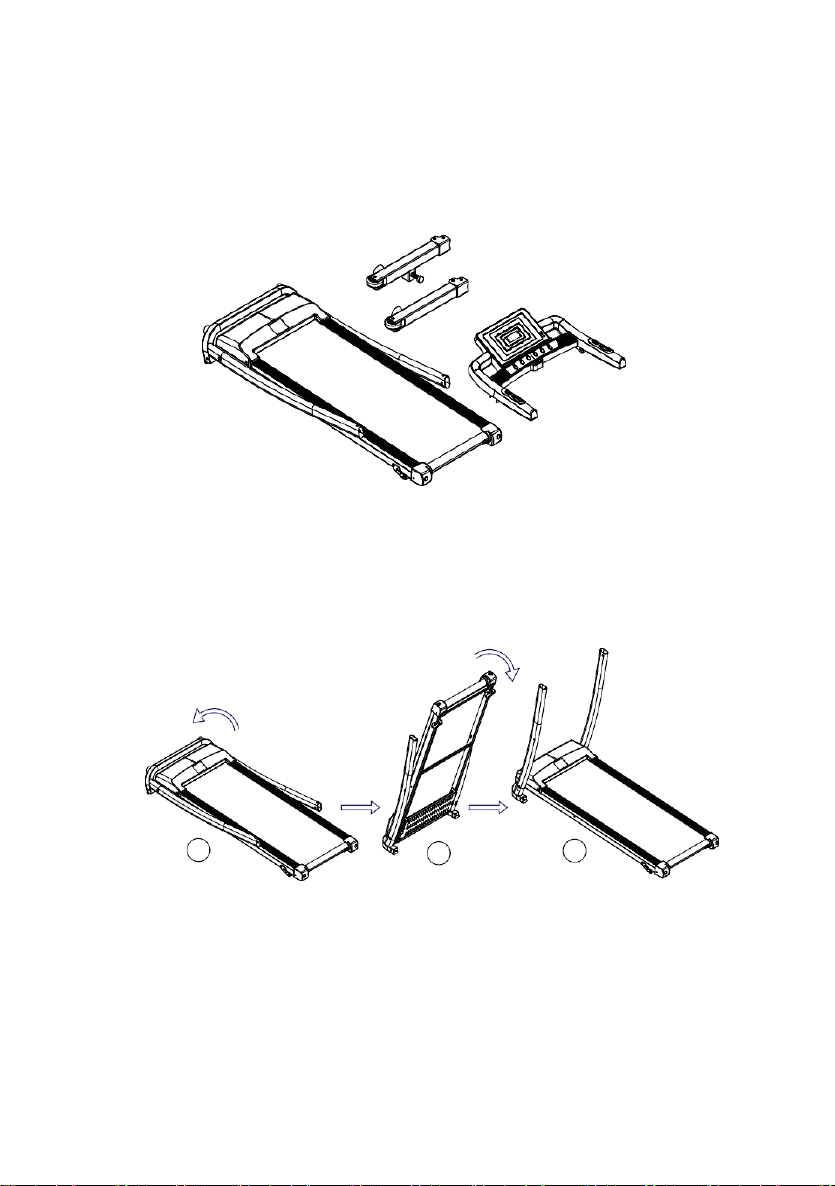
Asembly instructions
Step 1:Take out main frame and electronic watch from the carton and open the bundling harness of the
treadmill frame.
Step2:Unfolding the frame:When unfolding, please stand the machine up in the direction of the arrow
(as shown in Figure 1), and then place the frame flat on the floor in the direction of the arrow (as shown in
Figure 2 and Figure 3)。
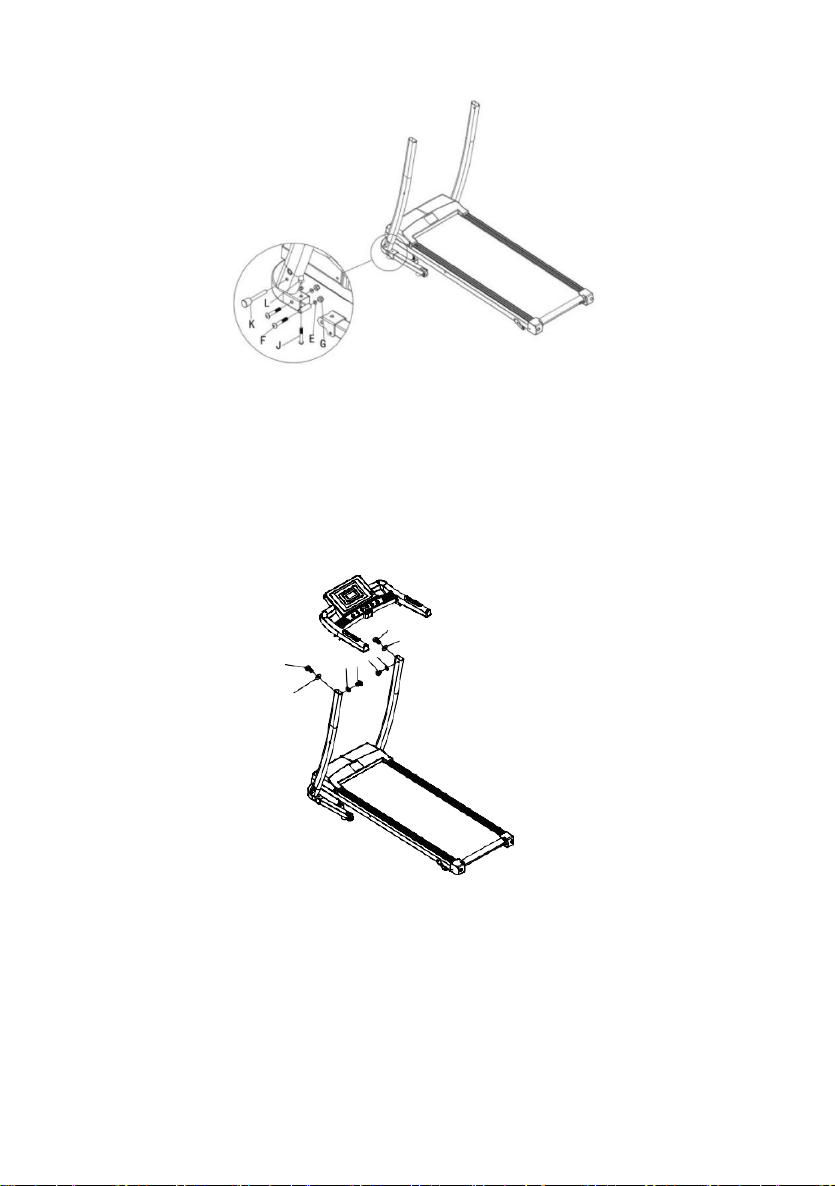
Step 3:Put the base frame side pipe into the base frame in the direction of arrow, and fix the F#
semi-round head hexagonal bolts (4), G# hexagonal lock nuts (4) and E# flat washers (4) on the
base frame, then fix the base frame side pipe and base frame with J# hexagonal screws (2) and E#
flat washers (2), and insert the K# pins from the bottom of the column into the holes of the iron
sheet at the front end of the running table (as shown in the figure).
11
D
E
EDDE
E
Note: B#6mm hexagonal wrench and I#5mm hexagonal wrench are needed here
Step 4:Attach the side cover to the upright tube and base frame with Flat Washer
E#M8(4pieces),D#M8*16(4pieces).
Step 5: Before use: press the start button while the electronic watch is turning on ,the treadmill start to
work.
Note: the safety key must be placed on the yellow sticker position in the middle of the meter, the treadmill
can start to work normally; if the electronic watch window shows "E07", the safetykey is not placed or not
in place.

12
Safety key:Put
the iron suction the meter label
Emergency stop function: when the safety key is off power, the power lead is disconnected and the weak
part keeps the power supply. The operation is not controlled by software.
For your safety,be sure to use the safety key while training exercise.
Please note:Tight all screws after confirming that all the screws are installed in accordance with the above
requirements, and check if there are omissions before you connect to the power lead.
Step 6: treadmill folding: when you need to carry or not use this treadmill for a long time,please follow the
below introduction.Stand behind the treadmill and begin to raise the deck in the direction of arrow.Hold the
frame,pull out the spring pull pin(showas below photo)put down the running board until you hear a
“click” it is finished.
Treadmill unfolding:Pull out the pull pin rod on the column by hand, , you can unfold the treadmill.
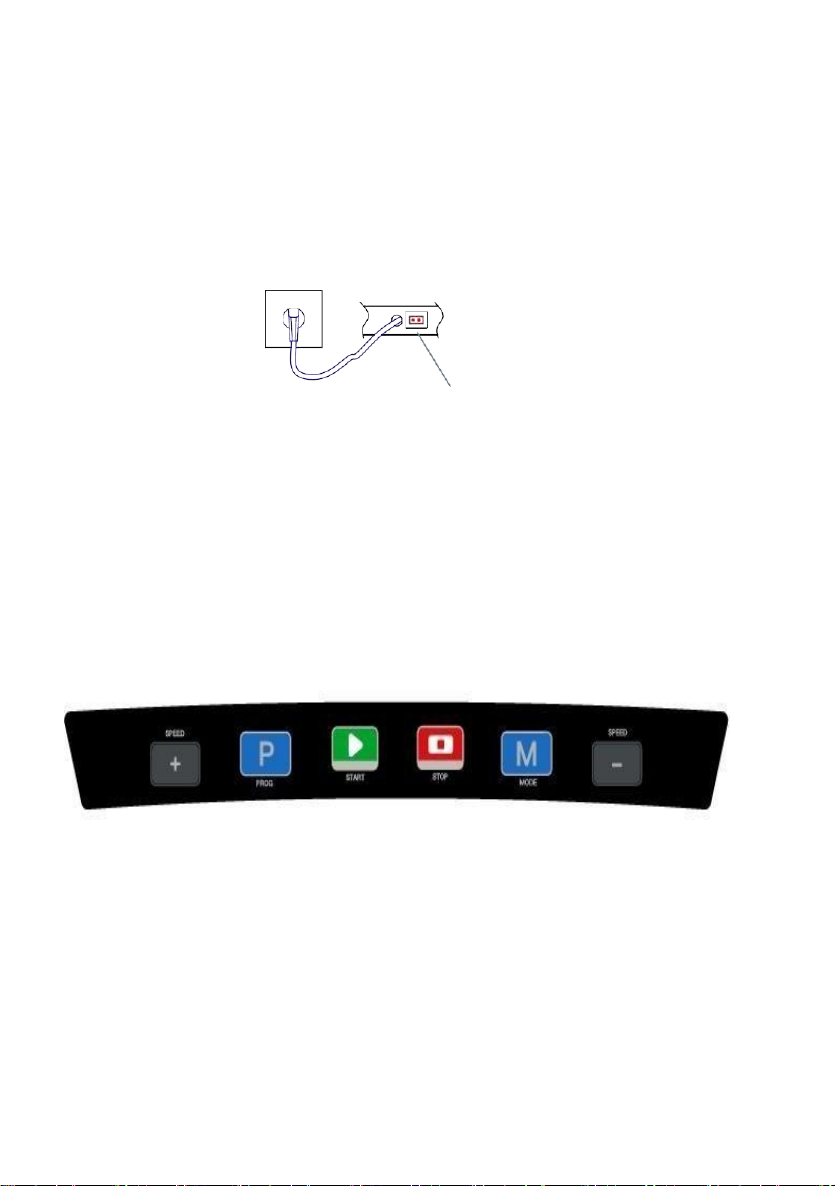
Electronic control operation instructions
Using the treadmill
1. Ensure that the power lead is plugged into a suitable, live, mains socket. Turn on the power switch(red).
Enter manual mode: After the electronic power meter-wide display, enter the initial standby mode, then
press the start button, enter to manualmode.
Power switch
2. Safety key illustrate:
Attach the SAFETY KEY to the console before turning the machine on.Attach the clip to your clothing at
your waist before beginning your workout. If the SAFETY KEY disconnects during use, the treadmill
will slow down and stop,you can pull the safe key for the machine’s sudden stop under the dangerous
condition. Then you will not be injured. If you need to reuse the machine, you could putsafetykeyon.
Program guideline
3. Window display
4. turn on the power
Start normally after 3 seconds.
5. Number of programs
3 manual programs ,12 automatic programs.
6.Safety key function
Unplug the safety key and window display "E7" the treadmill stop running, and beep alarm sound
appears, the electronic watch display 2 seconds when put on the safety key, all data zero.
7. Key function.
7.1. Start key, stopkey:
Start key, in the treadmill stop state, press start key, speed display "1 km ", treadmill start. Stop key, in
the treadmill running state, press stop key, all data clear, treadmill stop back to manual mode, treadmill
11

12
stop.
Press the “start” button, treadmill start to running, speed window show 1km.Press the “stop” button, all
data clearing and will record from zero,treadmill will stop slowly and return to manual mode.
7.2. Program key:
When standby, press this key to cycle from manual mode to automatic mode P1—P12; manual mode is
the default running mode of the system.
7.3 Mode key:
When standby, press this key to select 3 different count backwards time under. time ,distance, calories
modes,adjust the setting by the key “speed +” & “speed - ”,press “start” key to enter the mode and
treadmill start running.
7.4 Speed reduction key
It can be used to adjust the setting value of speed e when setting the parameters for the treadmill. The
treadmill can be used to adjust the speed, automatically increase or decrease by 0.1km each time when
continuously pressing for more than 2 seconds. The handlebar including the two button.
8. Display function
8.1.Speed display
Display the speed value of the current run.
8.2.Time display
Display count backwards time under manual mode and program.
8.3.Distance display
Display count backwards distance and distance accumulation under manual mode and program.
8.4.Calorie display
Display count backwards Calorie and Calorie accumulation under manual mode and program.
9.Automation Programs
Each program segment is divided into 10 segments, and the running time of each program segment is
equally allocated.The following is a moving diagram of 12 programs.
Time
Program
Set time / 10 = the time on each segment
1
2
3
4
5
6
7
8
9
10
P1
SPEED
3
3
6
5
5
4
4
4
4
3
P2
SPEED
3
3
4
4
5
5
5
6
6
4
P3
SPEED
2
4
6
8
7
8
6
2
3
2
P4
SPEED
3
3
5
6
7
6
5
4
3
3
P5
SPEED
3
6
6
6
8
7
7
5
5
4
P6
SPEED
2
6
5
4
8
7
5
3
3
2
P7
SPEED
2
9
9
7
7
6
5
3
2
2

13
P8
SPEED
2
4
4
4
5
6
8
8
6
2
P9
SPEED
2
4
5
5
6
5
6
3
3
2
P10
SPEED
2
5
7
5
8
6
5
2
4
3
P11
SPEED
2
5
6
7
8
9
10
5
3
2
P12
SPEED
2
3
5
6
8
6
9
6
5
3
10. Parameter setting under 3 modes
The count backwards time initially set at 10:00 minutes, with a range of 20:00-99: 00 minutes and a step
of 1:00.
The count backwards calorie is set to 50 kcal, the range is 10-990 kcal, step 10.
The count backwards distance is set to the initial distance, the range is 1.0-99.0 km, step 1.0. Switching
order is: manual, time, distance, calories.
11. Other
After a count backwards parameter is finished, the display screen displays END ,0.5 seconds alarm every
2 seconds until the treadmill stops and then returns to manual mode.
If you set a parameter, you can set cycling, for example, the time range is 5:00-99:00. When you set it to
99:00, press the "+" button and return to 5:00 to cycle. Add and subtract with the "+"-" symbol.
The count backwards time, the count backwards calorie,the count backwards distance can only set one
mode, run according to the last setting, set the count backwards parameters, others show count forward
parameters.
12. Function options
Please operate the following corresponding instructions according to the function of the purchased
treadmill.
Heart rate measurement function (if you buy the treadmill with heart rate measurement function, please
refer to this operation)
In the case of treadmill power, hold the heart rate piece for 5 seconds with heart rate display, the initial
value is the actual measured heart rate, the display range is: 50-200 times / min. Test heart rate process,
need a few seconds waiting time. The data is for reference only and cannot be taken as medical data.
Bluetooth shared music (if you buy the treadmill with Bluetooth music function, please refer to this
operation)
Turn on the treadmill power switch, use the phone to manually search for Bluetooth devices (DP), find
the Bluetooth device and click on the connection, after successful connection, play themusic on the
phone can be transmitted to the amplifier device on the treadmill through Bluetooth to play.
MP3 music function (if you buy the treadmill with MP3 music function, please refer to thisoperation)
Plug one end of the spring cable into the cell phone port and the other end into the MP3 port and then
play music with the cell phone software.

14
USB function (if the treadmill you bought is with USB function, please refer to this operation) Connect
one end of the cell phone data cable to the cell phone and insert the other end into the USB port。
Maintenance guidelines
Proper maintenance can always keep your treadmill in the best condition; wrong maintenance can hurt or
shorten the life of the treadmill.
Warning:
Be sure to unplug the treadmill before cleaning or maintaining the product!
1. Regular dust removal to keep componentsclean
2. After each use of the treadmill, wipe the clean instrument and other parts of the sweat and debris with a
clean towel or cloth. Please be careful not to splash water on the electrical components and under the
running belt.
3. Please put your treadmill in a clean, dry environment, make sure the power isoff and the plug has been
unplugged.
4. Tofacilitate movement, the treadmill is equipped with wheels. Please make sure to disconnect the power
and fold the fuselage before moving.
5. Always check and lock all parts of the treadmill; parts of the damaged ring shall be replaced immediately.
6.In order to better maintain and prolong the life of the treadmill, it is recommended that you keep the
treadmill for 10 minutes after 30 minutes ofcontinuous use.
7. The running belt has been adjusted when it leaves the factory, but after use, the running belt will be
stretched and will deviate from the center position to cause friction edge strip and rear cover damage. The
running belt is forced to stretch during use. After a period of time, if you are using the treadmill, you can
adjust the tightness of the running belt toimprove.
A .Adjust running belt alignment
A.Run belt elastic adjustment
If the running belt is too loose, insert the randomly
presented hexagonal wrench into the adjusting hole of the
left foot of the treadmill, rotate 1/4 laps clockwise, and
then rotate 1/4 laps clockwise to the right foot. This can
tighten the running belt and the running belt will not
deviate from thecenter point.If the running belt is too tight,
the left and right synchronization counterclockwise
adjustment.
When you use the treadmill, the pressure on the running belt is unbalanced because the two feet are not
the same when running, resulting in the running belt deviating from the center. This deviation is normal,
and when no one runs on the running belt, it automatically returns to the center. If you can't get back to
the center, you need to run back to the center.
Run the treadmill without load, speed to the sixth gear, observe the distance from the running belt to the

15
left and right side bars:
●
if left, use a hexagonal wrench to clockwise rotate the left screw1/4lap;
●
if to the right, use a hexagonal wrench to rotate the right screw 1/4 lap clockwise;
●
if the running belt is still not in the middle, repeat the above action until adjusted to the middle.
After adjusting the running to the middle, adjust the speed to the sixth gear, and observe the deviation of
the running belt and the smooth running. If there is any deviation, repeat the adjustment steps.
Warning:
Please do not over tighten the roller! This will cause permanent damage to the bearing!
8. Lubricating oil
The treadmill is lubricated when it leaves the factory, but it is often tested for lubricity, which helps the
treadmill to stay in its best use. The treadmill must be lubricated after one year or 100 hours of operation.
After 30 hours or 30 days of use, in the treadmill static state, pull up the running belt13 from the side to
touch the platform surface as far as possible, if you feel the lubricating oil, you do not need to add
lubricating oil; If you touch the surface with a strong sense of dryness, follow the following instructions
for refueling. (Use non-oil lubricants)
How to add lubricating oil, please follow the following way to operate, open the left from
side of the edge bar refueling decorative cover, with scissors or knife to cut the lubricating
oil bottle according to the size of the drawing, and then press the bottom icon refueling,
Please pay attention to inserting the rod in the oil pipe on the platform.
General failures and troubleshooting
1.
Electronic display error code and exclusion
Fault code Fault Description Fault handling

16
E01
Abnormal communication:
abnormal
communication between power
up and down control and
electronic meter
Lower control shutdown into fault state. Can not boot
operation. The electronic meter shows the fault code and
the buzzer rings 3 times. Possible reasons: electronic
control and electronic meter communication blocked,
check the electronic meter to the lower control
communication line of each section of the connection, to
ensure that each core is fully inserted. Check that the
connection between the electronic meter and the controller
is damaged and replace the connection and electronic
meter.
E02
Indicates that the controller did
not
detect the voltage
above the motor
Check that the motor line is firmly connected to the control
terminal.
E05
Overcurrentprotection:
in therunning state,the DC motor
current is detected continuously
for more than 5 seconds
Stop into the fault state, electronic meter buzzer ring 9, at
the same time display fault code, the rest of the area does
not display content. Maintain fault state about 10 seconds
after entering standby state, can restart. Possible reasons:
over rated load leads to excessive current, system self-
protection, or a part of the treadmill is stuck, resulting in
the motor can not turn, heavy load, too large current, the
system self-protection; Adjust the treadmill to restart. The
other is to check whether the motor is running with over
current sound or charred smell, to replace the motor; or to
check whether the controller is charred smell, to replace
the controller; or to check whether the power supply
voltage specification is inconsistent or low, Re-test with
the correct voltage
E07
Indicates that the electronic
meter does notdetect a security
lock signal
Magnetron damaged, magnetron installation position is
correct, magnetron is placed.

17
2.
Frequently Asked Questions and Exclusion Methods
1. some or all of the keys are notworking
1.1 Open the upper shell of the electronic watch and test whether the keys arenormal;
1.2 Check or replace electronic watchboards;
1.3 Whether the button can be used normally afterre-energizing.
2. Electronic display
Exclusion guidelines:
2.1 Check that the input voltage is within the allowablerange;
2.2 Check that the switch on the running machine ison;
2.3 Check that the fuse in the power outlet is fused. If fused, replace it with a sparefuse;
2.4 Check the controller to see if the LED lights areon;
2.5 Check the connection lines;
2.6 Inspection or replacement of electronic watchboards;
2.7 Check or replace the lower control circuitboard.
3. Other issues and exclusions a.Treadmill can't start
Check that the power plug is plugged in, the power switch is turned on, and the safety
switch is removed. b.Treadmill skid
Refer to the instructions and adjust the running belt. c.Running belt
Refer to the instructions and adjust the running belt in the middle. d.Operation noise
Check that the machine screws are loose and that the running belt needs lubricating oil.
Maintenance terms
1. Non-artificial damage that occurs during normal use of the product under the condition of correct use
and maintenance.
2. The following terms are not covered bywarranty
a.Damage caused by abuse, negligent use, accident or unauthorized modification;
b.Damage caused by improper adjustment of the running belt and drive belt;
c.Damage caused by abnormal maintenance;
d.Other illegal operations and resulting damages.
3. This warranty is only valid for private use at home, not for professional training situations such as gyms.
Practice Notes
●
consult your doctor before starting a sports or training program, follow your doctor's advice and guidance.
●
set exercise goals after consulting your doctor to ensure that the plan is realistic and starts the training
plancalmly.
●
you can add some aerobic exercise to your exercise plan, such as walking, jogging, swimming, dancing or
cycling. Always check your pulse. If you don't have an electronic heartbeat monitor, ask your doctor how
to measure your pulse by hand from your wrist or neck. In addition, you must set the target heartbeat rate
based on annual fitness and physicalgoodness.
●
Drink plenty of water during exercise. Youmust replenish the water lost by excessive exercise to prevent
dehydration. Avoid drinking large amounts of ice water or drinks, drinking water or drinks at room
temperature.

18
Warming
Warming and soothing exercise: A successful exercise program must include warm-up, aerobic and
soothing exercise. Exercise at least two to three times a week, exercise a day off, a few months later, you
can increase the number of exercise to a Thursday to five days. Warming is a very important part of
your fitness exercise. Warm your body before each exercise. Moderate warming can prepare your body
for the next more intense exercise, because warming up can help your muscles warm up and stretch,
improve blood circulation, your pulse, and send more oxygen into your muscles. After aerobic exercise,
repeated warming can also reduce muscle soreness. We recommend the following warm-up and soothing
exercises.
1. Stretch down:
Bend your knees slightly, bend your body slowly forward, relax your
back and shoulders, and touch your toes as much as possible. Hold for
10-15 seconds, then relax. Repeat 3 times.
2. Hamstring Stretch:
Sit on a clean cushion, straighten one leg, and then close the other leg
to the inside of a straight leg, and touch your toes with your hands.
Hold for 10-15 seconds, then relax. Repeat each leg three times.
3. Leg and heel tendon extension:
Hold the wall or stand with both hands, one foot behind, keep the hind
leg upright, heel to the ground, tilt towards the wall. Hold for 10-15
seconds, then relax. Repeat 3 times for each leg.
4. Quadriceps:
Hold the balance with your left hand on the wall or table, then extend
your right hand back, grab the right heel and slowly pull to the hip
until you feel the muscles in front of your thighs are tight. Hold for 10-
15 seconds, then relax. Repeat each leg.
5. Sartorius muscle(inner thigh muscle)extension:
The soles of the feet were opposite, the knees sat out, and both hands
grabbed the feet and pulled in the groin direction. Hold for 10-15
seconds, then relax. Repeat 3 times.
19
RUN 1500
МОТОРИЗИРАНА БЯГАЩА ПЪТЕКА
арт. BF4003

20
Прочетете внимателно тази инструкция, преди да използвате този
продукт, и я пазете!
Внимание
Не дръжте едновременно устройства за измерване на сърдечен ритъм на
пътеката и други безжични устройства за измерване на сърдечен ритъм
в близост, в противен случай това ще причини електрически смущения.
ИНСТРУКЦИЯ ЗА РЪКОВОДСТВО И БЕЗОПАСНОСТ
Смята се, че измерванията, направени от оборудването, са относително
точни, но не могат да се използват като медицински измервания.
Преди да използвате този продукт, моля, консултирайте се с личния си
лекар за пълен физически преглед. Честото усилено упражнение трябва
да бъде одобрено от Вашия лекар. Ако някакъв дискомфорт се дължи на
употребата на този продукт, спрете да спортувате и се консултирайте с
вашия лекар. Правилното използване на тази пътека е от съществено
значение.
Моля, пазете всички деца и домашни любимци далеч от оборудването
по време на употреба и когато оборудването е без надзор. Уредът не е
предназначен за използване от малки деца или немощни лица без надзор.
Малките деца трябва да бъдат контролирани, за да се гарантира, че те не
играят с уреда.
Винаги носете подходящо облекло, включително маратонки, когато
спортувате. Не носете свободни дрехи, които биха могли да ви хванат
по време на тренировка.
Уверете се, че всички болтове и гайки са затегнати, когато се използва
оборудване и ги проверявайте и затягайте преди тренировка.
Необходима е периодична поддръжка на цялото оборудване за
упражнения, за да се поддържа в добро състояние.
This manual suits for next models
1
Table of contents
Languages:
Other BODYFLEX Treadmill manuals


Popular Treadmill manuals by other brands


NordicTrack
NordicTrack C4000 Treadmill Manuale d'istruzioni

NordicTrack
NordicTrack T12 Si Cwl Treadmill Manuale d'istruzioni

Freeform
Freeform F100 Operating instructions manual

Paradigm
Paradigm Pacer2800 owner's manual

FITFIU FITNESS
FITFIU FITNESS MC-80 instruction manual

Spirit
Spirit SPT0042 owner's manual