Bodystance Backpod User manual

Designed and made in New Zealand
USER GUIDE
®

Introduction and how to use the Backpod®
1Introduction: Why you have neck or upper back pain - the iHunch
3Instructions: How to use the Backpod®
6Care of your Backpod®
7Warnings and precautions
Home care programme
9One simple muscle stretch
10 Two simple strengthening exercises
12 Posture
13 Massage – two simple techniques
Note from Steve August, B.A., Dip. Physio
Thank you for buying the Backpod®. The views and recommendations contained in this user guide are
my own. They are those of a New Zealand physiotherapist with 30 years’ experience. This amounts to
over 40,000 patient treatments performed personally, plus innumerable courses, conferences, clinical
discussions, reading, etc. Views on the strengths and limitations of other treatment and care approaches are
fair comment from the viewpoint of a very experienced practitioner.
Home care programme

Health Practitioner pages
15 Backpod® combined with manipulation and manual therapy from doctors,
physiotherapists, osteopaths and chiropractors
17 Backpod® for straight or concave thoracic spines
18 Backpod® for scoliosis
19 Backpod for Costochondritis, Tietze’s Syndrome, ‘slipping ribs’ and
costovertebral (posterior rib) joints
21 Backpod® for chronic asthma, bronchitis; rib pain in pregnancy
23 Backpod® for ankylosing spondylitis, Scheuermann’s Osteochondritis and
Parkinson’s Disease
24 Backpod® for persisting pain after neck or thoracic surgery
25 Backpod® for sacroiliac mobilisations, and for coccydynia (tailbone pain)
27 Backpod® for T4 Syndrome
28 Backpod® for prescribing doctors, pharmacists and acupuncturists
29 Backpod® combined with massage therapy
30 Backpod® with yoga, Feldenkrais Method, Alexander Technique and ergonomics
31 Backpod® for gymnasiums, Pilates and personal trainers

Why you have neck or upper back pain - the iHunch
Pain in the neck and upper back is a truly enormous
problem. Here’s how big: of 400 million people in
Europe, statistics show that perhaps 60 million will
be in acute pain right now, including headaches.
Forty-five million people in the USA and 600,000 in
New Zealand will have a problem right now. You are
not alone! What’s going on?
Here’s how it happens. We all start out upright:
watch four-year-olds running around with their
heads balanced perfectly above their shoulders.
But then we all bend forward to do things – in
school and on into adult life. Do enough of this and
the upper/middle back tightens into that bent-
forward hunch.
Then the muscles along the back of the neck have
to work several times harder just to hold the head
up – and they strain, scar and tighten. This puts a
compressive load on the joints in the neck giving
them a tendency to eventually jam up and lock,
which can cause acute pain and headaches. In the
worst cases discs and nerves become involved,
with pain spreading down the arms. Whiplash and
impact injuries also take their toll, but that upper
back hunching probably underlies the majority of
upper back and neck problems in the world today.
See the iHUNCH page on the Backpod’s website
www.backpod.co.nz.
And it’s getting worse. This forward-bending stoop
has accelerated in the last few years with the
advent of laptops, tablets, smartphones and similar
- see the Wikipedia entry on the iHunch. Unlike
desktop computers you can’t detach the keyboards
from the small screens, so users tend to hunch
forward even more. What to do?
1
Introduction

The good news is that because it all happens in
a logical pattern, you can treat it logically and
effectively. But you have to treat all the pieces
causing the problem. Often health professionals
are so busy or specialised they treat only one or
two, so you tend to get only very temporary relief.
The Backpod® is a high-tech mobilising tool which
uses your own upper body weight to let you stretch
out the tightened hunched upper and middle back
which commonly underlies most neck problems.
This user guide also provides the basic stretching
and strengthening exercises, home massage and
postural techniques that you need to treat and care
for your own upper back and neck at home. These
aren’t time-consuming or complicated. They are
also available free as videos on our website
www.backpod.co.nz.
It’s fine if you’re already receiving help from a
doctor, physiotherapist, osteopath, chiropractor,
pharmacist or acupuncturist; doing Pilates or yoga;
working out at the gym; etc. The Backpod® and
its programme will generally help and enhance all
these other approaches. They provide stand-alone
treatment and maintenance for most middle back
and neck problems, but if your specific problem
needs extra help, your health practitioner is there to
provide it. We all want you, the patient, to get better,
and stay that way.
The second part of this user guide is for doctors,
physiotherapists, osteopaths, chiropractors and
other health professionals. It contains more
detailed information on how the Backpod® will
help their particular treatment approach. The
Backpod® and its programme are highly effective
complements to each speciality. 2
Introduction

Instructions: How to use the Backpod®
The Backpod® is designed to stretch out a bent-
forward and stiffened upper and middle back.
When the joints in the spine have jammed up
enough, and the very tough tissue surrounding
them has tightened, you can’t free them up using
your own muscles or body movements. It’s no
longer enough to just “sit up straight” – you haven’t
got the leverage to unlock a specific joint or stretch
out the stiffened ligaments around it on your own.
You can do it with the help of the Backpod® though.
Your own body weight provides the force, and the
shape of the Backpod® localises it to the particular
areas that need to free up.
The stretch provided by the Backpod® can be
strong, so the first time you use it, start off with
three pillows under your head, and if necessary
layers of fluffy towel over the Backpod® itself. This
will make the stretch more comfortable. It should
definitely not be actually painful.
However, the Backpod® is a real treatment device,
not a gimmick, and you could feel some slight
discomfort to start off with. It’s like stretching a
muscle – if you couldn’t feel anything, then you
wouldn’t be doing anything useful.
3
Instructions : How to use

1 Place the Backpod® on the floor, flat side down.
(Don’t use it on a bed or any other soft, springy
surface.) Sit on the floor with your knees bent up
and your feet on the floor, and gently lower yourself
onto the Backpod® so that it lies lengthwise under
your spine between your shoulder-blades – as
shown in the picture on the front cover of this user
guide.
2 Place your hands behind your head, and let your
shoulders and back relax. Hold your chin in slightly.
You may feel some slight discomfort but this will
usually disappear inside a minute as the spine
stretches out a bit. If you think it’s still too sore, just
add some more padding over the Backpod®.
3 Relax in this position for 30-60 seconds. Let your
elbows also relax and drop, which will stretch your
chest muscles. Breathe slowly and deeply. Any initial
discomfort should ease off.
4 Every 30-60 seconds change your position about
50mm (2 inches). Work the Backpod® up and down
your middle back and about the same distance out
to both sides. Don’t go up the spine as high as your
neck or lower than the bottom of your rib cage. Most
tightness occurs around the shoulder blades, so
concentrate on that area. Positioning the Backpod®
about 50mm (2 inches) out to one side of the spine
between it and the shoulder blades mobilises the
rib joints, which can get tight just as the spine does.
Spend several minutes working around the whole 4
Instructions : How to use

middle and upper back area like this. You can do
this once a day at home or at work, most days a
week. If the spine feels too tender, stretch only
every second day.
5 When stretching with the three pillows becomes
comfortable, you can make the stretch stronger by
using just two pillows. When that feels acceptable
drop back to one, and then to no pillow at all.
Depending on how tight your back is, it may take
weeks to get to this point. Stick with it – it’s very
tough material you’re loosening, and it may have
been frozen up for many years.
For a stronger stretch, turn the Backpod sideways
across your spine. (The tighter curve across the
Backpod will apply more localised pressure to your
back.) Or lift your buttocks off the floor. Or slowly
keep moving your linked hands over your head and
back down to your waist.
When you can do a session on the Backpod® with
no pillows and no discomfort you’ve reached your
goal! What this means is that nothing is jammed
and everything has been stretched back to normal
flexibility, and no longer hurts to move. To keep
everything freed up, just use the Backpod® once a
week, or if things feel like they’re getting tight again.
Using the Backpod® in a sitting position: You can
also use the Backpod® in a chair or car seat. Just
slip it down between your upper back and the seat
and lean back onto it. This sitting position gives
a milder stretch than the lying position. When
driving a car or truck you can push back against the
steering wheel to give a stronger stretch against the
Backpod®, so it’s an excellent opportunity for plenty
of stretching when commuting or on a long trip.
Further treatment: The Backpod® can stretch out
a tight spine more effectively than anyone can
with just their own exercises. But some spines
can be so tight that they also need manipulation
or mobilisation from a manipulating doctor,
physiotherapist, osteopath or chiropractor. These
practitioners can unlock joints so that the Backpod®
can then stretch them the rest of the way, and then
keep them free. It’s a perfect combination - and
avoids ongoing repeated manipulations.
5
Instructions : How to use

Care of your Backpod®
The Backpod® itself consists of a strong poly-
carbonate core (the transparent blue inner part)
with a cushioning synthetic rubber outer layer (the
flexible apple-green part). The inner core is sculpted
to stretch your spine when you lie back on the
Backpod® and the cushioning outer layer is there to
make this comfortable enough.
The Backpod® is immensely strong – we’ve driven
a BMW over one to test it for Europe and a Jeep
Cherokee to test it for the USA. The Backpod® was
fine both times. So we don’t think it’s going to break
when anyone lies on it, and we think it will last for
many, many years.
Any dust or fluff on the outer green layer can usually
be brushed or wiped off with a dry tea-towel or bath
towel. More resistant dust or fluff may need wiping
off with a warm, damp sponge or towel.
Any oils, such as massage oil or perspiration, should
be wiped off as the residue may reduce the life
of the green synthetic rubber outer layer. Use a
warm, damp sponge or towel, and also mild soap if
necessary.
Do not wash the Backpod® under a tap or submerge
it in a sink or basin – the internal core may fill up
with water.
Do not put the Backpod® in the microwave,
dishwasher, washing machine or oven.
Do not remove the flexible green outer layer of the
Backpod® as bending it backwards may possibly
cause internal cracks in the synthetic rubber.
Cracks on the inside of the green outer layer are not
grounds for return of the Backpod® because they can
only happen if the green layer is pulled off - don’t do
this.
6
Care of your Backpod®
View our instruction videos online
at www.bodystance.co.nz/backpod.php

Warnings and precautions
When used sensibly, the Backpod® is safe to use
for almost all common musculoskeletal conditions
involving the upper back, middle back and neck.
It is a passive device and entirely under the user’s
control. The only force applied comes from the
user’s own upper body weight which they can lower
gently to lie on the Backpod®. They can get off again
if there are problems. Bodystance Ltd is not liable
for any damage or injury resulting from non-directed
or non-sensible use of the Backpod®, its user guide
or website videos.
If problems or pain persist when using the
Backpod® or following its programme, see your
doctor or other appropriate health practitioner. It
is not possible to build a single product perfectly
suited to every patient; however, the Backpod® and
its programme should benefit the vast majority of
upper back and neck problems. That the Backpod®
and its programme do not fully solve your particular
problem is not grounds for the return of the product
– you may also need specific health practitioner
intervention(s) as well.
Treatment soreness.
Any effective stretch of tight muscles, tendons or
ligaments may produce some discomfort, even mild
soreness – just like any warm-up muscle stretch.
This doesn’t do any harm. Patients commonly
describe a “good pain, which is doing the right
thing.”
Use of the Backpod® should be graded with
pillows and even layers of fluffy towel over the
Backpod® itself so it’s not too uncomfortable on
any one stretch. Stretching only every second day
is recommended if the spine is too tender. If pain is
clearly extreme, or persists for more than a day or
two, see your doctor or other health professional.
Don’t use the Backpod® if there is reason to
suspect a bony fracture, e.g., a heavy impact on the
spine or ribs.
Don’t use the Backpod® in the presence of recent
surgery, wounds, bruising, infections, shingles or
other skin lesions in the area. Watch that any catch
on a bra strap doesn’t dig in painfully.
7
Warnings and precautions

Don’t use the Backpod® for children. Their bones
are still growing and their joints are usually fully
flexible anyway. However, the Backpod® programme
of muscle strengthening, posture education and
home massage can be extremely helpful. It is also
available as videos on our website
www.backpod.co.nz.
Osteoporosis and osteopenia
These are conditions of reduced bone density,
making the bones more at risk of a fracture. The
Backpod® should be used with increased caution,
but mild degrees of these conditions are not a
total contra-indication. The Backpod® provides
only a passive stretch of the spine, and can be
gently graded by using pillows under the head and
padding over the Backpod® itself. If unsure, check
with your doctor first.
Scheuermann’s Osteochondritis
The Backpod® may irritate this condition when it
is in the inflammatory phase. However, it is highly
appropriate for treatment of the common tight
flexed middle and upper back that remains once
the inflammation has settled. If unsure, check with
your doctor first.
Straight or concave middle and upper backs
This is the one fairly common case where the
standard use of the Backpod® won’t help. About
5% of middle backs are straight or even slightly
hollowed. This is usually because of a fall on the
back or other impact, or an excessively rigid upright
posture.
The Backpod® used in the usual way will push
these spines further in the wrong direction, causing
compressive loading on the joints at the back of the
bony vertebrae, which can then jam.
If you think you might have this sort of back, just
get someone to look at your spine between the
shoulder-blades. If it’s straight or hollowed, and
the Backpod® is not helping, see your health
professional. There is an effective use of the
Backpod® for this type of spine outlined on page
17 of the Health Practitioner pages: “Backpod® for
straight or concave thoracic spines”. The Backpod®
programme will help in any case – especially the
massage (see pages 13 & 14: “Massage – two
simple techniques”). 8
Warnings and precautions

One simple muscle stretch
Flexibility is good for you. In an ideal world, we’d
have time to do an hour’s stretching every day. If
you haven’t got that time, here is the single stretch
with the greatest benefit for most neck problems. It
is for the upper trapezius muscle which runs from
the point of your shoulder across to the spine and
up to the base of your skull. When you’re wearing a
backpack, this is the muscle the straps are resting
on, and it’s what you use when you shrug. It’s
usually the first one to tighten up with stress and
lots of bent forward work. When you see someone
with their shoulders held up around their ears, they
need this stretch.
This is a simple side-bending stretch, which can
be done sitting or standing. Drop one arm and
shoulder down towards the ground and stretch your
head sideways away from it, using your other hand
to pull your head towards your other shoulder. Keep
the dropped shoulder relaxed. You can bend your
head forward slightly, and rotate it a little, to pull
on different fibres of the muscle. When doing this
stretch while sitting, tuck the hand of the dropped
arm under your buttock to help keep the shoulder
dropped.
If you’re doing this at home, hold the stretch for 30
seconds, then do the same for the other side. Do
two or three stretches if you have time. In a busy
and stressful workplace, even a 10-second stretch
from time to time will usually stop the muscle
straining and tightening.
9
Home care programme
View our instruction video online
at www.bodystance.co.nz/backpod.php

Two simple strengthening exercises
A full gym strengthening programme will do a more
thorough job of building up the strength you need
to live your busy life. If you can’t fit that in, here
are the two strengthening exercises which will give
you the maximum benefit for the time and effort
involved.
The common hunched-forward upper back/poked-
chin posture which is the basis of most neck and
upper back problems has two main areas of muscle
weakness. One is around the middle back and
includes the muscles which anchor and stabilise
the shoulder-blades and stop the upper back from
drooping forward. (These include the middle and
lower trapezius fibres and the rhomboid muscles.)
The second group that gets really weak are the
deep muscles around the front of the neck. When
this happens, the chin pokes out and the joints at
the back of the neck bones are compressed, which
can result in joints jamming and trapping of the
nerves which run out between the bony vertebrae.
1 To strengthen between the shoulder-blades,
lie on your front, arms by your sides with palms
upwards, chin tucked in. Squeeze your shoulder-
blades together, lift your chest slightly up off the
ground, and lift your straight arms up so they
are just off the ground. Hold that position for five
seconds and then relax. Do it ten times in a row.
This is called a ‘set’. Rest for a minute, then do
another set. Rest for another minute, then do a
third set.
Do this exercise at home every day or every second
day. When it becomes easy, move your hands
inwards so the knuckles are just above each
buttock. When that becomes easy, do it holding
a half-kilogram (one pound) weight in each hand.
Then when that’s easy, use a 1kg (2lb) weight;
then finally progress to a 2kg (4lb) weight. You
can stop there - you’re strong enough! If you don’t
have hand weights, you can use cans of beans for
half-kilogram weights, and one-litre plastic bottles
filled with water for the 1kg weights, and 2L bottles
for the 2kg weights.
10
Home care programme

2 To strengthen the front neck muscles, lie on
your back on the floor with your knees bent and
your feet on the floor. Roll your head slightly to tuck
your chin in, hold it carefully in, and lift the back of
your head only a centimetre or two (half an inch)
off the floor. Hold that position for ten seconds,
then relax and rest. Repeat the exercise until you
have done it ten times.
It’s most important that this exercise be done
accurately – don’t let the chin poke out or the
head come too far off the floor. To start with, if you
can’t hold the position for a full ten seconds, just
hold it correctly for as long as you can. Also, if you
can’t do ten lifts in a row, just do as many as you
can correctly. Don’t be discouraged if it’s hard – it
may take weeks before you are strong enough to
manage ten full ten-second lifts in a row.
If your front neck muscles are really weak, and with
your chin held in you can’t lift your head off the floor
at all - don’t give up. It’s just where you’re starting
from and they’ll get stronger - muscles are really
good at that. Just do the exercise as described in
the first paragraph but don’t even try to lift the head
off as well. When you can firmly hold your chin in for
10 seconds, 10 times in a row, and do three lots of
that easily enough – then you’ll be strong enough to
start lifting the head off as well.
The reason for these two exercises is to get the
muscles strong enough to use during the day
to hold your neck and upper back in a neutral
position which won’t strain muscles or joints. This is
explained on the next page: ‘Posture’.
11
Home care programme
View our instruction videos online
at www.bodystance.co.nz/backpod.php

Posture
This is easier than you think. The two exercises
in the preceding strengthening section will give
you the strength you need to hold your neck in
a neutral position so that your joints won’t jam,
even when you are bending forward. Posture is the
practical daily application of that strength. It’s often
explained in a confusing and complicated way and
it doesn’t need to be. Here’s how simple it is:
1 For the neck, hold your chin in a little. Don’t let it
poke out.
2 For the upper and middle back, hold your
shoulders back and down a little. Don’t let them
hunch.
If you’re not sure exactly how far to go, just do
both actions as far and as hard as you can, then
relax a little from that position. Initially you’ll often
forget to hold your neck and shoulders like this, but
don’t give up – it becomes automatic with enough
practice, and easy when the muscles get stronger.
One indicator that you’re getting it right is that
your ear lobe sits vertically above the point of your
shoulder. (You can notice someone getting it badly
wrong – seen from side on, the back of their head
will sit vertically above the front of their chest.)
Posture is important not just for pain relief.
Research shows a hunched posture indicates and
may even drive a lack of personal confidence, and
also correlates strongly with not being listened to.
Perfect posture gets attention. For an inspiring
explanation of this, Google Dr Amy Cuddy’s TED talk
(with over 40 million views) on posture and body
language.
Home care programme
12
Massage - two simple techniques
In an ideal world, frequent massage would be
part of our lives. Failing that, here are the two
massage techniques that are of most use in most
neck problems. You need a massage partner. If
you haven’t got someone on hand, find someone
else with a neck problem – which shouldn’t be too
difficult!
The main muscles that need massage run from
the base of the skull down the back of the neck
to below the shoulder blades, and also out to the
points of the shoulders. (The main ones are called
the trapezius, rhomboid and levator scapulae
muscles.) When they fatigue and strain, small tears
occur which scar up as part of their repair process.
A build-up of this scarring (called adhesive fibrosis)
shortens the muscles, lifting the shoulders up
towards the ears and pulling the head back so the
chin pokes out.
The upper trapezius stretch shown in the stretching
section on page 9 is a good daily way of keeping
that part of these muscles elastic but if they are
scarred enough they will also need massage.
Massage has much more leverage on tight, tough
muscle scarring than just stretching – like a rolling
pin flattening out a chunk of dough into a pancake.
Deep tissue massage like this shouldn’t be done
more than once a week – the tissues need time to
recover. You will need some massage wax, massage
oil or cooking oil to let your fingers slide easily over
the skin.
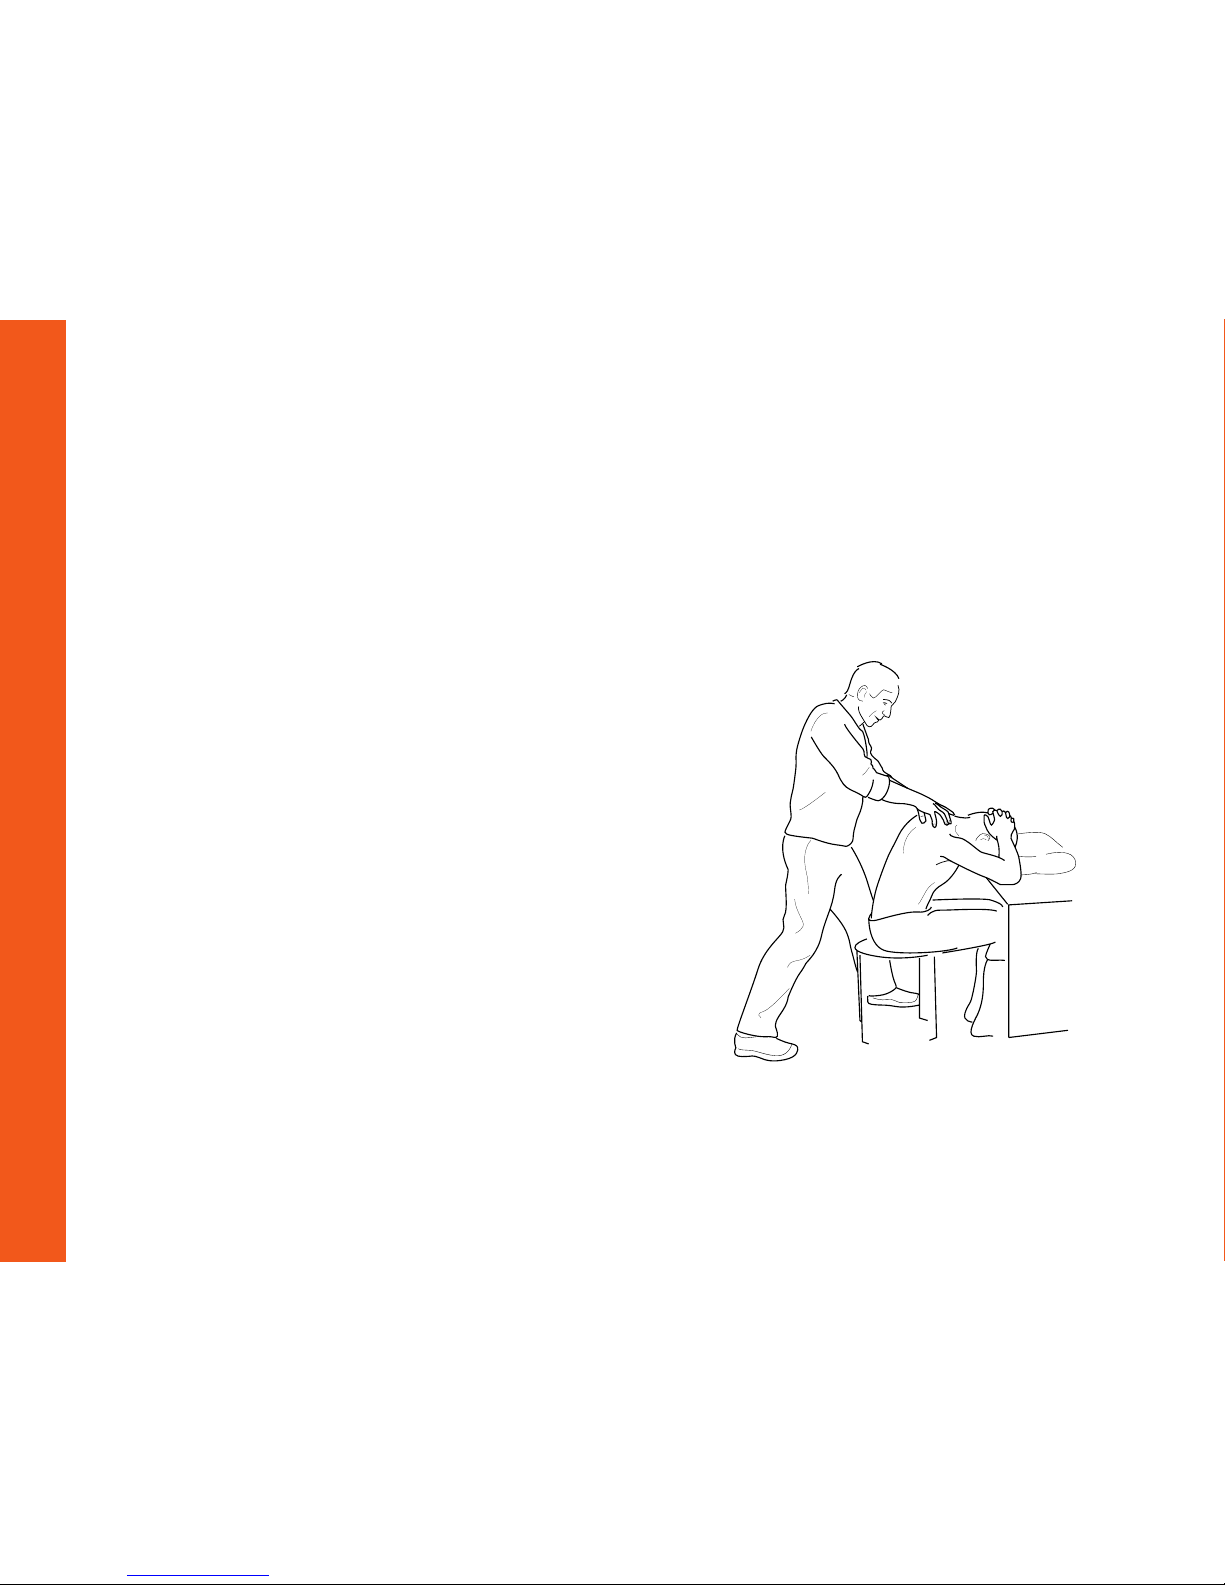
1 Sitting massage position.
Patient: sit at a desk or table with your forehead on
a pillow, rolled towel or something else comfortable.
Home care programme
13

Clasp your hands behind your neck, then slide
them up onto the back of your head, pulling your
hair up and out of the way. Tuck your chin in so
that the muscles at the back of the neck are gently
stretched.
Person massaging: work up and down the neck and
back muscles from just below the shoulder blades
right up to the base of the skull. Take your time and
go gently to start with. Use your fingers, thumbs or
knuckles to work the muscle fibres lengthwise. You
may feel harder lumpy bits in the muscles – they
are the scarred patches so concentrate on them.
Spend about 10-15 minutes doing this.
2 Side lying massage position.
Patient: lie on your side, with your head dropped
sideways (without a pillow if that’s comfortable
enough). Your top shoulder should be relaxed and
dropped in the direction of your hip, with your hand
around your buttock to hold it like that. Your hips
and knees should be bent up so you don’t roll
around. This position stretches the upper trapezius
muscle running from the shoulder up the neck to
the base of the skull, which is usually the first one
to strain and tighten during bent forward work.
Person massaging: massage along the length of
this muscle. Concentrate on the hard patch of scar
tissue usually found between the shoulder and the
neck. Start gently. You can work more deeply into
the muscles once they have warmed up. Spend
about 5-10 minutes working on each side.
Home care programme
14

Backpod® combined with manipulation and manual therapy from
doctors, physiotherapists, osteopaths and chiropractors
The Backpod® is an ideal adjunct to manual or
manipulative therapy. Manipulation is excellent for
unlocking jammed joints, but they usually won’t stay
free unless the surrounding tightened capsules and
ligaments are also stretched out. The Backpod® is
ideal for this, so you get a long-term solution, not just a
temporary fix.
High velocity short amplitude thrust manipulation is
a quick and effective way of banging free a locked
spinal apophyseal (facet) or costovertebral (CV,
posterior rib) joint. Obviously the usual precautions
and contraindications taught to trained manipulators
need to be observed. However, if the joint has been
jammed for some time, the surrounding collagenous
capsule and ligaments will have tightened around
the immobile hinge. Manipulation can free the hinge
movement, but the surrounding tight collagen close
around it tends to freeze it up again. Collagen is tough
and can take up to six months to remodel. This is
the main reason for the problem coming back again
weeks or only days after an effective manipulation
treatment session.
Lying back on the Backpod® for several minutes daily
will give a strong sustained stretch to shortened
ligaments and capsules around the joints and quietly
reduce an excessive thoracic kyphosis. The pressure
can be graded for the thoracic facets by positioning
the Backpod® longitudinally under the spine (a gentler
curve) or transversely (a sharper curve, hence more
stretch pressure); and by using pillows under the
patient’s head and even layers of fluffy towel over
the Backpod® itself. The CV joints are localised by
positioning the Backpod® longitudinally on the curve of
the ribs between the scapula and the spine itself. See
pages 3–5: ‘Instructions: How to use the Backpod®’.
The Backpod® works particularly well after
manipulation, when the joints have been definitively
unlocked so they will move to allow the stretch
pressure to directly reach the surrounding collagen. It
is also effective before manipulation, to produce some
loosening of the hypomobile segments first and make
the manipulation easier, both for the therapist and the
patient.
The Backpod® programme of posture, massage,
strengthening and stretching covers the other
aspects of the usual flexed thoracic/chin poked neck
problem. For instance, manipulation can effectively
and immediately unlock atlanto-occipital (C0/1) joints
jammed in extension and causing headaches – a
common problem. But the wider drivers (over-flexed
15
Health Practitioner pages

thoracic spine, weak neck flexor muscles, strained
scarred upper trapezius muscles, poked chin posture,
etc.) that force the C0/1 joints into extension until
they freeze also need to be countered, or the problem
will rapidly return. The Backpod® programme covers
each of these necessary components in turn. It is also
available as free videos on our website
www.backpod.co.nz.
Backpod® in conjunction with manual
physiotherapy, the McKenzie approach, Mulligan
and Maitland techniques, etc.
The Backpod® fills a gap in physiotherapy techniques
for the common excessively kyphotic thoracic spine.
The patient can use it for a stretch lasting several
minutes, which is much more effective on chronically
shortened collagen than a few seconds of, say,
Maitland PAs. It can stretch tightened costovertebral
joint capsules in the same sustained way. Hands-on
manual techniques and manipulation can apply
greater force to unlock a chronically jammed joint, but
a sustained stretch is needed to stop the surrounding
tightened collagen just freezing it up again. The
Backpod® can provide this, with sufficient leverage, and
in the patient’s own home. A rolled-up towel or tennis
ball usually can’t.
In my experience the McKenzie treat-your-own-back
approach is brilliantly effective for treating bulging
lumbar discs. However, the thoracic spine is reinforced
and splinted to a fair extent by the rib cage and chest
muscles. So repeated active movements by the
patient alone cannot bring as much force to bear on a
specific vertebra here as they can in the low back. The
Backpod® enables the patient to bring the necessary
much greater leverage to a section of thoracic spine,
and they can do it at home in their own time. The
McKenzie approach does include appropriate therapist
hands-on mobilisation, of course. The Backpod® is a
valuable addition to these techniques for the thoracic
spine.
Sub-group of straight or concave thoracic spines.
The common manipulation techniques (vertical
downward thrust on the thoracic spine or ribs with the
patient lying prone, ‘knee-in-the-back’ or variants, ‘dog
technique’ body drop onto the supine patient with the
therapist’s fist underneath) are all appropriate for an
excessively flexed hypomobile thoracic spine. They
jolt the joints in an extension direction to reduce that
excessive flexion.
However, there is a small subgroup of patients with
thoracic segments locked in extension, indicated
clinically by a straight or even concave section of the
thoracic spine. These manipulations don’t help these
segments much, as they tend to shift the joints further
into the range they’re already locked in. There is a
logical and simple solution – see page 17: ‘Backpod®
for straight or concave thoracic spines’.
16
Health Practitioner pages

Backpod® for straight or concave thoracic spines
The common problem with middle/upper thoracic
spines is excessive kyphosis from too much bent-
forward activity. This leads on to most neck problems
as the cervical spine is cranked into excessive
extension and joint loading to simply hold the head up,
and the upper trapezius muscles which do most of the
work strain, scar and shorten.
However, a minority of patients (perhaps 5%) have
straight or even concave sections of the thoracic spine
where the segments are locked in extension. This is
usually the result of a fall on the back or other impact,
or an excessively rigid upright posture. These type of
thoracic spines are readily identified simply by looking
at the patient from behind.
In my experience, the standard physiotherapy
mobilisation technique of oscillating downward
pressure on the spinous processes with the patient
lying prone (Maitland PAs) will tend to make this
sub-group worse, as it increases the extension glide of
facets already excessively extended (i.e., it increases
the concavity). On the same principle, repeated
manipulation similarly tends not to clear the problem.
The Backpod® answer to this subgroup is simple
and logical. Lay the patient prone with the Backpod®
longitudinally under their sternum – you may need
to cover it with a folded towel for extra padding. This
creates a flexion stretch at the extended thoracic
joints. Then glide the spinous processes longitudinally
apart using thumbs, fingers and/or hypothenar
eminences. This direction of mobilisation glides the
facets in a flexion direction, taking them out of their
locked end-range extension.
Oscillatory pressure is best initially to get the facets
moving, followed by sustained pressure to stretch the
shortened capsules and ligaments. It is a technique
that can generally be taught to the spouses, partners,
friends, etc. of patients for follow-up at home.
Note that these patients with straight or concave
thoracic spines can still have tight or frozen
costovertebral joints where the ribs hinge onto the
backbone. These patients can use the Backpod in the
normal way to stretch these posterior rib joints, with
the Backpod positioned slightly to either side of the
backbone but not over the spine itself. The positioning
is over the curve of the ribs, about 40-50mm (2
inches) out from the midline, i.e. between the midline
of the spine and the inside edge of the scapula.
17
Health Practitioner pages
Other manuals for Backpod
1
Table of contents
Other Bodystance Personal Care Product manuals


