Bojungle B720100 User manual

B-Swinging High Chair
(Manual – Handleiding – Mode d‛emploi - Gebrauchsanleitung-
Instrucciones de uso - Instruções de utilização - Istruzioni per
l‛uso - Návod k použití - INSTRUKCJA UŻYTKOWANIA)
Made In China – Bo Jungle - Vox Populi BVBA – Brambroek 23B - 9500 GERAARDSBERGEN – BELGIUM
www.bojungle.eu – info@bojungle.eu – Tel: +32 54 240 331 – Fax: +32 9 270 01 80
EN
NL
FR
ES
IT
1.Left tube
2.Left swing tube
3.Folding button
4.Control panel
5.Right tube
6.Right swing tube
7.Safety harness
8.Activity tray
9.Footrest
10.Battery
compartment
11.Leg tubes
12.Toy arch
1. Linkerbuis
2. Buis schommel
linkerzijde
3. Knop dichtplooien
4. Controlepaneel
5. Rechterbuis
6. Buis schommel
rechterzijde
7. Veiligheidsharnas
8. Activiteitentablet
9. Voetensteun
10.
Batterijcompartiment
11. Buizen onderzijde
12. Speelboog
1. Tube gauche
2. Tube balancelle
gauche
3. Bouton de pliage
4. Panneau de contrôle
5. Tube droit
6. Tube balancelle droit
7. Harnais de sécurité
8. Tablette d’activités
9. Repose-pied
10. Compartiment de
piles
11. Tubes du fond
12. Arceau de jeux
1. Tubo izquierdo
2. Tubo izquierdo de
oscilación
3. Botón de plegado
4. Panel de control
5. Tubo derecho
6. Tubo derecho del
oscilación
7. Arnés de seguridad
8. Bandeja de
actividades
9.Reposapiés
10. Compartimiento de
pilas
11. Tubos de patas
12. Arco de juego
1. Tubo sinistro
2. Tubo oscillante
sinistro
3. pulsante di chiusura
4. Pannello di controllo
5. tubo destro
6. Tubo oscillante destro
7. Cablaggio di sicurezza
8. Vassoio attività
9.Poggiapiedi
10. Scomparto batteria
11.Tubi di base
12. Arco giochi
DE
PL
CZ
SK
EL
1.Linkes Rohr
2.Linkes Schwenkrohr
3.Faltungsknopf
4. Bedienfeld
5.Rechtes Rohr
6.Rechtes Schwenkrohr
7. Sicherheitsgurt
8.Aktivitätstablette
9. Fußstütze
10. Batteriefach
11. Unteres Rohr
12.Spielbogen
1.Prawa noga
2. Prawe ramię
huśtawki
3. Przycisk rozwijania
4. Panel sterowania
5.Lewa noga
6.Lewe ramię huśtawki
7. Pasy bezpieczeństwa
8. Taca aktywności
9. Podnóżek
10. Pojemnik na baterie
11.Rama
12. Pałąk z zabawkami
1. Levý rám
2. Levý houpací rám
3.Tlačítko skládání
4. Ovládací panel
5. Pravý rám
6. Pravý houpací rám
7. Bezpečnostní pás
8. Pultík
9.Opěrka nohou
10.Prostor pro baterie
11. Rám nohou
12.Hrazdička s hračkami
1. Ľavý rám
2. Ľavý hojdacia rám
3.Tlačítko skladanie
4. Ovládací panel
5. Pravý rám
6. Pravý hojdacia rám
7. Bezpečnostný pás
8. Pultík
9.Opěrka nôh
10.Prostor pre batérie
11. Rám nôh
12.Hrazdička s hračkami
1.Διακόπτης σωλήνας
2.Μετατροπέας
ολίσθησης
3.Πλήκτρο
αναδίπλωσης
4.Πίνακας ελέγχου
5.Διακόπτης σωλήνας
6.Διακόπτης
σωληνώσεων
7.Συσκευή ασφαλείας
8. Δίσκος ενεργειών
9.Footrest
10.Το διαμέρισμα
μπαμπού
11. Σωλήνες κράματος
12.Αυτό τόξο
RO
1. tub tuburi
2.Tubul leagăn spre
stânga
3.Blocare
4.Panoul de control
5.Tubul drept
6.Tubul drept
7. Cablajul de siguranță
8. Tava de acțiune
9.Footrest
10. Compartimentul
bateriei
11. Tuburi de legare
12.Toy arch
1.
2.
3.
4.
5.
6.
7.
8.
9.
10.
11.
12.

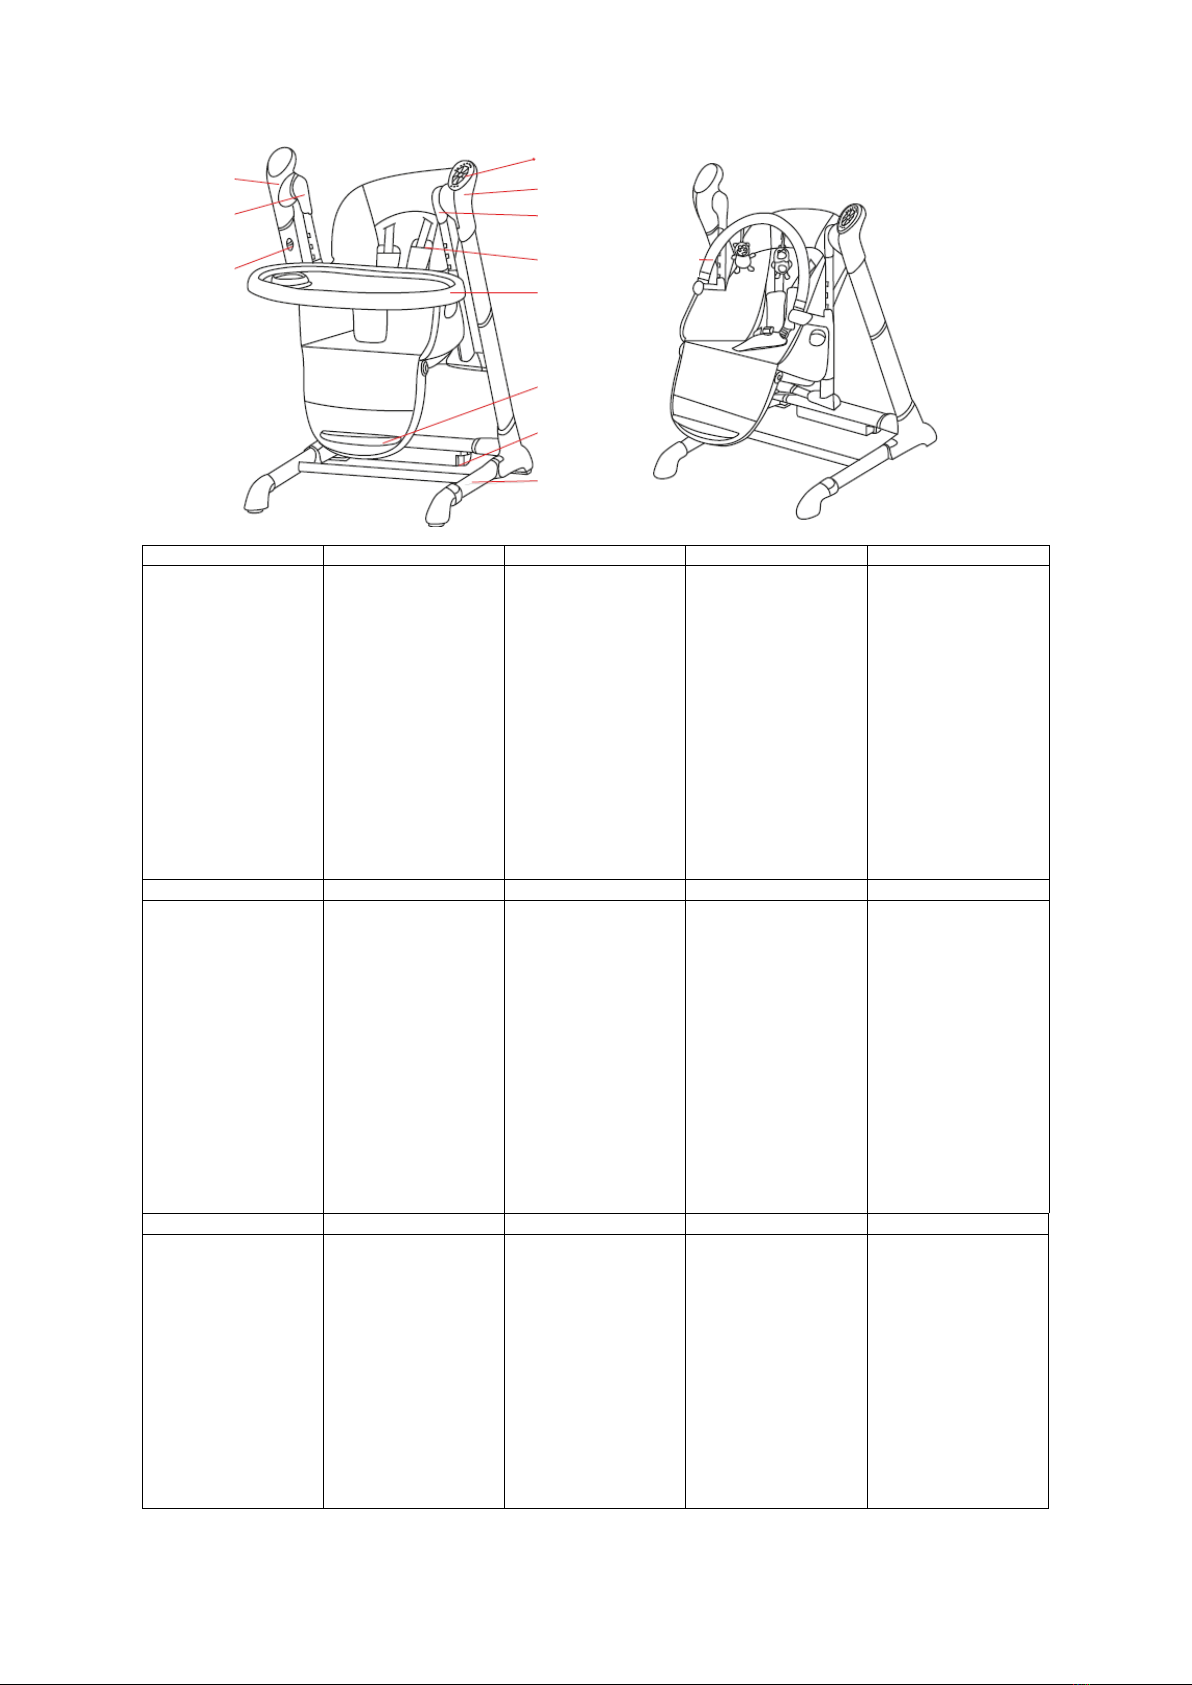
PARTS
1 2 3 4 5
6 7 8 9
10 11 12
EN
1 Main tube
2 Support tube
3 Frame bo om
4 Le swing tube
5 Right swing tube
6 Seat cover
7 Swing set
8 Ac vity tray
9 Crotch strap
10 Toy bar
11 Footrest base
12 Adapter
Adapter
NL
1 Hoofdbuis
2 Steunbuis
3 Buis onderzijde
4 Linkse schommelbuis
5 Rechtse
schommelbuis
6 Bekleding zitje
7 Schommelgedeelte
8 Ac viteitentablet
9 Kruisgordel
10 Speelboog
11 Basis voetensteun
12 Adapter
FR
1 Tube principal
2 Tube de support
3 Tubes du fond
4 Tube balancelle
gauche
5 Tube balancelle droit
6 Coussin siège
7 Siège balancelle
8 Table e d’ac vités
9 Ceinture d’entrejambe
10 Arche de jeux
11 Base repose-pieds
12 Adaptateur
ES
1 Tubo principal
2 Tubo de soporte
3 Tubo inferior
4 Tubo columpio
izquierdo
5 Tubo columpio
derecho
6 Cubierta de asiento
7 Parte columpio
8 Bandeja de
ac vidades
9 Correa de la
entrepierna
10 Barra de juguetes
11 Base reposapiés
12 Adaptador
IT
1 Tubo prinicipale
2 Tubo di supporto
3 Parte inferiore dei tubi
4 Tubo oscillante sinistro
5 Tubo oscillante destro
6 Coprisedile
7 Set altalena
8 Vassoio a vità
9 Cingha spar gambe
10 Arco giochi
11 Base del poggiapiedi
12 Ada atore
DE
1 Hauptrohr
2 Stützrohr
3 Rahmen unten
4 Schwenkrohr links
5 Rechtes Schwenkrohr
6 Sitzbezug
7 Schaukelset
8 Ak vitätstable e
9 Gurt zwischen den
Beinen
10 Spielbogen
11 Fußrastenbasis
12
PL
1 Lewa noga z jednostką
sterowania
2 Prawa noga
3 Rama
4 Prawe ramięhuśtawki
5 Lewe ramie huśtawki
6 Siedzisko
7 Łącznik
8 Taca aktywności
9 Trzpieńkrokowy
10 Pałąk z zabawkami
11 Podstawa podnóżka
12 Zasilacz sieciowy
CZ
1 Hlavní rám
2 Nosný rám
3 Spodní rám
4 Levý houpací rám
5 Pravý houpací rám
6 Potah sedadla
7 Houpací souprava
8 Pul k
9 Mezinožní pás
10 Hrazdička s hračkami
11 Opěrka nohou
12 Adaptér
SK
1 Hlavný rám
2 Nosný rám
3 Spodný rám
4 Ľavý hojdacia rám
5 Pravý hojdacia rám
6 Poťah sedadla
7 Hojdacia súprava
8 Pul k
9 Medzinožný pás
10 Hrazdička s hračkami
11 Opierka nôh
12 Adaptér
EL
1 κύριος σωλήνας
2 Σωλήνα στήριξης
3 Πλαίσιο πλαισίου
4 Αριστερός σωλήνας
ταλάντωσης
5 Δεξιός σωλήνας
ταλάντευσης
6 Κάλυμμα καθίσματος
7 Σετ Swing
8 Δίσκος
δραστηριοτήτων
9 ιμάντας Crotch
10 Μπαρ παιχνιδιών
11 Βάση ποδιού
12 Προσαρμογέας
RO
1 Tub principal
2 Tub de sprijin
3 Partea inferioarăa
cadrului
4 Tubul leagăn stâng
5 Tub drept
6 Capacul scaunului
Set de leagăn
8 Tava de ac vități
9 Curea crotch
10 Jucărie bar
11 Baza picioarelor
12 Adaptor
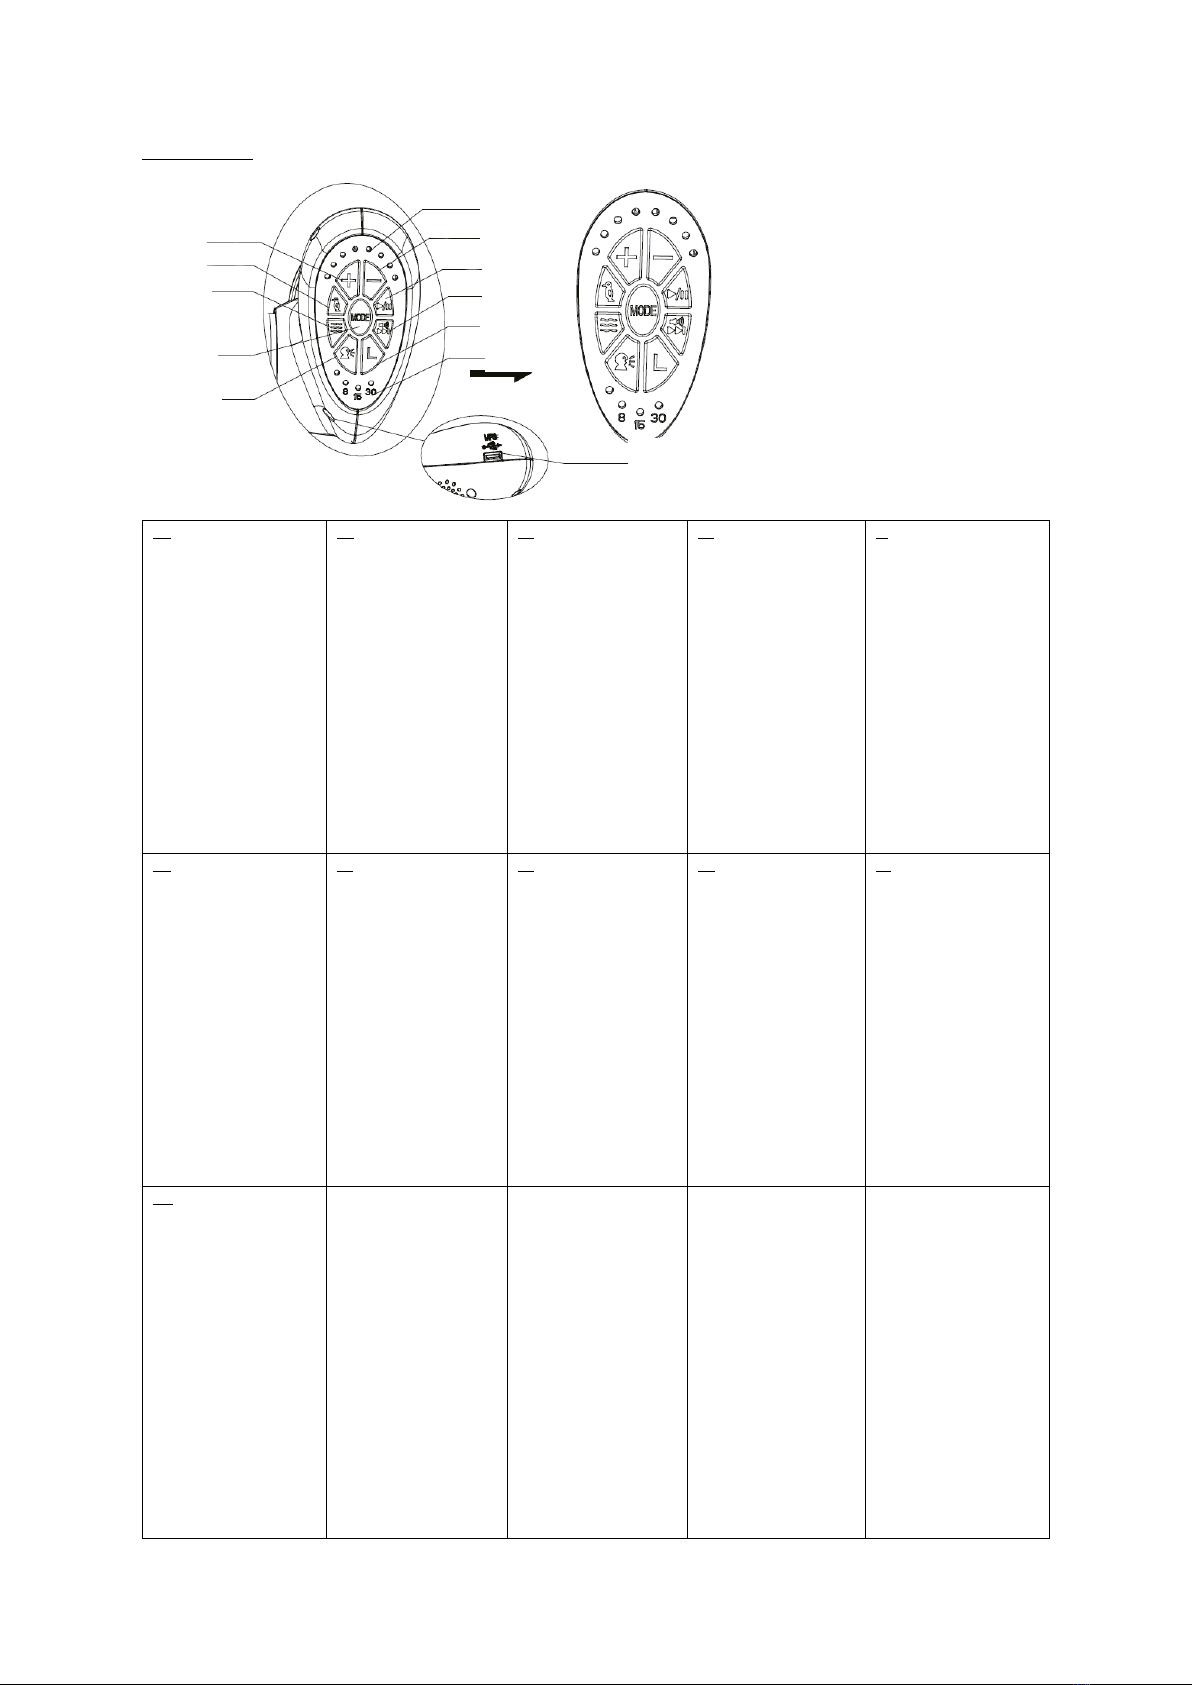
CONTROL PANEL
EN
1 Speed up
2 Bird sound
3 Water sound
4 Adapt mode
5 Voice activation
6 Speed indicator light
7 Speed down
8 Play/Pause music
9 Volume/music
selection
10 Timer button
11 Timer indicator
12 USB connector
NL
1 Snelheid verhogen
2 Vogelgeluid
3 Watergeluid
4 Modus wijzigen
5 Stemactivatie
6 Aanduiding snelheid
7 Snelheid verlagen
8 Muziek
spelen/pauzeren
9 Selectie
volume/muziek
10 Knop timer
11 Aanduiding timer
12 USB connector
FR
1 Accélérer
2 Son d’oiseau
3 Son d’eau
4 Changer mode
5 Activation vocale
6 Indication vitesse
7 Réduire vitesse
8 Jouer/pause musique
9 Sélection
musique/volume
10 Minuterie
11 Indication minuterie
12 Connecteur USB
ES
1 Acelerar
2 Sónido de pájaro
3 Sonido del agua
4 Cambiar modo
5 Activación por voz
6 Indicador Luminoso
velocidad
7 Diminiuir velocidad
8 Reproducir/pausar
música
9 Selección de
volume/música
10 Temporizador
11 Indicador de
temporizador
12 Conector USB
IT
1 Accelerare
2 Suono degli uccelli
3 Suono dell'acqua
4 Adattare modalità
5 Attivazione vocale
6 Indicatore luminoso
7 Ralentare
8 Riproduci o metti in
pausa la musica
9 Selezione di volume /
musica
10 Pulsante timer
11 Spia del timer
12 connettore USB
DE
1 Beschleunigen
2 Vogelgeräusch
3 Wassergeräusch
4 Anpassungsmodus
5 Sprachaktivierung
6
Geschwindigkeitsanzeige
7 Beschleunigen
8 Musik abspielen /
pausieren
9 Lautstärke /
Musikauswahl
10 Timer-Taste
11 Timeranzeige
12 USB-Anschluss
PL
1 Przyspieszenie
2 Dźwięk ptaka
3 Dźwięk wody
4 Tryb adaptacji
5 Aktywacja głosowa
6 Kontrolka prędkości
7 Zmniejsz prędkość
8 Odtwórz / wstrzymaj
muzykę
9 Wybór głośności /
muzyki
10 przycisk timera
11 Wskaźnik timera
12 złącze USB
CZ
1 Zvýšení rychlosti
2 Zvuk ptáků
3 Zvuk vody
4 Režim přizpůsobení
5 Aktivace hlasu
6 Kontrolka rychlosti
7 Snížení rychlosti
8 Přehrávání nebo
pozastavení hudby
9 Výběr hlasitosti /
hudby
10 Časovač
11 Indikátor časovače
12 Konektor USB
SK
1 Zvýšenie rýchlosti
2 Zvuk vtákov
3 Zvuk vody
4 Režim adaptácie
5 Aktivácia hlasu
6 Kontrolka rýchlosti
7 zníženie rýchlosti
8 prehrávanie alebo
pozastavenie hudby
9 výber hlasitosti /
hudby
10 časovač
11 indikátor časovača
12 konektor USB
EL
1 Επιτάχυνση
2 Ήχος πτηνών
3 Ήχος νερού
4 Λειτουργία
προσαρμογής
5 Ενεργοποίηση φωνής
6 Ένδειξη ταχύτητας
7 Αναστροφή
8 Αναπαραγωγή ή
παύση μουσικής
9 Επιλογή έντασης /
μουσικής
10 Χρονοδιακόπτης με
κουμπιά
11 Χρονοδιακόπτη
12 Υποδοχή USB
RO
1 Accelera
2 Sunet de pasare
3 Sunet de apă
4 Butonul pentru
comutarea modului
5 Activarea vocii
6 Indicator luminos de
viteză
7 Incetiniti
8 Redați sau întrerupeți
muzica
9 Selectarea volumului /
muzicii
10 Buton Cronometru
11 Indicatorul luminos al
temporizatorului
12 Conector USB
1
2
3
4
5
7
8
9
10
6
11
12

APP
EN
1 Timer setting
2 Music
3 Bird sound
4 Water sound
5 Swing speed
6 Music player
7 Previous song
8 Volume down
9 Music mode switch
10 Not available
11 Voice control
12 Swing speed down
13 Next song
14 Volume up
NL
1 Timer
2 Muziek
3 Vogelgeluid
4 Watergeluid
5 Schommelsnelheid
6 Muziekspeler
7 Vorige nummer
8 Volume lager
9 Aanpassing
muziekmodus
10 Niet beschikbaar
11 Spraakbesturing
12 Schommelsnelheid
lager
13 Volgend nummer
14 Volume hoger
FR
1 Minuterie
2 Musique
3 Son d’oiseaux
4 Son de l'eau
5 Vitesse balancelle
6 Lecteur de musique
7 Chanson précédente
8 Diminuer volume
9 Sélectionner mode
musique
10 Pas disponible
11 Contrôle vocal
12 Diminuer vitesse de
balancement
13 Chanson suivante
14 Augmenter volume
ES
1 Temporizador
2 Música
3 Sonido de pájaro
4 Sonido del agua
5 Velocidad de swing
6 Reproducir música
7 Canción anterior
8 Bajar volumen
9 Modo de música
10 No disponible
11 Control de voz
12 Diminuir velocidad
de balanceo
13 Canción siguiente
14 Bajar volumen
IT
1 Timer
2 Musica
3 Suono di uccello
4 Suono dell'acqua
5 Velocità di rotazione
6 Lettore musicale
7 Canzone precedente
8 Volume giù
9 Modalità musica
10 Non disponibile
11 Controllo vocale
12 Abbassare velocità
13 Prossima canzone
14 Volume su
DE
1 Timer-Einstellung
2 Musik
3 Vogelgeräusch
4 Wassergeräusch
5
Schwenkgeschwindigkeit
6 Musikspieler
7 Vorheriges Lied
8 Leiser machen
9 Musikmodusschalter
10 Nicht verfügbar
11 Sprachsteuerung
12 Abschwenken
13 Nächstes Lied
14 Lauter
PL
1 Ustawienie timera
2 Muzyka
3 Dźwięk ptaka
4 Dźwięk wody
5 Prędkość obrotowa
6 Odtwarzacz muzyczny
7 Poprzednia piosenka
8 Zmniejsz głośność
9 Przełącznik trybu
muzycznego
10 niedostępne
11 Sterowanie głosowe
12 Prędkość obrotowa
w dół
13 Następna piosenka
14 Zwiększ głośność
CZ
1 Nastavení časovače
2 Hudba
3 Zvuk ptáků
4 Zvuk vody
5 Rychlost otáčení
6 Hudební přehrávač
7 Předchozí píseň
8 Snižte hlasitost
9 Přepínač režimu
hudby
10 není dostupný
11 Ovládání hlasem
12 Rychlost posuvu
13 Další píseň
14 Zvyšte hlasitost
SK
1 Nastavenie časovača
2 Hudba
3 Zvuk vtákov
4 Zvuk vody
5 Rýchlosť otáčania
6 Prehrávač hudby
7 Predchádzajúcu
skladbu
8 Zníženie hlasitosti
9 Prepínač režimu
hudby
10 nie je k dispozícií
11 Ovládanie hlasom
12 Rýchlosť otáčania
13 Ďalšia skladba
14 Zvýšenie hlasitosti
EL
1 Ρύθμιση
χρονοδιακόπτη
2 Μουσική
3 Ήχος πτηνών
4 Ήχος νερού
5 Ταχύτητα ταλάντωσης
6 Αναπαραγωγή
μουσικής
7 Προηγούμενο
τραγούδι
8 Μείωση έντασης ήχου
9 Διακόπτης λειτουργίας
μουσικής
10 μη διαθέσιμος
11 Φωνητικός έλεγχος
12 Ταχύτητα
ταλάντευσης προς τα
κάτω
13 Επόμενο τραγούδι
14 Μείωση έντασης
10 – NOT AVAILABLE ON THIS MODEL
9
11
12
1
2
3
4
5
6
13
14
7
8

RO
1 Setarea cronometrului
2 Muzică
3 Sunet de pasăre
4 Sunet de apă
5 Viteza de mișcare
6 Music player
7 Cântecul anterior
8 Reduceți volumul
9 Comutator de mod
muzical
10 Controlul jucăriilor
mobile
11 Control vocal
12 Viteza înclinată
13 Cântecul următor
14 Măriți volumul

EN
IMPORTANT!
PLEASE READ CAREFULLY & KEEP FOR FUTURE REFERENCE
Thank you for choosing our product. Please take a little time to read the important
safety notes detailed below, as this will ensure many years of happy, safe use.
WARNING
-In the high chair mode: this product is intended to be used by children from 6 to 36 months or 20 kg,
whichever comes first.
-In swing mode, this product can be used from 0 to 12 months or until 9 kgs, whichever comes first.
-NEVER leave your child unattended whilst he or she is in the seat.
-NEVER move the chair whilst the child is in it.
-NEVER use the toy bar as a handle to pick up or move the chair.
-DO NOT allow your child to climb on or play with the high chair or stand up whilst he/she is in the chair. This
product is not a toy.
-ALWAYS make sure the safety harness is correctly fastened and adjusted to the child’s height. The tray has
not been designed to keep the child in the chair.
-ALWAYS make sure all parts are correctly fitted and adjusted to your baby’s height.
-DO NOT place the product close to an open fire or other heat source or in direct sunlight.
-ALWAYS keep this product away from humid or dusty environments, so as not to damage the circuit board.
-DO NOT place the product close to another product, which could create a danger of suffocation or
strangulation, e.g. strings, blinds/curtain cords, necklaces, electrical cords, ribbons for baby dummies, etc.
-NEVER hang anything on the chair as this may affect the stability of it.
-DO NOT place the product near solid structures or furniture to avoid injuries from falls or access to
dangerous objects.
-ONLY use the high chair on flat, even and stable floors. NEVER use it on elevated surfaces.
-ALWAYS ensure that the product is correctly assembled before placing your child in it.
-Check the product periodically for loose fittings, screws, etc. Do not use if any part is broken, torn, loose or
missing and use only spare parts that have been previously approved by the manufacturer. NEVER use any
accessories that have not been approved by the manufacturer.
-Ensure all packaging materials and fasteners are removed before using this product and keep them out of
the reach of children.
-ALWAYS make sure children are at a safe distance when folding/unfolding the high chair.
-This product is not intended for prolonged periods of sleeping. It does not replace replace a cot or baby
bed. Place your baby in a suitable baby bed or cot when he/she needs to sleep.
-Check regularly if the power cord of the adapter or related parts are not damaged. Do not use it if this
should be the case. Make sure the input for the adapter is between 100 and 240V ~50/60Hz 0.3A. Keep the
adapter and cable away from children.
Batteries:
This device works on 4 x D batteries or the AC adapter.
-ALWAYS keep batteries out of children’s reach. NEVER allow them to play with batteries.
-Ensure the batteries are correctly inserted and that the polarity corresponds with the polarities indicated in
the battery compartment.
-ALWAYS remove exhausted batteries. Rechargeable batteries can only be recharged by an adult.
-ALWAYS remove the batteries when the product is not going to be used for a while.
-NEVER mix different battery types or old and new, rechargeable and non-rechargeable batteries. This may
prove dangerous.
-NEVER recharge non-rechargeable batteries.

Care & Maintenance:
-Check the product before assembly and periodically during use. Please contact the after-sales department if
any defects or malfunctions are observed.
-Frame: Wipe surface with a damp cloth or sponge, use a mild detergent and warm water to clean. Towel or
air dry.
-Seat: The seat cushion is not machine washable, do not dry clean, do not iron, do not tumble dry. Use a
clean, humid cloth to clean the seat.
Instructions for assembly
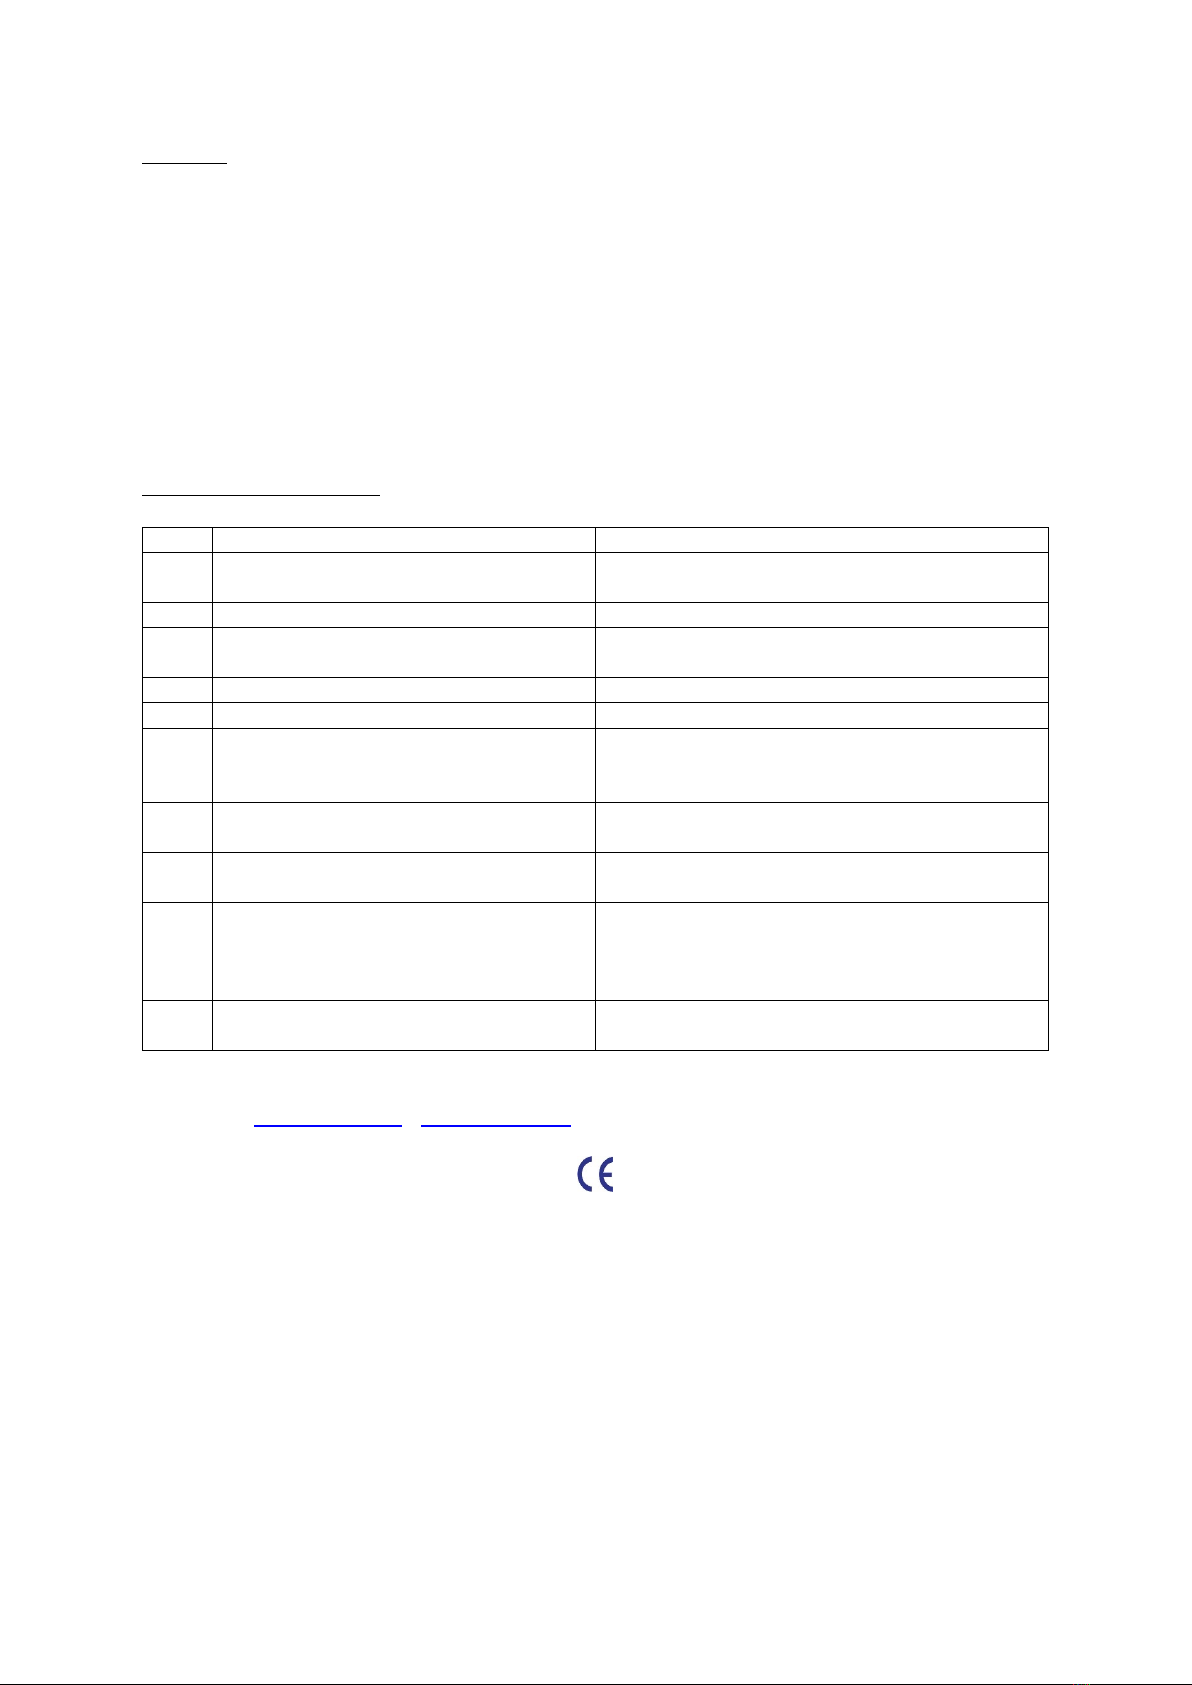
1. Open the leg tubes as shown in the picture below.
WARNING: Make sure the tubes are correctly unfolded and positioned, as this will affect the stability of the
chair.
2. Push the main tube and support tube onto the bottom tubes until you hear a clicking sound, indicating that
the tubes are fixed.
3. Insert the left and right swing tubes in the swing set as shown below until you hear a clicking sound.
4. Insert the bottom of the left and right swing tubes into the swing set, until you hear a clicking sound.

5. Fix the left and right swing tubes as shown below.
Use a hard object with a diameter of less than 4mm to remove the pins.
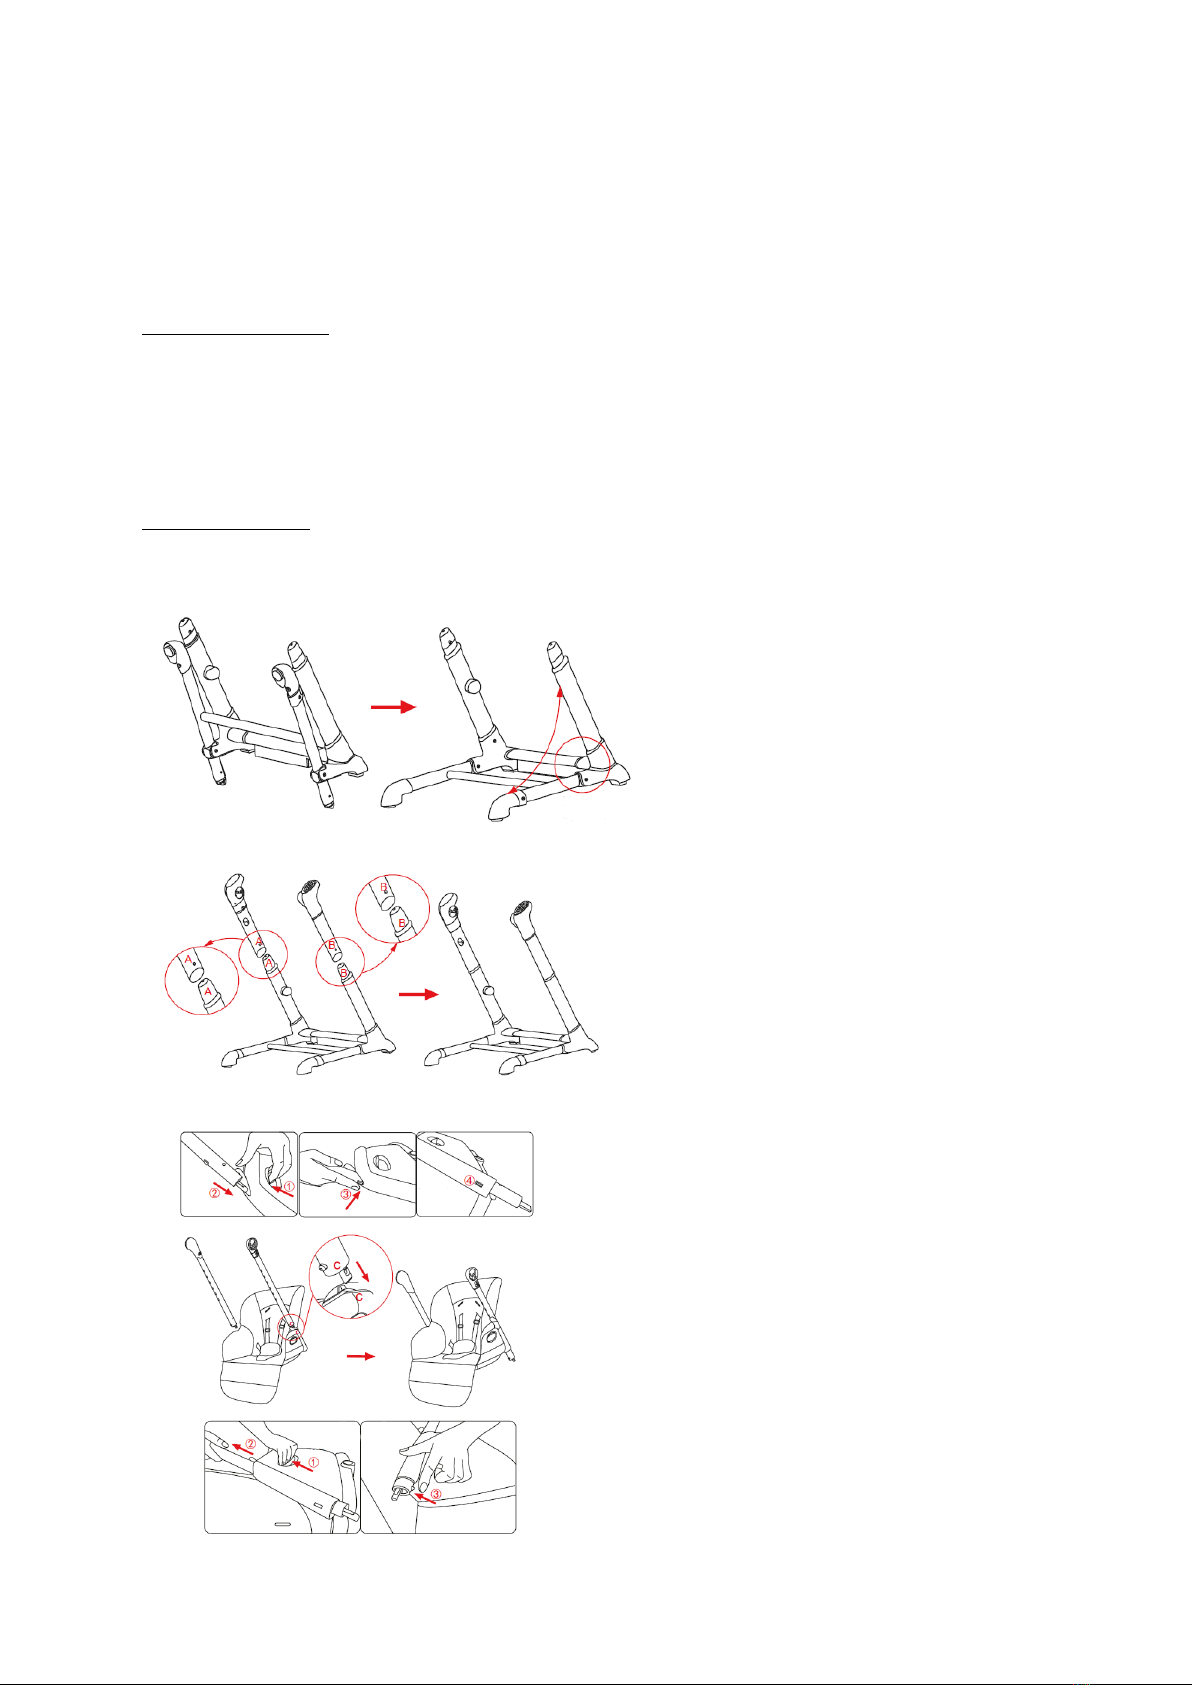
6. Fit the crotch strap into the activity tray.
7. Press the buttons on the activity tray and fix it onto the seat as follows to use the chair with the dinner tray.
8. Press the buttons on the toy arch and fix it onto the seat as shown below to use the chair with the toy arch.
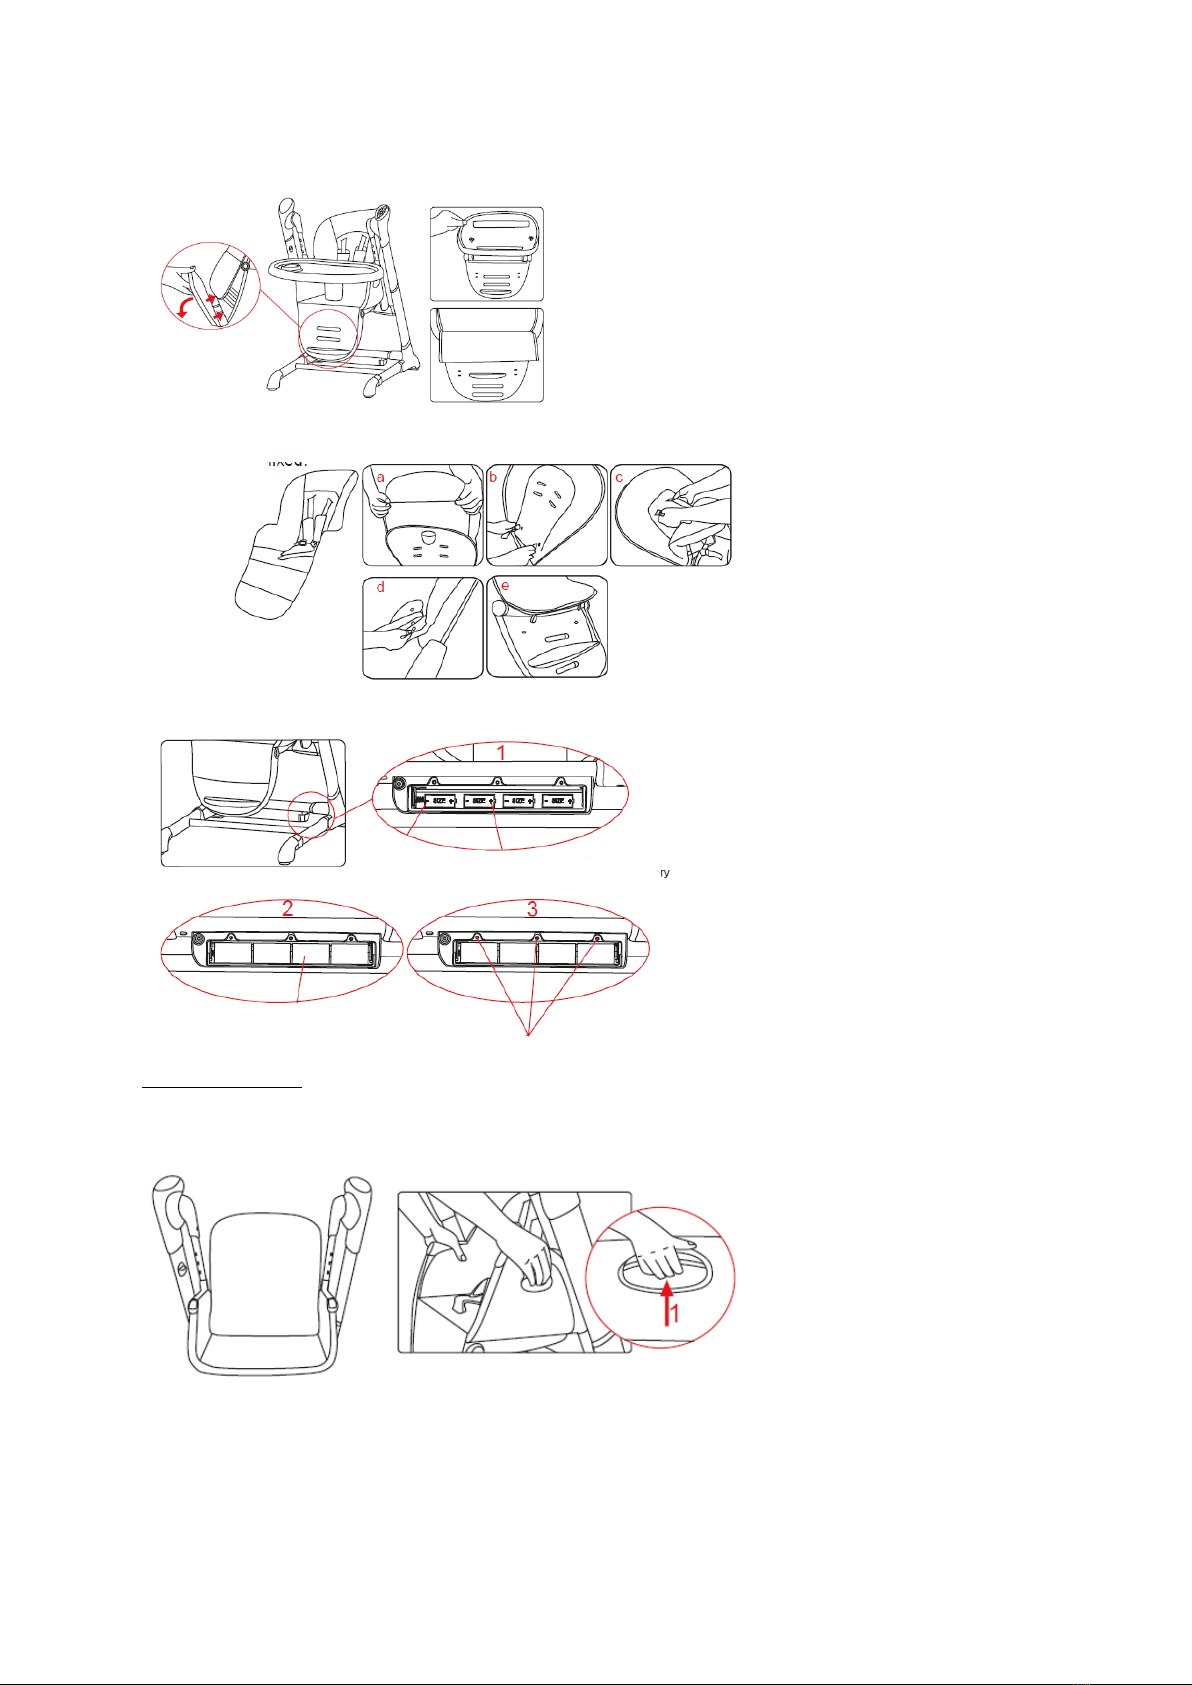
9. Fit the footrest into the openings and press it down to fix it well. The footrest has 3 different adjustable
height positions, the seat cover can be attached when the footrest is used in a higher position.
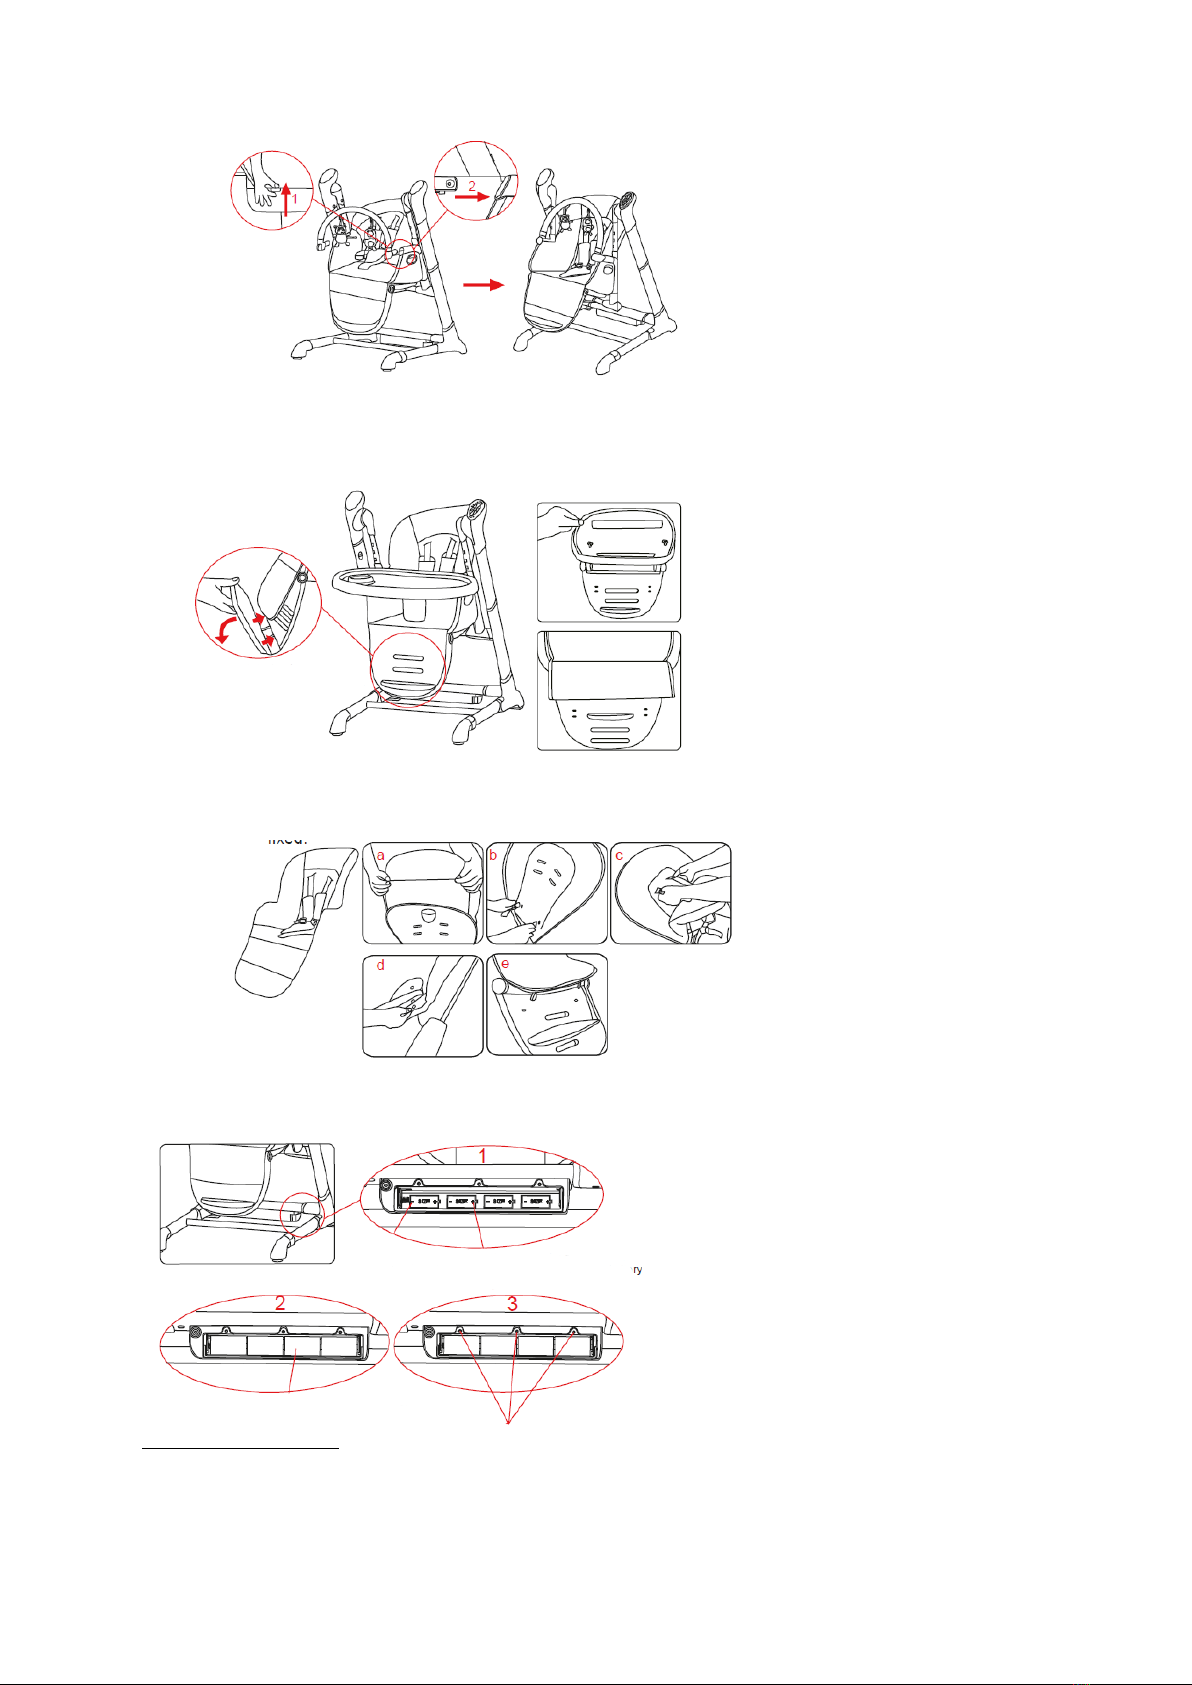
10. Fix the seat cover on the seat frame and insert the safety harness into the therefore foreseen openings.
Fasten the buttons on the seat and the fabric. Pass the elastic parts through the footrest and attach them.
11. Use a screwdriver to remove the cover of the battery compartment, place batteries into the battery
compartment in accordance with the indicated polarity and place the cover back in its position.
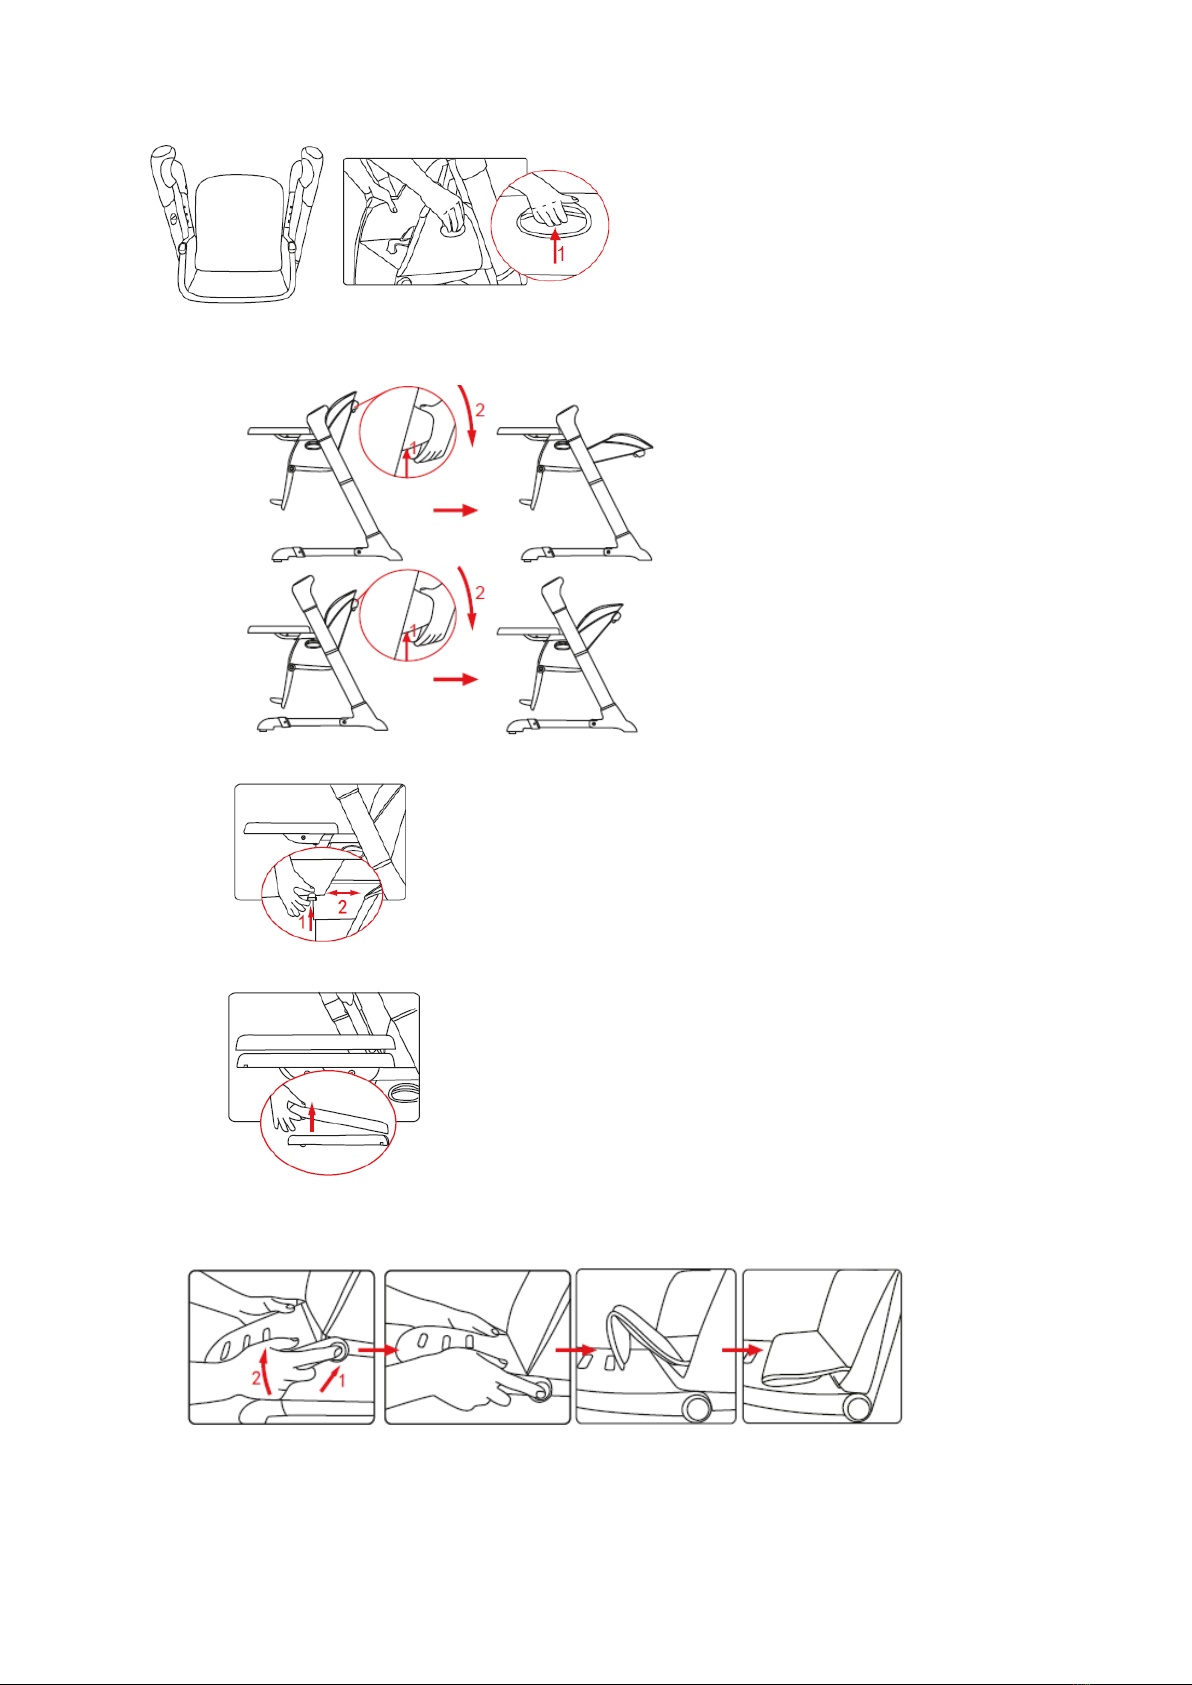
Instructions for use
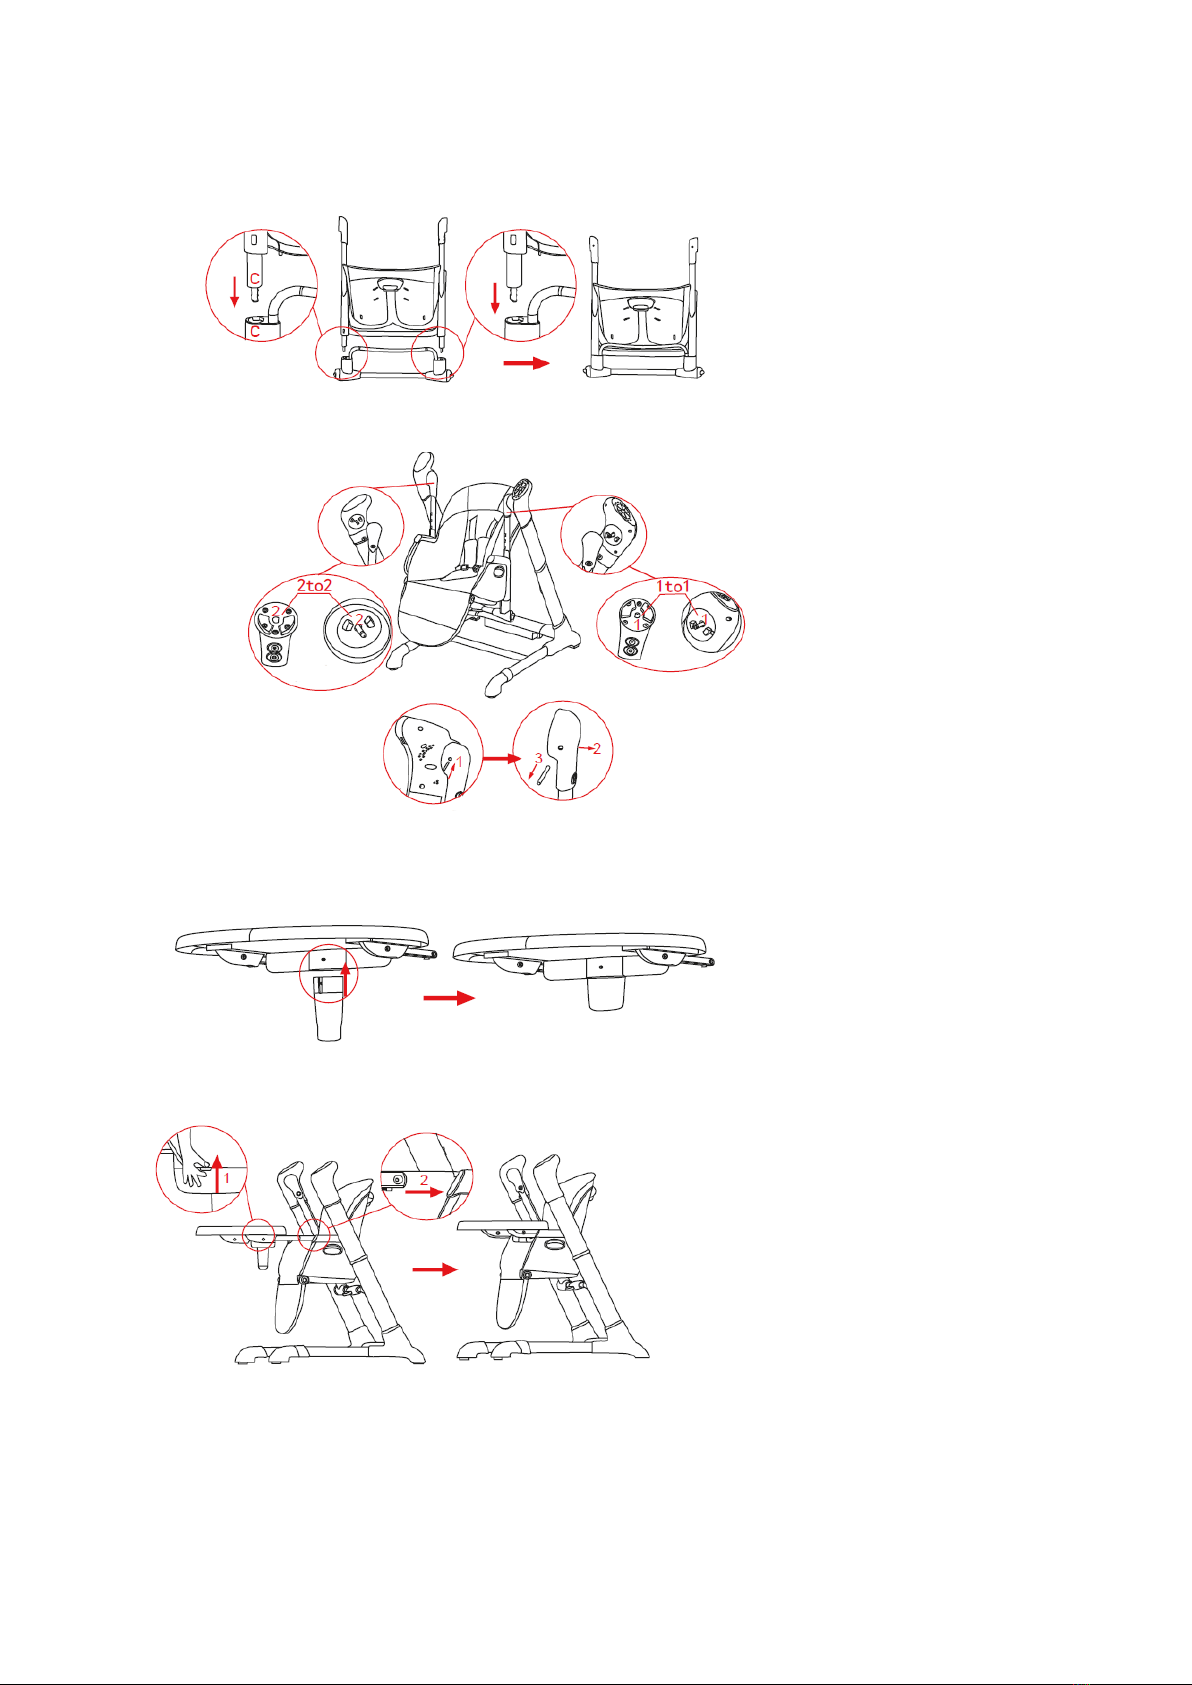
1. To adjust the height position of the seat: press the adjustment buttons on both sides of the seat and move
the seat up or down. The seat can be placed in 6 different positions. Make sure both sides of the seat are
placed at the same height and correctly fixed in place.
2. The backrest can be adjusted in 4 different positions. Press the adjustment button with one hand and adjust
in the desired position. When the seat itself is in the lowest position, the backrest can only be adjusted in 2
positions.

3. The activity tray can be adjusted in 3 different positions.
4. Cleaning the tray
5. To adjust the position of the footrest, push the buttons on both sides simultaneously and adjust
upwards or downwards (4 positions). When you adjust the footrest itself, you can also attach the seat
cover to shorten it.
6. When the seat is in the lowest position, it can be used as a swing.
WARNING: The seat height cannot be adjusted when the chair is being used in swing mode.
WARNING: Always stop the rocking function before you convert the swing into a high chair again, as this is
affects the motor.
7. The backrest can be adjusted in two positions while the chair is being used in swing mode.

8. Adjust the straps of the safety harness to the size of your baby.
9.
10. Wh
end into an appropriate power supply. The power supply for this product should be 100-240V, 50/60 Hz 0.3A.
en it is no longer needed, disconnect the plug and store it in the b ery compartment.
11. To fold the chair, press the folding bu n and close the leg tubes simultaneously.
WARNING: Do not fold while the chair is in swing mode.
r
Power
connecto
1
DC plug
2
Control panel
1. There are 8 different speed settings for the swing (8 indicator lamps). Press + to turn the speed up and – to
turn the speed down.
2. There are three different time settings. Press the button once and the lights will switch on for 8 minutes,
press a second time and the lights will be on for 15 minutes. Press a third time and the lights will turn on for
30 minutes. After the time has run out, the swing will switch off. When you do not use the timer function,
all active functions will continue working until the power is off.
3. Play/pause button. Press once to hear music, press the button a second time to stop the music. This button
has the same function in the APP-mode.
4. Volume/next song button. When listening to music, you can press this button to play the next song out of
12 possible melodies. Keep pressing this button to adjust the volume. This button has the same function in
the APP-mode.
5. Bird and water sound button. You can choose between bird sound and water sound by pushing this button
one or several times.
6. Motion detection. The indicator light will switch on when you push this button. When the voice control
sensor detects continuous sounds, the swing will start swing at the lowest speed and play music
automatically.
7. USB-connector: Connect a smartphone or USB-device to play music.
8. MODE-button: Press the button to switch between the different devices ( pre-installed music on the swing,
USB, smartphone).
Installing the app
-To install the app, scan the QR-code on the box or in the instruction manual or go to the app store, search
for “swing control” (swing-018A) and follow the installation instructions. The App is suitable for iOS 8.3.0,
Android 4.3.0 or above.
-Switch on the power on the device.
-Make sure Bluetooth is on. Search for and pair with swing-018A. If the App has been used before, just turn
on Bluetooth and you can use the app.
-Open the app. If the pairing succeeded, there should be an indication “Connected” on the display, if it says
“Disconnected”, you should pair the devices again.
-After installation, click “mode” either on the app or on the device itself to switch to App mode.
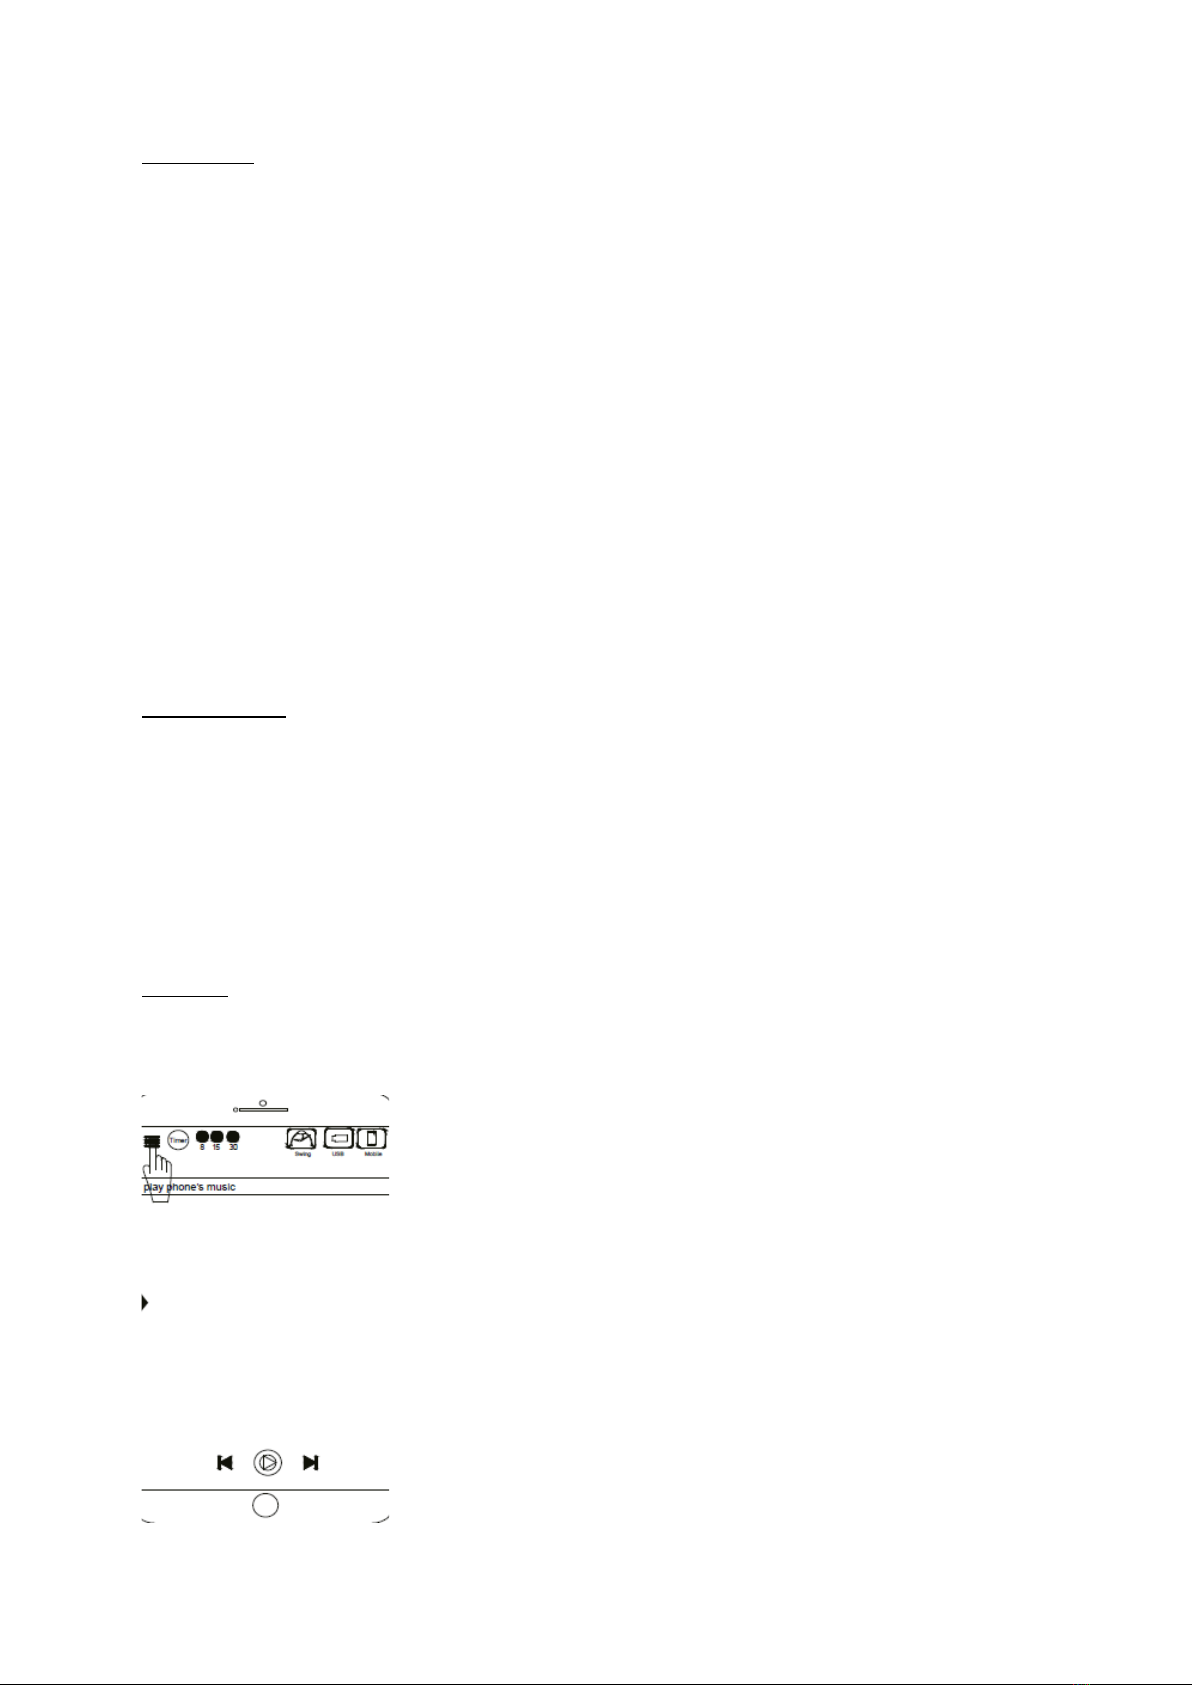
Functions:
-The buttons in the app have the same function as they do on the control panel (see chapter: control panel).
-Click on the menu to open your music list. When there is no music, you will receive pop up instructions. You
can either play music from a local file or play music from a third party app.
Attention:
-When using the app, make sure your phone network is connected.
-The maximum distance between the phone and swing is 5 meters.
-When playing music of the phone, make sure there is downloaded music on the phone already.
-When you receive a call on your phone while the Bluetooth function is in use, there will be little or no
sound. Please check and adjust the volume after the phone call if necessary and reconnect the Bluetooth in
case it has been disconnected.
-Please adjust the volume of the Bluetooth to a volume suitable for babies.
-When using the voice control function, make sure the surrounding environment is quiet, to avoid starting
the operation of the high chair needlessly.
-When there is not enough memory on your phone, please clean up the memory and close other
background apps.
Frequently Asked Questions:
Nr
Problem
Solution
1
The swing function and music suddenly stop
Check if the batteries have been correctly installed
and if there is enough electrical power.
2
No functions
Check if the batteries have been correctly installed.
3
Swing will not be used for a longer period of
time
Take the batteries out before storage
4
The swing/chair shakes
Check if the folding joint has opened completely
5
The indicator light becomes weak
Check if the batteries still have enough power
6
No or little sound after connecting the App
Check if the Bluetooth is successfully connected,
check the volume, check if the signal distance is still
within range
7
The motor lifespan becomes shorter
Always shut down the swing function when
converting the swing into a high chair.
8
The App does not work
Try reinstalling the app, follow the installation
procedure to do so
9
Impossible to activate the App or connect
Bluetooth
1. Cut off the power and restart the App
2. Check if there is another mobile phone
connected. If so, cut the connection with the
other phone.
10
Impossible to download the App
Check the system version, if it is not iOS 8.3.0,
Android 4.3.0 or above, upgrade it
Made In China – Bo Jungle - Vox Populi BVBA – Brambroek 23B, 9500 Geraardsbergen – BELGIUM
www.bojungle.eu – info@bojungle.eu – Tel: +32 54 240 331 – Fax: +32 9 270 01 80

NL
BELANGRIJK!
GELIEVE DE VOLGENDE INFORMATIE ZORGVULDIG TE LEZEN EN TE BEWAREN VOOR TOEKOMSTIG GEBRUIK
Bedankt om voor ons product te kiezen. Gelieve even tijd te nemen om de hierna volgende belangrijke
veiligheidsinstructies te lezen om dit product nog vele jaren op een aangename en veilige manier te kunnen
gebruiken.
WAARSCHUWING
-In de hoge stoel-modus: dit product is bedoeld om gebruikt te worden door kinderen van 6 tot 36 maanden
of 20 kg, afhankelijk van wat het eerst komt.
-In de schommel-modus kan dit product gebruikt worden van 0 tot 12 maanden of 9 kg, afhankelijk van wat
het eerst komt.
-Laat uw kind NOOIT zonder toezicht achter terwijl hij/zij in de stoel zit.
-Verplaats NOOIT de stoel terwijl uw kind erin zit.
-Gebruik NOOIT de speelboog als handvat om de stoel op te tillen of te verplaatsen.
-Sta uw kind NOOIT toe om op de stoel te klimmen of ermee te spleen of recht te staan terwijl hij/zij in de
stoel zit. Dit product is geen speelgoed.
-Zorg er ALTIJD voor dat het veiligheidsharnas correct bevestigd is en dat het aangepast is aan de hoogte van
het kind. Het tablet is niet ontworpen om een kind in de stoel te houden.
-Zorg er ALTIJD voor dat alle onderdelen correct bevestigd zijn en aangepast zijn aan de grootte van het kind.
-Plaats het product NIET naast een open vuur, een andere hittebron of in direct zonlicht.
-Houd dit product STEEDS weg uit vochtige of stoffige omgevingen, om het bedieningspaneel niet te
beschadigen.
-Plaats het product NIET vlakbij een ander product, dat een gevaar of verstikking of wurging zou kunnen
inhouden, bijv. koordjes, koorden van gordijnen/blinden, kettingen, elektriciteitskabels, speenkettingen,
etc.
-Hang NOOIT iets aan de stoel aangezien dit de stabiliteit zou kunnen beïnvloeden.
-Plaats het product NIET vlakbij vaste structuren of meubels om letsels door vallen of veroorzaakt door
toegang tot gevaarlijke objecten te voorkomen.
-Gebruik de hoge stoel ENKEL op vlakke, gelijke en stabiele vloeren. Gebruik deze NOOIT op verhoogde
oppervlakken.
-Zorg er ALTIJD voor dat het product correct gemonteerd is voordat u uw kind erin plaatst.
-Controleer het product regelmatig op losse onderdelen, schroeven, etc. Gebruik het niet indien er
onderdelen gebroken, gescheurd of los zijn of ontbreken en gebruik enkel onderdelen die vooraf
goedgekeurd zijn door de fabrikant. Gebruik NOOIT accessoires die niet goedgekeurd zijn door de fabrikant.
-Zorg ervoor dat alle verpakkings -en hechtmaterialen verwijderd zijn voordat u dit product gebruikt en
bewaar ze buiten het bereik van kinderen.
-Zorg er ALTIJD voor dat kinderen zich op veilige afstand bevinden wanneer u de hoge stoel op -of uitplooit.
-Dit product is niet bedoeld om gedurende lange perioden in te slapen. Het kan een babywieg of bed niet
vervangen. Leg uw kind in een geschikt babybed of wieg wanneer hij/zij moet slapen.
-Controleer regelmatig of het netsnoer van de adapter en daarbij horende onderdelen niet beschadigd zijn.
Gebruik dit apparaat niet als dit het geval zou zijn. Zorg ervoor dat de input voor de adapter tussen 100 en
240V en ~50/60Hz 0.3A ligt. Houd de adapter en kabel weg van kinderen.
Batterijen:
Dit toestel werkt op 4 x D batterijen of op de netstroomadapter.
-Houd batterijen ALTIJD buiten het bereik van kinderen. Laat hen NOOIT met batterijen spelen.
-Zorg dat de batterijen correct ingebracht zijn en dat de polariteit ervan overeenkomt met de aanduidingen
in het batterijcompartiment.
-Verwijder lege batterijen ALTIJD. Herlaadbare batterijen mogen enkel herladen worden door een
volwassene.
-Verwijder batterijen ALTIJD wanneer het product gedurende enige tijd niet gebruikt zal worden.
-Meng NOOIT verschillende batterijtypes of oude en nieuwe batterijen, herlaadbare en niet-herlaadbare
batterijen. Dit kan gevaarlijk blijken.
-Herlaad NOOIT niet-herlaadbare batterijen.
Reinigen & onderhoud
-Controleer het product voor het monteren en regelmatig gedurende het gebruik. Contacteer de dienst-na-
verkoop indien u gebreken of defecten vaststelt.
-Frame: Wrijf het oppervlak schoon met een vochtige doek of spons, gebruik een milde detergent en warm
water. Droog af met een handdoek of laat aan de lucht drogen.
-Zitkussen: Het zitkussen is niet machinewasbaar, geen droogkuis, niet strijken, geen droogkast. Gebruik een
schone, droge doek om het zitje schoon te maken.
Montage-instructies
1. Open de buizen aan de onderzijde zoals weergegeven op onderstaande foto.
WAARSCHUWING: Zorg ervoor dat de buizen correct uitgevouwen en geplaatst zijn, aangezien dit de
stabiliteit van de stoel beïnvloedt.
2. Duw de hoofd -en steunbuizen naar beneden op de onderste buizen tot u een klikgeluid hoort dat aangeeft
dat de buizen goed bevestigd zijn.
3. Breng de linkse en rechtse schommelbuis in het schommelgedeelte zoals hieronder weergegeven, tot u een
klikgeluid hoort.
4. Breng de onderzijde van de linkse -en rechtse schommelbuis in het schommelgedeelte tot u een klikgeluid
hoort.
5. Maak de linkse -en rechtse schommelbuizen vast zoals hieronder weergegeven.
Gebruik een hard voorwerp met een diameter van minder dan 4mm om de pinnetjes te verwijderen.
6. Maak de kruisgordel vast aan het tablet.
7. Druk op de knoppen op het tablet en bevestig dit op het zitje zoals aangeduid om de stoel met het eettablet
te gebruiken.
8. Druk op de knoppen op de speelboog en bevestig deze op het zitje zoals aangegeven om de stoel met
speelboog te gebruiken.
9. Plaats de voetensteun in de openingen en druk deze naar beneden om hem goed vast te zetten. De
voetensteun heeft 3 verschillende instelbare hoogteposities. De overtrek van het zitje kan vastgemaakt
worden wanneer de voetensteun in een hogere positie staat.
10. Maak de overtrek van het zitje vast op het zitframe en maak het veiligheidsharnas vast in de daartoe
voorziene openingen. Maak de knopen vast aan het zitje en de stof. Breng de elastieken door de
voetensteun en bevestig ze.
11. Gebruik een schroevendraaier om het afdekplaatje van het batterijcompartiment te verwijderen. Plaats de
batterijen in het batterijcompartiment in overeenstemming met de aangegeven polariteit en plaats het
afdekplaatje terug.
Gebruiksaanwijzigingen
1. Om de hoogtepositie van het zitje in te stellen, drukt u op de aanpassingsknoppen aan beide zijden van het
zitje en beweegt u het zitje naar boven of naar onderen. Het zitje kan in 6 verschillende posities versteld
worden. Zorg ervoor dat beide zijden van het zitje op dezelfde hoogte staan en dat ze goed vast staan.
2. De rugsteun kan in 4 posities aangepast worden. Druk met een hand op de aanpassingsknop en verstel in de
gewenste positie. Als het zitje in de laagste positie staat, kan de rugsteun in slechts 2 posities versteld
worden.
3. Het activiteitentablet kan in 3 verschillende posities versteld worden.
4. Het tablet schoonmaken.
5. Om de positie van de voetensteun aan te passen, drukt u gelijktijdig op de knoppen aan beide zijden.
Verstel de voetensteun dan naar boven of naar onderen (4 posities). Wanneer u de voetensteun zelf
verstelt, kunt u ook het zitkussen vastmaken om het korter te maken.
6. Als het zitje in de laagste stand staat, kunt u het ook als schommel gebruiken.
WAARSCHUWING: De hoogte van het zitje kan niet versteld worden wanneer de stoel in schommelmodus
gebruikt wordt.
WAARSCHUWING: Stop altijd de schommelfunctie voordat u de schommel opnieuw in hoge stoel verandert,

aangezien dit een effect hee op de motor.
7. De rugleuning kan in twee posi es versteld worden terwijl de stoel in schommelmodus gebruikt wordt.
8. Pas de bandjes van het veiligheidsharnas aan de gr e van uw baby aan.
9.
10. Verwijder de stekker uit het stopcontact wanneer deze niet langer nodig is en berg hem op in het
berijcompar ment.
11. Om de stoel op te plooien, druk u op de knop en vouwt u beide buizen van het onderstel gelijk jdig dicht.
WAARSCHUWING: Niet dichtplooien terwijl de stoel in schommelmodus staat.
r
Power
connecto
1
vervolgens het andere uiteinde in een geschikte voedingsbron. De voeding voor dit product moet
100-240V, 50/60 Hz 0.3A zijn.
DC plug
2
Table of contents
Languages:
Other Bojungle High Chair manuals


