Bolymedia MG984G User manual

Boly Trail Cameras – MG984G/ MG983G
Boly Inc. | User Manual
03/01/2017
MG984G-30M
MG983G-30M
MG984G-A
user manual

Boly Trail Cameras – MG984G/ MG983G
Boly Inc. | User Manual
03/01/2017

Boly Trail Cameras – MG984G/ MG983G
Boly Inc. | User Manual
03/01/2017
Table of Contents
1. Getting Started.......................................................................... 1
2. Camera Operations.................................................................. 3
2.1 Batteries / Power Supply................................................... 3
2.2 SD Card Information......................................................... 3
2.3 SIM Card Information....................................................... 4
2.4 Camera Modes.................................................................... 5
2.5 Manual Image / Video Capturing.................................... 6
2.6 Manage Images and/or Videos........................................ 6
2.7 Sending Images via MMS or GPRS..................................6
2.8 Trigger Modes..................................................................... 8
2.9 Laser Pointer....................................................................... 9
3. Camera Setup Settings & Display........................................ 10
3.1 Settings Interface & Display............................................10
3.2 Mobile Communication...................................................11
3.3 Camera Setup Software................................................... 12
3.4 Mobile Applications.........................................................14
3.4.1 Changing settings via Android APP................... 15
3.4.2 BG Tools Usage Instructions.............................. 16
3.5 Use the Remote Control.................................................. 20
3.6 Load or Remove a Wireless Sensor............................... 21
3.7 Camera Setup Options.....................................................24
4. Detection Ranges – PIR Detection Zones..........................30
5. Technical Specifications........................................................32

Boly Trail Cameras – MG984G/ MG983G
Boly Inc. | User Manual
03/01/2017
1
1. Getting Started
Battery Tray
Lock Loop

Boly Trail Cameras – MG984G/ MG983G
Boly Inc. | User Manual
03/01/2017
2
This camera, a digital scouting camera with communication
function, is a digital infrared surveillance camera, triggered by
any movement of human or animal monitored by a high
sensitive Passive Infrared (PIR) motion sensor, and then
automatically captures high quality pictures (up to 30M pixels)
or records video clips (1080 FHD). It sends picture instantly to
your mobile device or video (less than 10M) to your e-mail via
GPRS network.The MG984G-A can only send pictures to your
e-mail via GPRS network.
You’ll be alerted just when the camera is triggered or per
custom settings. It takes color pictures or videos under
sufficient daylight. While at night, the built-in infrared LEDs
can help to take clear pictures or videos.
When mounting the camera outdoors, use the strap that was
included with the camera. Periodically clean the camera lens
and PIR sensor to avoid dust build up that can reduce picture
quality and check to make sure the mounting strap is not
loose.
DC Port

Boly Trail Cameras – MG984G/ MG983G
Boly Inc. | User Manual
03/01/2017
3
2. Camera Operations
2.1 Batteries / Power Supply
The camera is powered by four or eight AA batteries -
High-density, high-performance alkaline, rechargeable
Alkaline or NiMH batteries are recommended. When the
batteries are low, the camera will beep twice and
automatically shut down.
A DC 6-Volt, 2 Amp external power supply adapter can
also be used to power the camera (not included).
2.2 SD Card Information
To take full advantage of the latest technologies, we
recommend Class 10 SD cards or better, which have
fast transfer speeds and long durability for extensive
shooting in the most extreme outdoor conditions.
Secure Digital High Capacity (SDHC) PRO cards work
with SDHC compatible devices only. Please check that
your product is compatible with SDHC cards.
Insert the SD card into the camera before
turning on the camera
This camera supports up to a 32GB capacity SD card
and has no built-in internal memory. The camera will
not function without the SD card properly inserted into
the camera.

Boly Trail Cameras – MG984G/ MG983G
Boly Inc. | User Manual
03/01/2017
4
Make sure the SD card is unlocked before
inserting the SD card into the camera
The camera will operate normally with a locked SD card
inserted, but the card will not be able to store captured
images or videos taken by the camera.
Do not remove the SD card while the camera is
on
By removing the SD card while the camera is on risks
damaging the internal components of the camera.
If you experience any problems with an
inserted SD card
Try reformatting the SD card, utilizing the camera’s
main settings option.
2.3 SIM Card Information
Insert the SIM card into the camera before
turning on the camera
The camera SIM slot is sized for a standard SIM card.
If you have a nano or micro size SIM card, utilizing a
SIM card adapter (included with most of our cameras)
will be required to connect your camera to the cellular
network.
Note: The camera will still function without a SIM card.
The SIM card is needed only for the wireless/cellular
capabilities.

Boly Trail Cameras – MG984G/ MG983G
Boly Inc. | User Manual
03/01/2017
5
2.4 Camera Modes
The different modes are accessed by sliding the power
switch to the different positions marked on the camera:
OFF Mode
Turns the camera off. The camera will still consume a
small amount of power while in OFF mode. It is
recommended to remove the batteries if the camera
will not be used for a long period of time.
TEST/SETUP Mode
Customize the camera settings, or play back pictures
and videos the camera has taken on the LCD display.
ON Mode [ Hunting Mode ]
Camera will take pictures or video when motion is
detected and/or at specific time intervals, according
to the programmed settings. After switching the
camera to the ON position, the motion indicator LED
(red) will blink for about 10 seconds and then turn off.
This preset time allows you to adjust the cameras
position if needed, before the camera becomes active.
●Security Mode(Only for MG983G-30M)
similar to hunting mode, but needs more
power to supply. So it’s suitable for indoor
use and needs to use the power adapter.
Only in security mode you can use the
remote control to easily arm or disarm.
If the power switch is in ON position
and the Security Mode Is ON, you need to press the
left key to enter security mode quickly or wait for

Boly Trail Cameras – MG984G/ MG983G
Boly Inc. | User Manual
03/01/2017
6
about two minutes till there is an “A”instead of “S”on
the display screen.Then the camera will work in
Security Mode.
2.5 Manual Image / Video Capturing
Place the camera in TEST/SETUP mode and
press”►/SHOT” to manually capture photos or record
video. Press ”►/SHOT” again to stop capturing video.
2.6 Manage Images and/or Videos
Place the camera in TEST/SETUP mode and press
“OK/Play”on the remote to view images or videos. The
latest image or video will be shown on the LCD screen.
To view:
Press ▲or ▼to view the previous or next image or
video. Press OK to start a video.
To delete:
Press OK on the remote in Test/Setup Mode to access
the pictures and videos. Press the MENU key to enter
into Playback mode. Press the ▲or ▼keys to find
the Delete option. Press OK when the Del One option
is selected. Press OK again to confirm you want to
delete the picture or video.
2.7 Sending Images via MMS or GPRS
Images can be sent directly to your wireless device or
email, based on the Send Mode settings. Email and

Boly Trail Cameras – MG984G/ MG983G
Boly Inc. | User Manual
03/01/2017
7
wireless device information need to be set up while the
camera is in TEST/SETUP Mode. Images can only be
sent when a correctly setup SIM card is recognized,
installed and the wireless signal strength is adequate.
You have the options of email MMS, email GPRS, Phone
MMS in the internet tab of the camera
settings. Videos will not send due to the size of video files
and limitations set by the SIM card carrier.
To manually send a photo:
Put the camera in TEST/SETUP mode
Wait for the camera to acquire a network signal and
the SIM card to be recognized
indicates the SIM card is recognized by the camera.
indicates the SIM card is not recognized by the
camera or the SIM card is not working due to
connection/activation issues.
Take a manual photo by pressing the SHOT button
or press OK to view the photos stored on the camera
Find the picture you want to manually send
Press the MENU button to pull up the Send To:
option that is currently set in the camera settings
Press OK again to send the picture
Send Mode settings will dictate how often you want
pictures sent to you and the options “Daily Report” and
“Instant” will only be active when the camera is in the
ON mode. You can find more detailed information on
the Send Mode options in the proceeding Command List
section.

Boly Trail Cameras – MG984G/ MG983G
Boly Inc. | User Manual
03/01/2017
8
2.8 Trigger Modes
There are 3 different trigger modes for the camera: PIR
Trigger/Sensitivity, Time Lapse, and a combined
PIR/Time Lapse mode. These modes are activated by
three different menu options (PIR Trigger/Sensitivity,
PIR Interval, and Time Lapse).
PIR Trigger/Sensitivity
The camera will activate when motion is detected. If
the PIR Trigger/Sensitivity option is set to OFF, the
camera will not respond to any motion within the
camera’s range.
Time Lapse
The camera will activate at the set time interval
regardless of motion detection. If the Time Lapse
option is set to OFF, this trigger function will be
disabled.
Combined PIR/Time Lapse
For the combination of both PIR and Lapse triggering,
the following settings must be set correctly:
PIR Trigger/Sensitivity must NOT be set to OFF
The Time Lapse interval must be set to a
non-zero value.
The camera will capture pictures or video when
motion is detected and at the preset time, regardless
of motion detection.

Boly Trail Cameras – MG984G/ MG983G
Boly Inc. | User Manual
03/01/2017
9
Additional PIR settings to note:
PIR Interval
This setting indicates how long the PIR sensor will be
disabled after each camera triggering. During this
interval time, the camera will not react to any
detected motion or activate at the scheduled Time
Lapse interval.
Further detailed information about the trigger modes
can be found in Camera Setup Options section of the
manual.
2.9 Laser Pointer
The laser light pointer beam can be activated to assist in
the camera’s positioning by pressing ◄in SETUP mode.
NOTE: Do not point the laser at people – The laser can
cause physical harm, if shined into eyes.

Boly Trail Cameras – MG984G/ MG983G
Boly Inc. | User Manual
03/01/2017
10
3. Camera Setup Settings & Display
The remote control is required for initial setup and
changing any camera settings. When powering on the
camera, please allow 10-20 seconds for the camera to
recognize the remote. An icon on the LCD screen will
appear once the camera has recognized the remote. The
maximum detectable range for the remote is 30 feet. The
remote will not work properly without the antenna attached
to the camera.
3.1 Settings Interface & Display
To update the camera settings, place the power switch to
the TEST/SETUP position.
To navigate the menus, utilize the following built-in
buttons:
MENU: Enter the program menu in Preview Mode
▼►: Selecting menu options
OK / PLAY: Save parameter settings and play videos
DEL / : to delete an image or video
SHOT / ►: Capture a photo or record a video manually
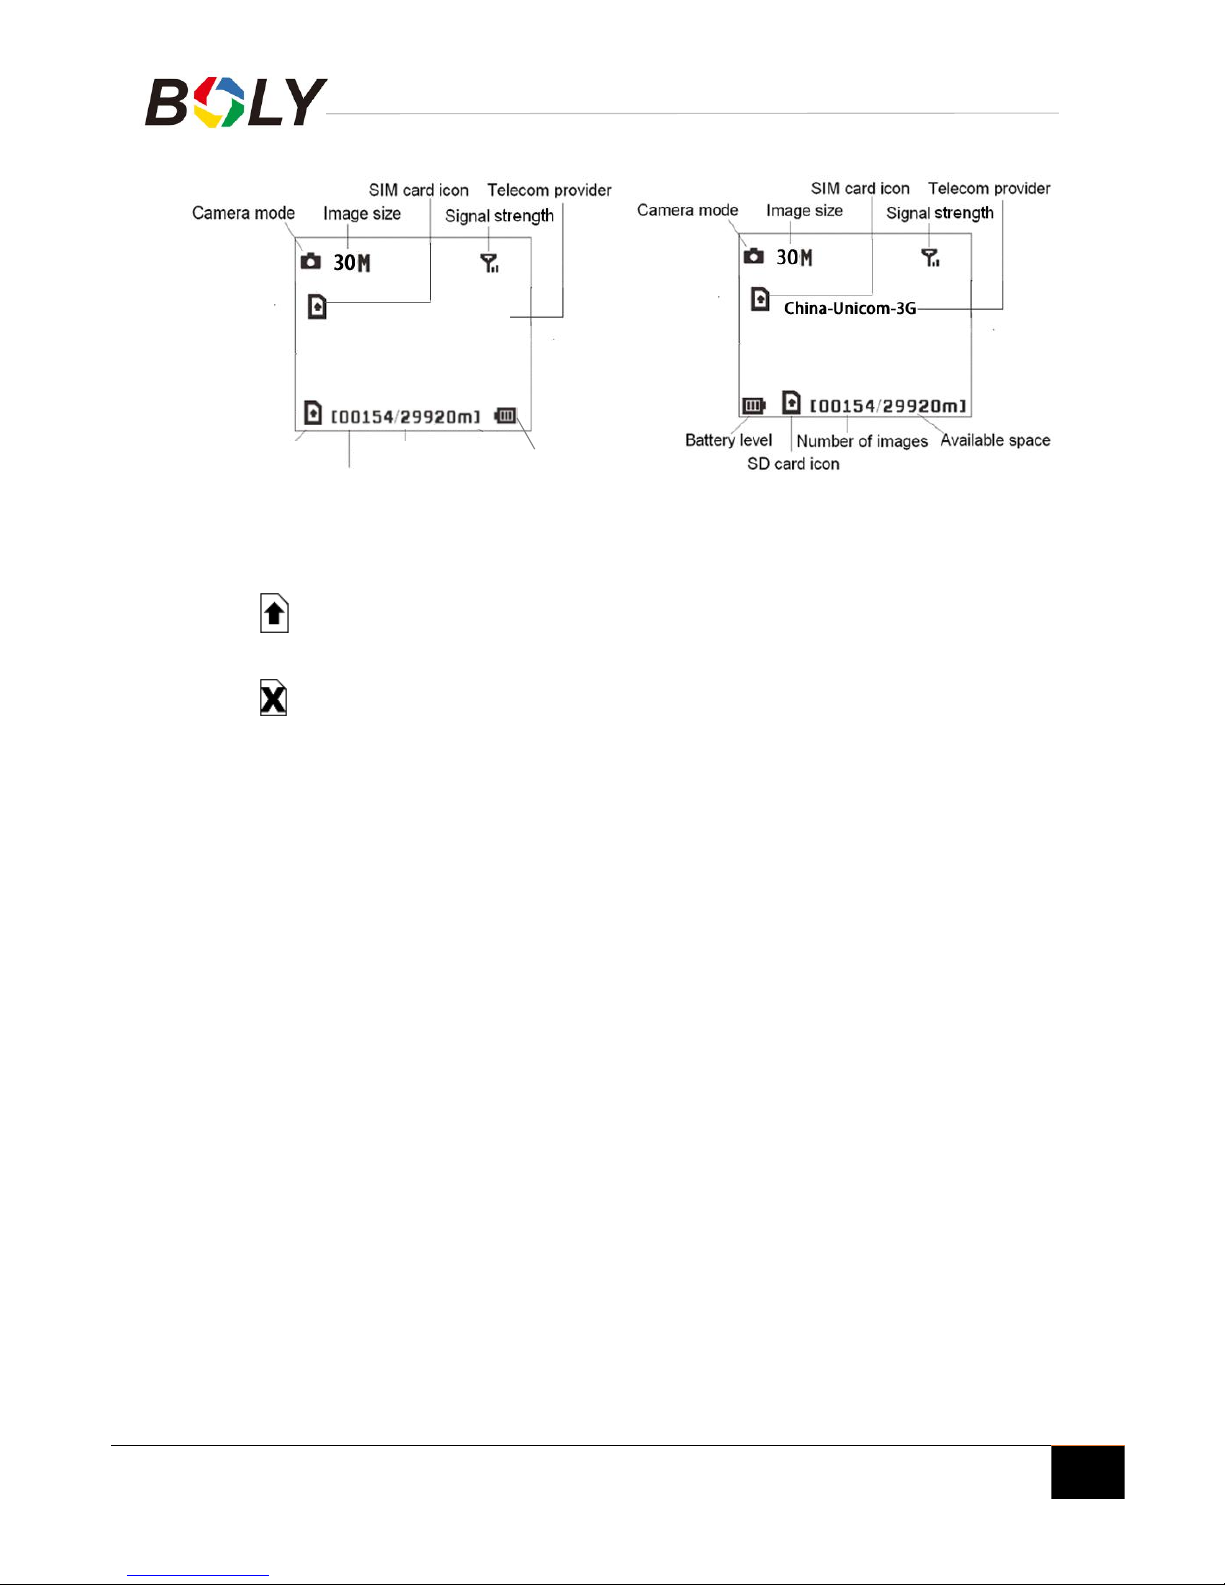
When the camera is in TEST/SETUP Mode, the screen
will activate and display the following:
Boly Trail Cameras – MG984G/ MG983G
Boly Inc. | User Manual
03/01/2017
11
MG984G-30M/MG984G-A MG983G-30M
indicates the SIM card is recognized by the
camera.
indicates the SIM card is not recognized by the
camera or the SIM card is not working due to
connection/activation issues.
3.2 Mobile Communication
The camera can receive and respond to commands sent
via SMS, MMS, GRPS and the Apple or Android
application, as long as the camera is correctly connected
to a wireless carrier.
To enable the SMS functionality using the mobile
application, complete the following steps:
Place the camera in Test/Setup Mode and go into
the menu Setup options
Set SMS control to ON
For MMS and GPRS functionality, the following menu
Setup options will need to be set:
China- Unicom-4G
SD card icon
Available space
Battery level
Number of image

Boly Trail Cameras – MG984G/ MG983G
Boly Inc. | User Manual
03/01/2017
12
MMS network settings (varies depending on
carrier)
GPRS network settings (varies depending on
carrier)
Send to Phone option (MMS or GPRS)
The settings for the network options vary between service
providers. You will need to contact your SIM service
provider for specifics on these settings.
3.3 Camera Setup Software
For easier camera setup, download the camera setup
application (BMC_config.zip), along with the basic
instructions from our website(http://www.bolyinc.com/).
In summary.
STEP 1: Open the software and select camera mode:

Boly Trail Cameras – MG984G/ MG983G
Boly Inc. | User Manual
03/01/2017
13
STEP 1: Select your country and carrier.
STEP 2: Choose between default or manual settings. For
first time use, we suggest using the default settings.
STEP 3: Input the phone number of the phone to
receive/send the remote commands and images in the
“administrator number” field and email address in
“Receive Email 1” field (This is NOT the phone number
of the inserted SIM card that resides in the camera).
STEP 4: Save the .txt file in the GSM folder of SD card
after all settings are complete.

Boly Trail Cameras – MG984G/ MG983G
Boly Inc. | User Manual
03/01/2017
14
If your country or SIM card provider is not listed, select
“Others”. You will need to ask the SIM card provider for
their specific MMS URL, MMS APN, Port, MMS IP,
Account, Password, GPRS APN, GPRS account, GPRS
password. For email sending, your email service provider
will be able to provide the send email server and port
settings.
Note: Once the SD card is inserted into the camera and
the camera is turned on, this file will automatically be
uploaded to the camera and be deleted from the SD card.
3.4 Mobile Applications
When the camera is switched to the ON mode, you can
change some of the basic camera settings through the
mobile application. There are currently apps supported
by Android and Apple devices. Charges or fees may be
incurred through your cellular provider when sending
text messages to the camera.
For Android, you can download the application
directly from our website, under the Downloads
section.(http://www.bolyinc.com/)
For Apple, search BGTools in the official Apple Apps
store.

Boly Trail Cameras – MG984G/ MG983G
Boly Inc. | User Manual
03/01/2017
15
3.4.1 Changing settings via Android APP
Basic settings can be changed through the Android app.
There are two user authorization levels for this feature:
administrator and normal users.
It’s easy to use the Android APP to communicate with the
camera.Select the camera in the application that you
would like to access. Setting and camera command
options will be under the COMMON tab of the
application.
Functions
User Level
Set administrator phone
number
Only administrator’s
password
Set administrator’s
password
administrator
Set camera parameters
administrator
Set normal user
administrator
Receive emergency calling
administrator, normal user
Send SMS for on spot
picture
administrator
Receive MMS when
triggered
administrator, normal user
Check camera status
administrator, normal user
Get help information
administrator, normal user

Boly Trail Cameras – MG984G/ MG983G
Boly Inc. | User Manual
03/01/2017
16
3.4.2 BG Tools Usage Instructions
STEP 1:Open the BG Tools app,click on the icon add a
new device.
STEP 2:①Input a name for you camera ②Input your SIM
card number which is inserted in your
camera.③Choose your camera model number,
then click”Add”。
STEP 1 STEP 2

Boly Trail Cameras – MG984G/ MG983G
Boly Inc. | User Manual
03/01/2017
17
STEP 3: Set super user number and password. For the first
time use the super user password is 0518.(The
Super User number is the SIM card number
which is inserted in your mobile phone).
STEP 4:In the step 3 Click”send”,then choose the country
and provider according to your SIM card. Then
Click”Check WAP/Internet Parameters” to check
whether you have all parameters filled in. The”User
name and User Password“ is your MMS name and
password.
STEP 3 STEP 4
This manual suits for next models
4
Table of contents
Other Bolymedia Scouting Camera manuals

Bolymedia
Bolymedia SG550M-8mHD User manual

Bolymedia
Bolymedia Pocket Camera SG560F User manual

Bolymedia
Bolymedia SG560K-8mHD User manual

Bolymedia
Bolymedia SG565F User manual

Bolymedia
Bolymedia SG520 Series User manual

Bolymedia
Bolymedia SG550M-12mHD User manual

Bolymedia
Bolymedia MG582-8M User manual

Bolymedia
Bolymedia SG880MK-18mHD User manual

Bolymedia
Bolymedia BG668 36MP Series User manual

Bolymedia
Bolymedia SG370-6mHD User manual


