Bolzzen SNIPER User manual

ELECTRIC SCOOTER
USER MANUAL
CONTENTS
BEFORE READING MANUAL
BEFORE READING MANUAL
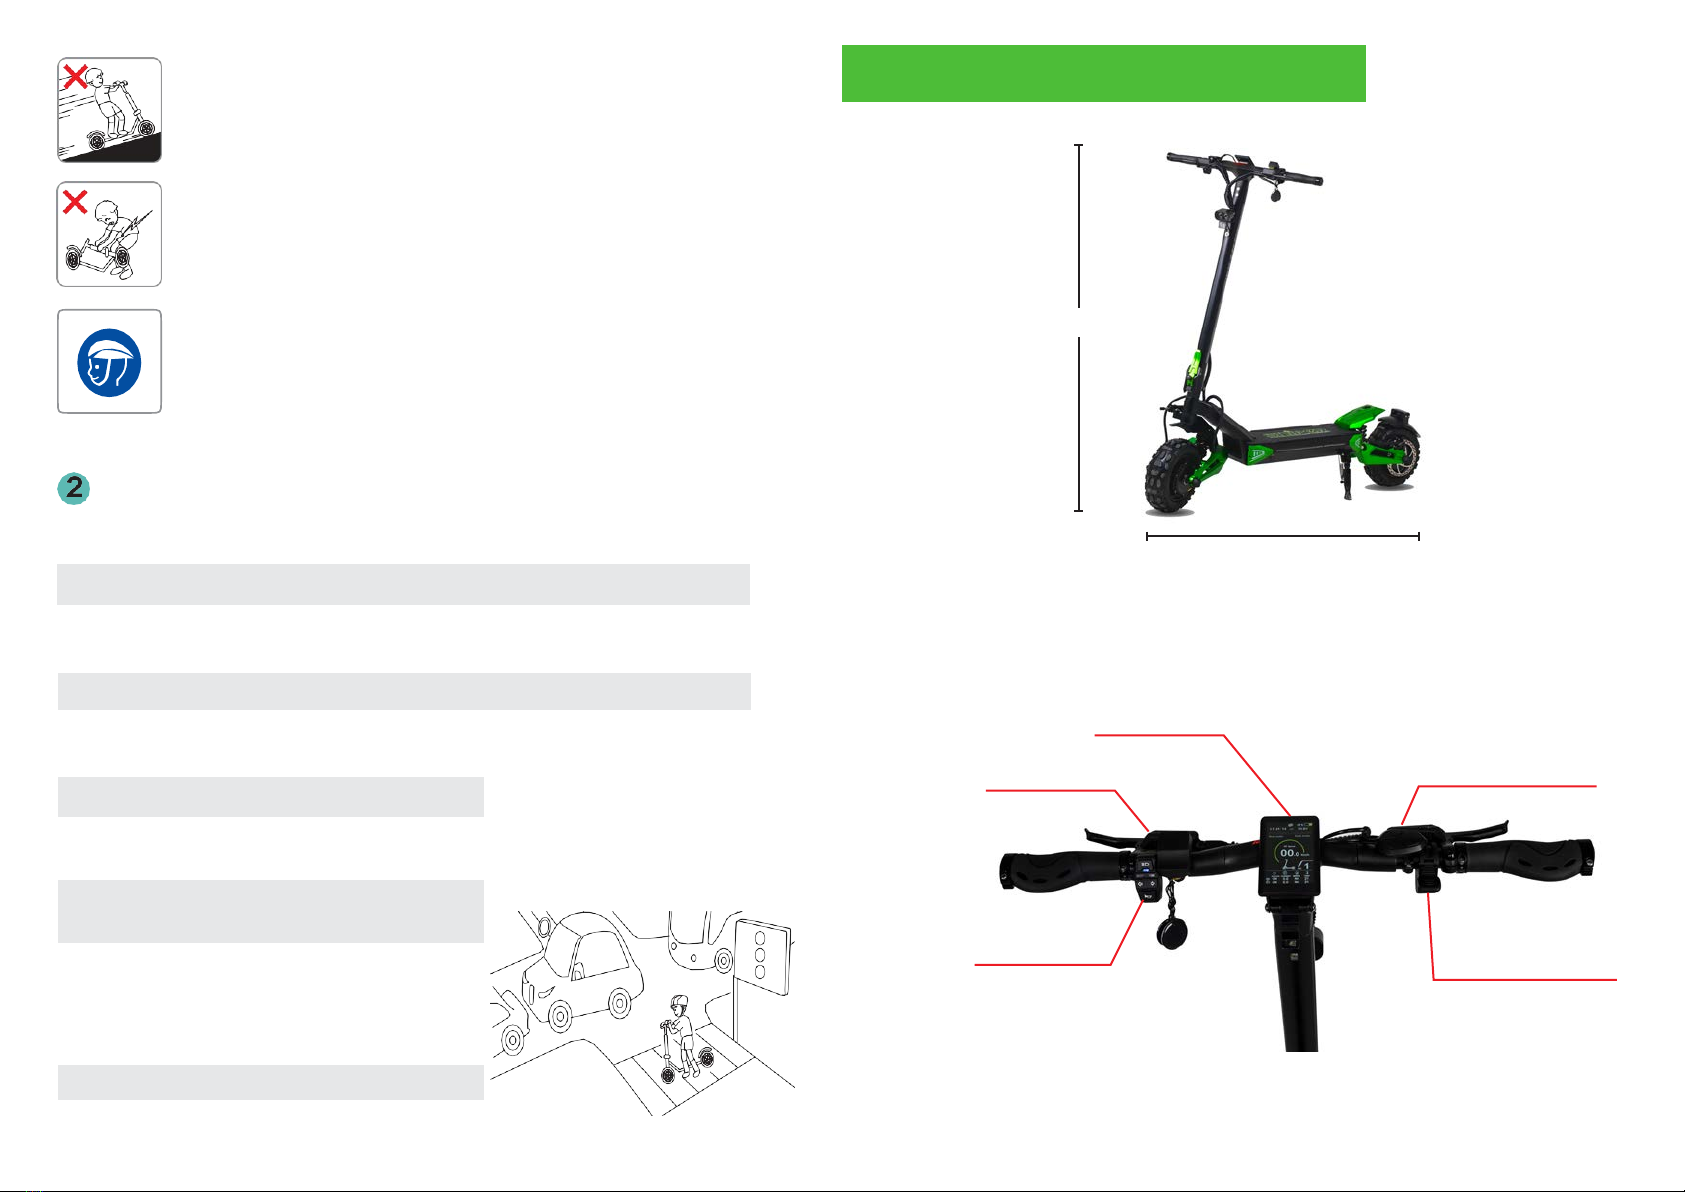
Scooter dimensions
Components list
How to fold / unfold
TFT display instructions
Status
Functional display
Menu parameter setting
Assembly instructions
Charging your scooter
Safety precautions for lithium battery
Safety guidelines before driving
Care and maintenance
External damage inspection
Important checklist
This manual contains important information to help you
use your scooter in the safest way possible.
Indicatesahazardoussituationthatcouldresultinseriousinjury.
Indicatesahazardoussituationthatcouldresultinminorormoderateinjury.
BEFORE READING MANUAL
CONTENTS
To
reorder
8
9
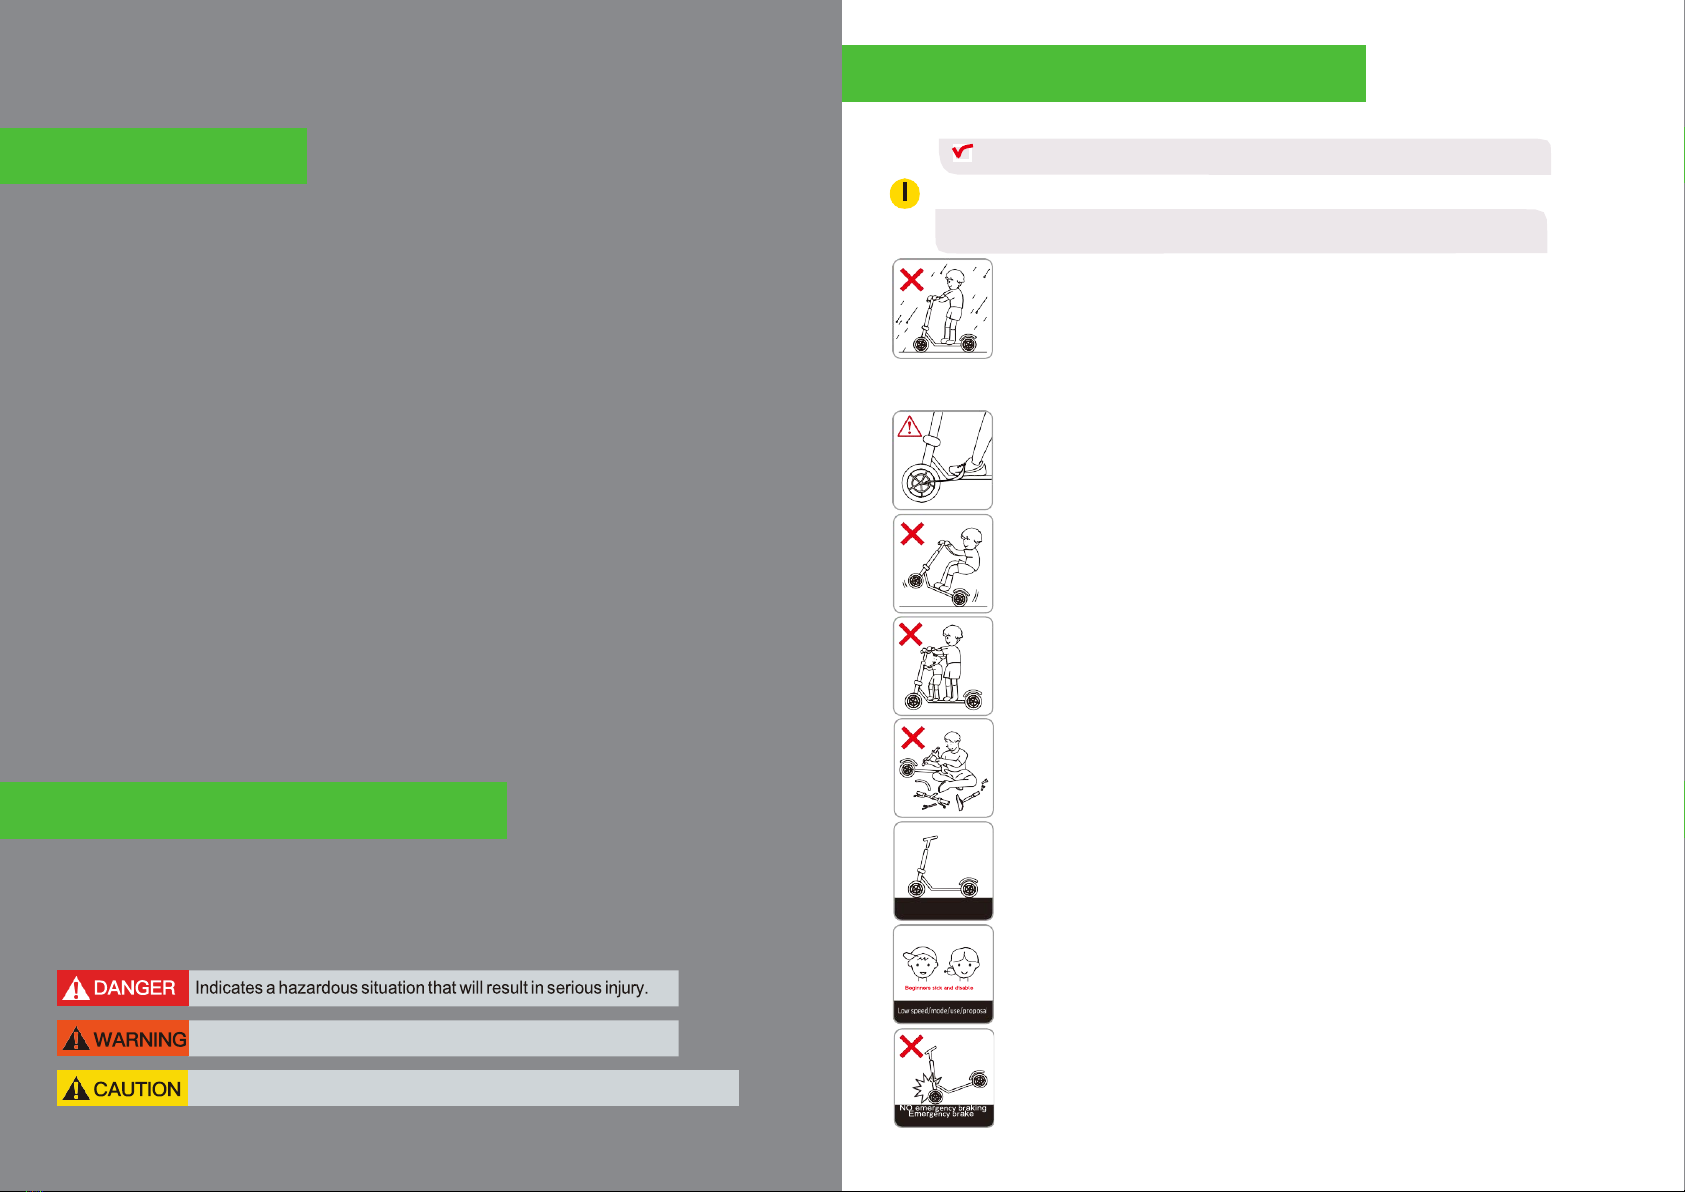
General safety guidelines and restrictions
Even if your scooter is within the warranty period, you may be liable for any
accident caused by any of the following causes.
1.
Be careful ofwater!
This product and components are
NOT
waterproof. Do not let water get into your
scooter and components.
*Never use your scooter if the road is wet due to rain, snow or hailstone.
*If you wash your scooter the electrical components may be vulnerable for water
ingress so please take extreme care when doing so as this can result in malfunction
and/or permanent damage.
2.
Beware of folding and moving parts!
If parts of the body, such as a finger or hair, get caught in the moving or folding parts
of the scooter, this may lead to severe injuries. Please be careful.
3.
No stunts or tricks
Stunts and tricks such as jumping, wheel-stands etc are strictly prohibited as they can
cause malfunction, permanent damage & increase risk of accidents resulting in injury.
4.
No companionboarding
This scooter is intended for one adult only, so children, infants, or two people are
prohibited from boarding.
BEFOREREADINGMANUAL
5.
Self-maintenance
Do not open or modify any electrical component including but not limited to batteries,
controllers or motors. Doing so will void your warranty. Changing of brake pads, tubes,
tyres and other general
non-electrical
maintenance is encouraged.
6.
Laws and regulations
Certain States and Territories of Australia either prohibit the use of, or have specific laws
in place for the use of this Bolzzen scooter. Please comply with the applicable laws and
regulations of your location and operate this scooter safely, legally and with enjoyment.
7.
Novice riders
Novice riders who are not experienced in riding electric scooters should avoid high
speed mode riding and recommend low speed riding.
8.
Use of brakes
Sudden braking should be done safely. To do this you will need to apply equal amount
of pressure to both front and rear brakes. Using excess pressure on the front opposed
to the rear could result in the scooter overturning forwards.
With this in mind, it is certainly not recommended to only use the rear brakes which
will reduce stopping power and cause uneven wear of your brake pads.
Please read this manual carefully before using this Scooter
Indicates ahazardous situation that could result in minor ormoderate injury.
Indicates a hazardous situation that could result in serious injury.
TFT Display
NFC Reader TFT Control
Thumb Throttle
Multi
Accelerator
HandlebarHandlebar
SCOOTER DIMENSIONS
9.
Riding on inclines
Acceptable gradeability is different for each scooter. Excessive inclines
exceeding the specification may cause damage to the electrical
components due to temperature cut, overcurrent or low voltage cut, which
may cause the scooter to malfunction.
10.
Safety warning when lifting the product
Please always lift the scooter with at least one other person.
When lifting the scooter, please use correct lifting procedures to avoid
injury.
11.
Safety gear
For your safety, be sure to wear a full face helmet and other protective gear
(knees, elbows, hands, upper body) and do not wear inappropriate footwear
such as thongs, high heels etc. that can hinder safe riding.
Precaution before riding
1 Night riding should be avoided where possible. If doing so, all scooter lights should be
switched on and a high visibility vest is strongly encouraged.
3 When turning left / right, slow down to avoid the danger of overturning or slipping, then
turn safely.
5 Do not ride in a way that threatens any other means of transport, such as pedestrians,
bicycles, motorcycles, cars and trucks etc.
7 When decelerating or braking, do not stop with your
foot, but by using the brake appropriately.
9 Always keep two hands firmly on the handlebars
whilst riding. Due to small diameter of scooter
wheels/tyres relaxed or one-handed riding will
almost certainly result in an accident.
SCOOTER DIMENSIONS
Handlebar
NFC Reader
Display / Throttle
10 Do not ride with the kick stand down.
2 Select the mode that best suits your riding ability. In order to handle sudden situations,
be prepared to slow down and brake at all times.
4 When crossing a pedestrian crossing, dismount and walk alongside the scooter.
6 When passing speed bumps and road obstacles, be
sure to slow down.
8 Beware of the risk of burns due to heat from
the motor and brake (especially disc rotor)
after riding.
1300mm
1275mm
COMPONENTS LIST / DIAGRAM
Handle Grip
TFT Display
Brake Lever
Hook
Front light
Main stem
Folding Lever
Motor
Tyre
Deck
Kick stand
Rubber Mat
Steering
Damper
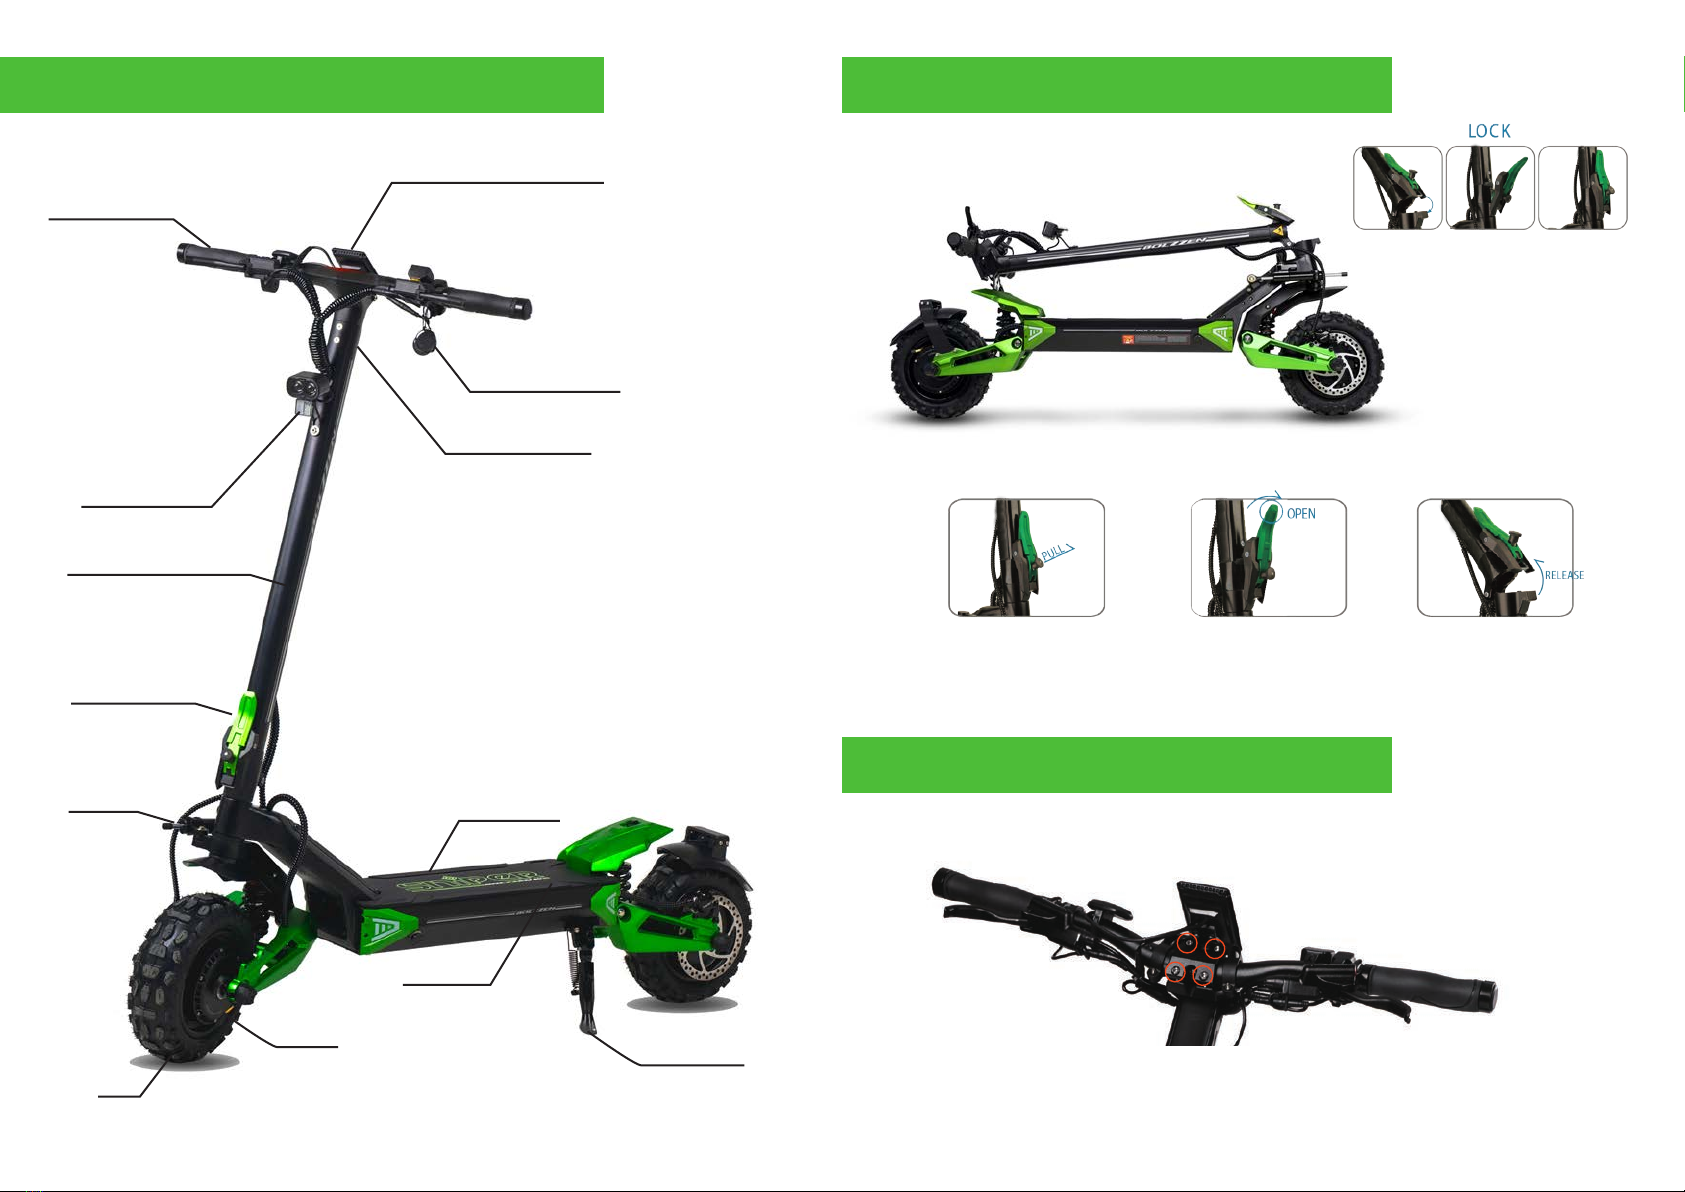
Name of Parts Product unfolding
Product folding
Lock handle bar
Motor
Arm Deck kickstand
brake
fender
Rubber mat
Hook
tire
Fender
Turning
damper
Folding level
Steering tube
Handle grip
TFT display
Brake level
0605
OPEN
LOCK
Screw in X 4
PULL
RELEASE
HOW TO FOLD / UNFOLD
LOCK HANDLE BAR

TFT Display Instructions
TFT Display Instructions
TFT screeninstructions
TFT display instruction
Introduction
0807
5.4 Adjusting 5 levels backlight brightness: 1st level is the darkest, 5th is the
lightest.
5.5 ECO and 1-5 levels: Can be set according to customers’ habits.
5.6 Mileage indicator: Odometer/Trip distance/ Riding time.
5.7 Clock display: inner small battery, keep time when the display is closed
5.8 Power indicator: Real time power indicator, digital or analog.
5.9 Error code indicator.
5.10 Speed limit adjustment function: total speed limit and gear speed limit can
be set.
5.11 Current limit adjustment function
5.12 USB charging port: provide rated charging for mobile devices. Current:
500mA/5V.
5.13 Software upgrade: Software can be upgraded through UART.
5.14 Speed measurement magnets (number of pole pairs) adjustment function:
the number of speed measurement magnets (magnetic poles) can be set.
5.15 Level parameter setting: you can set the parameters of the levels.
5.1 Screen size: 3.5inch color TFT screen.
5.2 Kilometer / Mile: Can be set according to customers’ habits.
5.3 Intelligent power indicator contains below: It can provide a stable power
indication through the optimization algorithm. The power is not affected by the
start-stop fluctuation of the motor. If the system supports battery communication,
the accurate percentage of power will be displayed.
Information:
Headlight
时钟显示
电量显示
档位显示
功率显示
速度信息
Mileage and speed
定速巡航
时钟显示
速度信息
档位显示
定速巡航
时钟显示
速度信息
功率显示
档位显示
定速巡航
时钟显示
速度信息
Battery
Power
Assist level
Fixed Speed
Cruise Control
Clock
Speed
Brake
F & R motor work simultaneously
5.1 Screen size: 3.5inch color TFT screen.
5.2 Kilometer: Can be set according to customers’ preference.
5.3 Intelligent power indicator contains below: It can provide a stable power
indication through the optimization algorithm. The power is not affected by the
startstop fluctuation of the motor. If the system supports battery communication,
the accurate percentage of power will be displayed.
5.4 Adjusting 5 levels backlight brightness: 1st level is the darkest, 5th is the
brightest.
5.5 ECO and 1-5 levels: Can be set according to customers’ preference.
5.6 Mileage indicator: Odometer/Trip distance/ Riding time.
5.7 Clock display: inner small battery, keeps time when the display is closed
5.8 Power indicator: Real time power indicator, digital or analog.
5.9 Error code indicator.
5.10 Speed limit adjustment function: total speed limit and gear speed limit can
be set.
5.11 Current limit adjustment function
5.12 USB charging port: charging for mobile devices. Current:
500mA/5V.
5.13 Software upgrade: Software can be upgraded through UART.
5.14 Speed measurement magnets (number of pole pairs) adjustment function:
the number of speed measurement magnets (magnetic poles) can be set.
5.15 Parameter level setting: you can set the level parameter.
TFT screeninstructions
TFT display instruction
Introduction
0807
5.4 Adjusting 5 levels backlight brightness: 1st level is the darkest, 5th is the
lightest.
5.5 ECO and 1-5 levels: Can be set according to customers’ habits.
5.6 Mileage indicator: Odometer/Trip distance/ Riding time.
5.7 Clock display: inner small battery, keep time when the display is closed
5.8 Power indicator: Real time power indicator, digital or analog.
5.9 Error code indicator.
5.10 Speed limit adjustment function: total speed limit and gear speed limit can
be set.
5.11 Current limit adjustment function
5.12 USB charging port: provide rated charging for mobile devices. Current:
500mA/5V.
5.13 Software upgrade: Software can be upgraded through UART.
5.14 Speed measurement magnets (number of pole pairs) adjustment function:
the number of speed measurement magnets (magnetic poles) can be set.
5.15 Level parameter setting: you can set the parameters of the levels.
5.1 Screen size: 3.5inch color TFT screen.
5.2 Kilometer / Mile: Can be set according to customers’ habits.
5.3 Intelligent power indicator contains below: It can provide a stable power
indication through the optimization algorithm. The power is not affected by the
start-stop fluctuation of the motor. If the system supports battery communication,
the accurate percentage of power will be displayed.
Information:
Headlight
时钟显示
电量显示
档位显示
功率显示
速度信息
Mileage and speed
定速巡航
时钟显示
速度信息
档位显示
定速巡航
时钟显示
速度信息
功率显示
档位显示
定速巡航
时钟显示
速度信息
Battery
Power
Assist level
Fixed Speed
Cruise Control
Clock
Speed
Brake F & R motor work simultaneously
Brake
Speed
Clock
Headlight
Single or dual meter indicator
Battery
Power usage
Power mode
Trip computer
Fixed speed
cruise control
Table of contents
Other Bolzzen Scooter manuals


