1
11
1
For 220-240VAC mains single-
phase connection with ope
Jumpers connecting the terminals
2-3. Jumper to the terminals 4-5
for the neutral conductor.
Protective conductor on .
2
22
2
For 220-240VAC mains two-
phase connection with opera
ing neutral conductor. Jumpers connecting the terminals 1
Jumper to the terminals 4-
5 for the neutral conductor. Pr
tective conductor on .
3
33
3
For 220-240VAC mains three-
phase connection with opera
ing neutral conductor. Jumpers connecting 4
the neutral conductor. Protective conductor on
L1, L2, L3 = Phase N = Neutral PE =
L1, L2, L3 = Phase N = Neutral PE = L1, L2, L3 = Phase N = Neutral PE =
L1, L2, L3 = Phase N = Neutral PE =
Information to reduce the environmental effect of cooking
Information to reduce the environmental effect of cookingInformation to reduce the environmental effect of cooking
Information to reduce the environmental effect of cooking
(acc. VO (EU) No. 66/2014 appendix I, No. 2)
(acc. VO (EU) No. 66/2014 appendix I, No. 2)(acc. VO (EU) No. 66/2014 appendix I, No. 2)
(acc. VO (EU) No. 66/2014 appendix I, No. 2)
Hob / Induction hob
Hob / Induction hobHob / Induction hob
Hob / Induction hob
Use pans and pots with flat floors. Uneven floors increase the energy consumption.
The diameter of the pot and pan floors should be according to the size of the cooking zone, or bigger.
and pots, which are too small on the cooking zone lead to energy losses. Note: Dishes producer partly
indicate the upper pot diameter. It is usually larger than the diameter of the pot floor.
Use a small pot for small quantities. A large pot, which is onl
Use as little water as possible. This saves energy. Vegetables retain their vitamins.
Always close pots with a suitable lid. When cooking without lid you need four times more energy. When using
energy can be saved because you can see into the pot without open the lid.
Use a quick cooker to clearly reduce the cooking time and save energy.
After boiling or frying, switch off the used cooking zones to a smaller power level.
the pan, the pot and the food. Switch off the cooking zones 5
Information to professional users for disassembly
Information to professional users for disassemblyInformation to professional users for disassembly
Information to professional users for disassembly
(acc. VO (EU) No. 66/2014 appendix I, No. 2)
(acc. VO (EU) No. 66/2014 appendix I, No. 2)(acc. VO (EU) No. 66/2014 appendix I, No. 2)
(acc. VO (EU) No. 66/2014 appendix I, No. 2)
Hob / Induction hob
Hob / Induction hobHob / Induction hob
Hob / Induction hob
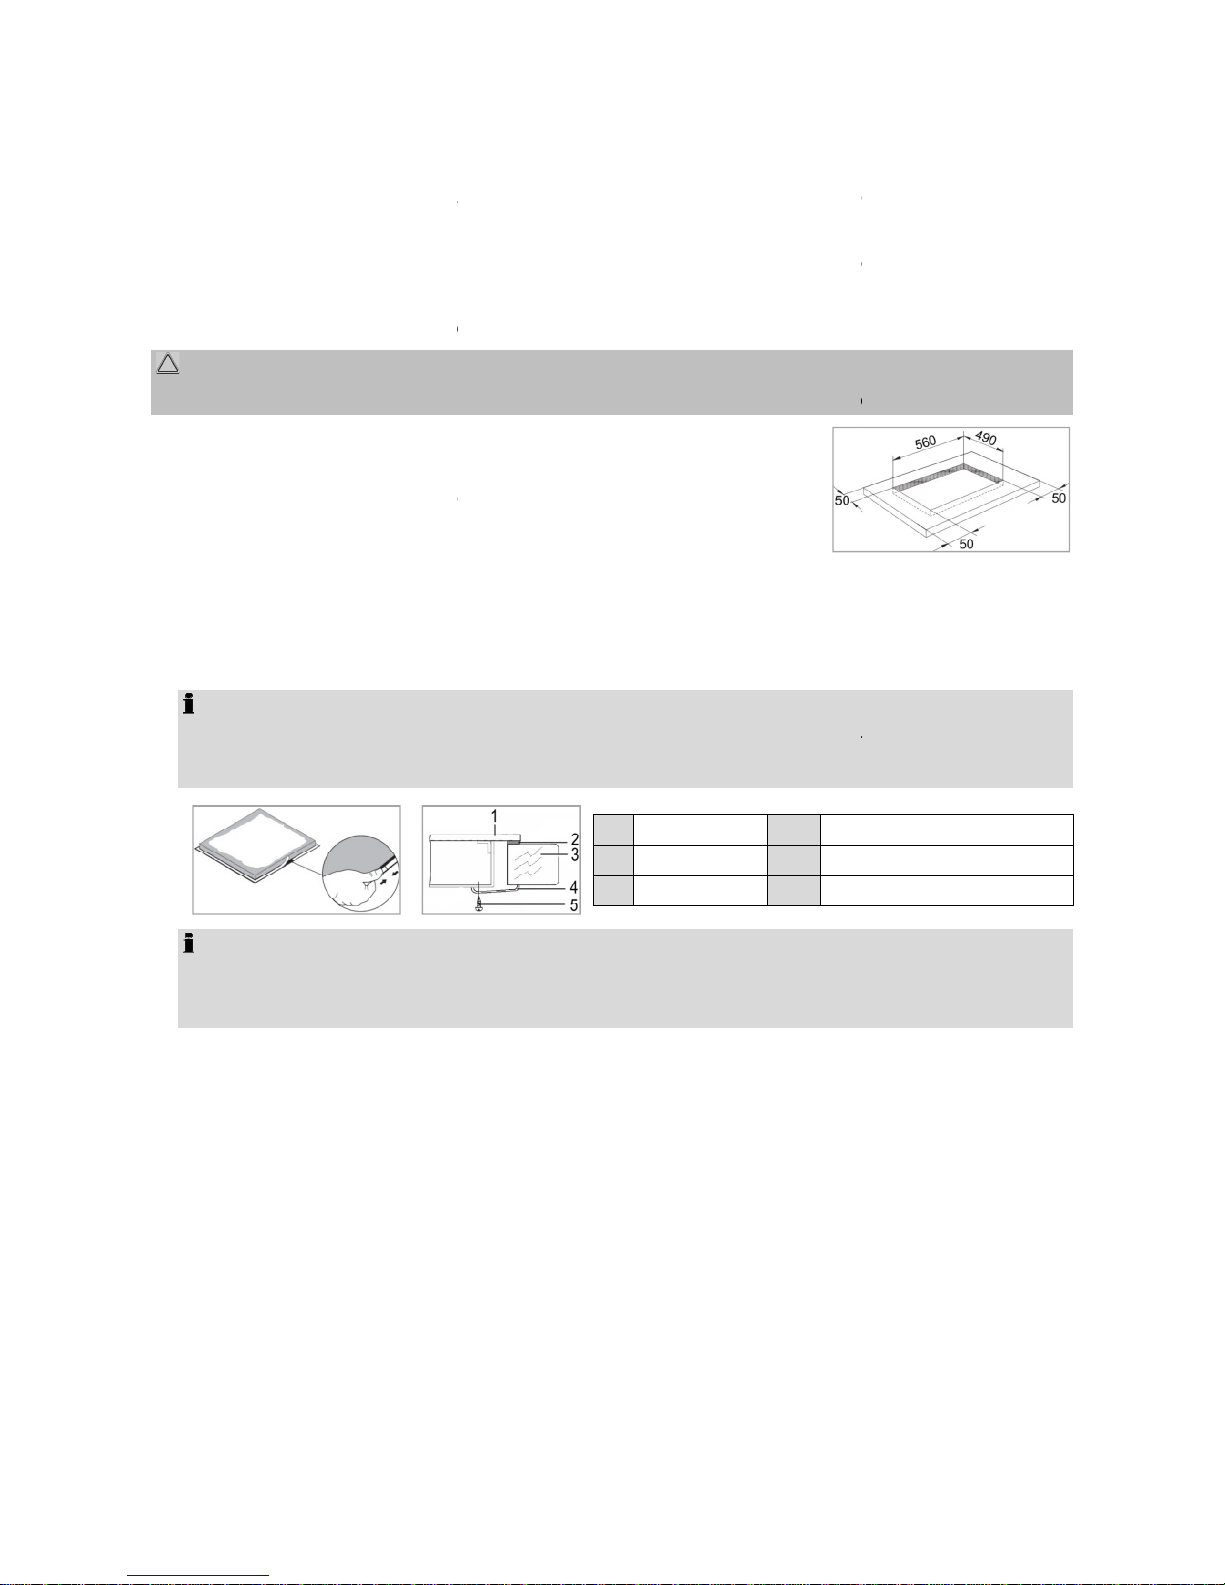
Information for non-
destructive disassembly for maintenance purposes
A further disassembly for maintenance purposes by the user is not provided. Do not disassemble the unit.
For repair and replacement of defective parts, please contact our customer servi
Accumulators are not included.
9
phase connection with ope
Jumpers connecting the terminals
for the neutral conductor.
phase connection with opera
ing neutral conductor. Jumpers connecting the terminals 1
5 for the neutral conductor. Pr
phase connection with opera
ing neutral conductor. Jumpers connecting 4
the neutral conductor. Protective conductor on
L1, L2, L3 = Phase N = Neutral PE =
L1, L2, L3 = Phase N = Neutral PE = L1, L2, L3 = Phase N = Neutral PE =
L1, L2, L3 = Phase N = Neutral PE =
otective ground
otective groundotective ground
otective ground
Startup / Operation
Startup / OperationStartup / Operation
Startup / Operation
Information to reduce the environmental effect of cooking
Information to reduce the environmental effect of cookingInformation to reduce the environmental effect of cooking
Information to reduce the environmental effect of cooking
(acc. VO (EU) No. 66/2014 appendix I, No. 2)
(acc. VO (EU) No. 66/2014 appendix I, No. 2)(acc. VO (EU) No. 66/2014 appendix I, No. 2)
(acc. VO (EU) No. 66/2014 appendix I, No. 2)
Use pans and pots with flat floors. Uneven floors increase the energy consumption.
The diameter of the pot and pan floors should be according to the size of the cooking zone, or bigger.
and pots, which are too small on the cooking zone lead to energy losses. Note: Dishes producer partly
indicate the upper pot diameter. It is usually larger than the diameter of the pot floor.
Use a small pot for small quantities. A large pot, which is onl
y slightly filled, required a lot of energy.
Use as little water as possible. This saves energy. Vegetables retain their vitamins.
Always close pots with a suitable lid. When cooking without lid you need four times more energy. When using
energy can be saved because you can see into the pot without open the lid.
Use a quick cooker to clearly reduce the cooking time and save energy.
After boiling or frying, switch off the used cooking zones to a smaller power level.
the pan, the pot and the food. Switch off the cooking zones 5
Information to professional users for disassembly
Information to professional users for disassemblyInformation to professional users for disassembly
Information to professional users for disassembly
(acc. VO (EU) No. 66/2014 appendix I, No. 2)
(acc. VO (EU) No. 66/2014 appendix I, No. 2)(acc. VO (EU) No. 66/2014 appendix I, No. 2)
(acc. VO (EU) No. 66/2014 appendix I, No. 2)
destructive disassembly for maintenance purposes
A further disassembly for maintenance purposes by the user is not provided. Do not disassemble the unit.
For repair and replacement of defective parts, please contact our customer servi
H05VV
H05VVH05VV
H05VV-
--
-F
FF
F3
33
3G
GG
G6
66
6
H05VV
H05VVH05VV
H05VV-
--
-F4G6
F4G6F4G6
F4G6
H05VV
H05VVH05VV
H05VV-
--
-
F
FF
F5G2
5G25G2
5G2.5
.5.5
.5
otective ground
otective groundotective ground
otective ground
The diameter of the pot and pan floors should be according to the size of the cooking zone, or bigger.
and pots, which are too small on the cooking zone lead to energy losses. Note: Dishes producer partly
y slightly filled, required a lot of energy.
Always close pots with a suitable lid. When cooking without lid you need four times more energy. When using
energy can be saved because you can see into the pot without open the lid.
the pan, the pot and the food. Switch off the cooking zones 5
A further disassembly for maintenance purposes by the user is not provided. Do not disassemble the unit.