Bondura Multi Tool 140 User manual

user manual - for disassembly
art. 108343 rev. 07.03.2019 A
bondura®Multi Tool 140
pin and conical sleeve removal
Ø070mm - Ø195mm
bondura.no
1/ bondura® 6.6
1.1 conical sleeve removal / demontering av konhylse
1.2 pin removal / demontering av bolt
2/ bondura® 6.1
2.1 conical sleeve removal / demontering av konhylse
2.2 pin removal / demontering av bolt
3/ bondura® 6.2
3.1 conical sleeve removal / demontering av konhylse
3.2 pin removal / demontering av bolt
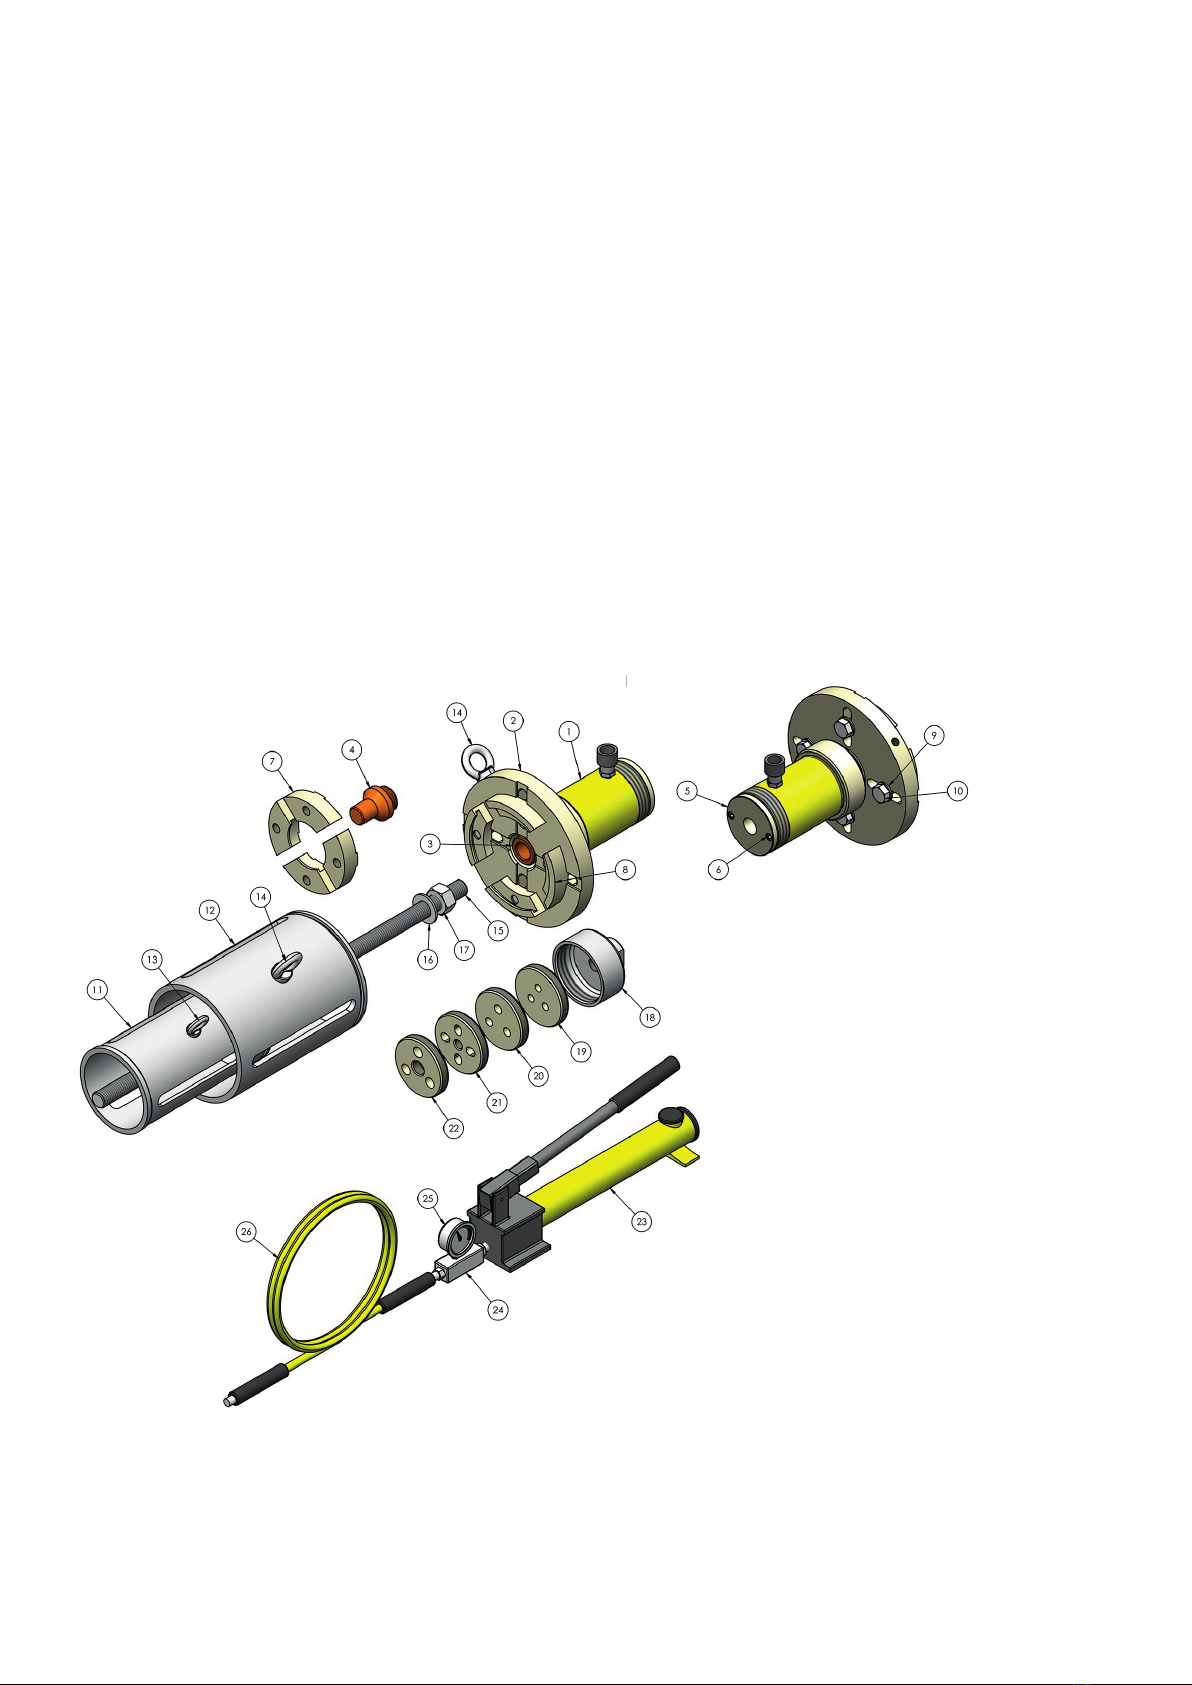
1
Hydraulic Puller 30T - 01
Pulling Plate 140 - 02
Piston Extension 140 - 03
Piston Extension 140 for DUAL - 04
Puller Fastener Plate - 05
Screw 3/8”-UNCx3/4” cyl. - 06
Jaw M20 for Ø070-Ø135 - 07
Jaw M20 for Ø140-Ø195 - 08
Washer Ø21/37x3 - 09
Screw M20x50 - 10
Casing Ø140 - 11
Casing Ø200 - 12
Lifting Eye M10 - 13
Lifting Eye M16 - 14
Threaded Rod M30 - 15
Washer Ø31/56x4 - 16
Nut M30 - 17
Adapter Plate Holder M30 - 18
Adapter Plate for 6.6 Ø070-Ø082,5 - 19
Adapter Plate for 6.6 Ø085-Ø095 - 20
Adapter Plate for 6.6 Ø100-Ø110 - 21
Adapter Plate for 6.6 Ø114-Ø130 - 22
Hydraulic Hand Pump - 23
Manometer Adapter - 24
Manometer - 25
Hydraulic Hose - 26
bondura.no
1/ bondura® 6.6
1.1 conical sleeve removal / demontering av konhylse
1.1.1/ Tomakeitaseasyaspossibletodisassemble,theequipmentmustbeooaded.
For å gjøre demonteringen enklest mulig, må utstyret avlastes.
1.1.2/ Remove screws, plates and greasing details.
Demonter skruer, plater og smøredetaljer.
1.1.3/ TheHydraulicPuller(1)isedtothePullingPlate(2)
with the Piston (3) pointed towards the pin.
Jekken(1)monteresltrykkplaten(2)medstempelet(3)
pekende mot bolten.
2
Piston
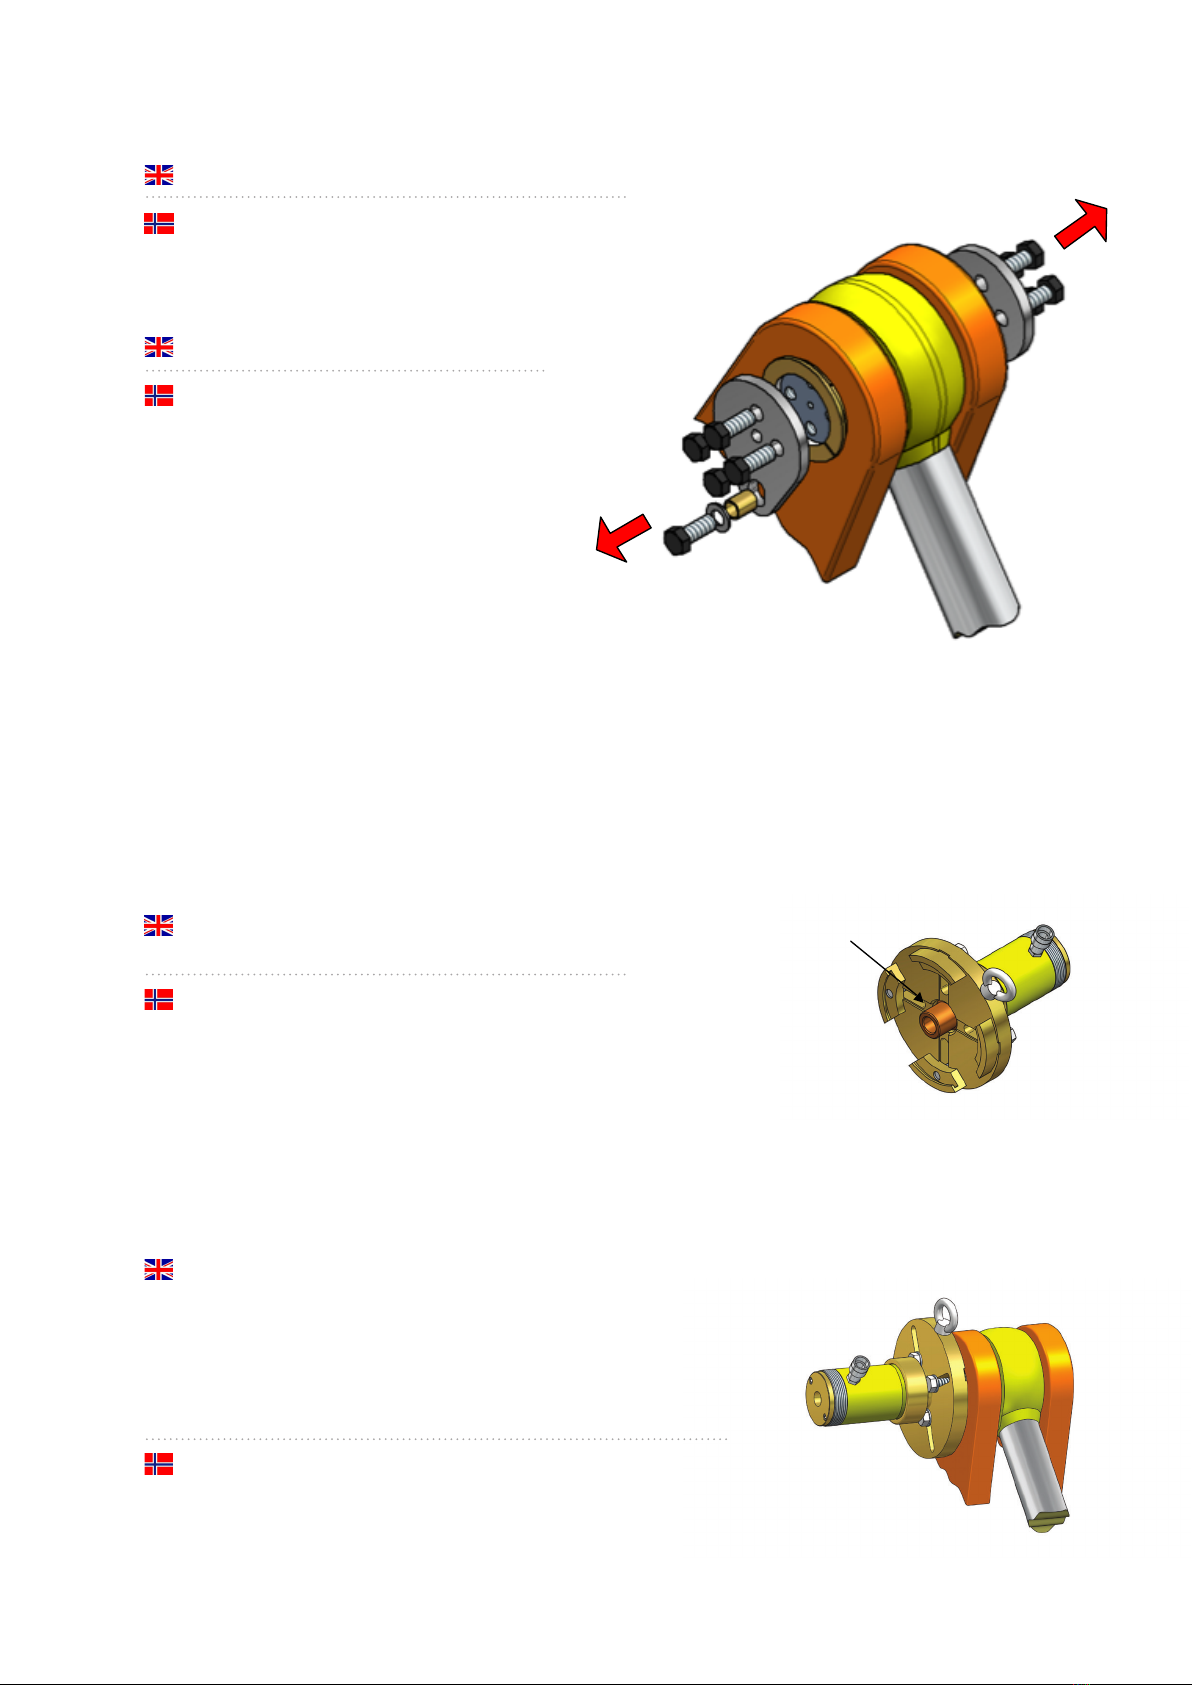
1.1.4/ Assemble the tool as shown.
AachtheappropriatejawsforØ070-Ø135(7)orØ140-Ø195(8)
totheangeontheconicalsleeve.ConnecttheHydraulicPump
and Hose (23-26).
Pull out the conical sleeve.
Monter verktøyet som vist.
Avtrekksklørne for Ø070-Ø135 (7) eller Ø140-Ø195 (8) skal skyves
innbakavtrekksensenpåkonhylsen.Koblelhydrauliskpumpe
og slange (23-26).
Trekk ut konhylse.
PleasereadtheEnerpacInstruconSheetbeforeaempngtoassemble/operatetheHydraulicPuller.
VennligstlesInstruksjonsmanualenlEnerpacførdustartermontering/brukavhydrauliskjekk.
NOTE
MERK

bondura.no
1/ bondura® 6.6
1.2 pin removal / demontering av bolt
1.2.1/ TheHydraulicPuller(1)isedtothePullingPlate(2)
with Piston (3) pointed away from the pin.
Jekken(1)monteresltrykkplaten(2)medstempelet(3)
pekende bort fra bolten.
3
Piston
1.2.3/ AachtheThreadedRodM30(15)tothecenterholein
the pin.
Gjengestang M30 (15) skrus inn i senterhullet på bolten.
1.2.4/ Assemble the tool as shown using the appropriate Casing (11-12).
Connect the Hydraulic Pump and Hose (23-26). Pull out the pin.
Monter verktøyet som vist ved å bruke passende casing (11-12).
Koblelhydrauliskpumpeogslange(23-26).Trekkutbolten.
1.2.2/ For pins without threaded center holes, the appropriate Adapter
Plate(19-22)shouldbefastenedtothepinusingexisngscrews.
Connect the Adapter Plate Holder (18) to the Adapter Plate (19-22).
AachtheThreadedRodM30(15)totheAdapterPlateHolder(18).
For bolter uten gjenget senterhull, skal den passende adapterplaten
(19-22)skrusfastlboltenvedåbrukeeksisterendeskruer.
Skruadapterplate-holderen(18)ladapterplaten(19-22).
FestgjengestangM30(15)ladapterplate-holderen(18).
PleasereadtheEnerpacInstruconSheetbeforeaempngtoassemble/operatetheHydraulicPuller.
VennligstlesInstruksjonsmanualenlEnerpacførdustartermontering/brukavhydrauliskjekk.
NOTE
MERK

bondura.no
2/ bondura® 6.1
2.1 conical sleeve removal / demontering av konhylse
2.1.1/ Tomakeitaseasyaspossibletodisassemble,theequipmentmustbeooaded.
For å gjøre demonteringen enklest mulig, må utstyret avlastes.
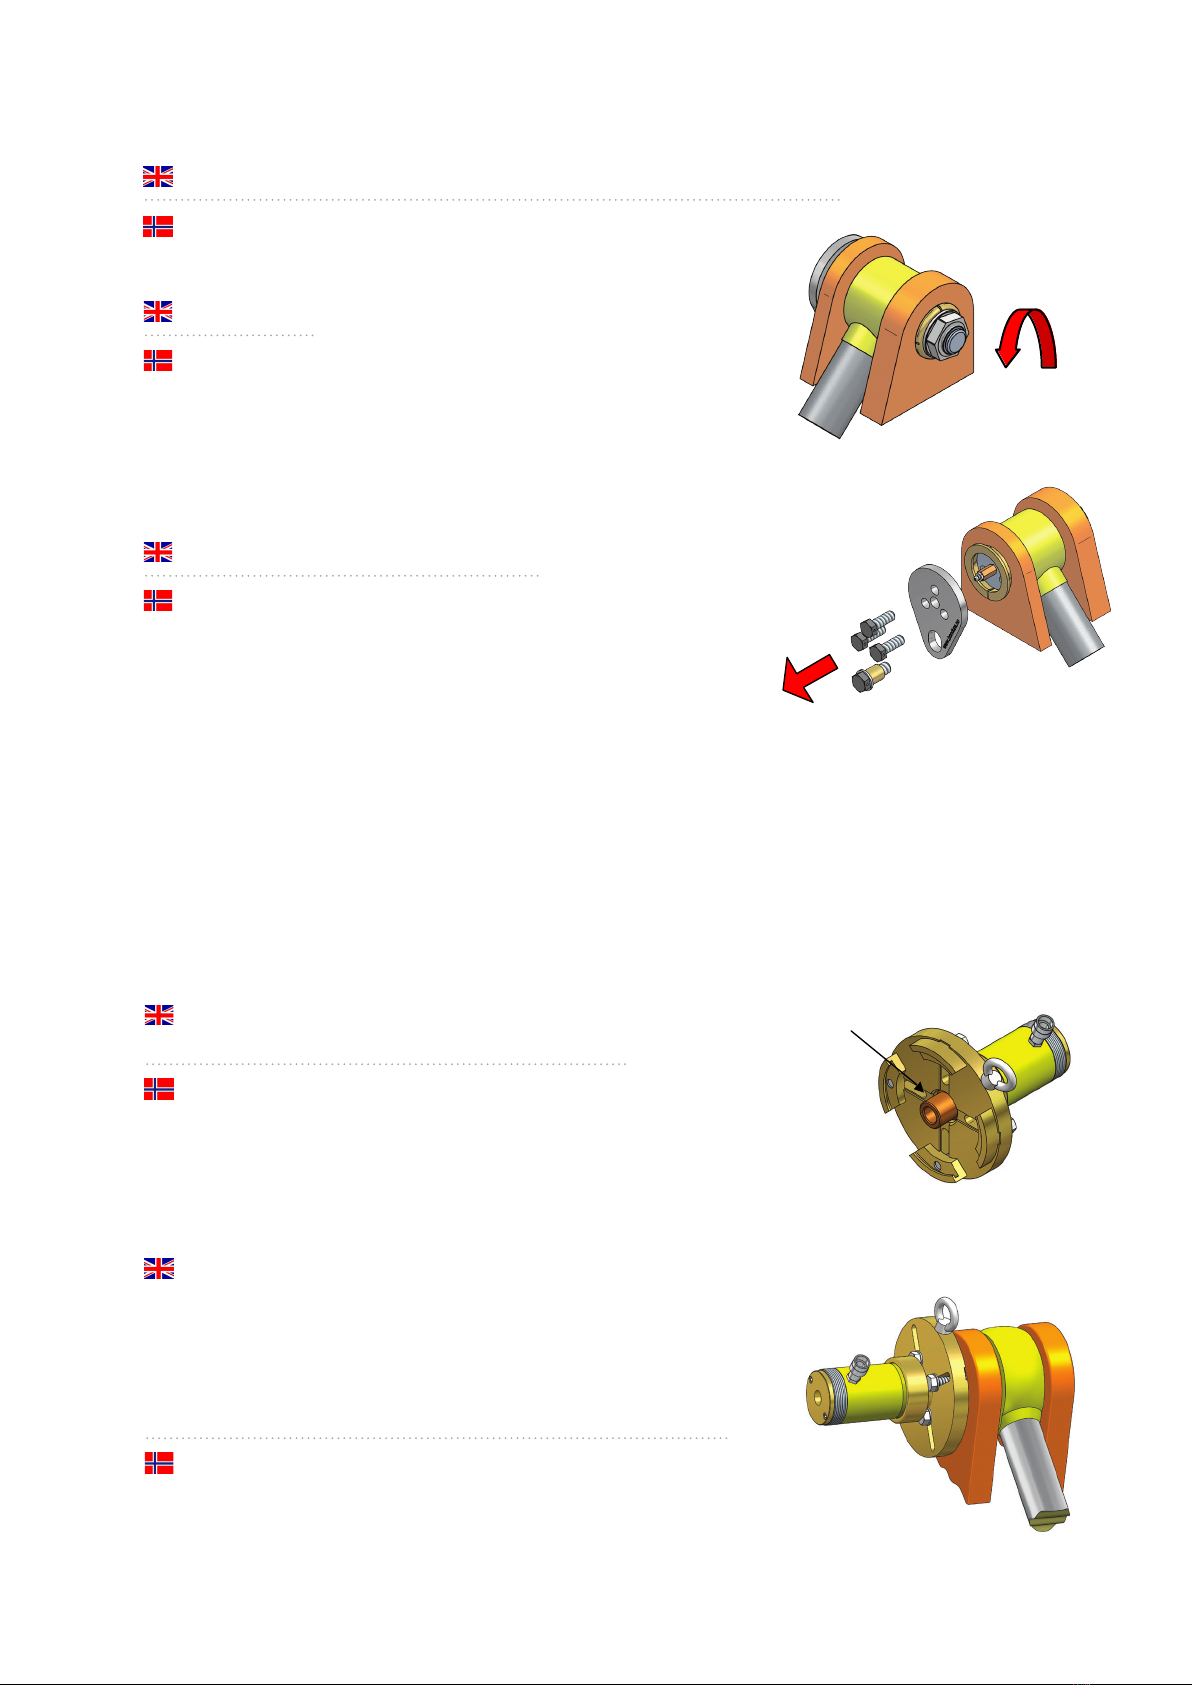
2.1.2/ Remove screws and plate.
Demonter skruer og plate.
4
2.1.3/ Loosen the axle.
Løsne akslingen.
2.1.4/ Use a rubber mallet and hit on the axle to loosen the
inner conical sleeve. Remove the axle.
Bruk en gummi-klubbe og slå på akslingen for å løsne
den indre konhylsen. Ta akslingen helt ut.
Piston
2.1.5/ TheHydraulicPuller(1)isedtothePullingPlate(2)
with the Piston (3) pointed towards the pin.
Jekken(1)monteresltrykkplaten(2)medstempelet(3)
pekende mot bolten.
2.1.6/ Assemble the tool as shown.
AachtheappropriatejawsforØ070-Ø135(7)orØ140-Ø195(8)
totheangeontheconicalsleeve.ConnecttheHydraulicPump
and Hose (23-26).
Pull out the conical sleeve.
Monter verktøyet som vist.
Avtrekksklørne for Ø070-Ø135 (7) eller Ø140-Ø195 (8) skal skyves
innbakavtrekksensenpåkonhylsen.Koblelhydrauliskpumpe
og slange (23-26).
Trekk ut konhylse.
PleasereadtheEnerpacInstruconSheetbeforeaempngtoassemble/operatetheHydraulicPuller.
VennligstlesInstruksjonsmanualenlEnerpacførdustartermontering/brukavhydrauliskjekk.
NOTE
MERK

bondura.no
2/ bondura® 6.1
2.2 pin removal / demontering av bolt
5
Piston
2.2.1/ TheHydraulicPuller(1)isedtothePullingPlate(2)
with Piston (3) pointed away from the pin.
Jekken(1)monteresltrykkplaten(2)medstempelet(3)
pekende bort fra bolten.
2.2.3/ AachtheThreadedRodM30(15)tothecenterholein
the pin.
Gjengestang M30 (15) skrus inn i senterhullet på bolten.
2.2.2/ For pins without threaded center holes, the appropriate Adapter
Plate(19-22)shouldbefastenedtothepinusingexisngscrews.
Connect the Adapter Plate Holder (18) to the Adapter Plate (19-22).
AachtheThreadedRodM30(15)totheAdapterPlateHolder(18).
For bolter uten gjenget senterhull, skal den passende adapterplaten
(19-22)skrusfastlboltenvedåbrukeeksisterendeskruer.
Skruadapterplate-holderen(18)ladapterplaten(19-22).
FestM30gjengestang(15)ladapterplate-holderen(18).
PleasereadtheEnerpacInstruconSheetbeforeaempngtoassemble/operatetheHydraulicPuller.
VennligstlesInstruksjonsmanualenlEnerpacførdustartermontering/brukavhydrauliskjekk.
NOTE
MERK

bondura.no
2.2.3/ Screw the axle back in the nut, and pull out the nut
and inner conical sleeve.
Skruakslingenlbakeimueren,ogtrekkutmuer
og indre konhylse.
6
2.2.4/ Assemble the tool as shown using the appropriate
Casing (11-12). Connect the Hydraulic Pump and
Hose (23-26). Pull out the pin.
Monter verktøyet som vist ved å bruke passende
casing(11-12).Koblelhydrauliskpumpeog
slange (23-26). Trekk ut bolten.
bondura.no
7
3/ bondura® 6.2
3.1 conical sleeve removal / demontering av konhylse
3.1.1/ Tomakeitaseasyaspossibletodisassemble,theequipmentmustbeooaded.
For å gjøre demonteringen enklest mulig, må utstyret avlastes.
3.1.2/ Loosen the nut.
Løsnemuer.
3.1.3/ Remove screws, plates and greasing details.
Demonter skruer, plater og smøredetaljer.
3.1.4/ TheHydraulicPuller(1)isedtothePullingPlate(2)
with the Piston (3) pointed towards the pin.
Jekken(1)monteresltrykkplaten(2)medstempelet(3)
pekende mot bolten.
Piston
3.1.5/ Assemble the tool as shown.
AachtheappropriatejawsforØ070-Ø135(7)orØ140-Ø195(8)
totheangeontheconicalsleeve.ConnecttheHydraulicPump
and Hose (23-26).
Pull out the conical sleeve.
Monter verktøyet som vist.
Avtrekksklørne for Ø070-Ø135 (7) eller Ø140-Ø195 (8) skal skyves
innbakavtrekksensenpåkonhylsen.Koblelhydrauliskpumpe
og slange (23-26).
Trekk ut konhylse.
PleasereadtheEnerpacInstruconSheetbeforeaempngtoassemble/operatetheHydraulicPuller.
VennligstlesInstruksjonsmanualenlEnerpacførdustartermontering/brukavhydrauliskjekk.
NOTE
MERK

bondura.no
3/ bondura® 6.2
3.2 pin removal / demontering av bolt
8
3.2.1/ TheHydraulicPuller(1)isedtothePullingPlate(2)
with Piston (3) pointed away from the pin.
Jekken(1)monteresltrykkplaten(2)medstempelet(3)
pekende bort fra bolten.
Piston
3.2.3/ AachtheThreadedRodM30(15)tothecenterholein
the pin.
Gjengestang M30 (15) skrus inn i senterhullet på bolten.
3.2.2/ For pins without threaded center holes, the appropriate Adapter
Plate(19-22)shouldbefastenedtothepinusingexisngscrews.
Connect the Adapter Plate Holder (18) to the Adapter Plate (19-22).
AachtheThreadedRodM30(15)totheAdapterPlateHolder(18).
For bolter uten gjenget senterhull, skal den passende adapterplaten
(19-22)skrusfastlboltenvedåbrukeeksisterendeskruer.
Skruadapterplate-holderen(18)ladapterplaten(19-22).
FestgjengestangM30(15)ladapterplate-holderen(18).
3.2.4/ Assemble the tool as shown using the appropriate Casing (11-12).
Connect the Hydraulic Pump and Hose (23-26). Pull out the pin.
Monter verktøyet som vist ved å bruke passende casing (11-12).
Koblelhydrauliskpumpeogslange(23-26).Trekkutbolten.
PleasereadtheEnerpacInstruconSheetbeforeaempngtoassemble/operatetheHydraulicPuller.
VennligstlesInstruksjonsmanualenlEnerpacførdustartermontering/brukavhydrauliskjekk.
NOTE
MERK

bondura® technology AS
Vardheivegen 56b
4340 Bryne
Norway
support tel +47 51 77 20 20
post@bondura.no
bondura.no
Other Bondura Tools manuals

Popular Tools manuals by other brands


4PRO
4PRO PET Series Installation, Warnings, and Operation Instructions

ERBA
ERBA 13286 instruction manual

Alemlube
Alemlube HR90005 Owner technical manual

Pittsburgh
Pittsburgh 62601 Owner's manual & safety instructions

Rothenberger
Rothenberger Ro-Groover 1-12 Instructions for use

Robit
Robit S Sense Operator's manual


