manuals.online logo
Brands
  1. Home
  2. •
  3. Brands
  4. •
  5. Woodhaven
  6. •
  7. Tools
  8. •
  9. Woodhaven 8625 User manual

Woodhaven 8625 User manual

Parts List:
Part Description Quantity
8625B Plate Marking Base . . . . . . . . . . . . . . . . 1
8610A 1/2" Cap . . . . . . . . . . . . . . . . . . . . . . . . . . 1
8610C 1/4" Cap . . . . . . . . . . . . . . . . . . . . . . . . . . 1
8610D Indexing Plate. . . . . . . . . . . . . . . . . . . . . 1
8610E Indexing Plate Riser . . . . . . . . . . . . . . . 1
4208 7-7/8" One Track . . . . . . . . . . . . . . . . . . 1
PLUS the hardware shown below:
8625 Adjustable
Plate Marking Jig
Please Read Carefully!
Part# Description Qty.
5771B 3/4" Screw 2
Part# Description Qty.
HB030 1" Bolt 1
Part# Description Qty.
5765B Offset Oval Nut 2
Part# Description Qty.
WB002 Washer 1
Part# Description Qty.
BUSH050 3/8" Spacer 5
1
Part# Description Qty.
5863 Ratchet Handle 1
Part# Description Qty.
BUSH001 1/8" Spacer 3
Part# Description Qty.
MF035 1/2" Screw 2
Part# Description Qty.
5521 Thumb Nut 1
Part# Description Qty.
5860 Ratchet Handle 1
Part# Description Qty.
BUSH5050 1/2" Spacer 1
Part# Description Qty.
MP200 2" Screw 1
Part# Description Qty.
BUSH004 5/8" Spacer 2
Part# Description Qty.
HB050 1-1/2" Bolt 1
Part# Description Qty.
MP150 1-1/2" Screw 2
2
BEFORE BEGINNING
Identify and verify that you have all the parts listed.
Read the instructions at least once before beginning. This jig
is designed for marking/mounting 35mm or 26mm cup hinge
mounting plates (with 32mm on center mounting holes) at a
distance of 37mm to 70mm from the edge of the cabinet.
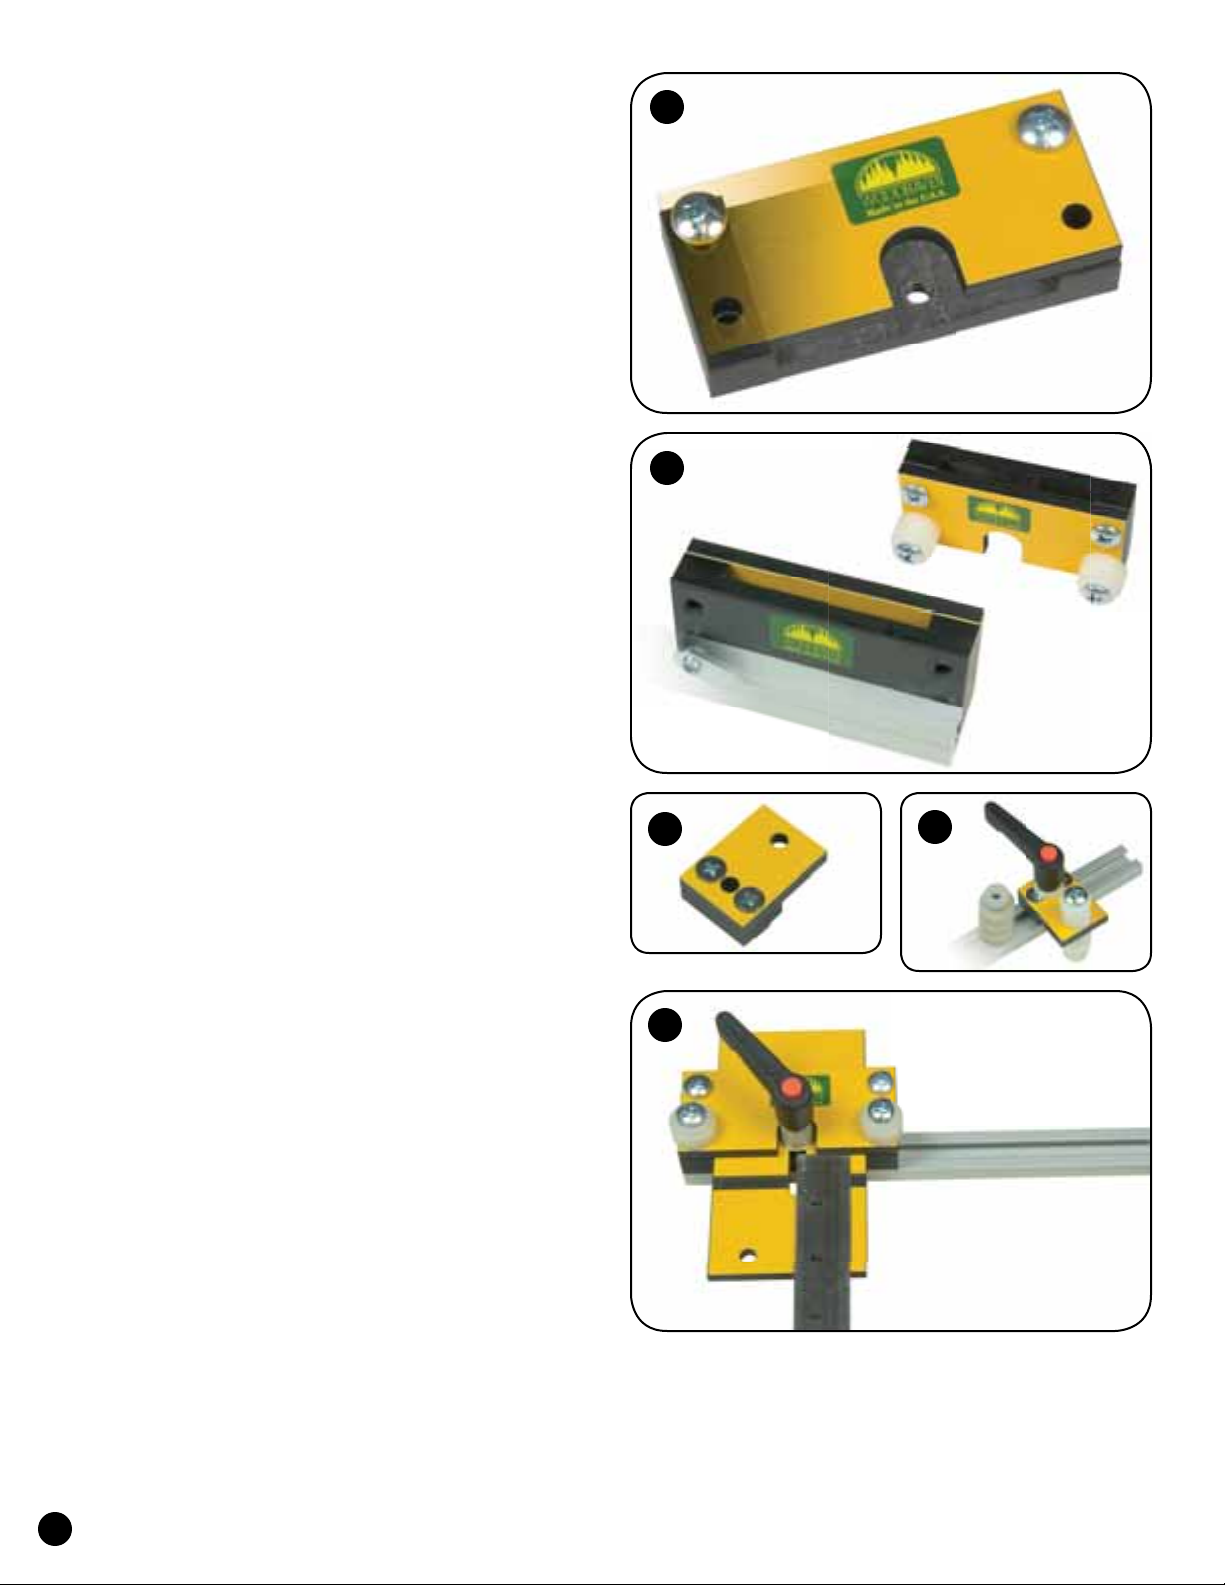
ASSEMBLY
Attach the 1/4" Cap (8610C) to the 1/2" Cap
(8610A) using the 3/4" screws (5771B). See fig. 1.
Install a 1/8" Spacer (BUSH001) and a 3/8" Spacer
(BUSH050) on both of the 1-1/2" Screws (MP150). Insert the
screws thru the two open holes in the Caps and start an Offset
Oval Nut (5765B) on the end of each screw. See fig. 2.
Lay the assembly on edge. Slide the 7-7/8" One Track
(4208) on to the offset oval nuts until it's flush with one end
of the assembly, then tighten the 1-1/2" screws. See fig. 2.
Insert three 3/8" Spacers (BUSH050) on the 1-1/2"
Bolt (HB050) and start a Thumb Nut (5521) on the end of
the bolt. This assembly provides support for the jig when it's
flipped and is best positioned next to the Indexing Plate. Slide
the assembly on the One Track and tighten. See fig. 4.
Attach the Indexing Plate (8610D) to the Indexing Plate
Riser (8610E) using the 1/2" screws (MF035). See fig. 3.
Insert a 1" bolt (HB030) thru the Riser, then the
Indexing Plate. Install a 1/8" Spacer (BUSH001) and start
a Ratchet Handle (5860) on the end of the bolt. Slide the
assembly on the One Track and tighten. See fig. 4.
If you're indexing the jig off the edge of a door or panel,
install a 5/8" Bushing (BUSH004) on the 2" Screw (MP200),
insert the screw thru the hole in the Indexing Plate, install
another 5/8" Bushing and then the Thumb Nut (5521). If
you're indexing the jig against the inside of a cabinet, don't
install this hardware on the Indexing Plate. See fig. 4.
Slide the Base (8625B) in the slot of the assembly with
the shallow black groove in the base facing the 1/4" Cap. The
slot in the Base should be lined up with the tapped hole in
the 1/2" Cap below it. Install a 1/2" Bushing (BUSH5050)
and a washer (WB002) on a Ratchet Handle w/stud (5863).
Install the Ratchet Handle w/stud thru the slot in the Base
and start it in the tapped hole in the 1/2" Cap. See fig. 5.
USING THE JIG
By aligning the edge of the shallow black groove in the
Base with the edge of the 1/4" Cap, the marking holes will
be 37mm from the edge of the jig. This 37mm dimension is
the built-in offset. By moving the Base/marking holes further
from the 1/4" Cap, you'll increase the distance of the plate
from the edge of the cabinet. Be sure to add the measurement
between the Cap and the groove to 37mm to get the actual
distance. For example, if the distance measures 23mm, plus
the 37mm built-in offset, the actual distance to the center
line of the marking holes will be 60mm. See fig. 5.
Flip the jig to go from left to right or top to bottom.
Use a 1/4" Marking Punch (8600) to mark the
holes for drilling. Or use a Self-Centering bit (6507
or 6507) to drill the screw pilot holes and mark
the 35mm or 26mm cup hole for drilling.
©Copyright WOODHAVEN INC. 9/18/06
(800) 344-6657 or WWW.WOODHAVEN.COM
5
2
1
34
One Track

Other Woodhaven Tools manuals

Woodhaven 5435 User manual

Woodhaven

Woodhaven 5435 User manual

Woodhaven HD Panel Master 5432 User manual

Woodhaven

Woodhaven HD Panel Master 5432 User manual

Woodhaven 8610 User manual

Woodhaven

Woodhaven 8610 User manual

Woodhaven Angle Ease 1425 User manual

Woodhaven

Woodhaven Angle Ease 1425 User manual

Woodhaven 8615 User manual

Woodhaven

Woodhaven 8615 User manual

Woodhaven Angle-Ease 1470 User manual

Woodhaven

Woodhaven Angle-Ease 1470 User manual

Woodhaven 8715 User manual

Woodhaven

Woodhaven 8715 User manual

Woodhaven 6002 User manual

Woodhaven

Woodhaven 6002 User manual

Woodhaven 8628 User manual

Woodhaven

Woodhaven 8628 User manual

Woodhaven 5432 User manual

Woodhaven

Woodhaven 5432 User manual

Woodhaven 3000 User manual

Woodhaven

Woodhaven 3000 User manual

Woodhaven Angle-Ease 1470 User manual

Woodhaven

Woodhaven Angle-Ease 1470 User manual

Woodhaven 3000 User manual

Woodhaven

Woodhaven 3000 User manual

Woodhaven EZ Lift 1429 User manual

Woodhaven

Woodhaven EZ Lift 1429 User manual

Woodhaven 7902 User manual

Woodhaven

Woodhaven 7902 User manual

Woodhaven 7500 User manual

Woodhaven

Woodhaven 7500 User manual

Woodhaven 3210 User manual

Woodhaven

Woodhaven 3210 User manual

Woodhaven 204 User manual

Woodhaven

Woodhaven 204 User manual

Woodhaven 8395 User manual

Woodhaven

Woodhaven 8395 User manual

Woodhaven 6012 User manual

Woodhaven

Woodhaven 6012 User manual

Popular Tools manuals by other brands

Blue Line Twister quick start guide

Blue Line

Blue Line Twister quick start guide

MasterForce HAMMERHEAD Operator's manual

MasterForce

MasterForce HAMMERHEAD Operator's manual

OEM Tools 24562 Operating instructions and parts manual

OEM Tools

OEM Tools 24562 Operating instructions and parts manual

RED FUEL SL157 owner's manual

RED FUEL

RED FUEL SL157 owner's manual

EGAmaster PRESSMATIC MINI operating instructions

EGAmaster

EGAmaster PRESSMATIC MINI operating instructions

Welbilt 483700 owner's manual

Welbilt

Welbilt 483700 owner's manual

Earth Way 14050 Assembly instruction

Earth Way

Earth Way 14050 Assembly instruction

Power Tec 91781 quick start guide

Power Tec

Power Tec 91781 quick start guide

Band-it IT8000 user manual

Band-it

Band-it IT8000 user manual

PROPOINT 8886400 instructions

PROPOINT

PROPOINT 8886400 instructions

Wesco 272301 Operating instructions and parts manual

Wesco

Wesco 272301 Operating instructions and parts manual

Makita DGP180 instruction manual

Makita

Makita DGP180 instruction manual

EINHELL DL-MH Operating and maintenance instructions

EINHELL

EINHELL DL-MH Operating and maintenance instructions

AG SPRAY FSUTV-HR-50 owner's manual

AG SPRAY

AG SPRAY FSUTV-HR-50 owner's manual

Grizzly H7583 owner's manual

Grizzly

Grizzly H7583 owner's manual

MAG TOOLS GG43HD operating manual

MAG TOOLS

MAG TOOLS GG43HD operating manual

Gesipa NTX Operation and maintenance

Gesipa

Gesipa NTX Operation and maintenance

Hytorc LION GUN X Basic operation manual

Hytorc

Hytorc LION GUN X Basic operation manual

manuals.online logo
manuals.online logoBrands
  • About & Mission
  • Contact us
  • Privacy Policy
  • Terms and Conditions

Copyright 2025 Manuals.Online. All Rights Reserved.