Bordogna CASSEFORTI MT 03TR-C1 User manual
CONSERVARE LE PRESENTI ISTRUZIONI ASSIEME ALLA GARANZIA
CARATTERISTICHE GENERALI
• Alimentazione con batteria alcalina 9v tipo rettangolare. (Non
fornita).
• La batteria deve essere alloggiata nella scatola nera posta all’inter-
no della porta; dopo aver collegato la batteria occorre aspettare
10 sec. (sia al primo inserimento che ad ogni cambio batteria).
• Codice unico e variabile da 6 a 16 cifre/lettere.
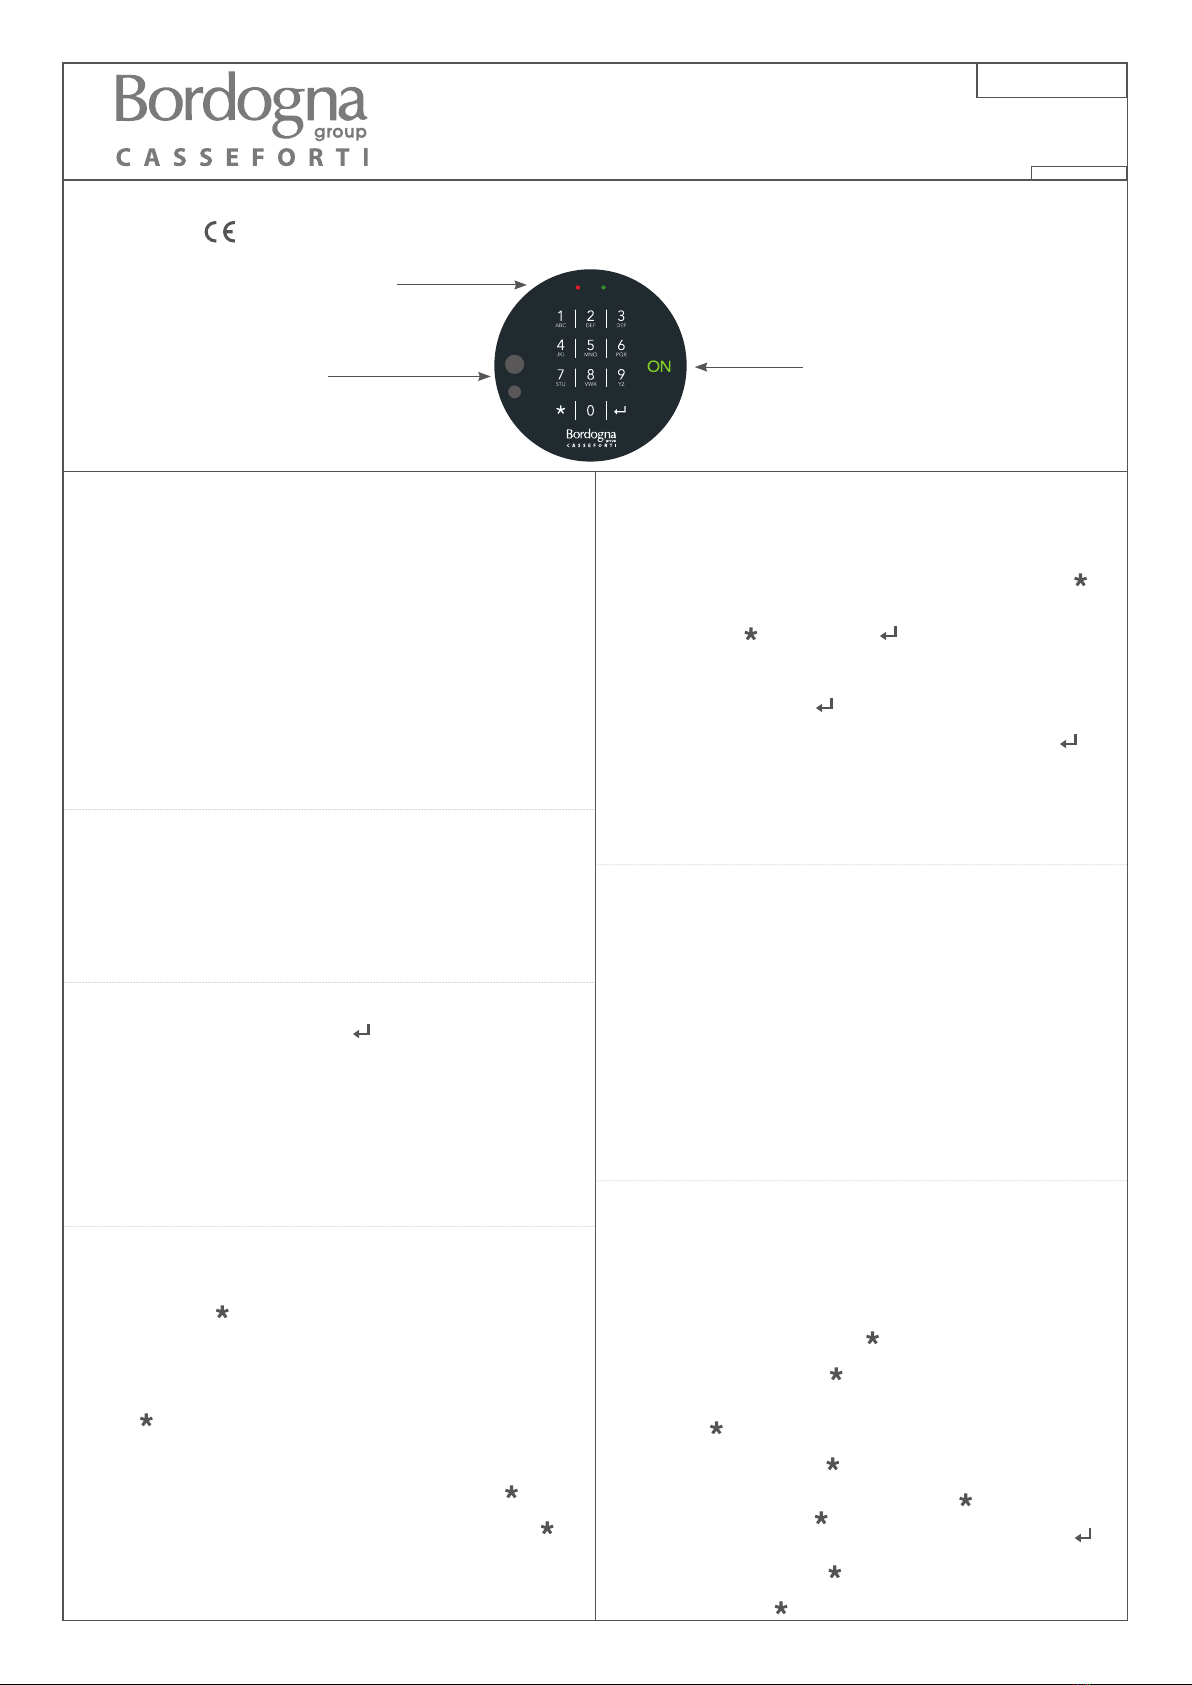
• Tastiera alfanumerica a membrana, 12+1 tasti con LED di segnala-
zione e piazzole per l’alimentazione d’emergenza.
• Box in acciaio con scheda elettronica interna.
• Segnalazione acustica e visiva di batteria scarica.
• Segnalazione di errori e blocco su tentativi di apertura con codice
errato.
• Autospegnimento per limitare i consumi.
• Durata batteria con utilizzo “standard” 1 anno (circa 1000 cicli di
apertura/chiusura).
• Temperatura di utilizzo da 0° a 70°C.
• Protezione da scariche elettrostatiche.
ISTRUZIONI D’USO
• IL CODICE IMPOSTATO IN FABBRICA È 204060.
• Tenere presente che si hanno 10 secondi di tempo a disposizione
tra la pressione di un tasto e quella del tasto successivo.
• Se la batteria è scarica, all’accensione la serratura emette il segnale
‘batteria scarica’, costituito da 4 beep di un secondo e contempo-
ranea accensione del LED rosso. Anche se dopo questo segnale
si possono eseguire circa 10 aperture, è opportuno procedere al
cambio della batteria.
APERTURA
• Premere il tasto ON (si accende il LED verde).
• Digitare il codice e premere il tasto , se il codice è corretto la ser-
ratura emette tre beep (ok codice) e inizia l’apertura (tempo neces-
sario circa 5-6 sec.), ad apertura avvenuta vengono emessi quattro
beep (ok aperto) e il led verde si spegne. Solo a questo punto si
può aprire la porta ruotando o tirando il pomolo.
NOTE
• In caso di introduzione di un codice errato la serratura emette un se-
gnale di errore, costituito dalla accensione del LED rosso e da un beep
della durata di un secondo.
• Al terzo codice errato consecutivo, la serratura si blocca per due minu-
ti lasciando il LED verde acceso.
CHIUSURA
• Accostare la porta e mandare in espansione i chiavistelli ruotando
il pomolo, ove non sso.
• Premere il tasto ON (si accende il LED verde).
• Premere il tasto , la serratura si chiude (5-6 sec.), l’elettronica si
disattiva e quindi si spegne il LED verde.
NOTE
• Se la chiusura è impedita da qualche vincolo esterno alla serratura, il
chiavistello torna indietro in posizione di apertura. L’elettronica rima-
ne accesa (LED verde) in attesa di un altro comando di chiusura
(tasto ) e si spegne soltanto dopo la chiusura. Questa fase è segna-
lata da una serie di quattro beep ogni 10 secondi e dal LED verde ac-
ceso.
• Se la carica della batteria scende sotto la “soglia di controllo”, la serra-
tura si blocca in posizione aperta e al comando di chiusura risponde
con un segnale di errore (LED rosso + beep), il LED verde si spegne ma
la chiusura non avviene. Inoltre se si preme un tasto diverso da vie-
ne segnalato nuovamente l’errore. PER POTER CHIUDERE LA SERRATU-
RA È NECESSARIO SOSTITUIRE LA BATTERIA.
CAMBIO DEL CODICE DI APERTURA
IMPORTANTE: il cambio del codice di apertura si eettua nella situa-
zione di porta aperta, chiavistelli in espansione (fuori).
Il cambio codice non è consentito se la batteria è scarica.
Eseguire le seguenti operazioni:
1. Premere il tasto ON, si accende il LED verde. Premere il tasto .
2. Premere il tasto ON, si accende il LED verde.
3. Impostare il codice di apertura esistente.
4. Premere il tasto e quindi il tasto .
5. Se il codice è corretto vengono emessi tre beep e si entra nella fase
di programmazione del codice di apertura.
6. Impostare il nuovo codice di apertura desiderato (da 6 a 16 cifre/
lettere) e premere il tasto .
Due beep confermano che l’impostazione è corretta.
Impostare lo stesso codice un’altra volta e premere il tasto .
Se le operazioni sono corrette, tre beep avvisano che il nuovo codi-
ce è stato memorizzato e il LED verde si spegne, diversamente viene
emesso un segnale di errore (LED rosso + beep) e rimane impostato
il vecchio codice. L’elettronica rimane accesa, si rimane nella fase di
programmazione del codice di apertura, ed è possibile ripetere le
operazioni dei punti 5-6.
ALIMENTAZIONE DI EMERGENZA
In caso di batteria deteriorata, di contatti ossidati o di inutilizzo pro-
lungato (anni) è possibile aprire la serratura alimentandola dall’ester-
no. È suciente accostare una batteria (9v alcalina tipo rettangolare)
alle piazzole di emergenza sulla tastiera, procedere all’apertura e so-
stituire la batteria interna.
N.B. IMPORTANTE: non staccare la batteria no ad apertura av-
venuta (attendere quindi i quattro beep di ‘ok aperto’).
NOTE
• Se durante l’apertura si stacca la batteria dalle piazzole, la serratura si
ferma prima di completare la corsa, (non emette i 4 beep di ok aperto);
in questo caso riaccostare la batteria alle piazzole e rieseguire la pro-
cedura di apertura. La serratura completerà regolarmente la sua cor-
sa ed emetterà i 4 beep di ‘ok aperto’, oppure, completerà la sua corsa
ma automaticamente si chiuderà, a questo punto si deve rieseguire
l’apertura d’emergenza dall’inizio, attenti a non staccare la batteria
dalle piazzole prima dei 4 beep di ‘ok aperto’.
CASI PARTICOLARI
La serratura non si apre! Casi possibili:
Caso (1) Dopo l’impostazione del codice d’apertura vengono emes-
si i tre beep che signicano ‘ok codice’ ma non i 4 beep di ‘ok aperto’
• In questo caso ripetere la procedura di apertura.
Caso (2) La serratura emette i 4 beep che signicano ‘ok aperto’ ma
non si apre completamente, e se si premono altri tasti viene emesso
un segnale di errore
• In questo caso occorre premere , generalmente la serratura si ri-
chiude e si può rieseguire la procedura di apertura. Può accadere
però che premendo il tasto , la serratura si richiuda e subito torni
indietro (si riapre), in questo caso vengono emessi i quattro beep
di ‘ok aperto’ e l’elettronica rimane accesa in attesa di un comando
di chiusura .
La serratura non si chiude! Casi possibili:
Caso (1) Premendo il tasto la serratura rimane aperta, emette
quattro beep e l’elettronica resta accesa
• Premere alcune volte il comando di chiusura .
Caso (2) Premendo il tasto si ha la segnalazione di errore
• In tal caso impostare il codice di apertura e premere il tasto . La
serratura può chiudersi subito oppure rimanere ancora aperta. In
quest’ultimo caso premere ; la serratura si dovrebbe chiudere, se
invece rimane ancora aperta e emette 4 beep, si può provare la
chiusura premendo .
SERRATURA ELETTRONICA BMZ66-CM
Conforme alla direttiva compatibilità elettromagnetica n. 89/336 CEE e successive modiche
LED DI SEGNALAZIONE
PIAZZOLE PER
L’ALIMENTAZIONE DI EMERGENZA
TASTO DI ACCENSIONE
Viale Europa, 37 - 25036 Palazzolo sull’Oglio (BS) - ITALY
' +39 030 7406011 - 7 +39 030 7401649
bordogna@bordognagroup.com
www.bordognagroup.com
85.012.120
REV. 03 DEL 02/15
KEEP THESE INSTRUCTIONS TOGETHER WITH THE GUARANTEE CONSERVER LES PRESENTES INSTRUCTIONS AVEC LA GARANTIE
MOTORISED ELECTRONIC LOCK MT 03TR-C1
Pursuant to the EEC 89/336 Standard of Electromagnetic Compatibility
and successive modications
GENERAL FEATURES
• Powered by a rectangular 9v alkaline battery. (Not supplied)
• The battery must be placed in the black box positioned inside the door, after having
connected the battery, wait 10 seconds (both the rst time and whenever the battery
is changed).
• Unique variable code from 6 to 16 numbers/letters.
• Alphanumeric keyboard with membrane, 12+1 keys with LED signal lights and bump
contacts for emergency power.
• Steel box with internal electronic card.
• Acoustic and visual signalling of discharged battery.
• Signalling of errors and block on attempts to open with the wrong code.
• Automatic shutdown to save on consumption.
• Duration of battery with “standard” use 1 year (about 1000 cycles of opening/closing).
• Temperature of use from 0° to 70°.
• Protection from electrostatic discharges.
INSTRUCTIONS FOR USE
• THE CODE SET IN THE FACTORY IS 204060.
• Bear in mind that there are 10 seconds available between pressing one key and the
next.
• If the battery is discharged when the lock is switched on, it will emit the “battery dischar-
ged” signal, which consists of a 4 second beep and the simultaneous switching on of the
red LED. Even if after this signal one can open the safe about 10 times, ideally one should
change the battery.
OPENING
• Press the key ON (the green LED comes on).
• Enter the code and press the key , if the code is correct the lock emits three beeps
(code OK) and begins to open (time required about 5-6 seconds), once it is opened you
will hear 4 beeps (opened OK) and the green LED goes o. Only at this point can the
door be opened by turning or pulling the knob.
NOTE
• If the wrong code is entered the lock emits an error signal, which consists of the switching on
of the red LED and a one-second beep.
When the wrong code is inserted for the third consecutive time, the lock blocks for two mi-
nutes leaving the green LED on.
CLOSING
• Close the door and, where they are not xed, expand the bolts by turning the knob.
• Press the ON key (the green light comes on).
• Press the key, the lock closes (5-6 seconds), the electronics are deactivated and there-
fore the green light goes o.
NOTE
• If closure is impeded by some external restraint, the bolt returns to the opening position. The
electronics remain on (green LED) waiting for another command to close ( key) and will
go o only after it has been closed. This phase is signalled by a series of 4 beeps every 10
seconds with the green LED on.
• If the charging of the battery goes below the “control level”, the lock blocks in the open po-
sition and the close command responds with an error signal (red LED + beep), the green
LED goes o but it does not close. Furthermore if any key other than is pressed the error is
signalled once again.
IN ORDER TO CLOSE THE LOCK IT IS NECESSARY TO CHANGE THE BATTERY.
TO CHANGE THE OPENING CODE
IMPORTANT: to change the opening code the door must be open, the bolts expanded
(out), and the lock closed. It is not possible to change the code if the battery is at.
First the existing code must be entered, and then the new code set two times. More
exactly:
1. Press the ON key, the green LED comes on.
2. Set the existing opening code.
3. Press the key and then the key.
If the code is correct three beeps are sounded and the programming phase of the
opening code begins.
4. Set the new opening code required (from 6 to 16 gures/letters) and press the key.
Two beeps will conrm that it has been set correctly.
5. Set the same code another time and press the key.
If the operations are correct, three beeps inform you that the new code has been memori-
sed and the green LED goes o, otherwise an error signal is emitted (red LED + beep) and
the old code remains. The electronics remain on, it remains in the programming phase of
the opening code, and it is possible to repeat the operations of steps 4 and 5.
EMERGENCY POWER
If the battery has deteriorated, the contacts oxidised or if there has been a prolonged pe-
riod without use (years) it is possible to open the lock by powering it from the outside.
Place a battery (rectangular 9V alkaline type) near the bump contacts on the keyboard,
open it and substitute the battery inside.
N.B. IMPORTANT: do not detach the battery until the lock has fully opened (therefore
wait for the four beeps signalling “opened OK”).
NOTE
• If during the emergency opening contact is interrupted, that is if the battery is detached from
the bump contacts, the lock stops before it has completed opening, (it does not emit the 4
beeps of opened OK); in this case put the battery near the bump contacts again and repeat
the opening procedure. The lock will complete its opening as normal and will sound the 4
beeps of “opened OK”, or, it will complete its run but will close automatically, at this point you
must repeat the emergency opening from the beginning, taking care not to detach the
battery from the bump contacts before the 4 beeps of “opened OK” have sounded.
PARTICULAR CASES
The lock does not open!
Possibilities:
Case (1) After setting the opening code three beeps are emitted which mean “code OK” but
not the 4 beeps that mean “opened OK”.
• In this case repeat the opening procedure.
Case (2) The lock emits 4 beeps which mean “opened OK” but fails to open completely, and
if other keys are pressed an error signal is sounded.
• In this case you must press , generally the lock re-closes and you can repeat the ope-
ning procedure. However it may occur that on pressing , the lock closes again and re-
turns immediately (re-opens), in this case the four beeps of “opened OK” are emitted and
the electronics remain on awaiting a command of closure .
The lock will not close!
Possibilities:
Case (1) When you press the lock remains open, emits four beeps and the electronics
remain on
• Press the closure control several times.
Case (2) Pressing the key you hear the error signal.
• In this case set the opening code and press the key. The lock may close immediately
or still remain open. In the latter case press ; the lock should close, if however it still
remains open and emits 4 beeps, you can try to close it by pressing .
SERRURE ELECTRONIQUE MOTORISEE MT 03TR-C1
Conforme aux Directives de la CEE n. 89/336 “Compatibilité Électroma-
gnétique” et successives modications
CARACTERISTIQUES GENERALES
• Alimentation par batterie alcaline 9 v rectangulaire. (Non fournie).
• La batterie doit être installée dans la boîte noire située dans la contre-porte.Après avoir
rellé la batterie, attendre dix secondes (lorsque l’on introduit la batterie pour la première
fois et à chaque changement).
• Code unique et variable de 6 à 16 chires et lettres.
• Clavier alphanumérique à membrane, 12 + 1 touches avec DEL (diode électrolumine-
scente) d’indication et les prises pour l’alimentation d’urgence.
• Boîtier en acier avec carte électronique interne.
• Indication sonore et visuelle du déchargement de la batterie.
• Indication des erreurs et blocage des tentatives d’ouverture avec code erroné.
• Auto-extinction pour limiter la consommation.
• Durée de la batterie avec utilisation “standard”: 1 an (environ 1000 cycles d’ouverture et
de fermeture).
• Température d’utilisation de 0° à 70° C.
• Protection contre les décharges électrostatiques.
MODE D’EMPLOI
• LE CODE PROGRAMME EN USINE EST 204060.
• Garder présent à l’esprit que l’on dispose d’un intervalle de 10 secondes entre le moment
où l’on appuie sur une touche et la touche suivante.
• Si la batterie est déchargée, la serrure émet le signal “batterie déchargée” lors de l’allu-
mage. Ce signal est constitué par 4 bip d’une seconde et de l’allumage simultané de la
DEL rouge. Bien que l’on puisse encore eectuer une dizaine d’ouvertures après l’émis-
sion de ce signal, il est recommandé de remplacer la batterie.
OUVERTURE
• appuyer sur la touche ON (la DEL verte s’allume).
• Taper le code et appuyer sur la touche . Si le code est correct, la serrure émet trois
bips (code ok) et déclenche l’ouverture (temps nécessaire 5 à 6 secondes). A l’ouverture,
la serrure émet quatre bips (ouverture ok) et la DEL verte s’éteint. Ce n’est qu’à ce mo-
ment-là que l’on peut ouvrir la porte en tournant ou en tirant sur la poignée.
NOTE
• En cas d’introduction d’un code erroné, la serrure émet un signal d’erreur, constitué de l’allu-
mage de la DEL rouge et d’un bip d’une durée d’une seconde.
Au troisième essai erroné consécutif, la serrure se bloque pendant deux minutes et la DEL
verte reste allumée.
FERMETURE
• Fermer la porte et mettre les verrous en expansion en tournant la poignée, si elle n’est
pas xe.
• Appuyer sur la touche ON (la DEL verte s’allume).
• Appuyer sur la touche , la serrure se ferme (5 à 6 secondes), l’électronique se désactive
et la DEL verte s’éteint.
NOTE
• Si un obstacle extérieur à la serrure empêche la fermeture, le verrou revient en position d’ou-
verture. L’électronique reste allumée (DEL verte) en attente d’un autre ordre de fermeture
(touche ) et s’éteint seulement après la fermeture. Cette phase est signalée par une série de
quatre bips toutes les 10 secondes et par la DEL verte allumée.
• Si la charge de la batterie descend en-deça du “seuil de contrôle”, la serrure se bloque en position
ouverte et un signal d’erreur (DEL rouge + bip) répond à l’ordre de fermeture ; la DEL verte s’éteint
mais la fermeture ne se produit pas. En outre, si l’on appuie sur une autre touche que , l’erreur est
de nouveau signalée. POUR POUVOIR FERMER LA SERRURE, IL FAUT CHANGER LA BATTERIE.
CHANGEMENT DU CODE D’OUVERTURE
IMPORTANT: le changement du code d’ouverture doit se faire avec la porte ouverte, les
verrous en expansion (dehors) et la serrure fermée. Il est impossible de modier le
code si la batterie est déchargée.
Taper en premier lieu le code actuel puis saisir deux fois le nouveau code. Plus précisément:
1. Appuyer sur la touche ON, la DEL verte s’allume.
2. Taper le code d’ouverture actuel.
3. Appuyer sur la touche puis sur la touche . Si le code est correct, la serrure émet trois
bips et l’on entre en phase de programmation du code d’ouverture.
4. Saisir le nouveau code d’ouverture désiré (de 6 à 16 chires et lettres) puis appuyer sur
la touche . Deux bips conrment que la saisie a été eectuée correctement.
5. Taper de nouveau le même code et appuyer sur la touche .
Si les opérations ont été eectuées correctement, trois bips conrment la mémorisation du
nouveau code et la DEL verte s’éteint. Dans le cas contraire, un signal d’erreur est émis (DEL
rouge + bip) et l’ancien code reste mémorisé. L’électronique reste allumée, on reste en pha-
se de programmation du code d’ouverture et il est possible de recommencer les opérations
décrites aux points 4 et 5.
ALIMENTATION D’URGENCE
Si la batterie est détériorée, les contacts oxydés ou en cas d’inutilisation prolongée (plu-
sieurs années), il est possible d’ouvrir la serrure en l’alimentant depuis l’extérieur.
Il sut de relier une batterie (9v alcaline rectangulaire) aux prises d’urgence sur le clavier,
d’ouvrir et de remplacer la batterie interne.
IMPORTANT: ne pas débrancher la batterie avant l’ouverture complète (attendre les
quatre bips indiquant “ouverture ok”).
NOTE
• Si pendant l’ouverture d’urgence, le contact est interrompu, c’est-à-dire si l’on débranche la
batterie des prises, la serrure s’arrète avant d’achever sa course (elle n’émet pas les 4 bips d’ou-
verture ok). Dans ce cas, relier la batterie aux prises et recommencer la procédure d’ouverture.
La serrure achèvera normalement sa course et émettra les 4 bips indiquant “ouverture ok” ou
elle achèvera sa course mais se fermera automatiquement. Dès lors, recommencer l’ouvertu-
re d’urgence depuis le début en veillant à ne pas débrancher la batterie des prises avant
l’émission des 4 bips indiquant “ouverture ok”.
CAS PARTICULIERS
La serrure ne s’ouvre pas. Cas possibles:
Cas (1) Les 3 bips indiquant “code ok” sont émis après la saisie du code d’ouverture mais pas
les 4 bips signiant “ouverture ok”.
• Dans ce cas, recommencer la procédure d’ouverture.
Cas (2) La serrure émet les 4 bips signiant “ouverture ok” mais ne s’ouvre pas complète-
ment et émet un signal d’erreur si l’on appuie sur les autres touches.
• Dans ce cas, appuyer sur la touche ; en règle générale, la serrure se referme et l’on
peut recommencer la procédure d’ouverture. Il se peut cependant qu’en appuyant sur
la touche , la serrure se referme et revienne tout de suite en arrière (se rouvre). Dans
ce cas, les 4 bips indiquant “ouverture ok” sont émis et l’électronique reste allumée dans
l’attente d’un ordre de fermeture .
La serrure ne se ferme pas. Cas possibles :
Cas (1) Si l’on appuie sur la touche , la serrure reste ouverte, émet 4 bips et l’électronique
reste allumée.
• Donner plusieurs fois l’ordre de fermeture en appuyant sur .
Cas (2) Le signal d’erreur se déclenche lorsque l’on appuie sur la touche .
• Dans ce cas, taper le code d’ouverture et appuyer sur la touche . La serrure peut soit se
fermer tout de suite soit rester ouverte. Dans ce dernier cas, appuyer sur la touche ; la
serrure devrait se fermer. Si elle reste toujours ouverte et émet 4 bips, essayer de la
fermer
en appuyant sur .
Other Bordogna Lock manuals


