manuals.online logo
Brands
  1. Home
  2. •
  3. Brands
  4. •
  5. Safety 1st
  6. •
  7. Lock
  8. •
  9. Safety 1st HS247 User manual

Safety 1st HS247 User manual

BEFORE YOU BEGIN:
• Read all instructions before installing.
• Keep these instructions for future use.
• Remove all contents from packaging and discard box, and/or poly bags.
• Lay out and identify all parts.
• Do not return this product to the place of purchase. If any parts are
missing, e-mail consumer@djgusa.com, call Consumer Relations at
(800) 544-1108, or fax at (800) 207-8182. You can also visit our web
site at www.safety1st.com. Have the model number ready (HS247) and
date code (manufacture date) located on product.
• Tools needed: tape (for template)
Important Safety Information
Adult Installation Required.
Check for security after installation.
Your child will eventually be able to defeat this product. To keep this
product effective for as long as possible, avoid letting children see how
you operate child safety devices. Watching you disengage a lock, latch
or cover could enable them to learn sooner how to defeat it.
ANTES DE COMENZAR:
• Lea todas las instrucciones antes de instalar.
• Guarde estas instrucciones para su uso futuro.
• Retire todo el contenido del embalaje y deseche la caja y/o las bolsas de polietileno.
• Despliegue e identifique todas las piezas.
• No devuelva este producto al lugar donde lo compró. Si falta alguna pieza, envíe un
correo electrónico a consumer@djgusa.com, llame al Departamento de Relaciones
con el Consumidor al (800) 544-1108, o envíe un fax al (800) 207-8182. También
puede visitar nuestro sitio web en www.safety1st.com. Tenga a mano el número de
modelo (HS247) y el código de fecha (fecha de fabricación), indicados en el producto.
• Herramientas necesarias: cinta adhesiva (para la plantilla)
Información de seguridad importante
Verifique por seguridad después de la instalación.
Requiere ensamblado por parte de un adulto.
Un niño sin supervisión puede ser capaz de inutilizar la protección que ofrece
este producto. Para que este producto funcione efectivamente durante más
tiempo, evite que los niños vean como se opera. Si los niños ven cómo usted
libera una traba, un pestillo o una cubierta, podrían aprender más rápido la
manera de inutilizar cualquier tipo de dispositivo de seguridad.
1
A
B
C
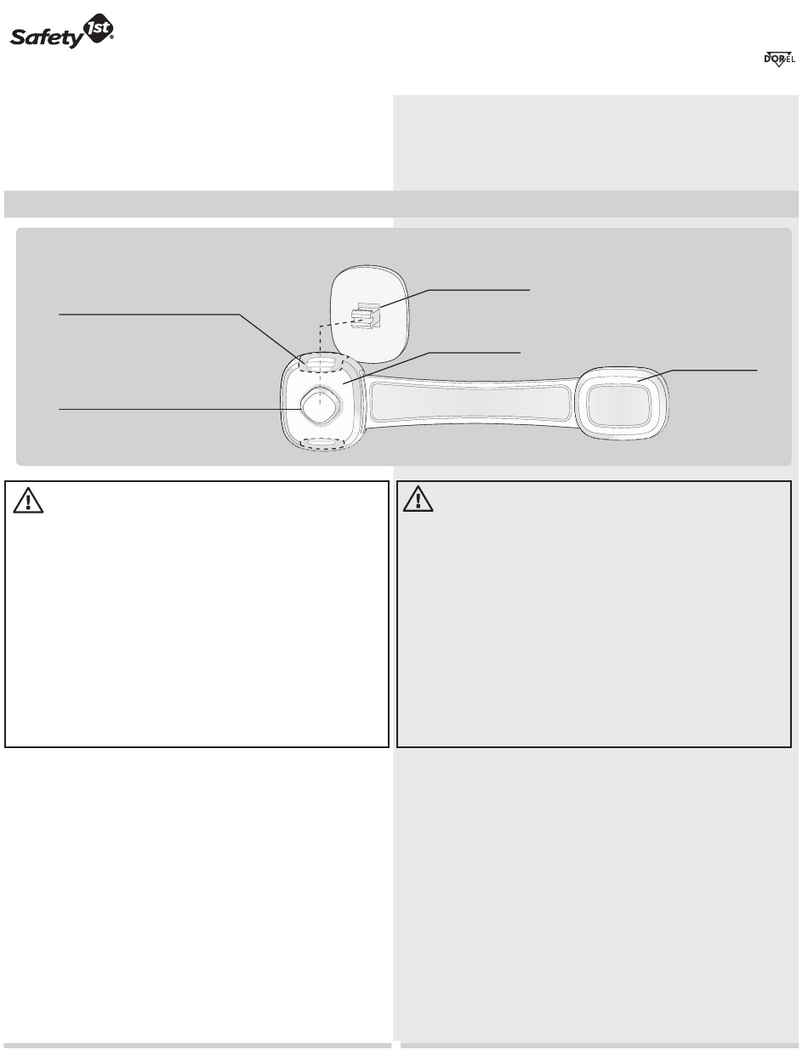
Lock tab
Release buttons
Lid catch
Bowl catch
Strap
Adhesive pads
Arrows
Template (not shown)
D
CAUTION:
• This product is not a toy. Do not allow children to play with it.
When not in use, keep out of reach of children.
• This product is only a deterrent. It is not a substitute for proper
adult supervision. Discontinue use when child becomes old
enough to defeat it.
• DO NOT use this product if damaged or broken.
©2014 Dorel Juvenile.
www.djgusa.com (800) 544-1108 www.safety1st.com Made in CHINA. Hecho en CHINA.
Styles and colors may vary. Los estilos y los colores pueden variar.
Distributed by (distribuido por) Dorel Juvenile Group, Inc., 2525 State St., Columbus, IN 47201-7494
Dorel Juvenile Canada, 873 Hodge, St. Laurent, QC H4N 2B1
10/15/14 4358-6601C
PRECAUCIÓN:
• Este producto no es un juguete. No permita que los niños jueguen con
él. Cuando no lo utilice, manténgalo fuera del alcance de los niños.
• Este producto es sólo un elemento disuasivo. El mismo no reemplaza
la supervisión adecuada por parte de un adulto. Deje de usar la traba
cuando el niño sea suficientemente grande como para destrabarla.
• NO lo utilice si se encuentra roto o dañado.
Easy Grip Toilet Lock
HS247
User Guide
Traba “Easy Grip” para inodoro
HS247
Guía del Usuario
Parts & Features Lista de piezas y características
WARNING:
• NEVER LEAVE CHILD UNATTENDED IN BATHROOM.
• This product is for use on “hard” toilet lid and seat
assemblies only. It is not intended for use on soft or
padded lids or seats.
• When properly installed, the toilet lid should lift no
more than 1.5” (3.8 cm).
• FOR INDOOR HOME USE ONLY.
AVISO:
• NUNCA DEJE AL NIÑO SIN ATENCIÓN EN EL BAÑO.
• Este producto es para utilizar únicamente con conjuntos
de asiento y tapa “duros”. No debe usarse con tapas y
asientos blandos o acolchados.
• Una vez instalada correctamente, la tapa del asiento no
debe levantarse más de 1.5 pulg. (3.8 cm).
• PARA USO DOMÉSTICO ÚNICAMENTE EN INTERIORES.
E
F
G
H
A
B
C
Pestaña de traba
Botones pulsadores
Pasador de la tapa
Pasador del inodoro
Correa
Almohadillas adhesivas
Flechas
Plantilla (no se muestra)
D
E
F
G
H
To Install Para instalar
NOTE: Clean toilet lid and
bowl with alcohol and ensure
surface is dry where lock will
be adhered.
1
Follow instructions on
template for placement
on toilet.
NOTA: Limpie la tapa y el inodoro
con alcohol y asegúrese de que
la superficie donde se adherirá la
traba está seca.
1
Siga las instrucciones en la
plantilla para colocarla sobre
el inodoro.
1 1a
B
A
C
E G
FF
D
2
5
6
1
Dual action unlocking:
Depress both release buttons, while
pulling up on lock tab to disengage
the latch (Figure 5).
Pivot lock out of the way.
Wipe clean with bleach or bathroom sanitizer. Limpie con blanqueador o limpiador de baños.
To Remove for Cleaning/Periods of Non-Use
Disengage latch. Rotate strap downward
toward floor until you feel it click. Holding the
base of the strap, slide it to the right to free
strap from left-hand locking slot
(Figure 6).
Pull down to remove strap entirely.
To Remove Permanently
Follow instructions to remove for cleaning.
Wrap a flat head screwdriver with a soft cloth
and wedge under catch to release adhesive
from toilet.
Para quitar y limpiar o durante períodos en los
que no se usa
Pestillo para destrabar. Gire la correa hacia
abajo en dirección al piso hasta sentir un clic.
Sostenga la base de la correa y deslícela hacia
la derecha para liberarla de la ranura de traba
derecha (Figura 6). Tire hacia abajo para quitar
la correa completamente.
Para quitar de manera permanente
Siga las instrucciones para quitar y limpiar.
Envuelva un destornillador plano con un paño
suave y cuña bajo el adhesivo se suelte del
inodoro.
To Install (continued) Para instalar (continuación)
2 2
1 1
4
1
Doble acción para destrabar:
Suelte ambos botones pulsadores
a medida que jala la pestaña de traba
para destrabar el pestillo (Figura 5).
Destrabe.
3
Holding the bowl catch in
position, test to ensure the toilet
lid can not open more than 1.5”
(Figure 3).
3
Sostenga el pestillo del inodoro
en su lugar y verifique que la tapa
no puede abrirse más de 3,81 cm
(1,5”) (Figure 3).
4
Remove adhesive paper from
the bowl catch (Figure 4) and
install in the predetermined
position from step 3 (Figure
4a). Remove template from
toilet bowl.
NOTE: For best results,
disengage lock from lid catch
and pivot to downward position.
Product will be ready for use
after 1 hour. Adhesive will
achieve maximum bonding
strength 24 hours after
attachment.
4
Quite el papel adhesivo del pestillo
del inodoro (Figura 4a) e instale
en la posición predeterminada en
el paso 3 (Figure 4a). Remove
template from toilet bowl.
NOTA: Para lograr mejores
resultados, libere la traba del
pestillo de la tapa y gire a la
posición hacia abajo. El producto
estará listo para usarse después
de 1 hora. El adhesivo alcanzará el
punto máximo de unión 24 horas
después de colocarlo.
4a
2
Remove the adhesive paper
from the lid catch and adhere
to toilet lid (Figure 2). NOTE:
The arrows on the strap should
align with the top of the template.
2
Quite el papel adhesivo del pestillo
de la tapa y adhiéralo a la tapa
del inodoro (Figure 2). NOTA: Las
flechas de la correa deben estar
alinearse con el borde superior de
la plantilla.
2
To Remove Para quitar
To Clean Para limpiar
To Use Cómo utilizar
1.5”
3
11
2

Other Safety 1st Lock manuals

Safety 1st 48206 User manual

Safety 1st

Safety 1st 48206 User manual

Safety 1st HS294 User manual

Safety 1st

Safety 1st HS294 User manual

Safety 1st HS129 User manual

Safety 1st

Safety 1st HS129 User manual

Safety 1st 48448 User manual

Safety 1st

Safety 1st 48448 User manual

Safety 1st OutSmart HS270 User manual

Safety 1st

Safety 1st OutSmart HS270 User manual

Safety 1st OutSmart HS289 User manual

Safety 1st

Safety 1st OutSmart HS289 User manual

Safety 1st OutSmart SECRET BUTTON User manual

Safety 1st

Safety 1st OutSmart SECRET BUTTON User manual

Safety 1st OutSmart HS271 User manual

Safety 1st

Safety 1st OutSmart HS271 User manual

Safety 1st 33110038 User manual

Safety 1st

Safety 1st 33110038 User manual

Safety 1st 48517 User manual

Safety 1st

Safety 1st 48517 User manual

Safety 1st OUTSMART User manual

Safety 1st

Safety 1st OUTSMART User manual

Safety 1st HS130 User manual

Safety 1st

Safety 1st HS130 User manual

Safety 1st 3202001400 User manual

Safety 1st

Safety 1st 3202001400 User manual

Safety 1st OutSmart HS361 User manual

Safety 1st

Safety 1st OutSmart HS361 User manual

Safety 1st HS129 User manual

Safety 1st

Safety 1st HS129 User manual

Safety 1st HS162 User manual

Safety 1st

Safety 1st HS162 User manual

Safety 1st HS291 User manual

Safety 1st

Safety 1st HS291 User manual

Safety 1st OUTSMART 3202007000 User manual

Safety 1st

Safety 1st OUTSMART 3202007000 User manual

Safety 1st HS247 User manual

Safety 1st

Safety 1st HS247 User manual

Safety 1st OutSmart HS288 User manual

Safety 1st

Safety 1st OutSmart HS288 User manual

Safety 1st 33110039 User manual

Safety 1st

Safety 1st 33110039 User manual

Popular Lock manuals by other brands

Nauta miniK10 user manual

Nauta

Nauta miniK10 user manual

iLoq S50 user guide

iLoq

iLoq S50 user guide

Kryptonite Keeper 585 Combo user manual

Kryptonite

Kryptonite Keeper 585 Combo user manual

INOX ED93F-CVRW Series Instructions for installing

INOX

INOX ED93F-CVRW Series Instructions for installing

amig Remock Lockey user guide

amig

amig Remock Lockey user guide

Steren SEG-010 user manual

Steren

Steren SEG-010 user manual

Assa Abloy 8800 Series installation instructions

Assa Abloy

Assa Abloy 8800 Series installation instructions

IKEA ROTHULT manual

IKEA

IKEA ROTHULT manual

Simons Voss Technologies SmartHandle 3062 Quick installation guide

Simons Voss Technologies

Simons Voss Technologies SmartHandle 3062 Quick installation guide

Assa Abloy G-S Assembly and installation instructions

Assa Abloy

Assa Abloy G-S Assembly and installation instructions

Amazon B07T8HQC33 manual

Amazon

Amazon B07T8HQC33 manual

CODELOCKS NANO90 Programming & operating instructions

CODELOCKS

CODELOCKS NANO90 Programming & operating instructions

EntraPass GL-1 Installation instructions and operating manual

EntraPass

EntraPass GL-1 Installation instructions and operating manual

GTO RB909 installation manual

GTO

GTO RB909 installation manual

Ojmar OTS ADVANCE quick guide

Ojmar

Ojmar OTS ADVANCE quick guide

sellmore SOLO instructions

sellmore

sellmore SOLO instructions

Gianni GK460 Series installation instructions

Gianni

Gianni GK460 Series installation instructions

whatlock Magnetic Security Lock Fitting instructions

whatlock

whatlock Magnetic Security Lock Fitting instructions

manuals.online logo
manuals.online logoBrands
  • About & Mission
  • Contact us
  • Privacy Policy
  • Terms and Conditions

Copyright 2025 Manuals.Online. All Rights Reserved.