Bosch BCH?7 User manual

Register your new Bosch now:
www.bosch-home.com/welcome
Moodpic 1
63,2 x 50,25mm
CMYK & GREY
Moodpic 2
98,6 x 46,7mm
CMYK & GREY
Register your new Bosch now:
www.bosch-home.com/welcome
Moodpic 1
63,2 x 50,25mm
CMYK & GREY
Moodpic 2
98,6 x 46,7mm
CMYK & GREY
Register your new Bosch now:
www.bosch-home.com/welcome
Register your n
www.bosch-hom
r new Bosch now:
home.com/welcome
tlethA
...H 6CB
isvnaskurBno
ivnasgurBda
askuirbeGnl
i pnoizurtsIit
mpe’dedoMfr
oitcurtsnIen
hcuarbeGde
obsajckurtsInpl
ıkmınalluKrt
ρχςίεγηδΟel
seõuçrtsInpt
onicucrtsInes
ejhotötyäKfi
isvnaskurBsv
nginis
gnnis
gnizjiwnaa
osu’r lei p
oilmp
lnuama
n
ngutienlas
ar
nuiţcurtsnIro
ацтауплскэ
ицкуртснИru
яіцкуртснІuk
я зиназакУbg
italánzasHhu
igułobs
uuzavlı
ςησήρ
oçivrsede
soudeseon
e
nginis
erailiztuedin
ииац
опяи
їіцатаулпсекз
абертопауяз
ástíastu
BCH7

2

3
Table of content
Intended use . . . . . . . . . . . . . . . . . . . . . . . . . . . . . . . . 5
Safety information. . . . . . . . . . . . . . . . . . . . . . . . . . . . 6
Properuse . . . . . . . . . . . . . . . . . . . . . . . . . . . . . . . . . . 7
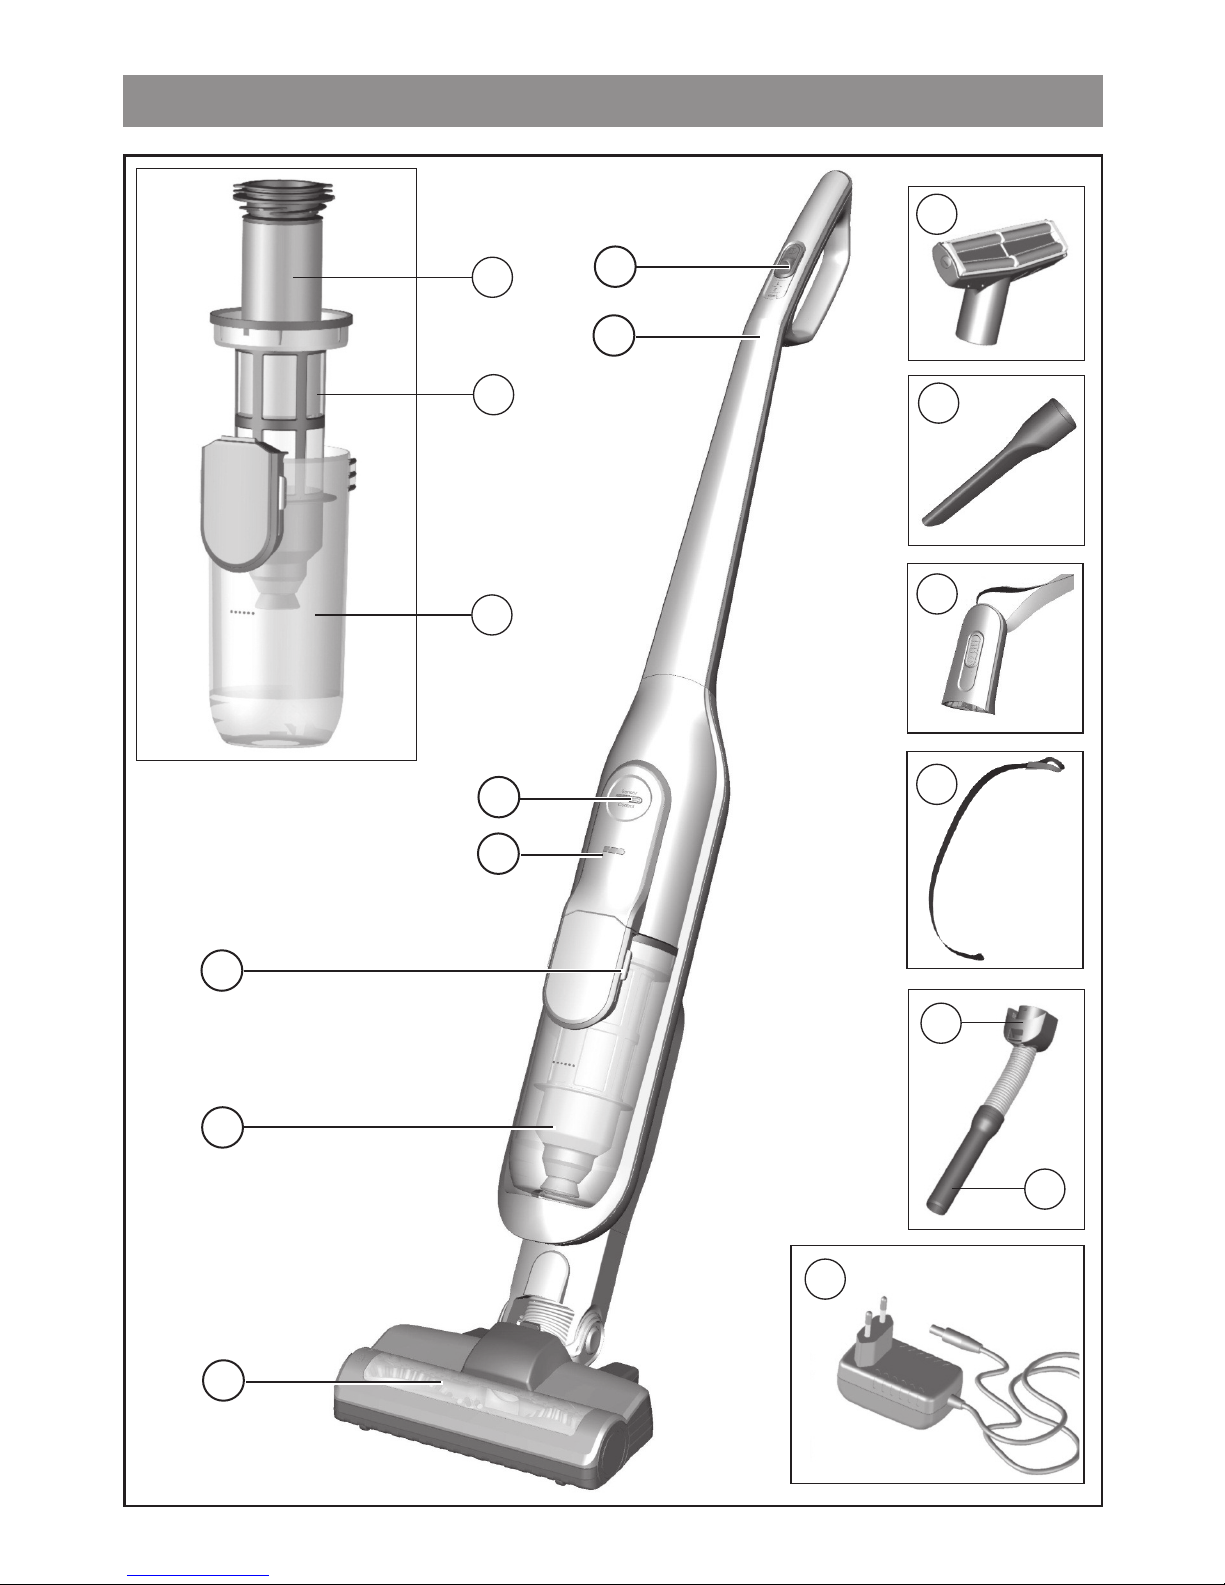
Yourvacuumcleaner. . . . . . . . . . . . . . . . . . . . . . . . . 10
Before using forthe first time. . . . . . . . . . . . . . . . . . 12
Plugging the handle onto the main housing . . . . . . . 12
Plugging the appliance into the floor tool . . . . . . . . 12
Charging . . . . . . . . . . . . . . . . . . . . . . . . . . . . . . . . . . . 13
Charging the battery. . . . . . . . . . . . . . . . . . . . . . . . . 13
Battery charging status indicator . . . . . . . . . . . . . . . 14
Vacuuming . . . . . . . . . . . . . . . . . . . . . . . . . . . . . . . . . 14
Switch On/Off. . . . . . . . . . . . . . . . . . . . . . . . . . . . . . 14
Controlling the suction level. . . . . . . . . . . . . . . . . . . 15
Transport . . . . . . . . . . . . . . . . . . . . . . . . . . . . . . . . . 16
Vacuuming with accessories. . . . . . . . . . . . . . . . . . . 16
Switching off the appliance . . . . . . . . . . . . . . . . . . . 18
Whenthe work isdone . . . . . . . . . . . . . . . . . . . . . . . 19
Parking . . . . . . . . . . . . . . . . . . . . . . . . . . . . . . . . . . . 19
Switching off the appliance . . . . . . . . . . . . . . . . . . . 19
Emptying the dust container . . . . . . . . . . . . . . . . . . 20
Removing the dust container . . . . . . . . . . . . . . . . . . 21
Taking out the filter unit . . . . . . . . . . . . . . . . . . . . . . 22
Inserting the dust container . . . . . . . . . . . . . . . . . . . 23
Disassembly . . . . . . . . . . . . . . . . . . . . . . . . . . . . . . . . 24
Releasing the handle . . . . . . . . . . . . . . . . . . . . . . . . 24
Releasing the floor tool. . . . . . . . . . . . . . . . . . . . . . . 24

4
Filtercare. . . . . . . . . . . . . . . . . . . . . . . . . . . . . . . . . . 25
Sensor Control . . . . . . . . . . . . . . . . . . . . . . . . . . . . . 25
Cleaning the outer filter unit . . . . . . . . . . . . . . . . . . 26
Cleaning the filter cartridge or changing the filter . . . 28
Cleaning the floortool. . . . . . . . . . . . . . . . . . . . . . . . 29
Cleaning the floor tool . . . . . . . . . . . . . . . . . . . . . . . 29
Care . . . . . . . . . . . . . . . . . . . . . . . . . . . . . . . . . . . . . . 30
Malfunctions and CostumerService . . . . . . . . . . . . . 31
Disposal . . . . . . . . . . . . . . . . . . . . . . . . . . . . . . . . . . . 33
Conditions of guarantee . . . . . . . . . . . . . . . . . . . . . . 34
Table of content

5
Safety information
Please keep this instruction manual for future reference.
When passing the vacuum cleaner on to a third party,
please also pass on this instruction manual.
Intended use
This appliance is intended for domestic use only, not
for commercial use. Only use this vacuum cleaner in
accordance with the information provided in this
instruction manual.
Inorderto prevent injuriesand damage, the vacuum
cleanermust not be used for:
Vacuuming persons or animals
Vacuuming up:
- hazardous, sharp-edged, hot or glowing substances.
- damp or liquid substances.
- highly flammable or explosive substances and gases.
- ash, soot from tiled stoves and central heating
systems.
- toner dust from printers and copiers.

6
Safety information
Safety information
This vacuum cleaner complies with the recognised rules
of technology and the relevant safety regulations.
The appliance may be used by children over the age
of 8 years and by persons with reduced physical, sen-
sory or mental capacity or by persons with a lack of
experience or knowledge if they are supervised or
have been instructed on the safe use of the appliance
and the have understood the potential dangers of
using the appliance.
Children must never play with the appliance.
Cleaning and user maintenance must never be carried
out by children without supervision.
Plastic bags and films must be kept out of the reach of
children and disposed of.
=>There is a risk of suffocation.

7
Safety information
Properuse
The charging cable must only be connected and opera-
ted as specified on the rating plate.
The appliance must only be stored and charged indo-
ors.
Do not expose the appliance to temperatures below
0 °C or above 40 °C.
Never vacuum without the dust bag or dust container,
motor protection or exhaust filter.
This may damage the vacuum cleaner.
Keep the vacuum cleaner away from your head when
using nozzles and tubes.
=> This could cause injury.
Do not use a damaged charging cable. Replace it with
an original charging cable.
When disconnecting the charging cable from the
mains, pull the plug itself to remove it; do not pull on
the power cord.
Do not pull the charging cable over sharp edges or
allow it to become trapped.
Before carrying out any work on the vacuum cleaner,
switch off the appliance and disconnect it from the
charging cable and the mains.
Do not operate the vacuum cleaner if it is damaged.
If a fault is detected, switch off the appliance and dis-
connect it from the charging cable and the mains.
For safety reasons, only authorised after-sales service
personnel are permitted to carry out repairs and fit
replacement parts to the vacuum cleaner.

8
In the following cases, you must stop the appliance
immediately and contact the after-sales service:
If you have accidentally vacuumed up some liquid or
liquid has entered the inside of the appliance;
If the appliance has been dropped and damaged.
Protect the vacuum cleaner from outside weather con-
ditions, moisture and sources of heat.
Do not pour flammable substances or substances
containing alcohol onto the filters (dust bag, motor
protection filter, exhaust filter, etc.).
The vacuum cleaner is not suitable for use on con-
struction sites.
=> Vacuuming up building rubble may damage the
appliance.
Switch off the appliance when it is not in use.
Safety information

9
Safety information
!Batteries
Your appliance is fitted with lithium-ion batteries which,
for safety reasons, are only accessible to professional
repair specialists.
For battery replacement, please contact your nearest
after-sales centre or an authorised specialist dealer.
Notesontransport
The lithium-ion batteries in the appliance are subject to
the requirements of dangerous goods legislation. The
batteries can be transported by the user by road with-
out any further requirements. In the event that they are
dispatched by a third party (e.g. transported by air or
freight carrier), special requirements regarding packa-
ging and identification must be met. In this case, a dan-
gerous goods expert must be consulted when preparing
the goods for dispatch.

10
Yourvacuumcleaner
11
12
14
15
16
13
17
6
7
8
1
2
3
4
5
9
10

11
Floor tool with electric
brush
Dust container
Dirt container release
button
Battery charging status
indicator
Sensor Control indicator
Dust container
Outer filter unit
Filter cartridge with motor
protection filter and foam
filter
Handle
1
2
5
6
4
3
7
8
9
Yourvacuumcleaner
On/off switch
Professional upholstery
nozzle
Professional crevice
nozzle
Short handle
Carrying strap
Accessory adapter
Flexible hose with handle
Charging cable
17
10
11
12
14
15
16
13

12
Before using forthe first time
1Plugging the handle onto the
mainhousing
Figure
●Carefully plug the handle onto
the main housing and lock into
place.
1
2Plugging the appliance into the
floortool
Figure
●Plug the hand vacuum cleaner
into the floor tool and lock into
place.
2
Click!
Click!

13
Charging
Caution!
Before using the vacuum clea-
ner for the first time, the batte-
ries must be charged for at least
6 hours.
Charging the battery
Figure
●To charge the vacuum cleaner,
place it near to a socket. The
appliance can be left standing
anywhere in the room. Figure
●Plug the charging cable into
the connection at the rear of the
appliance.
●Plug the charging cable plug into
the socket.
●The charging indicator flashes
during the charging process.
●Once the battery is fully
charged, the charging indicator
lights up in blue and no longer
flashes.
●It is normal for the charging
cable and hand vacuum cleaner
to become hot and not a cause
for concern.
3
10
3
1
2

14
Charging
Battery charging statusindicator
Figure
The indicator shows the charging
status of the battery.
Battery fully charged
Battery semi-charged
Battery low
●When the indicator flashes, the
battery must be recharged.
4
4
Vacuuming
5Switch On/Off
Figure
●Move the on/off button in the
direction of the arrow.
5

15
Vacuuming
6Controlling the suctionlevel
Figure
●To change the suction power, slide
the on/off switch to the desired
position:
Power level 1 1
Vacuuming without the electric
brush switched on.
For simple cleaning tasks like cur-
tains and particularly low opera-
ting noise. Not suitable for car-
pets.
The appliance achieves the maxi-
mum run time at this level.
Power level 2 2
Vacuuming at normal power and
with the electric brush switched
on.
For normal cleaning tasks at an
average run time.
Power level 3 3
Vacuuming at full power and with
the electric brush switched on.
For particularly demanding clea-
ning tasks on all surfaces (car-
pets, in particular) and when
using an optional accessory. The
appliance achieves a shorter run
time at this level.
6
1
2
3

8
16
Vacuuming
Vacuuming with accessories
Figure
●Fasten the carrying strap to the
adapted short handle.
●Remove the long handle from the
main housing.
8
Transport
Figure
●To overcome obstacles, e.g.
steps, the appliance can also be
carried by the handle on the
appliance body.
7
7
Attention!
For vacuuming with accessories
slide the on/off switch to the
highest level (level3)
1
2

17
Vacuuming
8Figure
●Plug the short handle onto the
main housing and lock into place
●Press the release button and pull
down the floor tool.
●Plug the accessory adapter into
the hand vacuum cleaner and
lock into place.
8
Click!
1
2
Click!

18
Vacuuming
Figure
Fit nozzles as required to the flexible
hose with the accessory adapter
handle:
●Upholstery nozzle for vacuuming
upholstered furniture, curtains,
etc.
●Crevice nozzle for vacuuming
crevices and corners, etc.
●Handle of the flexible hose to suck
up bigger dirt particles or small
pieces, like cullets, paper clips, etc.
9
9

19
Whenthe work isdone
Switching off the appliance
Figure
●Switch off the appliance after
vacuuming.
11
11
Parking
Figure
During short pauses in vacuuming,
the appliance can be left standing
anywhere in the room. To do this,
tilt the vacuum cleaner forwards
slightly in the direction of the
nozzle.
10
Caution!
When the appliance is left stan-
ding, it must be switched off,
because if the brush is turning
while the appliance is standing
still, it could cause damage to
the floor covering.
10

20
Whenthe work isdone
Emptying the dust container
Figure
In order to achieve the best
possible vacuuming results, the
dust container should be emptied
after every use or, at the latest,
when dust at one point in the dust
container has reached the
marking.
We recommend that you not fill
the dust container beyond the
marking, as this leads to
considerable soiling of the filter.
When emptying the dust
container, always check how dirty
the outer filter unit is and, if
necessary, clean it as detailed in
the "Cleaning the outer filter unit"
instructions. Figure 19
12
12
Caution!
The filter can only be cleaned if
the appliance is switched off.
Never vacuum without the outer
filter unit and its fitted filter car-
tridge.
Table of contents
Other Bosch Vacuum Cleaner manuals

Bosch
Bosch BHN09070 MOVE User manual

Bosch
Bosch BHS4 Series User manual

Bosch
Bosch BSG6B110 User manual

Bosch
Bosch GL-50 User manual

Bosch
Bosch GL-50 User manual

Bosch
Bosch GAS 15 Professional User manual

Bosch
Bosch AQUATAK 10 User manual

Bosch
Bosch BSGL 32383 User manual

Bosch
Bosch Unlimited BCS1 Series User manual

Bosch
Bosch BGB38 User manual

Bosch
Bosch BKS4 series User manual

Bosch
Bosch BGC2U230 User manual

Bosch
Bosch BGL4SIL1 User manual

Bosch
Bosch Turbobrush User manual

Bosch
Bosch Relaxx'x BGS5SIL66C User manual

Bosch
Bosch BGS4.. Runn'n User manual

Bosch
Bosch GAS 35 L AFC Professional User manual

Bosch
Bosch BHN20L User manual

Bosch
Bosch BBS71 User manual

Bosch
Bosch BGBS4 Series User manual