manuals.online logo
Brands
  1. Home
  2. •
  3. Brands
  4. •
  5. BOWMAN
  6. •
  7. Industrial Equipment
  8. •
  9. BOWMAN MINI GAME TRAILER User manual

BOWMAN MINI GAME TRAILER User manual

01
MINI GAME TRAILER
INSTRUCTIONS
Check Contents
Having moved the protective card from around the clay pigeon trap checks its contents to ensure they are all
present. You should have included:
• 2 x Supermatch 1 traps 2 x standard clay hoppers and 2 x midi clay hoppers
• 2 x yellow safety rings Radio release - Mini Game trailer Flush System (if purchased)
• Quad Barrow 2 x small bag containing spare brush & spare twin spring rubbers
• DTL wobble base
Key Points:
• Check your contents
• Read thoroughly before
attempting to assemble or
operate.
• Do not attempt to fit the battery
until all three assembly tasks
have been completed!
Think! Safety First!
These machines can cause serious injury, read these
instructions prior to assembly and use.
If you are missing any contents, are unsure or concerned
about the use of your clay pigeon trap then please don’t
hesitate to call bowman’s directly on 01777 870243.
Tools Required: 2 x 17mm spanners & wire cutters /
scissors.
Positioning and fixing clay
pigeon trap
Attach the DTL base centrally onto the quad
barrow securing with 4 x 10mm bolts provided.
Attach the long bar which the traps will
eventually sit on, onto the DTL base with 4 x
10mm bolts, one of which is countersunk. You
may need to oscillate the base by connecting
it to a battery to fit the countersunk bolt.
Finally fit each trap in position at either end of
the bar by using 4 x 10mm bolts provided.
Your mini game trailer should look like the one
pictured when assembled.
02
1. First task: fit your safety rings
2. Second task: fit the main springs
For safety reasons your clay pigeon trap may be supplied with the main
spring detached. Remove the cable ties carefully to access the spring; place
the washer, hand nut and wing nut carefully to the side. To re-attach the
main spring, push the throwing under the main plate and round until it points
straight ahead. In this position there is no tension on the main spring,
allowing you to fit the M12 studding through the spring tension block at the
rear. Once through the block, add the washer, tighten the hand nut to the
desired spring tension and then finally secure with the 12mm wing nut.
3. Third task: fit the clay hoppers
Screw the 10mm studding of the
safety ring into the front of the
casting and lock off with the
10mm nut.
Remove the ‘R’ clips from the
sockets underneath the clay plate
at the rear of the trap and insert
the safety ring ends.
Align the holes and secure by
pushing the ‘R’ clips through the
socket and safety ring. Finally
lock the two 10mm nuts up to the
steel tube at the front of the
safety ring.
Remove all three 6mm wing
nuts.
Place the hopper with short
ends down onto the three studs
now protruding,
Secure with the wing nuts and
ensure these remain tight
through regular maintenance
checks.
03
Use of the clay pigeon traps
With all three tasks complete, the trap is now ready to connect to the battery. Do not add clays into the hoppers at
this point. When preparing to connect to the battery move to a safe position at the rear of the trap and make sure
that NO-ONE is in the DANGER ZONE in front of the trap or inside the area marked out by the safety ring.
Connect the radio receivers to the green sockets on the traps, check that the control box switches are in the off
position and then connect the crocodile clips to the battery. To arm the traps, turn the program switches to ’on run,
the traps will power up and the motor will rotate the throwing arms and stop in the firing position. Fire the trap by
pressing the wireless control (notice that the traps re-arm themselves ready to fire again). Now you must disarm the
traps in order to load clays and make elevation adjustments.
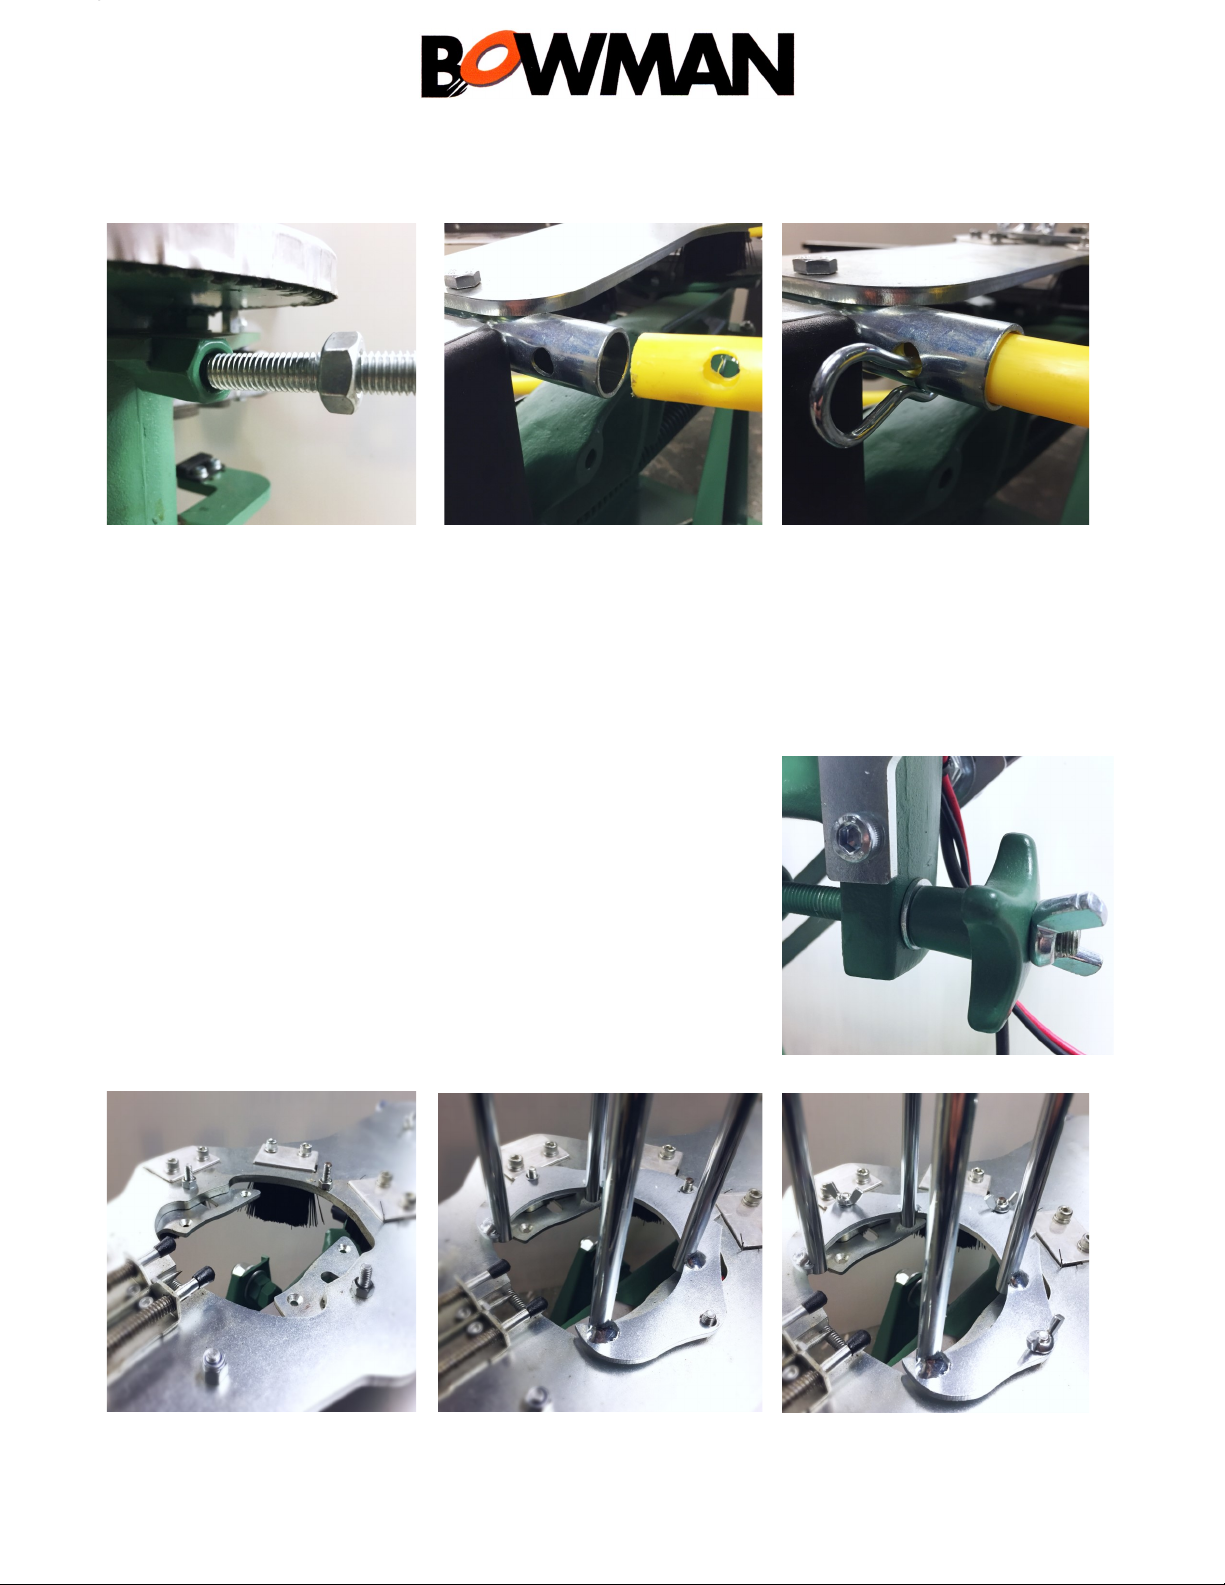
Disarm and make safe
To disarm and make the traps safe you ‘flick’ the program switches to ‘nudge fire’. Notice the traps will fire, but do
not re-arm with the throwing arms visible to the left. Remove the crocodile clips from the battery. Load your clays
gently into the hoppers, being careful not to drop them onto the spike (wet clay separator). To make elevation
adjustments, release the lever lock, tilt the trap backwards to the desired height and then re-tighten the lever lock.
Now you are ready to re-attach the crocodile clips (ensuring the program switch is set to ‘off’) and then switch the
program to ‘on run’ in preparation to fire clays.
Note: When the traps are armed and ready to fire, turning the program switches to off will not make them safe, they
MUST be de-cocked using nudge fire and the power source removed before being completely safe.
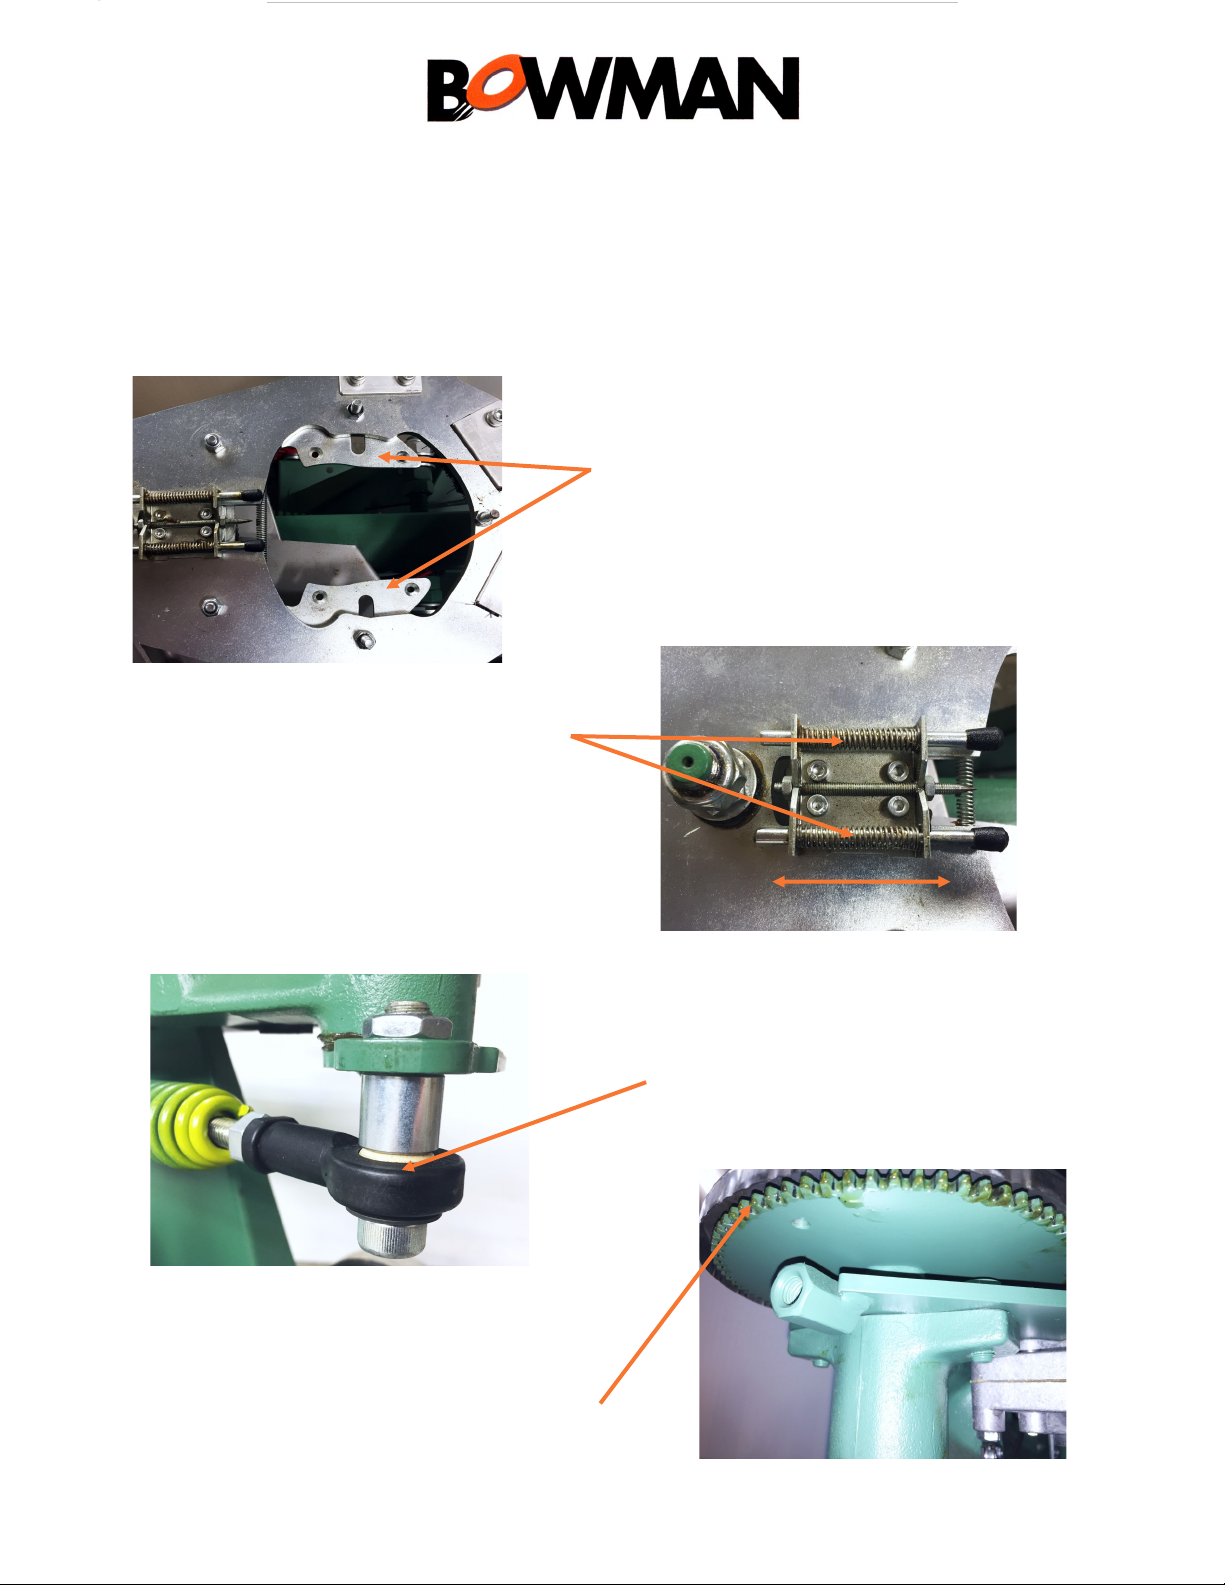
Operating the wobble base
To operate your wobble base connect to a 12v battery. Moving the switch to the right will nudge the traps in small
increments and clicking it fully over to the left with engage continuous left to right movement. You can run the
traps and movement from one battery however the battery will loose charge quicker. There are two battery trays
on your mini game trailer if you prefer to the run the system off two batteries.
04
Apply a good coating of CD90 to the rod end
bearing where the spring attaches.
The sprockets underneath the stainless steel
cover should be lubricated every 6 months
with grease applied with a paint brush or CD90
oil spray.
Servicing and maintenance
Lubrication
The following moving parts of the Supermatch One need top be lubricated once a month, particularly if the trap is
left outside in all weather conditions.
The iris jaws should be free moving and snap back
into place. Use WD40 or GT85 spray to clear these
from clay dust. Do not use oil or grease on this part
as it may cause the jaws to stick.
The twin spring supports require a light amount
of lubrication with CD 90 oil spray.
Clear out the twin spring support slider of clay
dust with GT85 and provide a light amount of
CD90 oil spray.
05
Lubrication continued...
We use a chain oil lubricant CD90 for lubricating moving parts and GT85 as a water displacement spray for
clearing out clay dust from moving parts and to protect motors, wires and the main spring from damp
conditions.
Changing fuse on 30amp relay
Position yourself behind the trap looking at the instructions on the control box. All of the Supermatch One’s
electrics are housed in the control box, sealed with a black plastic bung on the left and right. To change the
fuse on the relay, ease the right hand bung out of the box with a screw driver. You will find the 30 amp
relay just behind the bung. Inspect the relay to see if it has blown & replace if necessary. Reposition the
bung and press to secure.
WJ Bowman
High Street East Markham
Nottinghamshire NG220RE
01777 870243
www.bowmantraps.co.uk
@bowmantraps
Thank you for your purchase, please call if you need any help or advice. Your support online would be
much appreciated. Kind Regards Andrew Davidson Managing Director of WJ Bowman (1884) LTD.
Lubricate moving joints on the
wobble base to support movement.

Other BOWMAN Industrial Equipment manuals

BOWMAN SUPERMATCH SPORTING DOUBLE User manual

BOWMAN

BOWMAN SUPERMATCH SPORTING DOUBLE User manual

BOWMAN 2-25-3737-4 Owner's manual

BOWMAN

BOWMAN 2-25-3737-4 Owner's manual

BOWMAN 4111-2 User manual

BOWMAN

BOWMAN 4111-2 User manual

BOWMAN EC Series Owner's manual

BOWMAN

BOWMAN EC Series Owner's manual

BOWMAN EC120 Owner's manual

BOWMAN

BOWMAN EC120 Owner's manual

Popular Industrial Equipment manuals by other brands

Tecnodue I.T.S PT 315 operating manual

Tecnodue

Tecnodue I.T.S PT 315 operating manual

MIMAKI OPT-J0400 Operation manual

MIMAKI

MIMAKI OPT-J0400 Operation manual

ABB HT608808 Operation manual

ABB

ABB HT608808 Operation manual

OMCA SMF Use and maintenance manual

OMCA

OMCA SMF Use and maintenance manual

Nordco CGS Installation, operation and maintenance manual

Nordco

Nordco CGS Installation, operation and maintenance manual

ABB HT611069 Operation manual

ABB

ABB HT611069 Operation manual

Lanner ISD-O370 user manual

Lanner

Lanner ISD-O370 user manual

probst RG-SAFELOCK Series operating instructions

probst

probst RG-SAFELOCK Series operating instructions

ABB HT575002 Operation manual

ABB

ABB HT575002 Operation manual

HRS TJA Series Guideline

HRS

HRS TJA Series Guideline

Mecc Alte ECO Series Operating and maintenance instructions

Mecc Alte

Mecc Alte ECO Series Operating and maintenance instructions

CORNING ICH-02P quick start guide

CORNING

CORNING ICH-02P quick start guide

ABB SACE Emax 2 E1.2 Instruction handbook

ABB

ABB SACE Emax 2 E1.2 Instruction handbook

ABB HT607984 Operation manual

ABB

ABB HT607984 Operation manual

Mayr ROBA -brake-checker plus manual

Mayr

Mayr ROBA -brake-checker plus manual

Titan Attachments 120STMPGRNDRv2 Operator's manual

Titan Attachments

Titan Attachments 120STMPGRNDRv2 Operator's manual

Rexnord Hydro-flow Series manual

Rexnord

Rexnord Hydro-flow Series manual

Festo HGPLE Series operating instructions

Festo

Festo HGPLE Series operating instructions

manuals.online logo
manuals.online logoBrands
  • About & Mission
  • Contact us
  • Privacy Policy
  • Terms and Conditions

Copyright 2025 Manuals.Online. All Rights Reserved.