Brainstorm Electronics DXD Series User manual

Remote for the
DXD
Universal Clock
Operations manual
Version 3.00
June 2023
All materials herein © Brainstorm Electronics, Inc.
Brainstorm Electronics reserves the right to change or modify the contents of this manual at any time.
Brainstorm Electronics, Inc.
www.brainstormtime.com

Page 2
DXD - Remote (rev 3.00)
1. Introduction!...............................................................................................................................3
2. Installation!................................................................................................................................4
3. Editing Parameters!....................................................................................................................4
3.1 PULL-DOWN LIST!...........................................................................................4
3.2 MANUAL ENTRY!...........................................................................................4
4. Header!.....................................................................................................................................5
4.1 TOP LINE (BLACK)!.........................................................................................5
4.2 CENTER LINE (PALE GREEN)!..........................................................................5
4.3 BOTTOM LINE!...............................................................................................5
5. Home Page!...............................................................................................................................5
6. Set Up & Status Pages!...............................................................................................................6
6.1 REFERENCE / SYNC / BNC IN!.......................................................................6
6.2 BNC OUTPUTS!..............................................................................................7
6.3 NETWORK!....................................................................................................7
6.4 PTP!................................................................................................................8
6.5 NTP!...............................................................................................................9
6.6 GPS RECEIVER!...............................................................................................9
6.7 TIME!...........................................................................................................10
6.8 TIME CODE!.................................................................................................10
6.9 NAME / GPIO / PRESETS / KEYS!.................................................................11
6.10 REMOTE CONTROL VS FRONT PANEL!........................................................11
7. Firmware Update!.....................................................................................................................12
8. Multiple Windows!...................................................................................................................13
9. Multiple Browsers!....................................................................................................................13
10. Authorizations!.......................................................................................................................14
Table of Content
DXD - Remote (rev 3.00)
Page 3
1. Introduction
Firmware 3.00 brings Remote Control functionality to the DXD Universal Clocks via embedded web pages. These provide a
GUI that enables the operator to remotely control and monitor the DXD from a standard web browser.
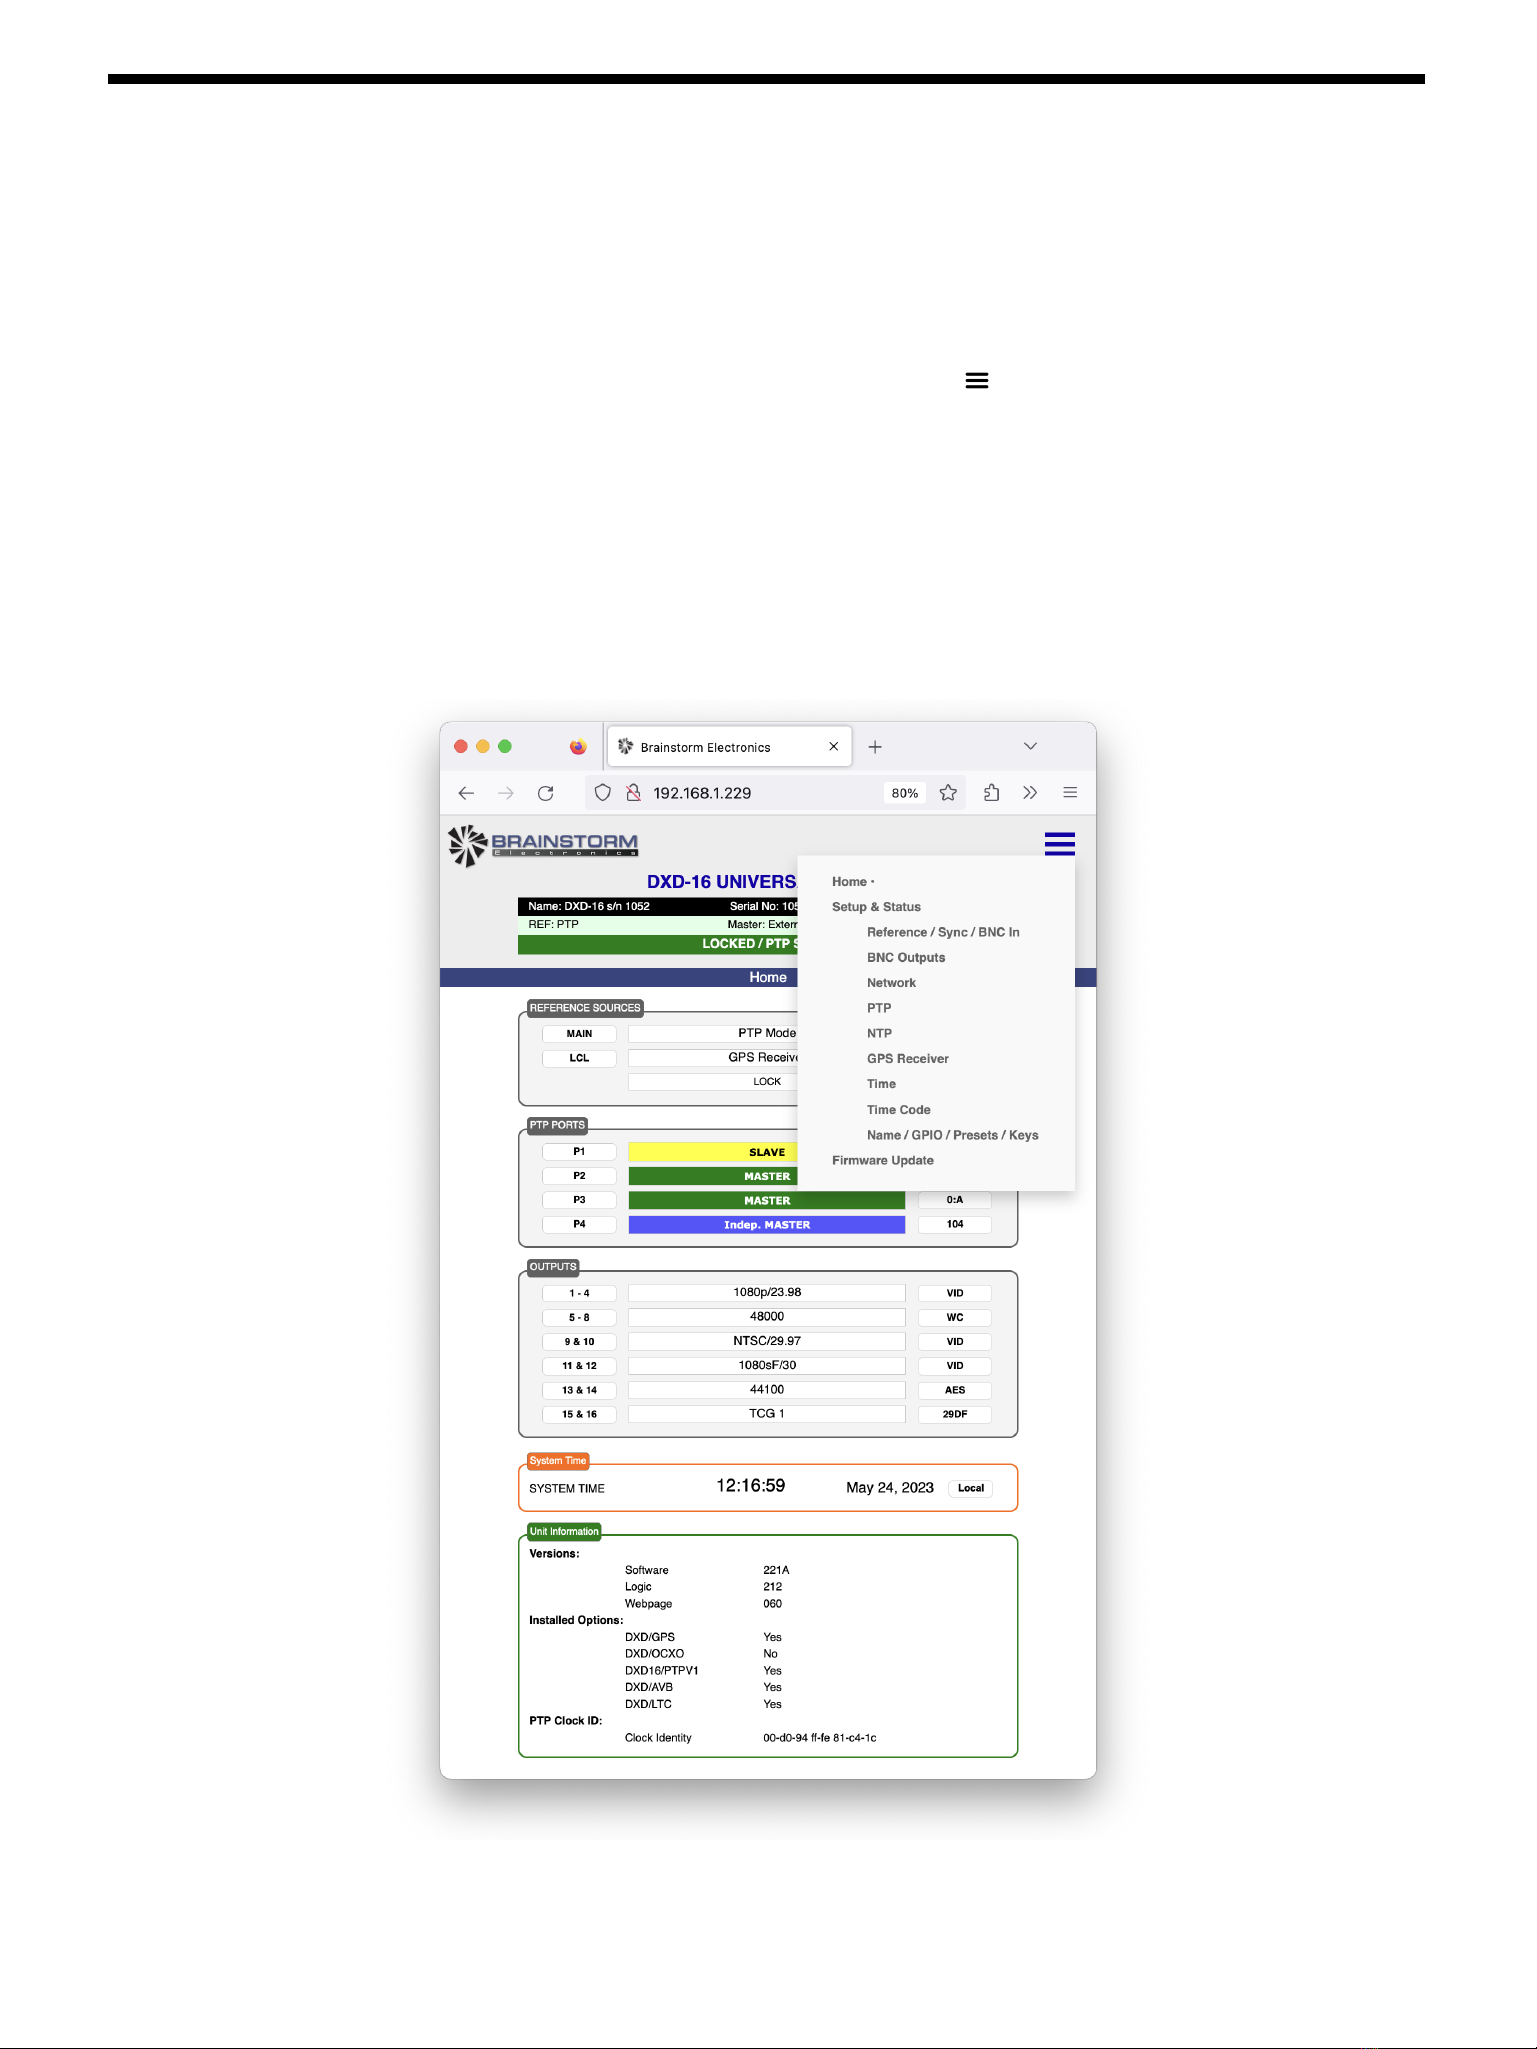
The information available in these web pages is laid out similarly to how it is presented on the front panel. Three different
types of pages are available by clicking on the Menu icon at the top right:
•Home Page: provides an overview of the main settings, similar to the front panel Main Rotation pages
•Set Up & Status: individual pages with specific parameters, similar to the front panel Set Up pages
•Firmware Update: used to upload new firmware.
To help identify the different data provided, colors are used:
•Grey: data from the front panel main rotation display pages (Reference Sources, PTP Ports & Outputs)
•Orange: time & date
•Green: data from the front panel Status pages
•Purple: data from the front panel Set Up pages (Set Up menus)
Firmware 3.0 is available for models DXD-16 and DXD-8. Web pages are identical for both with modifications based on the
differences between the 2 models.
Page 4
DXD - Remote (rev 3.00)
2. Installation
Firmware 3.0 is a free upgrade for all DXD Universal Clocks. Once firmware 3.0 has been installed, simply point your browser
to the IP address of your DXD and the home page will appear.
3. Editing Parameters
To edit a parameter from a web page, click on the MENU icon ( ) and go to the appropriate SET UP & STATUS page. All
DXD parameters are accessible via those pages (see chapter 6).
Parameters can be edited 2 different ways: from a list or by manual entry.
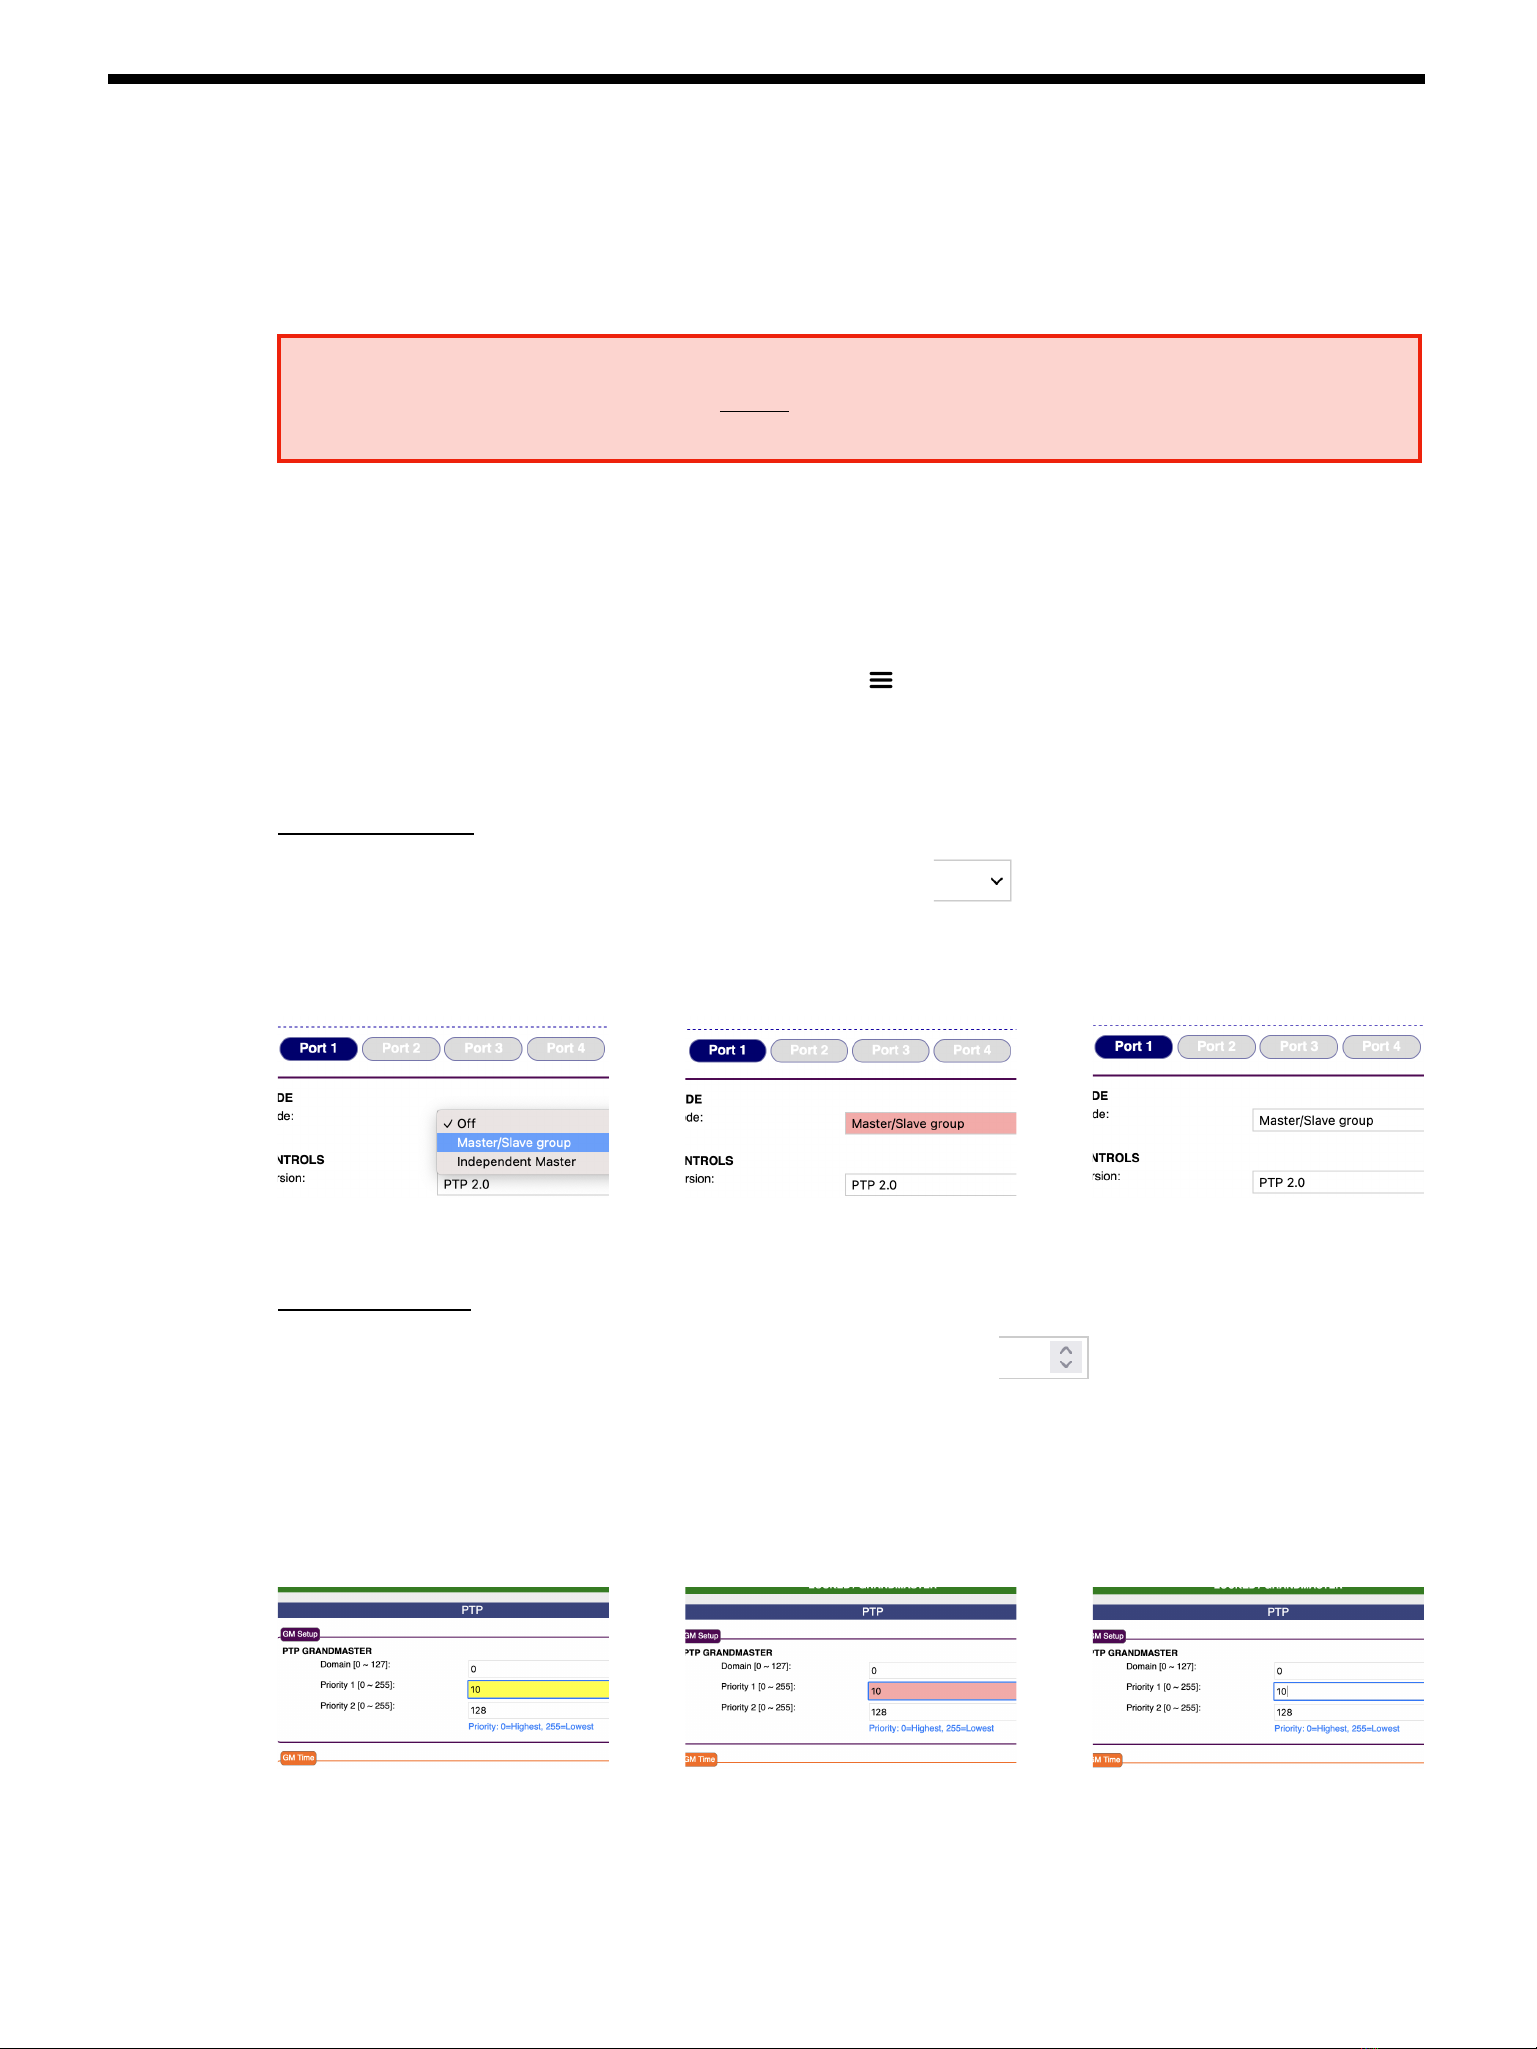
3.1 PULL-DOWN LIST
These menus have a down-pointing arrow on the right side of the box.
Click in the box to make the list of values appear. Move to the chosen value and click again. The background color of the box
will temporarily turn pink indicating that the chosen value is being sent to the DXD. Then the background color returns to
white, indicating the change has been recorded.
3.2 MANUAL ENTRY
These menus have arrows pointing up and down on the right side of the box.
Value in these fields can be entered 2 different ways.
•3.2.1 Manual Entry:Click in the box and enter a value manually using the computer keyboard. The background color will
change to yellow and remain yellow while the value is entered. Press the RETRUN or ENTER key on the keyboard to send
the value to the DXD. The background color will then change to pink. When the change has been recorded, the background
color will revert to white again.
•3.2.2: Up & Down Arrows: Use the Up or Down arrows to increase or decrease the value. The background color will
change using the same sequence: a brief yellow flash, then pink, then white.
>
>
>
>
IMPORTANT NOTE
On the DXD-16, PORT 4 must be used to access the web GUI.
Be sure port 4 is connected to the network and point the browser to the IP address of port 4.
DXD - Remote (rev 3.00)
Page 5
4. Header
At the top of each page the header includes data identifying the device and its lock statuses. It is made up of 3 horizontal lines
(black, pale green and green), each separated in 3 sections (left to right).
4.1 TOP LINE (BLACK)
This line identifies the device displayed on the page. Since multiple pages can be opened simultaneously to monitor multiple
devices, this adds clarification compared to simply relying on the IP address displayed at the top of the browser window.
•Name: data entered in Utility > Name menu
•Serial number: this is the unit’s serial number and cannot be altered.
•Location: data entered in Utility > Location menu.
4.2 CENTER LINE (PALE GREEN)
This line is identical to the Reference line on the front panel display, with the addition of GPS Status on the right side.
•REF: data entered in menu 1.1 (Reference > Source)
•Master: this section is only used when the reference is PTP Mode. For details, see the DXD manual.
•GPS: indicates the lock status of the GPS receiver (when installed).
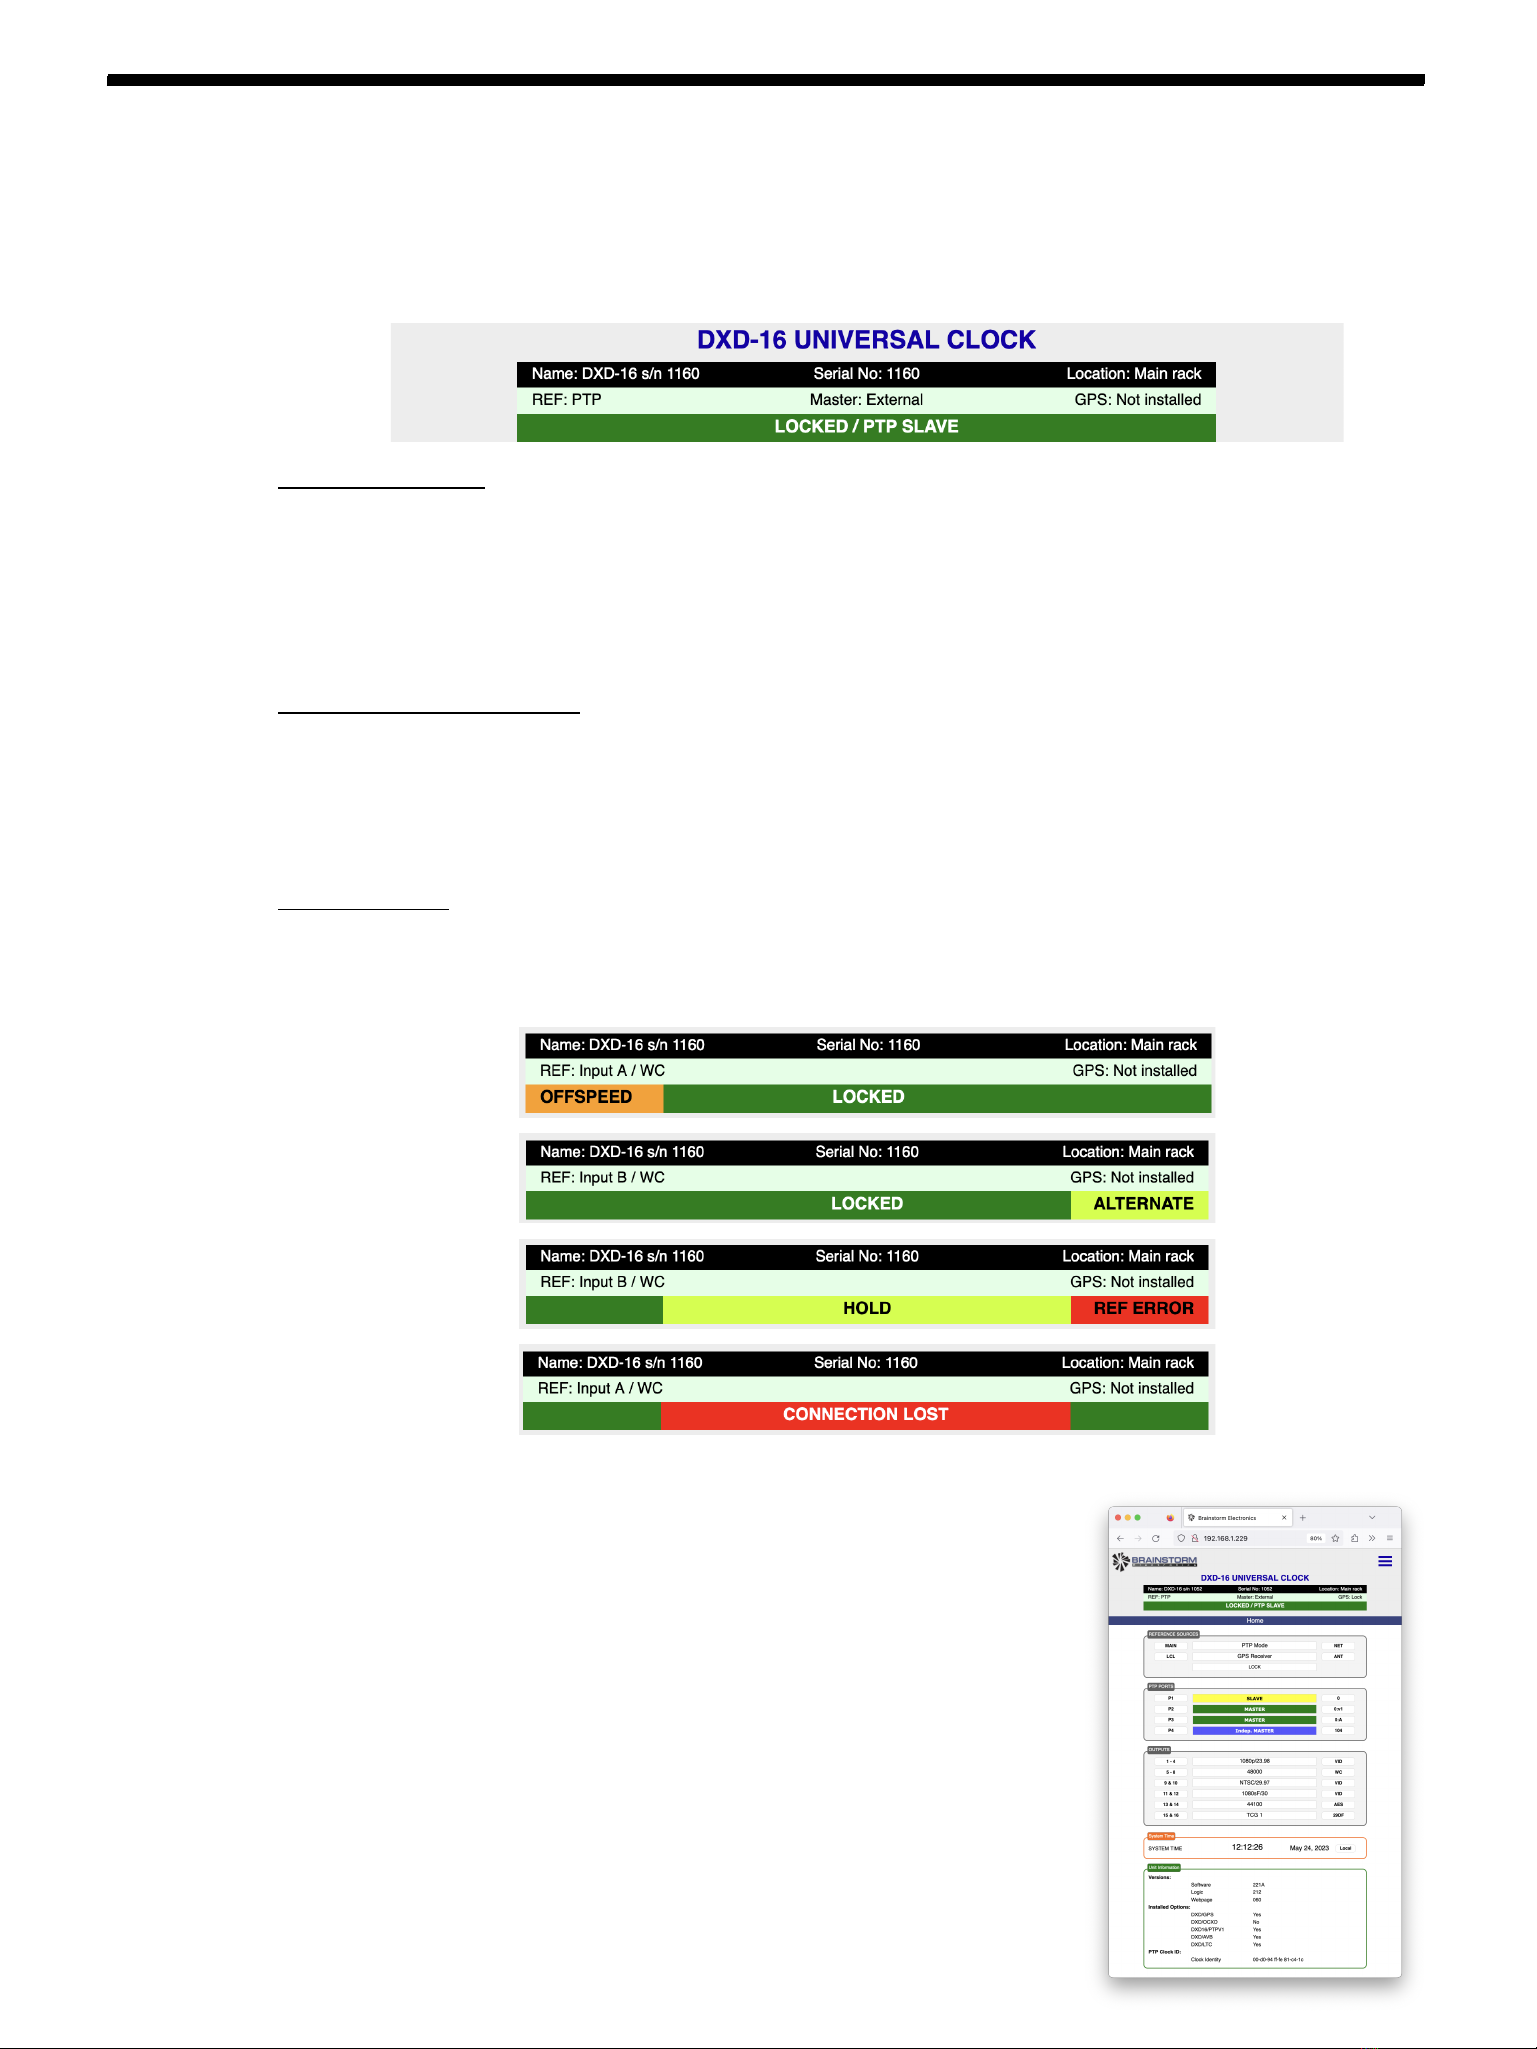
4.3 BOTTOM LINE
This line is identical to the Lock Status line on the front panel display. It is separated in 3 sections in order to display additional
information as shown below. Color will vary based on the Lock Status. For details, please refer to the DXD manual.
5. Home Page
The Home page is the first page that appears in the browser when communication
with the DXD is established. It includes status information only and offers a quick
view to the most important settings, similar to the different Main Rotation Display
pages on the front panel. This includes:
•Reference Sources
•PTP state, domain number and PTP format for each port
•BNC Outputs settings (format & rate),
•System Time and time standard,
•Unit information including current firmware, installed options, Clock ID.
Page 6
DXD - Remote (rev 3.00)
6. Set Up & Status Pages
Set Up & Status pages are arranged in 9 logical groups, similar to the SET UP pages on the front panel. Those pages are
accessed by first clicking on the Menu icon at the top right: , then clicking on the desired page from the pulldown list.
•Reference / Sync / BNC In
•BNC Outputs
•Network
•PTP
•NTP
•GPS Receiver
•Time
•Time Code
•Name / GPIO / Preset / Keys
The parameters displayed on the Set Up & Status pages are identical to the ones displayed on the front panel in the SET UP
menus, as are the choices available. Like on the front panel, these pages are dynamic meaning that available fields and
choices will vary based on certain selections. For additional information, please refer the the DXD manuals.
Colors: Boxes around the parameters are colored for easy identification:
•Purple is equivalent to the SET UP pages on the front panel;
•Orange is used for time & date;
•Green is equivalent to the STATUS pages on the front panel.
Buttons: Some pages include buttons to make certain selections such as the output groups on the BNC Output page.
•The button currently selected is in dark blue.
•To make another selection, click on the corresponding button.
•To temporarily view another selection, hover over the button while holding the CONTROL key.
The Web pages on the DXD-8 and the DXD-16 will have different buttons and different fields to reflect their configurations.
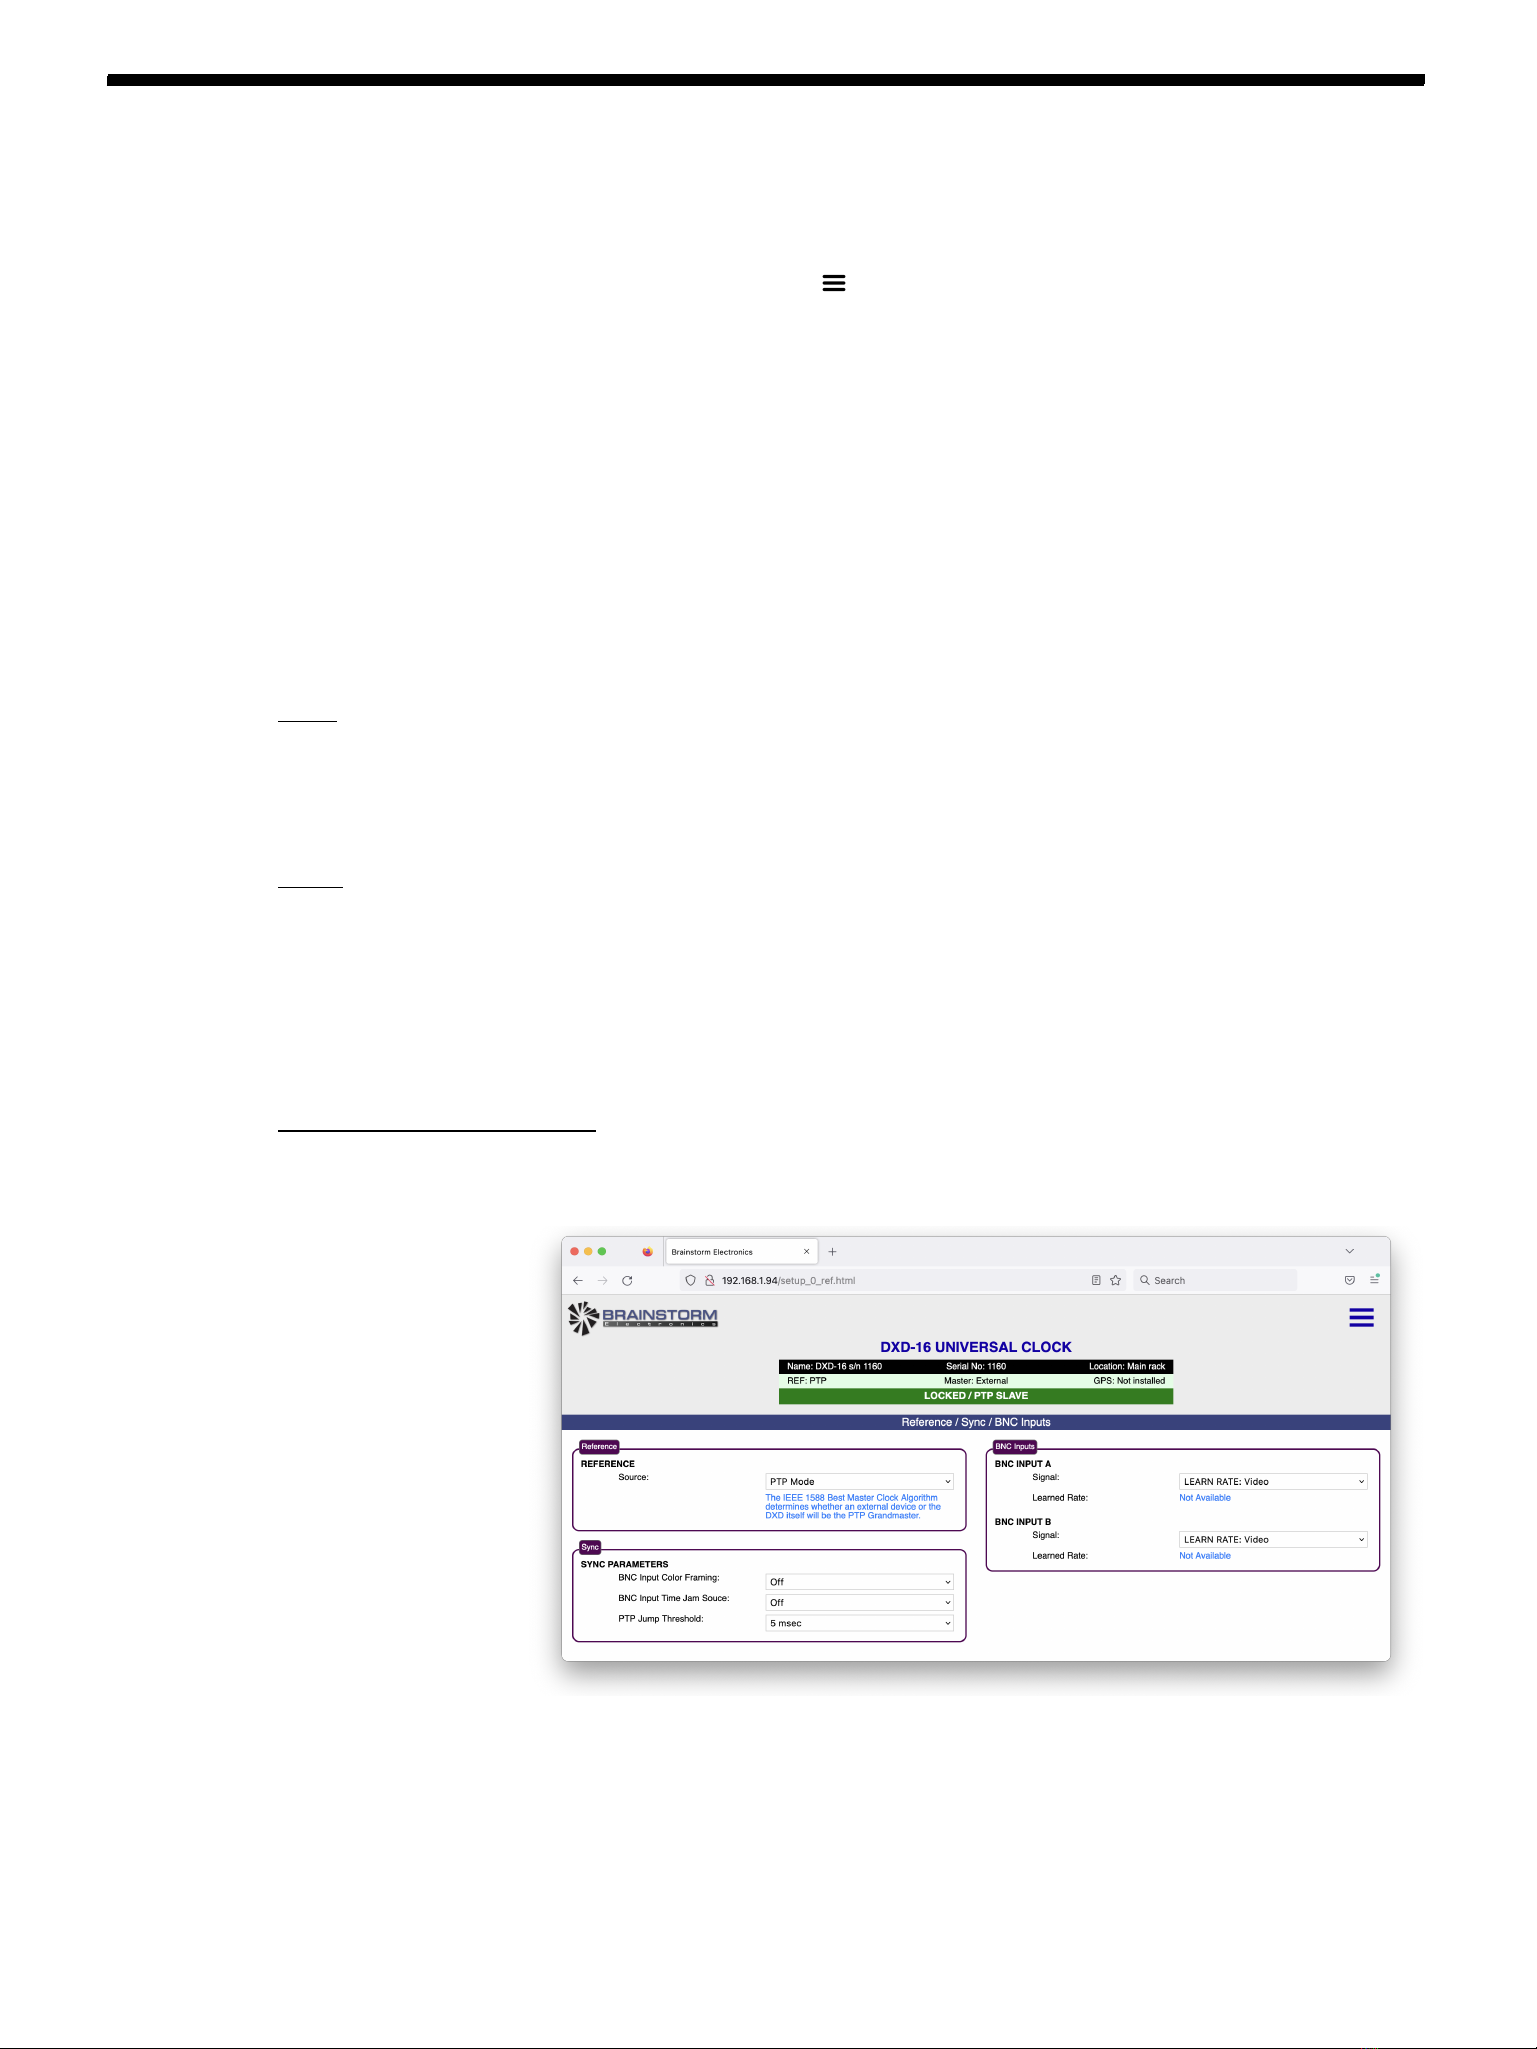
6.1 REFERENCE / SYNC / BNC IN
This page includes the parameters found in menus 1 & 2 on the front panel.
DXD - Remote (rev 3.00)
Page 7
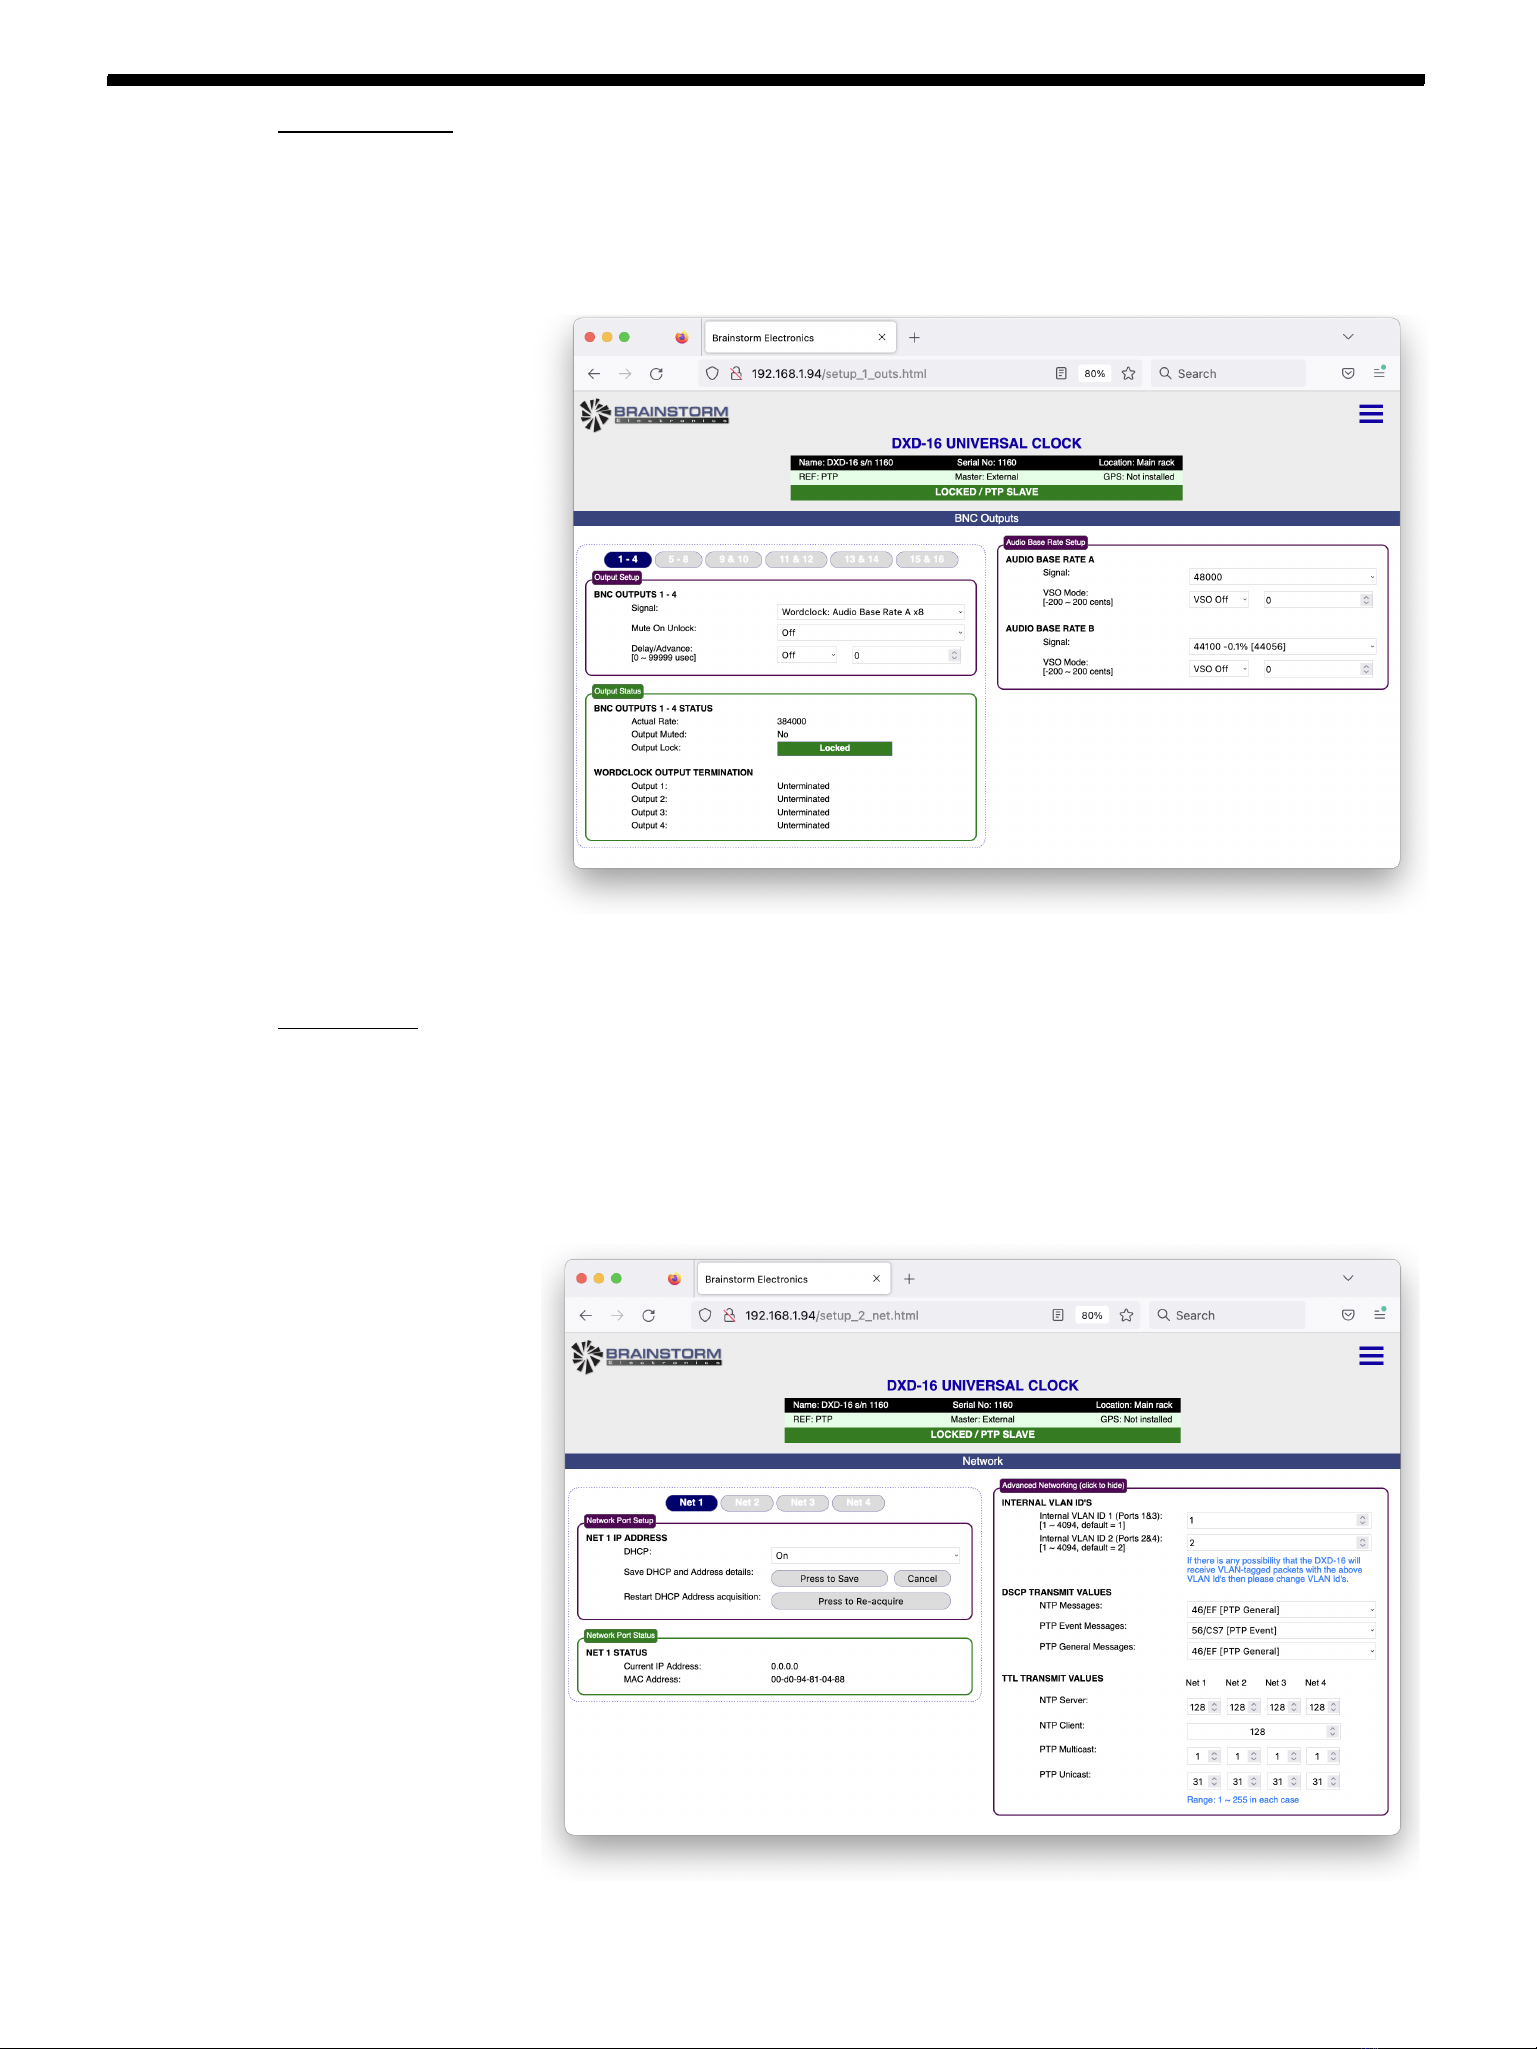
6.2 BNC OUTPUTS
The BNC outputs settings on this page include the parameters found in menu 3: the signal type and frequency for each group
but also the mute-on-unlock function and the offset value (advance or retard). Buttons are included for each outputs group: the
DXD-16 has 6 groups (and 6 buttons), the DXD-8 has 4. The page also includes Output Status information and Audio Base
Rates settings.
6.3 NETWORK
The NETWORK page has all the parameters for the network port(s) settings. The DXD-16 version includes buttons for each
port. The DXD-8, with a single port, does not have these buttons.
Advanced Networking data is hidden by default. To view this section, click on the box title.
Page 8
DXD - Remote (rev 3.00)
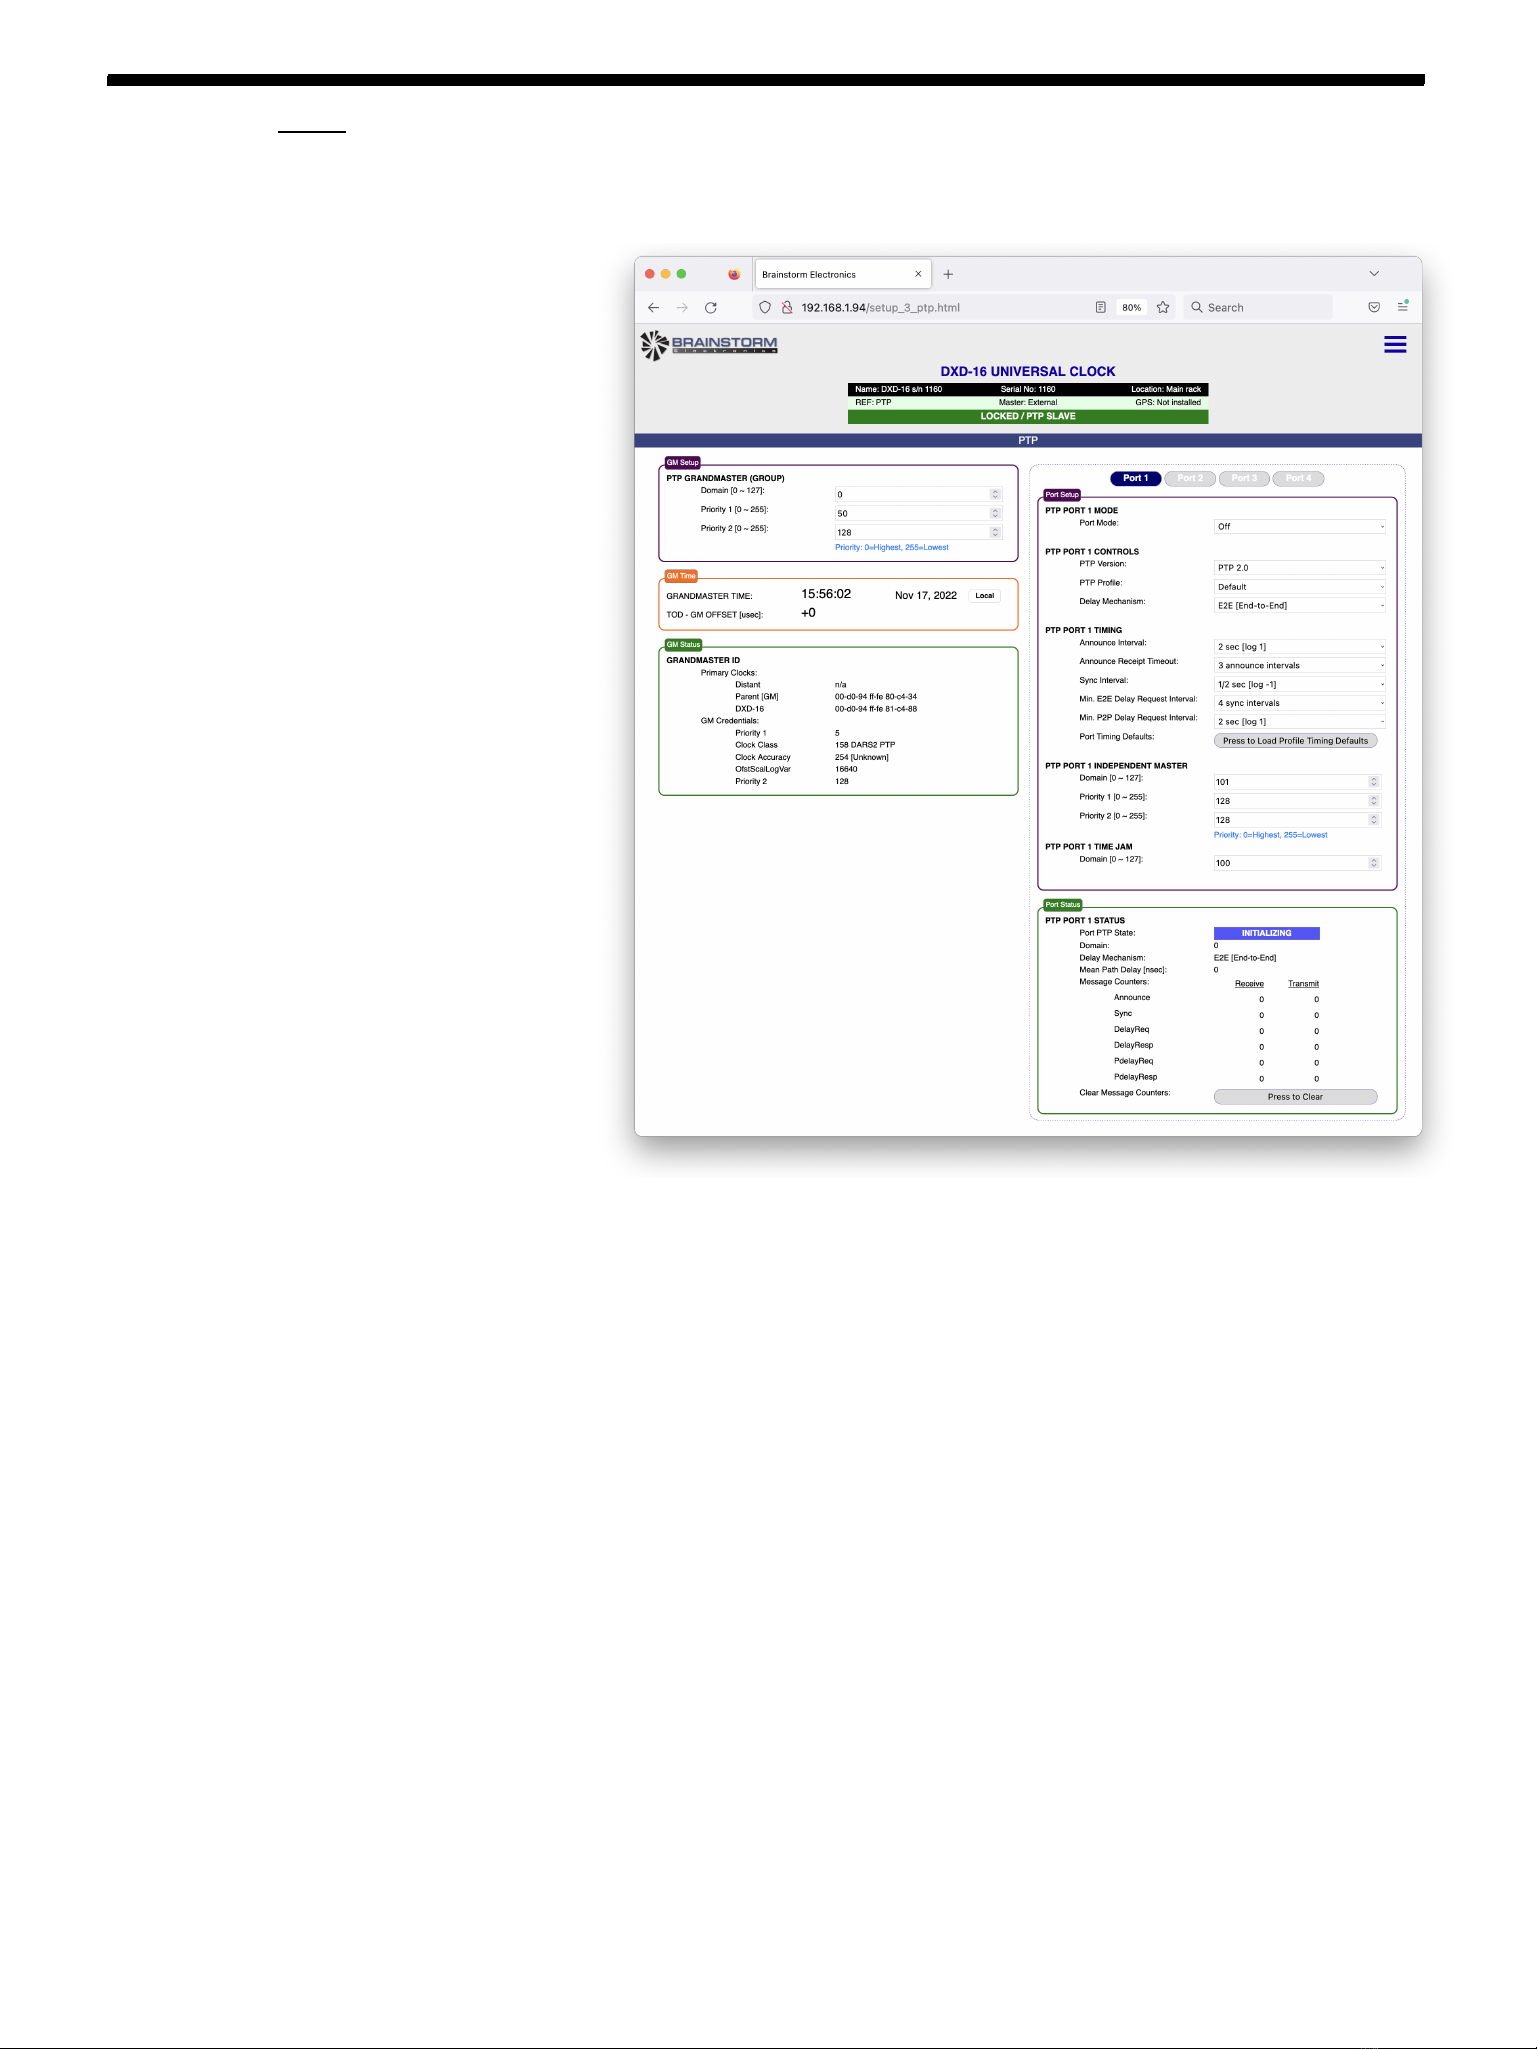
6.4 PTP
The PTP page has all the PTP parameters including the Grandmaster settings and the port(s) settings.
6.4.1 Grandmaster Setup
This section of the page contains the Grandmaster parameters, similar to menu 5.2 on the front panel. It includes the
PTP domain number and the 2 priority fields, Priority 1 and Priority 2.
6.4.2 Grandmaster Time
The time and date of the Grandmaster is displayed here in the currently selected standard (for selecting a different
time standard, go to the TIME page). When the DXD is not the Grandmaster, a second line appears indicating the
offset between the DXD internal Time-of-Day clock and the external Grandmaster time, in microseconds.
6.4.3 Grandmaster Status
This section includes the clock id’s of the different primary clocks and the Grandmaster credentials, 5 parameters used
by the BMCA (Best Master Clock Algorithm) to determine which PTP device becomes the Grandmaster, as defined in
IEEE 1588. These credentials are listed in the order of importance for the BMCA.
6.4.4 PTP Ports
The Ports section includes blue buttons for each network port on the DXD-16; the DXD-8, with a single port, does not
have these buttons.
Port Setup includes fields for Mode, Control, Timing and Time Jam parameters. The DXD-16 version also includes fields
for Independent Master parameters (a separate Grandmaster section for those ports).
The Port Status section displays different status field as well as counters for PTP messages received and transmitted by
the DXD. These counters are useful during troubleshooting and can be cleared by pressing the Presss-to-Clear button.

DXD - Remote (rev 3.00)
Page 9
6.5 NTP
The NTP page includes all the NTP parameters found in menu 6 including Server and Client settings. There is also a port status
box with NTP data including NTP message counters. The DXD-16 version includes buttons for each of the 4 network ports. The
DXD-8, with a single port, does not have these buttons.
6.6 GPS RECEIVER
The GPS Receiver page is only available when the GPS Receiver is installed in the DXD. Without it, a message will appear
saying that it is not installed.
The Setup section of this page includes all the parameters for satellites selection and GPS settings. The Status section displays
various data on the GPS receiver including the number of Satellites in view and the lock status. For more information, see the
GPS Receiver manual.

Page 10
DXD - Remote (rev 3.00)
6.7 TIME
The TIME page has all the parameters found in menu 8. This includes the time standards selections for the different times
available in the DXD, the definition of local time and the various settings for the DXD Real Time Clock (RTC).
6.8 TIME CODE
The full Time Code page is only available when the Time Code option is installed in the DXD. Without it, the Time Code
Generator part of the page will not be available.
Daily Jam is defined in SMPTE ST 2059. This section includes fields for the Daily Jam time settings and status information on
the previous and next daily jam times.
With the LTC option installed, the Time Code Generator section appears. Blue buttons allow the user to select either of the 2
Time Code Generators available. This section includes a TCG Settings box with fields for the operating mode, the format and
the number of Stop Hold Frames. Other boxes contain a time code reader and the operations buttons. While the generator is
running, the RUN button is illuminated in green.

DXD - Remote (rev 3.00)
Page 11
6.9 NAME / GPIO / PRESETS / KEYS
This page includes parameters found in the Utility section, specifically the Name & Location fields, the Presets and the Feature
Keys. The DXD-16 also includes a section for setting the GPIO’s.
Note: the browser will not transmit characters ‘#’, ‘%’ and ‘?’ as part of the messages to the DXD. When setting a
name from a webpage (e.g. NAME, LOCATION, PRESET name, etc.) these characters, if used, will be removed.
6.9.1 Name & Location
Device name and location are entered manually from the computer keyboard, followed by the ENTER key.
6.9.2 Presets
A NAME can be associated to each preset for easier identification. Preset names are entered manually from the
computer keyboard, followed by the ENTER key (see 3.2.1 Manual Entry).
To SET, RECALL or DELETE a preset, select the preset first (it will turn blue), then click on the chosen action button.
6.9.3 Feature Keys
To enter a Feature Key, use one of the 2 manual entry means described on page 4 (3.2 Manual Entry) and click SET.
6.9.4 GPIO
For each of the 3 General Purpose Inputs or 4 Outputs, a function can be selected from a pull-down list.
GPIO is only available on the DXD-16.
6.10 REMOTE CONTROL VS FRONT PANEL
If a value is being changed in a menu on the front panel, and prior to pressing ENTER someone changes a value from the
webpage, then the menu value being modified on the front panel will be reset back to its current value.

Page 12
DXD - Remote (rev 3.00)
7. F i r mwa r e U p d a t e
To update your device’s firmware, go to the Firmware Update page, click the BROWSE button and select the firmware file on
your hard disk. Typically, this would be DXD16FS_<version>.upld (or DXD8FS_<version>.upld). Then click on the UPLOAD
button. The normal programming sequence will follow.
NOTE: some browsers such as Safari will not let you select the .upld file as it is not a recognized format. When using Firefox,
after clicking on [BROWSE], a window appears that will let you navigate to the proper folder. On the bottom left of that
window click on the <Options> button. Under FORMAT, select ‘all files’ so you can select the .upld file.
Firmware files (.upld) are available for download on the Support page of the Brainstorm web site.
DXD - Remote (rev 3.00)
Page 13
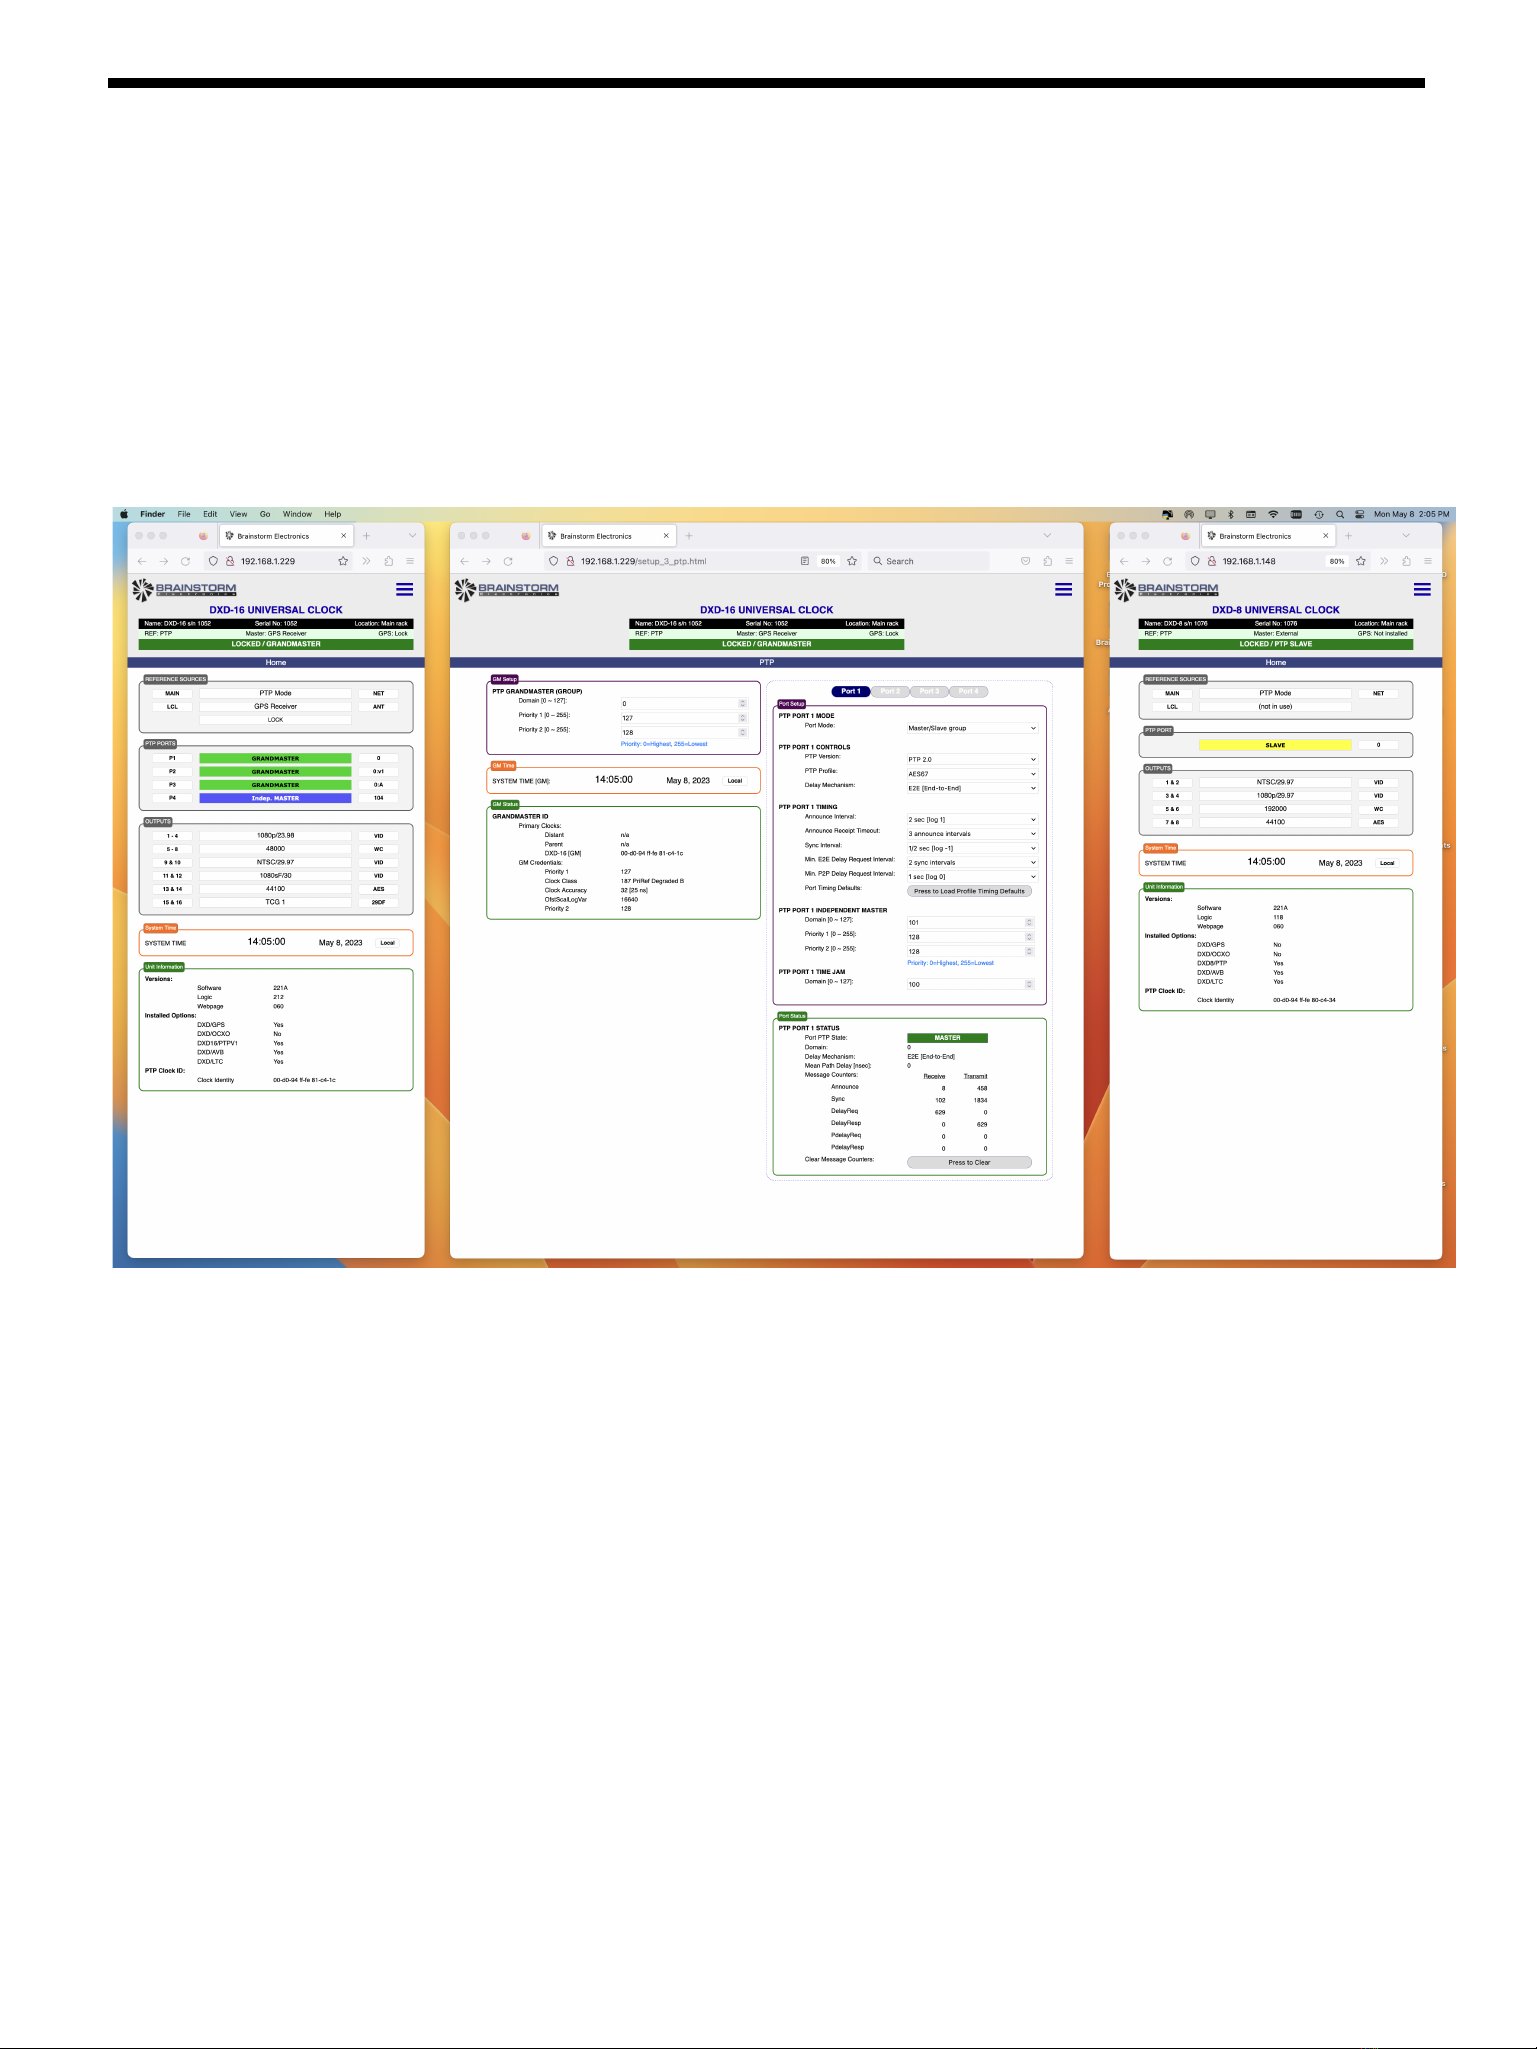
8. Multiple Windows
Several windows can be opened at the same time in the browser. This allows the operator to monitor and control multiple
devices simultaneously. It also allows multiple pages of a single device to be opened simultaneously such as the home page
and one of the SET UP pages.
The windows can be reduced in width for single column layout or, increasing the width for dual column layout.
Using the ZOOM function of the browser, font size can be increased (zoom in) or decreased (zoom out).
9. Multiple Browsers
Similarly, several browsers can monitor the DXD’s simultaneously, from separate computers or tablets.
Page 14
DXD - Remote (rev 3.00)
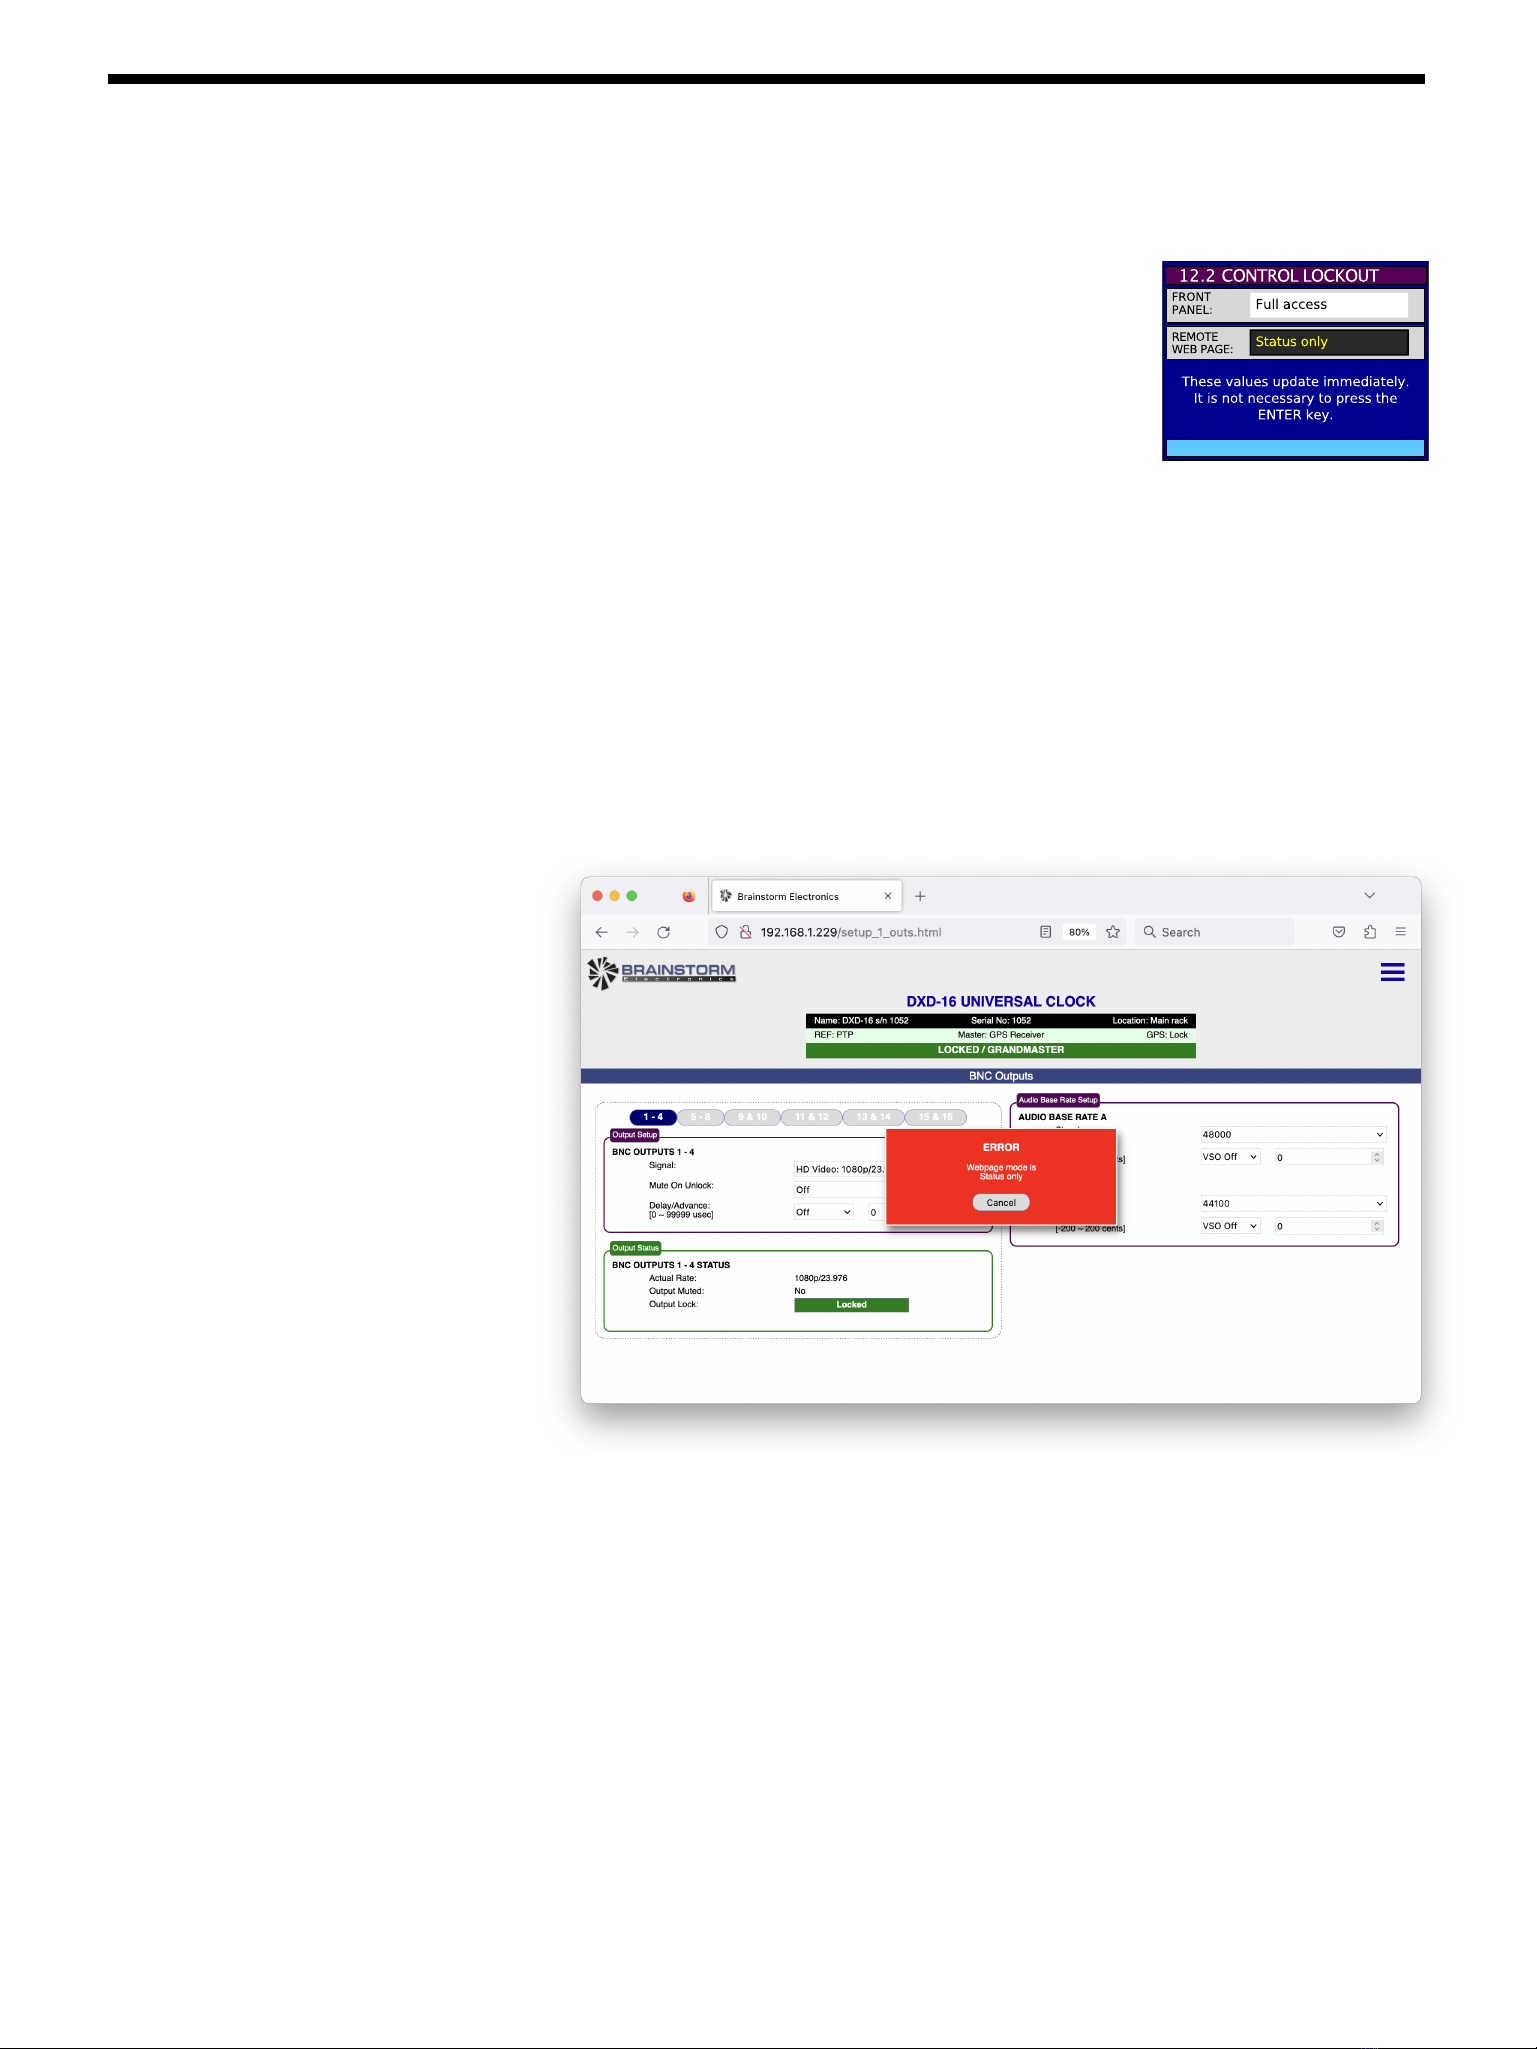
10. Authorizations
The Utility Menu includes a page that enables the system administrator to limit the remote
control. The menu number is11.2 for the DXD-8 and 12.2 for the DXD-16.
The choices under Remote Web Page are:
•Full access
In this mode, the user can access to all the webpages and modify all the
parameters on those pages.
•Status only
In this mode, the user can access to all the webpages but cannot modify any of the parameters.
When a new value is entered, the box containing this value will briefly turn pink and revert to white and revert to
the original value before the attempted modification. A red error message will appear indicating that the
Webpage mode is Status only.
•Status + Preset Recall
This mode is identical to the previous one but the user can also recall saved presets.
This manual suits for next models
2
Table of contents
Other Brainstorm Electronics Media Converter manuals


