Brandt FC-26CW User manual

FR MANUEL D’INSTRUCTION
EN INSTRUCTION MANUAL
Four compact 26L
Compact oven 26L
FC-26CB
FC-26CW

2
Chère Cliente, Cher Client,
Vous venez d’acqu rir un four compact BRANDT et nous vous en remercions.
Nous avons mis dans cet appareil toute notre passion, notre savoir-faire pour qu’il r ponde au mieux
à vos besoins. Innovant, performant, nous l’avons conçu pour qu’il soit aussi toujours facile à utiliser.
Vous trouverez galement dans la gamme des produits BRANDT, un vaste choix de petit
lectrom nager, de micro-ondes, de tables de cuisson, de hottes aspirantes, de cuisinières, de
lave-vaisselle, de lave-linge, de sèche-linge, de r frig rateurs et cong lateurs que vous pourrez
coordonner à votre nouveau four compact BRANDT.
Bien entendu, dans un souci permanent de satisfaire le mieux possible vos exigences vis à vis de nos
produits, notre service consommateurs est à votre disposition et à votre coute pour r pondre à
toutes vos questions ou suggestions.
Et connectez-vous aussi sur notre site www.brandt.com où vous trouverez tous nos produits,
ainsi que des informations utiles et compl mentaires.
BRANDT
Dans le souci d’une am lioration constante de nos produits, nous nous r servons
le droit d’apporter à leurs caract ristiques techniques, fonctionnelles ou esth tique
toutes modifications li es à leur volution.
Important : Avant d m ttr votr appar il n march , v uill z lir
att ntiv m nt c guid d’installation t d’utilisation afin d vous
familiaris r plus rapid m nt av c son fonctionn m nt.

3
SOMMAIRE P
1/ A L’ATTENTION DE L’UTILISATEUR 4
A.
Consignes de s curit 4
B.
Donn es techniques 4
C.
Protection de l’environnement 4
2/ INSTALLATION DE VOTRE APPAREIL 5
A.
Installation sur le plan de travail 5
B.
Le raccordement lectrique 5
C.
Description de votre appareil 5
3/ UTILISATION DE VOTRE APPAREIL 6
A.
Avant d’utiliser l’appareil pour la première fois 6
B.
R glage du thermostat 6
C.
S lection du mode de cuisson 6
D.
R glage de la dur e de cuisson 6
E.
Conseils d’utilisation 7
4/ ENTRETIEN ET NETTOYAGE DE VOTRE APPAREIL 8
ENGLISH INSTRUCTION MANUAL 9

4
1/ A L’ATTENTION DE L’UTILISATEUR
A. Consign s d sécurité
Ne chauffez pas d’aliments en bouteille ou en boîte car le r cipient pourrait se casser et vous
brûler.
Prenez garde de ne pas vous brûler lors de l'utilisation ou imm diatement après. Les p
arties
m talliques et la vitre de la porte deviennent extrêmement chaudes lors de l'utilisation. Prenez
garde de ne pas les toucher lorsque vous ouvrez ou fermez la porte.
La temp rature de la surface de contact peut être lev e lorsque l’appareil est en fonctionnement.
Utilisez toujours la pince lorsque vous ins rez ou retirez le plateau. Vous risquez de vous brûler
gravement si vous le touchez.
Ne versez pas d’eau sur la vitre du four lorsqu’il est chaud. La vitre risque de se briser.
Lorsque vous d branchez l’appareil, saisissez toujours la fiche. Ne tirez jamais sur le cordon. Cela
pourrait casser les fils qui sont à l’int rieur.
Lors de l’UTILISATION, ne placez jamais l’appareil à proximit d’un brûleur à gaz, d’une source
de forte chaleur ou d’un ventilateur lectrique, etc.. Cela pourrait nuire au contrôle de la
temp rature.
N’aspergez pas le cordon d'alimentation et ne manipulez pas l’appareil avec les mains mouill es.
D branchez toujours le cordon après utilisation ou lorsque l'appareil est laiss sans surveillance. S’il
reste branch , un dysfonctionnement peut provoquer un incendie.
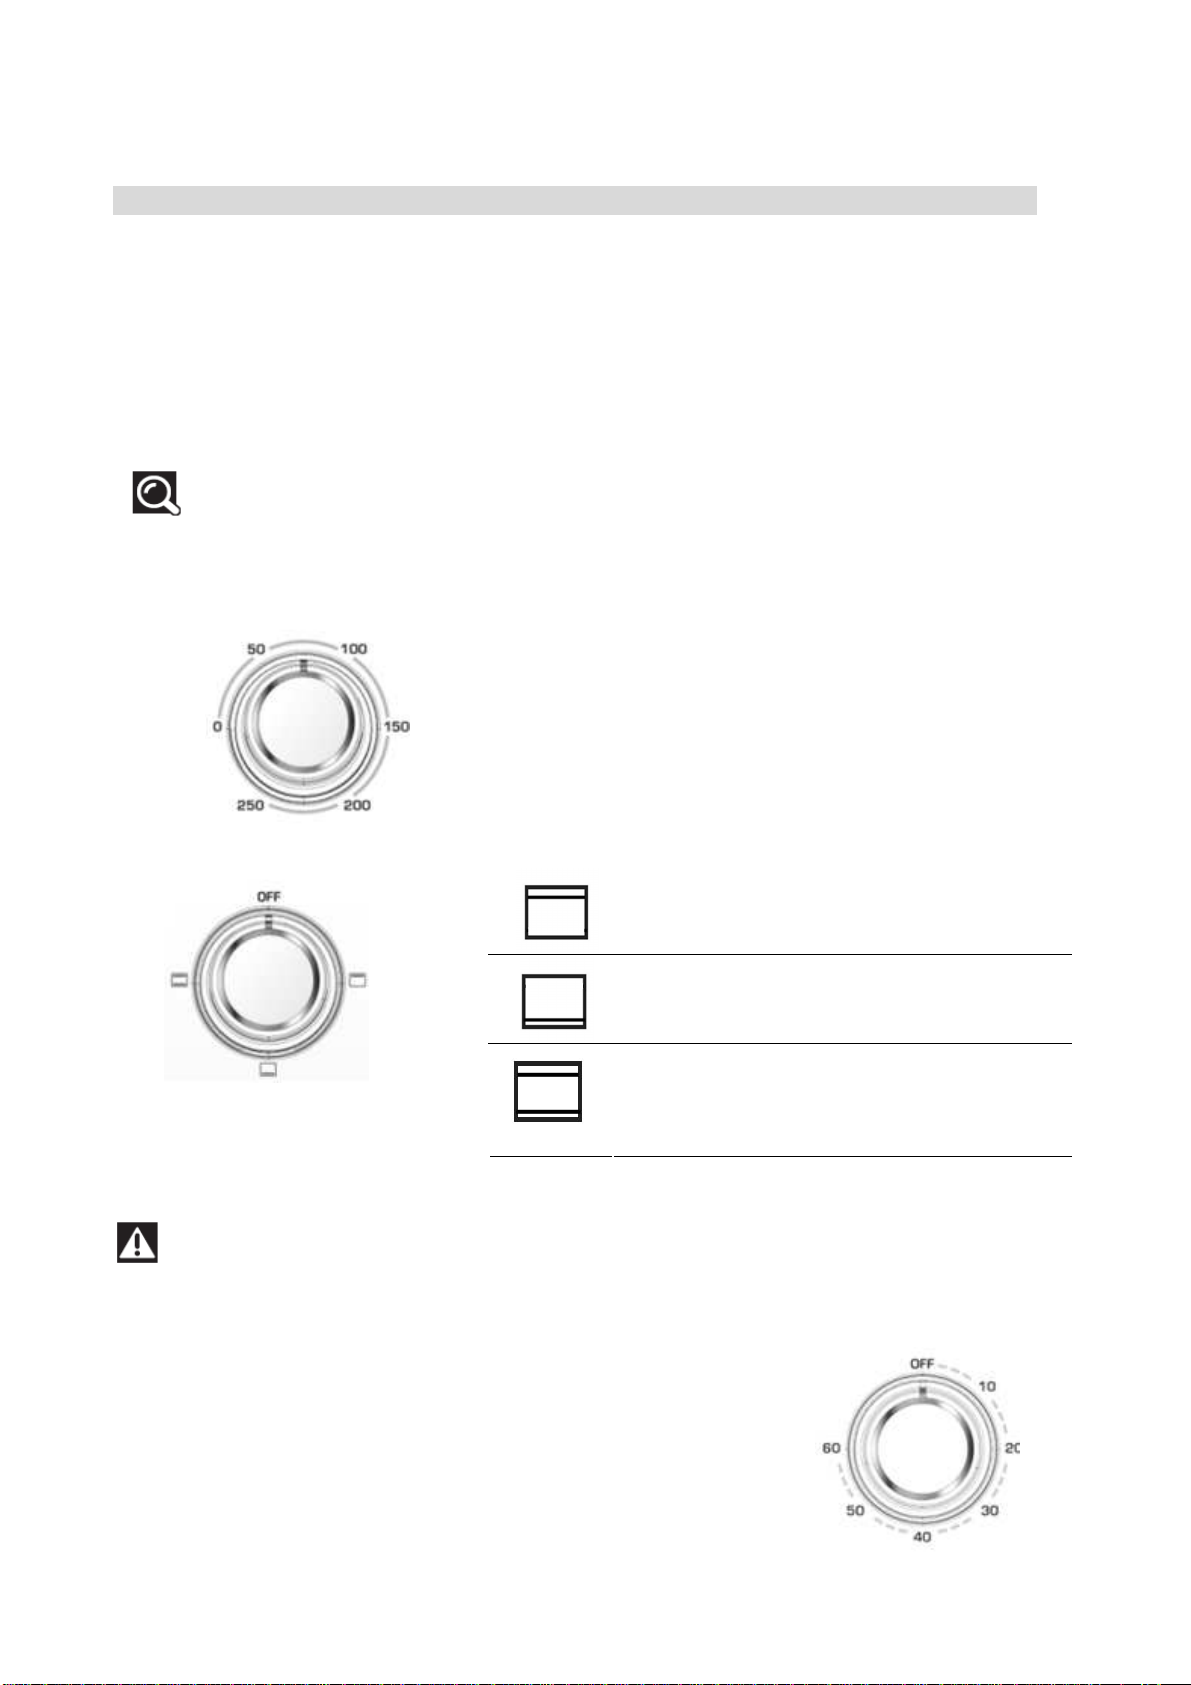
Lorsque vous cuisinez des plats à l’huile tels qu'un poulet rôti, il est recommand d’utiliser 2 feuilles
d’aluminium afin de r duire les projections. Placez une feuille sur le plateau et l’autre sur le poulet. Ainsi l’huile
coulera entre les deux feuilles.
B. Donné s T chniqu s
C. Prot ction d l’ nvironn m nt
Arriv en fin de vie, ce produit ne doit pas être jet avec les ordures m nagères. Il doit être
apport dans une d chetterie ou à votre revendeur. Cela permet d' viter les cons quences
n fastes pour l'environnement et la sant d coulant d'une limination inappropri e et de recycler
les mat riaux en vue de r aliser des conomies d' nergie et de ressources significatives.
Un logo vous rappelant que vous ne devez pas le jeter avec les ordures m nagères apparaît sur le produit.
Pour de plus amples informations, contactez votre mairie ou le magasin où vous avez achet ce produit.
N° du modèle
FC-26CB / FC-26CW
Alimentation
220-240 V 50 Hz
Consommation
1500 W
Dimensions
495 x 350 x 310 mm
Poids net
6,8 kg

5
2/ INSTALLATION DE VOTRE APPAREIL
A. Installation sur l plan d travail
Si le four est positionn trop près d’un mur, ce dernier peut-
être brûl ou tâch .
Assurez-vous qu’aucun rideau, etc., n’est en contact avec l'appareil.
Ne placez aucun objet entre l’appareil et la surface sur laquelle il est pos . L’objet
pourrait brûler.
Ne placez aucun objet sur le f
our lors de l’utilisation car la chaleur pourrait le
d former, le briser, etc.
B. L raccord m nt él ctriqu
L'alimentation lectrique doit provenir d'une prise correctement branch e. Ins rez
entièrement la fiche dans la prise. Dans le cas contraire, elle
pourrait chauffer
anormalement. N’utilisez pas de prise d’ clairage. Ne branchez jamais plusieurs fiches
sur une même prise.
C. D scription d votr appar il
•L four
1. Boîtier
2. Cavit
3. Gradins
4. Él ment chauffant
5. Vitre
6. Poign e de la porte
7. Thermostat
8. R gulateur de la fonction
9. Minuteur
10. Voyant lumineux
11. Pieds
•L s acc ssoir s
12. Plateau de cuisson
13. Pince
14. Grille
1
2
3
6
4
5

3/ UTILISATION DE VOTRE APPAREIL
A. Avant d’utilis r l’appar il pour la pr mièr fois
Chauffez le four à vide.
1. Ins rez le plateau et la grille de cuisson.
2. R glez le s lecteur de mode de cuisson sur « VOÛTE + SOLE » et le thermostat sur « 250 °C
» puis chauffez
le four à vide pendant environ 10 minutes.
R marqu :
Il se peut qu’il y ait une odeur de fum e et de brûl lors de la première utilisation, toutefois cela est
normal.
B. Réglag du th rmostat
R glez la temp rature en fonction du plat que vous allez cuisiner.
R glez la « Commande de la temp rature » en la tournant dans le
sens des aiguilles d'une montre pour s lectionner la temp rature
appropri e en fonction du plat que vous allez cuisiner.
(temp ratures entre 100 °C et 250 °C)
C. Sél ction du mod d cuisson
Voûte
Sole
S lectionnez l' l ment chauffant
appropri en fonction du plat que vous
allez cuisiner.
Voûte et sole
Attention à la graisse chaude
D. Réglag d la duré d cuisson
1. Placez la flèche du minuteur sur la dur e de cuisson (en minutes)
appropri e
pour le plat que vous allez cuisiner.
2. R glez le Minuteur en le tournant dans le sens des aiguilles d'une montre.
Le voyant lumineux vous permet de v rifier le bon fonctionnement des
l ments chauffants.

7
Le four s' teindra automatiquement à la fin de la dur e de cuisson s lectionn e et une alarme sonnera
3. Vous pouvez teindre le four manuellement pendant la cuisson en tournant le minuteur dans le sens
inverse des aiguilles d’une montre jusqu’à la position « OFF ».
R marqu :
Si l’int rieur du four est sale, il se peut que la cuisson soit l gèrement plus longue que d’habitude.
T mps d cuisson indicatifs
Type
d'aliment
Quantit ou
paisseur
Temp rature (°C)
Minuteur (mn)
Sandwich
2-3
200
2-3
Toast
2-4
250
2-5
Hamburger
2-3
200
3-5
Poisson
/
200
7-10
Jambon
2 cm
200
7-12
Saucisse
3-4
200-250
8-10
Gâteau
/
150
20-30
Steak
1-2 cm
250
10-15
Poulet
Demi-poulet
180-200
30-40
E. Cons ils d’utilisation
•
Plat au d cuisson t grill
Accessoire Aliments (à titre informatif
uniquement) Comment utiliser la pince ?
Plateau de cuisson
Ailes de poulet grill es, steak
hach , gratin, gâteau, presque
tous les autres aliments
pr par s au four
R marqu :
Nous vous recommandons de l'utiliser comme tiroir à miettes
Grille
Pommes de terre au four,
aliments secs
Plateau de cuisson + grille
Aliments produisant du jus, par
exemple poisson cuit au four,
etc..
Prenez garde lorsque vous retirez un pudding ou des liquides chauds du four.

8
•Gradins
Vous pouvez r gler la hauteur du plateau à 4
niveaux diff rents en fonction des
plats que vous
souhaitez cuisiner. Par exemple,
lorsque vous
pr parez un gratin de macaronis et que vous
voulez que la partie sup rieure soit plus cuite,
utilis
ez le premier ou le deuxième gradin. Pour rôtir
un poulet, utilisez le quatrième ou le dernier
gradin.
4/ ENTRETIEN ET NETTOYAGE DE VOTRE APPAREIL
D branchez l’appareil et laissez-le refroidir avant de le nettoyer.
Nettoyez la surface int rieure et ext rieure, le plateau, la grille et la fourche du
tournebroche avec un chiffon doux (ou une ponge) et un produit à pH neutre. Rincez
ensuite à l’eau claire. Afin de ne pas ray
er la surface int rieure du four et de prot ger le
plateau, la grille et la fourche du tournebroche, n’utilisez pas de brosse dure ou
quivalent lors du nettoyage.
N’utilisez pas de produits toxiques ou abrasifs tels que de l’alcool à brûler, de la poud
re
abrasive ou du solvant.
Si le cordon d’alimentation est endommag , il doit être remplac par le fabricant, le distributeur ou un
professionnel qualifi afin d’ viter tout risque.
Garanti t s rvic après-v nt
Ce produit est garanti par votre distributeur 2 ans après la date de votre achat. Pour plus de d tails, veuillez
vous reporter aux conditions de garantie fournies par celui-ci.
FagorBrandt SAS - Locataire-g rant - SAS au capital de 20.000.000 euros siège social : 7 rue Henri Becquerel
- 92500 Rueil-Malmaison - CS Nanterre sous le num ro 440 303 196

9
Dear Customer,
You have recently purchased a BRANDT compact oven and we would like to thank you for choosing
us.
We have put all of our passion and know-how to work in designing this appliance to ensure that it
meets all your needs. Innovation and performance are our key words, and we have made ease of
use a priority.
Brandt also offers a wide range of other products to complement your new BRANDT compact oven:
small domestic appliances, microwave ovens, hobs, ventilation hoods, electronic cookers,
dishwashers, refrigerators and freezers.
Of course, in an ongoing effort to satisfy your demands with regard to our products as best as
possible, our after-sales service department is available to answer your questions and welcomes any
suggestions you may have.
You can also log on to our website at www.brandt.com where you will find listings of all our
products, together with further useful information.
As part of our commitment towards constant improvement of our products, we reserve the right to
make changes to their technical, functional and/or aesthetic characteristics in line with technological
developments.
Warning: B for installing and using your applianc , pl as r ad this Guid
to Installation and Us car fully. It will h lp you quickly familiaris yours lf
with your applianc ’s op ration.

10
TABLE OF CONTENTS P
1/ INFORMATION FOR THE USER 11
A.
Safety recommendations 11
B.
Technical data 11
C. Protecting the environment 11
2/ INSTALLING YOUR APPLIANCE 12
A. Countertop installation 12
B.
Electrical connection 12
C. Description of your appliance 12
3/ USING YOUR APPLIANCE 13
A.
Before using your oven 13
B.
Temperature control 13
C.
Cooking function selection 13
D.
Cooking time setting 13
E.
Use recommendations 14
4/ CARING FOR AND CLEANING YOUR APPLIANCE 15

11
1/ INFORMATION FOR THE USER
A. Saf ty r comm ndations
Food cannot be heated directly in a bottle or tin as the bottle or tin could break and contents could
scald the user
Take care during and immediately after use. The metal parts and glass window of the door
become extremely hot during use. Take care not to touch them when opening and closing the door.
Oven surfaces may be hot when in use
Always use the handle when inserting or removing the tray. Touching the tray may cause severe
burns.
When hot, do not apply water to the glass window. It may cause the glass to break.
When unplugging the oven, always take hold of the plug itself. Never pull on the cord. This could
break the wires inside the cord.
Do not position the oven near a gas burner or any other heat source, and do not direct an
electric fan, etc, at the unit during USE. Doing so could affect the temperature control.
Do not touch the power cable or unit with wet hands. Always unplug the cord after use and whenever
the unit is left unattended. A malfunction while the plug is inserted into the mains could cause a fire.
When cooking fat-spitting dishes such as roast chicken, it is recommended to use 2 sheets of aluminium foil in
order to reduce fat spitting. Place one sheet on the tray and the other over the food. The oil will drip in to the
gap between the sheets of foil.
B/ TECHNICAL DATA
C/ PROTECTING THE ENVIRONMENT
At the end of its working life, the product must not be disposed with household waste. It must be
taken to a special local authority waste collection centre or to a company providing this service.
Disposing household appliances separately avoids possible negative effects on the environment and
health and enables the constituent materials to be recycled which saves energy and resources.
To remind you that you must dispose of this appliance correctly the symbol shown above appears on
the product warning you not to dispose of it with household waste.
For further information, contact your local authority or the shop where you bought the product.
Model no.
FC-26CB / FC-26CW
Power supply
220-240V 50Hz
Energy consumption
1500W
Specifications
495 x 350 x 310 mm
Net wt.
6,8 kg

12
2/ INSTALLING YOUR APPLIANCE
A. Count rtop installation
If the oven is positioned too close to a wall it may be burned or stained. Ensure curtains
etc. are not in contact with the oven.
Do not put anything between the base of the oven and the surface on which it is set.
Any object under the over may be burned
Do not put anything on top of the oven when it is use, the heat could deform, crack, etc
the item.
B. El ctrical conn ction
The oven must be connected to a properly wired power outlet. Insert the plug fully into
the socket. If it is not properly connected, it could overheat. Do not use an electric light
outlet. Never connect multiple plugs to the same power outlet
C. D scription of your applianc
•Ov n
1. Housing
2. Cavity
3. Rack support
4. Heating element
5. Glass
6. Door handle
7. Temperature control
8. Function selector
9. Timer knob
10. Indicator light
11. Stand
•Acc ssori s
12. Baking tray
13. Tray handle
14. Wire rack

14
3/ USING YOUR APPLIANCE
A. B for using th ov n for th first tim
Heat the oven with nothing inside it.
1. Insert the tray and wire rack.
2. Set the cooking function switch to "UPPER & LOWER", set the temperature control knob to "250 " and ℃
heat the empty oven for about 10 minutes.
There may be some smoke and a burning smell at first, but this is not a malfunction.
B. T mp ratur control
Set the Temperature Control Dial to the suitable temperature for the dish you
are cooking.
Set the “Temperature Control” by turning the knob clockwise to the suitable
temperature for the dish you are cooking. (Temperature Control range up to
250°C)
B. Cooking function s l ction
Select the suitable cooking function for the dish you are cooking.
Upper heating
Lower heating
Upper + lower heating
Beware of hot dripping fat!
D. Cooking tim s tting
1. Move the “Timer” arrow to the number which indicates the cooking time
(minutes) depending on the dish you are cooking.
2. Set the “Timer” by turning it clockwise.
You can check whether the heating elements are working or not by looking
at the front Indicator light.
The oven will turn off automatically at the end of the selected time and a
bell will ring.
3. The oven can be turned off manually during cooking by turning the
“Timer” anti-clockwise to the "OFF" position.
Not :
If the inside of the oven is dirty, cooking may take slightly longer
than usual.

15
Baking tim s
Type of food
Number or thickness
Temperature(°C)
Timer (min.)
Sandwich
2-3 pcs
200
2-3
Toast
2-4 pcs
250
2-5
Hamburger
2-3 pcs
200
3-5
Fish
/
200
7-10
Ham
2 cm
200
7-12
Sausage
3-4 pcs
200-250
8-10
Cake
/
150
20-30
Steak
1-2 cm
250
10-15
Chicken
Half chicken
180-200
30-40
E. Us r comm ndations
•Baking Tray and Wir Rack
Accessory Food (For Ref. only) How to use Tray Handle
Baking Tray
Roast chicken wings, hamburgers,
gratin, cakes, most other
oven-cooked foods
Note :
We recommend you use it as crumb tray.
Wire Rack
Baked potatoes,
dry food
Baking Tray and
Wire Rack
For food which will drip, e.g. boiled
fish etc.
Take care when removing pudding and hot liquids.
•Rack Support
There are 4 different positions for the tray which
you can adjust according to the dish you are
cooking. For example, when cooking macaroni
gratin, to have the top part cooked the most, use
the top or second position. For roasting a chicken,
use the fourth or bottom position.

4/ CLEANING & MAINTENANCE
Unplug and allow the oven to cool completely before cleaning.
When cleaning, use a soft cloth (or sponge) and neutral cleaner on the interior and
exterior surfaces of the oven, tray, rack, and rotisserie fork. Then rinse with clean water.
Do not use a hard brush or any others cleaners to avoid scratching or damaging the
interior surface of the oven, tray, wire rack and the rotisserie fork.
Do not use toxic or abrasive cleaners such as gasoline, polishing powder, solvent.
For safety reasons if the power cable is damaged, it must be replaced by the manufacturer or its
servicing company or a qualified person.
Warranty and aft r-sal s rvic
This product is covered by a 2-year warranty from your retailer. For more details, please refer to the warranty
conditions supplied by your retailer.
FagorBrandt SAS – Management Company - SAS with a capital of 20,000,000 euros
- Head Office: 7 rue Henri Becquerel - 92500 Rueil-Malmaison - RCS Nanterre 440 303 196
This manual suits for next models
1
Table of contents
Languages:
Other Brandt Oven manuals

Brandt
Brandt FP562BB User manual

Brandt
Brandt FP 228 Guide

Brandt
Brandt FC215MW User manual

Brandt
Brandt FC265MB User manual

Brandt
Brandt FC 222 User manual

Brandt
Brandt BOE1000X User manual

Brandt
Brandt FC 224 User manual

Brandt
Brandt BOP7534B User manual

Brandt
Brandt FC160CW User manual

Brandt
Brandt FC405MB User manual

Brandt
Brandt BXP6577X Installation instructions

Brandt
Brandt FV400XS1 User manual

Brandt
Brandt FC55MUW User manual

Brandt
Brandt FC4200M User manual

Brandt
Brandt FC210MW User manual

Brandt
Brandt FE 210 User manual

Brandt
Brandt FC265MHB User manual

Brandt
Brandt FC 520 Series User manual

Brandt
Brandt BOP7568 BB User manual

Brandt
Brandt FC209MUB User manual