BRASSELER USA EndoSync PLUS User manual

Cordless endodontic treatment motorized handpiece
Thank you for purchasing the EndoSync PLUS.
For optimum safety and performance, read this manual thoroughly before using the unit and pay close attention to warnings
and notes. Keep this manual in a readily accessible place for quick and easy reference.
INSTRUCTIONS FOR USE
Brasseler USA
変更箇所黄色
別紙 改訂履歴も参照してください

1Instructions for Use 2019-02-21
Accident Prevention 3
Precautions 5
Features 6
Parts Identication and Accessories 7
Usage 8
(1) Operating Environments 8
(2) Before Use 8
Charge Battery 8
Connect Contra Angle 9
File Installation 10
Calibration 10
Check Operation 11
(3) Operation 12
Basic Operation 12
Memory Settings 13
Memory Setting: OTR Mode 14
Memory Setting: Normal Mode (CW) 15
Memory Setting: Normal Mode (CCW) 16
Memory Settings: Other Settings 17
Restore Default Memories 18
(4) After Use 18
Take Out File 18
Usage; Operation with EndoSync A.I. 19
Install File Electrode 19
Connect Transmission Cable 20
Check Operation 20
Meter Display 21
Operation 21
Rotor Axle and Built-in Electrode Cleaning 23
Maintenance 25
Autoclavable Components 25
Wipe with Ethanol (70 vol% to 80 vol%) 28
Wash and Wipe with Ethanol (70 vol% to 80 vol%) 29
Table of Contents

2Instructions for Use 2019-02-21
Replacement Parts and Storage 30
(1) Replacement Parts 30
Battery Replacement 30
Built-in Electrode Replacement 31
(2) Transport and Storage Environments 33
Inspection and Warranty 34
Regular Inspection 34
Inspection Items 34
Warranty 35
Troubleshooting 36
Technical Specications 38
Technical Specications 38
Symbols 39
Electromagnetic Disturbances (EMD) 40
Trademarks (™) and Registered Trademarks (®) :
The names of companies, products, services, etc. used in this manual are either trademarks or registered trade-
marks owned by each company.
3Instructions for Use 2019-02-21
The warning symbols ( ) and caution symbols ( ) that appear next to the main text on the
right hand side of the page refer to and are explained by the Warnings and Cautions at the bot-
tom of the page.
Accident Prevention
Make sure to obtain clear instructions concerning the various ways to use this device described in this accompanying manual.
Most operation and maintenance problems result from insufcient attention to basic safety precautions and not being able to
foresee potential accidents.
Problems and accidents are best avoided by anticipating potential dangers and operating the device in accordance with the
manufacturer’s recommendations. First, thoroughly read all precautions and instructions pertaining to safety and accident pre-
vention. Then operate the device with the utmost caution to prevent either damaging the device itself or causing bodily injury.
The following symbols and expressions indicate the degree of danger and harm that could result from ignoring the cor-
responding instructions:
This refers to mandatory actions and procedures that are required to prevent damage to the
device.
The user (e.g., healthcare facility, clinic, hospital etc.) is responsible for the management, maintenance, and use of medical
devices.
This equipment must only be used by dentists and other legally licensed professionals.
Do not use the EndoSync PLUS for anything other than its specied dental purpose.
This alerts the user of the possibility of extremely serious injury or complete destruction of the
device, as well as other property damage including the possibility of re.
This alerts the user of the possibility of minor or moderate injury or damage to the device.
Customers
Preventing Accidents
CAUTION: Federal law restricts this device to sale by or on the order of a dentist. (Valid only for U.S.A.)

4
If an accident occurs, the EndoSync PLUS must not be used until repairs have been completed by a qualied and trained
technician authorized by the manufacturer.
Intended Operator Prole
a) Qualication : Legally qualied person such as dentists for endodontic device operation (it may differs among countries).
b) Education and Knowledge : It is assumed that the understands the risks of root canal measuring and treatment. It is also
assumed the user is thoroughly familiar with root canal measuring and treatment including the prevention of cross contami-
nation.
c) Language Understanding : English (Intended for professional use as described above)
d) Experience : Experienced person with operating endodontic device.
No special training is required except in cases where this is required by legal regulations of the relevant country or region.
Age : Child to Elderly
Weight : Not applicable
Nationality : Not applicable
Sex : Not applicable
Health : It is not intended for use on patients wearing pacemakers or ICDs.
Condition : Conscious and mentally alert person. (Person who can stay still during treatment.)
• When the EndoSync PLUS is connected to the EndoSync A.I., an apex locator, it is not recommended that this device be used with children under 12 years
of age.
Instructions for Use 2019-02-21
■Brasseler USA will not be responsible for accidents, equipment damage, or bodily injury resulting from:
1. Repairs made by personnel not authorized by Brasseler USA.
2. Any changes, modications, or alterations of its products
3. The use of products made by other manufacturers, except for those procured by Brasseler USA.
4. Maintenance or repairs using parts or components other than those specied by Brasseler USA or other than in their origi-
nal condition
5. Operating the device in a manner other than described in the operating procedures in this manual or in a manner inconsis-
tent with the safety precautions and warnings in this manual.
6. Workplace, environmental, or installation conditions that do not conform to those stated in this manual, such as an improp-
er electrical power supply.
7. Fires, earthquakes, oods, lightning, natural disasters, or forces majeure.
■The useful life of the EndoSync PLUS is 6 years from the date of installation provided it is regularly and properly inspected
and maintained.
Disclaimers
In Case of Accident
User Qualications
Patient Population

5Instructions for Use 2019-02-21
• Except for ways described in this manual, this unit must not be connected to or used in combination with any other apparatus
or system. It must not be used as an integral component of any other apparatus or system. Brasseler USA will not be respon-
sible for accidents, equipment damage, bodily injury or any other trouble which results from ignoring this prohibition.
• A rubber dam should be used when performing endodontic treatment.
• No modication of this equipment is allowed.
• Do not perform maintenance while using the unit for treatment.
• Instruments which produce considerable electrical noise such as electric scalpels can cause the EndoSync PLUS to operate
abnormally. Turn the EndoSync PLUS off before using any instruments that produce electrical noise.
• Do not use this unit on patients who have a pacemaker or an Implantable Cardioverter Debrillator (ICD). It could cause the
pacemaker or the Implantable Cardioverter Debrillator (ICD )to function abnormally.
• Illumination devices such as uorescent lights and lm viewers which use an inverter can cause the EndoSync PLUS to oper-
ate erratically. Do not use the EndoSync PLUS near lights such as these.
• Do not use this unit in the medical operation room.
• Blocked canals cannot be accurately measured.
* Brasseler USA is not responsible for any accidents or other types of trouble that are caused by not following the warnings
noted above.
Precautions

6
⹅Liquid Crystal Display (LCD)
The LCD is easy to read and shows all settings as well as how the motor is running.
⹅Controls
< OTR (Optimum Torque Reverse) Mode >
If the le torque is less than the set value, the le will keep rotating in the cutting direction.
When the le torque is more than the set value, the le will automatically rotate in the non-cutting and cutting directions at the
set angle as long as the torque value is exceeded. OTR Mode can set various motor controls as described below. Furthermore,
OTR Mode can use les for which the cutting direction is counterclockwise as well as normal les for which the cutting direction
is clockwise. (The cutting direction of the le can be set.)
Speed 100, 300, 500, 800, and 1000 rpm.
Reverse Torque Setting 0.2, 0.4, 0.6, 0.8, and 1.0 Ncm
(If the rotation speed is 100, 300, or 500 rpm, this can be set to 0.2 or 0.4 Ncm.)
Cutting Direction of File Clockwise (CW), Counterclockwise (CCW)
(The cutting direction is the le rotation direction as seen from the File Release Button side.)
Cutting Angle 90, 150, 180, 270, 360 degrees (If the speed is 100 rpm, this can be set to 90 degrees.)
Non-cutting Angle 30, 60, 90, and 120 degrees
Auto Start & Stop** The le starts when it is inserted in the canal and stops when it is taken out.
Apical Reverse or Stop** The motor reverses or stops when the tip of the le reaches a preset position inside the canal.
Reaches Apex** The motor stops when the tip of the le reaches the apex.
< Normal Mode >
If the le torque is less than the set value, the le will keep rotating in the clockwise direction. When the le torque is more than
the set value, the le will automatically start rotating in the counterclockwise direction.
Furthermore, Normal Mode can set various motor controls as described below. Note that les for which the cutting direction is
counterclockwise cannot be used for Normal Mode.
Speed 50, 100, 150, 200, 250, 300, 400, 500, 600, 800, and 1000 rpm
Torque Reverse The motor automatically reverses its rotation if the torque load exceeds the set value to reduc-
es the risk of jamming. (Only when the cutting direction is set to “CW” [clockwise].)
Reverse Torque Settings 0.2, 0.4, 0.6, 0.8, 1.0, 1.5, 2.0, 2.5, 3.0, 4.0, and 5.0 Ncm
Torque Slow Down The le slows down as torque increases.
Apical Slow Down The le slows down as it approaches the apex if the EndoSync PLUS is connected to the
EndoSync A.I.
Rotation Direction Clockwise (CW), or Counterclockwise (CCW)
Apical Reverse or Stop** The motor reverses or stops when the tip of the le reaches a preset position inside the canal.
Auto Start & Stop** The le starts when it is inserted in the canal and stops when it is taken out.
Apical Torque Reduction** The automatic torque reverse value is reduced as the le tip approaches the apex.
Reaches Apex** The motor stops when the tip of the le reaches the apex.
⹅Memory
Six combinations of speed, torque etc. can be memorized.
• Files for which the cutting direction is counterclockwise can only be used in OTR Mode with CCW setting. These les cannot be used for Normal Mode.
• Be sure to check that the memory setting for cutting direction and cutting direction of the le match. If they are not identical, the le could perforate the apical
foramen when the Apical Reverse or Stop is set to “Rev”.
Instructions for Use 2019-04-25
Features
Instructions for how to use the EndoSync PLUS when it is connected to the EndoSync A.I. are printed on a blue background.
** These functions are available only when the EndoSync PLUS is connected to the EndoSync A.I.
** These functions are available only when the EndoSync PLUS is connected to the EndoSync A.I.

7 Instructions for Use 2019-02-21
Contra Angle
Main Switch
Liquid Crystal Display
Select Switch
Plus and Minus Switches
Power Supply CordCharge LED (orange)Power LED (green)
Charger
Motor Handpiece
Charger Switch
Parts Identi cation and Accessories
⹅Standard Accessories
⹅Optional Accessories
Parts Identi cation
Accessories
Power Supply Cord
(1)
EndoSync Oil
(1)
Guide Bar
(1)
* Use the guide bar when cleaning and
replacing the built-in electrode.
p. 23 “Rotor Axle and Built-in Electrode Cleaning”
p. 31 “Built-in Electrode Replacement”
Handpiece Rest
(1)
Transmission Cable
(1)

8
1 2
Instructions for Use 2019-02-21
Green LED Orange LED
Temperature: +10°C to +40°C (+50°F to +104°F)
Humidity: 30% to 80% (without condensation)
Atmospheric Pressure: 70 kPa to 106 kPa
* If the unit has not been used for some time, make sure it works properly before using it again.
Check the following item before using the unit.
• Have autoclavable components been sterilized? p. 25 “Autoclavable Components”
The battery is built into the motor handpiece.
• The battery is not charged when the unit is shipped and must be charged before using the unit.
• Do not pull or yank the cord when disconnecting the power supply cord. Always grip the connectors.
• Use only the power cord provided and plug both ends all the way in.
• Charger and power supply cord must be located outside the so called patient environment (1.5 m around the patient location).
• If an electrical storm occurs while the battery is being charged, do not touch the charger or its cord as there would be a risk receiving an electric shock.
• Do not get the charger wet or use it where it might get wet.
Usage
(1) Operating Environments
Charge the battery as soon as the battery power indicator gets down to its last bar.
If the orange charge LED goes off immediately or doesn’t light up when the motor handpiece is put into the charger, the battery is probably fully
charged. To make sure, take the motor handpiece out and put it back in again.
Make sure the contact areas for the motor handpiece and charger are free of debris, especially metal fragments. Wipe with ethanol (70 vol% to 80
vol%) to remove any foreign debris. Do not press down too hard to wipe the charging areas; this could bend the electrical contacts.
Do not leave the charger where it will be exposed to direct sunlight.
Do not use any charger; use only the one that comes with the
EndoSync PLUS.
Connect the power cord to the charger and then plug
it in. Turn the charger on. The green Power LED will
light up.
* Ambient (room) temperature for charging is from +10ºC to +40ºC (+50ºF to +104ºF).
Put the motor handpiece into the charger as far as it
will go. The orange Charge LED will light up to show
that charging has begun.
* Charging time is about 120 minutes.
Green LED
(2) Before Use
Charge Battery

9 Instructions for Use 2019-02-21
The number of bars shows how much battery power is left.
Recharge the battery when there is only one bar left.
If the battery runs almost completely out, the EndoSync PLUS will automatically turn itself off
after about 10 seconds. Recharge the battery as soon as possible.
If the battery power is very low and a large load is applied to the le, the motor may stop or the
unit may turn itself off.
This is for safety; there may not be enough power to run the motor with suf cient stability.
Recharge the battery if the display shown to the left appears frequently.
Contra Angle Motor Handpiece
Line up the marks.
Approx. 290°
Do not force the contra angle to rotate beyond its limit.
The rotation range of the contra angle is about 290°.
Set it so that it reaches the treatment area and the
display is easy to see.
Line up the match marks and push the contra angle onto the motor handpiece until there is an audible click.
* The contra angle must be lubricated with the EndoSync Oil before using for the rst time. p. 27 “Lubrication”
• Push the contra angle all the way onto the motor handpiece and then give it a light tug to make sure it is securely attached.
• Make sure the connection components for both the motor handpiece and the contra angle are not damaged. An improper connection could cause the motor to
reverse unexpectedly and result in injuring the patient.
Connect Contra Angle
Charge Battery
10
3
1
2
Instructions for Use 2019-02-21
• Use caution when inserting and removing les to avoid injury to ngers.
• Inserting and removing les without holding the le release button down will damage the chuck.
• Make sure the EndoSync PLUS is turned off before inserting or removing les.
• Be sure to check that the memory setting for cutting direction and cutting direction of the le match. If they are not identical, the le could perforate the apical
foramen when the Apical Reverse or Stop is set to “Rev”.
• Never use deformed or damaged les.
• Give the le a light tug to con rm it is securely held in place. If the le is not securely placed, it could come out and injure the patient.
• When using the linkage function with EndoSync A.I., do not use the les that have no electrical conductivity between the le and its shank. p. 20 “Check
Operation”
It’s easiest to hold the button down if you put your index
nger where the head joints the body.
Use either Nickel-titanium or stainless steel les.
1. Hold down the le release button.
2. Insert the le and turn it back and forth until it lines
up with the latch mechanism.
3. Push the le all the way into the latch. Release the
le release button.
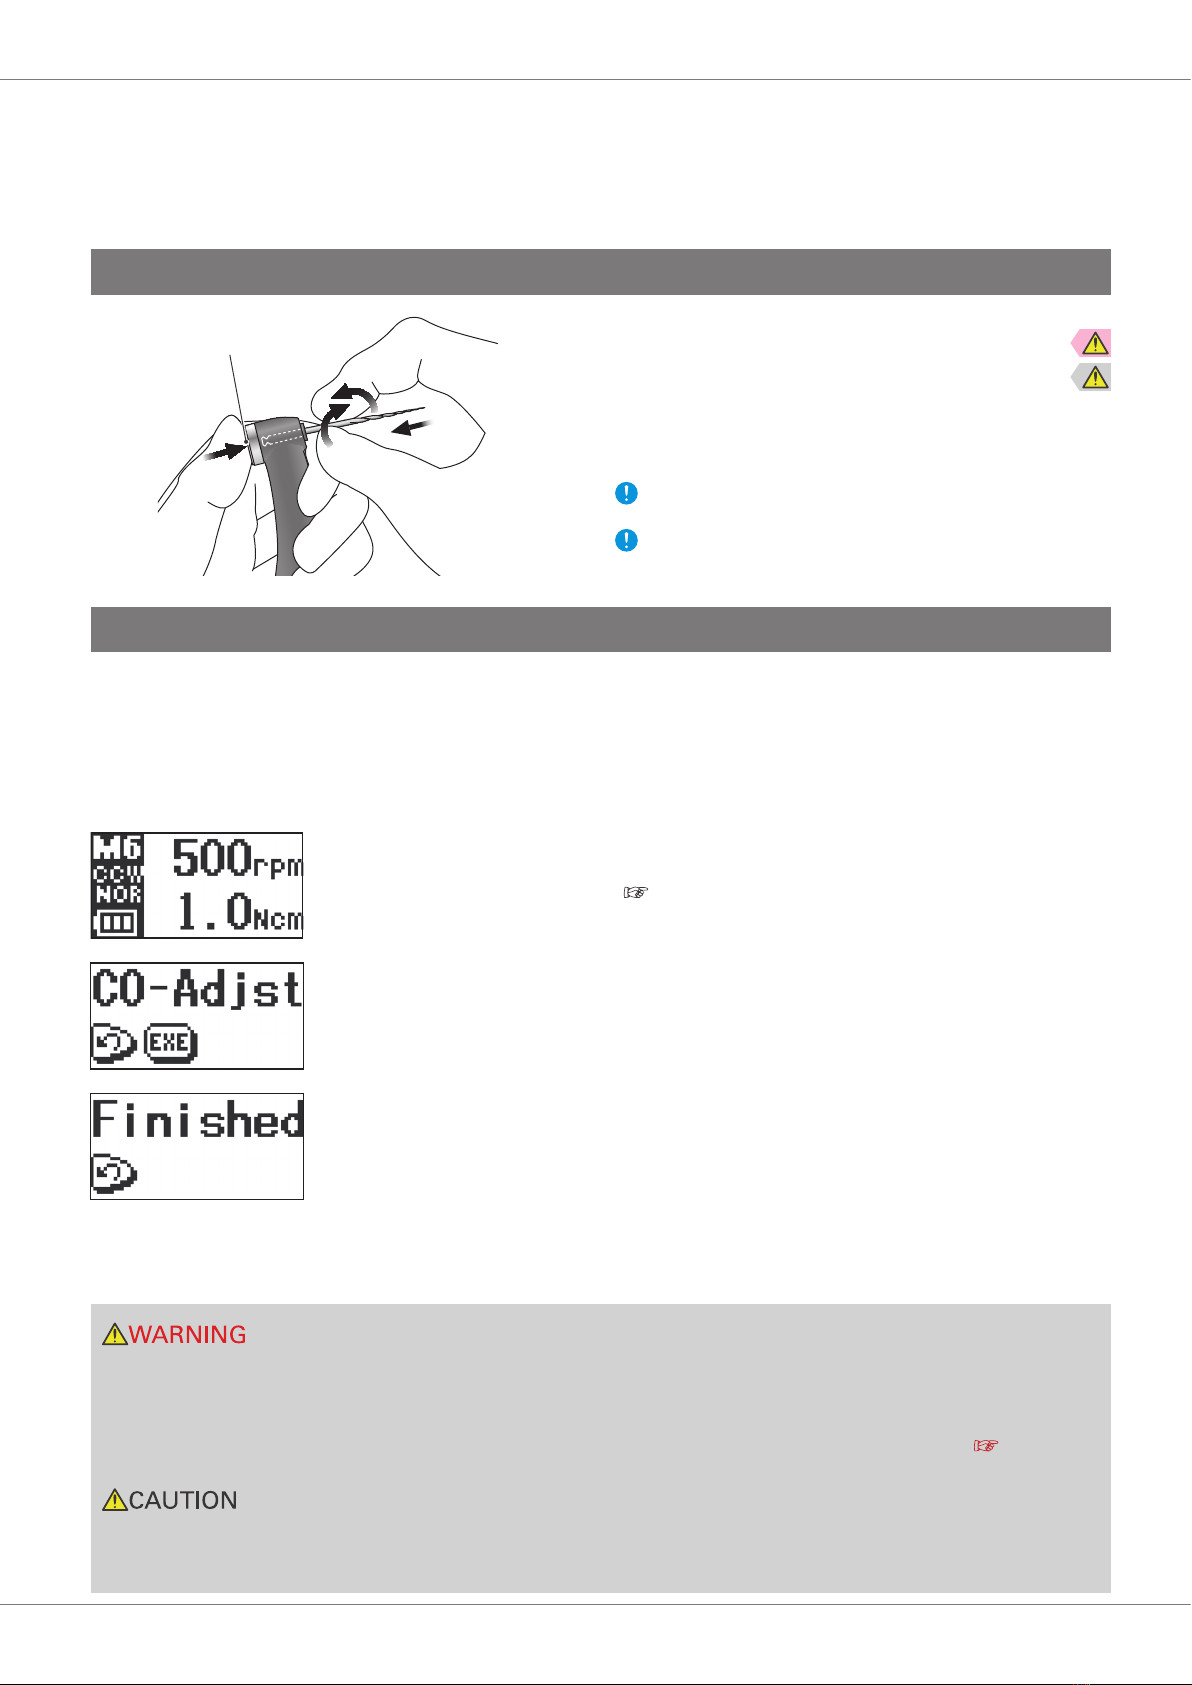
* Before using right after purchase, whenever the motor handpiece or contra angle has been replaced, or if the motor alternates
between forward and reverse rotation outside the canal, calibrate the unit in the following way:
1.Turn the unit on. (Press the Main Switch.)
2.Make sure the battery is fully charged (three bars are displayed).
3. Put a commonly used le into the contra angle.
4.Press the Plus or Minus Switch and then select memory M6.
5.Hold down the Select Switch for 2 seconds or more.
6.Set Rotation Mode to “CCW”; p. 16 “Memory Setting: Normal Mode (CCW)”
7.Turn the unit off. (Hold the Select Switch and then press the Main Switch.)
8.Hold the Plus and Minus Switches and then press the Main Switch to turn the unit back on.
9.When "CO-Adjst" appears in the display, press the Select Switch.
The motor will start running. Make sure there is no load on the le.
10. When "Finished" appears in the display, the motor will stop and the calibration will be com-
pleted. Press the Main Switch to go to the Standby Display.
* Once calibration has been completed, you may change the M6 setting and you may turn the
unit off with a setting other than M6.
* If the unit uses a le electrode, calibrate the unit by putting the electrode on the le and con-
necting the unit to a EndoSync A.I. unit which is turned on.
File Release Button
File Installation
Calibration

11 Instructions for Use 2019-02-21
Main Switch
File release button
Plus and Minus Switches
• Stop using the EndoSync PLUS if you feel or notice anything unusual. The EndoSync PLUS cannot be used for every canal and should be used along with
manual enlargement.
• File break more easily at fast speeds; always follow the le manufacturer’s usage recommendations. Also always check the speed settings before use.
• Do not use any type of les except nickel-titanium and stainless steel ones.
• Nickel-Titanium les are easily broken; note the following points.
• Open the canal up to the apical constriction manually before using a nickel-titanium le.
• Never use excessive force to insert the le.
• First remove all foreign matter, such as bits of cotton from the root canal.
• Never use excessive force to advance the le down the root canal.
• Do not use for extremely curved canals.
• Try not to trigger the auto torque reverse function when advancing the le down the canal.
• Do not skip le sizes; suddenly using a much larger le could break it.
• If you encounter resistance or the auto torque reverse is triggered, back the le up 3 or 4 mm and carefully advance it down the root canal again. Or re-
place the le with a smaller size. Never use excessive force.
• Do not force the le down the root canal or press it against the root canal wall.
• Do not use the same le continuously in one position as this may create “steps” on the root canal wall.
• Always take le out of the contra angle after use.
• Be sure to check that the memory setting for cutting direction and cutting direction of the le match. If they are not identical, the le could perforate the apical
foramen when the Apical Reverse or Stop is set to “Rev”.
• Operate the EndoSync PLUS outside the oral cavity to make sure it will operate properly before using it for treatment.
• Some canals may be impossible to enlarge; always take an X-ray to check.
• Nickel-titanium le may suddenly snap depending on the curvature and shape of the canal; stop using the le if you notice or feel anything amiss.
• Files will eventually break due to metal fatigue and should be replaced before they reach this point.
• Electric noise or a malfunction could interfere with the motor control. Do not depend entirely on the unit controlling itself; always watch the display and be
aware of tactile feedback.
• Files will jam and break if too much force is applied to them.
• Files may break even when the torque reverse is turned on, depending on the setting value. Never exert excessive force on the le.
• Files designed for use with engines break easily if too much force is applied. Also do not use these les for canals with excessive curvature.
• Always examine les for stretching and other deformities or damage before using them. Any type of deformity could result in the le breaking.
• Do not let the le release button on the contra angle press against the teeth opposite to the treatment area; this could cause the le to come out and result in
an injury.
• Do not press the le release button while the motor is running. It could heat up and cause a burn, or the le could come out and cause an injury.
If a malfunction occurs, the Endo-
Sync PLUS will stop working.
p. 36 “Troubleshooting”
■Make sure the contra angle and motor handpiece are properly and securely connected.
■ Make sure the le is securely installed; give it a light tug.
■Check switch operation.
Turn the Main Switch on and use the Plus or Minus Switches to select a memory number. Then press the Main Switch
again to see if the EndoSync PLUS runs smoothly.
How to check the EndoSync PLUS’s operation when it is connected to the EndoSync A.I.; pp. 19 to 24 “Usage; Op-
eration with EndoSync A.I.”
If this error display appears frequently, stop using the
unit and contact Brasseler USA. The number that ap-
pears after Error will depend on the type of malfunction.
Check Operation

12
1. Turn EndoSync PLUS On: Press the Main Switch.
The Standby Display will appear.
2. Select Memory Number: Press the Plus or Minus Switch.
* There are six memories for various combinations of speed, torque reverse and rotation mode settings.
* The backlight will temporarily change color if changing the memory number changes anything other than the speed, torque
reverse, and rotation mode settings.
3. Start Motor: Press the Main Switch again.
The Torque Display will appear.
* If you hold the Main Switch down when you start the motor, it will run only while the switch is held down and stop when the
switch is released.
* You can temporarily change the reverse torque setting while the motor is running by pressing the Plus or Minus Switch. (This
works only for Normal Mode.)
* The color of the backlight changes based on the load applied to the le.
* The backlight starts blinking when the load approaches the reverse torque setting. While the OTR is triggered, the back-
light does not blink.
4. Stop Motor: Press the Main Switch again.
The Standby Display will reappear.
5. Turn EndoSync PLUS Off: Hold the Select Switch and then press the Main Switch.
The EndoSync PLUS turns itself off automatically if it is not used for 3 minutes (initial setting).
Instructions for Use 2019-02-21
Reverse Torque Setting
Memory Number
Cutting Direction of File
Rotation Mode
Battery Power
Speed Setting
Reverse Torque Setting
Rotation Direction
Current Torque
Operation Mode
Standby Display (OTR Mode)
Standby Display (Normal Mode)
Torque Display
For meter readings and operation connected to the EndoSync A.I.; pp. 21 to 22.
(3) Operation
Main Switch
(Turn power on and starts/stops rotation)
Liquid Crystal Display
Select Switch
Plus and Minus Switches
(Select memory and change settings)
Basic Operation
• Be sure to check that the memory setting for cutting direction and cutting direction of the le match. If they are not identical, the le could perforate the apical
foramen when the Apical Reverse or Stop is set to “Rev”.
• Be sure to check the new settings whenever you change the Memory Number.
• The temperature of the motor handpiece rises up to +47.5°C (+117.5°F) when the ambient temperature is +40°C (+104°F).
• When the OTR seems to be triggered too frequently, or it is triggered immediately after starting the normal rotation, increase the torque setting by one level.
When the Apical Torque Reduction is set to “ON”, the torque setting cannot be temporarily changed.

13
• Files for which the cutting direction is counterclockwise can only be used in OTR Mode with CCW setting. These les cannot be used for Normal Mode.
• Be sure to check that the memory setting for cutting direction and cutting direction of the le match. If they are not identical, the le could perforate the apical
foramen when the Apical Reverse or Stop is set to “Rev”.
Instructions for Use 2019-02-21
The initial settings are shown below. These settings can be changed.
• If the torque limit is too high, the le could jam inside the canal and break.
• The torque settings must be changed depending on the root canal condition and the le.
• If the torque reverse seems to be activated too frequently increase its value.
• When OTR Mode (motor runs back and forth continuously) seems to be triggered too frequently, or it is triggered immediately after starting the normal rotation,
increase the torque setting by one line.
Setting
Memory
M1 M2 M3 M4 M5 M6
Rotation Mode OTR OTR OTR OTR OTR CW
Cutting Direction of File CW CW CCW CW CW CW
Speed (rpm) 500 500 500 1000 300 500
Reverse Torque (Ncm) 0.6 0.2 0.2 1.0 0.6 1.0
Cutting Angle (degree) 180 180 180 180 180 N/A
Non-cutting Angle (degree) 60 60 60 90 90 N/A
Apical Action Function** ON ON ON ON ON ON
Apical Reverse or Stop** Stop Stop Stop Stop Stop Stop
Auto Start or Stop** ON ON ON ON ON ON
Apical Slow Down** N/A N/A N/A N/A N/A OFF
Apical Torque Reduction** N/A N/A N/A N/A N/A OFF
Torque Slow Down N/A N/A N/A N/A N/A OFF
Memory Settings
⹅Operation Mode
There are three modes for canal shaping.
CW : Normal 360º forward rotation. Torque reverse and other functions can be used.
OTR : Used for canal shaping.
CCW :Reverse rotation only.
* When this mode is being used, a double-beep sounds continuously.
** These functions are available only when the EndoSync PLUS is connected to the EndoSync A.I.

14
Memory Setting: OTR Mode
Instructions for Use 2019-02-21
1.Select a memory number for the Standby Display;
press the Plus or Minus Switch.
2.Hold down the Select Switch for at least 2 seconds
to show the display for operation settings.
3.Press the Select Switch to go from one display to
the next.
4.Press the Plus or Minus Switch to change the set-
ting.
* Pressing the Main Switch to go back to the Stand-
by Display.
* The display will go back to the Standby Display
when 10 seconds (initial setting) elapses without
a switch being pressed.
Apical Action Function**:
When this is set to “ON”, Apical Reverse or Stop function be activated.
Sync: ON
Sync: OFF
Non-Cutting Angle:
30, 60, 90, and 120 degrees
Cutting Angle:
90, 150, 180, 270, and 360 degrees. (If the speed is 100 rpm, this can be set to 90 degrees)
OTR Cutting Direction of File:
CW or CCW
Reverse Torque Settings:
0.2, 0.4, 0.6, 0.8, and 1.0 Ncm
(If the speed is 100, 300, or 500 rpm, this can be set to 0.2 or 0.4 Ncm.)
Speed Settings:
100, 300, 500, 800, and 1000 rpm
Rotation Mode:
OTR or Normal (CW, CCW)
Apical Reverse or Stop**:
The le will reverse or stop when the le tip reaches the Flash Bar.
When Apical Action Function is set to “OFF”, this display will be
skipped.
Auto Start & Stop**:
When this is set to “ON”, the le starts rotating when it is inserted and stops when it is taken out of
the canal.
** These functions are available only when the EndoSync PLUS is connected to the EndoSync A.I.
(2 sec.)

15
Apical Action Function**:
When this is set to “ON”, Apical Reverse or Stop function be activated.
Instructions for Use 2019-02-21
Memory Setting: Normal Mode (CW)
1.Select a memory number for the Standby Display;
press the Plus or Minus Switch.
2.Hold down the Select Switch for at least 2 seconds
to show the display for operation settings.
3.Press the Select Switch to go from one display to
the next.
4.Press the Plus or Minus Switch to change the set-
ting.
* Pressing the Main Switch to go back to the Stand-
by Display.
* The display will go back to the Standby Display
when 10 seconds (initial setting) elapses without
a switch being pressed.
(2 sec.)
Torque Slow Down:
When this is set to “ON”, the motor will slow down as the torque load increases.
Apical Slow Down**:
When this is set to “ON”, the le slows down as it approaches the Flash Bar.
Apical Torque Reduction**:
When this is set to “ON”, the torque setting that triggers reverse rotation is reduced as the le tip
approaches the apex.
Cannot be used along with Apical Torque Reduction function.
If the Torque Reverse Less (TRL) is turned on, the Torque Slow Down function is disabled.
Cannot be used along with Apical Torque Reduction function.
Cannot be used along with Apical Slow Down or Torque Slow Down functions.
If the Torque Reverse Less (TRL) is turned on, the Apical Torque Reduction function is disabled.
Reverse Torque Settings:
0.2, 0.4, 0.6, 0.8, 1.0, 1.5, 2.0, 2.5, 3.0, 4.0, and 5.0 Ncm
This function can also be turned off: TRL (torque reverse less).
Speed Settings:
50, 100, 150, 200, 250, 300, 400, 500,
600, 800, and 1000 rpm
Rotation Mode:
Normal (CW, CCW) or OTR
Sync: ON
Sync: OFF
Apical Reverse or Stop**:
The le will reverse or stop when the le tip reaches the Flash Bar.
When Apical Action Function is set to “OFF”, this display will be
skipped.
Auto Start & Stop**:
When this is set to “ON”, the le starts rotating when it is inserted and stops when it is taken out of
the canal.
** These functions are available only when the EndoSync PLUS is connected to the EndoSync A.I.

16
Memory Setting: Normal Mode (CCW)
Instructions for Use 2019-02-21
1.Select a memory number for the Standby Display;
press the Plus or Minus Switch.
2.Hold down the Select Switch for at least 2 seconds
to show the display for operation settings.
3.Press the Select Switch to go from one display to
the next.
4.Press the Plus or Minus Switch to change the set-
ting.
* Pressing the Main Switch to go back to the Stand-
by Display.
* The display will go back to the Standby Display
when 10 seconds (initial setting) elapses without
a switch being pressed.
Reverse Torque Settings:
When Rotation Mode is set to “CCW”, the TRL (torque reverse less) setting cannot be changed.
Speed Settings:
50, 100, 150, 200, 250, 300, 400, 500,
600, 800, and 1000 rpm
Rotation Mode:
Normal (CW, CCW) or OTR
Apical Action Function**:
When this is set to “ON”, Apical Reverse or Stop function be activated.
Sync: ON
Sync: OFF
Apical Reverse or Stop**:
When Rotation Mode is set to “CCW”, the Stp (stop) setting cannot
be changed.
Auto Start & Stop**:
When this is set to “ON”, the le starts rotating when it is inserted and stops when it is taken out of
the canal.
(2 sec.)
** These functions are available only when the EndoSync PLUS is connected to the EndoSync A.I.
17 Instructions for Use 2019-02-21
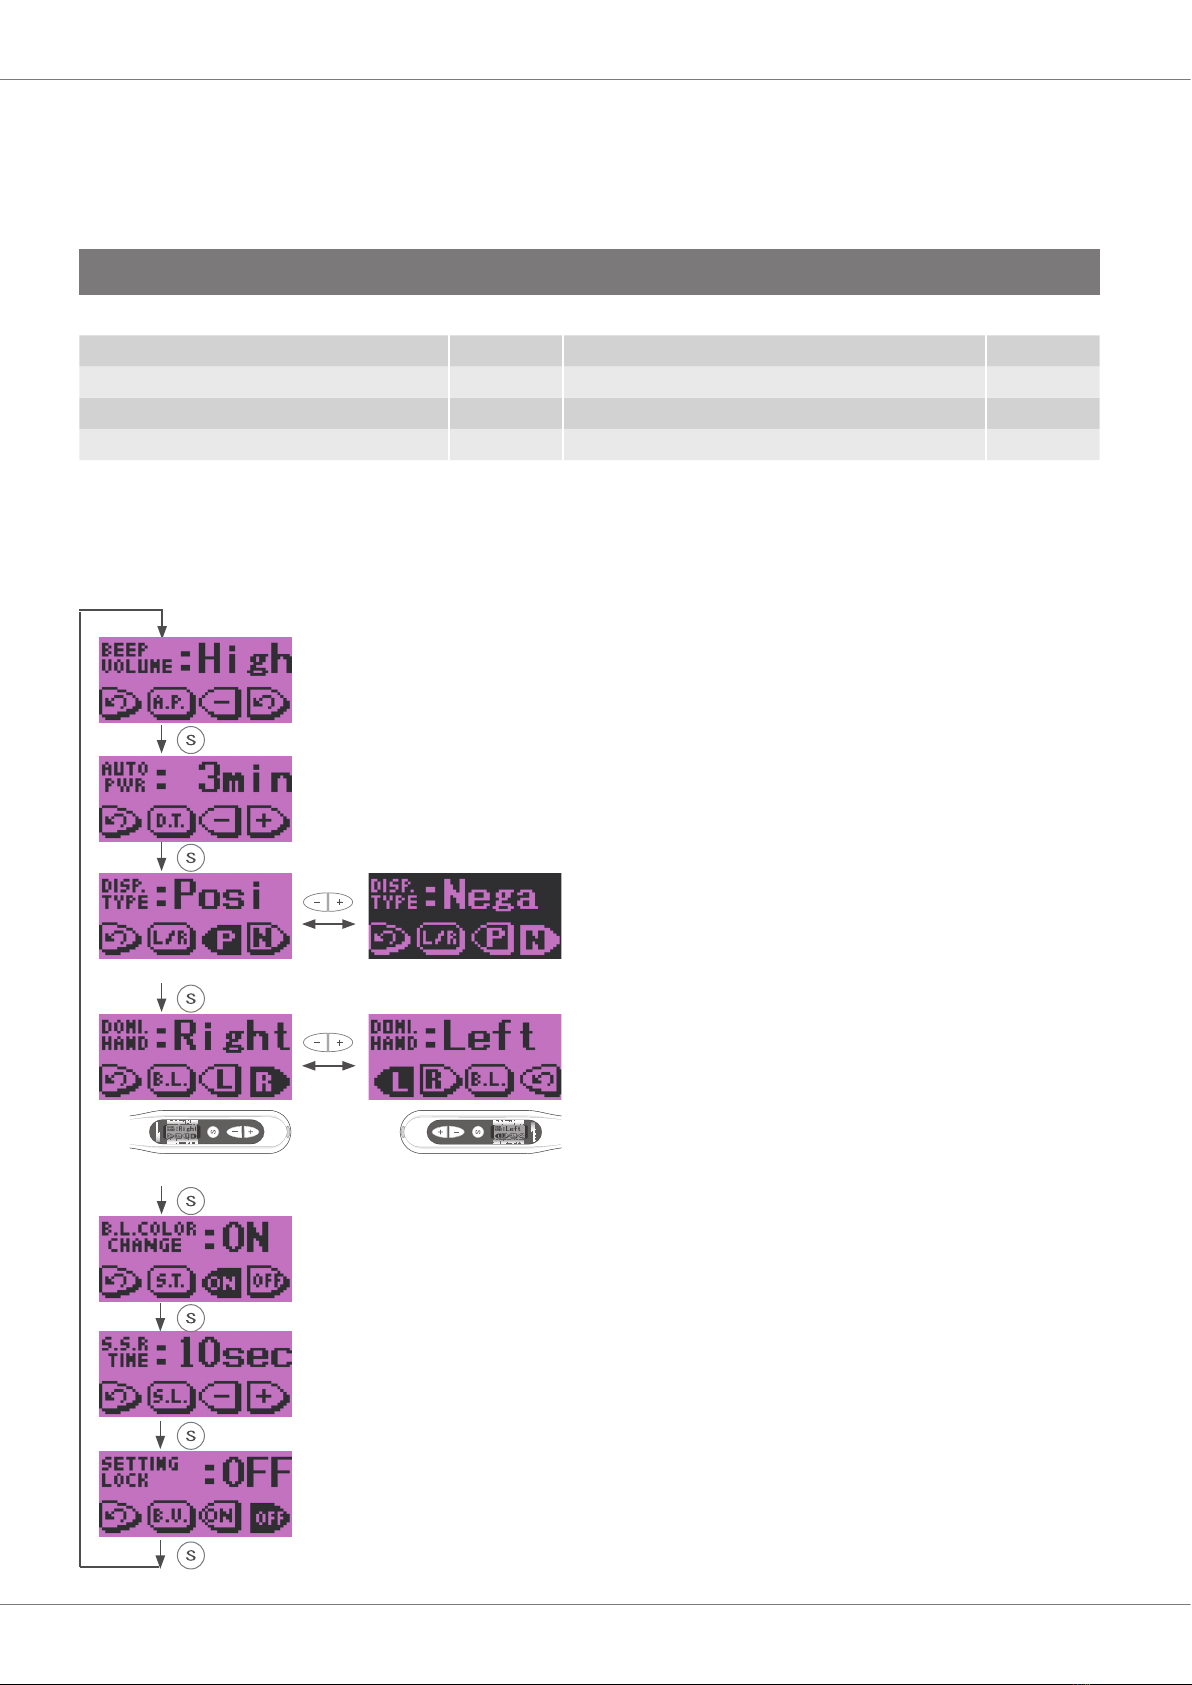
Other Settings: The initial settings are shown below.
1.With unit turned off, hold down Select Switch and then press the Main Switch.
2.Press the Select Switch to select one of the settings.
3.Press the Plus or Minus Switches to change the setting.
4.Press the Main Switch to return to the Standby Display.
Beeper (BEEP VOLUME) High Backlight (B.L.COLOR CHANGE) ON
Auto Power Off (AUTO PWR) 3 min. Return to Standby Time (S.S.R TIME) 10 sec.
Positive/Negative Display (DISP. TYPE) Posi Memory Setting Lock (SETTING LOCK) OFF
Right or Left Handed (DOMI. HAND) Right
Positive Display Negative Display
Right Handed Left Handed
Beeper Volume:
Press Plus or Minus Switch to set beep volume used for Switch operation and alarms at OFF,
Low or High.
Auto Power Off Time:
The time lapse for automatic shut off when the unit is not used can be set from 1 to 15 min-
utes. Press Plus or Minus Switch to set the time.
Positive / Negative Display:
Set display for black on white background or vice versa.
Right or Left Handed:
Set display for right- or left-handed user. Display turns up-
side down for left-handed users.
Backlight Color Change:
When this is set to “ON”, the backlight will change color depending on torque and le tip loca-
tion. It also changes color for setting displays. Does not change color when this is set to “OFF”.
Memory Setting Lock:
When this is set to “OFF”, all memory settings for each memory (M1 to M6) can be changed.
Set this to “ON” to preserve the memory settings.
Return to Standby Time:
Set the time that elapses before display returns to standby from settings displays. Set from 1
to 15 seconds by pressing Plus or Minus Switches.
Memory Settings: Other Settings

18
1
2
Instructions for Use 2019-02-21
Restore the initial settings for the memories in the following way.
* This will restore the original memory settings. You cannot restore settings for just one memory.
1.With the unit turned off, hold down the Select Switch, the Plus Switch and the Minus Switch and then turn the unit on with the
Main Switch.
2.The "MemClear" display will appear. Press the Select Switch to restore the default memories or press the Main Switch to
cancel the operation.
3.Wait unit the “Finished” display appears and then press the Main Switch to go to the Standby Display.
• Take care not to injure your ngers when inserting and removing les.
• Never insert or remove les without holding down the button; this will damage the chuck.
• Make sure the unit is turned off before inserting or removing les.
1.Hold down the Select Switch and press the Main Switch to turn the power off.
* The power will go off automatically if the unit is not used and no switches are pressed for 3 minutes.
2. Hold down the le release button and pull the le straight out.
(4) After Use
Take Out File
Restore Default Memories

19 Instructions for Use 2019-02-21
Usage; Operation with EndoSync A.I.
Install File Electrode
• Never put le in or take them out without pressing the button down. This could damage the chuck. Always hold the button down to put a le in or take it out.
• Use only Ni-Ti or properly designed stainless steel les.
• Be careful not cut your nger when putting les in and taking them out.
• Do not let the cutting part of the le touch the electrode; this will wear it out very quickly.
• Some les cannot be used with this electrode.
• Do not use les shanks larger than the ISO standard: Diameter 2.334 to 2.350 mm
• After use, be sure to take the le out.
• Be sure to check that the memory setting for cutting direction and cutting direction of the le match. If they are not identical, the le could perforate the apical
foramen when the Apical Reverse or Stop is set to “Rev”.
• Some les cannot use the built-in electrode to make measurement; always check for conductivity before using a le.
• Make sure the le goes all the way in. Give it a light tug to make sure it is held securely.
• Never use stretched, deformed or damaged les.
• Make sure the screw is tight enough. Otherwise, it might come out and be swallowed. Also, measurements might not be accurate.
3
1
2
It’s easiest to hold the button down if you put your index
nger where the head joints the body.
Use either Nickel-titanium or stainless steel les.
1. Hold down the le release button.
2. Insert the le and turn it back and forth until it lines
up with the latch mechanism.
3. Push the le all the way into the latch. Release the
le release button.
File Release Button
Other manuals for EndoSync PLUS
1
Table of contents
Other BRASSELER USA Medical Equipment manuals


Popular Medical Equipment manuals by other brands


Getinge
Getinge Arjohuntleigh Nimbus 3 Professional Instructions for use

Mettler Electronics
Mettler Electronics Sonicator 730 Maintenance manual

Pressalit Care
Pressalit Care R1100 Mounting instruction

Denas MS
Denas MS DENAS-T operating manual

bort medical
bort medical ActiveColor quick guide

AccuVein
AccuVein AV400 user manual


