BRAVILOR BONAMAT Bolero 20 User manual

Operating instructions GB
HOT BEVERAGE BREWER

1
2
10
3
9
8
7
4
65
19
20
2.5
2.4
2.3
2.2
2.2
2.1
11
12
13
14
15
16
17
18
19 4.1
4.1.1
4.6.1
4.
3
4.2
4.
4
4.
5
4.
6
4.
7
4.
8
21.2
21.1
21

400
55
W=40 E=37
572
245
200

1
Instruction Manual English
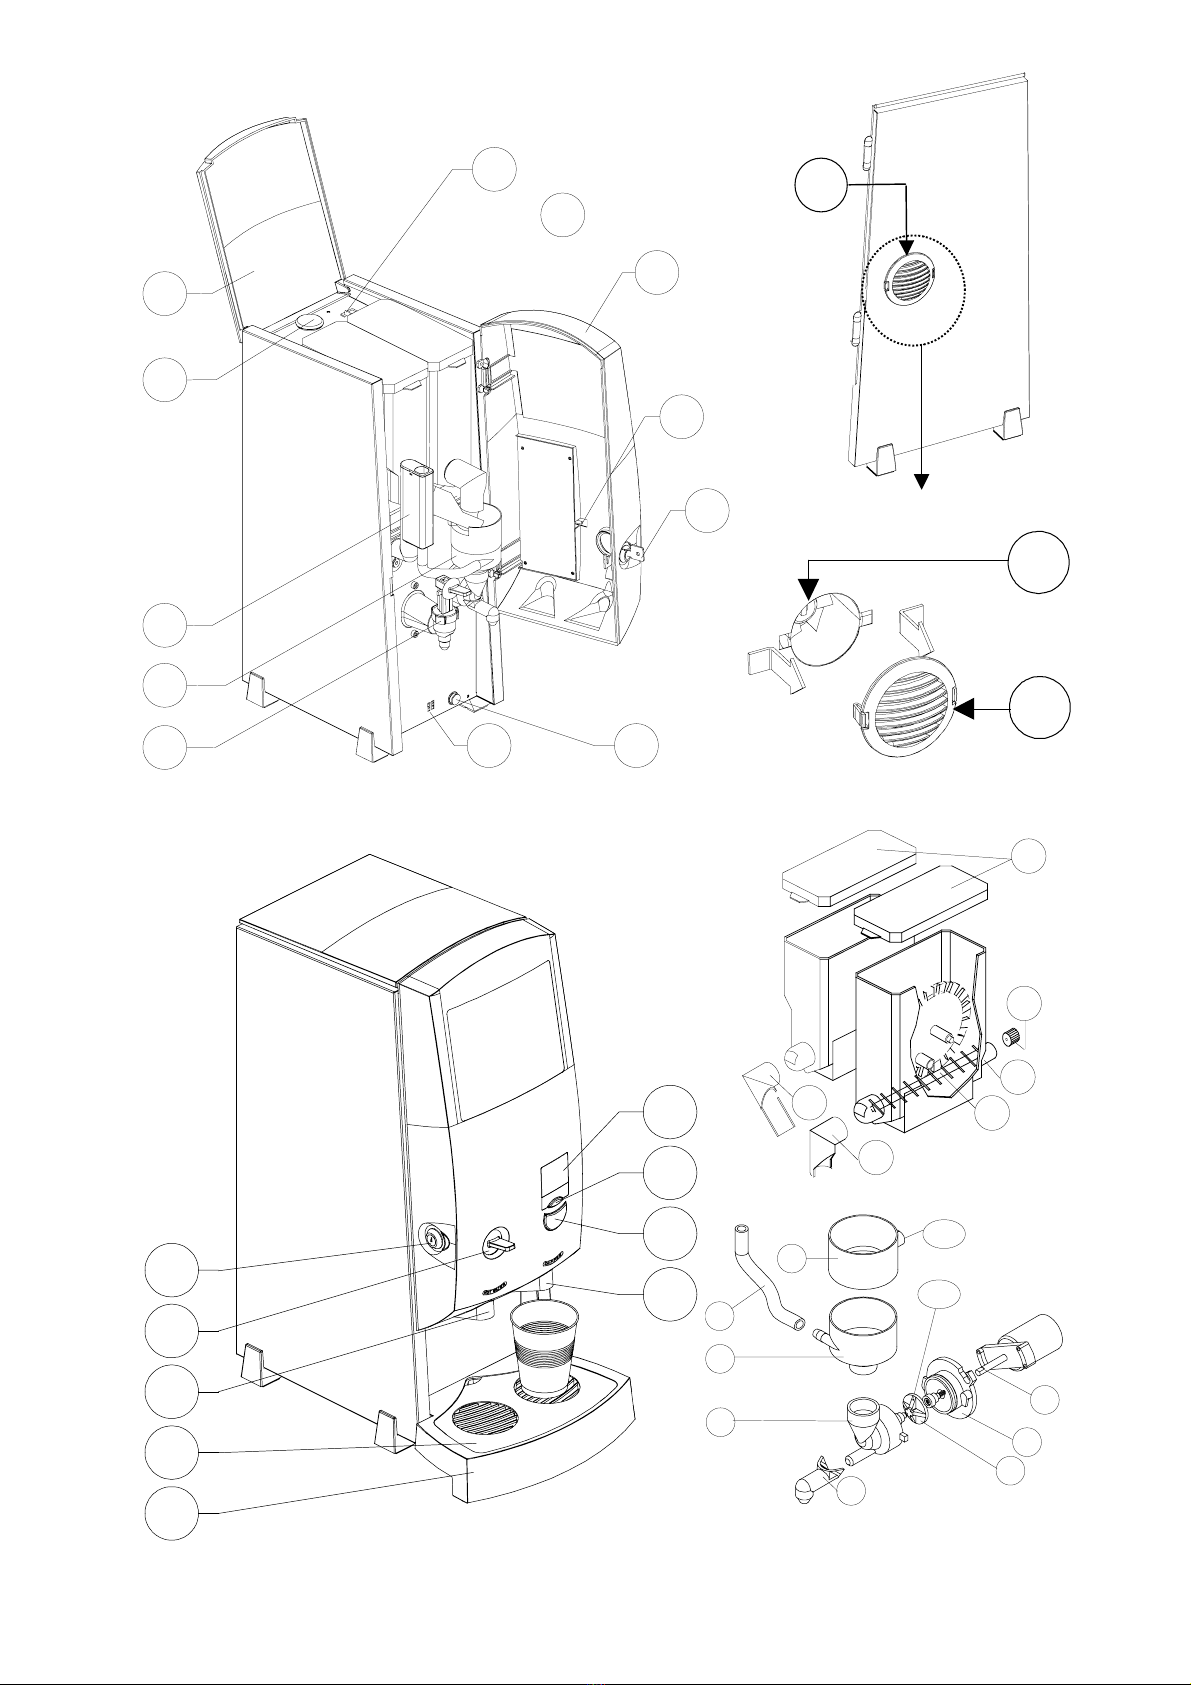
1.1 Introduction
We are delighted that you have chosen
one of our quality products, the Bolero.
These machines are specially designed
for making hot beverages
Model Bolero 20 is suitable for various
types of coffee, such as regular coffee,
decaffeinated coffee, etc.
This model is equipped with a plastic
worm and a motor running at 116 rpm for
both ingredient containers.
Model Bolero 21 is suitable for coffee-
/cappuccino, coffee/hot chocolate, etc. To
this end, this model is equipped with a
metal spiral and a motor running at 135
rpm for the right-hand ingredient
container.
In order to gain full and safe benefit from
this machine's facilities, we advise you to
read this manual carefully.
We recommend that you keep the double
page unfolded while reading this manual.
Contence Page
1.1. INTRODUCTION ................................................................. 1
1.2. MODELS AND TYPES.......................................................... 2
1.3. WARNINGS AND PRECAUTIONS .......................................... 2
1.3.1. Warnings............................................................ 2
1.3.2. Precautions........................................................ 2
1.4. A QUICK MACHINE GUIDE ................................................... 3
1.4.1. Accessories........................................................ 3
1.5. INSTALLING THE MACHINE AND SETTING UP FOR OPERATION 4
1.5.1. Hot-water tap ..................................................... 4
1.6. SETTINGS......................................................................... 5
1.7. GENERAL PROGRAMMING PROCEDURE............................... 6
1.7.1. In general........................................................... 6
1.7.2. Activating the settings program.......................... 6
1.7.3. Closing the settings program ............................. 6
1.8. STEP-BY-STEP PROGRAMMING .......................................... 7
1.8.1. Starting the rinsing program............................... 7
1.8.2. Start descaling program..................................... 7
1.9. STEP BY STEP PROGRAMMING (CONTINUED)....................... 8
1.9.1. Setting the quantity of beverage per cup for the
beverage under the left-hand start button.......... 8
1.9.2. Setting the quantity of beverage per cup for the
beverage under the right-hand start button ....... 8
1.10. STEP BY STEP PROGRAMMING (CONTINUED)..................... 9
1.10.1. Setting the strength of the beverage per cup for
the beverage under the left-hand start button
(from the left-hand ingredient container)..........9
1.10.2. Setting the strength of the beverage per cup for
the beverage under the right-hand start button
(from the right-hand ingredient container)........9
1.10.3. Setting the strength of the beverage per cup for
the beverage under the right-hand start button
(from the left-hand ingredient container).............. 9
1.10.4. Switching the mixer on or off when tapping
cups for the beverage under the left-hand start
button ...............................................................9
1.11. STEP BY STEP PROGRAMMING (CONTINUED) ...................10
1.11.1. Switching the mixer on or off when tapping
cups for the beverage under the right-hand
start button......................................................10
1.11.2. Setting the quantity of beverage per decanter
or switching off the decanter option for the
beverage under the left-hand start button ......10
1.12. STEP BY STEP PROGRAMMING (CONTINUED) ...................11
1.12.1. Setting the quantity of beverage per decanter
or switching off the decanter option for the
beverage under the right-hand start button....11
1.12.2. Switching the mixer on or off for decanters
for the beverage under the left-hand start
button. ............................................................11
1.12.3. Switching the mixer on or off for decanters
for the beverage under the right-hand start
button .............................................................11
1.13. STEP BY STEP PROGRAMMING (CONTINUED) ...................12
1.13.1. Setting the water temperature........................12
1.13.2. Setting descaling signal..................................12
1.14. USAGE..........................................................................13
1.14.1. Hot-water tap..................................................13
1.14.2. Stopping the brewing process ........................13
1.15. MAINTENANCE...............................................................14
1.15.1. Daily maintenance:.........................................14
1.15.2. Weekly maintenance: .....................................14
1.15.3. Cleaning the ingredient containers:................14
1.15.4. Removing and cleaning ventilator ..................14
1.16. DESCALING ...................................................................15
1.17. MALFUNCTIONS.............................................................16

2
1.2 Models and types
This instruction manual applies to the
following machines:
Blr20-001 (with plastic corkscrew)
Blr21-001 (with metal spiral)
See the type plate on the machine for
data relating to power, model and type
number, etc. We recommend that you
record this data in the drawing of the type
plate in the back of this instruction
manual.
1.3 Warnings and precautions
Please observe the following warnings
and precautions for safe use of the
Bolero:
1.3.1 WARNINGS
∆Never submerge the machine in water.
∆Stay with the machine during
maintenance activities such as
descaling.
∆The machine must be connected to the
power and water supply in such a way
that it can be detached easily.
∆The manufacturer accepts no liability for
any damage resulting from installation,
use or maintenance that is not in
compliance with this manual.
∆It is very important not to use regular
silicon grease on the axle (4.8). It has to
be silicon grease for food purpose use
only.
∆Avoid touching moving parts when
opening the machine. This can be
dangerous!
1.3.2 PRECAUTIONS
•If the machine is not used for some
considerable time, it is recommended
that you disconnect the water- and
power supply.
•Normally some water will always remain
inside the machine, please note this
carefully before placing the machine in
a room where the temperature might
drop below 0° Celsius.
•If you are using a strong detergent or
descaling agent, it is highly recommen-
ded to wear safety goggles (facial
protection) and gloves.
•Avoid spilling descaling agent on the
outside of the machine, as this may
result in lasting damage to the housing.
Remove any accidentally spilled
descaling agent immediately, while
taking all necessary warnings and
safety precautions mentioned in this
manual.
•Wash you hands after using a strong
detergent or descaling agent.
•All repairs must be performed by the
Bravilor Bonamat dealer or a skilled and
authorised expert.
•Remove the plug from the mains socket
before opening the machine, e.g. for
maintenance or repairs.
•Always connect this machine to an
earthed wall socket.
•Always use approved materials and
parts for installing or repairing this
machine.
•This machine must be connected to the
water supply using a manually operated
tap and the water hose supplied.
•Always observe local rules and
standards when installing this machine.
•This machine can only be used in a
room where the temperature will not fall
below 2°C or rise above 30°C.
•If this machine is exposed to
temperatures below freezing point, the
remaining water inside will freeze. If this
is the case, do not switch the machine
on, unplug it and call your service
engineer.
•Do not place this machine on a surface
at a slope of more than 5°.

3
1.4 A quick machine guide
The double page presents the most
important parts of the machine. Keep this
double page unfolded &while reading
this instruction manual.
1. On/off switch of the machine
2. Container for ingredients with
dispensing mechanism
2.1 Cover of container for ingredients
2.2 Outlet (discharge opening)
2.3 Corkscrew (plastic) or
Spiral (metal)
2.4 Connection piece
2.5 Gear wheel
3. Program switch
4. Mixing basin
4.1 Mixing basin (upper)
4.1.1 Extraction aperture
4.2 Mixing basin (lower)
4.3 Hose
4.4 Mixing chamber
4.5 Outlet
4.6 Mixer
4.6.1 Point (on mixer)
4.7 Base plate
4.8 Axle
5. Drain hose
6. Hot-water cock
7. Hot-water syphon
8. Inlet for descaling agent
9. Top cover
10. Door
11. Display
12. Selection key
13. Start button for the left and right
beverage (=setting key for
program)
14. Beverage outlet
15. Drip-tray
16. Drip-tray cover plate
17. Hot-water outlet
18. Hot-water tap
19. Lock with key
20. Opening for fixing driptray
21. Ventilator
21.1 Grate
21.2 Ventilator
1.4.1 ACCESSORIES
•Glass decanter
•Renegite
•Funnel
•Water connection hose
•Drip-tray with cover plate
•Keys
•Brush
•Operating instructions
•Sticker sheet
•Captions for the start button
When the machine requires descaling,
the descaling symbol (see figure 1)
appears in the display (11).
Fi
g
. 1
Fi
g
. 2
Fi
g
. 3

4
1.5 Installing the machine and setting up for operation
1. Place the machine on the work
surface. Leave a minimum of 6 cm
clear on the right-hand side so that the
door (10) can be opened.
2. Place the sticker “hot water” in the
recess above the hot water tap (17).
3. Place the sticker "Quantity" in the
recess above the beverage outlet (14).
4. Remove the cover of the start button
(13) at the bottom. Insert the desired
text in the cover. Press the cover
down on both sides until it clicks into
place.
5. Make sure that the machine is stable
and horizontal.
6. Check whether an earthed wall socket
and water supply are close by.
7. Connect the machine to the water
supply (via a tap) with the supplied
connection hose.
8. Open the tap.
9. Insert the plug in the earthed wall
socket.
10. Place the drip-tray (15) in front of the
machine. Put the fixing cams into the
opening (20).
−It is possible to connect a drain
hose to the drip-tray. A small spout
is provided at the rear of the
drip-tray. Drill a hole in this and
slide the hose onto it.
11. Open the door (10) on the left-hand
side with the key (19).
12. Open the cover of the machine (9).
13. Remove the covers (2.1) from the
ingredient containers. Fill the ingre-
dient containers with the special
ingredients available for these
machines. The right-hand ingredient
container of the model suitable for
making hot chocolate or cappuccino
must be filled with chocolate or milk
powder.
14. Replace the cover on the ingredient
container.
15. Switch on the machine. Set switch (1)
to the 'on' position, which shows a red
indicator side at the switch
−The machine will now fill with water.
−The water will be heated.
16. The version number of the machine
appears briefly in the display (11).
(Inform the engineer of this number in
case of repair or maintenance.) A cup
then appears in the display, see figure 2.
17. Close the cover (9).
18. Push the door to close it.
19. Lock the door with the key (19). A
flashing thermometer will appear in
the top right-hand corner of the
display, see figure 3. When the water
is hot enough, the thermometer will
disappear from the display.
20. Place an empty coffee cup under the
beverage outlet (14).
21. Push the left-hand side of the start
button . The beverage is dispensed
into the cup. (The cup in the display
flashes while the beverage is
dispensed.)
22. Discard the first two cups of beverage.
23. Repeat points 20 till 22, but this time
press the right-hand side of the start
button.
24. Replace the cup under the outlet and
push the left-hand side of the start
button again.
25. Check whether the taste and quantity
of the beverage are to your satisfac-
tion for the beverage specified
beneath the left-hand start button.
26. If the taste and quantity are correct,
repeat points 24 and 25, but this time
press the right-hand side of the start
button.
27. The beverage maker is ready for use
if the taste and quantity are correct for
both beverages.
28. If the taste and/or quantity is not
correct for one or both beverages,
proceed to chapter 1.6 Settings.
1.5.1 HOT-WATER TAP
1. Place a cup under the hot-water
outlet (17).
2. Draw off a cup of hot water via the
hot-water tap and discard this.
The hot-water system is now ready for
use.

5
1.6 Settings
The machine is equipped with a program
that allows you to set all the facilities of
the beverage maker. The program
comprises fifteen components in the
following sequence:
1. § 1.8.1 Starting the rinsing program.
2. § 1.8.2 Start descaling program.
3. § 1.9.1 Setting the quantity of
beverage per cup for the beverage
under the left-hand start button.
4. § 1.9.2 Setting the quantity of
beverage per cup for the beverage
under the right-hand start button.
5. § 1.10.1 Setting the strength of the
beverage per cup for the beverage
under the left-hand start button( from
the left-hand ingredient container).
6. § 1.10.2 Setting the strength of the
beverage per cup for the beverage
under the right-hand start button
(from the right-hand ingredient
container).
7. § 1.10.3 Setting the strength of the
beverage per cup for the beverage
under the right-hand start button
(from the left-hand ingredient container)
8. § 1.10.4 Switching the mixer on or off
when tapping cups for the beverage
under the left-hand start button.
9. § 1.11.1 Switching the mixer on or off
when tapping cups for the beverage
under the right-hand start button.
10. § 1.11.2 Setting the quantity of
beverage per decanter or switching
off the decanter option for the
beverage under the left-hand start
button.
11. 1.12.1Setting the quantity of
beverage per decanter or switching
off the decanter option for the
beverage under the right-hand start
button.
12. § 1.12.2 Switching the mixer on or off
for decanters for the beverage under
the left-hand start button.
13. § 1.12.3 Switching the mixer on or off
for decanters for the beverage under
the right-hand start button.
14. § 1.13.1 Setting the water
temperature.
15. § 1.13.2 Setting descaling signal.

6
1.7 General programming procedure
1.7.1 IN GENERAL
Before you start programming, remember
which settings have to be changed.
Make a note of the settings you wish to
change. You can then enter all the
changes in one go, one after the other.
An explanation of the different setting
possibilities is given in § 1.8.1 trough
1.13.2.
1.7.2 ACTIVATING THE SETTINGS PROGRAM
1. Open the door with the key (19).
2. Switch on the machine. Set switch (1)
to the 'on' position, which shows a red
indicator side at the switch.
3. Press the programming button (3) on
the inside of the door.
4. The number of brewed cups of
beverage for the beverage under the
left-hand and right-hand start buttons,
see figure 4, appears in the display
(11) on the outside of the door.
5. Attention! The program returns to
normal mode after 10 seconds. Press
again the programming button (3).
6. Press selection key (12). The
cleaning program will appear in the
display, see figure 5.
7. Press selection key (12)
again to proceed to the next
possible program/setting. In this
manner you can use the selection
key to run through all the
settings in the program. The display
shows what can be set after each
step.
1.7.3 CLOSING THE SETTINGS PROGRAM
1. If you have finished setting up the
program, press the programming
button (3) on the inside of the door
again. The new settings will now be
saved.
2. Check whether the changed settings
of points 3 to 14, § 1.6 are correct, by
tapping of a cup or decanter. If not,
change the settings so that they are
correct.
Fig. 4

7
1.8 Step-by-step programming
1.8.1 STARTING THE RINSING PROGRAM
1. Select the rinsing program. Figure 5
now appears in the display.
2. Place a cup under the beverage
outlet (14).
3. Press on the right-hand side of the
start button ß(13). The rinsing
program now flushes the machine
with hot water. This runs into the cup.
4. Discard this water.
5. Repeat steps 3 and 4 until the water
in the cup is clear. Press the
programming switch (3) to return.
The machine is again ready for use.
1.8.2 START DESCALING PROGRAM
1. Open the door (10) and flip the cover
(9) up.
2. Remove both ingredient containers (2)
and the drip-tray (15).
3. Press the programming key (3).
4. Select the descaling program with
selection key (12). Figure 6
appears in the display.
5. Press the right-hand side of the start
button ß(13).
−Cancelling the descaling
program, see point 24.
6. Pull out the drain hose (5).
7. Place the drain hose (5) over the
edge of a bucket that can hold at
least 7 litres.
CARE! Water that is leaving the hose
may be hot!
8. Remove the drain plug of the drain
hose (5) to allow the water out into
the drain or the bucket.
9. Replace the plug on the hose.
10. Gently remove the hose (4.3) from the
mixer chamber (4.2) and place it over
the edge of a bucket.
11. Dissolve 100 grams Renegite in
approx. 0.5 litre warm water.
12. Remove the plug from the descaling
inlet (8).
13. Use a funnel to pour the descaling
solution into the descaling inlet (8).
14. Close the inlet again with the plug.
15. Leave the Renegite solution for a few
minutes to take effect.
16. Press on the right-hand side of the
start button ß(13). The descaling
program now starts and will last for
approx. 15 minutes. The machine will
be rinsed with water.
17. Tap a few cups of water through the
hot-water tap to flush the hot-water
outlet.
18. Remove the drain plug of the drain
hose (5) to allow the water out into
the drain or the bucket.
19. Replace the plug on the hose.
20. Replace the ingredient containers (2).
21. Replace the drain hose (5) in its
original position and close the lid and
the door.
22. Replace the drip-tray (15).
23. Press the programming key (3). The
machine will now fill with water and
the water will be heated.
−The machine is again ready for
use. The descaling signal is now
automatically reset .
Fig. 5
Fig. 6
PRECAUTIONARY MEASURE **
•Stay with the machine throughout the
descaling process.
•Wear gloves and a facial protector
while descaling.

8
1.9 Step by step programming (continued)
24. Halt the descaling program
immediately after point 5:
Within 5 seconds:
The descaling program can be
cancelled by pressing the left-hand side
of the start button à,see fig. 7.
After 5 seconds:
−Switch off the machine by using
the On/Off switch.
−Press the programming button (3)
and keep this depressed.
−Switch on the machine again. The
machine has now quit the
descaling program and is again
ready to dispense coffee.
1.9.1 SETTING THE QUANTITY OF BEVERAGE
PER CUP FOR THE BEVERAGE UNDER
THE LEFT-HAND START BUTTON
1. Select program “Setting the quantity of
beverage per cup for the beverage
under the left-hand start button”.
Figure 8 appears in the display.
2. Press the right-hand side of the
setting key ß(13) for a larger
quantity, (maximum approx. 280 ml).
3. Press the left-hand side of the setting
key à(13) for a smaller quantity,
(minimum approx. 80 ml).
The default setting is 120 ml.
1.9.2 SETTING THE QUANTITY OF BEVERAGE
PER CUP FOR THE BEVERAGE UNDER
THE RIGHT-HAND START BUTTON
1. Select program “Setting the quantity of
beverage per cup for the beverage
under the right-hand start button”.
Figure 9 appears in the display.
2. Press the right-hand side of the
setting key ß(13) for a larger
quantity, (maximum approx. 280 ml).
3. Press the left-hand side of the setting
key à(13) for a smaller quantity,
(minimum approx. 80 ml).
The default setting is 120 ml.
Fig. 7 Fig. 8
Fig. 9
WARNING
Never halt the descaling program when
descaling agent has already been
poured into the machine!

9
1.10 Step by step programming (continued)
1.10.1 SETTING THE STRENGTH OF THE
BEVERAGE PER CUP FOR THE BEVERAGE
UNDER THE LEFT-HAND START BUTTON(
FROM THE LEFT-HAND INGREDIENT
CONTAINER)
1. Select program “Setting quantity of
ingredient” from the left-hand ingre-
dient container. Figure 10 appears in
the display.
2. Press the right-hand side of the
setting key ß(13) for a larger
quantity/stronger taste, (max. 25).
3. Press the left-hand side of the setting
key à(13) for a smaller
quantity/weaker taste, (minimum 1).
The default setting is 4.
1.10.2 SETTING THE STRENGTH OF THE
BEVERAGE PER CUP FOR THE BEVERAGE
UNDER THE RIGHT-HAND START BUTTON
(FROM THE RIGHT-HAND INGREDIENT
CONTAINER)
1. Select program “Setting quantity of
ingredient” from the right-hand
ingredient container. (The quantity of
milk powder for cappuccino.)
Figure 11 appears in the display.
2. Press the right-hand side of the
setting key ß(13) for a larger
quantity/stronger taste, (max. 25).
3. Press the left-hand side of the setting
key à(13) for a smaller
quantity/weaker taste, (minimum 1).
The default setting is 17.
In the case of model Blr21-001, this is
suitable for milk powder and chocolate.
In the case of Blr20-001 (for coffee), we
recommend changing this setting to 7.
1.10.3 SETTING THE STRENGTH OF THE
BEVERAGE PER CUP FOR THE BEVERAGE
UNDER THE RIGHT-HAND START BUTTON
(FROM THE LEFT-HAND INGREDIENT
CONTAINER)
−For the model for coffee/cappuccino,
the quantity of coffee must here be set
for cappuccino.
−For the model for coffee/special coffee
and coffee/hot chocolate, the quantity
must be set to zero.
1. Select program “Setting quantity of
ingredient” from the left-hand
ingredient container. Figure 12
appears in the display.
2. Press the right-hand side of the
setting key ß(13) for a larger
quantity/stronger taste, (max. 25).
3. Press the left-hand side of the setting
key à(13) for a smaller
quantity/weaker taste, (minimum 0).
The default setting is 4. (Only when it is set at
“zero”, decanters can be selected with the
right start button, see § 1.12.3).
1.10.4 SWITCHING THE MIXER ON OR OFF WHEN
TAPPING CUPS FOR THE BEVERAGE
UNDER THE LEFT-HAND START BUTTON
When drawing off both cups and jugs,
you can choose to switch the mixer on or
off. Mixing provides a layer of froth on the
coffee, for example. If you do not want a
layer of froth, then switch off the mixer.
(The mixer spins briefly before stopping.)
Always switch on the mixer when using
ingredients with a high dosage, such as
chocolate. Failing to do so results in
blockages.
Fig. 10
Fig. 11
Fig. 12

10
1.11 Step by step programming (continued)
1. Select program “switching mixer on or
off”. Figure 13 appears in the display.
2. Press the left-hand side of the setting
key à(13) to switch the mixer off,
see fig. 14.
3. Press the right-hand side of the
setting key ß(13) to switch the
mixer on, see fig. 13.
The default setting is: ON.
1.11.1 SWITCHING THE MIXER ON OR OFF WHEN
TAPPING CUPS FOR THE BEVERAGE
UNDER THE RIGHT-HAND START BUTTON
1. Select program “Switching the mixer on
or off” for the beverage under the
right-hand start button. Figure 15
appears in the display.
2. Press the left-hand side of the setting
key à(13) to switch the mixer off,
see fig. 16.
3. Press the right-hand side of the
setting key ß(13) to switch the
mixer on, see fig. 15.
The default setting is: ON.
1.11.2 SETTING THE QUANTITY OF BEVERAGE
PER DECANTER OR SWITCHING OFF THE
DECANTER OPTION FOR THE BEVERAGE
UNDER THE LEFT-HAND START BUTTON
1. Select program “Setting the quantity
per decanter for the beverage under
the left-hand start button.” Figure 17
appears in the display.
2. Press the right-hand side of the
setting key ß(13) for a larger
quantity, (maximum approx. 720 ml).
3. Press the left-hand side of the setting
key à(13) for a smaller quantity,
(minimum approx. 480 ml).
4. If the left-hand side of the setting key
à(13) is pressed once again after
480 ml, a decanter appears that is
crossed out, see figure 18. This
setting means that no decanters can
be tapped - i.e. only cups.
The default setting is: 720 ml.
Fig. 13
Fig. 14
Fig. 15
Fig. 16
Fig. 17
Fig. 18

11
1.12 Step by step programming (continued)
1.12.1 SETTING THE QUANTITY OF BEVERAGE
PER DECANTER OR SWITCHING OFF THE
DECANTER OPTION FOR THE BEVERAGE
UNDER THE RIGHT-HAND START BUTTON
1. Select program “Setting the quantity
per decanter” for the beverage under
the right-hand start button. Figure 19
appears in the display.
Care! No decanters can be selected
for cappuccino. This is the same as
setting the quantity to 1 or more in
§ 1.10.2.
2. Now proceed with points 2 to 4 of
§ 1.11.2.
1.12.2 SWITCHING THE MIXER ON OR OFF FOR
DECANTERS FOR THE BEVERAGE UNDER
THE LEFT-HAND START BUTTON.
Both in drawing off cups as well as
decanters, you can choose to switch the
mixer on or off. This mixing provides a
layer of froth on for example the coffee.
In drawing off whole decanters, too much
froth can be produced. If this is the case,
then switch the mixer off. (The mixer
spins ones before stopping.)
Always switch on the mixer in using
ingredients with a high dosage, such as
chocolate. Failing to do so results in
blockages.
1. Select program “Switching the mixer
on or off” for the beverage under the
left-hand start button. Figure 21
appears in the display.
2. Press the right-hand side of the
setting key ß(13) to switch the
mixer on, see fig. 22.
3. Press the left-hand side of the setting
key à(13) to switch the mixer off.
The default setting is: OFF
1.12.3 SWITCHING THE MIXER ON OR OFF FOR
DECANTERS FOR THE BEVERAGE UNDER
THE RIGHT-HAND START BUTTON
1. Select program “Switching the mixer
on or off” for the beverage under the
right-hand start button. Figure 23
appears in the display.
Care! No decanters can be selected
for cappuccino, and therefore the
mixer can also not be selected.
2. Now proceed with points 2 to 3 of
§ 1.12.2, Switching the mixer on or
off for decanters for the beverage
under the left-hand start button.
Fi
g
. 19 Fi
g
. 20
Fi
g
. 21 Fi
g
. 22
Fig. 23
Fig. 24

12
1.13 Step by step programming (continued)
1.13.1 SETTING THE WATER TEMPERATURE
1. Select program 'setting the water
temperature'. Figure 25 appears in
the display.
2. The setting ranges from 80 C through
90 C.
3. Select the required setting with the
start button .
−press on the right-hand side of the
setting key ßfor a higher water
temperature.
−press on the left-hand side of the
setting key àfor a lower water
temperature.
The default setting is 85°C.
1.13.2 SETTING DESCALING SIGNAL
1. Select program 'setting descaling
signal', see figure 26.
−The setting ranges from 0 through
5.
−This setting allows you to set the
number of litres of beverage that
can be brewed, after which the
machine must be descaled.
−This setting depends on the
hardness of the water. The harder
the water, the sooner descaling is
necessary.
2. Select the required setting with the
setting key ß(13).
−press on the right-hand side of the
setting key ß(=ascending).
−press on the left-hand side of the
setting key ß(=descending)
The default setting is: ± 1000 litres,
setting 3.
Water hardnessSetting Number of
litres °dH description
no signalling
1 ± 250 litres 18 till 30 hard
2 ± 500 litres 12 till 18 fairly hard
3 ± 1000 litres 8 till 12 average
4 ± 1500 litres 4 till 8 soft
5 ± 2000 litres 0 till 4 very soft
4,0 °dH = 0,714 mmol/litres
5,6 °dH = 1,000 mmol/litres
8,0 °dH = 1,429 mmol/litres
12,0 °dH = 2,143 mmol/litres
18,0 °dH = 3,214 mmol/litres
30,0 °dH = 5,357 mmol/litres
10,0 °TH = 1,000 mmol/litres
Fig. 25 Fig. 26

13
1.14 Usage
1. Insert the plug into an earthed wall
socket.
2. Open the door (10) on the left-hand
side with the key (19).
3. Open the top cover of the machine
(9).
4. Remove the covers (2.1) from the
ingredient container.
5. Fill the ingredient containers with the
special ingredients available for these
machines.
6. Replace the covers on the ingredient
containers.
7. Switch on the machine. Set switch (1)
to the 'on' position, which shows a red
indicator side at the switch.
8. Close the top cover (9).
9. Lock the door with the key (19).
A coffee cup appears in the display
(11). In the top right-hand corner a
flashing thermometer appears, see
fig. 3. As soon as the water is at the
correct temperature the thermometer
will disappear.
10. Place an empty cup under the
beverage outlet (14).
11. Push the left or right-hand side of the
start button (13) to select the
beverage.
12. The beverage will run into the cup.
13. It is also possible to tap a half or a
whole decanter of beverage.
14. Pushing the selection key (12)
once, or twice in a row enables you to
tap a whole decanter or half a
decanter respectively. The display
(11) subsequently shows half a
decanter and a full decanter.
15. Place an open and empty decanter
under the beverage outlet (14) when
the whole or half-decanter setting is
selected.
16. Press the left or right-hand side of
the start button within five
seconds. If you wait any longer, the
machine automatically returns to the
cup setting.
−If the water temperature is too low,
a thermometer appears in the
display, see figure 3. Tapping
beverage is temporarily blocked.
−As soon as the water has returned
to the correct temperature, a cup
appears in the display. From this
moment on it is possible to tap
beverage once again.
1.14.1 HOT-WATER TAP
−The hot-water tap is intended for filling
a cup occasionally.
−The hot-water tap (18) is not blocked
when the water temperature is too low.
−It is unadvisable to draw hot water
during drawing beverage.
1.14.2 STOPPING THE BREWING PROCESS
When the decanter setting is selected
and the start button is pressed,
although only cups are needed, it is
possible to halt the brewing process.
Halt the brewing process by pressing the
start button again immediately after
the start or by pressing the selection key
. Although this stops the brewing
process, a one cup beverage will still run
into the cup.

14
1.15 Maintenance
It goes without saying that the machine
and the accessories have to be kept
thoroughly clean.
1.15.1 DAILY MAINTENANCE:
−Cleaning:
•Remove the plug from the wall
socket.
•Clean the inside and the outside of
the machine with a moist cloth, if
necessary with a non-abrasive
and/or non-aggressive detergent.
Then wipe the machine dry with a dry
cloth.
−Wash with brush and hot water, or use
an ordinary detergent:
•Glass decanter
•Drip-tray
•Loose parts, see the fold out sheet.
Remove these parts as follows:
1. Remove hose (4.3) from the
mixing basin (4.2).
2. Pull mixing basin towards you to
remove the extraction aperture
(4.1.1) from the hole.
3. Twist the mixing basin (4.1+4.2)
back and forth to remove it.
4. Pull the outlet (4.5) carefully off
the mixing chamber (4.4) by a
rotating motion.
5. Remove the mixing chamber
(4.4) by turning it to the right
and pulling it towards you.
6. After cleaning replace the parts
in reverse order.
−Cleaning program:
•Perform the rinsing program every
day, see § 1.8.1, Starting the rinsing
program.
1.15.2 WEEKLY MAINTENANCE:
−Wash with brush and hot water, or use
an ordinary detergent:
•Perform the procedure for removing
the loose parts, see step 1 - 5 of the
daily maintenance.
1. Remove the mixer (4.6) at the
same time as the base plate
(4.7) by turning it to the right
and pulling it forward.
2. Clean these parts.
3. Clean the axle (4.8).
4. Replace all the parts in reverse
order.
Care! The mixer (4.6) contains
a dot (4.6.1). Slide the nut onto
the axle with the dot aligned to
the flat side of the axle.
1.15.3 CLEANING THE INGREDIENT
CONTAINERS:
−Before refilling the ingredient
containers:
•Use both hands to lift the ingredient
containers carefully out of the
machine, slanting it forward slightly.
•Use the brush that came with the
machine to remove residue from the
ingredient container (2) and the
corkscrew (plastic) or spiral (metal)
(2.3). Never use water or detergent
to clean this part of the machine.
•Replace the container in the same
way as you removed it, but in the
reverse order.
•Make sure:
−the connector (2.4) fits correctly
over the toothed wheel (2.5) in
the rear.
−the fixing lug of the container falls
into the slit of the panel.
1.15.4 REMOVING AND CLEANING VENTILATOR
1. Remove the plug from the wall socket.
2. Take the ventilation grate (21.1)
between thumb and index finger,
press the sides a little inwards, pull it
forward and remove the grate.
3. Take the ventilator (21.2) between
thumb and index finger and pull it
carefully out of the ventilator casing.
4. Clean the ventilator and its casing
thoroughly using a brush.

15
1.16 Descaling
During use limescale deposits
accumulate in the machine. The machine
is equipped with a signalling function that
is activated after a certain number of
litres water have run through the machine
(see § 1.13.2 Setting descaling signal).
When this descaling signal is activated
(fig. 1 appears in the display), the
descaling program § 1.8.2 must be
started soon.
Before descaling read the instruction
manual and the recommendations on the
sachet of descaling agent. We
recommend to use Renegite, which we
have tested.
PRECAUTIONARY MEASURE **
•Stay with the machine throughout the
descaling process.
•Wear gloves and a facial protector
while descaling.

16
1.17 Malfunctions
In the event of malfunctions, first consult
the malfunctions list. If this list does not
help to resolve the problem, consult your
Bravilor Bonamat dealer, your service
engineer or one of the service centres.
LIST OF MALFUNCTIONS
SYMPTOM:POSSIBLE CAUSE:ACTIONS:
•The machine does not
work and nothing appears
in the display.
•The plug is not in the socket.
•The external fuse has blown;
the group is overloaded.
•Put the plug into the socket.
•Replace fuse in question.
Connect machine to different
group if necessary.
•The descaling signal
(fig. 1) appears in the
display.
•The set number of litres for
the descaling setting has
been reached.
•Descale machine, see § 1.8.2.
•Nothing comes out of
the beverage outlet.
•Water comes out of the
ventilator.
•The mixing beaker is
obstructed. •Follow the procedure before
removing and cleaning the
separate parts. See § 1.15.1
Daily maintenance.
•The signal and 'error'
appears in the display.
•The water supply is blocked. 1. Supply cock is still closed.
Open it.
1.1 Switch the machine off
and on again by switch
3, to remove “error” from
the display. (It may be
necessary to repeat the
procedure after 5 min.)
1.2 If the machine still does
not start, remove the
mains plug from the
socket and call your
service engineer.
2. Close supply cock.
Disconnect the connecting
hose on either side and
remove any blockages.
1.3 Carry out Point 1.1 and,
if necessary, Point 1.2.
•A leak has been detected
near the axle (4.8). •The axle (4.8) and base
plate (4.7) are dirty. •Clean base plate and axle,
see § 1.15.2. Add a little
grease to the axle if
necessary. Replace base
plate if necessary.
•The signal and 'error'
appears in the display.
•Serious malfunction. •Remove plug from the wall
socket and call your service
engineer.
SUBJECT TO MODIFICATIONS
WARNING
If the machine needs to be opened, e.g.
in the case of repairs, the plug must first
be removed from the wall socket!

Blr020-001/Blr021-001 - 16 A
L= ± 120 cm
min. 1 bar/max. 10 bar
240 /h
Model : .....................................
Type : 8 . . .
Vlgnr. : ...............................VHH
CE
...............V 50/60HZ.................W
Other manuals for Bolero 20
1
This manual suits for next models
1
Table of contents
Other BRAVILOR BONAMAT Brewing System manuals

BRAVILOR BONAMAT
BRAVILOR BONAMAT Aurora GTBSH-001 Installation and maintenance instructions

BRAVILOR BONAMAT
BRAVILOR BONAMAT FRESHONE (G) Instruction sheet

BRAVILOR BONAMAT
BRAVILOR BONAMAT FreshMore User manual

BRAVILOR BONAMAT
BRAVILOR BONAMAT HP User manual

BRAVILOR BONAMAT
BRAVILOR BONAMAT B-Compact User manual

BRAVILOR BONAMAT
BRAVILOR BONAMAT Aurora GTBSH-001 User manual

BRAVILOR BONAMAT
BRAVILOR BONAMAT Aurora Twin Low User manual

BRAVILOR BONAMAT
BRAVILOR BONAMAT Bolero 10 User manual

BRAVILOR BONAMAT
BRAVILOR BONAMAT SPRSO User manual

BRAVILOR BONAMAT
BRAVILOR BONAMAT Aurora Single Low Instruction sheet