BREL BR35-10 User manual

Page 1
Manual Brel bi-directional mechanical radio 35mm and 45mm motor
Type BR35 and BR45
Read the manual before you begin the installation. f these instructions are not followed,
this may lead to defects and injury in which warranty can’t be claimed.
warning:
Children cannot recognize the dangers of electrical equipment and may therefore not work with it.
t is important to follow this instruction for your own safety.
1. Do not operate the motor in humid surroundings.
2. The motor must be installed correctly.
3. eep the antenna in a good condition and do not shorten.
The antenna should not come into contact with other metal
parts otherwise it will reduce the effect.
4. The motor must be protected from direct moisture influences.
5. BREL-Motors declares that this motor has been manufactured according to the guidelines of the CE standard 1999/5/EC
_______________________________________________________________________________
Wiring
_______________________________________________________________________________
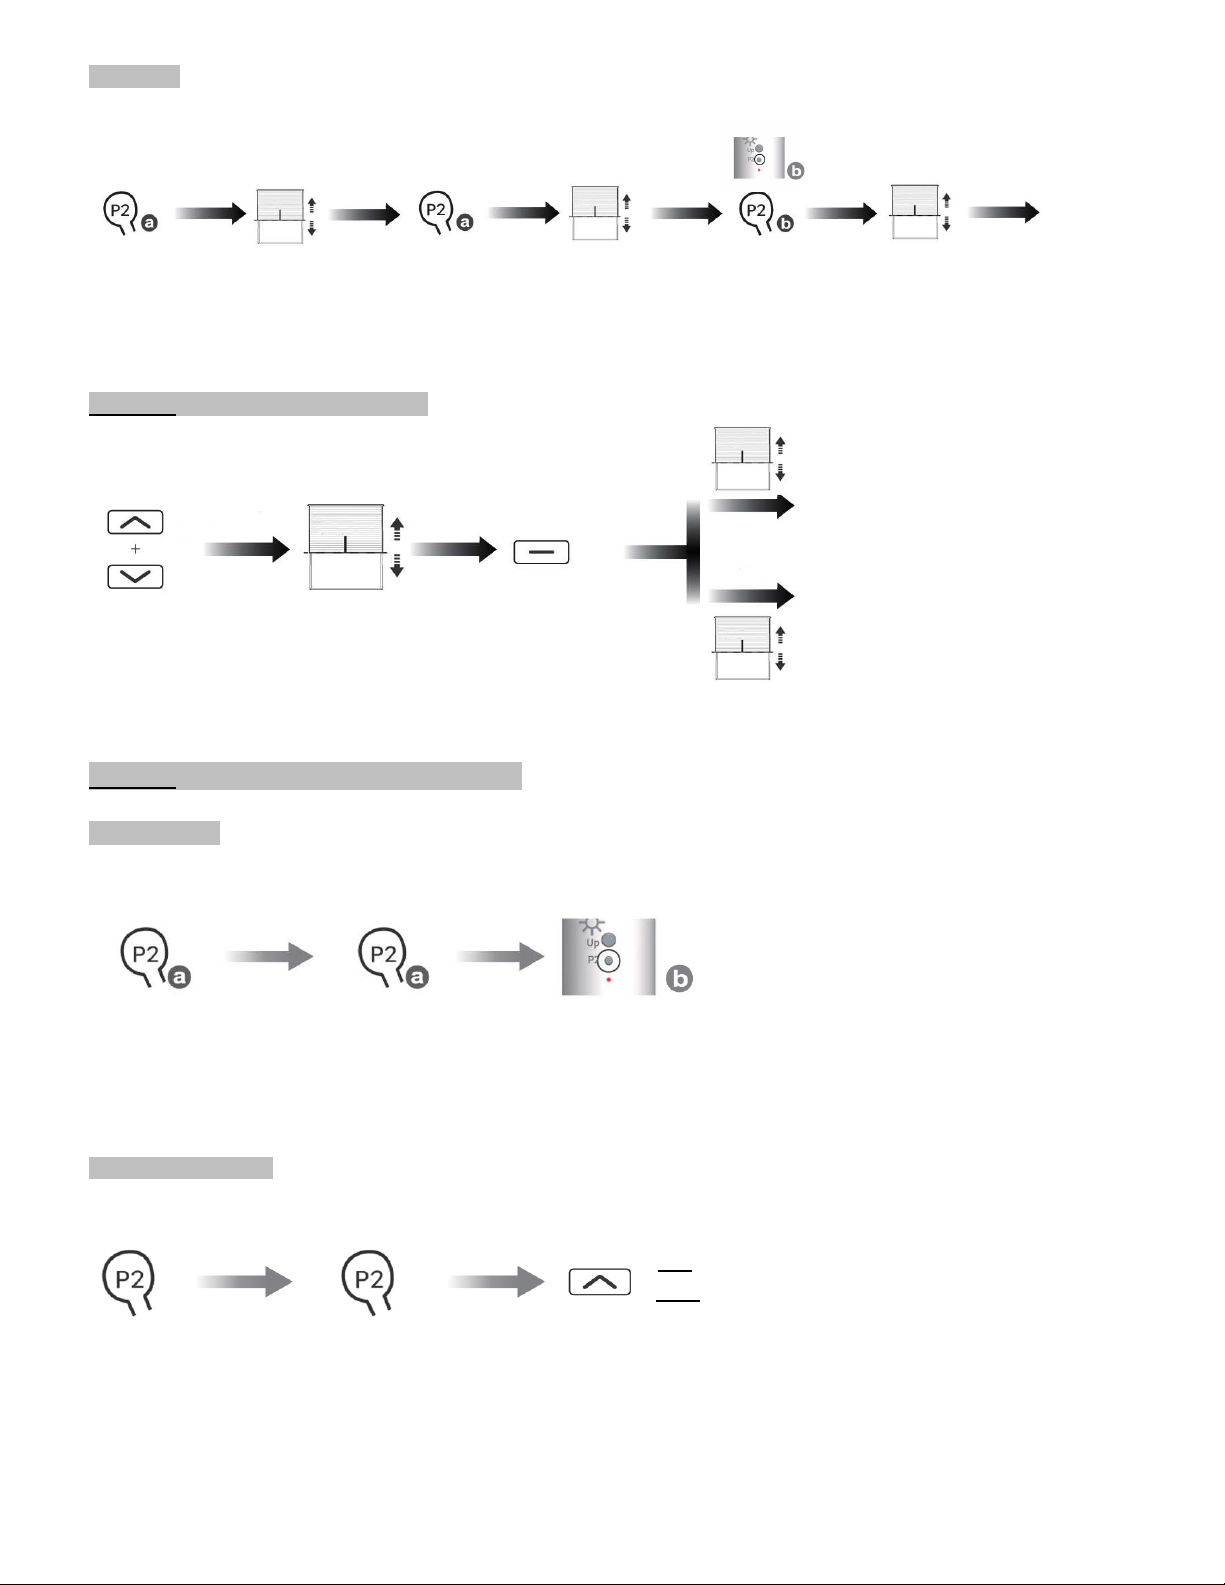
Functions remote control Changing batteries
Works with all BREL transmitters:
Visit our website www.BREL-HOME.com
for more manuals and information
_________________________________________________________________________
Technical data of the motor BR35-10 BR35-13 BR45-20 BR45-40
Voltage: AC 230V AC 230V AC 230V AC 230V
Power: 121W 121W 198W 198W
Torque: 10Nm 13Nm 20Nm 40Nm
Maximum motor runtime: 4 min. 4 min. 4 min. 4 min.
Speed: 17rpm 14rpm 15rpm 15rpm
Amperage: 0.67A 0.67A 0.86A 0.86A
Safety class: H H H H
Moisture and dust protection: IP44 IP44 IP44 IP44
Temperature range: Normal use: -10℃ tot +65℃
BR35-10 BR35-13 BR45-20 BR45-40
Scan the QR code here for the manual
to download and view instructional videos
NOTE:
f the motor has been running
continuously for 4 minutes, it
may become too hot and then
stop. After approximately half
an hour, this one will continue
to run.

Page 2
_______________________________________________________________________________
Step 1 Setting up the first remote/channel
Tension motor
STOP until 2x
OK
Put tension on the motor, the product Press and hold the STOP button until the Transmitter/channel
moves up and down. The motor beeps. product moves 2x up and down and beeps 3x. has been set.
______________________________________________________________________________
Step 2 Adjusting the direction of rotation(Only if the direction of rotation is not correct)
1x ▲ until 1x
▲+▼ until 1x
OK
Press 1x the P1 button shortly, Press UP and DOWN button The direction of rotation
until the product moves down. simultaneously, until the product moves. of the motor is OK.
_______________________________________________________________________________
Step 3 Adjusting endpositions of the motor
To determine where to stop the motor, use the adjustment pin provided.
The large arrow indicates the direction of rotation in which you change the end position.
By turning to the Plus or Min you can change the end position.
By turning to the Plus, the motor will make more revolutions.
By turning to the Min, the motor will make fewer revolutions.
The setting must be done for both directions of rotation.
If the motor has stopped on its own, do not turn more than 1 revolution towards the Min.
If you turn more than 1 revolution to the Min, you can disable the adjustment.
______________________________________________________________________________
Additional settings
Option A Learn new transmitter/channel
= Already existing transmitter = New transmitter
Method 1
P2 a until
P2 a until
STOP b until 2x
OK
Press P2 of a. The product Press P2 of a. The product Press STOP of b. The product The transmitter b
moves 1x up and down moves 1x up and down moves 2x up and down has been added.
and beeps 1x. and beeps 1x. and beeps 3x.
Repeating the abo e will remo e the new transmitter/channel.

Page 3
______________________________________________________________________________
Method 2 (also sun- and windmometer)
P2 a until
P2 a until
P2 b until 2x
OK
Press P2 of a. The product Press P2 of a. The product Press P2 of b. The product The transmitter b
moves 1x up and down moves 1x up and down moves 2x up and down has been added.
and beeps 1x. and beeps 1x. and beeps 3x.
Repeating the abo e will remo e the new transmitter/channel.
_______________________________________________________________________________
Option B Pulse / jog control 1x
, beeps 1x
▲+▼ until 1x
1x STOP
Pulse / jog on
Pulse / jog off
Press and hold UP and DOWN button, Press 1x STOP button.
until the product moves up and down.
2x
, beeps 3x
______________________________________________________________________________
Option C Sun and wind meter ( DD-116H )
_______________________________________________________________________________
Add / remove
1x P2a 1x
1x P2a 1x
1x P2b 2x
The sun and wind meter has been added.
Press P2 of a. The product Press P2 of a. The Press P2 of b. The
moves 1x up and down and product moves 1x up product moves 2x up
beeps 1x. and down and beeps 1x. and down and beeps 3x.
By repeating the abo e, you can remo e the sun and wind meter again.
_______________________________________________________________________________
On / off sun function ( Factory setting = on)
1x P2 1x
1x P2 1x
1x ▲
ON: The product moves up and down once and beeps once long.
OFF: The product moves up and down 2x and beeps 3x long.
Press 1x P2. The product Press 1x UP. The Press 1x UP.
moves 1x up and down and product moves 1x up
beeps 1x. and down and beeps 1x.
By repeating the abo e, you can switch the sun function on or off again.
This manual suits for next models
3
Table of contents
Other BREL Window Blind manuals
Popular Window Blind manuals by other brands

IKEA
IKEA FYRTUR 30 manual

rollease acmeda
rollease acmeda Easy Spring Wand installation manual

HOMCOM
HOMCOM 830-472 Assembly instruction

Draper
Draper FlexShade INSTRUCTIONS INSTALLATION & OPERATION

VENETA
VENETA Zebra Blind quick start guide

Creation Baumann
Creation Baumann PLITRIC F SLOPE 1 Assembly instruction

Victoria M
Victoria M Zevra Doppelrollo Original instructions

Rollos
Rollos Roller blind M cassette R76 Assembly and operating instructions

SOMFY
SOMFY Glydea DCT Installation and programming guide

Draper
Draper FlexShade INSTRUCTIONS INSTALLATION & OPERATION

Insetto
Insetto Rollo 6120 Fitting, Mounting

Portos
Portos SHUTTERS SN5000 installation manual