Breville BWM520 User manual

Breville is a registered trademark of Breville Pty. Ltd. A.B.N. 98 000 092 928.
Copyright Breville Pty. Ltd. 2014.
Due to continued product improvement, the products illustrated/photographed
in this brochure may vary slightly from the actual product.
BWM520 ANZ B14
Australian Customers
Mail: PO Box 22
Botany NSW 2019
AUSTRALIA
Phone: 1300 139 798
Fax: (02) 9384 9601
Email: Customer Service:
askus@breville.com.au
New Zealand Customers
Mail: Private Bag 94411
Botany Manukau 2163
Auckland NEW ZEALAND
Phone: 0800 273 845
Fax: 0800 288 513
Email: Customer Service:
askus@breville.co.nz
Breville Customer Service Centre
www.breville.com.au
www.breville.co.nz
BWM520
the No-Mess Waffle™
Instruction Booklet

2
CONTENTSCONTENTS
3Breville recommends safety first
7Know your Breville product
8Operating your Breville product
9Care & cleaning
10 Recipes

3
BREVILLE RECOMMENDS SAFETY FIRST
At Breville we are very safety conscious. We design and
manufacture consumer products with the safety of you, our
valued customer, foremost in mind. In addition we ask that you
exercise a degree of care when using any electrical appliance
and adhere to the following precautions.
READ ALL INSTRUCTIONS
BEFORE USE AND SAVE FOR
FUTURE REFERENCE
• Remove and safely discard
any packaging material and
promotional labels before use.
• To eliminate a choking
hazard for young children,
remove and safely discard the
protective cover fitted to the
power plug of this appliance.
• Always ensure the appliance
is properly assembled before
use. Follow the instructions
provided in this book.
• Do not touch hot surfaces.
Appliance surfaces are hot
during and after operation.
To prevent burns or personal
injury, always use protective
hot pads or insulated oven
mitts, or use handles or knobs
where available.
• Do not place the appliance
near the edge of a bench
or table during operation.
Ensure that the surface is dry,
level, clean and free of any
liquid and other substances.
• Always operate the appliance
on a stable and heat resistant
surface. Do not use on a cloth-
covered surface, and position
the appliance at a minimum
distance of 20cm away from
walls, curtains, cloths and
other heat sensitive materials.
• Do not place this appliance
on or near a hot gas or
electric burner, or where it
could touch a heated oven.
• Do not operate the appliance
on a sink drain board.
IMPORTANT SAFEGUARDS

4
BREVILLE RECOMMENDS SAFETY FIRST
• When operating the
appliance, ensure the power
cord is kept away from any
heat source including the
surface of the appliance.
Ensure the power cord does
not become trapped between
the upper and lower hot
plates of the appliance during
use and storage.
• Do not place anything on top
of the appliance lid when the
lid is closed, when in use and
when stored.
• Do not use harsh abrasives,
caustic cleaners or oven
cleaners when cleaning this
appliance. Keep the appliance
clean and refer to care and
cleaning section.
• Do not attempt to operate
the appliance by any method
other than those described in
this booklet. Do not leave the
appliance unattended when
in use.
IMPORTANT SAFEGUARDS
FOR ALL ELECTRICAL
APPLIANCES
• Unwind the power cord fully
before use.
• Do not let the power cord
hang over the edge of a
bench or table, touch hot
surfaces or become knotted.
• Connect only to a 230V or
240V power outlet.
• To protect against electric
shock, do not immerse the
power cord, power plug or
appliance in water or any
other liquid.
• Always turn the appliance to
the OFF position, switch off
at the power outlet, remove
the plug and allow all parts
to cool before attempting to
move the appliance, when the
appliance is not in use, before
cleaning and when storing.

5
BREVILLE RECOMMENDS SAFETY FIRST
• The appliance can be used by
children aged from 8 years
and above and persons with
reduced physical, sensory
or mental capabilities, or
lack of experience and
knowledge, if they have
been given supervision or
instruction concerning use
of the appliance in a safe
way and understand the
hazards involved. Children
shall not play with the
appliance. Cleaning and
user maintenance shall not
be made by children unless
they are older than 8 and
supervised.
• Keep the appliance and its
cord out of reach of children
less than 8 years.
• Children should be
supervised to ensure that
they do not play with the
appliance.
• It is recommended to
regularly inspect the
appliance. Do not use the
appliance if the power cord,
power plug or appliance
becomes damaged in any
way. Return the entire
appliance to the nearest
authorised Breville Service
Centre for examination and/
or repair.
• Any maintenance, other
than cleaning, should be
performed at an authorised
Breville Service Centre.
• The use of attachments
not sold or recommended
by Breville may cause fire,
electric shock or injury.
• This appliance is for
household use only. Do not
use this appliance for other
than its intended use. Do not
use in moving vehicles or
boats. Do not use outdoors.
Misuse may cause injury.
• The appliance is not intended
to be operated by means of
an external timer or separate
remote control system.

6
BREVILLE RECOMMENDS SAFETY FIRST
FOR HOUSEHOLD
USE ONLY
SAVE THESE
INSTRUCTIONS
• The installation of a residual
current device (safety switch)
is recommended to provide
additional safety protection
when using electrical
appliances. It is advisable that
a safety switch with a rated
residual operating current not
exceeding 30mA be installed
in the electrical circuit
supplying the appliance.
See your electrician for
professional advice.
SHORT CORD INSTRUCTIONS
Your Breville appliance is fitted
with a short power supply cord
to reduce personal injury or
property damage resulting from
pulling, tripping or becoming
entangled with a longer cord.
If an extension cord is used, (1)
the marked electrical rating of
the cord set or extension cord
should be at least as great as the
electrical rating of the appliance,
(2) the cord should be arranged
so that it will not drape over the
countertop or table-top where
it can be pulled on by children
or tripped over unintentionally
and (3) the extension cord must
include a 3-prong grounding
plug.
BREVILLE ASSIST™ PLUG
Your Breville appliance comes
with a unique Assist™ Plug,
conveniently designed with a
finger hole to ease removal from
the wall outlet. For safety reasons
it is recommended you plug
your Breville appliance directly
into its own electrical outlet on a
dedicated circuit separate from
other appliances. If the electric
circuit is overloaded with other
appliances, your appliance may
not function properly. It is not
recommended to use with a
power strip.
7
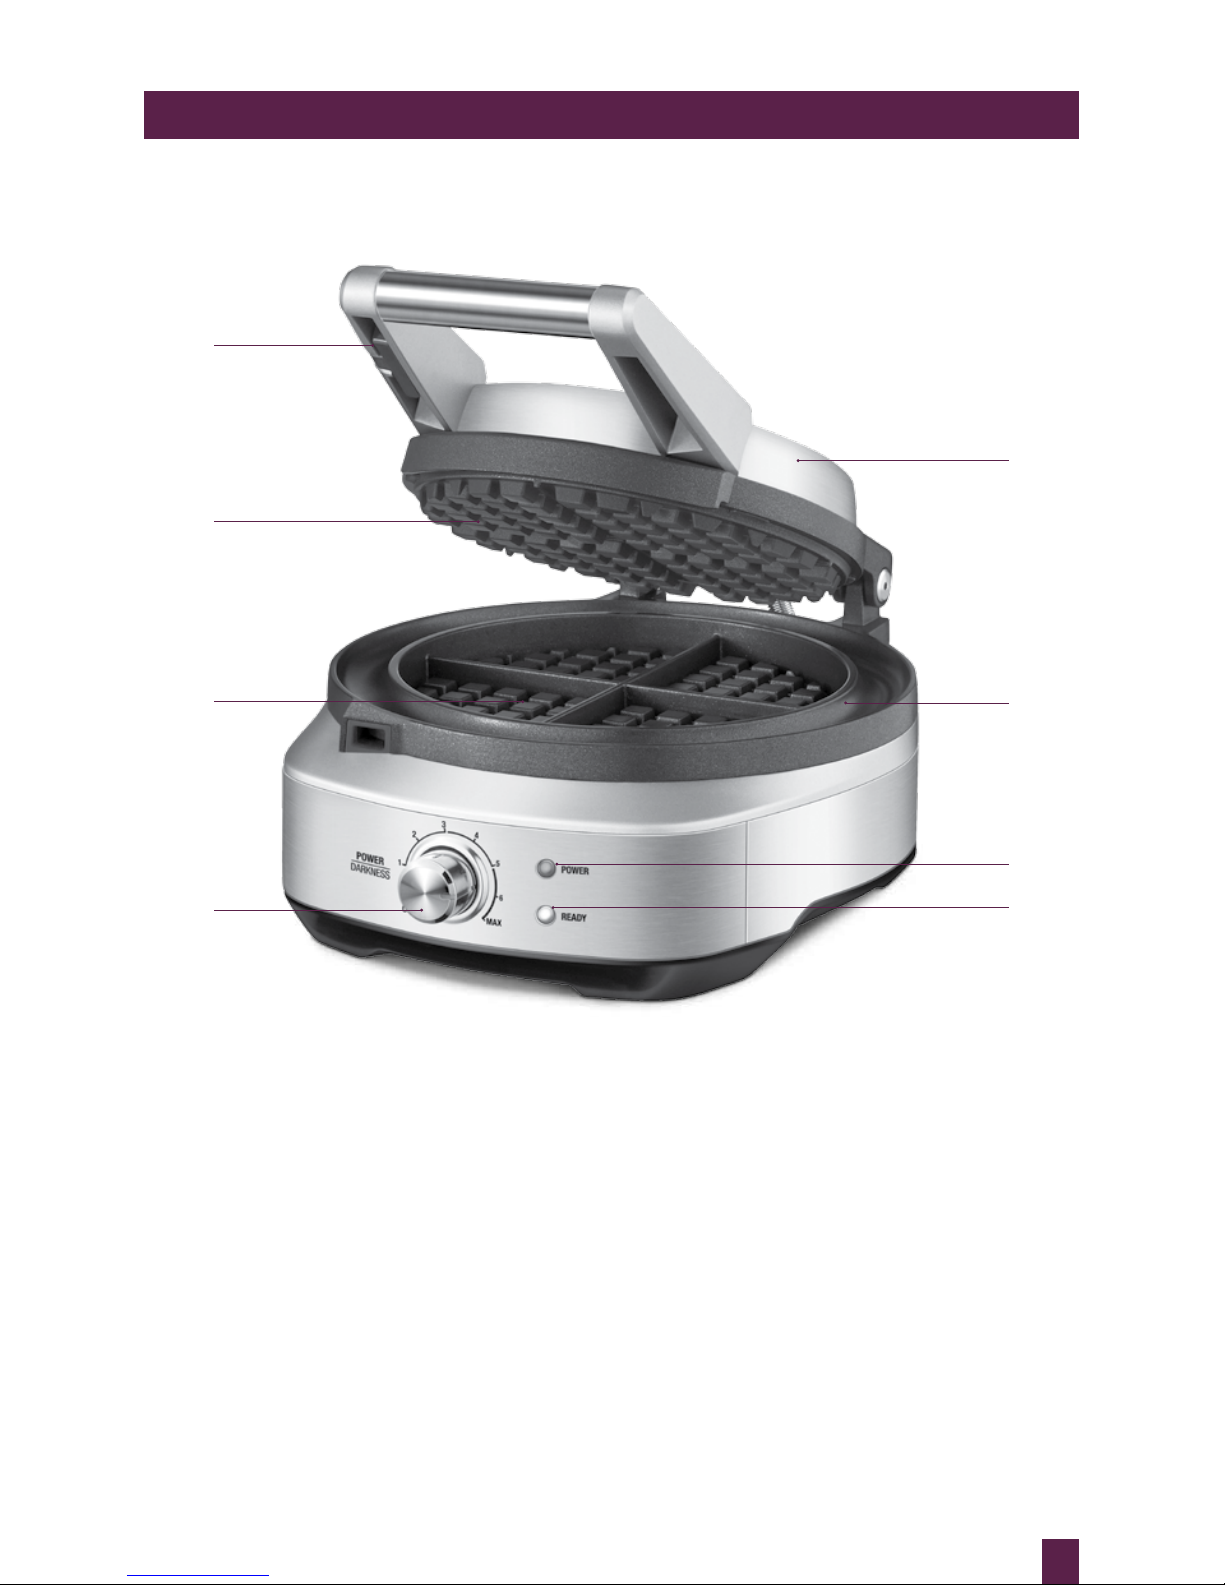
KNOW YOUR BREVILLE PRODUCT
A. POWER | DARKNESS Control dial
7 darkness settings allow you to customise
your waffle colour from light to dark.
B. Die-cast aluminum cooking plate
Thicker cooking plates for better heat
retention and even browning.
C. PFOA-free non-stick
Prevents waffles from sticking.
D. Integrated moat
No mess, no waste.
E. Stainless steel housing
F. Locking latch
G. POWER light
Lights up orange to indicate that the unit
is on.
H. READY light
Lights up blue to indicate that the unit
has reached cooking temperature.
I. Breville Assist™ plug (not shown)
B
F
A
E
D
H
G
C

8
Before first use, remove and safely discard any
packing material, promotional labels and tape
from the waffle maker.
1. Wipe the waffle maker cooking plates with
a damp sponge or cloth. Dry thoroughly
and close the lid.
2. Place the waffle maker on a flat, dry surface.
Ensure there is a minimum distance of
20cm of space on all sides of the waffle
maker. Do not place anything on top of the
waffle maker.
3. Unwind the power cord completely and
insert the power plug into a grounded
230/240V power outlet.
4. Turn the POWER | DARKNESS Control
Dial clockwise to the desired setting to
start pre-heating the waffle maker. The
POWER light will be illuminated.
5. Use the POWER | DARKNESS control
dial to adjust the brownness of your waffle.
There are 7 darkness settings ranging from
1 (lightest) to MAX (darkest). Rotate the
dial clockwise to increase the brownness
or counterclockwise to decrease it. When
making your first waffle we suggest using a
middle setting.
6. Once the waffle maker has completed
preheating, three audible alerts will sound
and the READY light will illuminate.
7. Open the lid and pour approximately ½
cup of batter evenly on the center of the
waffle plate. The batter should cover the
peaks of the waffle plate.
NOTE
When using the waffle maker for the
first time you may notice a fine smoke
haze. This is caused by the initial heating
of some of the components and is not a
cause for concern.
8. Close the lid but keep the locking latch
open. As the cooking cycle progresses
the READY light will switch off.
9. At the end of the cooking cycle, three
audible alerts will sound and the READY
light will illuminate. Open the lid and
carefully remove your waffles.
NOTE
There can be slight variations between
cooking cycles. If your waffles are not at
your desired darkness, close the lid and
cook for an additional minute.
10. For the most consistent results, add the
next batch of batter immediately after
removing the cooked waffle and repeat
steps 7 through 8.
NOTE
If the next batch of batter is not added
immediately after removing the cooked
waffle, close the lid and allow the waffle
maker to properly reheat (the READY
light will switch off and then back on)
before adding batter.
11. If you are not cooking any more waffles,
turn the POWER | DARKNESS control dial
to the OFF position.
OPERATING YOUR NEW BREVILLE PRODUCT

9
CARE AND CLEANING
• Before cleaning, ensure the
POWER | DARKNESS control dial is set
to the OFF position and then remove the
power plug from the power outlet.
• Allow your waffle maker to cool slightly
before cleaning. The waffle maker is easier
to clean when slightly warm.
• Always clean your waffle maker after each
use to prevent a buildup of baked-on foods.
Wipe cooking plates and overflow moat
with a soft cloth to remove food residue.
CAUTION
DO NOT IMMERSE ANY PART OF THE
BREVILLE WAFFLE MAKER IN WATER
OR ANY OTHER LIQUID.
PFOA-FREE NON-STICK COATING
The cooking plates, hinges and overflow moat
are coated with a PFOA-FREE non-stick finish.
This minimises the need for oil, prevents food
from sticking, and makes cleaning easier.
Do not use metal or other abrasive cleaning
tools on non-stick surfaces as they will damage
the coating. Use only warm soapy water and
remove stubborn residue with a non-abrasive
plastic scouring pad or nylon brush.
NOTE
Do not use non-stick cooking sprays as
they can impact the performance of the
non-stick surface on the cooking plates.
CARE & CLEANING
STORAGE
To store your waffle maker:
1. Ensure the POWER | DARKNESS control
dial is set to the OFF position and then
unplug power cord from the power outlet.
2. Allow the waffle maker to cool completely.
3. Set the locking latch to the locked position.
4. Wrap the power cord in the cord wrap area
below the waffle maker.
5. Store the waffle maker on a flat,
dry level surface.
NOTE
The locking latch should not be used
when batter is in the cooking plates.

RECIPES

11
RECIPES
CLASSIC WAFFLES
Makes 8 waffles
INGREDIENTS
2 cups self-raising flour
¼ cup sugar
1 teaspoon salt
1¾ cups milk
1 teaspoon vanilla extract
3 eggs
125g butter, melted and cooled slightly
METHOD
1. Whisk dry ingredients together in a
medium bowl.
2. Whisk milk, eggs and vanilla together in
another medium bowl.
3. Make a well in the center of the dry
ingredients. Pour the milk mixture into
the well along with the melted butter
and whisk until the ingredients are just
combined. Do not over-mix the batter
(it will be slightly lumpy). For best results,
let the batter rest while pre-heating the
waffle maker.
4. Turn the POWER | DARKNESS control
dial to the desired darkness setting and
wait until the READY light illuminates.
5. Pour ½ cup of batter evenly on the center
of the waffle plate and close the lid.
6. At the end of the cooking cycle (the
READY light will go off during cooking
then go back on to indicate the end of the
cycle), open the lid and carefully remove
your waffle.
7. Repeat with remaining batter. For the most
consistent results, put the next batch of
batter in immediately after removing the
cooked waffle.
YEAST (BELGIAN-STYLE) WAFFLES
Makes 8 waffles
INGREDIENTS
½ cup warm water
1 package (2¼ teaspoons) dry active yeast
1½ cups warm milk
125g butter, melted and cooled slightly
2 cups plain flour
1 tablespoon sugar
1 teaspoon salt
2 eggs
1 teaspoon vanilla
METHOD
1. Combine water and yeast in a large bowl.
The batter will double in size so make sure
to use a large enough bowl. Let stand for
5 minutes to dissolve yeast.
2. Add the remaining ingredients, except for
eggs and vanilla, and mix well to form a
smooth mixture.
3. Cover the bowl with plastic wrap and rest
in the refrigerator overnight or for at least
8 hours and up to 24 hours.
4. Just before cooking the waffles, whisk
in the eggs and vanilla and stir until
well mixed.
5. Turn the POWER | DARKNESS control
dial to the desired darkness setting and
wait until the READY light illuminates.
6. Pour ½ cup of batter evenly on the center
of the waffle plate and close the lid.
7. At the end of the cooking cycle (the
READY light will go off during cooking
then go back on to indicate the end of the
cycle), open the lid and carefully remove
your waffle.
8. Repeat with remaining batter. For the most
consistent results, put the next batch of
batter in immediately after removing the
cooked waffle.

12
RECIPES
BUTTERMILK WAFFLES
Makes 4 waffles
INGREDIENTS
1 cup self-raising flour
1 tablespoon sugar
¼ teaspoon salt
1 cup buttermilk
1 egg
60g butter, melted and cooled slightly
½ teaspoon vanilla
METHOD
1. Whisk dry ingredients together in a
medium bowl.
2. Whisk buttermilk, egg, melted butter and
vanilla together in another medium bowl.
3. Make a well in the center of the dry
ingredients. Pour the buttermilk
mixture into the well and whisk until the
ingredients are just combined. Do not
over-mix the batter (it will be slightly
lumpy). For best results, let the batter rest
while pre-heating the waffle maker.
4. Turn the POWER | DARKNESS control
dial to the desired darkness setting and
wait until the READY light illuminates.
5. Pour ½ cup of batter evenly on the center
of the waffle plate and close the lid.
6. At the end of the cooking cycle (the
READY light will go off during cooking
then go back on to indicate the end of the
cycle), open the lid and carefully remove
your waffle.
7. Repeat with remaining batter. For the most
consistent results, put the next batch of
batter in immediately after removing the
cooked waffle.
8. If batter gets too thick as it rests between
batches, thin it out with an additional
1–2 tablespoons of buttermilk.
CHOCOLATE WAFFLES
Makes 7–8 waffles
INGREDIENTS
100g butter
80g bittersweet chocolate
1 cup plain flour
½ cup cocoa powder
½ cup sugar
1½ teaspoons baking powder
½ teaspoon salt
1½ cups milk
2 eggs
½ teaspoon vanilla
METHOD
1. Melt the butter and bittersweet chocolate
in a microwave or over a double-boiler.
2. Whisk dry ingredients together in a
medium bowl.
3. Whisk milk, egg and vanilla together in
a small bowl to combine. Add the melted
butter and chocolate and stir to combine.
4. Make a well in the center of the dry
ingredients. Pour the milk mixture into the
well and whisk until the ingredients are
just combined. Do not over-mix the batter
(it will be slightly lumpy).
5. Turn the POWER | DARKNESS control
dial to the desired darkness setting and
wait until the READY light illuminates.
6. Pour ½ cup of batter evenly on the center
of the waffle plate and close the lid.
7. At the end of the cooking cycle (the
READY light will go off during cooking
then go back on to indicate the end of the
cycle), open the lid and carefully remove
your waffle.
8. Repeat with remaining batter. For the most
consistent results, put the next batch of
batter in immediately after removing the
cooked waffle.

13
NOTES

14
NOTES

15
NOTES
Other manuals for BWM520
1
This manual suits for next models
1
Table of contents
Other Breville Waffle Maker manuals

Breville
Breville DuraCeramic User manual

Breville
Breville Smart Waffle Pro User manual

Breville
Breville VST072X User manual

Breville
Breville the Crisp Control BWM250 User manual

Breville
Breville Crisp Control BWM250BSS User manual

Breville
Breville WM800B User manual

Breville
Breville Smart Waffle BWM620XL User manual

Breville
Breville the Smart Waffle Pro BWM604 User manual

Breville
Breville SG2300B User manual

Breville
Breville BWM520 User manual


