Brica 63004 User manual
day & night light
musical auto mirror®
63004
Questions?
1.866.869.8257
bricababy.com
©2010 BRICA, Inc. 500 West 5th Street,
Suite 220, Charlotte, NC 28202
Retain this address for future reference.
Choose an attachment option
1
2Adjustable Stand
Fastener
Clip
Tether
Anchor
Clamp
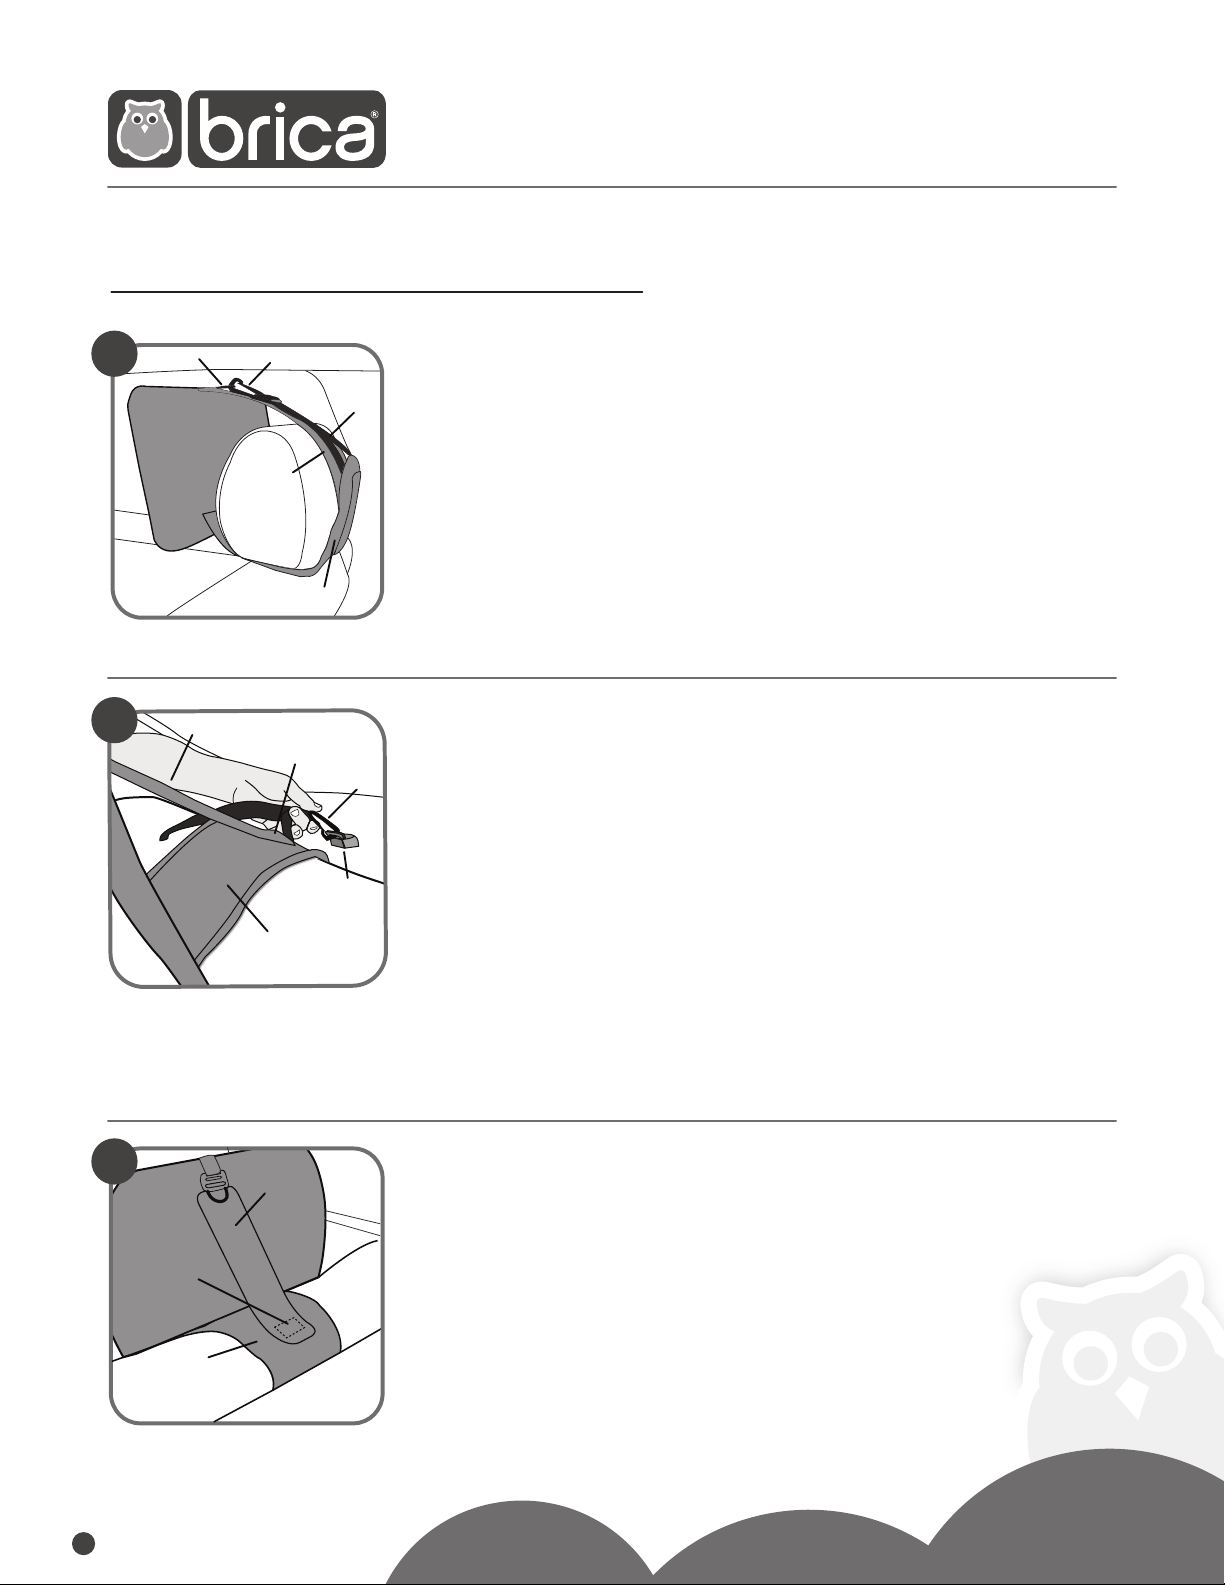
Tether Anchor Attachment
Important! Do not attach this product to your vehicle’s tether anchor if your child safety
seat is installed in your vehicle using this anchor.
1. Position mirror on back seat in front of tether anchor.
2. Insert clamp between seat and rear deck of your vehicle.
3. Bend clamp to conform to seat.
4. Attach clip to tether anchor and tighten strap.
5. Unfasten adjustable stand’s fastener and tilt mirror to desired angle so your child is visible
to driver in vehicle’s rear-view mirror.
Note:The tether anchor attachment method is designed for sedan vehicles. If you own a
mini-van, station wagon or sport utility vehicle (SUV) and would like to use the tether
anchor attachment method, you may need a tether extender. Please visit BRICA, Inc. at
bricababy.com or call 1.866.869.8257
3Adjustable
Stand
Fastener
Back Seat
Rear Deck
Clamp
Center Back Seat with Rear Deck Attachment
1. Position mirror on center front side of back seat.
2. Bend clamp to conform to top of the back seat.
3. Insert clamp between seat back and rear deck.
4. Adjust as needed so clamp is secure.
5. Unfasten the adjustable stand’s fastener, and tilt mirror to desired
angle so your child is visible to driver in the vehicle’s rear-view mirror.
1D-Ring Clip
Strap
Adjustable
Stand
Clamp
Back Seat Head Restraint Attachment
1. Raise head restraint.
2. Insert clamp underneath head restraint.
3. Wrap adjustable stand over top of head restraint.
4. Bend clamp upward to conform to head restraint.
5. Wrap strap underneath and around head restraint and attach clip to D-Ring.
6. Push head restraint down to secure in place.
7. Tighten strap and rotate mirror to desired angle so your child is visible to driver in
vehicle’s rear-view mirror.

Battery Information and Activation
Battery Information / Mirror: Locate the battery compartment door on the back of the mirror. Loosen the screw in the
battery compartment door with a Phillips screwdriver. Remove the battery compartment door. Insert three “AA” (LR06)
alkaline batteries. Replace battery compartment door.
Battery Information / Remote: Locate the battery compartment door on the back of the remote. Loosen the screw in the
battery compartment door with a Phillips screwdriver. Remove the battery compartment door. Insert three “AAA” (LR03)
alkaline batteries. Replace battery compartment door.
Normal Operation:
1. Locate ON/OFF switch on back of mirror (located on the battery box).
2. Slide switch to the ON position.
3. Mirror is now ready to function using the remote control.
Note: To help prolong battery life, slide the ON/OFF switch to the OFF position when not in use.
Night Light Activation:
1. Press light bulb button on remote control to activate night light.
Note: Light will fade off after 10 seconds.
Music Activation:
1. Press music notes button on remote control to activate music.
2.To stop music, press music notes button on remote again.
Hint: When using the remote, make sure that nothing is between the remote and the mirror that
could obstruct the signal.
Important! For best performance, avoid using this product in direct sunlight. In bright light you
may notice loss of range when using the remote. To help improve performance in bright light
conditions, move the remote or mirror, or reduce the amount of light by using a sun shade.
63004
Questions?
1.866.869.8257
bricababy.com
©2010 BRICA, Inc. 500 West 5th Street,
Suite 220, Charlotte, NC 28202
Retain this address for future reference.
2
4Adjustable Stand
Fastener
Clamp
Center Back Seat Attachment for Bench Seats
1. Position mirror on center of back seat.
2. Bend clamp to conform to top of back seat.
3. Squeeze clamp firmly to secure mirror in place.
4. Unfasten adjustable stand’s fastener, and tilt mirror to desired angle
so your child is visible to driver in vehicle’s rear-view mirror.
Front Head Restraint Attachment
(For Forward-facing Children)
1. Raise head restraint.
2. Insert clamp underneath head restraint.
3. Wrap adjustable stand over top of head restraint.
4. Bend clamp upward to conform to the head restraint.
5. Insert strap underneath head restraint, over top of head restraint and attach to D-ring.
6. Tighten strap and adjust the mirror so child can see themselves.
Note: This method can be used for mounting mirror to the back of the driver or front
passenger seat head restraint for entertaining forward-facing children.
5D-Ring
Clip
Strap
Clamp
Adjustable
Stand

FCC Note (US Only)
This device complies with part 15 of the FCC rules. Operation is subject to the following two conditions: (1) This device may
not cause harmful interference, and (2) this device must accept any interference received, including interference that may
cause undesired operation.
This equipment has been tested and found to comply with the legal limits for a Class B digital device, pursuant to part 15 of
the FCC rules. These limits are designed to provide reasonable protection against harmful interference in a residential
installation. This equipment generates, uses and can radiate radio frequency energy and, if not installed and used in accor-
dance with the instructions, may cause harmful interference to radio communications. However, there is no guarantee that
interference will not occur in a particular installation. If this equipment does cause harmful interference to radio or television
reception, which can be determined by turning equipment off and on, the user is encouraged to try to correct the interfer-
ence by one or more of the following measures:
• Reorient or relocate the receiving antenna.
• Increase the separation between the equipment and receiver.
• Consult the dealer or an experienced radio /TV technician for help.
Note: Changes or modifications not expressively approved by the manufacturer responsible for compliance could void the
user’s authority to operate the equipment.
Questions?
1.866.869.8257
bricababy.com
©2010 BRICA, Inc. 500 West 5th Street,
Suite 220, Charlotte, NC 28202
Retain this address for future reference.
3
63004
Important! Keep mirror out of baby’s reach and direct sunlight. Always carefully follow car seat manufacturer’s directions
for correct installation and position of a child safety seat. If the tether anchor is being used to secure a child safety seat, do
not use this attachment method.
To Clean: Wipe the mirror with a soft, dry cloth. Do not use any cleaning solutions. Fabric is surface washable with a damp
cloth and mild soapy water. Air dry. Do not bleach. Do not submerse mirror in water.
CAUTION
Always verify that the mirror is properly secured on the seat
back, head restraint or tether anchor. Check frequently.
!
Prevent strangulation or entanglement. Never place in or
attach to a crib. Never add strings or ties to the product.
Never leave child unattended.
WARNING
Adult assembly required.
Always drive safely!
This is not a toy!
Table of contents
Other Brica Automobile Accessories manuals


Popular Automobile Accessories manuals by other brands


ULTIMATE SPEED
ULTIMATE SPEED 279746 Assembly and Safety Advice

SSV Works
SSV Works DF-F65 manual

ULTIMATE SPEED
ULTIMATE SPEED CARBON Assembly and Safety Advice

Witter
Witter F174 Fitting instructions

WeatherTech
WeatherTech No-Drill installation instructions

TAUBENREUTHER
TAUBENREUTHER 1-336050 Installation instruction