Brinsea Octagon TLC-4 User manual

TLC-4/TLC-5 US Issue 2
1
Octagon TLC-4 and TLC-5
Thermal
Life-support
Cabinet
User instructions
for brooding Parrots and other altricial bird species
Contents
Section Subject Page
1 Introduction 2
2 Unpacking 4
3 Location and Installation 4
4 Temperature 5
5 Humidity 6
6 Introducing your birds 7
7 Auxiliary components 7
8 Cleaning up 7
9 Servicing 8
10 Specifications 9

TLC-4/TLC-5 US Issue 2
2
IMPORTANT NOTICE
Brinsea Products Inc. and its agents or distributors will not be responsible for loss of animals in the
event of failure however caused and the user is advised to arrange his own insurance cover where
loss of power or mechanical or electrical failure might result in unacceptable losses. It is not
recommended that animals of significant value be housed in this product unless it is used in
conjunction with an independent temperature alarm system. Such systems are available from
Brinsea Products Inc.
1.0 Introduction
These instructions detail the operation of your new Octagon TLC Brooder/Intensive care unit. Please read them
carefully before setting up your brooder to achieve best results and keep these instructions safe for future
reference. Your TLC brooder/Intensive care unit is designed to allow the user to vary the environmental
conditions to suit a wide range of species and the specific set-up for every species is beyond the scope of these
instructions. There are a range of books available covering hand rearing or animal recovery techniques.
The two principle applications for the TLC-4 and TLC-5 are for brooding young altricial species and as a
Intensive Care Units or sick, injured or post operative animals and birds.
Care must be taken to ensure adult birds or other animals do not cause damage to the brooder interior,
particularly interference with the filter or components above the filter. Damage to these parts could cause
injury or death to an animal.

TLC-4/TLC-5 US Issue 2
3
Fig. 1 Functional features of the TLC-4 and TLC-5.
Control
Panel
Carrying
Handle
Circulation
Filter
Air Inlet
Filter
Liner
Removable
Inner Door
(Optional)
Outer Door
Water
Reservour
TLC4 3333
33
TLC5 3333 33333
TLC-5
(Component Layout as TLC 4)
Removable
Clear Door Removable
Inner Door
(Optional)
TLC-4M
Control Panel
Carrying Handle
Air Inlet Filter
Water Reservoir
Circulation Filter
Sliding Door
Liner
Light
Switch
Temperature
Adjustment
Temperature
Control
Indicator
Temperature
Display
Control Panel: -

TLC-4/TLC-5 US Issue 2
4
2.0 Unpacking
Your TLC brooder / Intensive Care Unit has been supplied in protective packaging. Please remove all tape,
strapping and packing. Retain the carton and packing materials to enable the unit to be repacked.
The Octagon TLC-4 will include:
Quantity
Item
1 TLC-4 or TLC-5 (with filters fitted)
4 White plastic nest tubs (TLC-4 only) or
1 Plastic liner for base (TLC-5 only)
1 Guarantee Card
2.1 Please identify each part and check that they are all present and undamaged. If there are any parts damaged or
missing please contact your retailer or Brinsea Products (at the address at the end of the document).
2.2 Check that the electrical supply matches the machine’s requirements (marked on the technical label on the rear
of the TLC).
2.3 Complete and return your guarantee card to register for your free 2 year guarantee.
2.4 Go to www.Brinsea.com and register as a free member of the Brinsea e-mail group to receive the latest news
and information such as advance notice about new products, special offers, exclusive competitions and much
more.
3.0 Location and Installation
Your TLC will give best results in a room free from wide temperature variations and with generous ventilation
– particularly important if several brooders are in use at the same time. Ensure that the room temperature
cannot drop on a cold night. Ideally thermostatically control the room at between 68 and 80°F (20 and 27°C)
but see warning under 4.0. Never allow the room temperature to drop below 59°F (15°C) and ensure that the
TLC cannot be exposed to direct sunlight.
3.1 Place the TLC on a flat, level surface (counter height is ideal) with the door facing forwards. A second TLC
can be stacked on top. Ensure that the feet of the upper unit locate in the recesses on the top of the lower TLC
and that the door is facing forwards on both machines.
3.2 Your TLC is supplied with filter media fitted (see fig.1). For details of filter replacement see servicing section.
3.4 Plug the TLC mains supply into a suitable outlet. Connecting the power will start the fan(s) (which run
continuously), illuminate the red LED on the control panel and the digital temperature display will indicate the
air temperature within the brooder chamber. See section 4 below on temperature adjustment. Ensure the sliding
door is closed before adjusting temperature.
3.5 The interior of the brooder/Intensive Care Unit can be illuminated to make cleaning or inspection of birds or
animals easier by pressing the red button on the control panel.

TLC-4/TLC-5 US Issue 2
5
4.0 Temperature
Stable and correct temperature is essential for good results. Adjust with care.
Note: your brooder or intensive care unit is not be set to the correct temperature from the factory and
the following procedure must be followed before introducing birds or other animals.
WARNING:-
THE CIRCULATING FAN AND THE METABOLIC HEAT FROM BIRDS OR ANIMALS CONTRIBUTE
HEAT TO THE INTENSIVE CARE UNIT. THE INTENSIVE CARE UNIT MAY NOT CONTROL
PROPERLY IF THE ROOM TEMPERATURE IS LESS THAN 3ºC (10°F) LOWER THAN THE
TEMPERATURE REQUIRED INSIDE THE PRODUCT. (FOR THE TLC5 PRODUCT ADDITIONAL
VENTILLATION CAN BE ACHIEVED BY SLIDING OPEN THE OUTER DOOR).
4.1 THE INTERNAL LIGHT CONTRIBUTES HEAT TO THE TLC-4 /TLC-5 WHEN SWITCHED ON.IF ROOM TEMPERATURE
IS HIGH AND CLOSE TO THE SET TEMPERATURE THE LIGHT CAN CAUSE OVERHEATING WHEN LEFT ON.IT IS
RECOMMENDED THAT THE LIGHT IS NOT LEFT ON FOR PERIODS LONGER THAN 5MINUTES.
4.2 Your TLC brooder/intensive care unit is fitted with a high quality, individually calibrated digital thermometer.
Be cautious of the accuracy of other thermometers used and have them calibrated if necessary.
4.3 After connecting power the TLC warms up and after a period of time the red LED will change from
continuously on to flashing. When flashing regularly the TLC is controlling at temperature. Allow at least half
an hour for the temperature to fully stabilize throughout the unit before making adjustments to achieve the
desired temperature.
4.4 To adjust temperature on the TLC rotate the knob on the right hand side of the control panel, clockwise to
increase temperature, anticlockwise to reduce it. Follow the approximate guide below to achieve desired
temperature settings. Always allow half an hour between adjustments for the temperature to stabilise and refer
to the digital temperature display to confirm that the desired temperature has been reached.
Temperature Setting Guide (Approx.)
4.5 When reducing temperature the red LED may go out while the TLC-4 / TLC-5 cools – this is normal.
30ºC
(80ºF)
40ºC
(96ºF)
20ºC
(64ºF)

TLC-4/TLC-5 US Issue 2
6
4.6 As a general rule a newly hatched chick will need a brooder temperature a little lower than incubation
temperature, about 95-97°F (35-36°C) and the temperature can be reduced progressively at about 1°F (0.5°C)
per day until it is fully feathered or no longer requires supplementary heat. In warm ambient conditions this
will be sooner than in cold climates. When brooding temperatures are just above room temperature the red
indicator light may go out (indicating that no heat is being applied). This indicates that the birds are ready to be
moved to a nursery cage. If room temperature then drops (e.g. at night) then the birds can be kept warm by
replacing them into the TLC.
4.7 Where there is to be a continuous throughput of birds of differing stages of development, several TLC4
brooders can be set to different temperatures and the birds moved to cooler units as they grow.
Recommended staged temperature settings for most parrots and falcons:
Days 1 to 5 Days 6 to 10 Days 11 to 15 Days 16 to 25
97°F (36°C) 91°F (33°C) 85°F (29.5°C) 80°F (27°C)
These temperatures have been found to promote optimal health and growth for newly hatched chicks and are a
little higher than may be found in nests. Where birds are taken from a nest after more than a few days, the
temperature setting will usually need to be a few degrees lower to prevent heat stress. The recommendations
above are for guidance only, always observe the chick’s behaviour (see below) to verify setting.
Temperatures too high can cause heat stress, dehydration, deformities or haemorrhaging under the skin. Low
temperature may reduce appetite and retard growth. Observation of the bird is the best guide to its comfort.
Chicks try to huddle together if cold and move about seeking parental warmth. Chicks too warm separate and
pant. In either case they will complain vocally. Comfortable birds will lie quietly sleeping with wings loosely
folded at the sides, usually in contact with one another.
4.8 Developing chicks are fairly tolerant of short term temperature drops but care should be taken about cooling
that occurs during feeding or inspection. Keep the room warm, hold the bird in a cloth to prevent chilling from
cold hands and use warmed feeding utensils.
5.0 Humidity
Many exotic species raise young in naturally hot, humid conditions. By raising the air temperature in a brooder the
humidity level will be reduced and can cause dehydration in young birds.
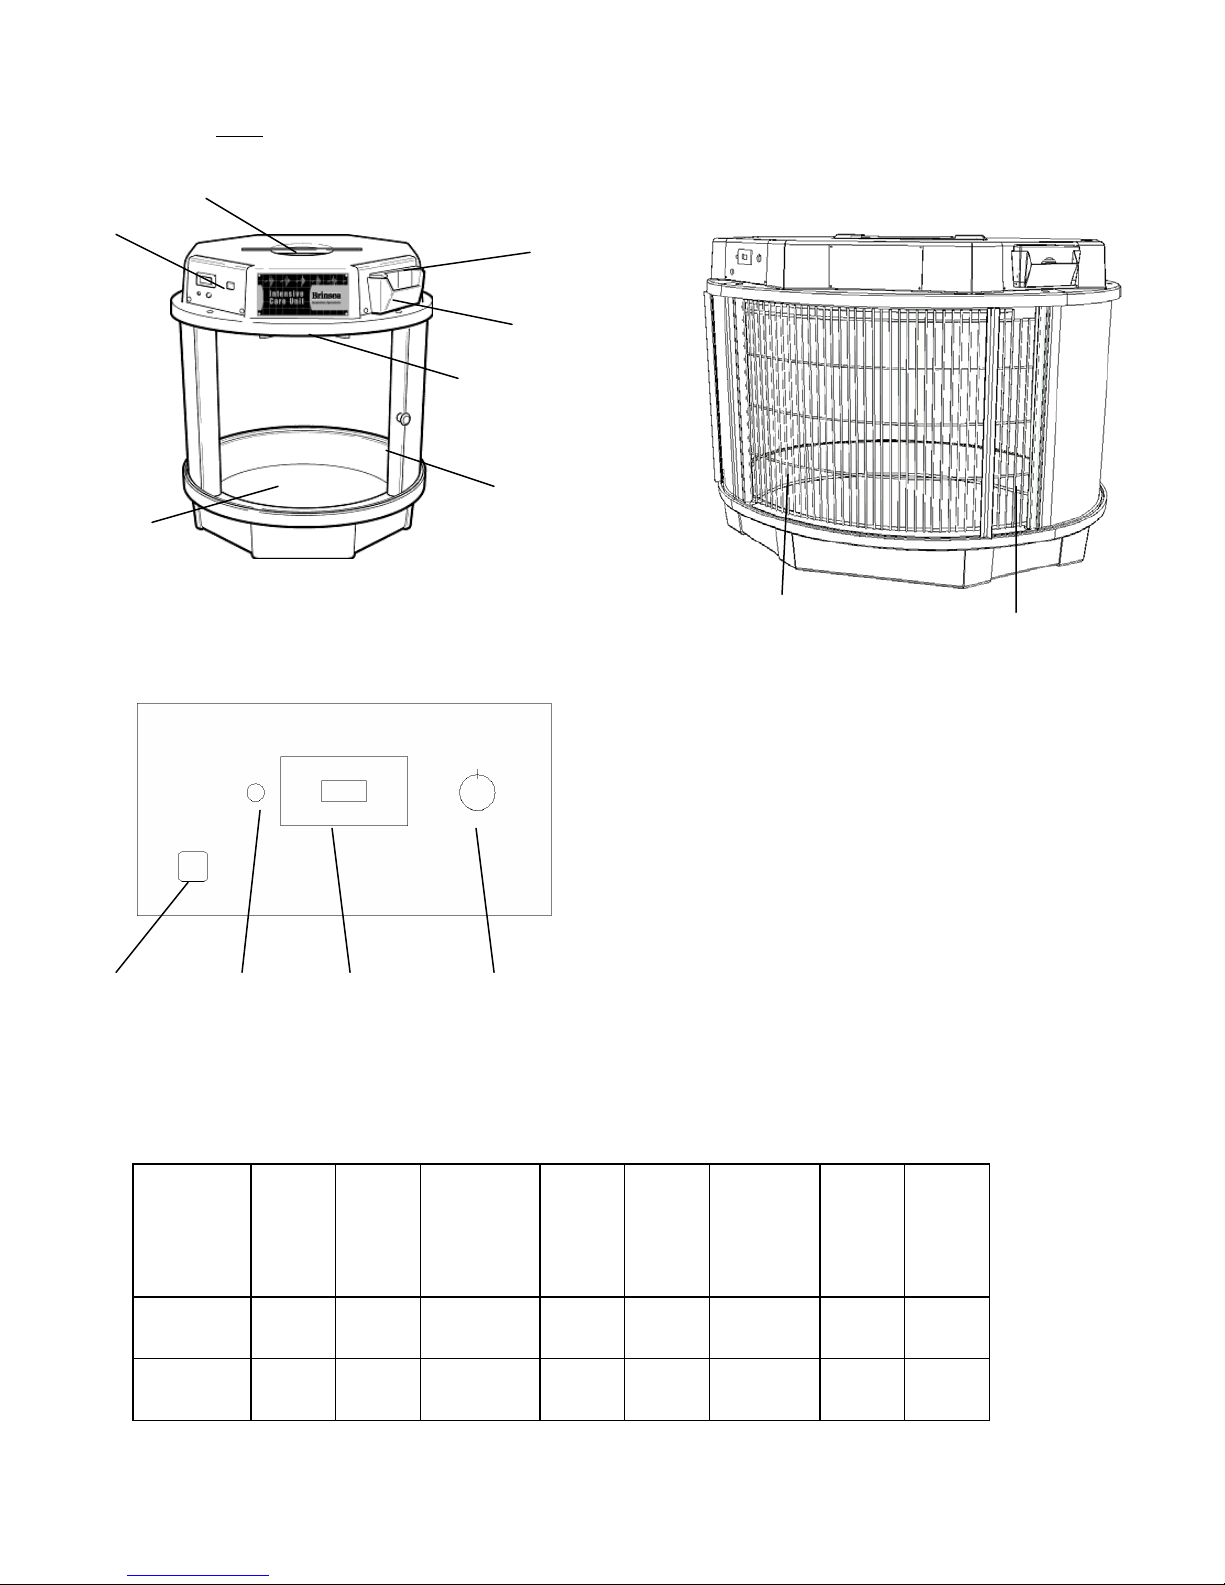
5.1 Your TLC is fitted with a water reservoir (see fig.1) which humidifies air as it is drawn into the brooder
through the air inlet filter. Use a solution of Brinsea Incubation Disinfectant (1part concentrate to 100 parts
water) in the water reservoir to inhibit bacterial build-up. It is recommended that the reservoir is topped up
with solution daily to reduce dehydration of the chick(s).
5.2 To further increase humidity levels within the brooder the water reservoir can be fitted with a block of
absorbent paper mesh (optional). This block may be cut down in length with a sharp knife or removed entirely
to give lower humidity levels. The block can provide a breeding ground for bacteria. In addition to the use of
Brinsea Incubation Disinfectant concentrate in the water, it is recommended that the block is replaced every 2
months of use.

TLC-4/TLC-5 US Issue 2
7
6.0 Introducing your Birds
Once the correct temperature has been established and the air humidified the TLC is ready for use. For older
chicks and adults, line the base of the brooder with paper towel and place the bird(s) directly on this. A durable
floor liner is available as an option and can be used as a single nest tub for larger birds or underneath the four
nest tubs to minimize cleaning.
6.1 For newly hatched chicks use the 4 nest tubs (supplied with the TLC-4 only) lined with paper towel. Chicks of
similar age and size can be placed together and benefit from the warmth and comfort. If disparity in size is
too great the smaller chick is at risk of being crushed or smothered.
6.2 Change paper towel at each feed or at least four times a day.
6.3 Follow feeding regimes recommended by breeders for your species ensuring the highest standards of hygiene
at all times.
7.0 Auxiliary Components
7.1 TEMPERATURE ALARM SOCKET -The TLCs are fitted with a 3.5mm Temperature Alarm Input Socket as
standard. This allows a Brinsea ‘T20’ Temperature Alarm Module to be fitted to the product. Call Brinsea on
1-888-667-7009 or visit us online at www.brinsea.com for more details on this product.
8.0 Cleaning Up
8.1 IMPORTANT:
DISCONNECT THE TLC BROODER / INTENSIVE CARE UNIT FROM THE MAINS POWER SUPPLY
DURING CLEANING. ENSURE THAT ALL ELECTRICAL PARTS ARE KEPT DRY.
8.2 Following each brood in your TLC remove all debris from the floor. Wipe all internal surfaces with a soft cloth
soaked in 100:1 Brinsea Incubation Disinfectant solution. Remove all filters and gently hand wash in warm
water then allow to dry before use. Filters need replacing every six months. Immerse and soak the nest tubs
and/or liner in disinfectant solution.
8.3 The exterior of the TLC may be cleaned with a damp cloth.
On the TLC-5 unit, remove doors to clean hard to reach places.
Removing Outer Door:- Removing Inner Door (if supplied):-
Clear outer door slides out of
groove on the rear of the unit
Remove optional inner wire door by opening then lifting
the door from its hinges, reverse this technique to put
door back in place

TLC-4/TLC-5 US Issue 2
8
8.4 Always clean the TLC brooders before storage and ensure that the unit is totally dry inside and out.
8.5 Re-order Brinsea Incubation Disinfectant, filters or evaporating block by calling 1-888 667 7009 or visit
www.Brinsea.com.
9.0 Servicing
IMPORTANT. THE HEATER IS AT MAINS VOLTAGE. NEVER DRILL INTO OR PUNCTURE THE CURVED SIDES
OF THE BROODER. RISK OF ELECTRIC SHOCK.
9.1 Replace all filters every six months of use. Contact Brinsea Products on 1-888 667 7009 to order.
9.2 The interior light bulb can be replaced if necessary.
ENSURE THAT THE TLC IS DISCONNECTED FROM THE MAINS SUPPLY.
Remove the eight screws which retain the ceiling and replace the bulb with 15Watt pygmy BC type. Do not
exceed the recommended Wattage.
9.3 In case of failure first check that the mains power supply is working and that there is power at your receptacle.
If the problem persists contact your distributor or Brinsea Products Service Dept.
The functional parts of the Octagon TLC brooders are modular and parts are available and are readily
exchanged by a suitably qualified person equipped with basic tools.
Fitting instructions are supplied with replacement parts.

TLC-4/TLC-5 US Issue 2
9
10.0 Specification
TLC - 4
Construction: Top and base mouldings: structural, insulated polyurethane
Curved sides: Twin skin ABS
Door opening frames: Anodised extruded aluminium
Clear door: ‘Plexiglass’ or similar scratch resistant clear acrylic
Dimensions : (External) 475mm high x 450mm diameter (18 ¾” high x 17 ¾” diameter)
(Max. Internal) 370mm high x 395mm diameter (14 ½ high x 15 ½” dia.)
Weight: 5.5Kg (12lbs)
Power Consumption: 120 Watts (maximum)
60 Watts (typical average)
Electrical Supply: 230v 50Hz or 115v 60Hz as ordered
TLC - 5
Construction: Top and Bottom mouldings: Structural, insulated Polyurethane
Curved Sides: Twin skinned ABS
Door opening frames: Anodised Extruded Aluminium
Removable Inner Door (Optional): Chromed Welded Steel Wire Cage
Removable Clear Outer Door: Flexible clear ‘PETG’ sheet plastic with anodised extruded
handles
Dimensions: (External) 760mm Wide x 510mm Deep x 600 High
(30“ Wide x 20“ Deep x 23 ¾” High)
(Internal) 680mm Wide x 430mm Deep x 470mm High
(26 ¾” Wide x 17” Deep x 18 ½” High)
Weight: 10kg (24lbs)
Electrical: 230v, 50Hz or 115v, 60Hz
Supply: 200 watts (Maximum)
90 watts (Typical Average)
Brinsea Products Inc., 704 N Dixie Ave., Titusville, FL 32796-2017 USA.
Phone. (321) 267-7009 Toll Free 1-888-667-7009 Fax (321) 267-6090
Other manuals for Octagon TLC-4
1
This manual suits for next models
1
Table of contents
Other Brinsea Pet Care Product manuals
Popular Pet Care Product manuals by other brands

Horsepower Technologies
Horsepower Technologies FastTrack Liner Use guide

Richell
Richell Pet Stuff Tower instruction manual

PetNovations
PetNovations CatGenie 120 Operation guide

RoamEO
RoamEO PuPpod GPS user guide

Roverpet
Roverpet K889F Assembly instructions

outstanding pet
outstanding pet DR-500M user manual

Aquatronica
Aquatronica ACQ450 instruction manual

E-Collar Technologies
E-Collar Technologies 1000 Series Operation manual

Dogtrace
Dogtrace d-fence 6th SENSE user guide

Garmin
Garmin Pro Series BATTERY REPLACEMENT INSTRUCTIONS

Zoo Med
Zoo Med REPTI RAPIDS RR-21 instructions

Dogtra
Dogtra 2300NCP EXPANDABLE owner's manual