Broadview OfficeSuite User manual

Administrator User Guide
CONTACT SUPPORT
1-888-623-VOIP
OceSuiteSupport@Broadviewnet.com
http://community.broadviewnet.com
OceSuite® Phone
PUTTING ALL YOUR OFFICESUITE® FEATURES TO USE TO BE MORE EFFICIENT

Table of Contents
Quick Start Guide .....................................................................................................................3
Using Your Phone ................................................................................................................4
Managing Features Through the MyOceSuite® Portal ...........................................................................5
Installing Your Phone .................................................................................................................7
Using Your OceSuite® Phone ........................................................................................................8
Activating Your Phone ...........................................................................................................8
Making Calls .....................................................................................................................8
Setting Up Voicemail ............................................................................................................8
Administering the System .......................................................................................................... 10
Setting Up How Calls Come Into Your Business ..................................................................................12
Setting Up Users . . . . . . . . . . . . . . . . . . . . . . . . . . . . . . . . . . . . . . . . . . . . . . . . . . . . . . . . . . . . . . . . . . . . . . . . . . . . . . . . . . . . . . . . . . . . . . . . . . . . . . . . . . . . . . . . 13
Adding an Employee............................................................................................................13
Setting Up and Changing Call Permission Proles................................................................................14
Setting Up Your Business Hours .................................................................................................16
Using the System ...................................................................................................................20
Listening to Voicemail...........................................................................................................20
Setting Up Speed Dials..........................................................................................................21
Forwarding Calls ................................................................................................................21
Setting Up Music on Hold .......................................................................................................23
Optional Features and Services ......................................................................................................26
Getting Help ........................................................................................................................30
Troubleshooting Your System ........................................................................................................31
FCC Notice to U.S. Customers .......................................................................................................32
Index ...........................................................................................................................35
2

All of your phone’s features and settings will be managed through the phone itself
and through our intuitive, online customer portal called MyOceSuite®. An account
has been created for you upon purchase in which you will receive an activation email
instructing you to set your password. Once activated, you can login to the portal at
http://MyOceSuite.broadviewnet.com to view and manage your system and features.
Quick Start Guide
This quick start guide is designed to provide you with a brief overview of the system.
For more detailed instructions, please reference the Index on page 35 and search by
the topic. You can also watch the helpful videos conveniently displayed on each
of the widgets for visual step-by-step instructions.
Volume/Ring Volume/
Contrast Scroll
Action Keys
Mute Key
Speakerphone Key
Settings Key Cancel Key Redial Key
Hold Key Transfer &
Conference Key
Voicemail Key
Information Area Display
Action Keys
Key Page and Navigation Buttons
Phone Key Pad
Date/Time Display Voicemail Light
Soft Keys
Memory Keys
Microphone
Speaker
3Quick Start Guide

Quick Start Guide – Using Your Phone
ACTIVATING YOUR PHONE
Press the Activate soft key and enter your
extension and PIN, then press Enter or
the #key.
MAKING CALLS
External Calls
To make an external call, you must dial
a 9+1+ the number.
Internal Calls
Internal calls can be made by just
entering the 3 or 4 digit extension
of your colleague.
International Calls
To make calls outside of the United States,
dial 9+011+Country Code+City Code+the
phone number of the person you are
trying to reach.
RECORDING YOUR VOICEMAIL
GREETING
To record or change your voicemail
greeting. Press the Voicemail button on
your phone and enter the temporary
passcode of 1234 and follow the prompts
to record your greeting. Here, you can also
reset your password.
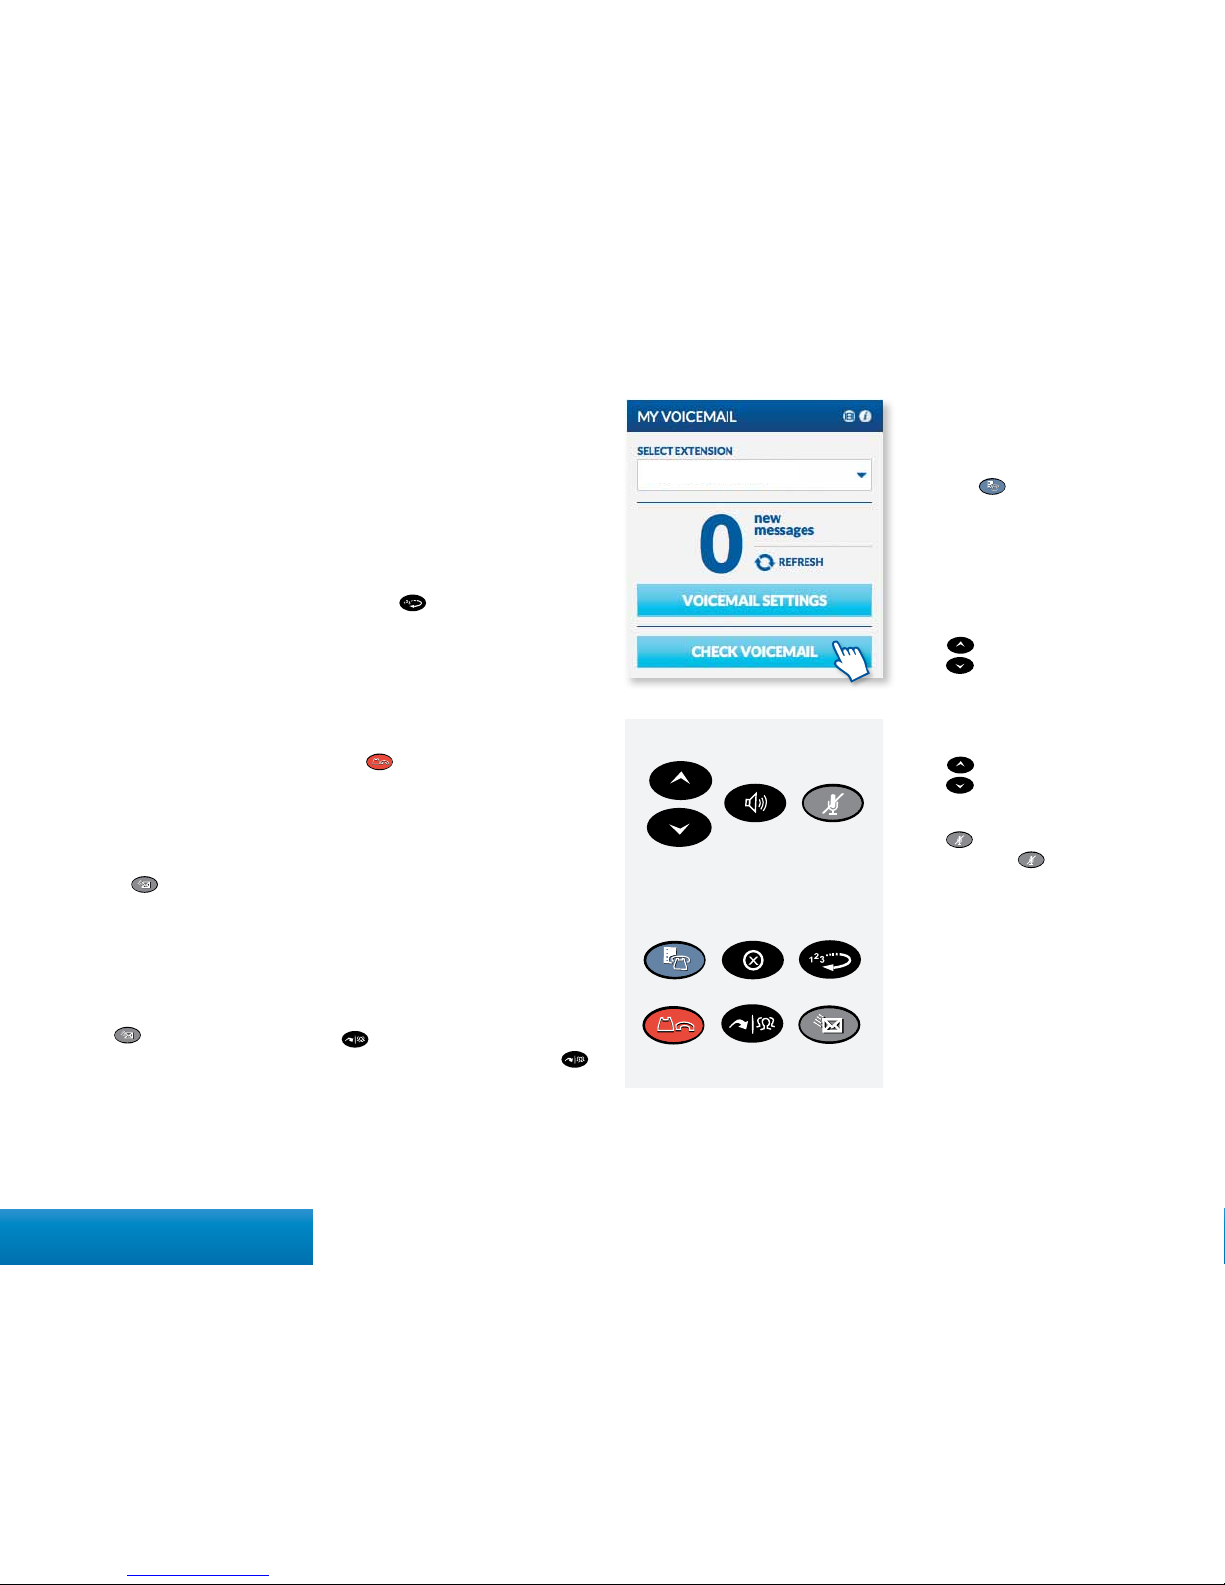
LISTENING TO VOICEMAIL MESSAGES
From Your Desk Phone
Press the key and follow the prompts.
From Any Phone Outside Your Oce
1. Call your own phone number
2. During your voicemail greeting press *
key and follow the prompts.
4Quick Start Guide
ACCESSING THE COMPANY
DIRECTORY
Press the Menu soft key on your phone,
then select Directory. Here you can
search for employees by typing in their last
name. Once the coworker you are trying
to reach is displayed, hit the Dial soft key
to begin the call.
USING REDIAL
Press the function key (or the Redial
soft key). Then, select the number you
wish to call by using the Arrow keys and
press the Dial soft key.
PLACING A CALL ON HOLD
When you are on a call and would like to
put someone on hold. Press the red hold
key . This places the call on hold.
TRANSFERRING A CALL
Once on an active call, you can transfer a
call by pressing the Transfer soft key. You
will then see Transfer To displayed. Dial
the internal or external number (don’t
forget to dial 9+1 for an external call).
The call will then be transferred to the
appropriate party.
MAKING A THREEWAY CALL
OR CONFERENCE CALL
Dial the rst party’s number, then press the
twice (or the Conf soft key once). Then
dial the second party and press the
function key once (or the Conf soft key)
to join the parties.
Volume/Ring Volume/
Contrast Scroll
Action Keys
Mute Key
Speakerphone Key
Settings Key Cancel Key Redial Key
Hold Key Transfer &
Conference Key
Voicemail Key
ADJUSTING YOUR PHONE
DISPLAY SETTINGS
You can adjust and personalize your
phone’s settings by clicking on the blue
action key . Here you will see a list of
the display features: Text Size, Brightness
and Contrast, Screen Saver and more.
To view or adjust any of these settings,
simply click on the gray button next to the
appropriate category.
ADJUSTING THE SPEAKER VOLUME
Press to adjust the volume of the
handset, headset and speakerphone
during a call.
ADJUSTING THE RINGER VOLUME
Press when the phone is ringing.
MUTING A CALL
Press to mute the microphone during
a call. Then press to turn o mute.
NOTE: This command works whether
you are using the headset, handset or
speakerphone. When on a call, if your
phone is muted and you need to enter
command keys, unmute the microphone to
ensure that they transmit properly.

Quick Start Guide – Managing Features through the MyOceSuite® Portal
5Quick Start Guide
Login to the MyOceSuite® Portal at
http://MyOceSuite.broadviewnet.com
to perform the next set of functions.
SETTING UP HOW YOU RECEIVE
VOICEMAILS
There are several ways that you can receive
voicemail messages, including via email.
To set up how you’d like to receive your
messages, click on Voicemail Settings on
the My Voicemail widget and check the
box for Enable Voicemail Notications
and select your preference and enter the
email address of where you would like to
receive messages.
CHECKING VOICEMAIL ONLINE
You can check your voicemail right from
the portal. Click on Check Voicemail
from the My Voicemail widget. Here
you can listen, sort, delete, or forward
messages.
CREATING AN AUTO ATTENDANT
TO ANSWER CALLS
Ocesuite® Phone comes with virtually
unlimited auto attendants that can
be used to ensure all of your calls are
answered and directed to the right
person every time the phone rings, not
matter who is in the oce. For more
information on how to set up your auto
attendants, see page 17 of the user guide.
RECORDING YOUR NAME FOR
THE DIRECTORY
Recording your name for the directory
is important so callers hear your name
in your own voice. To do this, select the
extension you’d like to record on the
Phone Systems Directory widget and
the extension you can be reached at and
click on Record Name. The system will
then call your extension and prompt you
to call your name through your phone.
CALL TWINNING
Enable your cell phone and desk phone
to ring simultaneously so you never miss
a call. After purchasing this feature, you
can easily turn it on through the My
Call Twinning widget and entering the
number you’d like to twin and click Save.

Quick Start Guide – Managing Features through the MyOceSuite® Portal
PROGRAMMING BUTTONS: SPEED
DIALS AND FORWARDING CALLS
TO OUTSIDE PHONES
OceSuite® Phone enables you to
program any assigned keys on your
phone to whatever numbers you’d like.
The most popular buttons to program
are Speed Dials, Forward to Voicemail
or Cell, Intercom and Do Not Disturb.
To program your buttons, click on
Congure on the My Phones widget
and click on the gray button next to
any unassigned key and select from
the drop-down menu the type of
button you’d like to program, enter the
number, label it and click Save.
*All external numbers must be entered with 9+1+then the number in
order to function properly.
6Quick Start Guide
CHECKING EMAIL
Click on Check Email from the My
Email widget. The number of new
messages is displayed on the widget for
your convenience.
SEARCHING AND ADDING CONTACTS
Click on the Contacts tab on the top navigation of the portal. Here, you can search
and create Favorites and import new contacts.

7
For helpful videos, guides and other tools, visit:
http://www.broadviewnet.com/getting-started
1: CONNECT YOUR PHONE TO THE LOCAL AREA NETWORK
Connect one of the provided Ethernet cables into your existing local area network (LAN)
and into the port on the included power adapter. Next, connect another
Ethernet cable into the port on your power adapter and into the port
on the back of your OceSuite® phone.
Installing Your Phone Without Power Over Ethernet
1: CONNECT YOUR PHONE TO THE LOCAL AREA NETWORK
If your network is Power over Ethernet enabled, you do not need the power adapter and
should simply connect an Ethernet cable into your existing local area network and into
the port on the back of your OceSuite® phone.
2: CONNECT YOUR PHONE HANDSET
Connect your phone handset into the port next to on the back of your OceSuite®
phone. You may also connect a headset into the port next to on the back of your
OceSuite® phone.
3: CONNECT YOUR PC TO YOUR PHONE OPTIONAL
OceSuite® can utilize an integrated Ethernet switch that allows you to connect
to your computer without requiring an Ethernet Port.
To do this, connect one of the provided Ethernet cables to your computer and into the
PC port on the back of your OceSuite® phone.
Installing Your Phone With Power Over Ethernet
For a list of recommended headsets,
go to www.broadviewnet.com/ready

8
Activating Your Phone
Press the Activate soft key and enter
your extension and PIN, then press Enter
or the #key. Your extension was created
by Broadview Networks when your
account was created and when you rst
logged into MyOceSuite®, you created
your numeric pin.
Making Calls
EXTERNAL CALLS
For calls outside your oce, simply pick
up the handset or press any line key to
activate the speakerphone and dial 9 +
the 10-digit phone number.
Example: 9 + 1 + 800 + 555 + 1212
INTERNAL CALLS
For calls inside your oce, simply pick
up the handset or press any line key and
dial the 3 or 4 digit extension of your
colleague. To use the company directory
press Menu, then Directory and type
in the rst few letters of the party’s last
name using your phone’s keypad, or scroll
to nd their name, then press Dial.
INTERNATIONAL CALLS
To call outside of the United States dial
9 + 011 + Country Code + City Code +
Number, then the phone number of the
party you wish to call. Example: 9 + 1 + 52
+ 55 + 5130 + 5300
NOTE: OceSuite® allows companies to
restrict International calls so if you cannot
make an international call, please contact
your local administrator.
Setting Up Voicemail and
Getting Messages
Press the Voicemail key on your
phone and enter the temporary passcode
of 1234. Then, follow the voice prompts
to set up your mailbox and change your
passcode.
NOTE: Please choose a password that is
easy to remember for you, but dicult for
others to guess.
RECORDING YOUR
VOICEMAIL GREETING
To record or change your voicemail
greeting, hit the key on your phone
and log in with your passcode followed
by the #sign. Then, select option 9and
follow the prompts.
CHANGING YOUR VOICEMAIL
GREETING
To change your voicemail greeting, click
the key on your phone or simply
call your phone number and press the
Star (*) key when you hear your current
greeting.
Then, enter your voicemail passcode and
follow the instructions.
RETRIEVING VOICEMAIL FROM
YOUR OFFICESUITE® PHONE
When you have a message, your phone
indicator light will glow an orange-red
color on your phone. Then, push the
key and enter your passcode.
Using Your OceSuite® Phone
MAKING A THREEWAY CALL OR CONFERENCE CALL
You can initiate multiple party phone calls right from your OceSuite® Phone. Dial the
rst party’s number, then press the twice (or the Conf soft key once). Then, dial
the second party and press the function key once (or the Conf soft key) to join the
parties.
USING REDIAL
Press the function key (or the Redial soft key). Then, select the number you wish to
call by using the Arrow keys and press the Dial soft key.
Volume Control
ADJUSTING THE SPEAKER VOLUME
Press to adjust the volume of the handset, headset and speakerphone during a call.
ADJUSTING THE RINGER VOLUME
Press when the phone is ringing.
Mute Key
Voicemail Key
Volume/Ring
Volume/
Contrast Scroll

MUTING A CALL
Press to mute the microphone during
a call. Then press to turn o mute.
NOTE: This command works whether
you are using the headset, handset or
speakerphone. When on a call, if your
phone is muted and you need to enter
command keys, unmute the microphone
to ensure that they transmit properly.
Using Other Phones
PARKING A CALL ON ONE PHONE AND RETRIEVING IT ON ANOTHER
The Park/Retrieve feature allows you to put a call on hold at one phone and retrieve it
from any other phone in your organization. To use the Park/Retrieve feature, you must
rst program a Park/Retrieve key on each phone. Do this via the My Phones widget
in the MyOceSuite® portal. Select any unassigned key and then select Park/Retrieve
from the drop-down menu. When active in a call, press the Park/Retrieve key to park
the call. The phone display will show the parking lot assignment. The receptionist
can then page the party for whom the call is intended and convey the parking space
number. The other party retrieves the call from another phone by pressing the Park/
Retrieve key and the parking space number of the call. Up to 9 calls can be parked
at any time.
LOG OUT OF YOUR OFFICESUITE® PHONE
1. Press the Menu soft key.
2. Press the Logout soft key.
3. Press Yes to conrm your log out.
NOTE: When you log in to a dierent phone, you will be automatically logged out of
any other phone that is active unless multi-desking has been enabled.
HOT DESKING/MULTIDESKING
Hot Desking allows you to move around your oce and in between multiple locations
and simply log into any OceSuite® phone and use it as your own – same number,
same speed dials, same voicemail. There is nothing to set up! Simply go to any other
OceSuite® phone and if someone else is logged into it, press the Menu soft key and
then Log Out (When no one is logged into a phone, the screen will say Logged Out at
the top). Click the Activate button and enter your extension and your PIN.
THE PHONE IS NOW YOURS!
NOTE: When you log into another phone, you will automatically be logged out of all
other phones, unless your multi-desking is set to greater than one device – up to 5
devices can be used at once when multi-desking is activated.
CHECKING VOICEMAIL FROM ANY PHONE OUTSIDE YOUR OFFICE
Call your own phone number and during your voicemail greeting, press the Star (*) key
and then follow the prompts.
Using Your OceSuite® Phone
9

10
Administering and Using the System from the MyOceSuite® Portal
The MyOceSuite® portal is a
revolutionary customer portal that
enables you and your team to manage
all the preferences and features of your
OceSuite® system, including:
email, fax, HD meeting and your toll-free
service. You and your employees will be
set up by Broadview as MyOceSuite®
users for the customer portal, as well as
enabled with an extension for phone
system access. Once established, you will
receive a welcome email instructing you
to activate your account and set your
password and prole.
Once logged in, you are presented with
the MyOceSuite® Dashboard from
which you manage the entire system
and all of your services. Across the top
of the Dashboard is a series of tabs with
dierent functions and in the center of
the Dashboard are widgets from which
you can make changes to the system
and services. Each widget has a video
icon and information icon describing
its function to help illustrate how to use
the widget.
Video Help
Information

http://MyOceSuite.broadviewnet.com
Administering and Using the System from the MyOceSuite® Portal
11

12
As the Administrator, you have the ability to manage and access all aspects of your Ocesuite® system. This section covers the functions and features you have the ability to manage
and control for your company, from anywhere.
Administering the System
SETTING UP HOW CALLS COME
INTO YOUR BUSINESS
All incoming phone calls are sent to a
specic phone number in the system.
Calls can be sent to individual phones,
to an auto attendant, or to a call group.
The rst step is to make sure that your
phones and phone numbers are set up
the way you wish. To set up or change
the incoming call routing for any phone
number, click the Congure button
on the Incoming Call Routing widget.
On the left, you will see a list of all the
phone numbers on your system. To add
or update the call routing, simply click
any of the phone numbers listed. Next,
assign that phone number a name, like
main phone number or sales department
and select the appropriate business
hours prole. These proles can be set or
updated in the Business Hours widget
(See p.16 for Business Hours).
Now, simply move through the page to
determine where you’d like the calls to
go when that particular phone number
is called throughout the day. You can
have dierent call routes for when you
are open for business, closed for the day
or during lunch breaks or other special
hours.
* Emergency override allows you to
re-route your calls to a pre-determined
business location, for example: mobile
phones, other branch locations or a
designated emergency override number
to ensure that you do not experience any
down time in the event of an emergency
like a ood, storm or re. Please make
sure to complete the Emergency Override
Routing for each phone number listed.
Doing so will give you the ability to re-
route calls with the single click of a button
when it matters most.
YOUR PHONE NUMBERS
A list of your phone numbers and any
temporary phone numbers assigned
while your phone numbers are moving
to your new phone system can be found
by clicking Phone Numbers under
the Phone System tab. The process
of moving phone numbers from your
previous telecommunication provider to
Broadview is called porting and can take
up to two weeks to complete. You can
add additional phone numbers on this
page by clicking on Buy New Number.

Administering the System
SETTING UP USERS IN THE PORTAL
Dashboard proles allows you as an
admin to set up what employees see and
have access to on their own Dashboards.
There are two standard proles that come
with your OceSuite® Phone account,
an Administrator prole and a Standard
User prole. You also have the ability to
customize your own user proles as well,
as you may have users who you want
to have access to certain settings and
permissions based o of their role and
level of authority. To create new user
proles, go to User Manager option
under the Settings tab and click Create
New User Prole. Here, you can name
the prole, for example, customer service
or sales and then select the widget
options that you would like them to have
access to, be sure to click Save. Only the
items selected will appear on their own
Dashboard.
RESETTING EXTENSION PINS
AND PORTAL PASSWORDS
To reset a PIN or Password, simply go to
the Account Settings option under
Settings on the top navigation of
the Dashboard and click Reset PIN or
Change Portal Password.
ADDING A NEW EMPLOYEE
If you have a new team member and need
a new phone for them, you can quickly and
easily order a new phone for them right
through the MyOceSuite® portal. Just
click on the Phones and Accessories page
from the Phone System Tab on top and
select the model phone you would like to
add from the drop-down menu and add
the new phone to your account. You can
also contact us for assistance at anytime at
1-888-623-8647.
Adding a New User
To get started, you rst need to create
a new user through the MyOceSuite®
portal. To do this, go to the Settings tab
on top of the Dashboard and click on User
Manager in the drop-down menu. Then,
click on Create New User and enter their
information.
Creating a New Extension
Once you have created a new user for the
MyOceSuite® portal, you will then need
to create a new extension. To do this, go to
the Extension Manager under the Phone
System tab and click Add Extension. Enter
the new employee’s information and assign
them to the appropriate extension and
phone number from the drop-down menu
and click Save.
13

14
Administering the System
SETTING UP AND CHANGING CALL
PERMISSION PROFILES
OceSuite® Phone allows you to set the
outgoing calling permissions for each
extension. To set up or change these
permissions, select the extension you
would like to change from the drop-
down on the Call Permissions widget.
Next, pick the permissions you would
like to assign from the status drop-down.
In certain scenarios, you may choose to
block all outgoing calls. This is a common
prole for call center employees. You may
also want to block long distance calls or
international calls to avoid unnecessary
expenses or productivity losses. If you
would like to set the permissions for all
employees, check the box and be sure to
click Save.
INTERNATIONAL CALL PERMISSIONS
If your International call does not
connect, please ensure that International
calls are allowed for your extension
by checking under Status in the Call
Permissions widget found on the My
Account Dashboard.
CREATING NEW CALLING
PERMISSION PROFILES
You can create new custom permission
proles for your team, just click on Call
Permission Proles under the Phone
System tab. Then, click on Create New
Prole. Here you can select the types of
calls you would this employee or group
to be able to make. Then, drag and drop
employees below to add them to this
prole, once complete, be sure to click
Save.
SETTING CALL PERMISSIONS
FOR MULTIPLE USERS
To easily set permissions for more than
one of your users at one time, go to the
Extension Manager under the Phone
Systems tab. Here a list of all of your
users will appear. On the right hand
column, you will see Call Permissions,
click on the eld and a drop-down of
options will appear, select the permission
setting you’d like for each user, then
click Save.

Administering the System
CREATING GROUPS OF EXTENSIONS
OR CALL GROUPS
Setting up a Call Group is easy with
MyOceSuite®. Simply click the Manage
button on the Call Groups widget. Next,
from the Add drop-down menu, select
the type of call group you would like to
create.
OceSuite® Phone allows you to create
several dierent types of Call Groups:
Broadcast groups – Calls are routed to
all members of this group; all phones can
ring or only those that are not in use.
Call Pickup groups – Calls to any
member of the group can be picked up
by any other member of the group.
Hunt groups – Calls to a linear hunt group are routed to each group member in turn,
and always start with the rst member listed; calls to a circular hunt group are routed
in the same way, but the starting member role rotates among members.
Monitor groups – Members (secondary) can monitor calls of another member
(primary)
Rollover groups – A call rings the phones of a rollover group one at a time until the
call is answered or sent to call coverage.
Enter a name for the group and choose an extension from the drop-down. Complete
any other selections like Call Behavior in the general information settings to dene
how you would like calls routed. Finally, add members to the group by dragging and
dropping them from the available column into the selected column or by clicking the
plus sign. Then, scroll down and choose how you would like to forward calls that are
unanswered by this group. Unanswered group calls can continue to ring or be sent to a
voicemail box, to an auto attendant, another employee, or to any other phone number,
anywhere. When you complete the details, click Save.
*Remember to update your company incoming call routing or employee call
forwarding selections to take advantage of the new Call Group.
MAKING CHANGES TO SETTINGS FOR MULTIPLE USERS
The MyOceSuite® portal allows you to make changes like call permissions, outgoing
caller ID, and enabling features like call twinning and more, for multiple users at one
time. To quickly change the settings on more than one extension, go to Extension
Manager under the Phone System tab and change the settings you need for the
appropriate employees instantly. You can also add additional extensions.
ASSIGNING EXTENSIONS TO USERS
OceSuite® Phone is so exible that any extension can be assigned to any users. To
assign or change phones and extensions, go to the MyOceSuite® portal, click the
Phone System tab and choose Extension Manager. Here, you will see a list of each
of the extensions on your system. You can customize the options for your employees,
for example, their call permissions, music on hold, twinning and more.
15

16
Administering the System
MANAGING YOUR CORDLESS PHONES
If you’ve purchased cordless handsets
or cordless desk phones, you can easily
manage them right through the Cordless
Phones Widget. Here you will see a drop-
down with your business location(s), if you
have more than one location, select the
location that you would like to view from
the menu drop-down and click on Change
Conguration. You can then assign or
change phones by dragging and dropping
the phone image to the appropriate
employee and extension.
SETTING UP YOUR BUSINESS HOURS
FOR YOUR LOCATIONS
The OceSuite® Phone system lets you
pre-set your business hours so you can
send callers to dierent extensions, groups,
or auto attendants during open, closed,
lunch and special times. This is very useful
for departments that work varied hours like
sales, customer service, and warehouses
as opposed to corporate employees who
work traditional business hours.
From the Business Hours widget, click
Congure to get started. Then, click the
Add button or click on any location name
to dene your business hours. Select which
days and hours that location is open, as
well as any pre-dened lunch or special
hours of operation.
Special hours can be used for anything
you would like. If this is your main location
or the standard hours for most locations,
check the Default Business Hours box.
Now, simply drag and drop or click the plus
sign next to any available phone numbers
into the selected group, be sure to click
Save when complete. Your changes will
take eect immediately.
MANAGING YOUR CALLER ID
The number displayed to the parties you
call can be set up from the Outgoing
Caller ID widget. Select the extension
from the drop-down list and then select
the Outgoing Caller ID you would like
to use from the drop-down list. The Caller
ID can be any phone number on your
system. This is particularly helpful when
you would like to present one number
from all phones.
PLACING ANONYMOUS CALLS
To place anonymous outbound calls,
locate the Outgoing Caller ID widget
on the My Account Dashboard, then
select Private from the Outgoing Caller
ID drop-down list for each extension you
would like to designate as anonymous.
All calls made from that extension will not
send a calling number to other parties.
CORPORATE HQ
9 a.m. - 5 p.m.
SERVICE
DEPARTMENT
8 a.m. - 6 p.m.
SUPPORT
7 a.m. - 9 p.m.

Administering the System
CREATING AN AUTO ATTENDANT
TO ANSWER CALLS
An auto attendant can answer calls
coming into any of your phone numbers,
including your toll-free numbers. Many
organizations use auto attendants
to automate call routing, presenting
options such as: Press 1 for Sales, Press
2 for Service, Press 3 to hear a company
directory by last name and Press 4 to
repeat this menu. Each prompt can be
assigned to an extension, call group, or
another auto attendant.
Click the Congure button on the Auto
Attendants widget to begin. Then, click
on the arrow on the left hand side of your
list of greetings. Here you can add a new
greeting and name it.
RECORDING YOUR AUTO ATTENDANT
GREETING
To manage and record your Auto
attendant greetings, click on the
Congure button on the Auto
Attendants widget. Then, click on the
arrow on the left-hand side of your list
of greetings, and click on the Set Auto
Attendant tab on top. There, you will
see the options to create your greetings.
With OceSuite® Phone, there are three
ways you can record your auto attendant
greeting.
1. You can record your own greeting for the auto attendant by uploading a .wav or
.mp3 le. To record a .wav le on most Windows PCs that have a microphone, open the
Sound Recorder Program and click Start Recording. For Apple Macintosh, you can
use Audacity or a similar program that can record .wav and .mp3 les. Both the Apple
and Google app stores also have several apps that can record .wav or .mp3 les. Record
and send yourself an email with the le, then save the le to your desktop. Click the
Upload a .wav le or .mp3 le radio button under Audio File Options on the Auto
Attendants widget. Click Browse, choose your le, then click Use This Audio File.
2. To record your greeting right through your phone, just select the Call Me to Record
Audio option and nd your extension in the drop-down menu and click on Call, your
phone will start ringing. You will then be prompted to speak the greeting right into
your phone.
3. You can even use the OceSuite® Text-To-Speech option to automatically record
your greeting. Click the Use Text-to-Speech radio button, then choose a male or
female voice by clicking the appropriate radio button. Type your script in the Message
Box (it may be helpful to spell words phonetically to ensure they are pronounced
accurately) then click Create Recording. After the recording is complete, an option will
be presented so you can listen to your recording. If you are satised, click the Use this
Recording button. If you want to change the recording, modify your written text in the
Message Box and repeat the steps above.
Once a new auto attendant has been created, you will congure each key (Press 1,
Press 2, Press 3) with a result and if needed, an extension where calls will be sent. In this
example, callers that press 1 or 2 will be directed to user extensions, those who press 3
will go to the Last Name Directory and 4 will repeat the options.
Click the Save Menu Keys button when you are satised with the menu setup.
The next step is to record what the callers hear when calling the auto attendant.
17

18
Administering the System
VIEWING YOUR ACTIVE LICENSES
AND SERVICES
At anytime, you can view all of the active
licenses for your company by clicking on
Manage from the Voice Licenses widget
on the Dashboard. Here, you can view
how many you have of each feature,
manage them and buy more at anytime.
ROUTING CALLS IN AN EMERGENCY
When a disaster strikes you need to move
quickly. To re-route all of your calls during
an emergency like a snow storm, power
outage or connectivity loss, simply click
the Congure button on the Incoming
Call Routing widget. Now press the
Enable All Overrides button. This will
send incoming calls to the Override
number previously set up. The best
practice is to make the Override numbers
extensions in another branch or location,
or employees cell phones. You can also
choose to create and send calls to an
emergency voicemail box where callers
can leave you a message.
VIEWING COMPANY CALL HISTORY
As the administrator, you have the
ability to view all the incoming and
outgoing calls for your business. Click
on Call History under the Phone
System tab, here a complete list of all
the calls made and received, the times,
dates and empoyees are displayed for
your reference. You can also click-to-call
contacts and export a list for further use.
MANAGING YOUR ONLINE FAX
If you have purchased Broadview’s Online
Fax service, you can manage it through the
MyOceSuite® portal. On the My Online
Fax widget, you will see your inbound fax
numbers and there you are able to select
from the drop-down menu which number
you would like to set as your fax number.
To upgrade your fax service, or to purchase
any additional fax accounts, click the
Details button from the My Online Fax
widget. You’ll be contacted by Broadview
Networks to complete your order.
MANAGING HD MEETING
If you have purchased OceSuite HD
Meeting™, Broadview’s video conferencing
service, you can manage your account
through the MyOceSuite® portal. The
number of active licenses your company
has purchased is conveniently displayed
on the HD Meeting Licenses widget. To
manage your accounts, click on Manage
and a list of your active accounts and
which users they are assigned to will be
displayed for your reference.
To purchase more HD Meeting accounts
or an initial account, click on Buy and
enter your rst name, last name and email
address and click Submit Order. You will
receive an email with instructions on how to
complete the activation process.
For more information on how to get started and how HD Meeting works,
view our Quick Start Guide, which can be found under the Support tab
in the MyOceSuite® portal.

Administering the System
MANAGING YOUR TOLLFREE
NUMBER AND SERVICE
If you have purchased a toll-free number
for your business, you can manage it
through the MyOceSuite® portal. Here
you can manage your numbers, repoint
numbers and buy additional toll-free
numbers at anytime.
You can change which phone number
you’d like to have answer the toll-free
calls. This is referred to as pointing. To do
this, click on Repoint on the Toll-Free
Service widget and enter the number
you’d like to retrieve the calls, then press
Save.
REVIEWING SERVICE CHARGES
AND PAYING YOUR BILL
You can quickly and easily review all
charges and pay your bill online by clicking
on the Billing tab on the My Account
Dashboard or by clicking on Details
on the Billing Widget. Here you can
download a copy of your bill, review your
payment history and more.
Get answers on OceSuite®Phone
and other cloud services.
https://community.broadviewnet.com
OFFICESUITE
DENTAL™
CORDLESS
Bill
COMMUNITY
Visit our new
• FAQs
• Videos
• Guides
Help
?
19

20
TURNING ON VOICEMAIL
TRANSCRIPTION
Receive your voicemail messages via
email along with a transcription of
the audio. Check the box for Enable
Voicemail Notication and then click
the button to Include audio le w/
transcript. Monthly charges do apply,
see the portal for details.
ACTIVATING AND USING YOUR
VOICEMAIL APP
The OceSuite® Mobile Voicemail
App is available for free. The Voicemail
App allows access to your OceSuite®
voicemail messages on your mobile
device and displays a list of all of
the messages in your voicemail box,
indicating the time, caller and status.
The app allows you to listen to your
messages and features touch-controlled
fast forward and rewind. It also allows
callback, forwarding and general
integration with the contacts on your
smartphone. The app is integrated with
the Message Waiting Indicator on your
OceSuite® phone, so listening to a
message in the app marks it as listened
to and the message waiting light on your
OceSuite® phone will go out.
To get the app, simply download
it from your smartphone and follow
the simple instructions.
Using the System
LISTENING TO VOICEMAIL
To listen to your messages online,
simply click Check Voicemail from the
MyVoicemail widget.
Now, choose any message you would
like to listen to and use the built-in
controls to pause or stop the message.
From here, you can download messages
or delete them, ag messages for future
use, or forward them instantly right from
the portal. You can even nd important
messages by ltering for specic
voicemails with just a few key strokes, just
enter the date, name or phone number
and press enter.
SETTING UP HOW YOU RECEIVE
VOICEMAIL MESSAGES
Click on Voicemail Settings on the
MyVoicemail widget and select how
you would like to receive your voicemail
messages in the notication section.
GETTING VOICEMAIL MESSAGES
VIA EMAIL
OceSuite® Phone can send your
voicemail message to any email address.
To enable this, click on Voicemail
Settings on the My Voicemail widget
and click Enable Voicemail Settings.
Here, you can select to receive just an
audio le of the message or the audio le
with a transcript of the message. Then,
enter the email address you would like to
receive messages at and click Add Email
and Save.
Other manuals for OfficeSuite
7
Table of contents
Other Broadview Telephone manuals