manuals.online logo
Brands
  1. Home
  2. •
  3. Brands
  4. •
  5. Brugg
  6. •
  7. Cables And Connectors
  8. •
  9. Brugg CALPEX-Big-T-I-L User manual

Brugg CALPEX-Big-T-I-L User manual

Other Brugg Cables And Connectors manuals

Brugg CALPEX-T-I-L User manual

Brugg

Brugg CALPEX-T-I-L User manual

Brugg CASAFLEX UNO User manual

Brugg

Brugg CASAFLEX UNO User manual

Brugg CALPEX 25/76 User manual

Brugg

Brugg CALPEX 25/76 User manual

Brugg EIGERFLEX User manual

Brugg

Brugg EIGERFLEX User manual

Popular Cables And Connectors manuals by other brands

StarTech.com ST124HD20 quick start guide

StarTech.com

StarTech.com ST124HD20 quick start guide

Philips SWV4543S/10 Features

Philips

Philips SWV4543S/10 Features

Larson Electronics 10-50C instruction manual

Larson Electronics

Larson Electronics 10-50C instruction manual

Grip MEK-PM Assembly and operating manual

Grip

Grip MEK-PM Assembly and operating manual

Ultra Products Travel Pack #3 ULT31436 Specifications

Ultra Products

Ultra Products Travel Pack #3 ULT31436 Specifications

Surpass QCH-F Operation manual

Surpass

Surpass QCH-F Operation manual

Philips SWA6310 Specifications

Philips

Philips SWA6310 Specifications

StarTech.com CRJ4550PK quick start guide

StarTech.com

StarTech.com CRJ4550PK quick start guide

Nohau EMUL-IP2K-PC user guide

Nohau

Nohau EMUL-IP2K-PC user guide

Foxun SX-SP144E-HD4K2K operating instructions

Foxun

Foxun SX-SP144E-HD4K2K operating instructions

Philips SWA3305W Specifications

Philips

Philips SWA3305W Specifications

opticis Stretch DVIM1-1P0x user manual

opticis

opticis Stretch DVIM1-1P0x user manual

Volkswagen VAS 6558A operating manual

Volkswagen

Volkswagen VAS 6558A operating manual

NEXIBO N-13 user manual

NEXIBO

NEXIBO N-13 user manual

CYP PU-1H3HBTL Operation manual

CYP

CYP PU-1H3HBTL Operation manual

Allen-Bradley 1784-u2dhp installation instructions

Allen-Bradley

Allen-Bradley 1784-u2dhp installation instructions

Global Caché Flex Link Blaster quick start

Global Caché

Global Caché Flex Link Blaster quick start

Hauppauge USB-Live2 Quick installation guide

Hauppauge

Hauppauge USB-Live2 Quick installation guide

manuals.online logo
manuals.online logoBrands
  • About & Mission
  • Contact us
  • Privacy Policy
  • Terms and Conditions

Copyright 2025 Manuals.Online. All Rights Reserved.

CALPEX-Big-T-I-L
Montageanleitung CALPEX-Big-T-I-L-Schale (76–202 mm)
Instruction manual CALPEX-Big-T-I-L-shell (76 – 202 mm)
Instrukcja montażu korpusu trójnikowego (76 – 202 mm)
Istruzioni di montaggio per CALPEX-Big-T-I-L-guscio (76 – 202 mm)
PIONEERS IN
INFRASTRUCTURE
DE Lesen Sie diese Montageanleitung aufmerksam, bevor Sie mit dem Arbeiten beginnen.
EN Read these installation instructions through carefully before starting work.
PL Przed rozpoczęciem pracy prosimy o dokładne zapoznanie się z treścią niniejszej instrukcji.
IT Leggere con attenzione le presenti istruzioni di montaggio prima di iniziare a lavorare.
Sicherheitshinweise / Saftey notes / Wskazówki bezpieczeństwa/ Istruzioni di sicurezza 2CALPEX
1
DE Schaum , Kleber und Halbschale niemals der
Sonne oder Wärmequellen aussetzen!
EN Never expose the foam , glue or shell to sunlight
or heat sources!
PL Nigdy nie wystawiaj pianki , kleju ani samych korpusów
na bezpośrednie działanie słońca lub innych źródeł ciepła.
IT Non esporre assolutamente mai ai raggi solari o ad altre
fonti di calore la schiuma , l’adesivo e il guscio !
2
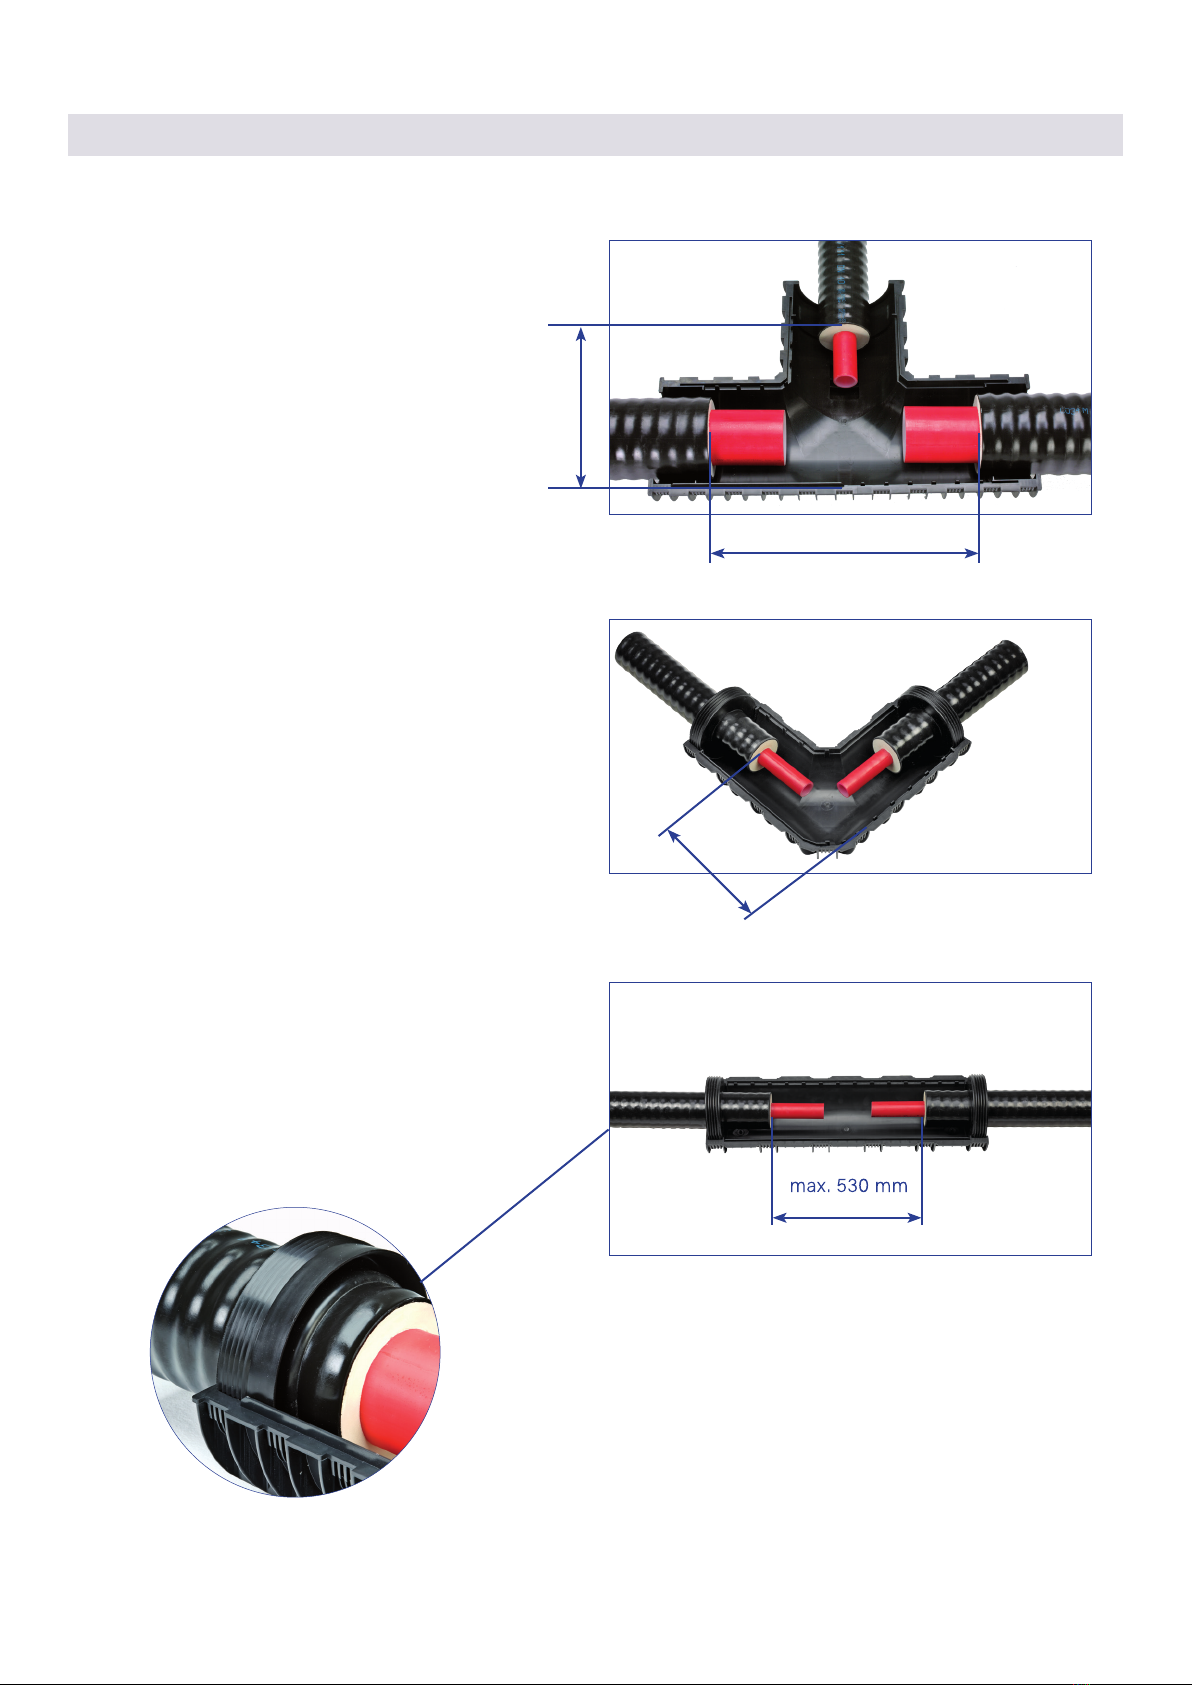
DE Dichtringe immer vor Fittings montieren! (Ist später
nicht mehr möglich!)
EN Always install sealing rings before fittings! (sealing
rings cannot be installed afterwards!)
PL Zawsze zakładaj pierścienie uszczelniające przed
montażem złączek trójnikowych. Po zamontowaniu
złączek będzie to niemożliwe!
IT Montare gli anelli di guarnizione semprecprima dei
raccordi! (a posteriore non è più possibile!)
651
6 5 1
6 5
1
65 1
4
4
4
4
3
DE Sorgen Sie immer für saubere Rohre und fettfreie Klebe-
flächen an beiden Halbschalen.
EN Always make sure pipes are clean and adhesion
surfaces on both shells are free of grease.
PL Upewnij się, że powierzchnie rur i korpusów są wolne
od zanieczyszczeń. Wyczyść je środkiem usuwającym
tłuszcz.
IT Controllare che i tubi siano puliti e che le superfici da
incollare sui gusci non presentino tracce di grasso.
4
DE Tragen Sie Schutzbrille und Handschuhe beim Kleben
und Arbeiten mit Schaum.
EN Wear safety goggles and gloves when gluing and wor-
king with foam.
PL Zakładaj okulary i rękawice ochronne podczas klejenia
i pracy z pianką.
IT Indossare occhiali protettivi e guanti protettivi durante
l’incollatura e quando si utilizza la schiuma.
PL Karty bezpieczeństwa dostępne na życzenie.
IT Le schede dei dati di sicurezza sono disponibili
su richiesta.
DE Wichtige Hinweise für die sichere und korrekte Handhabung dieses Produkts!
EN Important information on how to handle this product safely and correctly!
PL Zalecenia dotyczące bezpiecznego obchodzenia się z tym produktem!
IT Avvertenze importanti per l’utilizzo corretto e sicuro del prodotto!
DE Sicherheitsdatenblätter auf Anfrage
EN Safety data sheets on request
PL Zawartość zestawu montażowego EN Content installation kit
Montageanleitung / Instruction manual / Instrukcja montażu / Istruzioni di montaggio 3CALPEX
Inhalt
Obere Halbschale mit/ohne Stopfenlöcher
Untere Halbschale mit/ohne Stopfenlöcher
Klammern blau
Stopfen blau
Dichtungsringe
Schnellkleber
Montageschaum-Set
Montageanleitung
1
2
3
4
5
6
7
1
Zawartość kompletu
wierzch korpusu z otworami
spód korpusu bez otworów
niebieskie obejmy (klipsy)
niebieskie korki
pierścienie uszczelniające
klej
zestaw pianki PUR
instrukcja montażu
1
2
3
4
5
6
7
Componenti
superiore semiguscio con/senza fori per tappo
basso semiguscio con/senza fori per tappo
clip blu
tappi blu
anelli di guarnizione
adesivo rapido
set schiuma di montaggio
istruzioni di montaggio
1
2
3
4
5
6
7
3
2
45
7
6
1
1
1
Content
upper T-shell half with/without plug holes
lower T-shell half with/without plug holes
clamps blue
plugs blue
sealing rings
glue
foam set
instruction manual
1
2
3
4
5
6
7
1
EN Installation process
Montageanleitung / Instruction manual / Instrukcja montażu / Istruzioni di montaggio
1
DE Die Rohre abisolieren.
EN Strip the insulation from the pipes.
PL Usunąć izolację z rur.
IT Asportare l‘isolamento dei tubi.
4CALPEX
max. 530 mm
max. 370 mm
max. 370 mm
2
DE Alle Dichtringe auf zugehöriges Rohrende ziehen. Die
Dichtungslamellen müssen nach aussen gerichtet sein.
EN Pull all the sealing rings over the pipe end. The sealing
ridges have to point outwards.
PL Założyć pierścienie uszczelniające na wszystkie rury
w kierunku zgodnym z załączonym rysunkiem.
IT Inserire tutti gli anelli di guarnizione sulle estremità dei
tubi. Le lamelle di guarnizione devono risultare rivolte ver-
so l’esterno.
1
DE Die Rohre abisolieren.
EN Strip the insulation from the pipes.
PL Usunąć izolację z rur.
IT Asportare l‘isolamento dei tubi.
1
DE Die Rohre abisolieren.
EN Strip the insulation from the pipes.
PL Usunąć izolację z rur.
IT Asportare l‘isolamento dei tubi.
PL Przebieg montażu
EN Installation process
Montageanleitung / Instruction manual / Instrukcja montażu/ Istruzioni di montaggio 5CALPEX
3
DE Mediumrohre gemäss Montageanleitung dicht verbinden.
EN Connect the pipes according to the installation instructions.
PL Połączyć rury przewodowe zgodnie z instrukcją.
IT Collegare a tenuta i tubi secondo le istruzioni di montaggio.
4
DE Dichtringe genau positionieren. Stirnseiten müssen anliegen.
Passung der oberen Halbschale überprüfen.
EN Position the sealing rings precisely. The front faces must be
in contact. Check the fit of the upper shell.
PL Dokładnie spozycjonować pierścienie uszczelniające. Strony
czołowe muszą przylegać. Sprawdzić dopasowanie górnej
części korpusu.
IT Posizionare con precisione gli anelli di guarnizioni. I lati ante-
riori devono combaciare. Controllare la posizione guista del
guscio superiore.
DE Fortsetzung am Beispiel T dargestellt
ENNext steps according to the following example T
PL Następne kroki na przykładzie korpusu T
IT Seguenti passi di montaggio a esempio del guscio T
PL Przebieg montażu
EN Installation process
Montageanleitung / Instruction manual / Instrukcja montażu / Istruzioni di montaggio 6CALPEX
6
DEObere Schale jetzt auflegen.
EN Now place the upper shell on top.
PL Nałożyć górną część korpusu (tę z otworami).
IT Appoggiare il guscio superiore.
7
DE Sofort alle Klammern an den vorgesehenen Stellen anbrin-
gen und Kleber 20 Minuten aushärten lassen.
EN Immediately apply all the clamps at the positions provided
for them, and allow the glue to harden for 20 minutes.
PL Założyć klamry (klipsy) mocujące, najpierw na końcach
ramion korpusu, zaczekać 20 minut na stwardnienie kleju.
IT Applicare immediatamente tutte le clip nelle posizioni pre-
viste e lasciar indurire l’adesivo per 20 minuti.
5
DE Alle Klebeflächen fettfrei reinigen, dann eine lückenlose, ca.
4mm breite Kleberlinie nur auf unterer Schale aufbringen.
EN Clean all gluing surfaces so that they are free from grease,
then apply a continuous line of adhesive, about 4mm
(1/8 inch) wide, to the lower shell only.
PL Odtłuścić i oczyścić wszystkie powierzchnie do klejenia,
następnie nałożyć nieprzerwaną linią warstwę kleju na
klejoną powierzchnię w dolnej części korpusu. Szerokość
warstwy kleju - ok. 4 mm.
IT Pulire tutte le superfici da incollare, ainché non presentino
tracce di grasso, quindi applicare una striscia di adesivo di
4mm di larghezza solo sul guscio inferiore.
PL Przebieg montażu
PL Przebieg montażu EN Installation process
Montageanleitung / Instruction manual / Instrukcja montażu / Istruzioni di montaggio 7CALPEX
10
DE Frühestens nach 5 Minuten Gummi-Schutzzapfen verschliessen.
ENAllow at least 5 minutes, seal with the rubber stoppers.
PL Najwcześniej po 5 minutach zamknąć zatyczki w korkach.
IT Al più presto dopo 5 minuti inserire i perni di protezione in gomma.
9
DE Sofort nach Einfüllen alle 3 Önungen mit dem Stopfen-
durch Drehbewegung ganz verschliessen (1/4 Drehung!).
EN Immediately after pouring, seal all 3 openings completely
with the plugs, making a rotary movement (1/4 turn!).
PL Natychmiast po wlaniu pianki założyć na wszystkie
otwory niebieskie korki i przekręcić je o 1/4 obrotu.
IT Dopo aver inserito la schiuma, chiudere immediatamente
con le apposite chiusure i 3 fori e serrarle completamente
con un movimento di rotazione (1/4 di giro!).
8
DE Beiliegendes Schaumset nach Anleitung vorbereiten und in
die Schale giessen.
EN Prepare the enclosed foam kit according to the instructions
and pour the foam into the shell.
PL Wymieszać składniki pianki zgodnie z instrukcjami dołącz-
onymi do opakowania i wlać całość do otworu w korpusie.
IT Preparare il set della schiuma facente parte della fornitura
secondo le apposite istruzioni e versarne il contenuto nel
guscio.
CALPEX-Big-T-I-L
Artikel-Nr. 1012498
BRUGG Rohrsystem AG · Industriestrasse 39 · 5314 Kleindöttingen · Switzerland · bruggpipes.com
BRUGG Systemy Rurowe Sp. z o.o. · ul. Poznańska 628 · 05-860 Płochocin · Polska · www.brugg.pl
Nie bierzemy odpowiedzialności za nieprawidłowości powstałe na skutek zastosowania elementów
pozasystemowych oraz wynikłe z nieprzestrzegania niniejszej instrukcji.
Kopiowanie wzbronione.
We do not assume any responsibility for damage and malfunctions due to the use of system components
which have not been recommended by us or if the instruction manual has not been observed. The general
conditions of sale are applicable.
Copying not allowed.