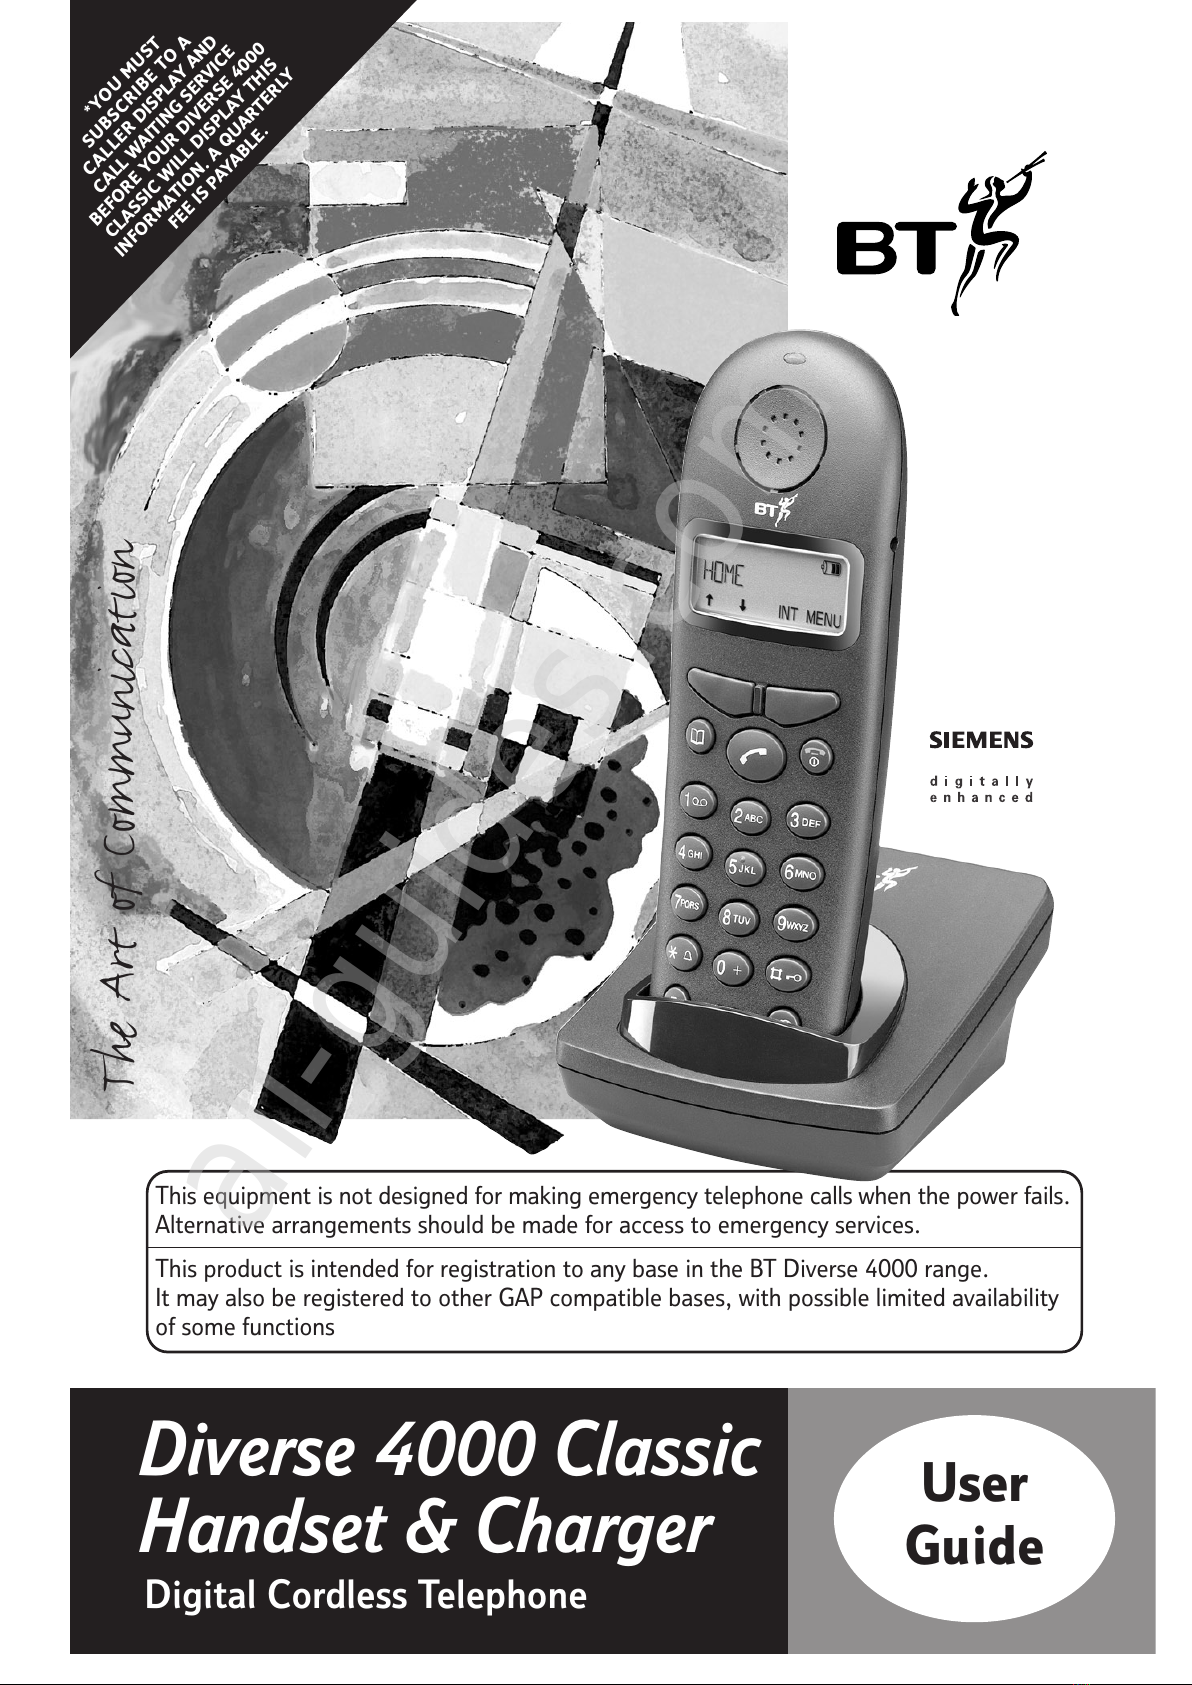
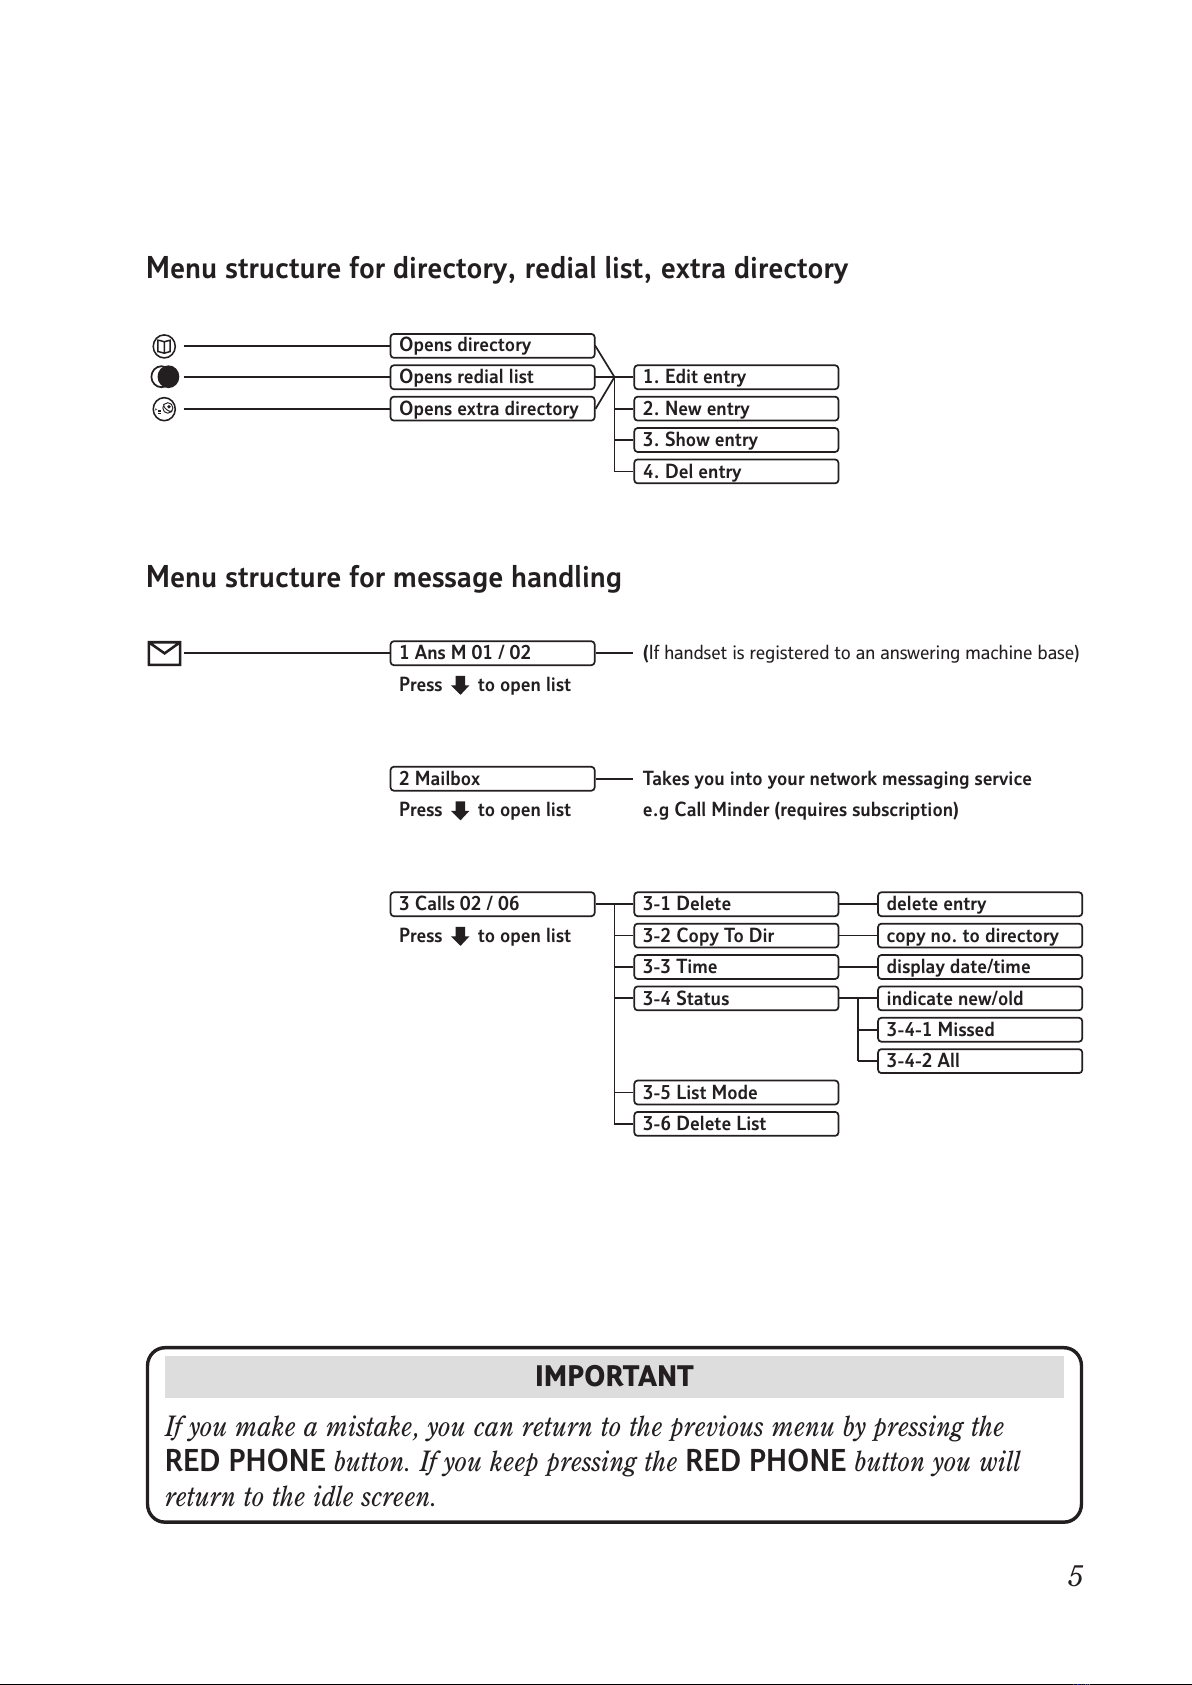
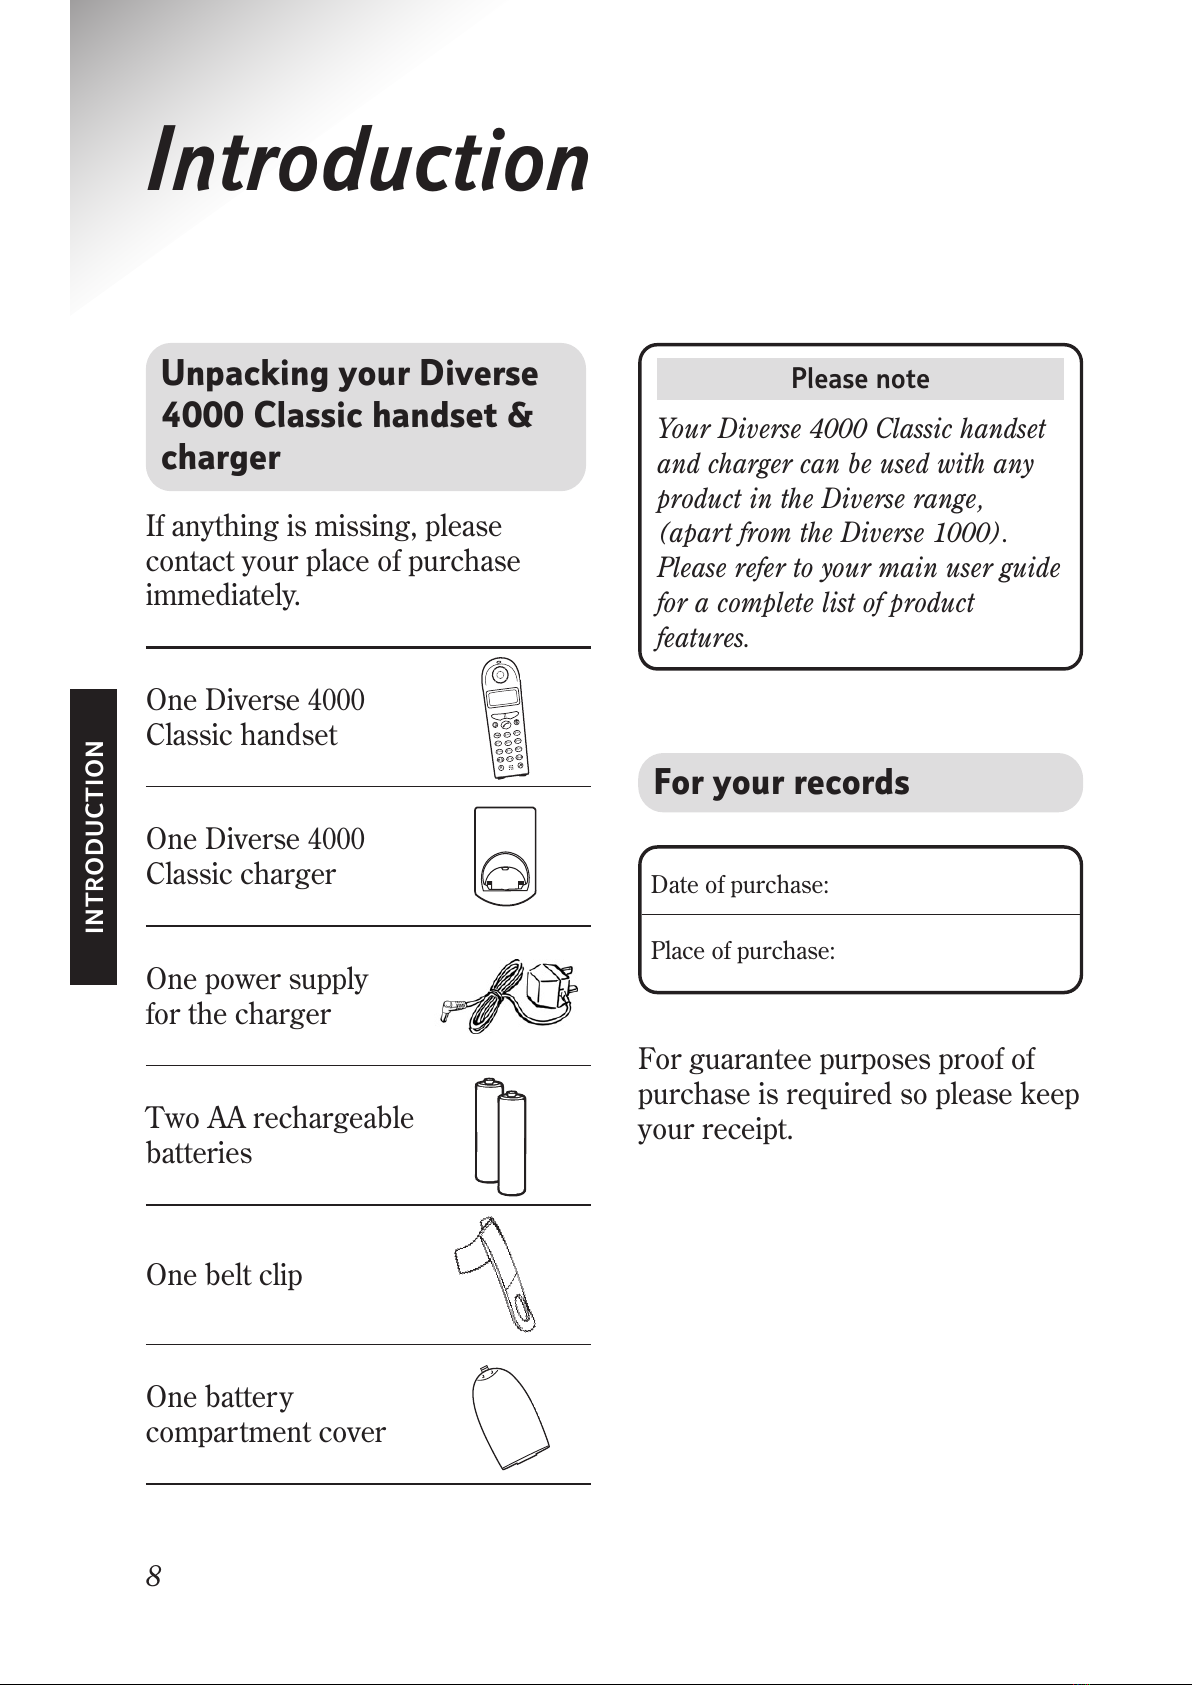
BT DIVERSE 4000 CLASSIC User manual

Diverse 4000 Classic ~10th Edition ~ 19th September ’01 ~ 4167
This eq ipment is not designed for making emergency telephone calls when the power fails.
Alternative arrangements sho ld be made for access to emergency services.
This prod ct is intended for registration to any base in the BT Diverse 4000 range.
It may also be registered to other GAP compatible bases, with possible limited availability
of some f nctions
Diverse 4000 Classic
Handset & Charger
Digital Cordless Telephone
User
Guide
*YOU MUST
SUBSCRIBE TO A
CALLER DISPLAY AND
CALL WAITING SERVICE
BEFORE YOUR DIVERSE 4000
CLASSIC WILL DISPLAY THIS
INFORMATION. A UARTERLY
FEE IS PAYABLE.
The Art of Communication
All manuals and user guides at all-guides.com
all-guides.com

Diverse 4000 Classic ~10th Edition ~ 19th September ’01 ~ 4167
lease open this page for an
‘At a glance’ guide to your
Diverse 4000 Classic.
All manuals and user guides at all-guides.com

Diverse 4000 Classic ~10th Edition ~ 19th September ’01 ~ 4167
At a glance
1
4
9
WXYZ
7
PQRS
8TUV
GHI
3DEF
5JKL
2ABC
6MNO
0
R䊳
Option buttons
Lets you select from
the menu options
shown on the display.
Green phone
For making and
answering calls.
One button
Apart from being the
number one button,
hold down to access your
Voice Mail service or
answering machine.
In use light
Lights up to indicate
an incoming call, an
alarm call or when the
handset is in use.
Star/Bell
Switches the handset
ringer on and off.
Hash/Keyguard
Switches the keypad
guard on and off.
R
For use with switchboards
and certain Network
Services.
Keypad
Microphone
Display
Displays the status of
your handset.
Extra Directory
Used to store
10 additional names
and numbers.
Red phone
To end a call, return to
idle and turn the
power off and on.
Directory
Used to store and
dial numbers in the
directory.
1
All manuals and user guides at all-guides.com

Diverse 4000 Classic ~10th Edition ~ 19th September ’01 ~ 4167
2
Charger
Contact points
Display option buttons
The OPTION buttons allow you to
select options within each menu
that are shown on the display.
INT MENU-> ->
Idle Screen
Press the left side of the
button for INT or the
right side of the button
for MENU.
Press the left side of the
button for and the
right side of the button
for when going
through menu options
Handset display
All manuals and user guides at all-guides.com

Diverse 4000 Classic ~10th Edition ~ 19th September ’01 ~ 4167
3
In this guide
At a glance 1
Menu structure 4
Quick guide (functions)
Quick guide to handset
display icons 7
Introduction 8
Unpacking your Diverse 4000
Classic handset & charger 8
For your records 8
Safety information 9
Setting up 10
Plan the location 10
Connect to the power supply 10
Register and charge
the handset 11
et the date and time 13
Using the telephone 15
Making and ending calls 15
Name and number directory 16
Extra directory 19
Redial 19
ecrecy 20
Internal calls 21
Alarm clock 22
Caller Display and other
Select Services 23
Caller Display 23
Calls list 23
Call Waiting 26
Call Divert 27
Withhold number 28
Ring Back 28
Voice Mail 29
Handset settings 31
Keyguard 33
Help 3
General information 38
Guarantee 38
Technical information 39
witchboard compatibility 39
etting pauses 41
Index 43
Hints and tips bo es
In this user guide, we’ve included
helpful tips and important notes.
They are shown in boxes like this.
All manuals and user guides at all-guides.com

Diverse 4000 Classic ~10th Edition ~ 19th September ’01 ~ 4167
4
Please note
If your handset is registered to a Diverse 4000 answering machine base, you will
have additional menus in No.6 Voice Mail. Please refer to your Diverse 4016
guide to see what further menus are now available.
1 Sel Services 1-1 Withhold No.
1-2 Call Waiting
1-3 Ringback Off
1-4 Call Divert
2 Alarm Clock Enter alarm call time
3 Audio Set 3-1 H/Set Vol set
3-2 Ringer set
3-3 Melody set
5 Base Set 5-1 Audio Set up 5-1-2 Ringer Vol set
5-1-3 Melody set
5-2 Date/Time 5-2-1 Date Set
5-2-2 Clock Set
5-2-3 Clock Mode 5-2-3-1 24H
5-2-3-2 12H
5-3 System PIN enter
5-4 Base Reset default
5-5 Add Features 5-5-1 Dial Mode 5-5-1-1 Tone
5-5-1-2 Pulse
5-5-1-3 DTMF-EARTH
5-5-2 tbr 100 MS
120 MS
180 MS
250 MS
300 MS
600 MS
5-5-3 Repeater on/off
5-5-4 Barge In on/off
6 Voice Mail 6-1 Set key 1 6-1-1 Mailbo Input No.
7 Register hs PIN enter
Menu Structure
All manuals and user guides at all-guides.com
all-guides.com

Menu structure for message handling
1 Ans M 01 / 02 (If handset is registered to an answering machine base)
Press to open list
2 Mailbo Takes you into your network messaging service
Press to open list e.g Call Minder (requires subscription)
3 Calls 02 / 06 3-1 Delete delete entry
Press to open list 3-2 Copy To Dir copy no. to directory
3-3 Time display date/time
3-4 Status indicate new/old
3-4-1 Missed
3-4-2 All
3-5 List Mode
3-6 Delete List
Diverse 4000 Classic ~10th Edition ~ 19th September ’01 ~ 4167
5
IMPORTANT
If you make a mistake, you can return to the previous menu by pressing the
RED PHONE button. If you keep pressing the RED PHONE button you will
return to the idle screen.
䊳
Menu structure for directory, redial list, e tra directory
Opens directory
Opens redial list 1. Edit entry
Opens e tra directory 2. New entry
3. Show entry
4. Del entry
All manuals and user guides at all-guides.com

Diverse 4000 Classic ~10th Edition ~ 19th September ’01 ~ 4167
6
Quick guide
Commonly used handset functions and settings
Switch handset on/off Hold down
Switch keyguard on/off Hold down
Switch handset
ringer on/off Hold down
Make an e ternal call
To end a call
Redial a number Select one of last 5 n mbers
To store a number in Add n mber
the directory
Dial from the directory
Dial from the Calls list
Handset volume
Make internal call Call all, or
Transfer call to handset Handset n mber (eg. 2)
Set date
Enter the date
Set time
Enter time
Set the alarm Enter the alarm time
Cancel the alarm OKALARM CLOCKMENU
OKOKALARM CLOCKMENU
OKOK
CLOCK SETOKDATE/TIMEOKBASE SETMENU
OK
DATE SETOKDATE/TIMEOKBASE SETMENU
INT
INT
OKH/SET VOLOKAUDIO SETMENU
SAVEOKOKCOPY TO DIRMENU
All manuals and user guides at all-guides.com

Diverse 4000 Classic ~10th Edition ~ 19th September ’01 ~ 4167
7
Quick guide to handset
display icons
Redial, lists p to the last 5 dialled n mber.
Indicates messages in the Calls list.
Flashes to indicate new messages.
For calling other handsets.
Opens the men .
Shows the stat s of the handset battery.
Scroll thro gh the men .
Confirms the f nction displayed.
Scroll left and right when entering n mbers or messages.
Deletes n mbers/characters (from left to right).
Do not dist rb/No tones.
Handset locked.
Displayed when the Alarm clock is set.
Shows the n mber of the handset and is displayed in top left hand corner.
eg.
All manuals and user guides at all-guides.com

Diverse 4000 Classic ~10th Edition ~ 19th September ’01 ~ 4167
8
Introduction
Unpacking your Diverse
4000 Classic handset &
charger
If anything is missing, please
contact your place of purchase
immediately.
One Diverse 4000
Classic handset
One Diverse 4000
Classic charger
One power supply
for the charger
Two AA rechargeable
batteries
One belt clip
One battery
compartment cover
Please note
Your Diverse 4000 Classic handset
and charger can be used with any
product in the Diverse range,
(apart from the Diverse 1000).
Please refer to your main user guide
for a complete list of product
features.
For your records
For guarantee purposes proof of
purchase is required so please keep
your receipt.
Date of purchase:
Place of purchase:
1
4
9
WXYZ
7
PQRS
8
TUV
GHI
3
DEF
5
JKL
2
ABC
6
MNO
0
R
䊳
INTRODUCTION
All manuals and user guides at all-guides.com

Diverse 4000 Classic ~10th Edition ~ 19th September ’01 ~ 4167
9
Safety information
General
Only use the power supply included with
the product. Using an unauthorised power
supply will invalidate your guarantee and
may damage the telephone. Power supply
number is M-GA35-095130F.
For the handset use only approved nickel-
cadmium (NiCad) rechargeable batteries.
Never use other batteries or conventional
alkaline batteries. They could lead to a
short circuit or destroy the battery
casing. Recommended batteries should
have a power rating of at least 600mAh
1.2V. Batteries are available from the
Diverse Helpline 08457 908070.
If the Keyguard is switched on, it is NOT
possible to make calls, including
emergency numbers (999/112).
Do not open the base station or handset
(other than to change batteries). This
could expose you to high voltages or
other risks.
Radio signals transmitted between the
handset and base may cause interference
to hearing aids.
This product should not be used near
emergency/intensive care medical
equipment and should not be used by
people with pacemakers.
Never dispose of batteries in a fire. There
is a serious risk of explosion and/or the
release of highly toxic chemicals.
Cleaning
Simply clean the handset and base
station with a damp (not wet) cloth, or an
anti-static wipe. Never use household
polish as this will damage the product.
Never use a dry cloth as this may cause
a static shock.
Environmental
Do not expose to direct sunlight.
The product may heat up when the
batteries are being recharged. This is
normal. However, we recommend that
you do not place the product on
antique/veneered wood to avoid
damage.
Do not stand your product on carpets or
other surfaces which generate fibres, or
place it in locations preventing the free
flow of air over its surfaces.
Do not submerge any part of your
product in water and do not use it in
damp or humid conditions, such as
bathrooms.
Do not expose your product to fire,
explosive or other hazardous conditions.
There is a slight chance that your phone
could be damaged by an electrical storm.
We recommend that you unplug the
power and telephone line cord during an
electrical storm.
SAFETY INFORMATION
All manuals and user guides at all-guides.com
all-guides.com

Setting up
Diverse 4000 Classic ~10th Edition ~ 19th September ’01 ~ 4167
10
IMPORTANT
Please note that your handset is
NOT registered to a base station.
The Diverse 4000 Classic handset
will be easily registered once you
complete steps 1 to 3.
Plan the location
Situate your product close enough
to a mains power socket so that the
cable will reach.
Make sure it is at least 1 metre
away from other electrical products
to avoid interference.
Do not situate the product in the
bathroom or other humid areas.
1Plug the power supply
unit cable into the charger
Plug the power supply unit cable
into the power socket on the
underside of your Diverse 4000
Classic charger.
2Plug the power supply
unit into the wall socket
SETTING UP
All manuals and user guides at all-guides.com

Diverse 4000 Classic ~10th Edition ~ 19th September ’01 ~ 4167
11
3Registering and charging
the handset
The display is protected by a plastic
film. You can remove this protective
film from the display.
Insert the batteries
Insert the two batteries supplied, as
indicated on the label inside the
battery compartment and slide the
battery compartment cover shut.
The battery cover may be found in
the packaging with the batteries.
WARNING
Under no circumstances should non-
rechargeable batteries be used. Only
use the approved batteries. Using
unapproved batteries will invalidate
your guarantee and may damage
the telephone.
To register your handset, place it in
the main Diverse 4000 base station
with the display facing upward.
After approx. one minute, the
handset’s internal number is
displayed (eg: INT2). Successful
registration is signalled by a
confirmation tone.
Replace the newly registered
handset into the Classic Charger
Unit and leave to charge for
approximately 16 hours. The
charging status icon flashes on the
handset to indicate that the
batteries are being charged.
When the handset is registered the
display will show:
If the icons on the display flash
continuously…
It means that the handset is not
registered with the base station.
Ensure you have correctly carried
out step 3 above.
All additional handsets you purchase
will need to be individually
registered with the base station before
they will work.
SETTING UP
All manuals and user guides at all-guides.com

Battery performance
After charging your handset batteries
for the first time, subsequent charging
time is approximately 4–5 hours.
Batteries and case may become warm
during charging. This is normal.
Under ideal conditions, the handset
batteries should give about 10 hours
talktime or 200 hours standby time
on a single charge. However, new
NiCad batteries do not reach their
full capacity until they have been in
normal use for several days.
Fully discharging the batteries at least
once a week will help them last as
long as possible. However, the charge
capacity of rechargeable batteries will
reduce with time as they wear out, so
reducing the talk/standby time of the
handset. Eventually they will need to
be replaced. New batteries can be
obtained from any BT shop or from
the Diverse Helpline 08457 908070.
If you replace the handset batteries
with ones that have been fully
charged, the battery indicator will
not show full until the next charge
cycle has been completed. Charge
the handset until the batteries
register full again. From then on
the display will be correct.
Diverse 4000 Classic ~10th Edition ~ 19th September ’01 ~ 4167
12
Out of range?
If you go out of range of a base
station for a long time while your
handset is switched ON, it may take
more than 20 minutes to ‘find’the
base station again when you come
back within range. However, by
simply switching the handset OFF
for a moment, then ON again, it
will find the base station within a
few seconds.
Battery level icons
When the batteries are almost flat a
beep sounds and the display shows
the empty battery icon. You will
need to recharge your handset before
you can use it. The various states of
charge are shown below:
Batteries f lly charged
Batteries at 66%
Batteries at 33%
Batteries empty
SETTING UP
Leave the handset for approx. 16
hours in the base station to charge
the batteries, as they are not
charged in the factory. The charging
status icon flashes on the handset
to indicate that the batteries are
being charged.
All manuals and user guides at all-guides.com

Diverse 4000 Classic ~10th Edition ~ 19th September ’01 ~ 4167
13
5Setting the date and time
Press the MENU options
button.
Press the DOWN button
until the display shows
BASE SET
.
Press the OK button.The
display shows
AUDIO SET UP
.
Press the DOWN button
until the display shows
DATE/TIME
.
Press the OK button.
The display will show
DATE SET
.
Press the OK button.
Use the keypad to enter
the date (DD/MM/YY).
Press the OK button.
Press the DOWN button
until the display shows
CLOCK SET
.
Press the OK button.
Use the keypad to enter
the time in 12-hour clock
format (HH/MM).
After entering the time,
press the OK button.
Press the DOWN button to
choose
AM
or
PM
.
Press the OK button.
Press the RED PHONE
button until you return to
the idle screen.
OK
OK
OK
OK
OK
OK
OK
MENU
Slot
4Fit the belt clip (optional)
Fit the belt clip onto the back of the
handset.
Helpline
Your Diverse 4000 Classic handset
& charger is now ready for use.
However, if you expereince any
difficulties please call the BT Diverse
Helpline on 08457 908 070.
SETTING UP
All manuals and user guides at all-guides.com

Diverse 4000 Classic ~10th Edition ~ 19th September ’01 ~ 4167
14
Note
If you subscribe to a Caller Display
Service the time and date will be set
with the first incoming call.
To set the time mode
(12 or 24-hour clock)
The handset’s default setting
is 12-hour clock. To change
the clock to the 24-hour
setting:
Press the MENU options
button.
Press the DOWN button
until the display shows
BASE SET
.
Press the OK button.
Press the DOWN button
until the display shows
DATE/TIME
.
Press the OK button.
Press the DOWN button
until the display shows
CLOCK MODE
.
Press the OK button.
Press the DOWN button to
switch between
24 H
and
12 H
settings.
Press the OK button to
confirm the setting you
want.
OK
OK
MENU
OK
OK
SETTING UP
All manuals and user guides at all-guides.com
all-guides.com

Diverse 4000 Classic ~10th Edition ~ 19th September ’01 ~ 4167
15
Using the telephone
Your Diverse 4010 Classic has a
menu driven display. The OPTION
buttons below the display allow you
to select options within each menu
and make adjustments to their
settings. When the phone is in idle
mode, press the MENU button to
enter the main menu. During a call,
if you press the MENU button it will
open the menu for that particular
situation.
Note
To quit a menu at any time, press
the RED PHONE button. This will
take you back one step. Keep
pressing the RED PHONE button to
get back to the idle screen.
To switch the handset power
on and off
Press and hold the RED
PHONE button to switch
the handset off.
Press and hold the RED
PHONE button to switch
the handset on again.
Making and ending calls
To make an e ternal call
Ensure the handset is
switched ON.
Press the GREEN PHONE
button. You will hear the
dial tone.
Dial the number.
Preparatory dialling
Enter the phone number
first. If you make a mistake
press the DELETE button
to remove any incorrect
digits.
Press the GREEN PHONE
button to dial the number.
To end a call
Press the RED PHONE
button.
USING
All manuals and user guides at all-guides.com

Diverse 4000 Classic ~10th Edition ~ 19th September ’01 ~ 4167
16
Call timer
Your handset automatically times
the duration of all external calls,
showing it on the display during
your call and for a few seconds after
it is finished.
To receive an e ternal call
When the phone rings, the
In use light on top of the
handset will flash.
Press the GREEN PHONE
button to answer the call.
Or
If the handset is on the
base, simply lift it up and
speak. You do not need to
press the GREEN PHONE
button.
This is called auto-talk.
You can switch autotalk off
so you always have to press
the GREEN PHONE button
to answer a call, see page 32.
Name and number directory
You can store up to 20 of your most
frequently used names (up to 12
letters) and numbers (up to 22 digits
long).
To store a name and number
in the directory
Press the DIRECTORY
button.
Press the MENU options
button.
Press the DOWN button
until the display shows
NEW ENTRY
.
Press OK to confirm.
Enter the telephone
number you want to store.
Press OK to confirm.
The display shows
<NAME>
.
Enter the name using the
letters on the keypad.
(See ‘Character map’
opposite for how to enter
special characters).
For example, to enter the
name TOM:
Press the 8button until
T
appears on the display.
Press the 6button until the
display shows
O
.
Then press 6until the
8TUV
6MNO
6MNO
OK
OK
MENU
USING
All manuals and user guides at all-guides.com

Diverse 4000 Classic ~10th Edition ~ 19th September ’01 ~ 4167
17
display shows
M.
Press OK to confirm.
The display will show
SAVED
and
TOM
.
Press the GREEN PHONE
button to dial the number.
Or
Press the RED PHONE
button until you reach the
idle screen.
Character map
As well as the standard letters and
numbers you can include special
1
Space
1
0
+
0
-
?
–-–
✱
*
/
(
)
,
#
---
Press
1st press
2nd press
3rd press
4th press
5th press
6th press
OK To dial a number from the
directory
Press the DIRECTORY
button.
If you wish, you can use
the keypad to enter the
first letter of the name, for
example to find
TOM
, press
the 8 button.
Press the DOWN button to
scroll to the entry you want.
Press the GREEN PHONE
button to dial the number.
To edit a directory entry
Press the DIRECTORY
button.
Use the keypad to enter
the first letter of the name
you want to edit.
Press the MENU options
button.
EDIT ENTRY
is
displayed.
Press the OK button.
Edit the number, if
necessary, using the
LEFT/RIGHT and DELETE
buttons .
Press the MENU options
button.
COPY TO DIR
is
displayed.
A B C
A B C
OK
MENU
MENU
USING
8TUV
All manuals and user guides at all-guides.com

Diverse 4000 Classic ~10th Edition ~ 19th September ’01 ~ 4167
18
To delete all entries from
the directory
Press the DIRECTORY
button.
Press the MENU options
button.
Press the 6button,
DEL ENTRY?
is displayed.
Press the OK button to
confirm. All directory
numbers are deleted.
Press the RED PHONE
button until you reach the
idle screen.
Press the OK button.
The number is shown
again.
Press the OK button again.
<NAME>
is displayed.
If the name is correct,
press the OK button.
Or
If you wish to edit the name,
enter a new name now.
Press the OK button.
The display will show
SAVED
.
You can either press the
GREEN PHONE button to
dial the number or the
RED PHONE button until
you reach the idle screen.
Press the DOWN button to
display
DEL ENTRY
.
Press the OK button to
confirm. The number is
deleted.
Press the RED PHONE
button until you reach the
idle screen.
Note
To cancel any procedure, press the
RED PHONE button until the
display returns to the idle screen.
To delete an entry from the
directory
Press the DIRECTORY
button.
Use the keypad to enter
the first letter of the name.
Or
Use the DOWN button to
find the entry you want.
Press the MENU options
button.
MENU
MENU
OK
OK
OK
OK
A B C
OK
6MNO
OK
USING
All manuals and user guides at all-guides.com
Other manuals for DIVERSE 4000 CLASSIC
1
Table of contents
Other BT Cordless Telephone manuals

BT
BT FREELANCE XD 7500 User manual

BT
BT Freestyle 350 User manual

BT
BT STUDIO PLUS 5500 User manual

BT
BT SYNERGY 1500 User manual

BT
BT Home SmartPhone User manual

BT
BT Lyric 1100 User manual

BT
BT QUARTET 3100 User manual

BT
BT DIVERSE 3000 CLASSIC User manual

BT
BT Diverse 6210 User manual

BT
BT HUB PHONE 1010 User manual

BT
BT BT3550 User manual

BT
BT Reveal User manual

BT
BT FREESTYLE 250 User manual

BT
BT BT6500 Specification sheet

BT
BT DIVERSE 3010 CLASSIC User manual

BT
BT XD56 Specification sheet

BT
BT 4000 Classic Specification sheet

BT
BT DIVERSE 4000 EXECUTIVE User manual

BT
BT FREESTYLE 4100 User manual

BT
BT DIVERSE 1010 User manual