burgbad Boleo M1298 User manual

1
Boleo
M1298
burgbad GmbH, Grafenberg,
Morsbacher Str. 15, D-91171 Greding
T +49 (0) 84 63-901-0
[email protected], www.burgbad.com
BELGIUM FRANCE
burgbad benelux bv burgbad france S.A.S
Brugsesteenweg 238 Siège social: Zl Le Poirier
B-8800 Roeselare 28210 Nogent Le Roi
T: 0032/51/231990 T: 02 37 38 85 53
F: 0032/51/229339 F: 02 37 51 43 94
MONTAGE- UND BEDIENUNGSANLEITUNG
FITTING INSTRUCTIONS
INSTRUCTIONS DE MONTAGE
MONTAGEAANWIJZING
ISTRUZIONI DI MONTAGGIO

2
MONTAGEHINWEISE
DE
!Nachfolgend nden Sie wichtige Informationen zur Montage und für den Umgang mit Badmöbeln sowie Sicherheitshinweise. Lesen und
beachten Sie diese unbedingt, bevor Sie die Möbel montieren. Für Schäden, die aufgrund von herunterfallenden Möbeln oder Möbelteilen
(Türen, Glasböden, Spiegeltüren) durch Nichtbeachtung entstehen, können wir keinerlei Haftung übernehmen.
Sollten Sie Beschädigungen (wie z.B. Kratzer, Dellen oder ähnliches) an den Produkten feststellen, sind diese trotzdem zu montieren. Wenn
ein Teil aufgrund von starker Beschädigung nicht montierbar ist, so sind sämtliche Montagevorbereitungen zu treffen sowie Montageschienen,
Haken und Stockschrauben anzubringen. Unser Werkskundendienst nimmt keine Bohrungen vor.
Hochglanzoberächen härten nach dem Entfernen der Schutzfolie innerhalb von 3 Wochen vollständig aus. Bitte in diesem Zeitraum beson-
ders vorsichtig behandeln und nicht reinigen oder abwischen (kein Mikrofasertuch).
Schutzfolie erst nach der fertigen Montage der Möbelanlage entfernen.
Es darf kein Bohrstaub auf die Auszugsschienen gelangen! Deshalb dürfen Möbel erst nach dem Bohren aufgehängt werden, oder müssen vor
dem Bohren wieder abgehängt werden. Bohrstaub ggfs. absaugen oder abschwemmen, niemals vom Waschtisch abwischen. Keine Werk-
zeuge, scharfkantige oder schwere Gegenstände auf dem Waschtisch ablegen.
Das Montieren unserer Produkte darf nur von einem Sanitär-Fachhandwerker oder einer anderen fachkundigen Person durchgeführt werden.
Elektroinstallationen dürfen nur vom Fachmann unter Berücksichtigung der DIN57100/VDE0100 Teil 701durchgeführt werden. Steckverbin-
dungen, Beleuchtung und Steckdosenanschluss müssen geprüft werden.
Das Befestigungsmaterial (Schrauben, Dübel) ist für massive, ausreichend tragfähige Wände ausgelegt. Bei anderen Einbausituationen müssen
entsprechende Spezialbefestigungen verwendet werden. Stockschrauben sind im Lieferumfang nicht enthalten!
SILICON
Um das Eindringen von Wasser zwischen Wand und Waschtisch zu vermeiden, muss die Anschlusskante zur Wand mit einer Silikonfuge ab-
gedichtet werden. Verwenden Sie ausschließlich neutral vernetztes (lösemittelfreies) Silikon.
iTüren und Schubladen müssen nach der Montage einjustiert werden. Das Nachjustieren gehört zu den üblichen Wartungsaufgaben je nach Nut-
zung und Beladung der Möbelteile und ist kein Beanstandungsgrund. Wasser- und Siphonanschluss auf Dichtigkeit prüfen. Möbel bitte vor Übergabe
reinigen! Bohrstaub, Etiketten und Klebereste entfernen! Die Funktion, Handhabung und Pege der Produkte muss dem Besitzer erklärt werden.
Die Produkte müssen an allen vorgesehenen Montagepunkten befestigt werden. Die Montagemaße beziehen sich auf Oberkante fertiger
Fußboden. Alle Maße in mm.
Bei Trocken- und Leichtbauwänden ist auf eine tragfähige Unterkonstruktion zu achten.
ASSEMBLY INSTRUCTIONS
EN
!Below you will nd important information for installing and handling bathroom furniture, as well as safety instructions. It is essential that you
read and make note of these before installing the furniture. We can accept no responsibility for damages that are the result of failure to adhe-
re to these instructions.
If you notice damage on the products, they should still be installed. If a part cannot be installed due to signicant damage, all preparations
for installation should still be made and the installation rails, hooks and hanger bolts should be attached. Our factory customer service does
not undertake drilling.
High gloss surfaces are fully hardened within three weeks of the protective lm being removed. Please treat them with particular care during
this period and do not clean or wipe them (no microber cloth).
Do not remove the protective lm until the furniture set has been fully installed.
No drilling dust can be allowed onto the pull-out rails! Furniture should therefore only be hung after drilling, or taken down again before
drilling. Vacuum up or rinse off any drilling dust; never wipe it from the washbasin. Do not place any tools or sharp-edged or heavy objects
on the washbasin.
Our products may only be installed by a specialist craftsman for sanitary facilities or by another competent person. Electrical installations
may only be conducted by a specialist, taking DIN 57100/VDE 0100 Part 701 into account. Plug connections, lighting and sockets must be
checked.
The fastening materials (screws, wall plugs) are designed for solid, sufciently load-bearing walls. In other installation situations, special faste-
nings must be used accordingly. Hanger bolts are not included in the delivery!
SILICON
In order to prevent water from penetrating between the wall and the wash basin, the connecting edge to the wall must be sealed with a silico-
ne joint. Use only neutrally bonded (solvent-free) silicon.
iDoors and drawers must be adjusted after installation. This subsequent adjustment is part of normal maintenance depending on the use and loading
of the items of furniture and is not a reason for complaint. Check the water and siphon connections for tightness! Please clean the furniture before
handover! Remove drilling dust, labels and adhesive residues! The function, handling and care of the products must be explained to the owner.
The products must be attached at all the installation points provided. The installation dimensions refer to the top edge of nished ooring.
All dimensions in mm.
Drywalls and plasterboard walls must have an adequate load bearing capacity.

3
INSTRUCTIONS DE MONTAGE
!
FR
Vous trouverez ci-après des informations importantes pour le montage et la manipulation des meubles de salle de bain, ainsi que des con-
signes de sécurité.Veuillez impérativement lire et respecter ces instructions avant de monter les meubles.Nous ne pourrons assumer aucune
responsabilité pour les dommages qui résulteraient du non-respect de ces instructions.
Dans le cas où vous constateriez la présence de défauts sur les produits, vous devez les monter quand même. Si une des pièces n‘est pas en
état d‘être montée en raison d‘un défaut majeur, vous devez préparer tous les éléments nécessaires au montage et poser/installer des rails de
montage, crochets et vis sans tête à letage partiel bois. L‘atelier du service après-vente n‘effectue pas de travaux de perçage.
Le durcissement complet des surfaces laquées intervient dans les 3 semaines qui suivent le retrait du lm protecteur. Pendant ce laps de temps,
traiter le meuble avec la plus grande précaution et éviter de le nettoyer ou de l‘essuyer (ne pas utiliser de tissu en microbres).
Le lm protecteur ne doit pas être retiré avant le montage complet des éléments du meuble.
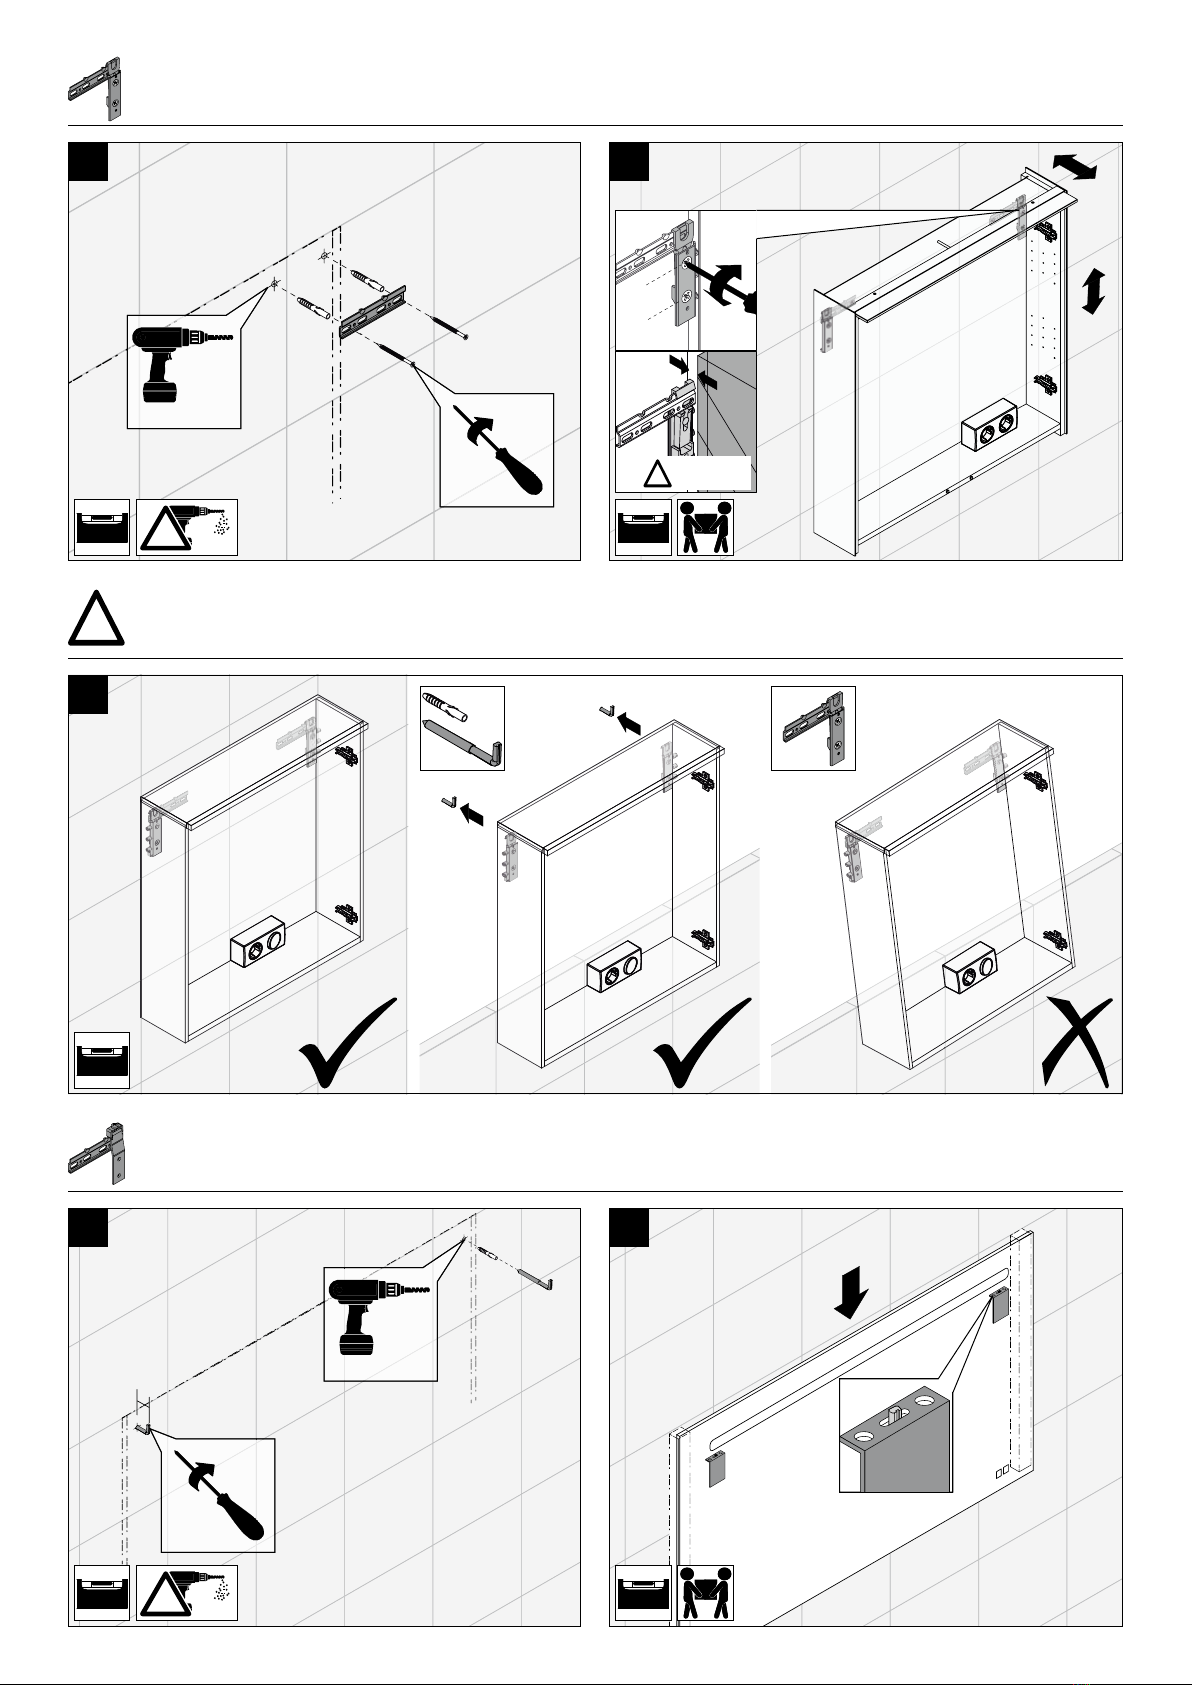
Veiller à ce qu‘aucune poussière ne tombe dans les glissières! Par conséquent, les meubles ne doivent être xés/suspendus qu‘une fois tous les
trous percés ou doivent être décrochés avant de percer d‘autres trous. Si nécessaire, aspirer ou rincer la poussière produite par le perçage. Ne
jamais essuyer la poussière du meuble sous vasque. Ne poser aucun outil ou objet lourd ou pointu sur la surface du meuble sous vasque.
Le montage de nos produits ne pourra être coné qu‘à un technicien spécialiste des équipements sanitaires ou à une autre personne qualiée.
Les installations électriques doivent impérativement être conées à un électricien et respecter la norme DIN57100/VDE0100 partie 701.
L‘état des prises de courant, de l‘éclairage et des ches électriques doit être contrôlé.
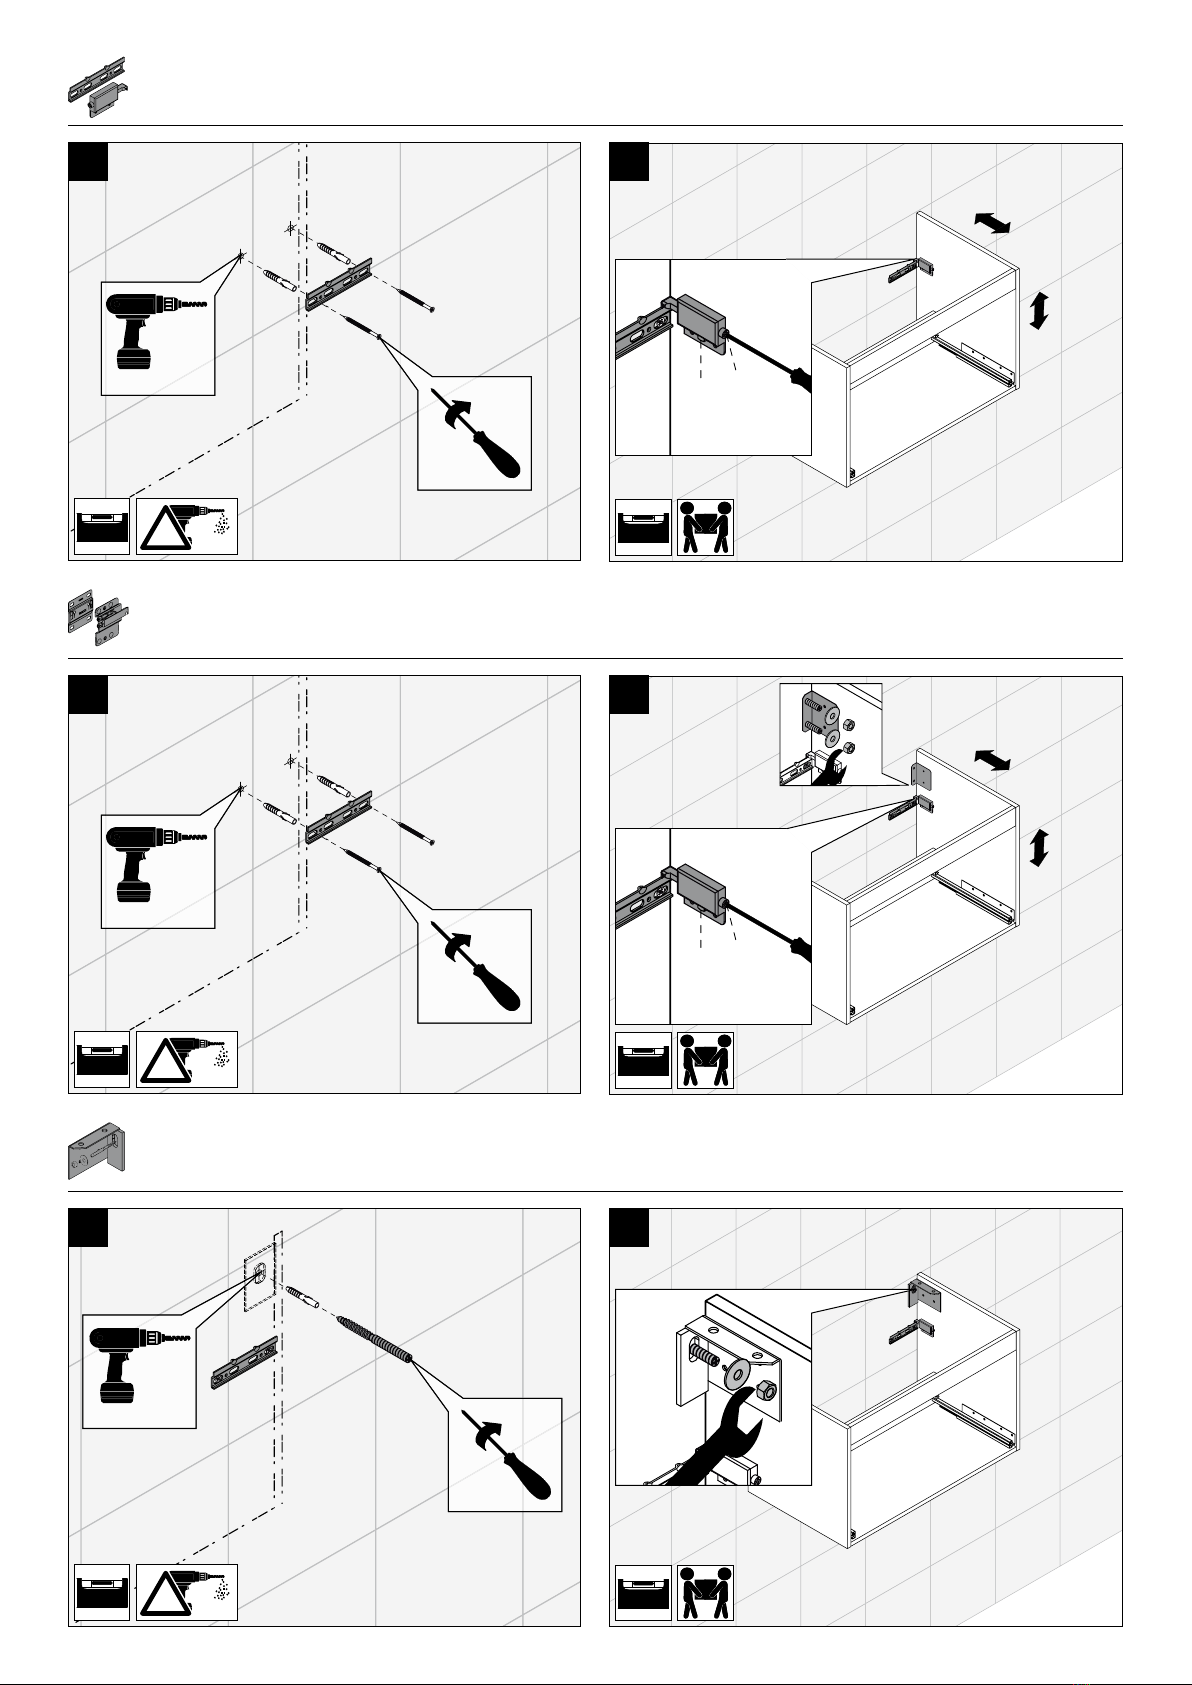
Le matériel de xation (vis, chevilles) est prévu pour des murs/parois épais et sufsamment solides. Pour une utilisation sur des murs ne répon-
dant pas à ces critères, des xations spéciales adaptées doivent être utilisées. Les vis sans tête à letage partiel bois ne sont pas fournies.
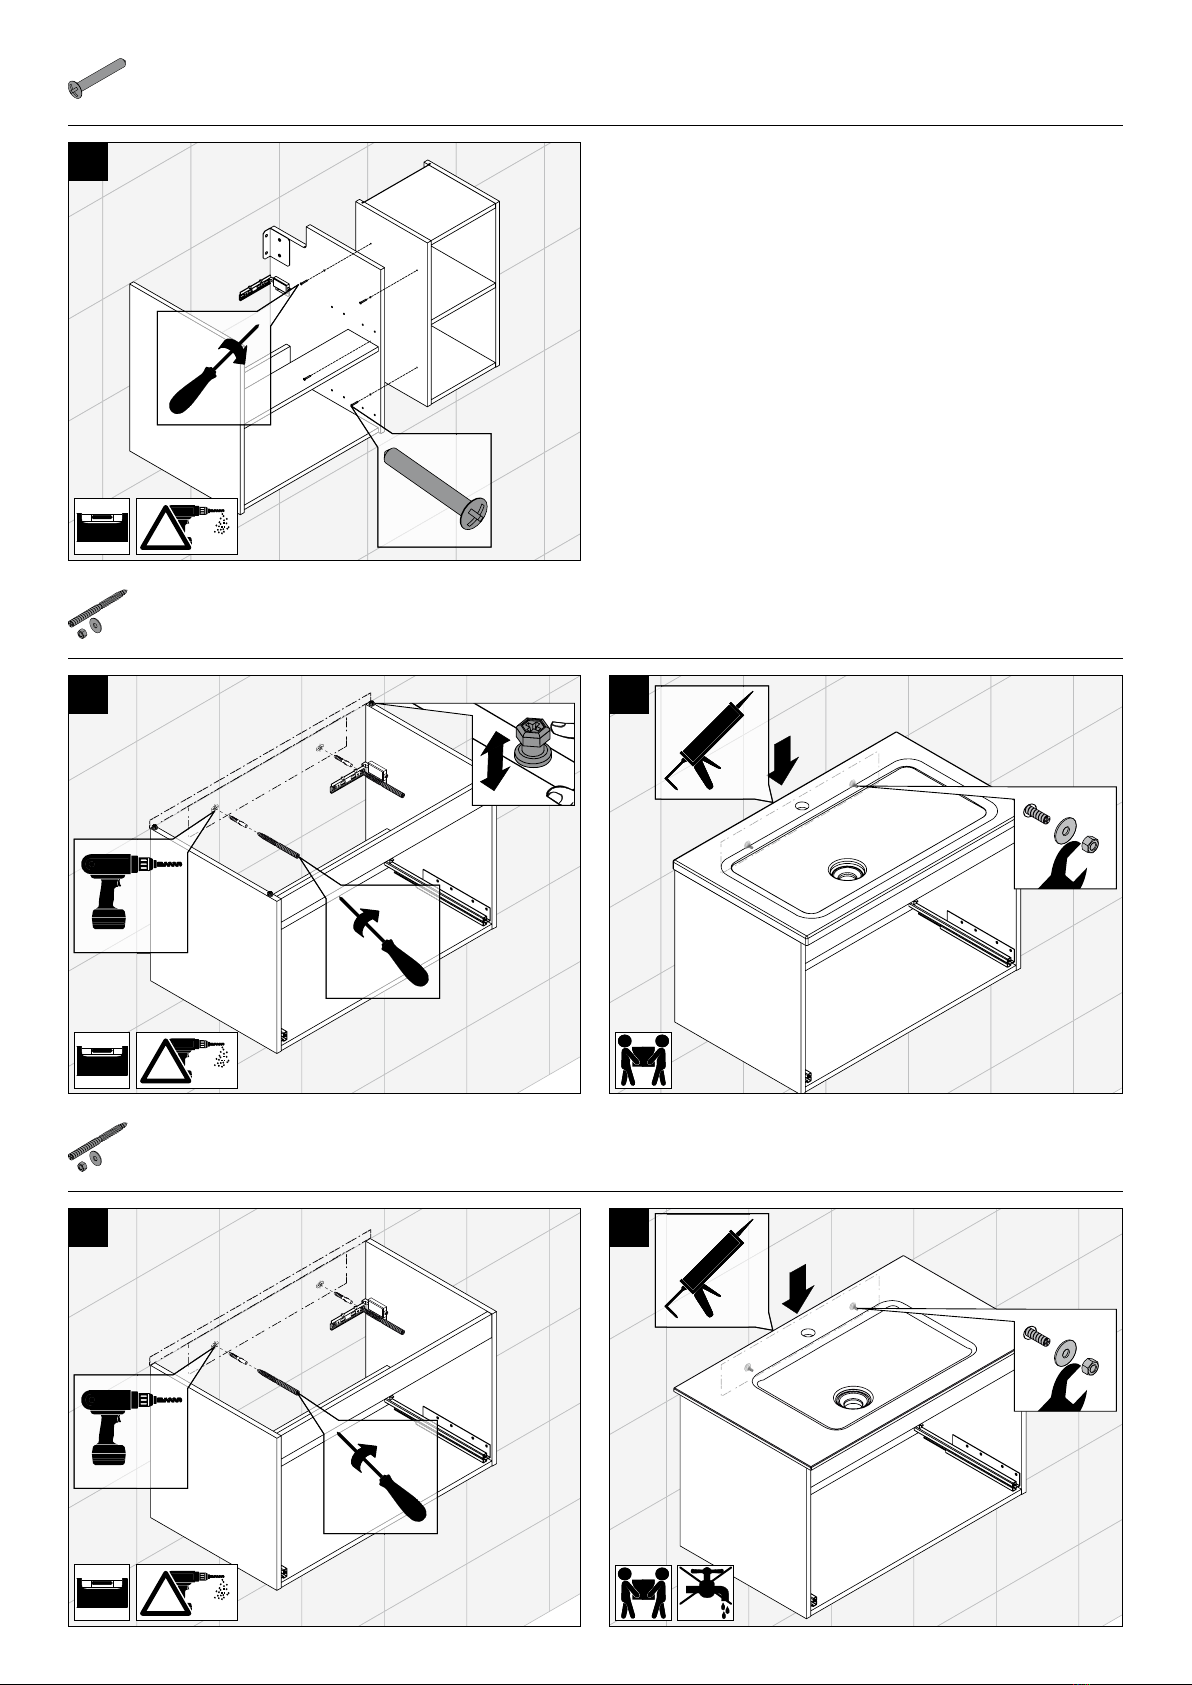
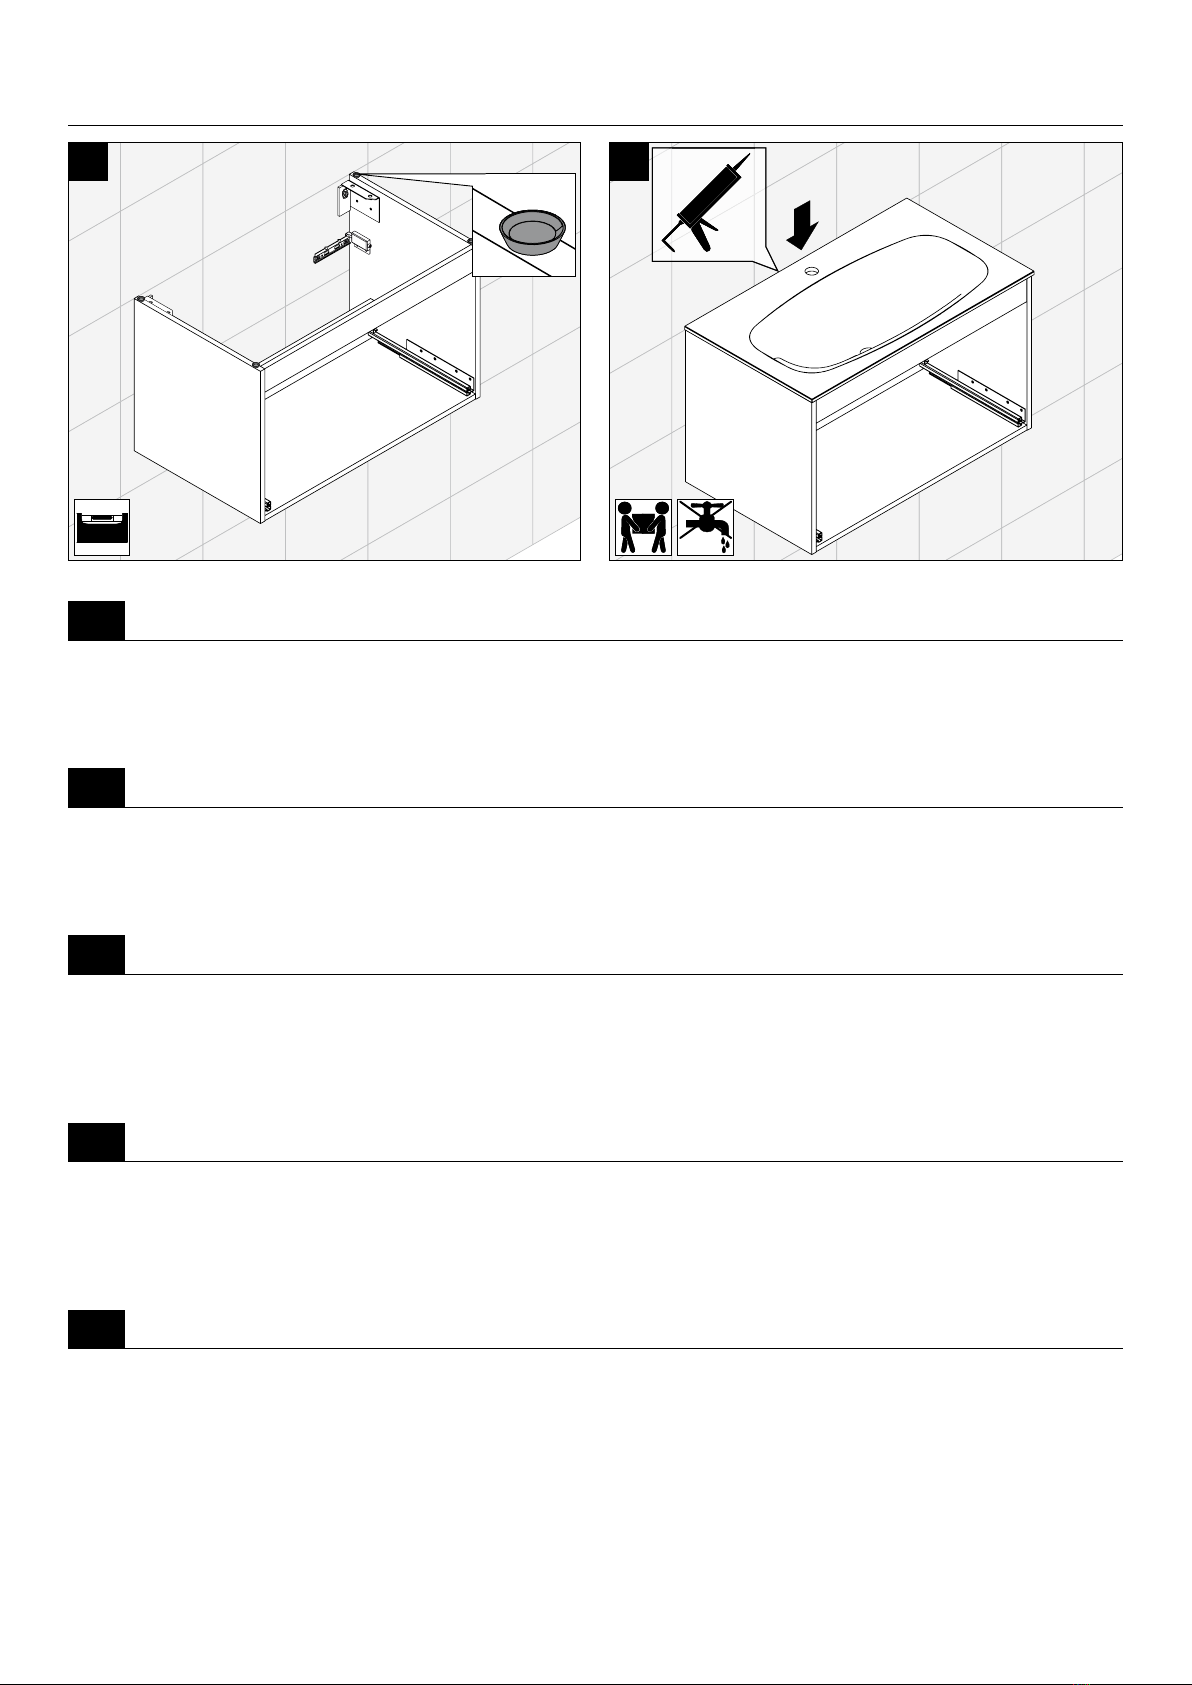
SILICON
Pour éviter que l’eau ne pénètre entre le mur et la vasque, il faut réaliser un joint en silicone entre le bord de la vasque et le mur. Utiliser
uniquement du silicone (sans solvant) neutre et ramié.
iUne fois montés, le positionnement des portes et des tiroirs doit être ajusté. Ce réglage relève des tâches d‘entretien courantes et dépend de
l‘utilisation et de la charge des meubles et ne peut en aucun cas être un motif de réclamation. Vérier l‘étanchéité au niveau de la prise d‘eau
et du siphon. Nettoyer les meubles avant leur mise à disposition. Retirer la poussière de perçage, les étiquettes et les traces de colle.
Le fonctionnement, la manipulation et l‘entretien des produits doivent être expliqués à leur propriétaire.
Les mesures de montage sont indiquées par rapport à la surface supérieure du sol. Elles sont exprimées en mm.
Pour les cloisons sèches et de construction légère, s‘assurer que la sous-construction est solide.
MONTAGEAANWIJZINGEN
NL
!Hierna vindt u belangrijke informatie betreffende de montage en het correct behandelen van uw badmeubelen evenals veiligheidstips. Lees
deze goed door voordat u de meubelen monteert. Voor schade ontstaan door het niet volgen van deze aanwijzingen kunnen wij niet aan-
sprakelijk gesteld worden.
Als u schade vaststelt aan een product, moet dit product toch gemonteerd worden. Wanneer de beschadiging zo erg is dat een onderdeel
niet gemonteerd kan worden, moeten alsnog montagemaatregelen getroffen worden, zoals het plaatsen van montagerails, het aanbrengen
van haken en stokschroeven. Onze monteurs voeren geen boringen uit.
Hoogglanzende oppervlakken harden binnen 3 weken na het verwijderen van de folie helemaal uit. Wees in deze periode heel voorzichtig
met deze oppervlakken. Niet schoonmaken of afstoffen (geen microvezeldoek).
Haal de beschermfolie pas van de meubelen als ze volledig gemonteerd zijn.
Er mag geen stof in de ladegeleiders komen! Hang de meubelen dus pas op, ná het boren of verwijder de meubelen weer voordat u gaat
boren. Boorstof eventueel opzuigen of (wegschuren) verwijderen, nooit van de wastafel wegvegen. Geen gereedschap, zware voorwerpen
of voorwerpen met scherpe kanten op de wastafel leggen.
De montage van onze producten mag alleen door een ervaren vakman of een ander vakkundig persoon uitgevoerd worden. Alleen een vak-
kundige elektromonteur mag de elektrotechnische installaties monteren in overeenstemming met DIN57100/VDE0100 deel 701. Stopcontac-
ten, verlichting en wandcontactaansluitingen moeten gecontroleerd worden.
Het bevestigingsmateriaal (schroeven, pluggen) is ontworpen voor massieve wanden met voldoende draagkracht. Bij andere inbouwsituaties
moeten speciale bevestigingen gebruikt worden. Wastafelbouten zijn niet in de leveringsomvang inbegrepen! De producten moeten aan alle
geplande montagepunten bevestigd worden.
SILICON
Om te voorkomen dat er water tussen de wand en wastafel terecht komt, moet de aansluitrand met de wand met een siliconenvoegmiddel
worden afgedicht. Gebruik hiervoor een neutraal (oplosmiddelvrij) silicone.
iDeuren en lades moeten na montage correct afgesteld worden. Het afstellen is één van de standaard onderhoudswerkzaamheden en is af-
hankelijk van het gebruik en de belasting van de meubelstukken. Afstellen kan nooit een reden zijn tot het indienen van een klacht. Controleer
de wateraansluiting en sifon op lekken! Meubelen voor overdracht schoonmaken. Boorstof, etiketten en kleefresten verwijderen! De functie,
het gebruik en onderhoud moeten aan de eigenaar uitgelegd worden.
De montageafmetingen gelden voor de aan de bovenkant afgewerkte vloer. Alle afmetingen zijn vermeld in mm.
Bij scheidingswanden en lichte constructies moet het draagvermogen van de ondergrond gecontroleerd worden.

4
ISTRUZIONE PER IL MONTAGGIO
IT
!Si riportano di seguito informazioni importanti per il montaggio e la manipolazione degli arredi da bagno con relative vertenze di sicurezza.
Esse devono essere assolutamente lette ed osservate prima di montare gli arredi. Di eventuali danni causati dall‘inosservanza delle stesse non
ci si assume alcun tipo di responsabilità.
In caso di danni riscontrati sui prodotti occorre comunque procedere al montaggio degli stessi. Qualora una parte di essi non dovesse essere
montabile a causa dell‘entità dei danni, dovranno essere effettuati tutti i preparativi per il montaggio e installate le guide per il montaggio, i
ganci e le viti a doppia lettatura. Il nostro servizio di assistenza tecnica non pratica fori.
Le superci lucide induriscono completamente entro 3 settimane dalla rimozione della pellicola protettiva. In questo arco di tempo trattarle
con particolare cura e non lavarle né pulirle con panni o simili (evitare l‘uso di panni in microbra).
Rimuovere la pellicola protettiva solo una volta terminato il montaggio di tutti gli elementi.
Impedire il deposito di polvere di foratura nelle guide degli estraibili! Per questo motivo gli arredi possono essere appesi solo dopo aver praticato i
fori e devono essere smontati di nuovo prima di praticare altri fori.Eventualmente aspirare o scaricare con l‘acqua la polvere prodotta nel praticare i
fori, non rimuoverla mai dal lavabo passandovi sopra con panni o simili. Non appoggiare sul lavabo utensili, né oggetti acuminati o pesanti.
Il montaggio dei nostri prodotti può essere effettuato solo da personale specializzato nell‘installazione di sanitari o da altra persona quali-
cata. Le installazioni elettriche possono essere effettuate solo da un esperto nel rispetto della normativa DIN57100/VDE0100 parte 701. I
collegamenti a spina, l‘illuminazione e l‘allacciamento alle prese di corrente devono essere controllati.
Il materiale di ssaggio (viti, tasselli) è specico per pareti solide e dotate di sufciente capacità portante. In altre situazioni di montaggio
occorre utilizzare materiali di ssaggio specici. Le viti a doppia lettatura non sono fornite in dotazione!
SILICON
Per evitare la penetrazione di acqua tra la parete e il lavabo, occorre sigillare il bordo di collegamento alla parete con una giuntura in silico-
ne. Utilizzare esclusivamente silicone neutro reticolato (senza solvente).
iAnte e cassetti, successivamente al montaggio, devono essere registrati. La registrazione successiva rientra nelle normali operazioni di ma-
nutenzione a seconda dell‘utilizzo e del carico cui sono sottoposti i componenti d‘arredo e non costituisce un motivo giusticato di reclamo.
Controllare la tenuta dell‘allacciamento dell‘acqua e del sifone! Pulire i mobili prima della consegna! Rimuovere la polvere prodotta dai fori,
le etichette e i residui di adesivo! Devono essere spiegate al proprietario la funzione, la manipolazione e la cura dei prodotti.
I prodotti devono essere ssati in tutti i punti di montaggio previsti. Le misure di montaggio si riferiscono al bordo superiore del pavimento
nito. Tutte le dimensioni sono espresse in mm.
Per le pareti in cartongesso e quelle divisorie, fare attenzione alla sottostruttura portante.

5
MONTAGEVORBEREITUNG
PREPARATIONS FOR FITTING // PRÉPARATION DU MONTAGE // VOORBEREIDING VAN DE MONTAGE // PREPARAZIONE AL MONTAGGIO
1 2
3 4
5
1
2
3
4
6
i

6
WICHTIGER MONTAGEHINWEIS
IMPORTANT FITTING ADVICE // REMARQUES IMPORTANTES // BELANGRIJKE MONTAGE-INSTRUCTIE // SMONTAGGIO E SMALTI-
MENTO
!
SPIEGELSCHRANK
MIRROR CABINET // ARMOIRE DE TOILETTE // SPIEGELKAST // PENSILE CONTENITORI A SPECCHIO
1
!
A
B
2
Ø 8 MM
A:
0-12
A
B
!
MAX:
12 MM
LEUCHTSPIEGEL
ILLUMINATED MIRROR // MIROIR // LICHTSPIEGEL // SPECCHIO CON ILLUMINAZIONE
i
2,5 MM
1
!
Ø 8 MM
2

7
WASCHTISCHUNTERSCHRANK I METALLKONSOLE 01
VANITY UNIT I CONSOLES // MEUBLE SOUS-VASQUE I SCONSOLES // WASTAFELONDERKAST I CONSOLEN // MOBILE SOTTOLAVABO I
STAFFA
WASCHTISCHUNTERSCHRANK I METALLKONSOLE 02
VANITY UNIT I CONSOLES // MEUBLE SOUS-VASQUE I SCONSOLES // WASTAFELONDERKAST I CONSOLEN // MOBILE SOTTOLAVABO I
STAFFA
1
!
Ø 14 MM
WASCHTISCHUNTERSCHRANK I AUFHÄNGER
VANITY UNIT I HANGER // MEUBLE SOUS-VASQUE I ACCROCHE // WASTAFELONDERKAST I HANGER // MOBILE SOTTOLAVABO I
GANCIO
1
!
Ø 8 MM
B
A
2
A
B
2
1
!
Ø 8 MM
B
A
2
A
B

8
KERAMIK-WASCHTISCH
CERAMIC WASHBASIN // PLAN DE TOILETTE EN CÉRAMIQUE // WASTAFEL KERAMIEK // LAVABO IN CERAMICA
1
!
2
Ø 14 MM
MINERALGUSS-WASCHTISCH
MINERAL CAST WASHBASIN // PLAN DE TOILETTE EN PIERRE DE SYNTHÈSE // WASTAFEL MINERAALSTEEN // LAVABO IN RESINA
MINERALE
1
!
2
SILICON
Ø 14 MM
SILICON
WASCHTISCHUNTERSCHRANK I UNTERSCHRANK
VANITY UNIT I MOBILE BASE // MEUBLE SOUS-VASQUE I MEUBLE BAS // WASTAFELONDERKAST I ONDERKAST // MOBILE SOTTOLAVA-
BO I MOBILE BASE
1
!
4X30

9
GLAS-WASCHTISCH
GLASS WASHBASIN // PLAN DE TOILETTE EN VERRE // GLAS-WASTAFEL // LAVABO IN VETRO
WICHTIGER MONTAGEHINWEIS - GLASWASCHTISCH
DE
Die Ablaufgarnitur und Armatur dürfen bei der Installation nicht zu fest angezogen werden – Achtung: Rissgefahr. Um Spannungsrisse zu vermeiden muss
für das von oben eingesetzte Abussventil eine dauerplastische Dichtungsmasse (Installationskitt) zwischen Ventil und Glas verwendet werden. Bei Armatu-
ren stets eine Gummidichtung zwischen Glas und die zu installierende Metallarmatur legen. Zum Abdichten verwenden Sie bitte nur ein transparentes,
neutral vernetzendes, lösungsmittelfreies Silikon. Lösungsmittelhaltige Silikone können die Farbbeschichtung des Waschtisches beschädigen.
IMPORTANT FITTING ADVICE - GLASS BASIN
EN
The outlet and tap should not be tted too tight during installation. Note: Danger of cracking. To avoid stress cracks, a permanently exible sealing
compound (installation putty) should be used between the valve and the glass when tting the outlet valve from above. For taps, always t a rubber seal
between the glass and the metal tting. For sealing use only a transparent, solvent free silicon. Solvent-based silicons can damage the colour
coating of the basin.
REMARQUES IMPORTANTES CONCERNANT LA POSE DU PLAN DE TOILETTE EN VERRE
FR
Le conduit d’écoulement et le robinet ne doivent pas être serrés trop fermement lors de l’installation. Attention: risque de ssuration. An d’éviter les
ssures, un mastic d’étanchéité thermodurcissable (kit d’installation) doit être appliqué entre la vanne et le verre pour la vanne d’écoulement installée
par-dessus. Pour les robinets, un joint en caoutchouc doit toujours être placé entre le verre et le robinet en métal à installer. Pour l’étanchéication,
veuillez utiliser uniquement du silicone transparent, réticulé neutre et exempt de solvants. Les silicones contenant des solvants peuvent
endommager la peinture du plan de toilette.
BELANGRIJKE MONTAGE-INSTRUCTIE - GLAZEN WASTAFEL
NL
Het afvoergarnituur en armatuur mogen bij de installatie niet te vast aangetrokken worden – Opgelet: gevaar voor scheuren. Om spanningsscheuren
te vermijden, moet er voor de bovenaan aangebrachte afvoerklep een duurzaam plastische dichtingsmassa (installatiekit) tussen klep en glas gebruikt
worden. Bij armaturen steeds een rubberafdichting tussen glas en het te installeren, metalen armatuur leggen. Gelieve om af te dichten uitsluitend
een transparante, neutraal verbindende, oplosmiddelvrije silicone te gebruiken. Oplosmiddelhoudende siliconen kunnen de veraag van
de wastafel beschadigen.
IMPORTANTE PER IL MONTAGGIO: LAVABO IN VETRO
IT
Lo scarico del rubinetto e il raccordo non devono essere stretti troppo durante l‘installazione. Attenzione: rischio che la supercie si crepi. Per evitare
crepe dovute alla tensione, per la valvola di scarico inserita dall‘alto bisogna utilizzare un mastice duroplastico (mastice da installazione) tra la valvola
e il cristallo. Per i raccordi inserire sempre una guarnizione di gomma tra il vetro e il raccordo in metallo da installare. Per sigillare utilizzare solo sili-
cone trasparente a reticolazione neutra senza solventi. I siliconi contenenti solventi possono danneggiare la verniciatura protettiva del lavabo.
1 2
SILICON

10
SCHRÄNKE
UNITS // COLONNES // KASTEN // COLONNE
1
!
Ø 8 MM
A
B
2
A:
0-12
A
B
!
MAX:
12 MM
SIDEBOARD
SIDEBOARD // COMMODES // SIDEBOARD // SIDEBOARD
1
!
2
Ø 14 MM

11
SCHUBLADEN I AUSZÜGE I JUSTIEREN
DRAWER I PULL OUT DRAWER I ADJUSTMENT // TIROIR I GRAND TIROIR I AJUSTAGE // LADEN I VERSTELLEN // CASSETTI I GUIDE I REGOLAZIO-
NE
±
2
± 1,5
1.
2.
1.
2.
3.
1
2
! CLICK !

12
+
-
3 MM (3-5 MM)
+
-
-+
-+
PUSH
PUSH
PUSH
SH
PUSH
SH
S
US
TIP-ON-TECHNIK TIP-ON-TECHNIK
TÜREN EINHÄNGEN I JUSTIEREN
DOORS I ADJUSTMENT // PORTES I AJUSTAGE // DEUREN I VERSTELLEN // ANTE I REGOLAZIONE
1
A
B
C
2
A
B
C
CLICK!
1
A
B
C
2
A
B
C
CLICK!
SCHUBLADEN I AUSZÜGE I JUSTIEREN
DRAWER I PULL OUT DRAWER I ADJUSTMENT // TIROIR I GRAND TIROIR I AJUSTAGE // LADEN I VERSTELLEN // CASSETTI I GUIDE I REGOLAZIO-
NE

13
ABDECKUNGEN
COVERS // COUVERTURES // COVERS // COPERTURE // DUVAR
SAÇAĞI
SCHARNIER
HINGE // CHARNIÈRE // SCHARNIER // CERNIERA //
MENTEŞE
SCHUBLADEN I AUSZÜGE
DRAWER I PULL OUT DRAWER // TIROIR I GRAND TIROIR // LADEN
CASSETTI // ÇEKMECELER
AUFHÄNGER
HANGER // ACCROCHE // HANGER // GANCIO // AYDIN-
LATMALI AYNA
DÄMPFERVERSTELLUNG ADJUSTMENT OF DAMPER // RÉGLAGE DE L‘ARMORTIS-
SEUR // DEMPER VERSTELLING // REGOLAZIONE DE L’ARMORTIZZATORE
LEICHTE STUFE -FÜR LEICHTE UND SCHMALE TÜREN
LOW LEVEL –FOR LIGHT AND SMALL DOORS
REGLAGE LÉGER – POUR PORTES LÉGÈRES ET ÉTROITES
LICHTSTE NIVEAU – VOOR LICHTE EN SMALLE DEUREN
MITTLERE STUFE/WERKSEINSTELLUNG – FÜR STANDARDTÜREN
MIDDLE LEVEL/FACTORY SETTING – FOR STANDARD DOORS
REGLAGE MOYEN – POUR PORTES STANDARDS
MIDDELSTE NIVEAU/FABRIEKSINSTELLING – VOOR STANDAAD
DEUREN
SCHWERE STUFE – FÜR GROSSE UND SCHWERE TÜREN
HIGH LEVEL – FOR LARGE AND HEAVY DOORS
REGLAGE FORT – POUR PORTES GRANDES ET LOURDES
ZWAARSTE NIVEAU – VOOR GROTE EN ZWARE DEUREN
+6/-0,45 mm
max. 7,5 mm min. 2 mm/ Ideal 4 mm
TIP-ON-VERSTELLUNG
TIP-ON ADJUSTMENT // RÉGLAGE TIP-ON // TIP-ON-SYSTEEM // REGOLAZIONE TIP-ON // YAVAŞ KAPANIR MENTEŞE AYARI
AUSTAUSCH VON LEUCHTMITTELN
REPLACEMENT OF ILLUMINANT // REMPLACEMENT DES ÉCLAIRAGES // VERVANGING VAN VERLICHTINGSELEMENTEN // SOSTITU-
ZIONE DI LAMPADE E FARETTI
SPKC
+6/-0,45 mm
max. 7,5 mm
min. 2 mm/ Ideal 4 mm

14
MONTAGEMASSE
FITTING INSTRUCTIONS // CÔTES DE FIXATION // MONTAGEVOORSCHRIFT // MISURE DI MONTAGGIO
1
SPKC
SIEG
Diese Produkte enthalten eine Lichtquelle der Energieefzienzklasse E
These products contain a light source of energy efciency class E
Ces produits contiennent une source lumineuse de la classe d‘efcacité énergétique E
Deze producten zijn voorzien van een lichtbron uit de energie-efciëntieklasse E
Questi prodotti contengono una sorgente luminosa di classe di efcienza energetica E
Bu ürünlere dahil olan ışık kaynağın enerji sınıfı E
SIJN
SIIX
Diese Produkte enthalten eine Lichtquelle der Energieefzienzklasse F
These products contain a light source of energy efciency class F
Ces produits contiennent une source lumineuse de la classe d‘efcacité énergétique F
Deze producten zijn voorzien van een lichtbron uit de energie-efciëntieklasse F
Questi prodotti contengono una sorgente luminosa di classe di efcienza energetica F
Bu ürünlere dahil olan ışık kaynağın enerji sınıfı F
ENERGIEEFFIZIENZKLASSE
ENERGY EFFICIENCY GRADE // CLASS D‘EFFICACITÉ ÉNERGÉTIQUE // ENERGIE-EFFICIËNTIEKLASSE // CLASSE ENERGETICA // ENERJI
SINIFI
700
600
1970
120 120
1830
1270
1650
SIIX060
+/- 0
30
+/- 0
2000
750
400
1805
1250
1650
+/- 0
SIJN075

15
MONTAGEMASSE
FITTING INSTRUCTIONS // CÔTES DE FIXATION // MONTAGEVOORSCHRIFT // MISURE DI MONTAGGIO
1
19
670
2010
1760 20
2010
811 0
870
1650
S/HSLL035
S
600 / 800 / 900/ 1000 / 1200
310
500
41
61
451
41
606 / 806 / 906 / 1006 / 1206
1
USZB060/080/090/100/120
xx/xx/2019
q u er
B l at t
:
v o n
B u r g b ad F r an c e S A S
Z I L e P o ir i er , r u e No u v ell e
C S 8 0 0 1 9 2 8 1 3 2 No g en t l e R o i
F R A NC E
k g
Schutzvermerk nach DIN ISO 16016 beachten - Protection notice to DIN ISO 16016 - Copyright reserved
G ew i c h t
:
F o r mat
:
M aß s t ab
:
L.Longhi
Name:
D at u m:

16
MONTAGEMASSE
FITTING INSTRUCTIONS // CÔTES DE FIXATION // MONTAGEVOORSCHRIFT // MISURE DI MONTAGGIO
1
8 7 0
1 63 0 0
5 2 0
5 7 0
280
4 0
5 0
1 2 0
4 0
d
SG SS062/082/092/102/122
8 7 0 6 0 1 1 6
560
6 1 0 110
170
255
2 0 2 0
7 5 7 5
3 3 3 3
d
280
5 0
1
SG SV062/082/092/102/122
870
300554 16
39 39
742
520
570
300 / 450
900 / 1200
920 / 1220
150
280
50
1
253 601 16
920 / 1220
280
50
33
20
520
570
597
683 62
33
20
900 / 1200
150
300 / 450
870
111
920 / 1120
39
300 16
870
554
300 / 450
150
900 / 1200
280
50
520
570
600 62
742
39
333
111
870
253 601 16
920 / 1220
280
50
20
33
900 / 1200
300 / 450
150
520
570
597
320
333
20
683 62
111
SF Q E 120
F R E E
16/01/2020
01
01
01
q u er
B l at t
:
v o n
B u r g b ad F r an c e S A S
Z I L e P o ir i er , r u e No u v ell e
C S 8 0 0 1 9 2 8 1 3 2 No g en t l e R o i
F R A NC E
k g
Schutzvermerk nach DIN ISO 16016 beachten - Protection notice to DIN ISO 16016 - Copyright reserved
G ew i c h t
:
F o r mat
:
M aß s t ab
:
L.Longhi
Name:
D at u m:
01
870
300554 16
39 39
742
520
570
300 / 450
900 / 1200
920 / 1220
150
280
50
1
253 601 16
920 / 1220
280
50
33
20
520
570
597
683 62
33
20
900 / 1200
150
300 / 450
870
111
920 / 1120
39
300 16
870
554
300 / 450
150
900 / 1200
280
50
520
570
600 62
742
39
333
111
870
253 601 16
920 / 1220
280
50
20
33
900 / 1200
300 / 450
150
520
570
597
320
333
20
683 62
111
SF Q E 120
F R E E
16/01/2020
01
01
01
q u er
B l at t
:
v o n
B u r g b ad F r an c e S A S
Z I L e P o ir i er , r u e No u v ell e
C S 8 0 0 1 9 2 8 1 3 2 No g en t l e R o i
F R A NC E
k g
Schutzvermerk nach DIN ISO 16016 beachten - Protection notice to DIN ISO 16016 - Copyright reserved
G ew i c h t
:
F o r mat
:
M aß s t ab
:
L.Longhi
Name:
D at u m:
01

17
MONTAGEMASSE
FITTING INSTRUCTIONS // CÔTES DE FIXATION // MONTAGEVOORSCHRIFT // MISURE DI MONTAGGIO
1
870
3 0 0 1 6
520
4 0 4 0
150
570
220
5 0
120
1
1
11
220
S G S Y 1 2 2
8 7 0 1 6
110
170
255
2 0 2 0
601
3 3
3 3
220 220
5 0
7 5 7 5
560
610
11
S G S Z 1 2 2
8 7 0 3 0 0 1 6
600
520
4 0 4 0
1 5 01 5 0
570
280
5 0
120
1
1
11
280
S G T A 1 2 2
8 7 0 1 6
110
170
255
2 0 2 0
601
3 3
3 3
280 280
5 0
7 5 7 5
7 5 7 5
d
560
610
11
S G T B 1 2 2

18
Vous pouvez installer votre meuble IP x4 dans les volumes 2 et hors volume
(cependant veuillez á ce que la prise électrique soit hors du volume 2).
En accord avec la norme NF C 15-100
MONTAGEMASSE
FITTING INSTRUCTIONS // CÔTES DE FIXATION // MONTAGEVOORSCHRIFT // MISURE DI MONTAGGIO
1
DEMONTAGE EN VERWIJDEREN
NL
!Gevaar van elektrische schok! Het aanraken van stroomvoerende
onderdelen kan ernstige letsels en zelfs de dood veroorzaken. De
buitenbedrijfstelling en reparaties moeten door een geautoriseerd
elektrotechnicus worden uitgevoerd.
Procedure voor buitenbedrijfstelling
1. De leidingen spanningsvrij maken en tegen opnieuw inschakelen
beveiligen
2. De kabelverbindingen afkoppelen
3. De elektrische componenten afkoppelen en verwijderen
4. Elektrische materialen, glas en onderdelen van meubels altijd apart
en overeenkomstig de plaatselijke voorschriften verwijderen
Elektrische apparaten recyclen of vakkundig verwijderen.
Elektrische apparaten nooit samen met het huishoudelijk vuil weg-
werpen. De plaatselijk geldende voorschriften naleven.
DEMONTAGE UND ENTSORGUNG
DE
!Gefahr durch Stromschlag! Das Berühren von stromführenden Teilen
kann zu schweren Verletzungen bis hin zum Tod führen. Die Außerbe-
triebnahme und Reparatur sind von einer Elektrofachkraft auszuführen.
Vorgehensweise Außerbetriebnahme
1. Leitungen stromfrei schalten und gegen Wiedereinschalten sichern
2. Lösen der Kabelverbindungen
3. Lösen und Entfernen der Elektrokomponenten
4. Elektromaterialien, Glas und Möbelteile jeweils separat den
örtlichen Vorschriften entsprechend entsorgen
Elektrogeräte recyceln oder fachgerecht entsorgen.
Elektrogeräte niemals über den Hausmüll entsorgen.
Die vor Ort gültigen Vorschriften beachten.
REMOVAL AND DISPOSAL
EN
!Risk of electric shock! Touching live parts can cause serious injury
or death. Removal and repairs should only be carried out by a
qualied electrician.
Removing an appliance
1. Switch off the power supply and ensure it cannot be switched
on again.
2. Disconnect the cables.
3. Loosen and remove the electrical components.
4. Dispose of electrical materials, glass and furniture separately
according to the regulations applicable in your area.
Recycling or disposing of electrical appliances.
Never dispose of electronic equipment in your household waste.
Observe the regulations applicable in your area.
DÉMONTAGE ET ÉLIMINATION
FR
!Risque d‘électrocution ! Le contact avec des pièces conductrices
peut entraîner de graves blessures, voire la mort. La mise hors ser-
vice et la réparation sont à effectuer par un électricien qualié.
Procédure de mise hors service
1. Mettre tous les câbles hors tension et les sécuriser contre la
mise en marche
2. Déconnecter les jonctions de câbles
3. Desserrer et retirer les composants électriques
4. Toujours éliminer les matériels électriques, le verre et les éléments
de mobilier séparément conformément aux prescriptions locales.
Recycler ou éliminer les appareils électriques de manière appropriée.
Ne jamais éliminer les appareils électroniques dans les ordures ména-
gères. Respecter les prescriptions locales en vigueur.

19
SMONTAGGIO E SMALTIMENTO
IT
!Pericolo di scosse elettriche! Il contatto con parti a conduzione di
corrente può provocare infortuni gravi o nanche il decesso. La
messa fuori servizio e la riparazione devono essere effettuate da
personale elettrotecnico specializzato.
Procedimento per la messa fuori servizio
1. Staccare i cavi dalla corrente elettrica e metterli in sicurezza
contro il reinserimento
2. Scollegare i cavi
3. Staccare e rimuovere i componenti elettrici
4. Smaltire separatamente i materiali elettrici, il vetro e le parti
di arredi, nel rispetto delle prescrizioni locali
Le apparecchiature elettriche devono essere riciclate oppure smaltite
nel rispetto delle norme vigenti. Non smaltire mai le apparecchiature
elettriche insieme ai riuti domestici. Osservare le norme vigenti locali.
SPKC
2
DEMONTAGE UND ENTSORGUNG
REMOVAL AND DISPOSAL // DÉMONTAGE ET ÉLIMINATION // DEMONTAGE EN VERWIJDEREN SMONTAGGIO E SMALTIMENTO
1 21
1 2
1 2

20
Die Badmöbel sind für eine lange Lebensdauer im Badezimmer konzipiert. Um langjährige Freude an unseren Qualitätsprodukten zu haben, bitten wir Sie folgende
Hinweise zu berücksichtigen:
1. Die Installation einer Duschabtrennung ist zwingend vorgeschrieben, wenn die Möbel direkt an Wanne/Duschbereich anschließen
2. Nach dem Duschen/Baden ausreichend lüften (Fenster, Lüftung)
3. überströmendes Wasser vermeiden, bzw. sofort beseitigen
Reinigung der Badmöbel, Spiegel und Glasächen, Mineralguss und Keramik:
Zur schonenden Reinigung von Holz-, Kunststoff-, Lack- und Keramikoberächen empfehlen wir ein sauberes, weiches, feuchtes Tuch. (kein Mikrofasertuch!) Verschüttete Subs-
tanzen sollten sofort entfernt werden. Besonders hartnäckige Flecken (Fett, Kosmetik etc.) lassen sich ohne Rückstände mit 1%iger Seifenlauge oder Feinspülmittel entfernen.
Anschließend Fläche trocken reiben. Es ist darauf zu achten, dass an den Rändern und Rückseiten keine Tropfenrückstände verbleiben. Grundsätzlich sind für die Pege von
Hochglanzoberächen keine Scheuermittel und keine Pegemittel, die alkoholhaltige Stoffe beinhalten, zu verwenden.
Hochglanzoberächen härten nach dem Entfernen der Schutzfolie innerhalb von 3 Wochen vollständig aus. Bitte in diesem Zeitraum
besonders vorsichtig behandeln und nicht reinigen oder abwischen.
Bei stärkerer Verschmutzung von Mineralguss, Keramik oder Glas verwenden Sie bitte einen milden Flüssigreiniger (ohne Alkohol und Scheuermilch), z.B. Essigreiniger von
Frosch und warmes Wasser. Bitte achten Sie darauf, dass die Wassertemperatur 65°C nicht übersteigt. Vermeiden Sie, dass diese hochwertigen Materialien mit harten und
kantigen Gegenständen in Berührung kommen. Keine heißen Gegenstände auf die Platten stellen! Um den Glanz der Mineralgussoberäche zu erhalten, empfehlen wir von
Zeit zu Zeit hochwertige Autopolitur aufzutragen und nachzupolieren, z.B. SONAX Xtreme Polish & Wax 2 Hybrid NPT.
PFLEGEHINWEISE
DE
!
The bathroom furniture is design for a long service life in the bathroom. We ask that you follow the instructions below to ensure that you can enjoy our high quality products
for many years:
1. The installation of a shower wall is essential if the furniture is installed directly next to the tub/shower area
2. Ensure sufcient ventilation (windows, ventilator)
3. Avoid or immediately mop up overowing water
Cleaning the bathroom furniture, mirrors and glass surfaces, mineral cast and ceramic:
We recommend a clean, soft, damp cloth (no microber cloth!) for gently cleaning wood, plastic, painted and ceramic surfaces. Particularly stubborn stains (oils, cosmetics
etc.) should be removed immediately. This can be done without residue using 1% soapy water or ne washing-up liquid. Then rub the surface dry. Take care that no droplets
of residue remain on the edges and backs. No scouring agents or care products containing alcoholic substances should be used to clean high gloss surfaces.
High gloss surfaces are fully hardened within three weeks of the protective lm being removed. Please treat them with particular
care during this period and do not clean or wipe them.
In the case of heavy soiling on mineral cast, ceramic or glass, please use a mild liquid cleaner (without alcohol or cream cleaner) such as the vinegar-based cleaner from
Frosch, with warm water. Please ensure that the water is not hotter than 65°C. Do not allow these premium materials to come into contact with hard or sharp-edged objects.
Do not place hot objects on the plates! In order to retain the sheen of the mineral cast surface, we recommend applying a high quality car polish such as SONAX Xtreme
Polish & Wax 2 Hybrid NPT and polishing it from time to time.
CARE INSTRUCTIONS
EN
!
Les meubles sont conçus pour être utilisés pendant de longues années dans les salles de bain. An de proter pleinement et durablement de la qualité de nos produits,
veuillez suivre les recommandations suivantes:
1. Installation impérative d‘un pare-douche lorsque le meuble est en contact direct avec le bac à douche ou la baignoire.
2. Assurer une aération sufsante (fenêtre, système de ventilation)
3. Éviter les projections d‘eau ou sécher immédiatement la zone aspergée.
Nettoyage des meubles de salle de bain, des miroirs et des surfaces miroirs, des vasques en résine ou en céramique:
Pour un entretien respectueux des surfaces en bois, en plastique, en céramique ou laquées, nous vous recommandons d‘utiliser un chiffon doux, humide et propre. (Jamais de
tissu en microbres!) Retirer immédiatement les tâches tenaces (résidus gras, cosmétiques, etc.) et éliminer tout résidu avec une inme quantité (1%) de lessive ou de produit
à vaisselle doux. Essuyer ensuite la surface jusqu‘à ce qu‘elle soit sèche. Vérier qu‘aucune trace de goutte ne reste sur les bords ou sur les panneaux arrière. D‘une manière
générale, éviter l‘emploi de crèmes à récurer ou de produits d‘entretien contenant de l‘alcool sur les surfaces laquées.
Le durcissement complet des surfaces brillantes intervient dans les 3 semaines qui suivent le retrait du lm protecteur. Pendant ce laps
de temps, traiter le meuble avec la plus grande précaution et éviter de le nettoyer ou de l‘essuyer.
Si les surfaces en résine, en céramique ou les vitres sont particulièrement encrassées, utiliser un produit d‘entretien liquide (sans alcool et sans crème à récurer), par ex. le
nettoyant au vinaigre de Frosch et de l‘eau tiède. Veiller à ce que la température de l‘eau ne dépasse pas 65°C. Éviter de mettre en contact les surfaces composées de ma-
tériaux de qualité supérieure avec des objets durs et pointus. Ne pas poser d‘objets chauds ou brûlants sur le plateau du meuble sous vasque! An de prolonger la brillance
des surfaces laquées, nous vous recommandons d‘appliquer de temps en temps un peu de polish pour auto (par ex. SONAX Xtreme Polish & Wax 2 Hybrid NPT) et de
lustrer la surface.
INTRUCTIONS D’ENTRETIEN
FR
!
Boleo-Montage 09/23 • Technische Änderungen vorbehalten. / Boleo tting instructions 09/23 • Subjects to technical changes.
Instructions de montage Boleo 09/22 • Sous réserve de modications
Table of contents
Other burgbad Bathroom Fixture manuals
Popular Bathroom Fixture manuals by other brands

Kohler
Kohler ARCHER 72700X-4 installation instructions

ALCO
ALCO AL-66049 Assembly instructions

Spectrum Brands
Spectrum Brands Altavista LF-048-AV Quick installation guide

Hans Grohe
Hans Grohe AXOR ShowerHeaven 720 10625800 Instructions for use/assembly instructions

Artos
Artos F502-4-1 installation guide

BELLOSTA
BELLOSTA piazza di spagna B3-120/B installation instructions

Brizo
Brizo ATAVIS 65042LF-PC manual

AmazonBasics
AmazonBasics B079LL22TC quick start guide

Akw
Akw iSure Installation and instruction manual

BATHSELECT
BATHSELECT BAKU BST10004 installation instructions

Hans Grohe
Hans Grohe AXOR Citterio E 36702 1 Series Installation

Bradley
Bradley TouchTime 1C Installation