Burndy PATRIOT IN-LINE MD-LW Series Maintenance and service guide

© BURNDY LLC, 2020
SAFETY OPERATING & MAINTENANCE INSTRUCTIONS
(ENGLISH)
PATRIOT®IN-LINE® MD-LW SERIES

2

3
Hazard has a high level of risk.
Hazard has a medium level of risk.
Hazard has a low level of risk.
SYMBOL MEANING
SAFETY INFORMATION
The above symbols are used to call your attention to
instructions concerning your personal safety. Look for
these symbols; read and follow the instructions that
accompany them. Failure to follow the safety information
provided can lead to serious personal injury or death.
TABLE OF CONTENTS (English)
Safety Information ....................................................... 3
Description...................................................................5
Specications .............................................................. 6
Features and Benets ................................................. 7
Specications - Hydraulic Power Source.. ...................8
Pre-Operation.............................................................. 8
Operation.....................................................................9
Crimping and Instructions ..........................................11
Maintenance.............................................................. 13
Service.......................................................................14
Troubleshooting......................................................... 15
Commonly Asked Questions ..................................... 16
Parts Section .............................................................17
Battery Recycling....................................................... 18
For information only, contact:
BURNDY®TOOL SERVICE CENTER
150 Burndy Road
Littleton, NH 03561 USA
or call, toll free 1-800-426-8720
ToolService@burndy.com
Additional or replacement manuals may be obtained free
of charge from the BURNDY®Tool Service Center.
SAFETY FIRST
The information provided in this manual
is essential for the safe handling,
operation, and maintenance of the
BURNDY®PATRIOT®IN-LINE®Series.
The operator must read, understand,
and follow these instructions and ALL
safety warnings and labels before
operating these tools.
• Only use these tools in accordance with the
manufacturer’s specications. Other use of these tools
may lead to serious personal injury or death.
Each employer shall instruct each employee and user
in the recognition and avoidance of unsafe working
conditions and the laws and regulations applicable to his/
her work environment to control or eliminate any hazards
or other exposure to illness or injury. Reference: OSHA
29CFR 1910 etseq. (1994).
If a conict arises between the material contained in this
manual, rules of the user, his/her employer or company,
and legal or industry guidelines, the more stringent rules
take precedence and must be followed.
Observe and follow all other safety rules and regulations
for the job.
Safety is everyone’s responsibility.

4
Tools are NOT insulated for use on or near
energized conductors. Use of these tools near
energized conductors may lead to electrical
shock, causing severe injury or death.
Pinch point hazard. Crimp ram operates at high
speed and force and can cause severe personal
injury. Keep all body parts away from moving
parts of the tool, especially the area of the head
and die holder during operation.
Blade hazard. Cutter blades move at high speed
and force and can cause severe personal injury.
Keep all body parts away from moving parts of
the tool during operation.
Blade hazard. Cutter blades have sharp edges
that may cause personal injury while not in use
or during blade replacement or installation. Use
caution and personal protective equipment when
handling tool and blades.
Projectile hazard. Cutter blades may break
during operation due to stress cracks or
misapplication. Always carefully inspect blades
before use to avoid serious personal injury.
Projectile hazard. Operator must clear all
bystanders from the work area especially when
cutting cable and rebar ends to avoid potential
injury to bystanders.
Hydraulic uid under pressure. Do NOT use
any part of your body to locate a hydraulic leak.
Escaping uid under pressure can cause severe
injury or death. If injury results from escaping
hydraulic uid, seek immediate medical attention
to avoid serious bodily injury.
Do NOT over-reach while operating this tool.
Loss of balance can cause serious personal
injury or death. Move closer to work area
and securely support yourself and your work.
ALWAYS keep proper footing and balance.
Always clip one end of the lanyard to the safety ring on the tool
and the other end to a secure point to avoid accidental drop of
more than 6 feet. Failure to follow this instruction may result in
personal injury or tool damage.
USE
This tool has been specically designed for use with
BURNDY®products. Use of non BURNDY®products is
limited to those which conform to BURNDY®Technical
Specications applicable to the tool. Use of non BURNDY®
non-conforming products with the tool shall be deemed
misuse or abuse.
IMPORTANT
When storing the tool, the following steps should be
followed to avoid potential injury:
• Engage the activation trigger lock
• Remove battery
• Position tool jaws-down in the tool bag
Use all appropriate personal safety equipment when
handling, operating, and servicing this tool such as: safety
shoes, hard hat, eye and ear protection, work gloves, and
sleeves.
To help ensure safe operation of this tool, keep all safety
labels clean and legible. Replace labels when necessary
with new labels. See PARTS SECTION of this manual for
information on reordering.
OPERATING SAFETY PRECAUTIONS

5
DESCRIPTION
The BURNDY®PATRIOT®IN-LINE®Crimper/Cutter is a battery-actuated tool that incorporates a high-speed hydraulic
pump, generating 6 tons of output force at the jaws. Due to its light weight, the tool can be operated with one hand
for advance, retract and hold functions. The design oers a precisely-tuned pressure relief valve to ensure consistent
compression connections every time. It also features interchangeable jaws and a rotating head for versatility in any situation.
Tool accepts 18V Makita Lithium Ion batteries, BL Series of size 2.0 Ahr and greater if the plastic battery clip in the tool
has a "star" molded into it. The "star" identies acceptance of the BL series batteries.
NOTE: For tools which do not have a “STAR” molded into the plastic battery clip, use is limited to the BL1830
(3.0 Ahr) battery. Forcing any other battery into this tool will void the warranty. Remove battery prior to placing
tool in storage.
The BURNDY®PATRIOT®IN-LINE®Crimpers use standard BURNDY® "W" and "X" dies for use with o-the-shelf BURNDY®
connectors available world-wide. It will install a full range of service entrance connectors, splices, terminals, stacking
lugs, stirrups, repair sleeves and many other applications.
See the PARTS SECTION of this manual for information on reordering replacement parts and accessories.
PATENTS
This tool is protected by U.S. Patents: 7487654, 5727417

6
** CUT CAPACITY
Conductor Type CU/AL
Jaw
Max Size
ACSR
Jaw
Max Size
Guy Wire
Jaw Max
Size
Copper (Soft
Drawn)
600 kcmil 350 kcmil --
Aluminum (AAC) 636 kcmil 636 kcmil --
ACSR (26/7) -- 556.5
kcmil
--
Guy Wire (EHS) -- -- 3/8"
PATMDCUTLW CUTTERS
Jaws with Cutting Blades
Uses BURNDY®Multi-purpose ACSR or CU/AL Blades
Cutting Force.........................6 tons (5.4 Metric Tons)
Cutting Capacity**............................See Chart Below
Tool Weight............................................7.2 lb (3.3 kg)
Length.............................................. 19.4 in (493 mm)
Width.................................................... 2.8 in (71 mm)
Height................................................. 4.3 in (109 mm)
Operating Voltage..........................................18 V-DC
5.0 Ah Battery (90 Wh) Recharge Time....... <45 mins
3.0 Ah Battery (54 Wh) Recharge Time....... <30 mins
SPECIFICATIONS: PATRIOT®IN-LINE® MD-LW CRIMPER/CUTTER SERIES
PATMD6LW, PATMD68LW, and
PATMD66LW CRIMPERS
Uses BURNDY®"W" & "X" Type Dies
Crimp Force........................ 6 tons (5.4 Metric Tons)
Crimp Capacity*............................ See Chart Below
Tool Weight....................................... 6.7 lbs (2.9 kg)
Length............................................18.7 in (475 mm)
Width................................................. 2.8 in (71 mm)
Height.............................................. 4.3 in (109 mm)
Operating Voltage........................................18 V-DC
5.0 Ah Battery (90 Wh) Recharge Time...... <45 mins
3.0 Ah Battery (54 Wh) Recharge Time...... <30 mins
Connector Type Conductor Type Size Range
Terminals and
Splices
Copper #8 AWG-500 kcmil
Flex Copper #8 AWG-350 kcmil
Aluminum (AAC) #8 AWG-350 kcmil
Full-Tension ACSR #10-4/0 AWG
Taps
Copper #10-2/0 AWG
Aluminum #14-4/0 AWG
ACSR #14-4/0 AWG
Stirrups ACSR #6-4/0 AWG
* CRIMP CAPACITY
PATMD-LW w/ PATMD430LWJAW
DIELESS CRIMPING JAW
Crimp Force........................ 6 tons (5.4 Metric Tons)
Crimp Capacity***.................................... See Chart
Tool Weight....................................... 6.7 lbs (2.9 kg)
Length............................................18.1 in (460 mm)
Width................................................. 2.8 in (71 mm)
Height.............................................. 4.3 in (109 mm)
Operating Voltage........................................18 V-DC
5.0 Ah Battery (90 Wh) Recharge Time...... <45 mins
3.0 Ah Battery (54 Wh) Recharge Time...... <30 mins
Connector Type Conductor
Type Size Range
Full Tension Splices
(YDS-RL1, YDSR-RL1,
YDS-RLY2
AAC, AAAC,
ACSR #4 - 3/0 AWG
Full Tension
Reducers (YDR-RL,
YDRR-RL)
AAC, AAAC,
ACSR #4 - 1/0 AWG
Partial Tension
Terminals and Splices3,
(YCA-RL, YCS-RL)
AAC, AAAC,
ACSR #4 - 3/0 AWG
Service Splices (YSS-R) AAC, AAAC,
ACSR #4 - #2 AWG
*** PATMD430LWJAW CRIMP CAPACITY
1 YDS4RL and YDSR4RL with #4 AAC is rated for ANSI C119.4
Class 1A normal tension (60% RBS). All others in family are
rated for ANSI C119.4 Class 1 full tension (95% RBS) for all
conductors and sizes shown.
2 YDS4RLY with #4 AAC and #4 ACSR is rated for ANSI C119.4
Class 1A normal tension (60% RBS). All others in family are
rated for ANSI C119.4 Class 1 full tension (95% RBS) for all
conductors and sizes shown.
3YCA-RL terminals and YCS-RL splices are rated for
ANSI C119.4 Class 2 partial tension (40% RBS).

7
FEATURES AND BENEFITS
FEATURE BENEFIT
- True one-handed operation for cutting and crimping
medium size cable and connectors - Easy tool operation
- High-speed hydraulic pump - Fast and accurate crimps and cuts
- Rotatable head - Allows for cutting in many positions
- Long battery life - Increased crimps and cuts per charge
- Ergonomically balanced tool - Eases operation and helps lessen fatigue
- State of the art head and jaw design - Allows use of standard BURNDY® dies and connectors
- Large hand grip area - Easier operation with gloves
- Excellent pump eciency - Smoother and more ecient tool operation
- Industry-standard battery and charger - Rugged, time-proven design
- Audible pressure "pop-o" valve - Indicates properly completed crimps and cuts
- Interchangeable jaws - More exibility for crimping and cutting with multiple
jaw options
- Scissor-action crimping and cutting jaws - Easier access to small areas and easier splice
crimping or mid-span cutting than latch-head cutters
- Two "High Capacity" 18V batteries and charger - Allows interruption free operation by charging one
battery while the other is in use
- Uses Lithium-ion batteries - Charging memory is no longer a concern
- Durable tool bag - Provides superior protection and stores accessories
- 5 Year warranty on tool, excluding blades; 3 years on
batteries & charger - Customer satisfaction and technical support
- INFINITY DRIVE®Transmission - Superior reliability and lifetime warranty

8
PRE-OPERATION INSTRUCTIONS
Read and follow all pre-operation and safety instructions
provided for your tool and for the battery charger (see
Battery Charger Instruction Manual) and accessories.
Failure to follow the proper operating instructions and
safety information provided can lead to serious personal
injury or death.
Before operating your PATRIOT®IN-LINE®Crimper/
Cutter, carefully read and follow these PRE-OPERATION
instructions to ensure your tool is in proper working
condition. Read and follow the Battery Charger Instruction
Manual included for operating your battery charger unit.
Following these instructions, charge the battery(s).
NOTE: Before proceeding to step 1, engage the Actuation
Trigger Lock Button and then Remove Battery.
1. Depress the upper black retraction trigger rst, to make
certain that the tool jaws are fully opened.
2. Ensure all body parts are away from pinch point jaws
prior to operating tool.
3. With a fully charged battery installed, depress the lower
green activation trigger until the jaws of the PATRIOT®
IN-LINE®crimper/cutter close. You will hear an audible
pop when the tool has reached maximum output and the
cycle is complete.
Please note that it is not necessary to have a battery
installed in the tool in order to retract the tool jaws.
SPECIFICATIONS - HYDRAULIC
POWER SOURCE
The internal hydraulic power source achieves very
high uid pressure during normal operation. Do NOT
disassemble this tool at any time. Disassembly of this
tool may result in severe personal injury or tool damage
and will void the warranty.
The hydraulic power system is a non-eld serviceable
item. If you suspect that your tool is not functioning
properly, please contact the BURNDY®Tool Service
Center: 1-800-426-8720, ToolService@burndy.com
PARTS OF THE TOOL
Before using the PATRIOT®IN-LINE®tool, take a
moment to familiarize yourself with the parts of the tool.
Doing so will make you aware of the terms used in the
following sections.

9
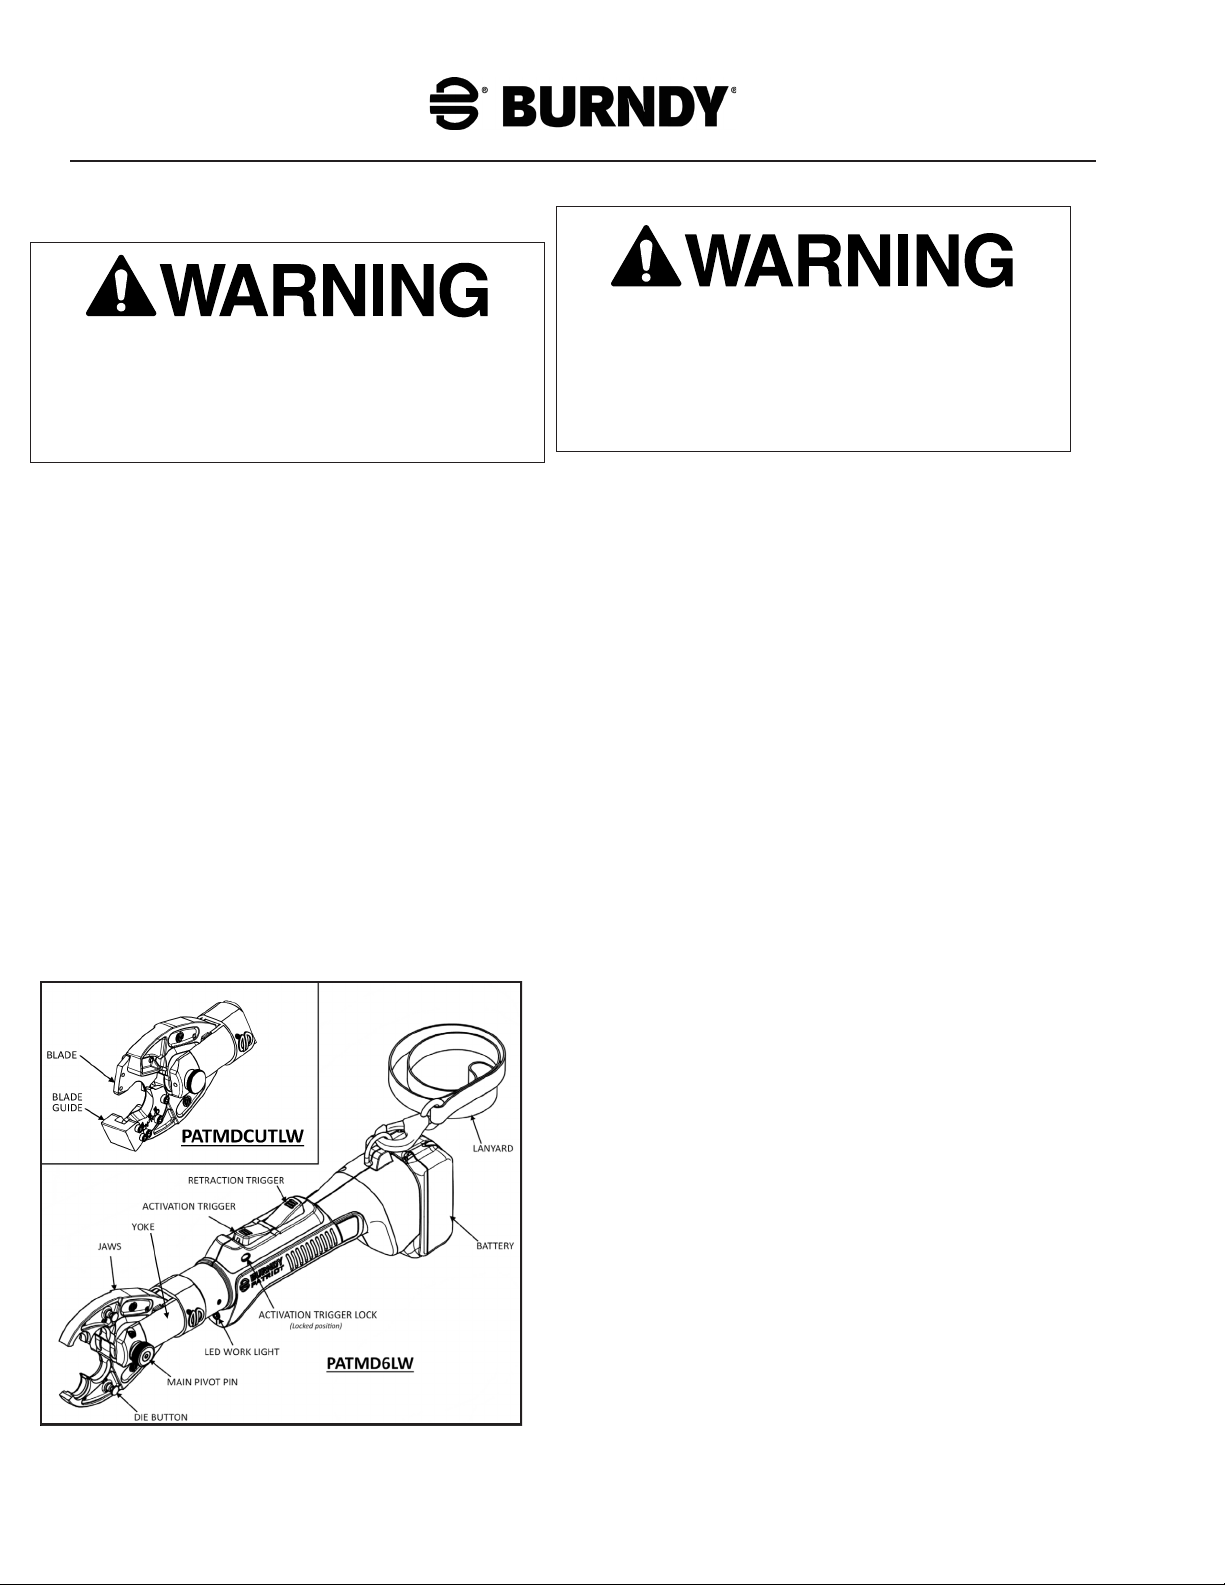
JAW INSTALLATION PROCEDURE
One of the main features of the BURNDY®PATRIOT®
IN-LINE®Crimper/Cutter tool is its ability to easily change
out and install dierent types of jaws, without the need
for any additional tools. There are several dierent types
of jaws for crimping and cutting, so it may be necessary
to switch jaws depending on the application. (See Parts
Section to order other jaw variations.)
1) Engage the activation trigger lock and then remove
battery.
2) Press the black retraction trigger to ensure the ram is
fully retracted.
3) Grip the knurled end of the main pivot pin and pull
outward. Turning the pin while pulling will make it
easier to get past the detent and pull outward. (Note:
The pin will not pull out of the yoke completely.)
4) Squeeze the jaws slightly and remove the jaws from
the tool.
5) Insert new jaws into the yoke by closing the jaws
slightly in your hand. Line up the tabs at the base of
the jaws with the notches in the yoke.
6) Push the pin inward so that it is fully inserted into the
jaws and yoke.
BLADE REPLACEMENT PROCEDURE
If the blades wear out, it will be necessary to change out
and install new blades. (See Parts Section to order new
blades and guide.)
Required Tools: 9/64" Allen Wrench, 5/32" Allen Wrench
1) Engage the activation trigger lock and then remove
battery.
2) Remove the guide by removing the #8-32 socket head
cap screws.
OPERATION
Read and follow all pre-operation and
safety instructions provided for your
PATRIOT®IN-LINE®Crimper/Cutter and
for the battery charger (see Charger
Instruction Manual) and accessories.
Failure to follow the proper operating
instructions and safety information
provided can lead to serious personal
injury or death.
This tool is NOT insulated for use on or
near energized conductors. Use of this
tool near energized conductors may lead
to electrical shock, causing severe injury
or death.
Pinch point hazard. Crimp ram operates
at high speed and force and can cause
severe personal injury. Keep all body
parts away from moving parts of the tool,
especially the area of the head and die
holder during operation.
Blade hazard. Cutter blades move at
high speed and force and can cause
severe personal injury. Keep all body
parts away from moving parts of the tool
during operation.
NOTE: Do not immerse the tool in water, as the PATRIOT®
IN-LINE®Crimper/Cutter is not designed to operate under
water. This is considered abuse and will void the warranty!
Always use the tool lanyard provided to prevent dropping
the PATRIOT®IN-LINE®Crimper/Cutter.
BLADE REPLACEMENT Continued
3) Remove each blade by removing the three
#10-32 x 1/2" socket head cap screws on both sides.
4) Install the new blades and secure with the three
#10-32 x 1/2" cap screws on each side.
5) Install the blade guide and secure with the #8-32
socket head cap screws.
6) Be sure that all screws are tight before operating the
tool.
7) Cycle the tool. Make sure that there is no interference
and that the jaws advance and retract smoothly.
DIE INSTALLATION PROCEDURE
For the majority of crimped connections, it is necessary to
select and install the appropriate die for the application.
Please refer to the connector catalog page or the die
index number shown on the connector to determine the
correct die set.
To Install:
1) Select the appropriate die for the application.
2) Engage the activation trigger lock and then remove
battery.
3) Push in die button while inserting the die into the crimp
jaws. The second die may have to be installed via the
top of the tool. (Note: For polarized dies – W28RT for
example – orient the dies in the crimp jaws according
to the arrow stamped on the die.)
To Remove:
1) Engage the activation trigger lock and then remove
battery.
2). Push in die button while removing the die.
Note: The rst die may have to be removed out the
top of the tool.

10
OPERATION INSTRUCTIONS
PATMDCUTLW Cutter Only:
1. Read and follow the PRE-OPERATION instructions
and Battery Charger Instruction Manual.
2. Ensure that jaws are fully open by depressing the
black retraction trigger.
3. Select and install the appropriate die set, if applicable,
for the connector and cable combination being
crimped. Insert a battery into the tool and disengage
the activation trigger lock only after all body parts are
clear of the jaw pinch point.
4. Position the tool properly on the connector making
certain that the die is aligned over the crimp area
indicators.
5. Insert the conductor into the connector, depress and
hold the green activation trigger to advance the tool.
6. Continue holding green activation trigger forward
until you hear the audible “pop” signifying the crimp
is complete.
7. Depress and hold the black retraction trigger until ram
fully retracts, or enough to move to next crimp location
if multiple crimps are required.
8. Continue crimping the connector until the proper
number of crimps have been completed. Work from
the center to the outer edges for splices and "H"
frame connectors, alternating sides if possible, for
the best compression connection. Remove tool from
connection.
PATMD-LW Crimpers Only:
Figure 1
1. Read and follow the PRE-OPERATION instructions
and Battery Charger Instruction Manual.
2. Ensure that the ram is fully retracted by depressing
the black retraction trigger.
3. Inspect the blades for wear or damage, especially on
the cutting edge. If cracks, chips or other damage is
found, discontinue use and replace blades according
to the blade replacement procedure.
4. If cutting less than 6 inches from the end of
uninsulated cable, it may be required to wrap tape
around the cable in the area to be cut to prevent the
strands from separating during cutting. If the cable is
not taped, this may prevent the tool from cutting or
retracting properly, and could damage the blades.
5. Insert a battery into the tool according to the PRE-
OPERATION instructions and dis-engage the
activation trigger lock only after all body parts are
clear of the jaw pinch point.
6. Insert cable into the tool.
7. Holding the tool perpendicular to the length of the
cable, depress the green activation trigger until the
cutting cycle is complete. If tape has been applied
(see step 4), be sure to cut directly on the tape.
8. Depress the black retraction trigger to retract the ram
and return the cutting blades to their original position.
Note: If the blades do not retract with the ram, a small
chip may be caught between the blades. In this case,
rest one side of the jaw on a stable surface and use a soft
hammer or rubber mallet and tap the back end of the jaw
until the blades release. See Figure 1 below.

11
DIELESS CRIMPING INSTRUCTIONS:
1. Place tool around the connector so that
it rests in the nest side of the jaw.
2. Make the rst crimp in the middle
of the splice next to the knurled area.
4. Make the second crimp about 1/16”
after the rst crimp.
3. Once the crimp is completed, rotate
the tool head 180 degrees. Note: Only
the jaws need to be rotated. Rotating
the entire tool is not necessary.
5. Continue crimping, rotating the
tool between each crimp, until
the splice is completely crimped.
DO NOT CRIMP ON THE
TAPERED SECTIONS.
See crimp chart for correct
number of crimps for each side
of the splice.

12
PATMD430LWJAW Dieless Scissor Jaw
Crimp Chart:
Series Conductor Size
(AAC, AAAC, ACSR) Connector Catalog Number # Crimps per Side
YDS-RL,
YDSR-RL,
YDS-RLY
#4 AWG YDS4RL1, YDSR4RL1, YDS4RLY2 4 11
#2 AWG YDS2RL, YDSR2RL, YDS2RLY 9
#2 AWG YDS021RL, YDS021RLY 10
1/0 AWG YDS25RL, YDSR25RL, YDS25RLY 14
2/0 AWG YDS26RL, YDSR26RL, YDS26RLY 12
3/0 AWG YDS27RL, YDSR27RL, YDS27RLY 16
YDR-RL,
YDRR-RL
#4 - #2 AWG YDRR2R4RG1 11
#4 - 1/0 AWG YDR25R4RL, YDRR25R4RL 11
#2 - 1/0 AWG YDR25R2RL, YDRR25R2RL 10
YCS-RL3
#4 AWG YCS4RL 4
#2 AWG YCS2RL 4
1/0 AWG YCS25RL 4
2/0 AWG YCS26RL 4
3/0 AWG YCS27RL 4
YCA-RL3
#4 AWG YCA4RL- 4
#2 AWG YCA2RL- 4
1/0 AWG YCA25RL- 4
2/0 AWG YCA26RL- 4
3/0 AWG YCA27RL- 4
YSS-R #4 AWG YSS4R 3
#2 AWG YSS2R 3
1YDS4RL and YDSR4RL with #4 AAC is rated for ANSI C119.4 Class 1A
normal tension (60% RBS). All others in family are rated for ANSI C119.4
Class 1 full tension (95% RBS) for all conductors and sizes shown.
2YDS4RLY with #4 AAC and #4 ACSR is rated for ANSI C119.4 Class 1A
normal tension (60% RBS). All others in family are rated for ANSI C119.4
Class 1 full tension (95% RBS) for all conductors and sizes shown.
3YCA-RL terminals and YCS-RL splices are rated for ANSI C119.4 Class 2
partial tension (40% RBS).
41/16" spacing between crimps cannot be maintained on YDS4RLY. Crimps on
this splice should be directly adjacent to one another.

13
MAINTENANCE
PREVENTIVE MAINTENANCE
Failure to perform regular maintenance tasks could result
in bodily injury and/or property damage.
The service life of a tool can be greatly improved with
proper care and maintenance. To extend the life of your
battery tool, follow the recommended maintenance tasks
outlined below.
• Always engage the activation trigger lock button and
then remove the battery prior to working on the tool.
• Keep the tool exterior clean at all times. Remove dirt,
debris, and other foreign substances from external
surfaces daily to help prevent corrosion and damage to
the tool, the ram, and piston mechanism.
• Remove all surface contaminants. When surface
contaminants cannot be removed with a cloth, spray
jaws and yoke with a general purpose cleaning solution
to help loosen contaminants. The cleaning solution
must be recommended for cleaning steel and aluminum.
Avoid getting solvents onto the plastic housing as some
cleaners and solvents may damage the housing material.
Using a sti brush, never metal, remove all contaminants
in and around the ram and piston area and allow solvent
to drain o tool.
• The tool ram must be fully retracted before cleaning,
removing, or installing the jaws. To clean the jaws or to
swap out the jaws, rst engage the activation trigger lock
button, remove the battery, then release the pivot pin to
remove the jaws. Clean the cam surface, release pin,
and lastly, clean the rollers located inside of the yoke.
Apply a light lm of grease to the cam surface, release
pin, and rollers. Install the jaws and ensure the release
pin is fully inserted prior to operating the tool. When
operating in dirty environments the jaws may need to
be cleaned more often.
• Extreme care should be taken to prevent contaminants
from entering the hydraulic system. The tool hydraulic
circuit is a closed system. Replacement of hydraulic
uid or topping o of hydraulic uid by the user is NOT
recommended.
• Inspect the tool for signs of leaks, cracks, wear, or
damage.
• Lightly lubricate the external ram and piston surfaces
and die buttons with a high-grade silicon lubricant.
• Wipe the tool with a clean, dry rag before placing the
tool into the case.

14
SERVICE
We do not recommend you attempt to service or repair any
tool yourself. Tool servicing by unqualied personnel will
void the warranty and may lead to serious personal injury.
DISASSEMBLY OF THE TOOL IS NOT
RECOMMENDED. RETURN THE TOOL TO THE
BURNDY® TOOL SERVICE CENTER OR BURNDY®
AUTHORIZED TOOL REPAIR CENTER. IF YOU
REQUIRE ADDITIONAL INFORMATION
CALL: 1-800-426-8720
ToolService@burndy.com
IMPORTANT SAFETY INSTRUCTIONS FOR
BATTERY CARTRIDGE
1. Before using battery cartridge, read all instructions
and cautionary markings on (1) battery charger,
(2) battery, and (3) product using battery.
2. Do not disassemble battery cartridge.
3. If operating time has become excessively shorter,
stop operating immediately. It may result in a risk of
overheating, possible burns and even an explosion.
4. If electrolyte gets into your eyes, rinse them out with
clear water and seek medical attention right away. It
may result in loss of your eyesight.
5. Do not short the battery cartridge: (1) Do not touch
the terminals with any conductive material. (2) Avoid
storing battery cartridge in a container with other
metal objects such as nails, coins, etc. (3) Do not
expose battery cartridge to water or rain. A battery
short can cause a large current ow, overheating,
possible burns and even a breakdown.
6. Do not store the tool and battery cartridge in
locations where the temperature may reach or
exceed 50°C (122°F).
7. Do not incinerate the battery cartridge even if it is
severely damaged or is completely worn out. The
battery cartridge can explode in a re.
8. Be careful not to drop or strike battery.
When battery pack is not in use, keep it away from other
metal objects like paper clips, coins, keys, nails, screws,
or other small metal objects that can make a connection
from one terminal to another. Shorting the battery terminals
together may cause burns or a re.
Under abusive conditions, liquid may be ejected from
the battery, avoid contact. If contact accidentally occurs,
ush with water. If liquid contacts eyes, additionally seek
medical help. Liquid ejected from the battery may cause
irritation or burns.

15
TROUBLESHOOTING
It is not recommended that the end user attempt to perform repairs on this tool, as specialized tools, training, and/or
procedures may be required.
Should you have any problems or questions with your BURNDY®hydraulic tooling, please do not hesitate to contact
the BURNDY®Customer and Technical Service Departments by calling 1-800-346-4175, or the BURNDY®Tool Service
Center for tool servicing and repair related questions at 1-800-426-8720; ToolService@burndy.com.
TROUBLESHOOTING GUIDE
For further assistance, contact the BURNDY®Tool Service Center at 1-800-426-8720.
SYMPTOM / PROBLEM CAUSE REMEDY
Jaws do not close when
activation trigger is pressed.
- Battery is not charged.
- Ram release trigger/valve is being
held open.
- Pump is damaged.
- Activation trigger switch failure.
- Charge the battery according to the Battery
Charger Instruction Manual provided with
your tool.
- Press and release the ram release trigger to
reset the valve.
- Return to factory for repair.
Jaws do not fully close. - Hydraulic system failure. - Return to factory for repair.
Excessive or unusual noise
from tool.
- Mechanical vibrations.
- Cavitation due to cold hydraulic uid.
- Cavitation due to hot hydraulic uid.
- Return to factory for repair.
- Allow tool to warm up before use.
- Allow tool to cool before continuing use.
Oil leaks from tool. - Seal defect or mechanical problems. - Return to factory for repair.
Number of crimps/cuts per
charge decreases with each
battery recharge.
- Battery is too warm due to frequent
discharge/recharge cycling.
- Allow battery to cool to room
temperature before recharging.
- Alternate batteries often.
Tool will not stop running after
activation trigger is released.
- Activation trigger stuck.
- Switch failure.
- Remove battery and check for contaminants
around the trigger switch area.
- Remove battery and return to factory for
repair.
Jaws/blades do not retract with
the ram when the black retraction
trigger is depressed.
(PATMDCUTLW only)
- Chip is caught between blades or
there is another interference in the
blade or guide area.
- See OPERATION INSTRUCTIONS section and
follow the instructions in the note.
- If cutting less than 6 inches from the end of
the cable, wrap cable with tape, and cut on
the taped area.
Audible "pop" is heard before
cable is cut or crimped.
- Cable is larger or a harder material
than is recommended.
- Blades are dull or chipped.
- Pressure relief valve setting is set
too low.
- See SPECIFICATIONS section and only cut
within the tool's cutting capacity.
- Replace blades.
- Return to factory to have the valve setting
increased.
When installing new jaws, the pin
does not line up with the hole - Ram is not fully retracted.
- Press the black retraction trigger to retract the
ram fully OR
- Squeeze jaws further than normal to line up the
pin with the hole in the jaws.

16
COMMONLY ASKED QUESTIONS &
ANSWERS:
1. Q - How many crimps/cuts can I get before I
need to recharge the battery?
It is very dicult to estimate the amount of cuts/crimps you
will get before recharging the battery. This will depend
on many factors such as temperature, size, and type of
material being cut or crimped, how the tool is used, the
weather, etc. (see below for more information).
The weather - Extreme cold temperatures can reduce the
battery charge by up to 60%. Keep charged batteries in a
warm place, but not in your pockets, since coins and other
metal parts may contact the battery terminal strips, causing
a short circuit. Warm weather users will nd they get more
crimps/cuts per charge than users in colder climates.
The size and type of material being cut - All Copper,
Aluminum, and ACSR cables, require dierent force to
crimp/cut. Diameter is also a factor in determining how
many crimps/cuts you can achieve before a recharge is
needed. Some connectors and cables may require more
frequent battery recharging.
How you use the tool - If you make multiple crimps/cuts,
one right after another, you will need more frequent battery
recharging than if you make a few and pause a moment
prior to crimping/cutting again. Full retraction after each
crimp/cut is not required if using small cables, while larger
cables may require full retraction. Advancing the ram each
time to approach small cables and connectors drains the
battery faster than just retracting enough to move to the
next crimp location.
The vast number of variables makes it dicult to provide
exact number of crimps/cuts per charge for every
possible eld situation.
2. Q - How long will the batteries last?
Under ideal circumstances each battery could be
recharged up to 1000 times before it will no longer accept
a charge. This number may vary due to individual use
and charging habits.
3. Q - Can the batteries be recycled?
YES! Once the battery no longer accepts a recharge,
simply follow the recycling instruction included in this
manual for proper recycling. If your local community or
company has a recycling program, you may choose to
contact them for instructions on recycling. Always properly
dispose of spent batteries by following the manufacturers
recommended recycling procedures.
(See "BATTERY RECYCLING" section for details)
4. Q - How far can the tool be dropped without
damaging it?
The PATRIOT®Crimper/Cutter has been designed to
withstand drops of six feet; however, due to the endless
angles at which a tool can be dropped, damage can still
occur. The outer housing is designed of a high strength
composite polymer plastic, but can be broken depending
upon the surface (pavement, grass, rocks, etc.) being
dropped upon and/or the angle of impact. The internal
working assemblies should survive without damage. We
strongly recommend that the tool restraint lanyard be
used at all times to help prevent dropping the tool. Drops
without the lanyard attached would be considered abusive
treatment.
5. Q - How do I know when I've properly
completed a crimp?
The PATRIOT®Crimper/Cutter produces an audible pop
when the crimp/cut has been properly completed.
6. Q - Does the tool require a charged battery
in order to retract the ram?
NO, the PATRIOT®Crimper/Cutter utilizes a mechanical
retraction mechanism which allows the ram to retract
without the battery.
Tips for maintaining maximum battery life
1. Charge the battery cartridge before completely
discharged. Always stop tool operation and charge
the battery cartridge when you notice less tool power.
2. Never recharge a fully charged battery cartridge.
Overcharging shortens the battery service life.
3. Charge the battery cartridge with room
temperature at 10°C - 40°C (50°F - 104°F). Let a hot
battery cartridge cool down before charging it.
4. Charge the Lithium-ion battery cartridge when you do
not use it for more than six months.

17
PARTS SECTION
# CATALOG NUMBER DESCRIPTION
1 PATMDLWLBLPRODL PATMD Label, Left
2 PATMDLWLBLPRODR PATMD Label, Right
3 PATMDLWLBLWRN Warning Label
4 PATMD6LWJAW Crimping Jaw with “D3” and “BG” Grooves
5 PATMD68LWJAW Crimping Jaw with “D3” and “O” Grooves
6 PATMD66LWJAW Crimping Jaw with “D3” Groove Only (Snub Nose)
7 PATMDCUTLWJAW Cutting Jaw with ACSR Cutting Blades
8 PATMDCUTCLWJAW Cutting Jaw with Cu/Al Cutting Blades
9 PATMDCUTGLWJAW Cutting Jaw with Guy Wire Cutting Blades
10 PATMDXPJLWJAW Crimping Jaw with Nicopress X, P, and J Grooves
11 PATMD430LWJAW Dieless Crimping Jaw for Overhead Distribution Splices
12 PATMDCUTACSRKIT Replacement Blades, 350 Cu/636 Al/556 ACSR Qty: 2
13 PATMDCUTCUALKIT Replacement Blades, 600 Cu/636 Al, Qty: 2
14 PATMDCUTGUYKIT Replacement Blades, 3/8" EHS Guy Wire, Qty: 2
15 PATMDCUTACSRFXGDE Fixed Blade Guide with Mounting Hardware
16 TOOLBAGMDLI Tool Bag
17 PATCHGRLIDC Makita Lithium Ion Battery Charger (12V DC)
18 PATCHGRLI Makita Lithium Ion Battery Charger (120V AC)
19 WDIETREE W Die Tree, Holds Up To 6 Sets (Dies Sold Separately)
20 BAT18VLI Makita 18V Lithium Ion Battery, 3.0 Ah
21 BAT18V5AHLI Makita 18V Lithium Ion Battery, 5.0 Ah
22 PATMDLWSOMI Safety, Operation And Maintenance Instructions (SOMI)
23 PT10074020 Wrist Strap

18
LITHIUM ION (Li-ion) SHIPPING REGULATIONS:
The U.S. DOT enacted new regulations in 2008 that
apply to shipments containing Lithium ion batteries.
Whenever possible, Lithium ion batteries should be
sorted from other rechargeable batteries.
Shipment of a non-Call2Recycle container of Lithium
ion batteries for recycling must adhere to the following
requirements, in addition to the safety requirements
listed on the opposite side:
· Each individual rechargeable battery, or cell
phone with battery, must be placed into a
separate bag (or terminals taped) to ensure
safe storage and shipping;
·Package must be marked “CONTAINS
LITHIUM ION BATTERIES – FORBIDDEN
FOR TRANSPORT ABOARD AIRCRAFT AND
VESSEL.” Lettering must be at least 0.25
inches in height;
·Package also must be marked: “DO NOT
DAMAGE OR MISHANDLE PACKAGE – IF
PACKAGE IS DAMAGED, BATTERIES MUST
BE QUARANTINED, INSPECTED AND
REPACKAGED”;
·Shipping document (e.g., BOL) must indicate
package contains lithium batteries and
package must be quarantined, inspected and
repackaged if damaged; and
·Package may not exceed 30 kg (66 pounds)
• Used batteries may have a signicant residual charge. It
is important that they are prevented form short-circuiting.
This can be done by placing the batteries separately in
plastic bags or by placing non-conductive tape over the
battery terminals.
• While these batteries are normally safe to handle, they do
contain caustic materials that may have "vented" due to
misuse during the life of the battery. If the battery appears
to be "dirty" or have a white "lm-like" substance around
the terminal, exercise caution when handling the battery.
Do not touch the dirty area. Wash your hands with soap
and water if they feel itchy, and avoid touching your eyes,
nose, mouth.
• Do not attempt to discharge the battery by short-circuiting
the terminals, consult your battery supplier for proper
instructions on discharging batteries.
• Do not bite, or place the battery in your mouth or nose.
• Do not place wet batteries in a plastic bag. The trapped
moisture will cause the battery to rust.
SAFETY GUIDELINES FOR BATTERY COLLECTION
LITHIUM ION BATTERIES
When recycling batteries you must include a bill of lading
in order to comply with all applicable state and federal
requirements, or the recycling center may be forced to
return the shipment at your expense. If you have any
questions, please contact the recycling center directly.
The EPA certified RBRC Recycling Seal indicates
BURNDY®is voluntarily participating in a program to
recycle these batteries at the end of their useful life. The
RBRC program provides a convenient
alternative to placing batteries into the
trash, which may be illegal in your area.
Please call 1-800-822-8837 for more
information. BURNDY®is committed
to preserving our environment and
conserving natural resources.
Approved Battery Recycling Location:
BURNDY®encourages recycling of its products whenever
feasible. Recycling regulations and methods vary within
North America and BURNDY®does not endorse any one
recycling method or company. Consumers that wish to
recycle BURNDY®products in North America are asked to
do so according to your local, state and federal regulations.
Recycling resources for the United States can be found at
the US EPA web site at the following link:
http://www.epa.gov/recycle
If you wish to recycle batteries please use the above
link and/or contact your local RBRC recycling center.
If additional information is needed please contact the
BURNDY®, Littleton Tool Service Center
A package containing Lithium ion batteries with a gross
weight of more than 30 kg (66 pounds) must be shipped
as a fully-regulated Class 9 hazardous material and
marked "LITHIUM BATTERY, UN 3090" and carry the
Class 9 Miscellaneous hazard label. Batteries must be
protected from short circuits and placed in strong outer
packaging or UN specication packaging. Shipments also
must be accompanied by hazardous materials shipping
paper. Shippers must be trained in accordance with the
U.S. hazardous materials regulations.

19

20
PATMDLWSOMI
Rev. K
Item #50054506
For more information write or call:
BURNDY®TOOL SERVICE CENTER
150 Burndy Road
Littleton, NH 03561 USA
or call, toll free 1-800-426-8720
ToolService@burndy.com
This manual suits for next models
5
Table of contents
Other Burndy Crimping Tools manuals
Popular Crimping Tools manuals by other brands

JST
JST CS 10-WC-SF1002 instruction manual

TE Connectivity
TE Connectivity 2381454-1 Guidelines

KUDOS
KUDOS HD-BGD3 SAFETY OPERATING & MAINTENANCE INSTRUCTIONS

Textron
Textron Klauke K 16 instruction manual

Tyco Electronics
Tyco Electronics AUTOPRESS C120 Technical handbook

Belden
Belden lumbergautomation AWG 28-26 quick start guide

HYDROSCAND
HYDROSCAND H24DC user manual

molex
molex 63825-9400 Application Tooling Specification Sheet

Cembre
Cembre B540ND-BVA Operation and maintenance manual

PRECISETOOL
PRECISETOOL XCXY-02 instructions

Emerson
Emerson Klauke UAP100120CFM manual

molex
molex 200218-2600 Application Tooling Specification Sheet