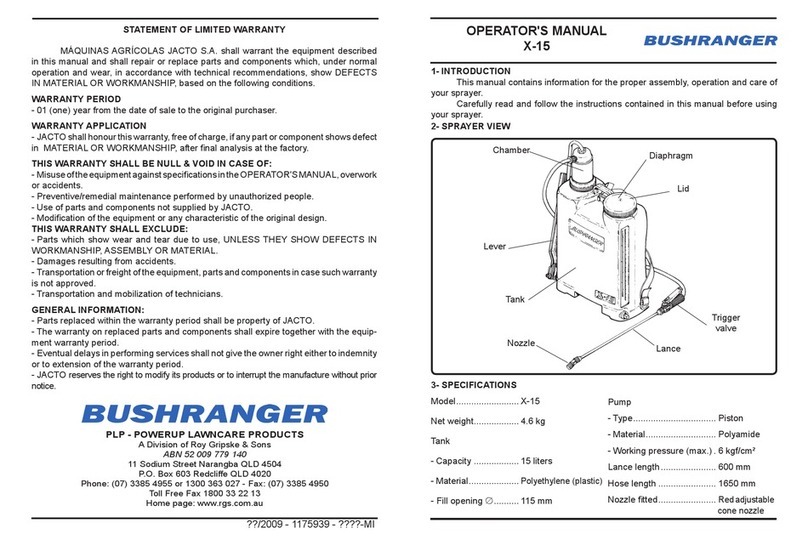
Bushranger X-16 User manual

COMMERCIAL SERIES
OPERATORS
MANUAL

2/24
BUSHRANGERTM X-16
X-16 Backpack Sprayer

3/24
BUSHRANGERTM X-16
COMMERCIAL SERIES
Operator's manual
Tank
Lever
Lance
Trigger valve
Diaphragm
Chamber
Nozzle
Lid
Hose
This manual contains information for the proper assembly, operation and
care of your sprayer.Carefully read and follow the instructions contained in
this manual before using your sprayer.
INTRODUCTION
SPRAYER VIEW

4/24
BUSHRANGERTM X-16
X-16 Backpack Sprayer
MODEL BushrangerX-16
Net weight 3.6kg
Tank
Capacity 16 (litres)
Material Polyethylene
Fill opening Ø 100 mm
PUMP
Type Piston
Material Brass
Working pressure 6 Kgf / cm
2
(max.)
Lance length 600 mm
Hose length 1350 mm
Nozzle tted JD 12P
Contents
of the
plastic
bag
1
Accessories plastic bag
2
Lever
3
Lance
4
Rod
5
Trigger valve
6
Manual
7
Tank
7
6
4
3
1 2
5
SPECIFICATIONS

5/24
BUSHRANGERTM X-16
COMMERCIAL SERIES
Introduce the shaft (1) in the free opening on the tank base
(on the same side of the chamber). Fit the shaft lock (2).
Be careful when taking the sprayer out of the
carton because the lever is loose and can
cause damage.
ATTENTION
INSTALLING THE SHAFT
Shaft lock (2)
Shaft (1)
INSTALLING THE LEVER
Lightly grease the orice on the top of the chamber.
Fit a at washer on the shaft and rod.
For easy assembly, install the lever on the shaft and the rod on the
chamber top at the same time.
Install the other at washers on the shaft and rod and lock
with the locked ring.

6/24
BUSHRANGERTM X-16
X-16 Backpack Sprayer
* Do not over tighten the screw cap.
1•Lance 2•Trigger
Push the lance into the trigger valve and secure
it with the screw cap.
2
ATTACHING THE LANCE TO THE TRIGGER VALVE
1
Rod
Lever Shaft
Locked ring Flat washers
Locked ring

7/24
BUSHRANGERTM X-16
COMMERCIAL SERIES
A
Before using the equipment, tighten the fastening nut (A).
IMPORTANT: This operation must be done by hand.
Do not use any type of tool.
TIGHTENING THE FASTENING NUT
ADJUSTING THE SHOULDER STRAP
The tank is contoured for the
operator's comfort. The shoulder
straps can be quickly adjusted to
properly position the sprayer on
the operator's back.

8/24
BUSHRANGERTM X-16
Handle
Buckle
AB
Hold the strap buckle rmly with one hand, and pull the
handle downward with the other hand.
ATTENTION
After assembling the sprayer, ll the tank with clean water and pressure-
check the tank lid, diaphragm, tank bottom, lance and trigger valve for
leakage. Most leaks can be stopped by retightening the appropriate
connections and ttings. Any leakage must be repaired before returning
to service.
TIGHTENING
Hold the buckle rmly with one hand, and pull the strap
upward with the other hand.
LOOSENING
X-16 Backpack Sprayer

9/24
BUSHRANGERTM X-16
Filter assembly
Filter
After nishing the application, clean and wash all equipment in an approved
decontamination area.
MAINTENANCE
Remove all chemicals before storing the
sprayer. Chemical products have different
reactions and can damage the sprayer
components and environment as well as
cause personal injury.
ATTENTION
COMMERCIAL SERIES

10/24
BUSHRANGERTM X-16
Remove the pumping rod
from the chamber. Loosen
the gasket holder and
remove the assembly.
Remove the chamber (A)
from the cylinder (B). Clean
the ball (C) and the piston
cup (D); replace them if
necessary.
AB
C
D
CYLINDER MAINTENANCE
Every 40 working hours, clean the chamber and lubricate the
components, as shown. Remove the chamber and lubricate the
piston cups.
Preferably, use graphite-base grease. It is recommended that you grease
with either silicone or vaseline. Do not apply grease excessively, this will
avoid clogging and impurities building up.
X-16 Backpack Sprayer

11/24
BUSHRANGERTM X-16
PROBLEM DESCRIPTION CAUSES CORRECTIONS
Leakage through the cylinder
upper part. Worn or dried out piston cup. Replace or lubricate the
piston cup.
After pumping and pressurizing the
chamber, as you operate the lever
it drops fast.
Cylinder valve not sealing
properly due to wear or
impurities.
Clean or replace
the valve.
After pumping and pressurizing
the chamber, the lever rises slowly
when released
.
Chamber valve not sealing
properly due to wear or
impurities.
Clean or replace the
chamber
.
Put about 2 litres of water in the tank. While operating the pumping lever,
look into the tank to see how the problem arises.
Refer to the table below.
TROUBLESHOOTING
COMMERCIAL SERIES

12/24
BUSHRANGERTM X-16
Hold the lance at the working height and spray to measure the application
band width. Based on the band width, calculate the total walking distance
required to spray the desired area
25m2
.
Band width
Band width (m) 0.5 0.7 1.0 1.2 1.5
Distance to walk (m) 50.0 35.7 25 20.8 16.7
Attach the calibrator bottle to the lance as shown:
A - Remove the cap, nozzle and lter.
B -
Mount the calibrator cover to the lance.
C - Reinstall the lter, nozzle and cap.
D - Screw the calibrator onto the cover.
USING CALIBRATOR BOTTLE (optional)
CALIBRATION OF MANUAL KNAPSACK SPRAYER
CALIBRATOR BOTTLE
LANCE
COVER
FILTER
NOZZLE
NOZZLE CAP
X-16 Backpack Sprayer

13/24
BUSHRANGERTM X-16
Hold the lance at the normal working height and spray into the bottle while
walking the distance required to spray an area corresponding to 25m². Place
the bottle on a level surface and observe the liquid level visible through the
side of the bottle. Match the liquid level to the corresponding scale on the
calibrator bottle. Empty the bottle and repeat this operation to
determine the average of two or more readings.
NOZZLE TYPE IDENTIFICATION PRESSURE FLOW RATE
(ml/min)
FLAT FAN
1197535-JEF 80015
GREEN 45 610
1197536-JEF 8002
YELLOW 45 810
1197537-JEF 8003
BLUE 45 1250
CONE
717942 - JD 10A 45 300
217174 - JD 12P 45 615
SPRAY NOZZLE
COMMERCIAL SERIES

14/24
BUSHRANGERTM X-16
X-16 Backpack Sprayer
NOZZLE TYPE IDENTIFICATION PRESSURE
(psi)
FLOW RATE
(ml/min)
CONE
1197565 - JHC 8002 45 830
1198892 - JHC 8004
45 1680
1198893 - JHC 8005 45 2060
DEFLECTOR
1197486 - JDF 11004 15 950
1197487 - JDF 11005 15 1150
1197488 - JDF 11006 15 1390
CONE
ADJUSTABLE
323725 - YELLOW 45 315
015024 - RED 45 640
325787 - BLUE 45 710

15/24
BUSHRANGERTM X-16
COMMERCIAL SERIES
Please read the manufacturer's chemicals labels carefully.
Wash hands and other parts of the body that have touched
chemicals before starting to spray.
Put 5 litres of water in a bucket and add the chemical product. Stir until it
becomes an homogeneous mixture and pour the solution into the tank while lling
with water.
Please read the chemicals manufacturer's label carefully.
Use of individual protective clothing and safety equipment is obligatory.
ATTENTION
SAFETY PRECAUTIONS

16/24
BUSHRANGERTM X-16
Do not eat, drink or smoke while spraying.
Do not pollute the environment.
Keep the products out of reach of children and animals. Lock up the
chemical products to prevent the untrained persons from handling them.
After nishing the spray application, take a shower with plenty of water and
soap. Put on clean clothes.
The clothing used during the application must be washed separate from other
clothes of ordinary use. In case of intoxication, see a doctor immediately and
show them the chemicals manufacturer's label.
ATTENTION
X-16 Backpack Sprayer

17/24
BUSHRANGERTM X-16
Even the containers considered empty contain chemical residues. Some
publications show that somewhere around 0.3% of the chemicals remains in
the container after being used. Therefore, discarding the containers without
washing out the residues is extremely dangerous to humans, animals and
the environment.
In the case of metal, plastic and glass chemical containers, each container
must be rinsed three times to ensure the residues are completely removed.
This manual describes how to make the TRIPLE WASH in a correct, safe and
effective way.
During the TRIPLE WASH, you must use appropriate protective clothing,
such as: gloves, apron, boots, goggles and protective masks with
appropriate lters.
TRIPLE WASH OF EMPTY
COMMERCIAL SERIES

18/24
BUSHRANGERTM X-16
IMMEDIATELY AFTER emptying the container, you must keep it with the opening upside
down over the sprayer tank opening or over the bucket that you are using to prepare the
chemical mixture for at least 30 seconds, until no residue is left in the container, when the
drops are falling in long intervals.
1
Next, hold the container in the upright position and ll it with water up to ¼.
For example: in a 20-litre container, put 5 litres of water.
2
Fit the container cap and tighten it
enough to avoid leakage during the agitation.
3
Agitate the container strongly in all ways
(horizontal and vertical), during approximately 30
seconds to remove the residues that are stuck to
the container internal walls.
4
Take the container cap off and carefully pour the
rinse water into the spray tank.
5
Keep holding the container over the spray tank
opening for approximately 30 seconds to the
last drop.
6
REPEAT this operation twice more. This way, you complete the TRIPLE WASH.
7
Do not pierce the bottom with a pointed instrument as this will damage labels
for identication.
X-16 Backpack Sprayer

19/24
BUSHRANGERTM X-16
8
The useless containers can be stocked temporarily in an appropriate place, until
nal destination.
9
In the case of mid and large size container (50, 100 and 200 litres), after washing with
the appropriate volume (¼ of the total) and tting the cap, roll it on the ground during
approximately 30 seconds.
10
Then in the upright position complete the agitation
by moving back and forth for approximately 30
seconds.
11
Then, empty the container by pouring the rinse
water into the spray tank.
12
REPEAT this operation twice more. In the last one,
empty totally the container by pouring rinse the
water in the spray tank.
13
The least amount of rinse water that remains in the container, from one wash to the
next,will result in less decontamination.
14
For the performance of the TRIPLE WASH, do not use a water volume either much lower
or much higher than ¼ of the container capacity.
15
The TRIPLE WASH must be done IMMEDIATELY AFTER emptying
the container, during the preparation of the solution.
SOURCE - ANDEF (NATIONAL ASSOCIATION OF VEGETAL DEFENSE - BRAZIL)
COMMERCIAL SERIES

20/24
BUSHRANGERTM X-16
X-16 Backpack Sprayer
37
38
01
34
33
32
15
16
14
01
12
11 21 22
23
25
24
20
18
17
17
26
26
27
36
19
31
35
28
30
29
41
40
39
08
10
06
05
04
03
02
13
09
07
PARTS LIST
Table of contents
Other Bushranger Paint Sprayer manuals