BUTURE VC10 User manual

Part Name
Main Body 1
1
1
1
1
1
1
1
1
1
1
1
1
1
Battery Pack
Adjustable Extension Tube
Motorized Brush Head
Soft Rolling Brush (Installed)
Carbon Fiber Rolling Brush
Long Crevice Nozzle
2 in 1 Upholstery Brush
Mini Cleaning Brush
Wall-mount Plate
Charger
HEPA Filter Replacement
Screw
User Manual
Quantity
2.PACKAGE CONTENT
Please check and confirm the accessories and parts according to the following sheet before using.
EN 02

3.KNOW YOUR PRODUCT
3.1 Product Details
Soft rolling
brush
Carbon fiber
rolling brush
Suction adjustment button
Battery indicator Battery pack
Dust cup release button
Digital display screen
Telescopic tube release button
Adjustable extension tube
Motorized brush
head release button
Charging spot
Switch button
Dust cup
Dust empty
release button
Length adjustment button
Motorized brush head
LED light
MAX
MIN
EN 03

3.2 Digital Display Screen
MAX
MIN
Remaining battery power
Brush blocking indicator
Suction decrease
indicator Suction increase
indicator
Suction adjustment button
Suction level indicator
Over-temperature
protection indicator
Tube & dust cup blocking Indicator
EN 04

3.3 Accessories Function Introduction
①2 in 1 Upholstery Brush
Easy to snap-on design,can help you remove
dust and hair on the carpet.
②Long crevice nozzle
Remove dust on the hard-to-reach areas like
windows, bed feet, gaps between sofa, etc.
③Wall-mount plate
Hold the vacuum and accessories on the
wall-mounted plate for easy storage and battery
charging.
④Mini cleaning brush
Remove hair, rubbish, and micro dust on the
accessories or filters.
⑤Soft rolling brush
Remove dust, debris, and hair from hard floors.
⑥Carbon Fiber Rolling Brush
Remove debris, dust, and hair in carpets, velvet.
EN 05

You can choose to directly install the cleaning accessories or after connecting the extension tube
according to the cleaning needs.
4.PRODUCT ASSEMBLING DIAGRAM
4.1 Install desired cleaning accessory
• Directly install the cleaning accessories
Ka da
Press and hold the extension tube length adjustment button, push forward or pull backward to select
the appropriate length of the extension tube.
• Install the extension tube and cleaning accessories
Ka da
Ka da
Ka da
Ka da
EN 06

4.2 Wall-Mounted Plate Assembling Diagram
1
3
2
• Please make sure there is no gas, water, or electrical cables and wires behind
the mounting area.
• To avoid the dock dropping down, please make sure it must be installed firmly.
• Store appropriately indoors in a dry place. Do not expose the machine to sunlight
or freezing temperature. Recommended temperature range:
39.2°F (4°C)-104°F(40°C).
WARNING
EN 07

Battery level indicatorStatus
Charging
Using
5.HOW TO USE
5.1 Charging
5.1.1 Charging methods:
5.1.2 Battery Indicator
When charging and using the product, you can check the battery power status through the following
two places.
MAX
MIN
•When using a new battery or using it for the first time after long-term
storage, please fully charge the battery first.
•When storing and not using the vacuum cleaner for a long time, please
ensure that it is charged and discharged at least once every three months.
0%~9%,“ ” flash red
9%~0%,“ ” flash red
10%~99%,“ ” flash green
100%,“”stay on green (The screen will turn to sleep mode
after 10mins of full charge to reduce power consumption)
100%~10%,“ ” stay on green
①Connect the main body to charge ②Hang on the wall mount to charge
• Digital display screen:
EN 08

5.2 Operating
①Start to Work
Press the switch button to turn it on and it will start MIN mode suction . Press again to turn it off.
Before each use, make sure that
The battery is fully charged, and fixed in place.
The dust cup and filters are cleaned, and fixed in place.
Battery level indicatorStatus
Charging
Using
• Battery power indicator:
0~33%,“ ” One blue lights always on
66%~34%,“ ” Two blue lights always on
100%~67%,“ ” Three blue lights always on
100%,“ ” three blue lights always on
0%~99%,“ ” three blue lights flash in a cycle
EN 09

5.3 Machine protection and error code indication
Note: Please keep your hands dry when using it,
Oil and water stains on your finger may affect
screen swiping.
Motor in VC10 cordless vacuum cleaner has built-in Blocking protection, and battery has built-in
over-temperature protection, overcurrent & overvoltage protection.
• Blocking protection
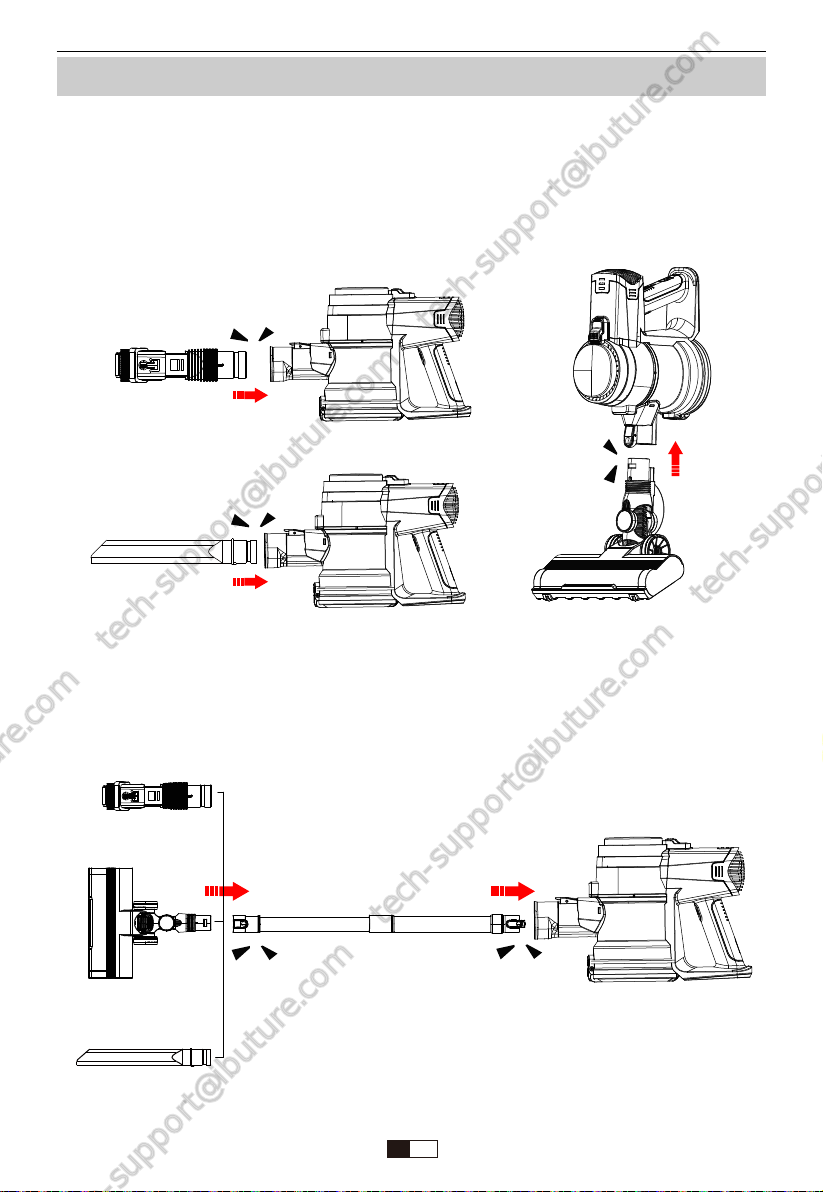
When the brush head, tube or dust cup is blocked, the blocking protection for motor will work. If the
brush head is blocked, the Brush Blocking Indicator will light up. If the tube or dust cup is blocked,
the Tube & Dust Cup Blocking Indicator will light up. At the same time the motor will temporarily stop
working to prevent damage. After cleaning the brush head, tube or dust cup, the blocking indicator
will go out and motor will work normally.
②Select Cleaning Mode
The appliance has 3 suction modes for different cleaning needs, which can be cycled
(MIN MAX) by a short press the suction adjustment button on the battery pack or the digital
display screen.
MIN
MAX
MAX
MIN
MAX
MIN
MAX
MIN
EN 10

• Over-temperature protection
Battery temperature will rise under continuous high suction power mode. If you charge the battery
when its temperature is to high, the over-temperature protection will work. On the screen the
over-temperature protection indicator will light up, and the battery will intelligently reduce the
charging input power to prevent overheating. Wait 20-45mins for the battery to return to normal
temperature, the temperature protection indicator will go out and the battery will return to
normal charging power.
• Overcurrent & Overvoltage protection
While charging, if the input voltage or current is too high, the Overcurrent & Overvoltage protection
will work. The three indicators on battery pack will flash at the same time and the battery will
temporarily stop charging. After the input voltage and current return to normal, the battery indicator
and charging progress will intelligently return to normal.
MAX
MIN
EN 11

12
6.MAINTENANCE
Please clean it regularly to prolong the lifespan of your vacuum cleaner.
6.1 Main body (non-washable parts) cleaning
6.2 Dust cup & HEPA filter cleaning
• Turn off the power before cleaning the body.
• Please use a neutral detergent, wipe the body with half-wet cloth.
• Please avoid sun exposure and store in a cool and dry place.
6.2.1 Empty the Dust Cup
• Press the dust empty release button to empty the dust
• When using, if the garbage in the dust cup exceeds MAX Line, please empty it in time.
MAX
MAX
×√
MAX
MAX
EN 12

24h
1min
6 7
6.2.2 Clean the dust cup and HEPA filter
• Press the dust cup release button to separate the dust cup and the main body.
• Hold the lower part of the dust cup with one hand and the upper part of the dust cup with the other
hand,twisting in an anti-clockwise di recti on,then separate the upper part of the dust cup and the
lower part.Take out the HEPA filter and the stainless steel filter in turn ,clean or change it.
1
2
3
4
5
EN 13

6.2.3 Install the filter and the dust cup
Install the filter and the dust cup in correct direction, make the buckles in right place and twist to fix it.
6.3 Brush Roller Cleaning
Note: After long periods of use, the bristle may be jammed by hair or similar build-up. It's recom-
mended to clean the brush roller periodically to ensure efficient operation and maintain suction.
• Push the button to the “unclock"sign,remove the brush roller.
1 2 3
EN 14

24h
• Remove the debris wrapped around the roller with mini cleaning brush,then flush with water.
• Gently push the brush roller into the motored brush,until securely in place. (Please make sure the
brush roller is completely dry before using.)
EN 15

Model VC10
Rated voltage DC22.2V
Battery type Lithium
Suction mode Min-Mid-Max
Charge time 4-5H
ISSUE SOLUTION
The vacuum
cleaner not work
Weak suction
CAUSE
(1)Out of power
(2)Battery pack not installed in place
(3)The motorized brush head is
blocked with hair and other debris
(4)Auto protection for overheating
Switch Button not work
(1)Charge the vacuum cleaner
(2)Battery pack installed in place
(3)Clean the motorized brush head
(4)Restart after cooling down Contact
BuTure Support for replacement
(1)Dust cup is full of garbage
(2)Dust baffle misaligned
(3)HEPA Filter are clogged or not
installed in place
(4)HEPA Filter not dry
(5)The motorized brush head is
blocked with hair or other debrisLow
power
(1)Empty the dust cup
(2)Align the dust baffle to correct hole
(3)Clean or change the HEPA Filter
(4)Dry out HEPA Filter
(5)Clean the motorized brush head
Charge the vacuum cleaner
Charging indicator
not light up or flash
abnormally
(1)Battery pack is dead or broken
(2)Charger is not correctly connected
Incompatible adaptor
(1)Change the battery pack
(2)Make sure the charger are fully
plugged in socket
(3)Use the adaptor provided by
BUTURE
Insufficient running
time after charging
(1)Insufficient charging time
(2)Battery aging
(3)The motorized brush head or is
tangled by hair or other debris
Incompatible adaptor
(1)Vacuum cleaner fully charged
(2)Change the battery
(3)Clean the motorized brush head
Use the charger provided by BUTURE
Motorized brush
head not rotate
(1)Brush roller are blocked with hair,
pebbles or other debris
(2)Dust cup is full of dust
(3)The brush may be defective
(1)Clean the brush roller
(2)Empty the dust cup
(3)Connect the brush head with the
main body to see if it would spin or not,
then contact us.
7.SPECIFICATION
8.TROUBLESHOOTING
EN 16

9.WARRANTY
9.1 The 2-Year Limited Warranty
• Our BUTURE machine has a 2-year warranty against original defects in material and workmanship,
when used for private household purposes in accordance with the BUTURE Instruction Manual.
• This warranty provides, at no extra cost to you, all labor and parts necessary to ensure your
machine is in proper operating condition during the warranty period.
9.2 What is covered?
Only applies to purchases made from authorized retailers of BUTURE.
This warranty will only be valid if the machine is used in the country in which it was sold.
9.3 How to claim?
Please keep your proof of purchase. To make a claim under our Limited Warranty, you need to
provide your original purchase receipt with the purchase date and order number on it.
If your machine is not functioning properly, or you still have any questions after reading this
manual carefully, please feel free to contact us, we will try our best to provide you with a
satisfactory solution.
EN 17
Other manuals for VC10
1
Table of contents
Other BUTURE Vacuum Cleaner manuals