BZB Gear BG-B20HS User manual

BG-B20HS
HD Color Video Camera
User Manual

1
Preface:
Thanks for using our HD color video conference camera.
This manual introduces the function installation and operation of the HD camera. Prior to
installation and usage, please read the manual thoroughly.
Warning
●Do not expose the camera to rain or moisture
●To reduce the list of electric shock do not remove the cover. Servicing should only be
done by qualified professionals.
●Please use a soft cloth to clean the camera. To prevent damage to the housing avoid
using any corrosive or abrasive cleaners.
Electrical Safety
Installation and operation must conform with local standards.
Caution to transport
Avoid stress, vibration and moisture in transport, storage and installation.
Polarity of power supply
The power supply of the product is ±12V, polarity of the power supply drawing pic 0.1.
Pic 0.4.1 Power plug
Installation Precautions
This camera must be placed on a smooth and level surface
Never power on before installation is completed.
Do not disassemble camera
There are no user-serviceable parts in this camera. Unauthorized disassembly will void
your warranty.
Attention
This camera may be sensitive to electromagnetic fields that can distort the image.

2
Content
1. Quick Start Guide............................................................................................................4
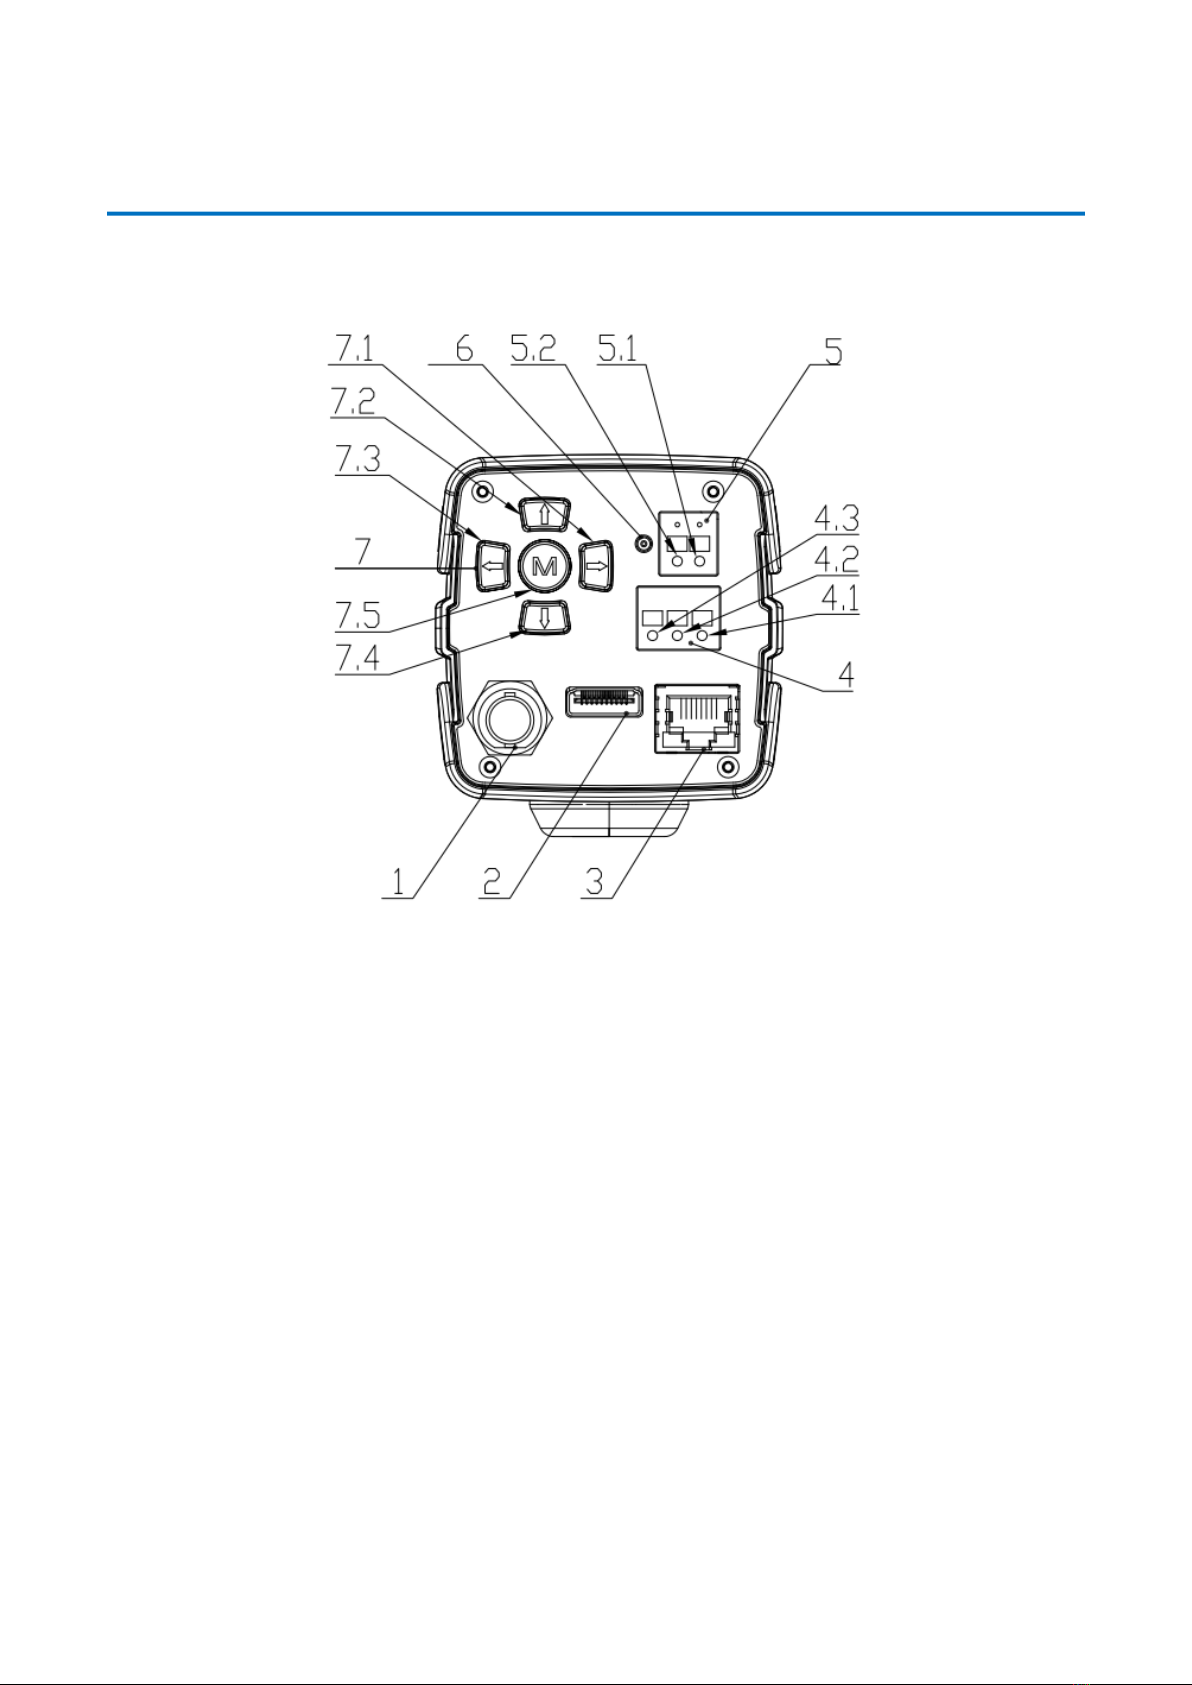
1.1 CAMERAINTERFACE EXPLANATION.................................................................................................................4
1.2 POWER ON SELF-TEST...................................................................................................................................5
1.3 VIDEO OUTPUT..............................................................................................................................................5
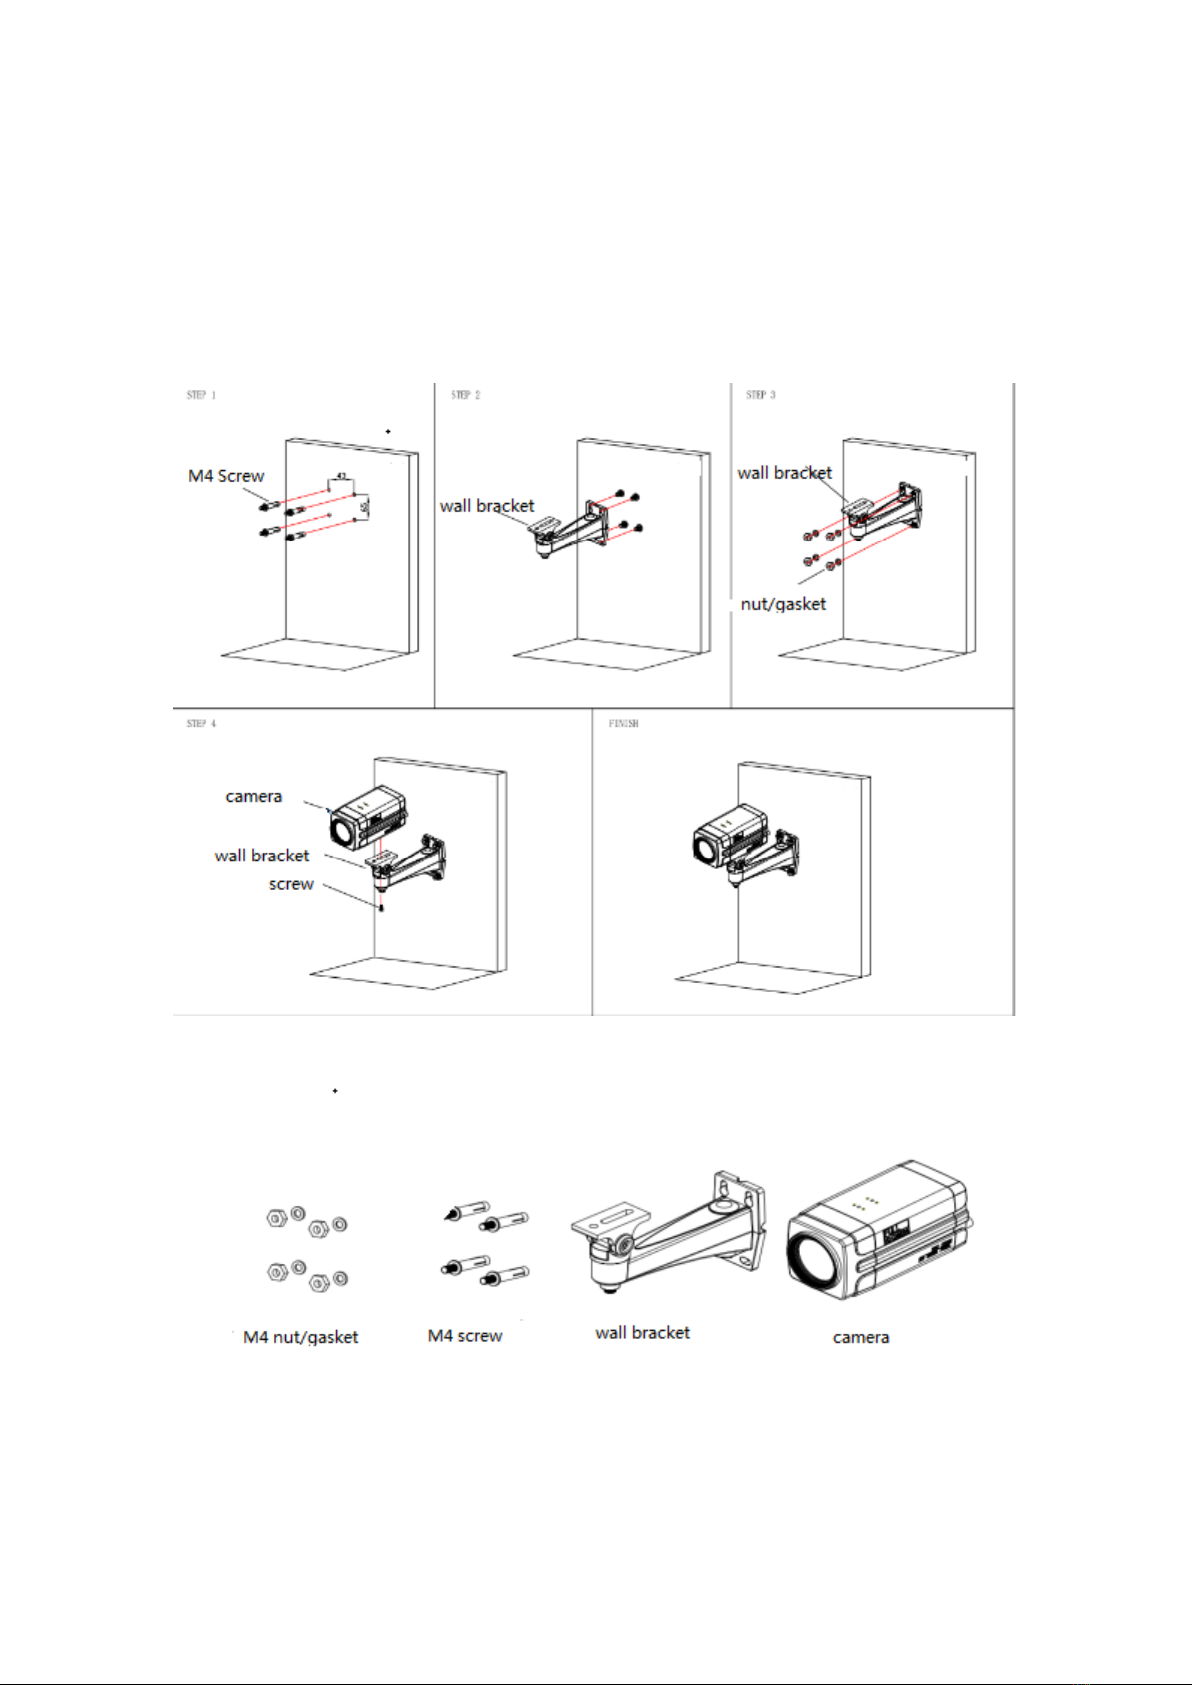
1.4 BRACKETMOUNTING.........................................................................................................................6
2. Product overview ..................................................................................................................7
2.1 PRODUCT INTRODUCTION.........................................................................................................................7
2.1.1 Dimension......................................................................................................................................7
2.1.2 Accessories ...................................................................................................................................7
2.2 MAIN FEATURES ......................................................................................................................................8
2.2.1 Camera performance.....................................................................................................................8
2.2.2 Network performance ....................................................................................................................8
2.2.3 Technical specifications.................................................................................................................8
2.2.4 Keyboard Introduction .................................................................................................................10
3.Application Instruction.........................................................................................................10
3.1 VIDEO OUTPUT ...........................................................................................................................................10
3.1.1 Power-On Initial Configuration...........................................................................................................10
3.1.2 Video output....................................................................................................................................... 11
3.2 MENU SETTING....................................................................................................................................... 11
3.2.1 Main menu......................................................................................................................................... 11
3.2.2 System setting ...................................................................................................................................12
3.2.2 Camera settings.................................................................................................................................12
3.2.3 ZOOM ................................................................................................................................................16
3.2.4 Video Format .....................................................................................................................................16
3.2.5 VERSION...........................................................................................................................................17
3.2.6 RESTORE DEFAULT.........................................................................................................................17
4. NETWORK CONNECTION................................................................................................................................18
4.1 Connection Mode..................................................................................................................................18
4.2.1 Web client....................................................................................................................................20
4.2.2 Preview............................................................................................................................................21
4.2.4 Configuration...................................................................................................................................21
4.2.5 Video configuration .........................................................................................................................22
4.2.6 Network configuration .....................................................................................................................24
4.2.7 System configuration.......................................................................................................................24
4.2.8 Logout .............................................................................................................................................25
5 Serial communication control............................................................................................25
5.1 VISCAPROTOCOL LIST..........................................................................................................................26
5.1.1 Camera return command (Correct) .............................................................................................26
5.1.2 Camera control command...............................................................................................................26
5.1.3 Inquiry command.............................................................................................................................30
5.2 PELCO-D PROTOCOL COMMAND LIST..........................................................................................................32
5.3 PELCO-PPROTOCOL COMMAND LIS............................................................................................................32

3
6 Camera Maintenance and Troubleshooting .....................................................................33
6.1 CAMERA MAINTENANCE.............................................................................................................................33
6. Maintenance and Troubleshooting.....................................................................................33
6.1 MAINTENANCE ............................................................................................................................................33
6.2TROUBLESHOOTING.....................................................................................................................................34
7 Warranty ............................................................................................................................34
8 Mission Statement.............................................................................................................35

4
1. Quick Start Guide
1.1 Camera Interface Explanation
Pic 1.1 Back plate
1. HD-SDI interface
2. HDMI interface
3. LAN interface
4. RS485 interface,support VISCA, PELCO-D, PELCO-P protocol
4.1 RS485 D-
4.2 RS485 D+
4.3 RS485 GND
5. Power interface,DC+12V,notes for polarity
5.1 DC+12V negative
5.2 DC+12V positive
6. Power indicator
7. Keyboard
7.1 Zoom In/Right
7.2 Focus -/Down
7.3 Zoom Out/Left
7.4 Focus +/Up
7.5 Menu/Confirm

5
1.2 Power on self-test
1) Power on: connect DC12V power supply adapter, and the indicator light will be on.
2) Self-testing: Power on with power indicator light on, camera module will stretch. When the module finishes stretching,
the self-testing is finished.
Note: If you set parking position, when Power on self-test is completed, the camera automatically goes to the parking
position.
1.3 Video output
1) Video output from LAN:
a) Network cable connection port
b) Web page Login::open your browser and enter 192.168.5.163 in the address bar (factory default); press
Enter to enter into the login page; click on the “player is not installed, please download and install!" and follow
the installation steps for installation. Then enter the username admin and password admin (factory default);
press Enter to access the preview page. Users can carry out PTZ control, video recording, playback,
configuration and other operations.
c) If without image, refer to Chapter 6 Troubleshooting
Pic 1.3.1 Web login page
2) 3G-SDI video output:
a) 3G-SDI video cable connection
b) Connect the camera and the monitor via 3G-SDI video cable; video output is available after camera self-test.
c) If without image, refer to Chapter 6 Troubleshooting
3) HDMI video output:
a) HDMI video cable connection
b) Connect the camera and the monitor via HDMI video cable; video output is available after camera self-test
c) If without image, refer to Chapter 6 Troubleshooting

6
1.4 BRACKET MOUNTING
Note: Ceiling or wall mounting brackets should only be installed on sturdy walls rated
to support mounted objects. For safety reason, plasterboard is not recommended.
1) Bracket installation steps
2)Accessories introduction
Note:Mounting brackets should be only installed and maintained by a qualified
technician. The product installation must strictly comply with all local electrical safety
standards.

7
2. Product overview
2.1 Product introduction
2.1.1 Dimension
Pic 2.1.1 Camera dimension
2.1.2 Accessories
Accessories
Power adapter
User manual
Warranty card

8
2.2 Main Features
2.2.1 Camera performance
This series camera features advanced ISP processing algorithms to provide vivid images with a strong sense of depth, high
resolution and fantastic color rendition. It supports H.264/H.264+ encoding which makes motion video fluent and clear even
with less than ideal bandwidth conditions.
1.Superb high-definition image: It employs 1/2.8-inch high quality CMOS sensor. Resolution is up to 1920x1080 with
frame rate up to 60 fps.
2.Various optical zoom lens: It has 20X optical zoom lens for options,3.3degree~54.7degree,2.9degree~55.4degree lens
for option.
3. Leading Auto focus technology: Leading auto focus algorithm allows fast, accurate and stable auto-focusing.
4. Low noise and High SNR: Low Noise CMOS effectively ensure high SNR of camera video.
Advanced 2D/3D noise reduction technology is also used to further reduce the noise, while ensuring image sharpness.
5.Multi-Format Video Outputs: support HDMI,3G SDI, wired LAN, the 3G-SDI is available for 100m transmission at
1080p60 format.
6.Support Multiple Control Protocol: Support VISCA, PELCO-D, PELCO-P protocols which can also be automatically
recognized. Support VISCA control protocol through IP port.
7.Keyboard: There are up/down/left/right/confirm control key in the back part of the cameras
8.Control Interface: Support RS485, Wired LAN, convenient for remote control after installation
9.Support parking position preset: Camera will run to the parking position after power on (can choose on/off on menu)
10.Wide application: tele-education, lecture capture, Webcasting, Videoconferencing, Tele-training, Tele-medicine,
Interrogation and Emergency command systems.
2.2.2 Network performance
1. Multiple Video compression: Support H.264/H.264+ video compression; Support compression of resolution up to
1920x1080 with frame up to 60 fps.
2. Multiple network protocol: Support ONVIF, RTSP, RTMP protocols and RTMP push mode, easy to link streaming
media server (Wowza, FMS)
2.2.3 Technical specifications
Camera Parameters
Sensor
1/2.8-inch high quality HD CMOS sensor
Effective Pixels
2.07 million;16:9
Video Format
1080P60/50/30/25/59.94/29.97 1080I60/50/59.94 720P60/50/30/25
/59.94/29.97
Optical Zoom
20x Optical Zoom
f=5.5~110mm

9
View Angle
3.3°(tele)~54.7°(wide)
Aperture
F1.6 ~F3.5
Digital Zoom
X10
Minimum
Illumination
0.5Lux (F1.8, AGC ON)
DNR
2D﹠3D DNR
White Balance
Auto / Manual/ One Push/ 3000K/ 4000K/5000K/6500K
Focus
Auto/Manual
Iris
Auto/Manual
Electronic Shutter
Auto/Manual
BLC
ON/OFF
WDR
OFF/ Dynamic level adjustment
Video Adjustment
Brightness,Color,Saturation,Contrast,Sharpness,B/W mode,Gamma curve
SNR
>55dB
Input/Output Interface
Video Interfaces
HDMI, 3G-SDI
Image Code Stream
Dual stream output
Video Compression
Format
H.265, H.264
Control Protocol
VISCA/Pelco-D/Pelco-P;Baud Rate: 115200/9600/4800/2400bps
IP Interface
100M IP port(100BASE-TX);Support VISCA protocol control through IP port.
Network Protocol
RTSP, RTMP, ONVIF, GB/T28181
Power Interface
(DC12V)
Other Parameters
Supply Adapter
Input AC110V-AC220V, output DC12V/1A
Input Voltage
DC12V±10%
Input Current
400mA(Max)
Consumption
4.8W(Max)
Store Temperature
-10℃~+60℃
Store Humidity
20%~95%
Working Temperature
-10℃~+50℃
Working Humidity
20%~80%
Dimension
155.7mmX70mmX70mm
Weight
0.7kg
Working
Environment
Indoor
Remote Operation
(IP)
Remote Upgrade,Reboot and Reset
Accessory
12V/1A power supply,manual,warranty card,installation bracket(option)

10
2.2.4 Keyboard Introduction
Menu
Menu and Confirm share the same key - “menu/ok”
Up
In the menu screen, when the cursor is on a particular sub-menu, the cursor will move
up to the selected menu when we press the "up” key.
When it is not on menu screen, it is used as Focus+
Down
In the menu screen, when the cursor is on a particular sub-menu, the cursor will move
up to the selected menu when we press the "down” key.
When it is not on menu screen, it is used as Focus-
Left
In the menu screen, when the cursor is on a particular sub-menu, we can go to the
selected menu by pressing the “left” key.
When it is not on menu screen, it is used as Zoom out.
Right
In the menu screen, when the cursor is on a particular sub-menu, we can go to the
selected menu by pressing the “Right” key.
When it is not on menu screen, it is used as Zoom In.
3. Application Instruction
3.1 Video Output
3.1.1 Power-On Initial Configuration
When first powered on the camera will initiate an auto test. When the lens finishes zoom in/out the auto-testing is finished. If
the preset 0 is set, camera will default to the 0 preset position.

11
3.1.2 Video output
1. Network output: connect this product and your computer via network cable, then open the browser and enter the
camera IP address (factory default 192.168.5.163) in the address bar. From the login page enter user name and
password (factory default is “admin” for both). After login you will be taken to the preview page where you will see
the camera image. If you forget your username, password, IP address, you can manually restore the default by the
default setting option in the menu.
2. 3G-SDI output or HDMI output: Connect the monitor with the corresponding video output interface, then the monitor
output image.
3.2 MENU SETTING
3.2.1 Main menu
In normal working mode, press 【MENU】key to display the menu, using scroll arrow to point at or highlight
the selected items.
LANGUAGE: Language setting, Chinese / English
SETUP: System setting
CAMERA OPTION: Camera setting
LEN OPTION: Len setting
VERSON: camera version setting
Restore Default: Reset setting
[↑↓] Select: for selecting menu
[← →] Change value: for modifying parameters
MENU
================
Language English
(Setup)
(Camera)
(Zoom)
(Video Format)
(Version)
(Restore Default)
(Return)
[↑↓]Select [←→]Change Value
[Menu]OK

12
[MENU] OK: Press [MENU] to confirm
3.2.2 System setting
Move the pointer to the (Setup) in the Main Menu, click the【MENU】key and enter into the (System Setting) as shown
below,
PROTOCOL:VISCA/Pelco-P/Pelco-D/Auto
Visca ADDR:VISCA=1~7 Pelco-P=1~16(1~16)/Pelco-D = 0~15(0~15)
Baud rate: 2400/4800/9600/115200
RETURN: Return to the former menu (Exit from main menu)
[↑↓] Select: for selecting menu
[← →] Change value: for modify parameters
[MENU] OK: Press [MENU] to confirm
3.2.2 Camera settings
Move the pointer to the (CAMERA) in the Main Menu, click the【MENU】key and enter the (CAMERA) settings
SETUP
================
Protocol Auto
ViscaAddress 1
ViscaAddress Fix OFF
PELCO-PAddress 1
PELCO-D Address 0
Baudrate 9600
Return
[↑↓]Select [←→]Change Value
[Menu]OK

13
EXPOSURE: Adjust Exposure setting
COLOR: Adjust color setting
Image: Adjust image setting
Focus: Adjust focus setting
Noise Reduction: Enter into noise reduction
RETURN: Exit menu
[↑↓] Select: for selecting menu
[← →] Change value: to modify parameters
[MENU] OK: Press [MENU] to confirm
1) EXPOSURE SETTINGS
Highlight (EXPOSURE) in the Main Menu and click【MENU】to enter Exposure Settings
MODE: Auto, Manual, Shutter priority, Iris priority and Brightness priority.
EV: On/Off (only available in auto mode)
Compensation level: -7~7 (only available in auto mode when EV is ON)
BLC: ON/OFF for options (only available in auto mode)
Anti-Flicker:OFF/50Hz/60Hz for options (only available in Auto/Iris priority/Brightness priority modes)
Gain limit: 0~15(only available in Auto/ Iris priority /Brightness priority mode)
WDR: Off,1~8
EXPOSURE
================
Mode Auto
EV OFF
BLC OFF
Flicker 50Hz
G.Limit 3
WDR 5
Return
[↑↓]Select [←→]Change Value
[Menu]OK
CAMERA
================
(Exposure)
(Color)
(Image)
(Focus)
(Noise Reduction)
Return
[↑↓]Select [←→]Change Value
[Menu]OK

14
Shutter priority:1/25,1/30,1/50,1/60,1/90,1/100,1/120,1/180,1/250,1/350,1/500,1/1000,1/2000,1/3000,1/4000,1/6000,
1/10000(only available in Manual and Shutter priority mode)
IRIS priority: OFF,F11.0,F9.6,F8.0,F6.8,F5.6,F4.8,F4.0,F3.4,F2.8,F2.4,F2.0,F1.8(only available in Manual and Iris priority
mode)
BRIGHTNESS: 0~23 (only available in Brightness priority mode)
RETURN: Return to the former menu
[↑↓] Select: for selecting menu
[← →] Change value: for modify parameters
[MENU] OK: Press [MENU] to confirm
2) COLOR SETTING
Highlight (COLOR) in the Main Menu and click【MENU】to enter Color Settings.
WB MODE: Auto,3000K,4000K,5000K,6500K,Manual,One Push
RED GAIN: 0~255(only available in Manual mode)
BLUE GAIN: 0~255(only available in Manual mode)
SATURATION: 60%,70%,80%,90%,100%,110%,120%,130%
Hue: 0~14
AWB Sensitivity: high/middle/low
Color Style: Default, style1~4.
Color temp: high/middle/low
RETURN: Return to the former menu
[↑↓] Select: for selecting menu
[← →] Change value: for modify parameters
[MENU] OK: Press [MENU] to confirm
COLOR
===============
WB Mode Auto
Saturation 80%
Hue 7
AWB Sensitivity High
Color style Default
Color temp Low
Return
[↑↓]Select [←→]Change Value
[Menu]OK

15
3) IMAGE
Highlight (IMAGE) in the Menu and click【HOME】to enter Image Settings.
Brightness: 0~14
Contrast:0~14
Sharpness:0~15
Flip-H: On/Off
Flip-V: On/Off
B&W mode: color, black/white
Gamma:default,0.47,0.50,0.52,0.55
DZoom: digital zoom options: On/Off
DCI: Dynamic Contrast: Off,1~8
RETURN: Return to the former menu
[↑↓] Select: for selecting menu
[← →] Change value: for modify parameters
[MENU] OK: Press [MENU] to confirm
4) FOCUS
Move the pointer to the (FOCUS) in the Menu, click the【MENU】and enter the (FOCUS) as follow,
Focus mode: Auto, manual
AF-Zone: Up, middle, down
AF-Sensitivity: High, middle, low
RETURN: Return to the former menu (if it is main menu, means close menu)
[↑↓] Select: for selecting menu
FOCUS
================
Focus Mode Auto
AF-Zone Center
AF-Sensitivity Low
Return
[↑↓]Select [←→]Change Value
[Menu]OK
IMAGE
================
Brightness 6
Contrast 8
Sharpness 2
Flip-H OFF
Flip-V OFF
B&W-Mode Color
Gamma Default
DZoom OFF
DCI Close
Return
[↑↓]Select [←→]Change Value
[Menu]OK

16
[← →] Change value: for modify parameters
[MENU] OK: Press [MENU] to confirm
5) NOISE REDUCTION
Move the pointer to the (NOISE REDUCTION) in the Menu,click the【MENU】and enter the (NOISE REDUCTION) as follow,
2D NOISE REDUCTION: Auto, close, 1~7
3D NOISE REDUCTION: Close,1~8
Dynamic Hot Pixel: Close,1~5
RETURN: Return to the former menu
[↑↓] Select: for selecting menu
[← →] Change value: for modify parameters
[MENU] OK: Press [MENU] to confirm
3.2.3 ZOOM
Highlight (ZOOM) in the Main Menu and click【MENU】to enter Zoom Settings.
Zoom speed: Set the zoom speed for remote controller,1~8
Park Set: ON/OFF
Saving Park: YES/NO
RETURN: Return to the former menu
[↑↓] Select: for selecting menu
[← →] Change value: for modify parameters
[MENU] OK: Press [MENU] to confirm
3.2.4 Video Format
Highlight (Video Format) in the Menu and click【MENU】to enter Video Format settings.
Zoom
================
Zoom speed 8
Park Set ON
Saving Park?NO
Return
[↑↓]Select [←→]Change Value
[Menu]OK
NOISE REDUCTION
================
NR-2D Auto
NR-3D 5
Dynamic Hot Pixel OFF
Return
[↑↓]Select [←→]Change Value
[Menu]OK

17
3.2.5 VERSION
Highlight (VERSION) in the Main Menu and click【MENU】to view Version Information.
MCU Version: Display MCU version information
Camera Version: Display camera version information
AF Version: Display the focus version information
RETURN: Return to the former menu (if it is main menu, means close menu)
[↑↓] Select: for selecting menu
[← →] Change value: for modify parameters
[MENU] OK: Press [MENU] to confirm
3.2.6 RESTORE DEFAULT
Highlight (RESTORE DEFAULT) in the Main Menu and click【MENU】to enter Restore Default Settings.
VERSION
================
MCU Version 2.0.0.0 2015-12-18
Camera Version 2.0.0.15 2015-12-18
AFVersion 2.0.0.6 2015-12-11
Return
[Menu]OK
VIDEO FORMAT
================
1080P60 1080P50
1080I60 1080I50
1080P30 1080P25
720P60 720P50
720P30 720P25
1080P59.94
1080I59.94
1080P29.97
720P59.94
720P29.97
Return
[↑↓]Select
[Menu] OK

18
Restore default: options: yes/no
RETURN: Return to the former menu (if it is main menu, means close menu)
[↑↓] Select: for selecting menu
[← →] Change value: for modify parameters
[MENU] OK: Press [MENU] to confirm
4. Network Connection
4.1 Connection Mode
Direct connection: Connect the camera directly to the computer by using an ethernet cable.
Internet connection mode: Connect the camera and computer to a router or switch and access via the local area
network (LAN).
Note: Ensure power and network connections are secured to prevent video issues caused by poor connection
quality.
The computer must be on the same subnet as the camera to connect successfully. The device will not be accessible
otherwise. The camera default IP address is 192.168.5.163, therefore the computer must be connected to the 192.168.5.x
subnet.
To connect to the camera open the Local Area Connection Properties on the computer.
For Windows users right-click on the internet connection in the lower right corner of the desktop.
Select “Open Network & Internet Settings”.
Select “Change Adapter Options”.
Right-click on your connection (Wi-Fi or Ethernet) and select “Properties”.
Select “Internet protocol version 4 (TCP/IPv4” as shown below and click “Properties”.
RESTORE DEFAULT
================
Restore Default? NO
Return
[↑↓]Select [←→]Change Value
[Menu]OK

19
For the following steps refer to the diagram below.
Click on the bubble for “Use the following IP address”
In the IP address field enter a non-conflicting IP address on the same subnet as the camera. If there is another device with
the same IP address you will not be able to connect. In the example below we are using 192.168.5.200
In the Subnet mask field enter 255.255.255.0
In the Default gateway field type 192.168.5.1
You can leave the DNS fields blank.
Click OK to apply your settings.
NOTE: When you are finished configuring the camera you will need to return to this screen and click the bubbles for
“Obtain an IP address automatically” and “Obtain DNS server automatically” to restore internet connectivity to your
computer. Also make sure to reconnect any ethernet cables you may have unplugged.
Table of contents
Other BZB Gear Camcorder manuals

BZB Gear
BZB Gear BG-PACKSHOT-C10X User manual

BZB Gear
BZB Gear BG-CAM-USB4K User manual

BZB Gear
BZB Gear BG-B20SA User manual

BZB Gear
BZB Gear BG-BPTZ-3XU User manual

BZB Gear
BZB Gear BG-PACKSHOT-C10X User manual

BZB Gear
BZB Gear BG-LVPTZ-10XHSP User manual

BZB Gear
BZB Gear BG-LVPTZ-12XHSP User manual

BZB Gear
BZB Gear BG-BSHA User manual

BZB Gear
BZB Gear BG-VPTZ-10HSU3 User manual

BZB Gear
BZB Gear BG-BPTZ-10XU User manual