Cafe CGP9530 User manual

Write the model and serial numbers here:
Model # _______________________________
Serial # _______________________________
You can find them on a label under the cooktop.
49-2001107 Rev. 1 05-22 GEA
English • Français • Español
Owner's Manual
Built-In Gas Cooktop
Models: CGP9530, CGP9536, CGP7030, and CGP7036
Contents
Safety Information...............................3
Using The Cooktop
In Case of a Power Failure .......................6
Surface Burners ................................6
Griddle Accessory ..............................8
Care And Cleaning
Cleaning the Glass Cooktop ......................9
Troubleshooting Tips ...........................13
Limited Warranty ...............................14
Accessories ...................................15
Consumer Support .............................16
TM

249-2001107 Rev. 1
THANK YOU FOR MAKING CAFÉ A PART OF YOUR HOME.
We take pride in the craftsmanship, innovation and design that goes into every Café product, and
we think you will too. Among other things, registration of your appliance ensures that we can deliver
important product information and warranty details when you need them.
Register your Café appliance now online. Helpful websites are available in the Consumer Support
section of this Owner’s Manual. You may also mail in the pre-printed registration card included in the
packing material.
TM

49-2001107 Rev. 13
READ AND SAVE THESE INSTRUCTIONS
IMPORTANT SAFETY INFORMATION
READ ALL INSTRUCTIONS BEFORE USING THE APPLIANCE
SAFETY INFORMATION
WARNING Read all safety instructions before using the product. Failure to follow these instructions may result
in fire, electrical shock, serious injury or death.
WARNING If the information in these instructions is not followed exactly, a fire or
explosion may result, causing property damage, personal injury or death.
- Do not store or use gasoline or other flammable vapors and liquids in the vicinity of
this or any other appliance.
- WHAT TO DO IF YOU SMELL GAS
■ Donottrytolightanyappliance.
■ Donottouchanyelectricalswitch.
■ Donotuseanyphoneinyourbuilding.
■ Immediatelycallyourgassupplierfromaneighbor’sphone.Followthegas
supplier’sinstructions.
■ Ifyoucannotreachyourgassupplier,callthefiredepartment.
- Installation and service must be performed by a qualified installer, service agency or
the gas supplier.
WARNING NEVER OPERATE THE TOP COOKING SECTION OF THIS
APPLIANCE UNATTENDED
■ Failuretofollowthiswarningstatement
could result in fire, explosion, or burn
hazard that could cause property damage,
personal injury, or death.
■ Ifafireshouldoccur,keepawayfromthe
appliance and immediately call your fire
department.
DO NOT ATTEMPT TO EXTINGUISH AN OIL/
GREASE FIRE WITH WATER.
WARNING KEEP FLAMMABLE MATERIALS AWAY FROM THE COOKTOP
Failure to do so may result in fire or personal injury.
■ Donotstoreoruseflammablematerialsnear
the cooktop, including paper, plastic, pot holders,
linens, wall coverings, curtains, drapes and gasoline
or other flammable vapors and liquids.
■ Neverwearloose-fittingorhanginggarmentswhile
using the cooktop. These garments may ignite if
they contact hot surfaces causing severe burns.
■ Donotletcookinggreaseorotherflammable
materials accumulate in or near the cooktop.
Grease on the cooktop may ignite.
WARNING IN THE EVENT OF A FIRE, TAKE THE FOLLOWING
STEPS TO PREVENT INJURY AND FIRE SPREADING
■ Donotusewaterongreasefires.Neverpickupaflamingpan.Turnthecontrolsoff.Smotheraflamingpan
on a surface unit by covering the pan completely with a well-fitting lid, cookie sheet or flat tray. Use a multi-
purpose dry chemical or foam-type fire extinguisher.

449-2001107 Rev. 1
SAFETY INFORMATION
READ AND SAVE THESE INSTRUCTIONS
IMPORTANT SAFETY INFORMATION
READ ALL INSTRUCTIONS BEFORE USING THE APPLIANCE
WARNING GENERAL SAFETY INSTRUCTIONS
WARNING
NEVER use this appliance as a
space heater to heat or warm the room. Doing
so may result in carbon monoxide poisoning
and overheating of the oven.
■ Usethisapplianceforitsintendedpurposeas
described in this owner’s manual.
■ Haveyourcooktopinstalledandproperlygrounded
by a qualified installer in accordance with the
provided installation instructions.
■ Anyadjustmentandserviceshouldbeperformed
only by a qualified gas cooktop installer or service
technician.Donotattempttorepairorreplace
any part of your cooktop unless it is specifically
recommended in this manual.
■ Yourcooktopisshippedfromthefactorysetforuse
with natural gas. It can be converted for use with
propane gas. If required, these adjustments must be
made by a qualified technician in accordance with
the installation instructions and local codes. The
agency performing this work assumes responsibility
for the conversion.
■ Havetheinstallershowyouthelocationofthe
cooktop gas shut-off valve and how to turn it off if
necessary.
■ Plugyourcooktopintoa120-voltgroundedoutlet
only.Donotremovetheroundgroundingprong
from the plug. If in doubt about the grounding of the
home electrical system, it is your responsibility and
obligation to have an ungrounded outlet replaced
with a properly grounded, three prong outlet in
accordancewiththeNationalElectricalCode.Do
not use an extension cord with this appliance.
■ Beforeperforminganyservice,unplugthecooktop
or disconnect the power supply at the household
distribution panel by removing the fuse or switching
off the circuit breaker.
■ Besureallpackingmaterialsareremovedfromthe
cooktop before operating to prevent ignition of these
materials.
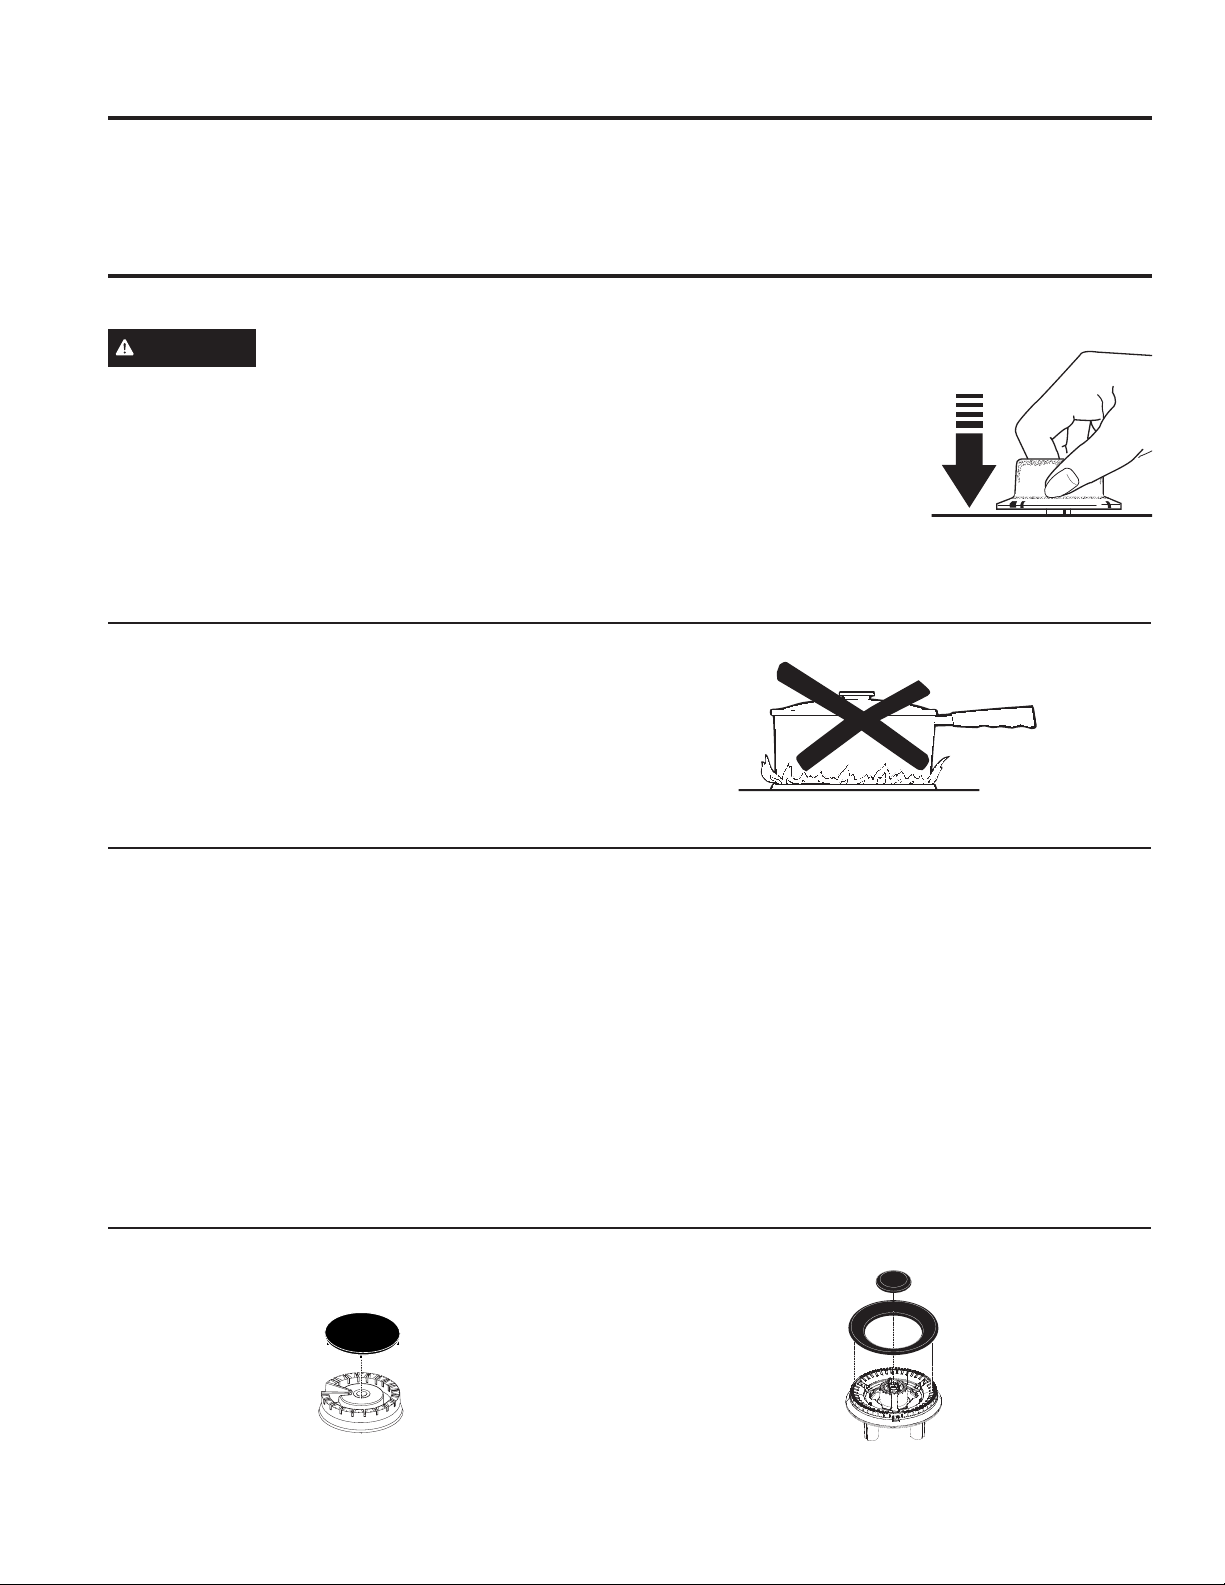
■ Avoidscratchingorimpactingcooktoporcontrol
panel.Doingsomayleadtoglassbreakage.Donot
cook on a product with broken glass. Shock, fire,
or cuts may occur. Contact a qualified technician
immediately.
■ Donotremovethe6blackZbracketsscrewedto
the bottom of the cooktop (on some models).
■ Donotleavechildrenaloneorunattendedinan
area where an appliance is in use. They should
never be allowed to climb, sit or stand on any part
of the appliance.
■
CAUTION
Donotstoreitemsofinterest
to children in cabinets above a cooktop - children
climbing on the cooktop to reach items could be
seriously injured.
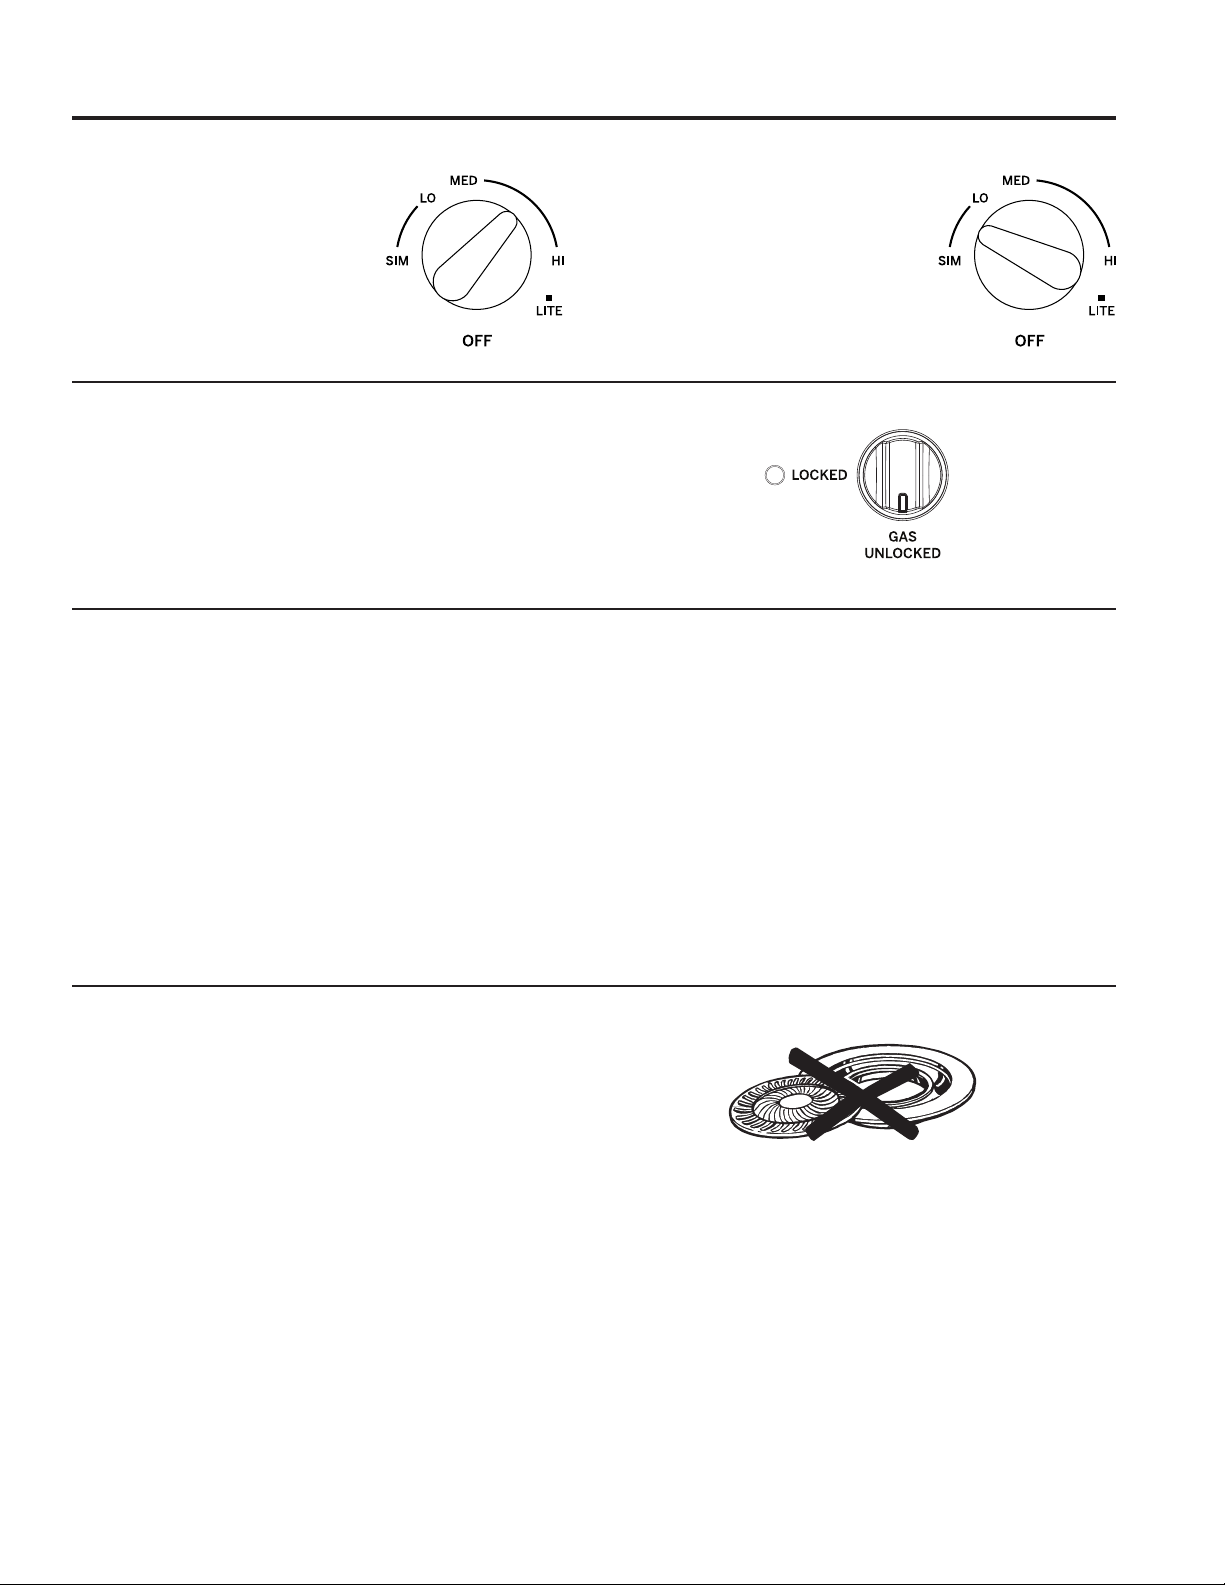
■ Useonlydrypotholders—moistordamppot
holders on hot surfaces may result in burns from
steam.Donotletpotholderstouchsurfaceburners
orburnergrate.Donotuseatowelorotherbulky
cloth in place of pot holders.
■ Becarefulnottotouchhotsurfacesofthecooktop.
■ Donotheatunopenedfoodcontainers.Pressure
could build up and the container could burst,
causing an injury.
■ Cookfoodthoroughlytohelpprotectagainst
foodborne illness. Minimum safe food temperature
recommendations can be found at IsItDoneYet.gov
and fsis.usda.gov. Use a food thermometer to take
food temperatures and check several locations.

49-2001107 Rev. 15
How to Remove Protective Shipping Film and Packaging Tape
Carefully grasp a corner of the protective shipping film
with your fingers and slowly peel it from the appliance
surface.Donotuseanysharpitemstoremovethefilm.
Remove all of the film before using the appliance for the
first time.
To assure no damage is done to the finish of the
product, the safest way to remove the adhesive from
packaging tape on new appliances is an application of
a household liquid dishwashing detergent. Apply with a
soft cloth and allow to soak.
NOTE: The adhesive must be removed from all parts. It
cannot be removed if it is baked on.
Consider recycling options for your appliance packaging
material.
WARNING COOKTOP SAFETY INSTRUCTIONS
■ Neverleavethesurfaceburnersunattendedat
medium or high heat settings. Foods, especially oily
foods, may ignite resulting in fire that could spread
to surrounding cabinets.
■ Neverleaveoilunattendedwhilefrying.Ifallowed
to heat beyond its smoking point, oil may ignite
resulting in fire that may spread to surrounding
cabinets. Use a deep fat thermometer whenever
possible to monitor oil temperature.
■ Toavoidoilspilloverandfire,usetheminimum
amount of oil when using a shallow pan-frying and
avoid cooking frozen foods with excessive amounts
of ice.
■ Useproperpansizeandavoidpansthatare
unstable or easily tipped. Select cookware that is
matched to the size of the burner. Burner flames
should be adjusted so that they do not extend
beyond the bottom of the pan. Excessive flame may
be hazardous.
■ AlwaysusetheLITEpositionwhenignitingthetop
burners and make sure the burners have ignited.
■ Whenusingglass/ceramiccookware,makesureit
is suitable for cooktop service; others may break
because of sudden change in temperature.
■ Tominimizethepossibilityofburns,ignitionof
flammable materials and spillage, the handle of a
container should be turned toward the center of the
cooktop without extending over nearby burners.
■ Donotuseawokwitharoundmetalsupportring.
The ring may trap heat and block air to the burner
resulting in a carbon monoxide hazard.
■ Donotattempttoliftthecooktop.Doingsomay
damage the gas tubing to the surface burners
resulting in a gas leak and risk of fire.
■ Whendisablinggaslockout(onsomemodels),
make sure the surface controls are set to the OFF
position. This will prevent unintended gas flow from
the burners.
■ Donotusealuminumfoiltocoverthegratesor
lineanypartofthecooktop.Doingsomayresult
in carbon monoxide poisoning, overheating of the
cooktop surfaces, or a potential fire hazard.
READ AND SAVE THESE INSTRUCTIONS
IMPORTANT SAFETY INFORMATION
READ ALL INSTRUCTIONS BEFORE USING THE APPLIANCE
SAFETY INFORMATION
PROPER DISPOSAL OF YOUR APPLIANCE
DisposeoforrecycleyourapplianceinaccordancewithFederalandLocalRegulations.Contactyourlocal
authorities for the environmentally safe disposal or recycling of your appliance.

649-2001107 Rev. 1
In Case of a Power Failure
Surface Burners
USING THE COOKTOP:InCaseofaPowerFailure/SurfaceBurners
In the event of a power failure, the surface burners may
be lit with a match. Using extreme caution, hold a lit
match near the ports beneath the surface burner cap,
thenslowlyturntheknobtotheLITEposition.Oncelit,
surface burners will continue to operate normally.
Lighting a Surface Burner
WARNING Burners should be operated only
when covered by cookware. Burner flames not
covered by cookware present a risk of fire or
clothing ignition. Never let flames extend beyond the
sides of the cookware. Failure to comply may result
in serious injury.
Make sure all burners are in their correct locations and
fully assembled before attempting to operate any burner.
Select a burner and find its control knob. Push the knob
inandturnittotheLITEposition.
Youwillhearaclickingnoise—
the sound of the electric spark
igniting the burner. When one
burneristurnedtoLITE,all
burners will spark. Sparking will
continue as long as the knob
remainsatLITE.Oncegasis
ignited, turn the knob to adjust
the flame size.
Selecting a Flame Size
Watch the flame, not the knob, as you adjust heat. When
rapid heating is desired, the flame size should match the
size of the cookware you are using. Flames larger than
the bottom of the cookware will not heat faster and may
be hazardous.
Using the Surface Burners
NOTES:
■ Donotoperatetheburnerforanextendedperiodof
time without cookware on the grate. The finish on the
grate may discolor or chip without cookware to absorb
the heat.
■ Donotattempttodisassembleanyburnerwhile
anotherburnerison.Damagetotheproduct
may occur.
■ Besuretheburnersandgratesarecoolbeforeyou
place your hand, a pot holder or cleaning materials
on them.
Your cooktop has sealed gas burners that offer
convenience, cleanability and flexibility for a wide range
of cooking applications.
The smallest burner is the simmer burner. A simmer
burnerturneddowntoLOprovidesprecisecooking
performance for foods such as delicate sauces that
require low heat for a long cooking time.
The extra-large burner is designed to quickly bring
large amounts of liquid to a boil. Some models have a
POWERBOIL™settingespeciallydesignedforusewith
cookware with a diameter of 11 inches or larger.
Types of Surface Burners
Round Burner (on some models)
Use this burner for general cooking purposes.
Size cookware appropriately to the flames.
Multi-Ring Burner (on some models)
Use this burner for large cookware or for simmering applications.
These flames are too large for the pot
Push the control knob in and
turnittotheLITEposition.

49-2001107 Rev. 17
Surface Burners (Cont.)
Multi-Ring Burner (some models)
For large cookware, activate
all rings by setting the burner
between Hi and Med.
For small cookware or low heating
applications, only activate the inner
rings by setting the burner between
LoandSim.
USING THE COOKTOP: Surface Burners
Stove Top Grills
Donotuseanafter-marketstovetopgrillonyour
gas surface burners. A stove top grill will cause
incomplete combustion resulting in carbon monoxide
levels above allowable standards. This could be
hazardous to your health.
Donotusestovetopgrills
Cooktop Cookware
Aluminum: Medium-weight cookware is recommended
because it heats quickly and evenly. Most foods brown
evenly in an aluminum skillet. Use saucepans with tight-
fitting lids when cooking with minimum amounts of water.
Stainless Steel: This metal alone has poor heating
properties and is usually combined with copper, aluminum
or other metals for improved heat distribution. Combination
metal skillets usually work satisfactorily if they are used
with medium heat or as the manufacturer recommends.
Cast-Iron: If heated slowly, most skillets will give
satisfactory results.
Enamelware: Under some conditions, the enamel
of some cookware may melt. Follow the cookware
manufacturer’s recommendations for cooking methods.
Glass:Therearetwotypesofglasscookware—those
for oven use only and those for surface burner cooking
(saucepans, coffee and teapots). Glass conducts heat
very slowly.
Heatproof Glass Ceramic: Can be used for either
surface or oven cooking. It conducts heat very slowly and
cools very slowly. Check the cookware manufacturer’s
directions to be sure it can be used on gas surface
burners.
Control Lock (on some models)
To lock the cooktop and prevent unwanted use, turn the
control lock knob clockwise to Locked. An indicator light
will illuminate when the cooktop is locked. When locked,
gas flow to the burners is prevented. Burners will spark if
a knob is turned, but will not ignite.
To unlock, turn the control lock knob to Unlocked.

849-2001107 Rev. 1
Griddle Accessory (available on some models)
USING THE COOKTOP: Griddle Accessory
CAUTION Fire Hazard
■ Usecarewhencookinggreasyfoods.Spilledgreasemayresultinfire.
■ Neverplaceanyitemsonthegriddlewhenitisnotinuse.Heatfromsurroundingburnerscanheat
the griddle and may result in fire.
■ PlaceandremovethegriddleonlywhengriddleiscoolandallsurfaceburnersareturnedOff.
Using Your Cast-Iron Griddle
(on some models)
Your griddle provides an extra-large cooking surface for
meats, pancakes and other foods usually prepared in
a skillet. Before first use, rinse with hot water and dry
thoroughly. Prepare the surface with cooking spray or
vegetable oil.
Griddle Precautions:
■ Donotplacethegriddleinamicrowaveoven.
■ Donotcleanyourgriddleinthedishwasher.
■ Ifsomethinghasspilledunderthegriddle,itshouldbe
cleaned up as soon as possible to prevent “baked on”
food soil.
■ Donotallowgreasetoaccumulateunderthegriddle
as it can be a fire hazard. Clean under the griddle with
hot, soapy water as soon as it is cool.
Positioning Your Griddle
The cast-iron griddle (on some models) can only be
used over the left burners of the cooktop. To position the
griddle, place the griddle on top of the left grate. Adjust
the griddle until it is fully seated and sitting flat on the
gratebelow.Donotturnontheleftburnersuntilyouare
certain the griddle has been positioned correctly.
Preheating Your Griddle
Preheat your griddle by setting both left burners to Hi for
5 minutes before placing food on the griddle. Once the
griddle is preheated, turn the knob on each left burner to
the griddle zone and use the cook setting outlined in the
table below.
Type of Food Cook Setting
Bacon Med
BreakfastSausageLinks Med
Eggs Lo
Grilled Cheese Med-Lo
Hamburgers Med-Lo
Pancakes Med-Lo
Warming Tortillas Lo
Cook settings may need to be reduced if the griddle is used for an
extended time.
Preseasoned Cast-Iron Griddle
2

49-2001107 Rev. 19
Cooktop Surface
Donotuseovencleaners,abrasivecleansers,strong
liquid cleansers, steel wool, plastic scouring pads, or
cleaning powders on the cooktop surface. Clean with a
mildsoapandwaterora50/50solutionofvinegarand
water. Rinse with clean water and dry with a soft cloth.
When cleaning surfaces, make sure that they are at
room temperature and not in direct sunlight.
Spillage of marinades, fruit juices, tomato sauces and
basting liquids containing acids may cause discoloration
and should be wiped up as soon as hot surfaces cool,
then clean and rinse.
Stainless Steel Surfaces (on some models)
Donotuseasteelwoolpad;itwillscratchthesurface.
To clean the stainless steel surface, use warm sudsy
water or a stainless steel cleaner or polish. Always wipe
the surface in the direction of the grain. Follow the cleaner
instructions for cleaning the stainless steel surface.
Cleaners with oxalic acid such as Bar Keepers Friend
SoftCleanser™willremovesurfacerust,tarnishand
small blemishes. Use only a liquid cleanser free of grit
and rub in the direction of the brush lines with a damp,
soft sponge.
To inquire about purchasing cleaning products
including stainless steel appliance cleaner or polish,
see the Accessories and Consumer Support sections
at the end of this manual.
Cleaning Knobs
For easier cleaning, the control knobs may be removed
by pulling them directly upwards once the knobs are in
the OFF position. The knobs can be washed by hand
with soap and water or in a dishwasher.
To replace knobs after cleaning, align the hole on the knob
backside with the gas valve shaft and push downward
until the knob is securely fastened. All knobs are
interchangeable except control lockout (on some models).
Cleaning the Cooktop
CARE AND CLEANING: Cleaning the Cooktop
Pull the knob straight up off the stem.

10 49-2001107 Rev. 1
Removal of Surface Burners for Cleaning
Turn all controls OFF. Allow cooktop to cool before removing grates and burner parts. When removing the burner
caps and heads, remember their size and location. Replace them in the same location after cleaning.
Cleaning the Cooktop (Cont.)
CARE AND CLEANING: Cleaning the Cooktop
Round Burner
Round Burner Cap
(Removable)
Electrode
Round Burner
Head
Multi-Ring Burner
Cap
Cap
Electrode
Burner

49-2001107 Rev. 111
Cleaning the Surface Burners
Cleaning the Burner Caps
Wash burner caps in hot, soapy water and rinse with
clean water. You may scour with a plastic scouring pad
to remove burned-on food particles. The round burner
caps may also be cleaned in your dishwasher.
Cleaning the Burner Heads
Wash the burner heads routinely, especially after bad
spilloverswhichcouldclogtheburneropenings.Lift
burners off when cool. Wash with hot, soapy water.
Rinse with clean water. For more stubborn stains, use a
brush with plastic bristles.
NOTE:Donotusesteelwoolorscouringpadstoclean
theburnerpartsasthesemayclogtheopenings.Never
washburnerheadsinyourdishwasher.Doingsomay
cause them to discolor.
The ports in the burner heads must be kept clean at all
times for an even, unhampered flame.
Clogged or dirty burner ports or electrodes will not allow
the burner to operate properly.
Replacing Surface Burners
Before replacingtheburnercaps,headsandovalhead/
cap assembly, shake out excess water and allow them to
dry thoroughly.
Replace burner heads in the correct locations according
to size. Ensure each cap is properly seated on the
burner head, as pictured below.
CAUTION Do not operate the cooktop without
all burner parts and grates in place.
Any spill on or around an electrode must be carefully
cleaned. Avoid hitting the electrode with anything hard or
it could be damaged.
Cleaning the Cooktop (Cont.)
CARE AND CLEANING: Cleaning the Cooktop
Burner cap is
NOTproperlyseated.
Burner cap is
NOTproperlyseated.
Burner cap is
properly seated.
The electrode of the spark igniter is exposed
when the burner head is removed. When one
burneristurnedtoLITE,alltheburnersspark.
Donotattempttodisassembleorcleanaround
any burner while another burner is on.
Electrode

12 49-2001107 Rev. 1
Grate Support Bumpers (on some models)
If any of the rubber grate support bumpers in the cooktop
are missing or damaged, replacement parts can be
obtained by visiting cafeappliances.com/part.
To insert the new bumpers, simply place the cone-
shaped end of the bumper into the hole in the cooktop
and push down while gently twisting the bumper.
Griddles (on some models)
Cast-Iron: Clean your cast-iron griddle with a stiff
brush and hot water. Using soap is not recommended,
and harsh detergents should never be used as they
will remove the seasoning. Rinse with hot water and
dry thoroughly. After rinsing, preseason the griddle by
applying a light coat of cooking oil to the griddle surface.
Wipe off excess oil with a paper towel.
Store in a cool, dry place.
Griddle Precautions:
■ If something has spilled under the griddle, it should
be cleaned up as soon as possible to prevent the spill
from getting baked onto the cooktop.
■ Donotallowgreasetoaccumulateunderthegriddle
as it can be a fire hazard. Clean under the griddle with
hot, soapy water as soon as it is cool.
■ Donotwashyourgriddleinthedishwasher.
■ Donotcleanthegriddleintheself-cleaningoven.
Cleaning the Cooktop (Cont.)
CARE AND CLEANING: Cleaning the Cooktop
2
Grate Support Bumpers
Burner Grates
Manual Cleaning
Grates should be washed in hot, soapy water and
rinsed with clean water. To soften burned-on food,
place grates in a solution containing ¼-cup of
household ammonia for several hours. Afterward, scrub
grates with a plastic scouring pad soaked in hot, soapy
water. Rinse well and dry.
Oven Cleaning
Some models have grates that can be cleaned in a self-
cleaningoven.IfgratesdoNOThaverubberbumpers
(pads) attached to the bottom of the grates, they may
be cleaned in the oven using the self-clean cycle. See
your oven's Owner's Manual for specific instructions. If
self-cleaning instructions are not mentioned in Owner's
Manual, the grates should not be cleaned in a self-
cleaning oven.
Dishwasher Cleaning
The grates may be cleaned in the dishwasher. Remove
any burnt-on food particles prior to placing the grates in
the dishwasher. Place them on the lowest rack of the
dishwasher and run on a "heavy duty" cycle.
Donotoperateaburnerforanextendedperiodoftime
without cookware on the grate. The finish on the grate
may chip without cookware to absorb the heat.
Although the grates are durable, they will gradually lose
their shine, regardless of the best care you can give
them. This is due to their continual exposure to high
temperatures and abrasion by the cookware.
NOTE: Use caution when removing the grates from the
oven after the self-clean cycle has ended. The grates
may still be hot.
Once the self-clean cycle is complete, the grates may
carefully be removed. You may notice a white residue on
the grates. Wipe it off with a damp sponge. If white spots
persist,wetthespongewitha50/50solutionofvinegar
and water and wipe the grates again.
When replacing the grates on the cooktop, be sure to
locate them correctly. Grates should fit securely into
the cooktop.

49-2001107 Rev. 113
TROUBLESHOOTING TIPS
Problem Possible Causes What To Do
Burners have
yellow or yellow-
tipped flames
The combustion quality of
burner flames needs to be
determined visually.
Determinethequalityofflamesvisually.Normalburnerflamesshould
look like (A) or (B).
Long,brightyellowflamesarenotnormal.Normalflamesmayshow
signs of an orange tint when well heated or signs of flickering orange
due to particles in the gas or air.
Control knobs will
not turn
Knob isn’t pushed down. To turn from the OFF position, push the knob down and then turn.
Burners do not light Plug on cooktop is not
completely inserted in the
electrical outlet.
Make sure electrical plug is plugged into a live, properly grounded
outlet.
Gas supply not connected or
turned on.
See the Installation Instructions that came with your cooktop.
A fuse in your home may be
blown or the circuit breaker
tripped.
Replace the fuse or reset the circuit breaker.
Burner parts not replaced
correctly.
See the Cleaning the Cooktop section.
The electrodes under the
burners are soiled.
See the Cleaning the Cooktop section.
Cooktop is locked. Unlock the cooktop. See the Using the Cooktop section.
The igniter hole (on some
models) is plugged.
See the Cleaning the Cooktop section.
Ticking sound of
igniter persists after
burner lights
Control knob is still in the
LITEposition.
Turn the knob out of the LITE position to the desired setting.
Turn the burner off and relight. If ticking is still present, call for service.
Top burners do not
burn evenly
Improper burner assembly. Make sure the burner caps are seated correctly. See the Care and
Cleaning of the range section.
Burner slots on the side of the
burner may be clogged.
Remove the burners for cleaning. See the Care and Cleaning of the
range section.
(A) Soft blue flames—
Normalfornaturalgas
(B) Yellow tips on
outer cones—
Normalforpropanegas
Troubleshooting Tips ... Before you schedule service
Save time and money! Review the charts on the following pages first and you may not need to schedule service.

14 49-2001107 Rev. 1
cafeappliances.com
All warranty service is provided by our Factory Service Centers, or an authorized service technician. To schedule service
online, visit us at cafeappliances.com/service. Please have your serial number and your model number available when
scheduling service.
Servicing your appliance may require the use of the onboard data port for diagnostics. This gives a Café factory service
technician the ability to quickly diagnose any issues with your appliance and helps Café improve its products by providing
Café with information on your appliance. If you do not want your appliance data to be sent to Café, please advise your
technician not to submit the data to Café at the time of service.
What Café will not cover:
■Service trips to your home to teach you how to use
the product.
■ Improperinstallation,deliveryormaintenance.
■ Failureoftheproductifitisabused,misused,
modified or used for other than the intended purpose
or used commercially.
■ Damagetotheglasscooktopcausedbyuseof
cleaners other than the recommended cleaning
creams and pads.
■ Damagetotheglasscooktopcausedbyhardened
spills of sugary materials or melted plastic that are
not cleaned according to the directions in the
Owner’s Manual.
■ Replacementofhousefusesorresettingofcircuit
breakers.
■ Damagetotheproductcausedbyaccident,fire,
floods or acts of God.
■ Incidentalorconsequentialdamagecausedby
possible defects with this appliance.
■ Damagecausedafterdelivery.
■ Productnotaccessibletoproviderequiredservice.
■ Servicetorepairorreplacelightbulbs,exceptfor
LEDlamps.
■Damagetofinish,suchassurfacerust,tarnish,orsmall
blemishes not reported within 48 hours of delivery.
EXCLUSION OF IMPLIED WARRANTIES
YoursoleandexclusiveremedyisproductrepairasprovidedinthisLimitedWarranty.Anyimpliedwarranties,
including the implied warranties of merchantability or fitness for a particular purpose, are limited to one year or
the shortest period allowed by law.
For the period of Café will replace
One year
From the date of the
original purchase
Any partofthecooktopwhichfailsduetoadefectinmaterialsorworkmanship.Duringthis
limited one-year warranty, Café will provide, free of charge, all labor and in-home service
to replace the defective part.
Staple your receipt here. Proof of the original purchase
date is needed to obtain service under the warranty. LIMITED WARRANTY
Café Gas Cooktop Limited Warranty
This limited warranty is extended to the original purchaser and any succeeding owner for products purchased for home
use within the USA. If the product is located in an area where service by a Café Authorized Servicer is not available, you
may be responsible for a trip charge or you may be required to bring the product to an Authorized Café Service location
for service. In Alaska, the limited warranty excludes the cost of shipping or service calls to your home.
Some states do not allow the exclusion or limitation of incidental or consequential damages. This limited warranty
gives you specific legal rights, and you may also have other rights which vary from state to state. To know what your
legal rights are, consult your local or state consumer affairs office or your state’s Attorney General.
Warrantor: GE Appliances, aHaier company
Louisville,KY40225
Warrantor in Canada: MC Commercial
Burlington,ON,L7R5B6
Extended Warranties: Purchase a Café extended warranty and learn about special discounts that are available while
your warranty is still in effect. You can purchase it online anytime at
cafeappliances.com/extended-warranty
Café Service will still be there after your warranty expires.

49-2001107 Rev. 115
ACCESSORIES
Looking For Something More?
Café offers a variety of accessories to improve your
cooking and maintenance experiences!
Refer to the Consumer Support page for phone numbers
and website information.
The following products and more are available:
Accessories
Cleaning Supplies
CitruShine Stainless Steel Wipes
Stainless Steel Polishing Cloth
Cerama Bryte®Burnt-On Grease Remover

16 49-2001107 Rev. 1
Printed in the United States
Consumer Support
CONSUMER SUPPORT
Café Website
Have a question or need assistance with your appliance? Try the Café website 24 hours a day, any day of the year!
You can also shop for more great Café products and take advantage of all our on-line support services designed for
your convenience. In the US: cafeappliances.com In Canada: cafeappliances.ca
Register Your Appliance
Register your new appliance on-line at your convenience! Timely product registration will allow for enhanced
communication and prompt service under the terms of your warranty, should the need arise. You may also mail in
the pre-printed registration card included in the packing material. In the US: cafeappliances.com/register
In Canada: cafeappliances.ca/registration
Schedule Service
Expert Café repair service is only one step away from your door. Get on-line and schedule your service at your
convenience any day of the year. In the US: cafeappliances.com/service In Canada: cafeappliances.ca/service
Extended Warranties
Purchase a Café extended warranty and learn about special discounts that are available while your warranty is still in
effect. You can purchase it on-line anytime. Café Service will still be there after your warranty expires.
In the US: cafeappliances.com/extended-warranty In Canada: cafeappliances.ca/extended-warranty
Remote Connectivity
For assistance with wireless network connectivity (for models with remote enable),
visit our website at cafeappliances.com/connect In Canada: cafeappliances.ca/connect
Parts and Accessories
Individuals qualified to service their own appliances can have parts or accessories sent directly to their homes
(VISA,MasterCardandDiscovercardsareaccepted).Orderon-linetoday24hourseveryday.
In the US: cafeappliances.com/parts
Instructions contained in this manual cover procedures to be performed by any user. Other servicing
generally should be referred to qualified service personnel. Caution must be exercised, since improper
servicing may cause unsafe operation.
Customers in Canada should consult the yellow pages for the nearest Mabe service center, visit our website at
cafeappliances.com/parts
Contact Us
If you are not satisfied with the service you receive from Café, contact us on our website with all the details including
your phone number, or write to:
IntheUS:GeneralManager,CustomerRelations|CaféAppliances,AppliancePark|Louisville,KY40225
cafeappliances.com/contact
InCanada:Director,ConsumerRelations,MabeCanadaInc.|Suite310,1FactoryLane|Moncton,N.B.E1C9M3
cafeappliances.ca/contact

Inscrivez ci-dessous les numéros de modèle
et de série
N° de modèle___________________________
N° de série_____________________________
Ils se trouvent sur une étiquette sous la table
de cuisson.
49-2001107 Rev. 1 05-22 GEA
Manuel du propriétaire
Au gaz encastrée table de cuisson
Modèles : CGP9530, CGP9536, CGP7030, et CGP7036
Table des matières
Consignes de sécurité ...........................3
Utilisation de la table de cuisson
En cas de panne de courant ......................6
Brûleurs de surface .............................6
Gril en accessoire ..............................8
Entretien et nettoyage
Nettoyage de la vitre de la table de cuisson ..........9
Trucs de dépannage ............................13
Garantie limitée ................................14
Accessoires ...................................15
Soutien au consommateur .......................16
TM

249-2001107 Rev. 1
NOUS VOUS REMERCIONS D’ACCUEILLIR CAFÉ CHEZ VOUS
Nous sommes fiers du savoir-faire, de l’innovation et de l’esthétique qui composent chaque
appareil Café, et nous pensons que vous le serez aussi. Dans cette optique, nous vous rappelons
que l’enregistrement de votre électroménager vous assure la communication de renseignements
importants sur le produit et la garantie lorsque vous en avez besoin.
Enregistrez votre électroménager Café en ligne dès maintenant. Des sites web et des numéros de
téléphone utiles figurent dans la section Soutien au consommateur de ce manuel d’utilisation.
Vous pouvez aussi poster la fiche de garantie pré-imprimée incluse dans l’emballage.
TM

49-2001107 Rev. 13
LISEZ CES INSTRUCTIONS ET RANGEZ-LES SOIGNEUSEMENT
CONSIGNES DE SÉCURITÉ IMPORTANTES
VEUILLEZ LIRE TOUTES LES CONSIGNES AVANT D’UTILISER L’APPAREIL
CONSIGNES DE SÉCURITÉ
AVERTISSEMENT Veuillez lire toutes les consignes avant d’utiliser ce produit. Le non-respect de ces instructions pourrait
entraîner un incendie, un choc électrique, une blessure grave voire la mort.
AVERTISSEMENT Le non-respect à la lettre de ces instructions peut causer un incendie ou
une explosion, qui pourrait entraîner des dommages matériels, des blessures ou la mort.
- Ne pas entreposer ou utiliser d’essence ou tout autre liquide ou gaz inflammable à proximité
de cet appareil ou de tout autre appareil.
- EN PRÉSENCE D’UNE ODEUR DE GAZ :
■ Netenterd’allumeraucunappareil;
■ Netoucheràaucuncommutateurélectrique;
■ N’utiliseraucuntéléphonedansl’immeuble;
■ Appelerimmédiatementlefournisseurdegazàpartird’untéléphonesituéàl’extérieurde
l’immeuble;Suivrelesinstructionsdufournisseurdegaz;
■ S’ilestimpossibledejoindrelefournisseurdegaz,appelerleservicedesincendies.
-L’installationetlaréparationdoiventêtreeffectuéesparuninstallateurouuneagencede
réparation ayant les qualifications requises ou par le fournisseur de gaz.
AVERTISSEMENT NE FAITES JAMAIS FONCTIONNER LA SECTION
DE CUISSON DE CET ÉLECTROMÉNAGER SANS
SURVEILLANCE
■ Lenon-respectcetavertissementpeut
entraîner un incendie ou une explosion
posant un risque de dommage à la
propriétéetdeblessuregraveoumortelle.
■ Dansl’éventualitéd’unincendie,tenez-vous
à l’écart de l’électroménager et appelez
immédiatementvotreserviced’incendie.
N’ESSAYEZ PAS D’ÉTEINDRE UN FEU
D’HUILE OU DE GRAISSE AVEC DE L'EAU.
AVERTISSEMENT
GARDER LES MATÉRIAUX INFLAMMABLES À L’ÉCART DE LA TABLE DE CUISSON
Le non-respect de ces instructions pourrait entraîner un incendie ou une blessure.
■ Nerangeznin’utilisezdematériauxinflammablesà
l’intérieurouàproximitédelatabledecuisson,ycompris
du papier, du plastique, des poignées, des nappes, des
revêtementsmuraux,desrideaux,desstoresainsiquede
l’essence ou d’autres vapeurs ou liquides inflammables.
■ Neportezjamaisdevêtementsampleslorsquevous
utilisez cette table de cuisson. Ces vêtements pourraient
s’enflammer s’ils entrent en contact avec des surfaces
chaudes, ce qui pourrait entraîner des brûlures graves.
■ Nelaissezpass’accumulerlagraissedecuissonou
autresmatièresinflammablessurlatabledecuissonouà
proximitédecelui-ci.Cettegraissepourraits’enflammer.
AVERTISSEMENT
DANS L’ÉVENTUALITÉ D’UN FEU, PRENEZ LES MESURES SUIVANTES
AFIN DE PRÉVENIR LES BLESSURES ET LA PROPAGATION DU FEU
■ N’utilisezpasd’eausurdesfeuxdegraisse.Neprenezjamaisunecasseroleenflammes.Éteignez(OFF)toutesles
commandes.Étouffezunecasseroleenflammessurunélémentchauffantenlarecouvrantcomplètementavecun
couverclebienadapté,unetôleàbiscuitsouunplateauplat.Utilisezunextincteuràpoudresècheouàmousse.

449-2001107 Rev. 1
LISEZ CES INSTRUCTIONS ET RANGEZ-LES SOIGNEUSEMENT
CONSIGNES DE SÉCURITÉ IMPORTANTES
VEUILLEZ LIRE TOUTES LES CONSIGNES AVANT D’UTILISER L’APPAREIL
CONSIGNES DE SÉCURITÉ
AVERTISSEMENT CONSIGNES GÉNÉRALES DE SÉCURITÉ
AVERTISSEMENT Ne JAMAIS utiliser cet
appareilélectroménagerenguisedechaufferette.
Lefaitdechaufferunepièceainsipeutentraînerun
empoisonnement au monoxyde de carbone ou une
surchauffedufour.
■ Utilisezcetélectroménagerauxfinsauxquellesilest
destiné d’après la description de manuel du propriétaire.
■ Votretabledecuissondoitêtreinstalléeetcorrectement
miseàlaterreparuninstallateurqualifiéconformément
auxinstructionsd’installationfournies.
■ Toutemiseaupointetréparationdoitêtreeffectuée
par un installateur de table de cuisson ou un technicien
en réparation qualifiés. Ne tentez pas de réparer ou
de remplacer une pièce quelconque de votre table de
cuissonsaufsicelaestexpressémentrecommandé
dans ce manuel.
■ Votretabledecuissonestexpédiéedel’usineprêteà
fonctionner au gaz naturel. Il est possible de la convertir
au gaz propane. Dans ce cas, la conversion doit être
effectuéeparuntechnicienqualifiéconformémentaux
instructionsd’installationetauxcodeslocaux.L’agentqui
réalise cette conversion en assume la responsabilité.
■ Demandezàl’installateurdevousmontrerl’emplacement
du robinet de la table de cuisson au gaz et comment le
fermer en cas de nécessité.
■ Branchezvotretabledecuissondansuneprisede120
voltsmiseàlaterreseulement.Neretirezpaslabroche
demiseàlaterrerondedelafiche.Encasdedoute
concernantlecircuitdemiseàlaterredudomicile,vous
avez la responsabilité et l’obligation de remplacer une
prisenonmiseàlaterreparunepriseàtroisbroches
correctementmiseàlaterre,conformémentauCode
national de l’électricité. N’utilisez pas de cordon de
rallonge avec cet électroménager.
■ Avantd’effectueruneréparation,débranchezlatablede
cuisson ou coupez l’alimentation électrique au panneau
de distribution du domicile en retirant le fusible ou en
désarmantledisjoncteur.
■ Assurez-vousquetoutlematérield’emballageestretiré
de la table de cuisson avant la mise en marche afin de
prévenir l’inflammation de ce matériel.
■ Évitezderayeroudeheurterlatabledecuissonetle
panneau de commande. Cela pourrait briser le verre.
Ne cuisez pas sur une table de cuisson dont le verre est
brisé. Cela poserait un risque de décharge électrique,
d’incendie ou de coupure. Appelez un technicien qualifié
immédiatement.
■ Neretirezpaslessix(6)supportsen«Z»noirsvissés
danslebasdelatabledecuisson(certainsmodèles).
■ Nelaissezpaslesenfantsseulsousanssurveillance
dans la zone où un électroménager est utilisé. Il faut leur
interdire de grimper, s’asseoir ou se tenir sur quelque
partie de l’appareil que ce soit.
■ ATTENTION Ne rangez pas des articles attractifs
pour les enfants dans les armoires au-dessus de la table
de cuisson. En grimpant sur la table de cuisson pour y
accéder, les enfants risquent de se blesser gravement.
■ N’utilisezpasdepoignées(carrésdetissusisolants)
humides ou mouillées pour prendre des casseroles sur une
surface chaude car la vapeur risque de vous brûler. Ces
poignées ne doivent pas toucher les brûleurs de surface ni
leur grille. N’utilisez pas une serviette ni d’autres linges de
grandformatàlaplacedepoignéesisolantes.
■ Veillezànepastoucherlessurfaceschaudessurlatable
de cuisson.
■ Nechauffezpaslescontenantsd’alimentsnonouverts.
Desblessurespeuventrésulterdel’explosiondu
contenantsuiteàl’augmentationdepression.
■ Cuisezlesalimentssuffisammentafindeprévenir
l’intoxicationalimentaire.Desrecommandationsrelatives
auxtempératuresdecuissonminimalessûressont
accessibles sur les sites IsItDoneYet.gov et
fsis.usda.gov.Utilisezunthermomètrepouralimentset
vérifiezàplusieursendroits.
This manual suits for next models
3
Table of contents
Languages:
Other Cafe Cooktop manuals
Popular Cooktop manuals by other brands

KitchenAid
KitchenAid KICU508SBL0 parts list

KitchenAid
KitchenAid KECC568GWW3 parts list

Eldom
Eldom Hiit PI100 Operating instruction

KitchenAid
KitchenAid ARCHITECT KDRS807 Use and care guide

Lotus
Lotus FT T-64ET X Series Instructions for installation and use

Miele
Miele KM 6324-1 Operating and installation instructions