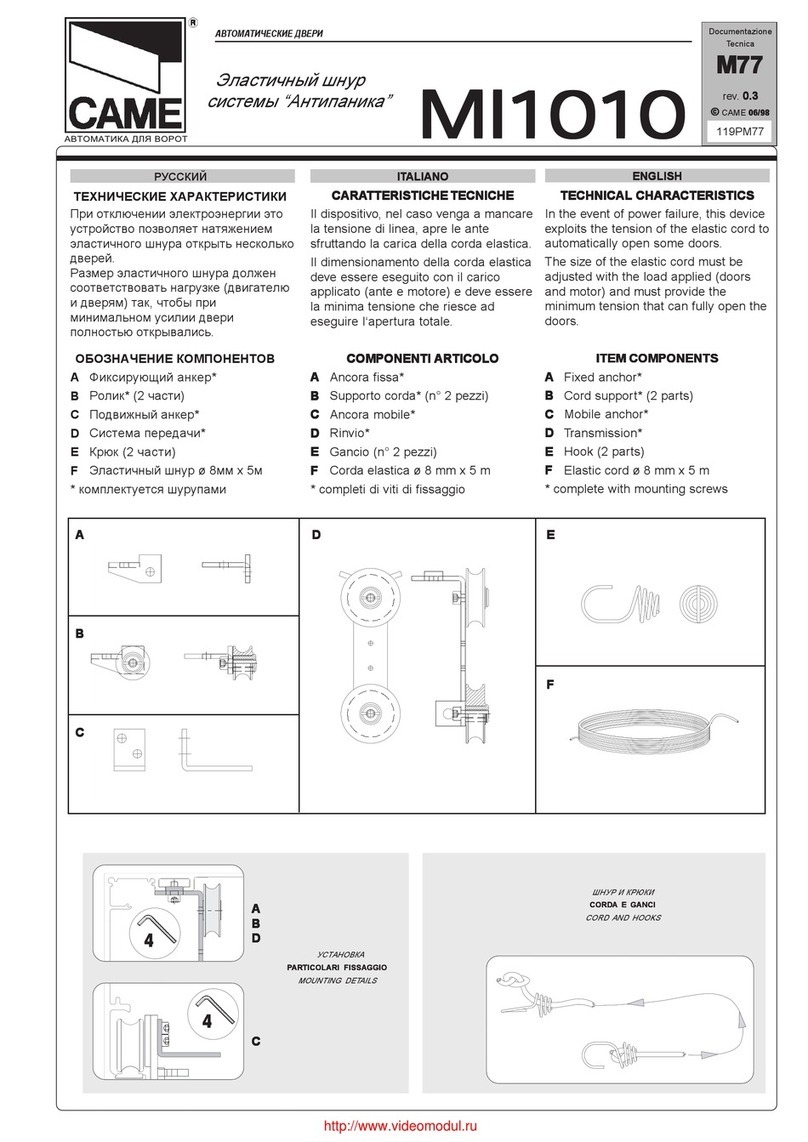
A E B F
C
EE
RTA
45÷50 мм
D
10÷20 мм anta aperanta aper
anta aperanta aper
anta apertata
tata
ta
door open
ЧРЕЗМЕРНОЕ НАТЯЖЕНИЕ ЭЛАСТИЧНОГО
ШНУРА СОЗДАЁТ ОПАСНОСТЬ ДЛЯ
ПОЛЬЗОВАТЕЛЯ.
МАССА ПОЛНОСТЬЮ ОСНАЩЁННЫХ ДВЕРЕЙ
НЕ ДОЛЖНА ПРЕВЫШАТЬ 150кг.
ПЕРИОДИЧЕСКИ ПРОВЕРЯЙТЕ ИЗНОС
ЭЛАСТИЧНОГО ШНУРА В КОНТАКТНЫХ ТОЧКАХ,
СМАЗКУ РОЛИКОВ СИСТЕМЫ ПЕРЕДАЧИ.
РУССКИЙ
Инструкция по монтажу
Перед началом монтажа
отключите электропитания.
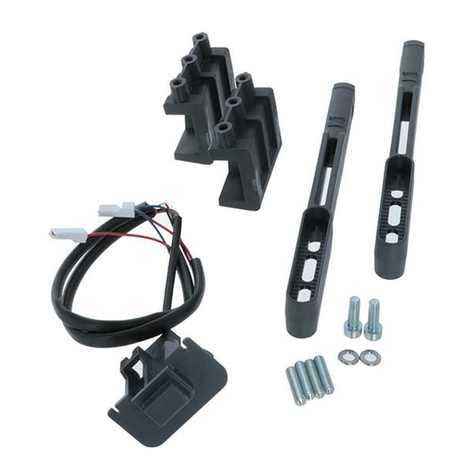
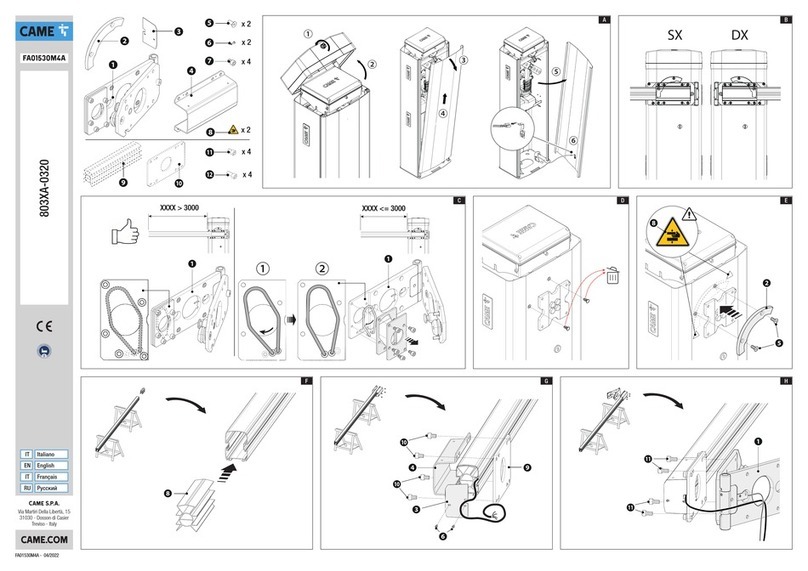
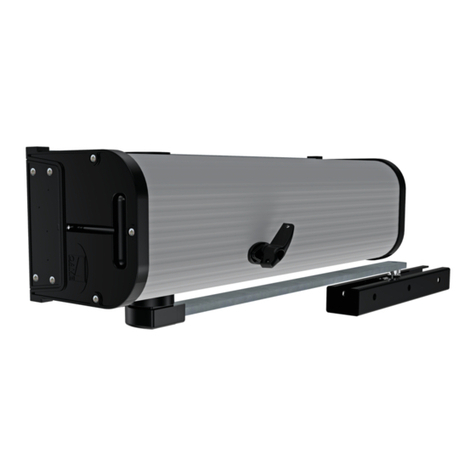
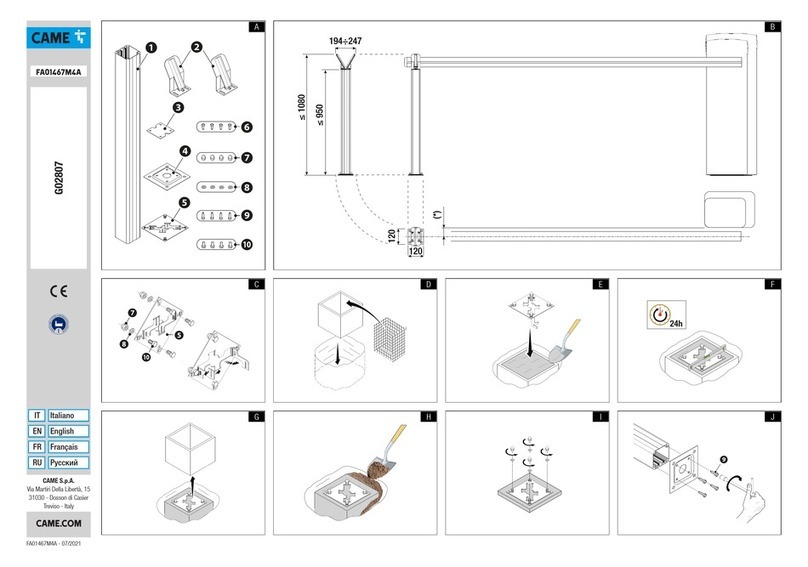
1 - Расположите и закрепите фиксирующий
анкер A, ролик B, и систему передачи
D, в указанных позициях.
2 - Установите подвижный анкер C на
тележке (дверь должна быть
открыта).
3 - Завяжите узел на одном конце шнура
F, вставьте шнур в первый крюк E и
закрепите крюк на анкере; проложите
шнур до подвижного анкера.
4 - Установите второй крюк на подвиж-
ном анкере и зафиксируйте в нём шнур,
создав предварительное натяжение.
5 - Проверте, что на траектории шнура
отсутствует трение с другими
компонентами; при необходимости
отрегулируйте систему передачи.
6 - Толкните закрытую дверь и
убедитесь, что система работает. При
необходимости измените натяжение шнура
и положение узлов. По окончании работ,
увеличте узлы и отрежте лишнюю
часть шнура.
7 - На платах ZP7 или ZP8, активируйте
- постоянное давление в закрытом
состоянии.
- активация системы “антипаника”.
8 - Проведите запуск и коллибровку
системы (смотрите техническую
документацию).
ITIT
ITIT
ITALIANOALIANO
ALIANOALIANO
ALIANO
ISTRISTR
ISTRISTR
ISTRUZIONI DI MONTUZIONI DI MONT
UZIONI DI MONTUZIONI DI MONT
UZIONI DI MONTAAAAAGGIOGGIO
GGIOGGIO
GGIO
togliere la tensione di linea
all’impianto.
11111 - Inserire e fissare l’ancora fissa AAAAA, i
supporti corda BBBBB e il rinvio DDDDD, nelle
posizioni illustrate.
22222 - Fissare l‘ancora mobile CCCCC al carrello
indicato, sui 2 fori esistenti (l’anta del’anta de
l’anta del’anta de
l’anta deveve
veve
ve
essere aperessere aper
essere aperessere aper
essere apertata
tata
ta).
33333 - Annodare una estremità della
corda FFFFF e infilare il primo gancio EEEEE;
agganciarlo all’ancora fissa e passare
la corda sul percorso fino all’ancora
mobile.
44444 - Inserire e agganciare il secondo
gancio sull’ancora mobile e annodare la
corda tensionandola provvisoriamente.
55555 - Verificare il percorso della corda,
curando di evitare attriti con altri
componenti: se necessario, inclinare la
staffa del rinvio.
66666 - Spingere l’anta in chiusura e
rilasciare per verificare l’efficenza del
sistema: se necessario, tendere o
allentare maggiormente la corda
agendo sui nodi. Al termine della
verifica, annodare definitivamente la
corda e tagliare la parte in esubero.
77777 - Sul quadro ZP7 o ZP8, attivare
- SPINTSPINT
SPINTSPINT
SPINTAAAAA COSTCOST
COSTCOST
COSTANTEANTE
ANTEANTE
ANTE (selettore a 10 vie:
dip 4 in ON)
- ANTIPANTIP
ANTIPANTIP
ANTIPANICOANICO
ANICOANICO
ANICO AAAAA CARICACARICA
CARICACARICA
CARICA ELASTICAELASTICA
ELASTICAELASTICA
ELASTICA
(selettore a 4 vie: dip 1 in ON).
88888 - Rieseguire la fase di ARieseguire la fase di A
Rieseguire la fase di ARieseguire la fase di A
Rieseguire la fase di Avviamento evviamento e
vviamento evviamento e
vviamento e
didi
didi
di TTTTTaratura dell’automazionearatura dell’automazione
aratura dell’automazionearatura dell’automazione
aratura dell’automazione, vedi la
relativa documentazione tecnica.
LLLLL’ECCESSIV’ECCESSIV
’ECCESSIV’ECCESSIV
’ECCESSIVAAAAA TENSIONE DELLA CORDTENSIONE DELLA CORD
TENSIONE DELLA CORDTENSIONE DELLA CORD
TENSIONE DELLA CORDA ELA-A ELA-
A ELA-A ELA-
A ELA-
STICA PUÒ CREARE PERICOLO PER LSTICA PUÒ CREARE PERICOLO PER L
STICA PUÒ CREARE PERICOLO PER LSTICA PUÒ CREARE PERICOLO PER L
STICA PUÒ CREARE PERICOLO PER L’OPERA-’OPERA-
’OPERA-’OPERA-
’OPERA-
TTTTTORE.ORE.
ORE.ORE.
ORE.
IL PESO COMPLESSIVO DELLE ANTE NON
DEVE SUPERARE I 150 KG.
CONTROLLARE PERIODICAMENTE L’USURA
DELLA CORDA ELASTICA SULLE PARTI IN
CONTATTO E VERIFICARE LO SCORRIMENTO
DELLE ROTELLE DI RINVIO.
EXCESSIVEEXCESSIVE
EXCESSIVEEXCESSIVE
EXCESSIVE TENSION ON TENSION ON
TENSION ON TENSION ON
TENSION ON THE ELASTIC CORDTHE ELASTIC CORD
THE ELASTIC CORDTHE ELASTIC CORD
THE ELASTIC CORD
COULD PRESENT A DCOULD PRESENT A D
COULD PRESENT A DCOULD PRESENT A D
COULD PRESENT A DANGERANGER
ANGERANGER
ANGER T
TTTTOOOOO THETHE
THETHE
THE
OPERAOPERA
OPERAOPERA
OPERATTTTTOR.OR.
OR.OR.
OR.
THE OTHE O
THE OTHE O
THE OVERALLVERALL
VERALLVERALL
VERALL WEIGHT OF WEIGHT OF
WEIGHT OF WEIGHT OF
WEIGHT OF THE DOORS MUSTTHE DOORS MUST
THE DOORS MUSTTHE DOORS MUST
THE DOORS MUST
NONO
NONO
NOT EXCEED 150 KG.T EXCEED 150 KG.
T EXCEED 150 KG.T EXCEED 150 KG.
T EXCEED 150 KG.
PERIODICALLY CHECK FOR WEAR ON THE
ELASTIC CORD AT THE CONTACT POINTS,
AND CHECK THAT THE TRANSMISSION
WHEELS RUN SMOOTHLY.
ENGLISHENGLISH
ENGLISHENGLISH
ENGLISH
ASSEMBLASSEMBL
ASSEMBLASSEMBL
ASSEMBLY INSTRY INSTR
Y INSTRY INSTR
Y INSTRUCTIONSUCTIONS
UCTIONSUCTIONS
UCTIONS
Disconnect the system's electrical
power supply.
11111 - Position and fix the fixed anchor AAAAA,
the cord supports BBBBB, and the
transmission DDDDD, in the indicated
positions.
22222 - Mount the mobile anchor CCCCC to the
carriage indicated on the 2 existing
holes (the door mthe door m
the door mthe door m
the door must be openust be open
ust be openust be open
ust be open).
33333 - Tie a knot on one end of the cord FFFFF
and thread on the first hook EEEEE; fasten
this to the fixed anchor and pass the
cord along its path to the mobile anchor.
44444 - Mount and fix the second hook on
the mobile anchor and tie a knot in the
cord, creating some provisional tension.
55555 - Check the path of the cord while
being careful not to cause any friction
with other components; if necessary,
angle the transmission bracket.
66666 - Push the door closed and release it
to check the functioning of the system. If
necessary, tighten or loosen the tension
on the cord by changing the position of
the knots. When finished, tighten the
knots in the cord and cut off the extra
part.
77777 - On the ZP7 or ZP8 panel, activate
- CONSTCONST
CONSTCONST
CONSTANTANT
ANTANT
ANT THRTHR
THRTHR
THRUSTUST
USTUST
UST (10 way selector: dip
4 set to ON)
- ELASTICELASTIC
ELASTICELASTIC
ELASTIC LOLO
LOLO
LOADAD
ADAD
AD ANTIANTI
ANTIANTI
ANTI-----PPPPPANICANIC
ANICANIC
ANIC DEVICEDEVICE
DEVICEDEVICE
DEVICE (4 way
selector: dip 1 set to ON).
88888 - PPPPPerferf
erferf
erform the automation Starorm the automation Star
orm the automation Starorm the automation Star
orm the automation Start-upt-up
t-upt-up
t-up
and Calibration steps aand Calibration steps a
and Calibration steps aand Calibration steps a
and Calibration steps againgain
gaingain
gain; see the
relative technical documentation.
Все материалы представленные в данном буклете являются
информационными. САМЕ s.p.a. оставляет за собой право
вносить изменения с целью улучшения потребительских и
технических характеристик.
дверь открыта
«МС ус» - официальное представительство
компании “CAME Cancelli Automatici S.p.a.” в оссии
ел: (495) 739-00-69,
Web:www.umcrus.ru, E-mail: info@umcrus.ru
ехническая поддерка: 8-800-200-15-50


