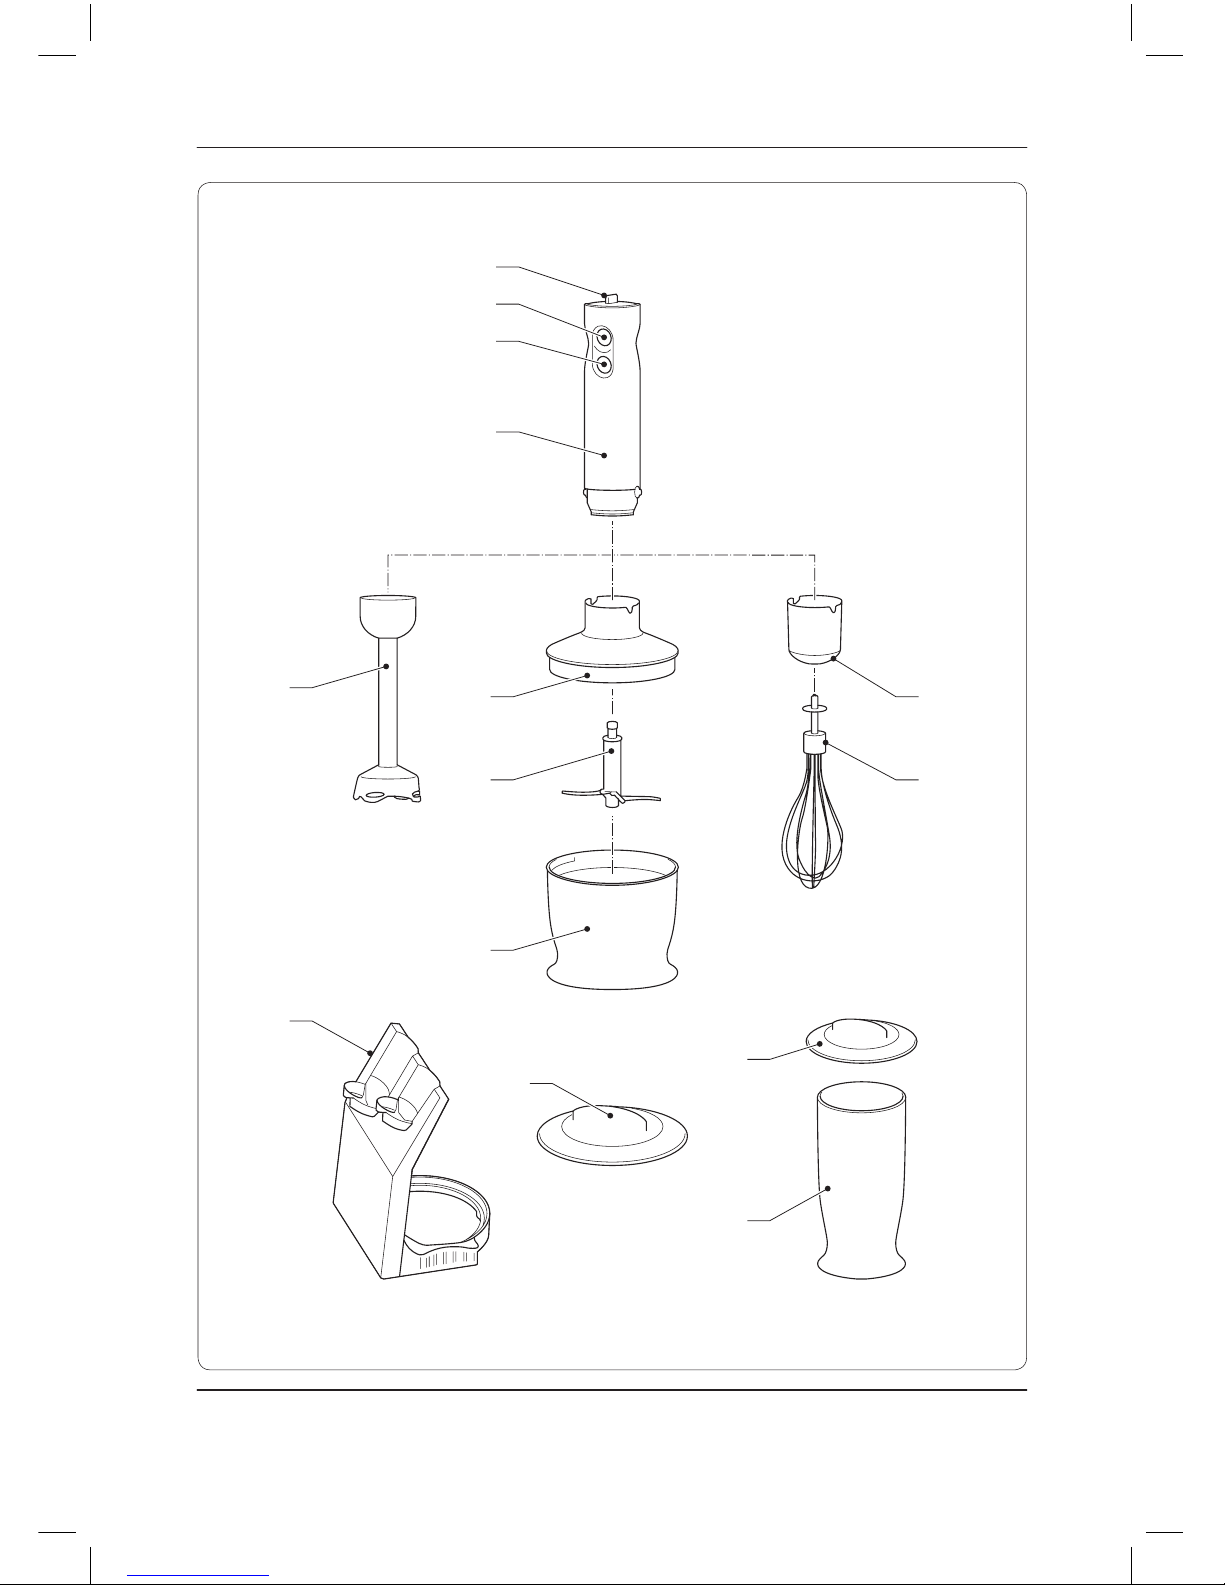
Campomatic SB850SS User manual

INSTRUCTION MANUAL
:
WWW.CAMPOMATIC.COM
Made in China
SB850SS
multi chef
hand blender

Nederlands 4
English 9
Français 14
Deutsch 19
Español 25
Italiano 30
Svenska 35
Norsk 40
Português 45
Polski 50
SB850SS

2
1
2
3
4
6
5
12
8
7
9
10
11
13
14
A

3
6 139
B1 B2 B3
B

4
NL
Veiligheidsinstructies
Algemene veiligheid
Lees voor gebruik de gebruik-•
saanwijzing zorgvuldig door.
Bewaar de gebruiksaanwijzing
voor toekomstig gebruik.
Gebruik het apparaat en de•
accessoires uitsluitend voor
de beoogde doeleinden.
Gebruik het apparaat en de
accessoires niet voor andere
doeleinden dan beschreven
in de gebruiksaanwijzing.
Gebruik het apparaat niet als•
een onderdeel of een
accessoire beschadigd of
defect is. Laat een beschadigd
of defect onderdeel of een
accessoire door de fabrikant
of een erkend servicecentrum
vervangen.
Het apparaat is niet bedoeld•
voor gebruik door personen
(inclusief kinderen) met een
lichamelijke, zintuiglijke of
geestelijke beperking of
zonder de benodigde ervaring
en kennis, tenzij ze onder
toezicht staan van een persoon
die verantwoordelijk is voor
hun veiligheid of instructies
hebben gekregen over het
gebruik van het apparaat.
Houd altijd toezicht op•
kinderen om te voorkomen dat
ze met het apparaat spelen.
Gebruik het apparaat niet in•
de buurt van badkuipen,
douches, wastafels of andere
voorzieningen die water
bevatten.
Dompel het apparaat niet•
onder in water of andere
vloeistoffen. Verwijder het
apparaat niet met uw
handen als het apparaat is
ondergedompeld in water of
andere vloeistoffen. Haal
onmiddellijk de stekker uit
het stopcontact. Gebruik het
apparaat niet langer als het in
water of andere vloeistoffen
ondergedompeld is geweest.
Reinig het apparaat en de•
accessoires. Zie het gedeelte
"Reiniging en onderhoud".
Elektrische veiligheid
Controleer voor gebruik altijd•
of de netspanning
overeenkomt met de
spanning op het typeplaatje
van het apparaat.
Bedien het apparaat niet•
door middel van een externe
timer of een apart
afstandsbedieningssysteem.

5
NL
Sluit het apparaat op een•
geaard stopcontact aan.
Gebruik indien nodig een
geaarde verlengkabel met
een geschikte diameter
(minimaal 3 x 1 mm2).
Installeer voor extra•
bescherming een aardlek-
schakelaar (RCD) met een
nominale reststroom van
maximaal 30 mA.
Zorg ervoor dat er geen•
water in de aansluitpunten
van het netsnoer en het
verlengsnoer kan komen.
Wikkel netsnoer en het•
verlengsnoer altijd volledig af.
Zorg ervoor dat het netsnoer•
niet over de rand van een
werkblad hangt, dat het niet
per ongeluk verstrengeld kan
raken en dat niemand erover
kan struikelen.
Houd het netsnoer uit de•
buurt van warmtebronnen,
olie en scherpe randen.
Gebruik het apparaat niet als•
het netsnoer of de stekker
beschadigd of defect is. Laat
een beschadigd of defect
netsnoer of een stekker door
de fabrikant of een erkend
servicecentrum vervangen.
Trek de stekker niet aan het•
netsnoer uit het stopcontact.
Haal de stekker uit het•
stopcontact als het apparaat
niet in gebruik is, voordat u
het gaat monteren of
demonteren en voordat u
reinigings- en onderhouds-
werkzaamheden gaat
uitvoeren.
Veiligheidsinstructies voor
staafmixers
Het apparaat is alleen•
geschikt voor huishoudelijk
gebruik.
Gebruik het apparaat niet•
buitenshuis.
Gebruik het apparaat niet in•
vochtige omgevingen.
Houd het apparaat uit de•
buurt van warmtebronnen.
Plaats het apparaat niet op
hete oppervlakken of in de
buurt van open vlammen.
Zorg ervoor dat uw handen•
droog zijn voordat u het
apparaat aanraakt.
Raak de bewegende delen•
niet aan. Houd uw handen
tijdens gebruik en tijdens
reiniging en onderhoud uit
de buurt van de bewegende
delen.

6
NL
Pas op voor scherpedelen.•
Houd uw handen uit de
buurt van de scherpedelen.
Het apparaatmaakt gebruik
van scherpe messen in het
mengaccessoire en het
hakaccessoire.
Pas op voor hete delen.•
Wacht totdat het apparaatis
afgekoeld voordatude
behuizing en deonderdelen
van het apparaataanraakt.
Het apparaat wordt heet
tijdens gebruik.
Wees extra voorzichtig tijdens•
reiniging en onderhoud.
Wees extra voorzichtig bij
het legen van demengbeker
of de hakcontainer. Wees
extra voorzichtig bij het
hanteren van het scherpemes.
Laat het apparaatniet•
onbeheerd achter tijdens
gebruik.
Reiniging en onderhoud (g. A & B)
Het apparaatmoet na ieder gebruik worden
gereinigd.
Waarschuwing!
- Schakel voor reiniging en onderhoud het
apparaat uit, verwijder denetstekker uit
het stopcontact en wacht totdat het
apparaatisafgekoeld.
- Dompel het apparaatniet onder in water
of andere vloeistoen.
Voorzichtig!
- Reinig het apparaatniet met bijtendeof
schurendereinigingsmiddelen.
- Gebruik geen scherpe voorwerpen om het
apparaat te reinigen.
- Reinig demotorunit, het mengaccessoire,
het hakaccessoire en het klopaccessoire
niet in de vaatwasser.
Controleer het apparaatregelmatig op•
mogelijke schade.
Reinigde motorunit (4) met een zachte,•
vochtige doek. Droogdemotorunit (4)
grondig met een schone, droge doek.
Reinigdeaccessoires:•
- Mengen: Reinig het mengaccessoire (6)
onder stromend water (g. B1). Reinig
de mengbeker (7) en het deksel (8) in sop
of in de vaatwasser. Spoel demengbeker
(7) en het deksel (8) af onder stromend
water.
- Hakken: Reinig het hakaccessoire (9)
onder stromend water (g. B2). Reinig
het hakmes (10), de hakcontainer (11)
en het deksel (12) in sop of in de
vaatwasser. Spoel het hakmes (10), de
hakcontainer (11) en het deksel (12)af
onder stromend water.
- Kloppen: Reinig het klopaccessoire (13)
onder stromend water (g. B3). Reinig
de garde(14) in sop of in de vaatwasser.
Spoel de garde (14) af onder stromend
water.
- Droogdeaccessoires grondig met een
schone, droge doek.
Beschrijving (g. A)
1. Testschakelaar
2. Aan/uit -knop (lage snelheid)
3. Aan/uit -knop (hoge snelheid)
4. Motorunit
5. Accessoirehouder

7
NL
Mengen
6. Mengaccessoire
7. Mengbeker
8. Deksel (mengbeker)
Hakken
9. Hakaccessoire
10. Hakmes
11. Hakcontainer
12. Deksel (hakcontainer)
Kloppen
13. Klopaccessoire
14. Garde
Gebruik (fig. A)
Waarschuwing!
- Schakel voor montage of demontage het
apparaat uit, verwijder de netstekker uit
het stopcontact en wacht totdat het
apparaat is afgekoeld.
Mengen
Het mengaccessoire (6) kan worden gebruikt
voor de volgende toepassingen: bereiden van
smoothies, shakes en sappen; bereiden van koude
soepen; bereiden van dressings en (dip)sauzen.
Waarschuwing!
- Laat het apparaat niet continu ingeschakeld
gedurende meer dan één minuut.
- Schakel het apparaat niet in wanneer de
mengbeker (7) leeg is.
- Zorg ervoor dat de motorunit (4) en het
mengaccessoire (6) niet in contact komen
met water of andere vloeistoffen.
- De mengbeker (7) en het deksel (8) zijn
niet geschikt voor gebruik in de magnetron.
Monteer het mengaccessoire (6) op de•
motorunit (4) door het linksom te draaien
totdat het op zijn plaats klikt.
Doe de ingrediënten in de mengbeker (7).•
Plaats de netstekker in het stopcontact.•
Plaats het mengaccessoire (7) op het deksel•
(8) op een stabiel en vlak oppervlak.
Plaats het mengaccessoire (6) in de•
mengbeker (7). Zorg ervoor dat het
accessoire zich in de ingrediënten bevindt.
Gebruik de testschakelaar (1) om te testen of•
het apparaat de ingrediënten goed mengt.
Houd de aan/uit-knop (2/3) ingedrukt om•
het apparaat in te schakelen.
Beweeg voorzichtig op en neer door de•
ingrediënten. Het apparaat mengt de
ingrediënten in enkele seconden. Hoe
langer het apparaat is ingeschakeld, des te
fijner de ingrediënten worden gemengd.
Laat de aan/uit-knop (2/3) los om het•
apparaat uit te schakelen.
Verwijder de netstekker uit het stopcontact.•
Laat het apparaat volledig afkoelen.•
Verwijder het mengaccessoire (6) uit de•
mengbeker (7).
Verwijder het mengaccessoire (6) van de•
motorunit (4) door het rechtsom te draaien.
Plaats het deksel (8) op de mengbeker (7)•
totdat u de ingrediënten voor verdere
voedselbereiding gebruikt.
Hakken
Het hakaccessoire (9) kan worden gebruikt
voor het hakken van vlees (rauw en gekookt),
groenten, fruit (vers en gedroogd), noten,
kruiden, specerijen, etc.
Waarschuwing!
- Laat het apparaat niet continu ingeschakeld
gedurende meer dan 10 seconden.
- Schakel het apparaat niet in wanneer de
hakcontainer (11) leeg is.
- Zorg ervoor dat de motorunit (4) en het
hakaccessoire (9) niet in contact komen
met water of andere vloeistoffen.
- De hakcontainer (11) en het deksel (12)
zijn niet geschikt voor gebruik in de
magnetron.
Monteer het hakaccessoire (9) op de•
motorunit (4) door het linksom te draaien
totdat het op zijn plaats klikt.
Plaats de hakcontainer (11) op het deksel•
(12) op een stabiel en vlak oppervlak.
Plaats het hakmes (10) in de hakcontainer•
(11).
Snijd het voedsel in stukken. Zorg ervoor•
dat de stukken voedsel in de hakcontainer
(11) passen.
Doe de ingrediënten in de hakcontainer•
(11).
Plaats de netstekker in het stopcontact.•

8
NL
Plaats het hakaccessoire (9) op de•
hakcontainer (11).
Gebruik de testschakelaar (1) om te testen•
of het apparaat de ingrediënten goed hakt.
Houd de aan/uit-knop (2/3) ingedrukt om•
het apparaat in te schakelen.
Houd het apparaat stevig vast tijdens het•
proces. Het apparaat hakt de ingrediënten
in enkele seconden. Hoe langer het
apparaat is ingeschakeld, des te fijner de
ingrediënten worden gehakt.
Laat de aan/uit-knop (2/3) los om het•
apparaat uit te schakelen.
Verwijder de netstekker uit het stopcontact.•
Laat het apparaat volledig afkoelen.•
Verwijder het hakaccessoire (9) van de•
hakcontainer (11).
Verwijder het hakmes (10) uit de•
hakcontainer (11).
Verwijder het hakaccessoire (9) van de•
motorunit (4) door het rechtsom te draaien.
Plaats het deksel (12) op de hakcontainer•
(11) totdat u de ingrediënten voor verdere
voedselbereiding gebruikt.
Kloppen
Het klopaccessoire (13) kan worden gebruikt
voor het kloppen van eieren, het kloppen van
room en het opschuimen van melk.
Waarschuwing!
- Laat het apparaat niet continu ingeschakeld
gedurende meer dan twee minuten.
- Schakel het apparaat niet in wanneer de
mengkom leeg is.
- Zorg ervoor dat de motorunit (4) en het
klopaccessoire (13) niet in contact komen
met water of andere vloeistoffen.
Plaats de garde (14) in het klopaccessoire•
(13).
Monteer het klopaccessoire (13) op de•
motorunit (4) door het linksom te draaien
totdat het op zijn plaats klikt.
Plaats een mengkom op een stabiel en vlak•
oppervlak.
Doe de ingrediënten in de mengkom.•
Plaats de netstekker in het stopcontact.•
Doe de garde (14) in de mengkom. Zorg•
ervoor dat het accessoire zich in de
ingrediënten bevindt.
Gebruik de testschakelaar (1) om te testen•
of het apparaat de ingrediënten goed klopt.
Houd de aan/uit-knop (2/3) ingedrukt om•
het apparaat in te schakelen.
Beweeg het apparaat rechtsom tijdens het•
proces.
Laat de aan/uit-knop (2/3) los om het•
apparaat uit te schakelen.
Verwijder de netstekker uit het stopcontact.•
Laat het apparaat volledig afkoelen.•
Verwijder de garde (14) uit de mengkom.•
Verwijder het klopaccessoire (13) van de•
motorunit (4) door het rechtsom te draaien.
Verwijder de garde (14) van het•
klopaccessoire (13).

9
EN
Safety instructions
General safety
Read the manual carefully•
before use. Keep the manual
for future reference.
Only use the appliance and•
the accessories for their
intended purposes. Do not
use the appliance and the
accessories for other purposes
than described in the manual.
Do not use the appliance if•
any part or any accessory is
damaged or defective.
If a part or an accessory is
damaged or defective,
it must be replaced by the
manufacturer or an authorised
repair agent.
The appliance is not intended•
for use by persons (including
children) with reduced
physical, sensory or mental
capabilities, or lack of
experience and knowledge,
unless they have been given
supervision or instruction
concerning use of the
appliance by a person
responsible for their safety.
Children should be supervised•
to ensure that they do not
play with the appliance.
Do not use the appliance near•
bathtubs, showers, basins or
other vessels containing water.
Do not immerse the•
appliance in water or other
liquids. If the appliance is
immersed in water or other
liquids, do not remove the
appliance with your hands.
Immediately remove the mains
plug from the wall socket.
If the appliance is immersed
in water or other liquids, do
not use the appliance again.
Clean the appliance and the•
accessories. Refer to the section
"Cleaning and maintenance".
Electrical safety
Before use, always check that•
the mains voltage is the same
as the voltage on the rating
plate of the appliance.
The appliance is not intended•
to be operated by means of
an external timer or separate
remote-control system.
Connect the appliance to an•
earthed wall socket. If
necessary, use an earthed
extension cable of a suitable
diameter (at least 3 x 1 mm2).
For additional protection,•
install a residual current

10
EN
device (RCD) with a rated
residual operating current
that does not exceed 30 mA.
Make sure that water cannot•
enter the contact plugs of
the mains cable and the
extension cable.
Always fully unwind the mains•
cable and the extension cable.
Make sure that the mains•
cable does not hang over the
edge of a worktop and cannot
be caught accidentally or
tripped over.
Keep the mains cable away•
from heat, oil and sharp
edges.
Do not use the appliance if•
the mains cable or the mains
plug is damaged or defective.
If the mains cable or the
mains plug is damaged or
defective, it must be replaced
by the manufacturer or an
authorised repair agent.
Do not pull the mains cable•
to disconnect the mains plug
from the mains.
Disconnect the mains plug from•
the mains when the appliance
is not in use, before assembly
or disassembly and before
cleaning and maintenance.
Safety instructions for stick
blenders
The appliance is suitable for•
domestic use only.
Do not use the appliance•
outdoors.
Do not use the appliance in•
humid surroundings.
Keep the appliance away•
from heat sources. Do not
place the appliance on hot
surfaces or near open flames.
Make sure that your hands•
are dry before touching the
appliance.
Do not touch moving parts.•
Keep your hands away from
the moving parts during use
and during cleaning and
maintenance.
Beware of sharp parts. Keep•
your hands away from the
sharp parts. The appliance
uses sharp blades in the
blending attachment and the
chopping attachment.
Beware of hot parts. Wait•
until the appliance has cooled
down before touching the
housing and the parts of the
appliance. The appliance
becomes hot during use.
Be extra careful during•
cleaning and maintenance.

11
EN
Be extra careful when
emptying the blending mug
or the chopping container.
Be extra careful when
handling the sharp blade.
Do not leave the appliance•
unattended during use.
Cleaning and maintenance
(g. A & B)
The appliancemust be cleaned after each use.
Warning!
- Beforecleaningor maintenance, switch o
the appliance, remove the mains plug from
the wall socket and wait until the appliance
has cooled down.
- Do notimmerse the appliancein water or
other liquids.
Caution!
- Do not use aggressive or abrasive cleaning
agents to clean the appliance.
- Do not use sharp objects to clean the
appliance.
- Do notclean the motor unit, the blending
attachment, the choppingattachment and
the whisking attachment in the dishwasher.
Regularly check the appliance for possible•
damage.
Clean the motor unit(4) with a soft, damp•
cloth. Thoroughly dry the motor unit (4)
with a clean, dry cloth.
Clean the accessories:•
- Blending applications: Clean the blending
attachment (6) under running water
(g. B1). Clean the blending mug (7) and
the lid (8)in soapy water or in the
dishwasher. Rinse the blendingmug (7)
and the lid (8) under running water.
- Choppingapplications: Clean the chopping
attachment (9) under running water
(g. B2). Clean the chopping blade (10),
the choppingcontainer (11) and the lid
(12) in soapy water or in the dishwasher.
Rinse the chopping blade (10), the
choppingcontainer (11)and the lid (12)
under running water.
- Whiskingapplications: Clean the
whiskingattachment (13) under running
water (g. B3). Clean the whisk (14) in
soapy water or in the dishwasher. Rinse
the whisk (14) under running water.
- Thoroughly dry the accessories with a
clean, dry cloth.
Description (g. A)
1. Inching switch
2. On/o button (low speed)
3. On/o button (high speed)
4. Motor unit
5. Accessory holder
Blending applications
6. Blending attachment
7. Blending mug
8. Lid (blending mug)
Chopping applications
9. Chopping attachment
10. Chopping blade
11. Chopping container
12. Lid (choppingcontainer)
Whisking applications
13. Whisking attachment
14. Whisk
Use (g. A)
Warning!
- Beforeassembly or disassembly, switch o
the appliance, remove the mainsplug from
the wall socket and wait until the appliance
has cooled down.
Blending applications
The blendingattachment (6)can be used for
the followingapplications: preparing
smoothies, shakes and juices; preparingcold
soups; preparing dressings, dips and sauces.

12
EN
Warning!
- Do not leave the appliance switched on
continuously for more than one minute.
- Do not switch on the appliance when the
blending mug (7) is empty.
- Make sure that the motor unit (4) and the
blending attachment (6) do not come into
contact with water or other liquids.
- The blending mug (7) and the lid (8) are
not suitable for use in the microwave.
Mount the blending attachment (6) to the•
motor unit (4) by turning it
counterclockwise until it clicks into place.
Put the ingredients into the blending mug•
(7).
Insert the mains plug into the wall socket.•
Place the blending mug (7) onto the lid (8)•
on a stable and flat surface.
Place the blending attachment (6) into the•
blending mug (7). Make sure that the
accessory is located in the ingredients.
Use the inching switch (1) to test whether the•
appliance blends the ingredients properly.
To switch on the appliance, keep the on/off•
button (2/3) pressed.
Move through the ingredients with a gentle•
up-and-down movement. The appliance
blends the ingredients in a few seconds.
The longer the appliance is switched on,
the finer the ingredients will be blended.
To switch off the appliance, release the•
on/off button (2/3).
Remove the mains plug from the wall socket.•
Allow the appliance to cool down•
completely.
Remove the blending attachment (6) from•
the blending mug (7).
Remove the blending attachment (6) from•
the motor unit (4) by turning it clockwise.
Place the lid (8) onto the blending mug (7)•
until you use the ingredients for further
food processing.
Chopping applications
The chopping attachment (9) can be used for
chopping meat (raw and cooked), vegetables,
fruits (fresh and dried), nuts, herbs, spices, etc.
Warning!
- Do not leave the appliance switched on
continuously for more than 10 seconds.
- Do not switch on the appliance when the
chopping container (11) is empty.
- Make sure that the motor unit (4) and the
chopping attachment (9) do not come into
contact with water or other liquids.
- The chopping container (11) and the lid (12)
are not suitable for use in the microwave.
Mount the chopping attachment (9) to the•
motor unit (4) by turning it
counterclockwise until it clicks into place.
Place the chopping container (11) onto the•
lid (12) on a stable and flat surface.
Place the chopping blade (10) into the•
chopping container (11).
Cut the food into pieces. Make sure that the•
pieces of food fit in the chopping container
(11).
Put the ingredients into the chopping•
container (11).
Insert the mains plug into the wall socket.•
Place the chopping attachment (9) onto•
the chopping container (11).
Use the inching switch (1) to test whether•
the appliance chops the ingredients
properly.
To switch on the appliance, keep the on/off•
button (2/3) pressed.
Firmly hold the appliance during the process.•
The appliance chops the ingredients in a
few seconds. The longer the appliance is
switched on, the finer the ingredients will
be chopped.
To switch off the appliance, release the•
on/off button (2/3).
Remove the mains plug from the wall socket.•
Allow the appliance to cool down•
completely.
Remove the chopping attachment (9) from•
the chopping container (11).
Remove the chopping blade (10) from the•
chopping container (11).
Remove the chopping attachment (9) from•
the motor unit (4) by turning it clockwise.
Place the lid (12) onto the chopping•
container (11) until you use the ingredients
for further food processing.

13
EN
Whisking applications
The whisking attachment (13) can be used for
beating eggs, whipping cream and frothing milk.
Warning!
- Do not leave the appliance switched on
continuously for more than two minutes.
- Do not switch on the appliance when the
mixing bowl is empty.
- Make sure that the motor unit (4) and the
whisking attachment (13) do not come
into contact with water or other liquids.
Insert the whisk (14) into the whisking•
attachment (13).
Mount the whisking attachment (13) to•
the motor unit (4) by turning it
counterclockwise until it clicks into place.
Place a mixing bowl on a stable and flat•
surface.
Put the ingredients into the mixing bowl.•
Insert the mains plug into the wall socket.•
Place the whisk (14) into the mixing bowl.•
Make sure that the accessory is located in
the ingredients.
Use the inching switch (1) to test whether the•
appliance whisks the ingredients properly.
To switch on the appliance, keep the on/off•
button (2/3) pressed.
Move the appliance clockwise during the•
process.
To switch off the appliance, release the on/•
off button (2/3).
Remove the mains plug from the wall socket.•
Allow the appliance to cool down•
completely.
Remove the whisk (14) from the mixing bowl.•
Remove the whisking attachment (13) from•
the motor unit (4) by turning it clockwise.
Remove the whisk (14) from the whisking•
attachment (13).

14
FR
Instructions de sécurité
Sécurité générale
Lisez avec soin le manuel•
avant utilisation. Conservez le
manuel pour référence future.
Utilisez l'appareil et ses•
accessoires uniquement pour
leurs fins prévues. N'utilisez pas
l'appareil et ses accessoires
pour tout autre objet que
celui exposé dans le manuel.
N'utilisez pas l'appareil si une•
pièce ou un accessoire
quelconque est endommagé
ou défectueux. Si une pièce
ou un accessoire quelconque
est endommagé ou
défectueux, il doit être
remplacé par le fabricant ou
par un réparateur agréé.
Cet appareil n'est pas destiné•
à être utilisé par des personnes
(notamment des enfants)
présentant des capacités
physiques, sensorielles,
mentales ou motrices réduites
voire dépourvues des
connaissances et de l'expérience
nécessaires, sauf sous la
surveillance ou après avoir reçu
des instructions d'usage de cet
appareil par une personne
responsable de leur sécurité.
Les enfants doivent toujours•
être surveillés pour s'assurer
qu'ils ne jouent pas avec
l'appareil.
N'utilisez pas l'appareil à•
proximité d'une baignoire,
d'une douche, d'un lavabo ou
d'autres récipients contenant
de l'eau.
Ne plongez pas l'appareil•
dans l'eau ou autres liquides.
Si l'appareil est plongé dans
l'eau ou d'autres liquides, ne
retirez pas l'appareil avec vos
mains. Débranchez
immédiatement la fiche
secteur de la prise murale.
Si l'appareil est plongé dans
l'eau ou autre liquide,
ne l'utilisez pas à nouveau.
Nettoyez l'appareil et les•
accessoires. Consultez la section
"Nettoyage et entretien".
Sécurité électrique
Avant toute utilisation,•
vérifiez que la tension du
secteur correspond à celle
indiquée sur la plaque
signalétique de l'appareil.
L'appareil n'est pas conçu pour•
être utilisé avec une minuterie
externe ou un système de
télécommande séparé.

15
FR
Connectez l'appareil à une•
prise murale mise à la terre.
Si nécessaire, vous pouvez
utiliser une rallonge d'un
diamètre adapté (au moins
3 x 1 mm2).
Pour maximiser la protection,•
installez un dispositif de
courant résiduel (RCD)
présentant une intensité de
service résiduelle nominale
inférieure ou égale à 30 mA.
Assurez-vous que l'eau ne•
peut pas s'infiltrer dans les
contacts de prise du cordon
d'alimentation et de la rallonge.
Déroulez toujours•
complètement le cordon
d'alimentation et la rallonge.
Assurez-vous que le cordon•
d'alimentation ne pend pas
sur le bord d'un plan de
travail et ne peut pas être
happé ou faire trébucher
quelqu'un accidentellement.
Maintenez le cordon•
d'alimentation à l'écart de la
chaleur, de l'huile et des
bords tranchants.
N'utilisez pas l'appareil si le•
cordon d'alimentation ou la
fiche secteur est endommagé
ou défectueux. Si le cordon
d'alimentation ou la fiche
secteur est endommagé ou
défectueux, il doit être
remplacé par le fabricant ou
par un réparateur agréé.
Ne tirez pas sur le cordon•
d'alimentation pour débrancher
la fiche secteur du secteur.
Débranchez la fiche secteur•
du secteur lorsque l'appareil
n'est pas utilisé, avant le
montage ou le démontage
de même qu'avant le
nettoyage ou l'entretien.
Instructions de sécurité pour
les pieds mixeurs
L'appareil est réservé à un•
usage domestique.
N'utilisez pas l'appareil à•
l'extérieur.
N'utilisez pas l'appareil dans•
un environnement humide.
Maintenez l'appareil à l'écart•
des sources de chaleur. Ne
placez pas l'appareil sur une
surface chaude ou à proximité
de flammes nues.
Assurez-vous d'avoir les mains•
sèches avant de toucher
l'appareil.
Ne touchez pas les parties•
mobiles. Maintenez vos mains
à l'écart des pièces mobiles

16
FR
pendant l'utilisation, le
nettoyage et l'entretien.
Attention aux pièces coupantes.•
Éloignez vos mains des
parties coupantes. L'appareil
emploie des lames aiguisées
pour les accessoires de
mixage et de hachage.
Attention aux pièces chaudes.•
Attendez que l'appareil ait
susamment refroidi avant
de toucher le carter ou ses
autres pièces. L'appareil peut
devenir chaud pendantl'usage.
Faites spécialement attention•
durant le nettoyage et la
maintenance. Faites
spécialement attention en
vidant le bol mixeur et le
conteneur de hachage. Faites
extrêmement attention en
manipulant la lame elée.
Ne laissez jamais l'appareil sans•
surveillancependantl'utilisation.
Nettoyage et entretien (g. A & B)
L’appareil doit être nettoyé après chaque
utilisation.
Avertissement !
- Avantlenettoyage ou l'entretien, arrêtez
l'appareil, débranchez la che secteur dela
prise murale et attendez que l'appareil
refroidisse.
- Ne plongez pasl'appareil dansl'eau ou
autres liquides.
Attention !
- N'utilisez pasdeproduits denettoyage
agressifsouabrasifspour nettoyer l'appareil.
- Ne nettoyez pas l'appareil avec des objets
coupants.
- Ne nettoyez pas l'unité moteur, l'accessoire
de mixage, l'accessoire de hachage et
l'accessoire defouet au lave -vaisselle.
Contrôlez régulièrement les éventuels•
dommages sur l'appareil.
Nettoyez l'unité moteur (4)avec un chion•
doux et humide. Séchez soigneusement l'unité
moteur (4)avec un chion propre et sec.
Nettoyez les accessoires :•
- Applicationsdemixage : Nettoyez
l'accessoire demixage (6) sous l'eau
courante (g. B1). Nettoyez le bol mixeur
(7) et le couvercle (8) à l'eau savonneuse
ou au lave -vaisselle. Rincez le bol mixeur
(7) et lecouvercle (8) sous l'eau courante.
- Applicationsde hachage : Nettoyez
l'accessoire de hachage (9) sous l'eau
courante (g. B2). Nettoyez la lamede
hachage (10), le conteneur de hachage (11)
et le couvercle (12)à l'eau savonneuse
ou au lave -vaisselle. Rincez la lame de
hachage (11), le conteneur de hachage (12)
et le couvercle (13) sous l'eau courante.
- Applicationsdefouet : Nettoyez
l'accessoire defouet (13) sous l'eau
courante (g. B3). Nettoyez lefouet (14)
à l'eau savonneuse ouau lave -vaisselle.
Rincez le fouet (14) sous l'eau courante.
- Séchez soigneusement les accessoires
avec un chion propre et sec.
Description (g. A)
1. Interrupteur pasà pas
2. Bouton marche/arrêt (vitesse lente)
3. Bouton marche/arrêt (vitesse rapide)
4. Unité moteur
5. Supportd'accessoires

17
FR
Applications de mixage
6. Accessoire de mixage
7. Bol mixeur
8. Couvercle (bol mixeur)
Applications de hachage
9. Accessoire de hachage
10. Lame de hachage
11. Conteneur de hachage
12. Couvercle (conteneur de hachage)
Applications de fouet
13. Accessoire de fouet
14. Fouet
Utilisation (fig. A)
Avertissement !
- Avant le montage ou le démontage, arrêtez
l'appareil, débranchez la fiche secteur de la
prise murale et attendez que l'appareil
refroidisse.
Applications de mixage
L'accessoire de mixage (6) peut servir aux
applications suivantes : préparer des smoothies,
des milk-shakes et des jus ; préparer des soupes
froides ; préparer des assaisonnements et des
sauces froides ou chaudes.
Avertissement !
- Ne faites pas fonctionner l’appareil
pendant plus d'une minute en continu.
- Ne mettez pas l'appareil sous tension si le
bol mixeur (7) est vide.
- Assurez-vous que l'unité moteur (4) et
l'accessoire de mixage (6) n'entrent pas en
contact avec de l'eau et autres liquides.
- Le bol mixeur (7) et le couvercle (8) ne sont
pas adaptés au micro-onde.
Montez l'accessoire de mixage (6) sur•
l'unité moteur (4) en tournant dans le sens
antihoraire jusqu'au clic.
Placez les ingrédients dans le bol mixeur (7).•
Insérez la fiche secteur dans la prise murale.•
Placez le bol mixeur (7) sur le couvercle (8)•
sur une surface stable et plane.
Placez l'accessoire de mixage (6) dans le bol•
mixeur (7). Assurez-vous que l'accessoire
est centré dans les ingrédients.
Utilisez l'interrupteur pas à pas (1) afin de•
tester si l'appareil mélange correctement
les ingrédients.
Pour mettre l’appareil en marche, maintenez•
le bouton marche/arrêt (2/3) enfoncé.
Passez dans les ingrédients avec un•
mouvement modéré de haut en bas. L'appareil
mixe les ingrédients en quelques secondes.
Plus l'appareil reste actif, plus les ingrédients
sont finement mixés.
Pour arrêter l’appareil, relâchez le bouton•
marche/arrêt (2/3).
Débranchez la fiche secteur de la prise•
murale.
Laissez l'appareil refroidir complètement.•
Retirez l'accessoire de mixage (6) du bol•
mixeur (7).
Retirez l'accessoire de mixage (6) de l'unité•
moteur (4) en le tournant dans le sens
horaire.
Placez le couvercle (8) sur le bol mixeur (7)•
jusqu'à ce que vous utilisiez les aliments
pour préparer à manger.
Applications de hachage
L'accessoire de hachage (9) peut servir à hacher
la viande (crue ou cuite), les légumes, les fruits
(frais et secs), les noix, les herbes, les épices, etc.
Avertissement !
- Ne faites pas fonctionner l'appareil pendant
plus de 10 secondes en continu.
- Ne mettez pas l'appareil sous tension si le
conteneur de hachage (11) est vide.
- Assurez-vous que l'unité moteur (4) et
l'accessoire de hachage (9) n'entrent pas en
contact avec de l'eau et autres liquides.
- Le conteneur de hachage (11) et le couvercle
(12) ne sont pas adaptés au micro-onde.
Montez l'accessoire de hachage (9) sur•
l'unité moteur (4) en tournant dans le sens
antihoraire jusqu'au clic.
Placez le conteneur de hachage (11) sur le•
couvercle (12) sur une surface stable et plane.
Placez la lame de hachage (10) dans le•
conteneur de hachage (11).
Coupez les aliments en morceaux. Assurez-•
vous que tous les morceaux d'aliments
tiennent dans le conteneur de hachage (11).

18
FR
Placez les ingrédients dans le conteneur de•
hachage (11).
Insérez la fiche secteur dans la prise murale.•
Placez l'accessoire de hachage (9) sur le•
conteneur de hachage (11).
Utilisez l'interrupteur pas à pas (1) afin de•
tester si l'appareil hache correctement les
ingrédients.
Pour mettre l’appareil en marche, maintenez•
le bouton marche/arrêt (2/3) enfoncé.
Maintenez fermement l'appareil durant le•
processus. L'appareil hache les ingrédients
en quelques secondes. Plus l'appareil reste
actif, plus les ingrédients sont finement
hachés.
Pour arrêter l’appareil, relâchez le bouton•
marche/arrêt (2/3).
Débranchez la fiche secteur de la prise•
murale.
Laissez l'appareil refroidir complètement.•
Retirez l'accessoire de hachage (9) du•
conteneur de hachage (11).
Retirez la lame de hachage (10) du•
conteneur de hachage (11).
Retirez l'accessoire de hachage (9) de•
l'unité moteur (4) en le tournant dans le
sens horaire.
Placez le couvercle (12) sur le conteneur de•
hachage (11) jusqu'à ce que vous utilisiez
les aliments pour préparer à manger.
Applications de fouet
L'accessoire de fouet (13) sert à battre les
œufs, fouetter la crème et faire mousser le lait.
Avertissement !
- Ne faites pas fonctionner l’appareil en
continu pendant plus de deux minutes.
- Ne mettez pas l'appareil sous tension si le
bol mixeur est vide.
- Assurez-vous que l'unité moteur (4) et
l'accessoire de fouet (13) n'entrent pas en
contact avec de l'eau et autres liquides.
Insérez le fouet (14) dans l'accessoire de•
fouet (13).
Montez l'accessoire de fouet (13) sur l'unité•
moteur (4) en tournant dans le sens
antihoraire jusqu'au clic.
Placez un bol mixeur sur une surface plane•
et stable.
Placez les ingrédients dans le bol mixeur.•
Insérez la fiche secteur dans la prise murale.•
Placez le fouet (14) dans le bol mixeur.•
Assurez-vous que l'accessoire est centré
dans les ingrédients.
Utilisez l'interrupteur pas à pas (1) afin de•
tester si l'appareil fouette correctement les
ingrédients.
Pour mettre l’appareil en marche, maintenez•
le bouton marche/arrêt (2/3) enfoncé.
Faites tourner l'appareil dans le sens•
horaire durant le processus.
Pour arrêter l’appareil, relâchez le bouton•
marche/arrêt (2/3).
Débranchez la fiche secteur de la prise•
murale.
Laissez l'appareil refroidir complètement.•
Retirez le fouet (14) du bol mixeur.•
Retirez l'accessoire de fouet (13) de l'unité•
moteur (4) en le tournant dans le sens
horaire.
Retirez le fouet (14) de l'accessoire de•
fouet (13).

19
DE
Sicherheitsanweisungen
Allgemeine Sicherheit
Lesen Sie das Handbuch vor•
dem Gebrauch genau durch.
Bewahren Sie das Handbuch
zur künftigen Bezugnahme auf.
Verwenden Sie das Gerät•
und sein Zubehör nur für den
Zweck, für den es konstruiert
wurde. Verwenden Sie das
Gerät und sein Zubehör nicht
für Zwecke, die nicht in
diesem Handbuch beschrieben
sind.
Verwenden Sie das Gerät nicht,•
wenn ein Teil oder Zubehör
beschädigt oder defekt ist.
Ist ein Teil oder Zubehör
beschädigt oder defekt, muss
es vom Hersteller oder einem
autorisierten Reparaturbetrieb
ausgetauscht werden.
Das Gerät darf nicht von•
Personen (einschließlich
Kindern) mit eingeschränkten
körperlichen, sensorischen
oder geistigen Fähigkeiten
oder ohne das erforderliche
Wissen und die nötige
Erfahrung benutzt werden,
es sei denn, diese Personen
werden beaufsichtigt oder in
den Gebrauch des Geräts
seitens einer für deren
Sicherheit verantwortlichen
Person eingewiesen.
Kinder müssen stets•
beaufsichtigt werden, um
sicherzustellen, dass sie nicht
mit dem Gerät spielen.
Verwenden Sie das Gerät nicht•
in der Nähe von Badewannen,
Duschen, Bassins oder
anderen Wasserbehältern.
Tauchen Sie das Gerät niemals•
in Wasser oder andere
Flüssigkeiten ein. Falls das
Gerät in Wasser oder andere
Flüssigkeiten eingetaucht
wurde, nehmen Sie es nicht mit
Ihren Händen heraus. Ziehen
Sie sofort den Netzstecker
aus der Wandsteckdose. Falls
das Gerät in Wasser oder
andere Flüssigkeiten
eingetaucht wird, darf es nicht
mehr verwendet werden.
Reinigen Sie das Gerät und•
das Zubehör. Siehe Abschnitt
"Reinigung und Wartung".
Elektrische Sicherheit
Vergewissern Sie sich vor•
dem Gebrauch stets, dass die
Netzspannung mit der
Spannung auf dem Typenschild
des Geräts übereinstimmt.
Table of contents
Languages:
Other Campomatic Kitchen Appliance manuals