manuals.online logo
Brands
  1. Home
  2. •
  3. Brands
  4. •
  5. Canaropa
  6. •
  7. Door Opening System
  8. •
  9. Canaropa 851 User manual

Canaropa 851 User manual

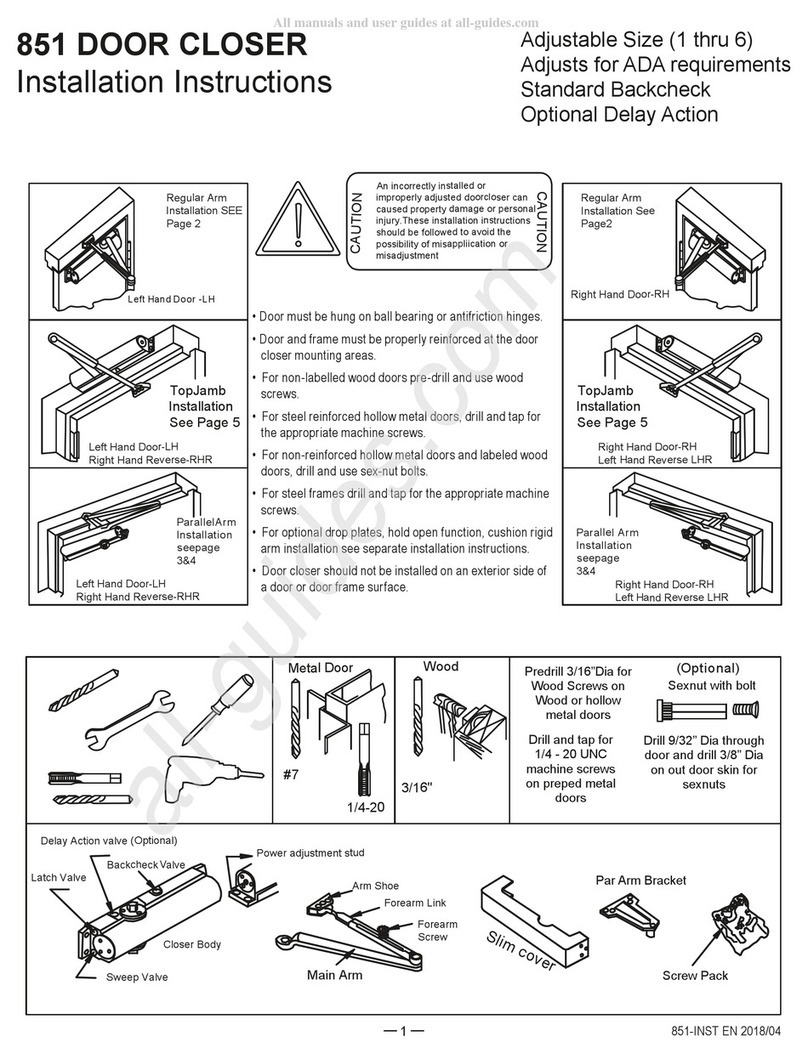
Regular Arm
Installation SEE
Page 2
Left Hand Door -LH
An incorrectly installed or
improperly adjusted doorcloser can
caused property damage or personal
injury.These installation instructions
should be followed to avoid the
possibility of misappliication or
misadjustment
CAUTION
CAUTION
Regular Arm
Installation See
Page2
TopJamb
Installation
See Page 5
Left Hand Door-LH
Right Hand Reverse-RHR
Right Hand Door-RH
TopJamb
Installation
See Page 5
Right Hand Door-RH
Left Hand Reverse LHR
Parallel Arm
Installation
seepage
3&4
Right Hand Door-RH
Left Hand Reverse LHR
ParallelArm
Installation
seepage
3&4
Metal Door
Wood
#7
1/4-20
3/16''
(Optional)
Backcheck alve
Latch Valve
Power adjustment stud
Closer Body
Sweep Valve
Forearm
Screw
Main Arm
1
Left Hand Door-LH
Right Hand Reverse-RHR
Delay Action valve (Optional)
Slimcover
• Door must be hung on ball bearing or antifriction hinges.
• Door and frame must be properly reinforced at the door
closer mounting areas.
• For non-labelled wood doors pre-drill and use wood
screws.
• For steel reinforced hollow metal doors, drill and tap for
the appropriate machine screws.
• For non-reinforced hollow metal doors and labeled wood
doors, drill and use sex-nut bolts.
• For steel frames drill and tap for the appropriate machine
screws.
• For optional drop plates, hold open function, cushion rigid
arm installation see separate installation instructions.
• Door closer should not be installed on an exterior side of
a door or door frame surface.
Predrill 3/16”Dia for
Wood Screws on
Wood or hollow
metal doors
Drill and tap for
1/4 - 20 UNC
machine screws
on preped metal
doors
Drill 9/32” Dia through
door and drill 3/8” Dia
on out door skin for
sexnuts
Sexnut with bolt
V
Forearm Link
Arm Shoe
851 DOOR CLOSER
Installation Instructions
Adjustable Size (1 thru 6)
Adjusts for ADA requirements
Standard Backcheck
Optional Delay Action
851-INST EN 2018/04
Par Arm Bracket
Screw Pack
2
A5-1/2
(140)
1-3/4
(44)
1-1/4
(32)
3/4
(19)
1
(25.4)
12
(304.8)
E
A
B
C
D
G
90°
L
S
(2)
or
L
S
F
PARTS MARK & DRILL HOLES
Inches
(mm)
R
L
Y
S
Z
SWEEP LATCH
Slimcover
Stronger
WeakerSlower
Faster
Slower
Faster
Regular Arm Installation (Pull Side)
with No Hold-Open
Forearm
Link
Main Arm
Right Hand shown
Forearm
Shoe
1 2
45
INSTALLATION SEQUENCE
SPRING POWER ADJUST
OpeningDimension"A"
To 100°
7-1/2
(191)
101° to 130°
131° to 180°
6
(152)
4-1/2
(114)
5
3
67
BACKCHECK (BC) & OPTIONAL DELAYED ACTION (DA)
BC
DA
Harder
Softer
LONGER
SHORTER
PINION CAP OR
OPTIONAL COVER
Caution:
Don't completely
close valve
851-INST EN 2018/04
MARK & DRILL HOLES
PARTS
2-3/4
(70)
2
(51)
3/8
(10)
A
1/2
(13)
7/16
(11)
1-1/2
F
A
B
E
D
C
G
3-1/2
(89)
3/4
(19) 12
(304.8)
B
Inches
(mm)
Door
Opening
To 120°
121° to 180°
A
B
9-1/2
(241)
7
(178)
3-3/4
(95)
1-1/4
(32)
Top of
DoorFrame
3
Slimcover
Slower (to close)
Faster
Parallel Arm Installation (Push Side)
with No Hold-Open
Forearm
Link
Main Arm
Parallel
Bracket
Parallel
Bracket
INSTALLATION SEQUENCE
CLOSING SPEED VALVES DOOR CLOSER & PARALLEL
BRACKET INSTALLATION
Right Hand or Left Hand Reverse shown
Rotate door closer bottom shaft
about 30° to 40° towards the
hinges and place main arm on
top shaft
12
3
456
L
S
SWEEP
LATCH
PRELOAD ARM
851-INST EN 2018/04
MAIN ARM ORIENTATION OPEN SPEED VALVES CONNECT ARM
B
A
L
S
S
L
1-1/2
(38)
L
S
L
S
(2)
or
Flat
Flat
R
S
Y
L
Z
Z
R
S
Y
L
Sweep
Latch
Caution:
Don't remove
valves
Stronger
Weaker
Slower
Faster
Slower
Faster
Parallel Arm Installation (Push Side)
with No Hold-Open
(1)
(2)
851-INST EN 2018/04
4
7
LEFT HAND
REVERSED (LHR)
RIGHT HAND
REVERSED (RHR)
8 9
FIX ARM
ADJUST LATCH SPEED INSTALL PINION CAP OR
OPTIONAL COVER
ADJUST BACKCHECK &
OPTIONAL DELAYED ACTION
ADJUST SPRING POWER ADJUST SWEEP SPEED
10 11 12
13 14 15
BC
DA
Harder
Softer
LONGER
SHORTER
CAUTION:
Don’t completely
close valve.
LHR
LHR
LHR
PARTS MARK & DRILL HOLES
INSTALLATION SEQUENCE
12
Top of
Frame
Inches
(mm)
OpeningDimension"A"
To 100°
7-1/2
(191)
101° to 130°
131° to 180°
6
(152)
4-1/2
(114)
Reveal
SWEEP LATCH
5
or
C
D
B
A
E
90
(304.8)
A
3/4
(19)
5/8
(16)
(140)
5-1/2
1-3/4
(44)
1-5/8
(41)
s
z
Y
R
L
Slimcover
Slower
Faster
Stronger
Weaker
Slower
Faster
Top Jamb Installation (Push Side)
with No Hold-Open
Forearm
Link
A longer forearm
link is required for
reveals greater
than 3" (76 mm)
Inside
Door Surface
Left Hand Reverse shown
12
5
3
4
76
SPRING POWER ADJUST
BACKCHECK (BC) & OPTIONAL DELAYED ACTION (DA) PINION CAP OR
OPTIONAL COVER
BC
DA
Harder
Softer
LONGER
SHORTER
Caution:
Don't completely
close valve
851-INST EN 2018/04
SWEEP LATCH BACKSET (BC)
OPTIONAL DELAYED ACTION (DA)
6
POWERADJUSTMENTCHART
M A X IM U M
D O O R W ID T H FULLTURNS
REQUIR ED
E X T E R IO R
D O O R S
IN T E R IO R
D O O R S
5lb-f*
M A X .D OOR
W E IG H T
L B S (K G S )
LONGER
SHORTER
Stronger
Weaker
7-1/2% stronger
or
or
7-1/2%weaker
DA
Slower
Faster
Slower
Faster
Slower
Faster Slower
Faster
Slower
Faster
Slower
Faster
BC
NOTE: Door Closer power adjustment has 20 full (360°) turns from minimum to maximum. Factory preset to Size 3
Harder
Softer
BACKCHECK
RANGE
CLOSING
CYCLE
OPENING
CYCLE
SWEEP
SPEED
DELAYED
ACTION
LATCH
SPEED
75°
75°
Door Closer Adjustments
Spring Power Adjustment
Use 5/32" hex key for these adjustments
Arm / Shoe
Configuratrion
33-65 (15-30)
POWER
SIZE
1
2
3
4
5
6
36” (914mm) 42” (1067mm)
60-90 (27-41)
54” (1372mm)
48” (1219mm) 175-265 (80-120)
60” (1524mm)
54” (1372mm) 250-330 (113-150)
42” (1067mm) 48” (1219mm) 125-190 (57-86)
85-140 (38-63)
36” (914mm)
- 7 TURNS C.C.W.
- 3 TURNS C.C.W.
- 0 TURNS
- 4 TURNS C.W.
- 8 TURNS C.W.
- 13 TURNS C.W.
851-INST EN 2018/04

Other Canaropa Door Opening System manuals

Canaropa 9500 Series User manual

Canaropa

Canaropa 9500 Series User manual

Canaropa 1900 Series User manual

Canaropa

Canaropa 1900 Series User manual

Canaropa 4000CNS Series User manual

Canaropa

Canaropa 4000CNS Series User manual

Canaropa 9500FL User manual

Canaropa

Canaropa 9500FL User manual

Canaropa 851 User manual

Canaropa

Canaropa 851 User manual

Popular Door Opening System manuals by other brands

G-U OTS 736 SV BG Assembly instructions

G-U

G-U OTS 736 SV BG Assembly instructions

CAMDEN CM-300 installation instructions

CAMDEN

CAMDEN CM-300 installation instructions

Artweger TWISTLINE Assembly instructions

Artweger

Artweger TWISTLINE Assembly instructions

Kesseböhmer eTouch CONVOY Centro operating instructions

Kesseböhmer

Kesseböhmer eTouch CONVOY Centro operating instructions

Hettich InLine P Mounting-instructions and technical data

Hettich

Hettich InLine P Mounting-instructions and technical data

Iseo IS 9100 Mounting and Commissioning instructions

Iseo

Iseo IS 9100 Mounting and Commissioning instructions

Detex Advantex RIM manual

Detex

Detex Advantex RIM manual

samet slidea manual

samet

samet slidea manual

Yale PR3301 installation instructions

Yale

Yale PR3301 installation instructions

Assa Abloy NORTON RIXSON 1600H Series installation instructions

Assa Abloy

Assa Abloy NORTON RIXSON 1600H Series installation instructions

LCN ELECTRIC AUTO-EQUALIZER 4630 manual

LCN

LCN ELECTRIC AUTO-EQUALIZER 4630 manual

Akerstroms Sesam 500 Technical guide

Akerstroms

Akerstroms Sesam 500 Technical guide

Dorma 8900 DS quick start guide

Dorma

Dorma 8900 DS quick start guide

Assa Abloy Pando Mini Go quick start guide

Assa Abloy

Assa Abloy Pando Mini Go quick start guide

Anvil 805153 quick start guide

Anvil

Anvil 805153 quick start guide

Dormakaba HSW-R manual

Dormakaba

Dormakaba HSW-R manual

GEZE TS 2000 V manual

GEZE

GEZE TS 2000 V manual

Tormax 1102 Installation and service manual

Tormax

Tormax 1102 Installation and service manual

manuals.online logo
manuals.online logoBrands
  • About & Mission
  • Contact us
  • Privacy Policy
  • Terms and Conditions

Copyright 2025 Manuals.Online. All Rights Reserved.