manuals.online logo
Brands
  1. Home
  2. •
  3. Brands
  4. •
  5. Canaropa
  6. •
  7. Door Opening System
  8. •
  9. Canaropa 1900 Series User manual

Canaropa 1900 Series User manual

19
00S
E
R
IES
S
ANHO
1
90
0
S
AHO190
0
SANHO1900
SAHO1900
190
0
S
E
RIE
S
 
Use diagram below to locate holes on door and frame:
4 holes on door for door closer
2 holes on frame for track assembly
Use diagram below to locate holes on door and frame:
4 holes on door for door closer
2 holes on frame for track assembly
1-1/8
(28.5)
1-1/8
(28.5)
INSTALLATION INSTRUCTIONS INSTALLATION INSTRUCTIONS
1 1
Body
Track assembly
Track assembly
Body
LATCH
SPEED
SWEEP
SPEED
BACKCHECK
CONTROL
Fast
Slow
Opening cycleClosing cycle
FIXING HOLE FOR COVER
Optional
DELAYED ACTION
Decrease
Increase
Slider
Stopper
Track
Side cap
Slider
Stopper
Track
Side cap
4
5
45°
Main Arm
Figure 1 Figure 2
4
5
Main Arm
Figure 2
Figure 1
2- 15/16
(75)
11 - 1/8
(282.5)
29/32
(2 3)
2- 15/16
( 75 )
11 - 1/8
( 282.5 )
2
(50)
29/32
(2 3)
4mm Hex key
.
SPRING POWER ADJUSTMENT
Installation Instructions
1900 SERIES DOOR CLOSER WITH SLIDE TRACK ARM (SAHO1900/SANHO1900)
STANDARD (120°)
PULL SIDE PULL SIDE
Spring Power
Adjusting Screw
Spring Power
Adjusting Screw
Spring Power
Adjusting Screw
Right Hand Door - RH Left Hand Door - LH
Hold-Open: Slider, Stopper, Side cap in to the track.
Non Hold-Open: Slider, Side cap in to the track.
Hold-Open: Slider, Stopper, Side cap in to the track.
Non Hold-Open: Slider, Side cap in to the track.
22
DIRECTION
and
SEQUENCE
CAUTION
DIRECTION
and
SEQUENCE
CAUTION
3 3
Install the body to the door.
Install the track assembly to the frame.
Install the body to the door.
Install the track assembly to the frame.
Install main arm to pinion shaft of door closer, see Figure 1.
Rotate the main arm and attach to the slider, see Figure 2.
45°
45°
45°
Spring Power
Adjusting Screw
2
(51)
20-5/16 (516)
5/32” Drill or Drill & Tap 10-32 UNF
3/16” Drill or
Drill & Tap
1/4-20 UNC
20-5/16 (516)
5/32” Drill or Drill & Tap 10-32 UNF
3/16” Drill or
Drill & Tap
1/4-32 UNC
SA1900-INST-EN-2016/09 1/2
CLOSER ADJUSTMENT
HINGES SIDE
HINGES SIDE
(SAHO1900)
(SAHO1900)
*SEE DOOR CLOSER
INSTRUCTIONS
FOR DETAILS
2
(51)
2
(51)
Adjust Hold-Open angle (if applicable)
Adjust door closer power and speed as
per door closer instructions
Install cover to the body.
Adjust Hold-Open angle (if applicable)
Adjust door closer power and speed as
per door closer instructions
Install cover to the body.
Install main arm to pinion shaft of door closer, see Figure 1.
Rotate the main arm and attach to the slider, see Figure 2.
INSTALLATION INSTRUCTIONS INSTALLATION INSTRUCTIONS
11
3 3
Track assembly
Track assembly
Body
PUSH SIDE
Spring Power
Adjusting Screw
Spring Power
Adjusting Screw
Right Hand Reverse - RHR
Body
2
Install the body to the frame.
Install the track assembly to the door.
Hold-Open: Slider, Stopper, Side cap in to the track.
Non Hold-Open: Slider, Side cap in to the track.
Hold-Open: Slider, Stopper, Side cap in to the track.
Non Hold-Open: Slider, Side cap in to the track.
2
Slider
Stopper
Track
Side cap
Slider
Stopper
Track
Side cap
4
* See back page for closer adjustment.
5
45°
Figure 1 Figure 2 Figure 1 Figure 2
4
* See back page for closer adjustment.
5
45°
Main Arm
2-15/16
(75)
11-1/8
(282.5)
20-5/16
(516)
2
(51)
1-1/8
(28.5)
29/32
5/32” Drill or Drill & Tap 10-32 UNF
3/16” Drill or
Drill & Tap
1/4-20 UNC
1
9
00S
E
RI
E
S
S
ANHO
1
90
0
S
AHO190
0
SANHO1900
SAHO1900
1
9
0
0
S
ER
IE
S
TOP JAMB (120°)
AN INCORRECTLY INSTALLED OR IMPROPERLY
ADJUSTED DOOR CLOSER CAN CAUSE
PROPERTY DAMAGE OR PERSONAL INJURY.
THESE INSTALLATION INSTRUCTIONS SHOULD
BE FOLLOWED TO AVOID THE POSSIBILTY OF
MISAPPLICATION OR MISADJUSTEMENT
CAUTION
CAUTION
PUSH SIDE
Left Hand Reverse - LHR
Use diagram below to locate holes on door and frame:
4 holes on frame for door closer
2 holes on door for track assembly
Use diagram below to locate holes on door and frame:
4 holes on frame for door closer
2 holes on door for track assembly
(23)
2-15/16
(75)
11-1/8
(282.5)
20-5/16
(516)
2
(51)
1-1/8
(28.5)
29/32
5/32” Drill or Drill & Tap 10-32 UNF
3/16” Drill or
Drill & Tap
1/4-20 UNC
(23)
DIRECTION
and
SEQUENCE
CAUTION
DIRECTION
and
SEQUENCE
CAUTION
Install the body to the frame.
Install the track assembly to the door.
Main Arm
45° 45°
Installation Instructions
1900 SERIES DOOR CLOSER WITH SLIDE TRACK ARM (SAHO1900/SANHO1900)
HINGES SIDE
HINGES SIDE
(SAHO1900) (SAHO1900)
SA1900-INST-EN-2016/09 2/2
2
(51)
2
(51)
Install main arm to pinion shaft of door closer, see Figure 1.
Rotate the main arm and attach to the slider, see Figure 2.
Install main arm to pinion shaft of door closer, see Figure 1.
Rotate the main arm and attach to the slider, see Figure 2.
Adjust Hold-Open angle (if applicable)
Adjust door closer power and speed as
per door closer instructions
Install cover to the body.
Adjust Hold-Open angle (if applicable)
Adjust door closer power and speed as
per door closer instructions
Install cover to the body.

This manual suits for next models

2

Other Canaropa Door Opening System manuals

Canaropa 4000CNS Series User manual

Canaropa

Canaropa 4000CNS Series User manual

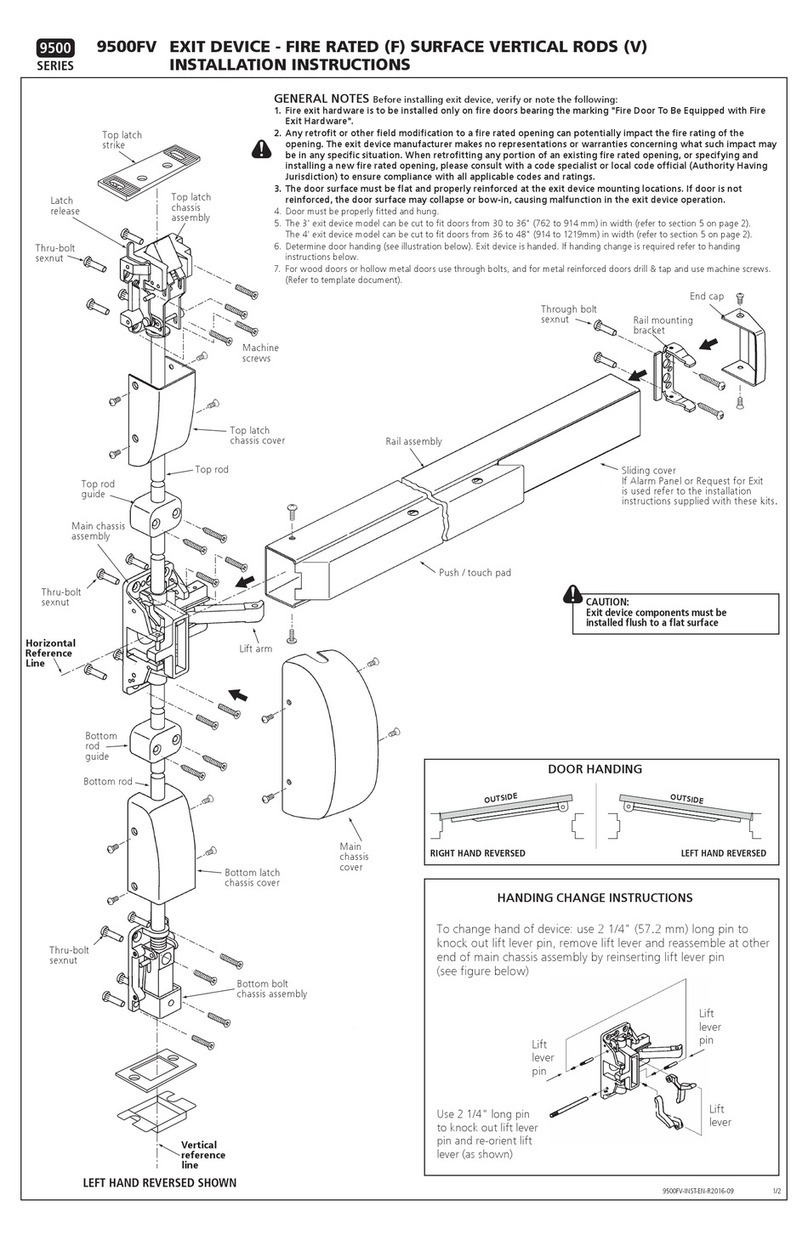
Canaropa 9500 Series User manual

Canaropa

Canaropa 9500 Series User manual

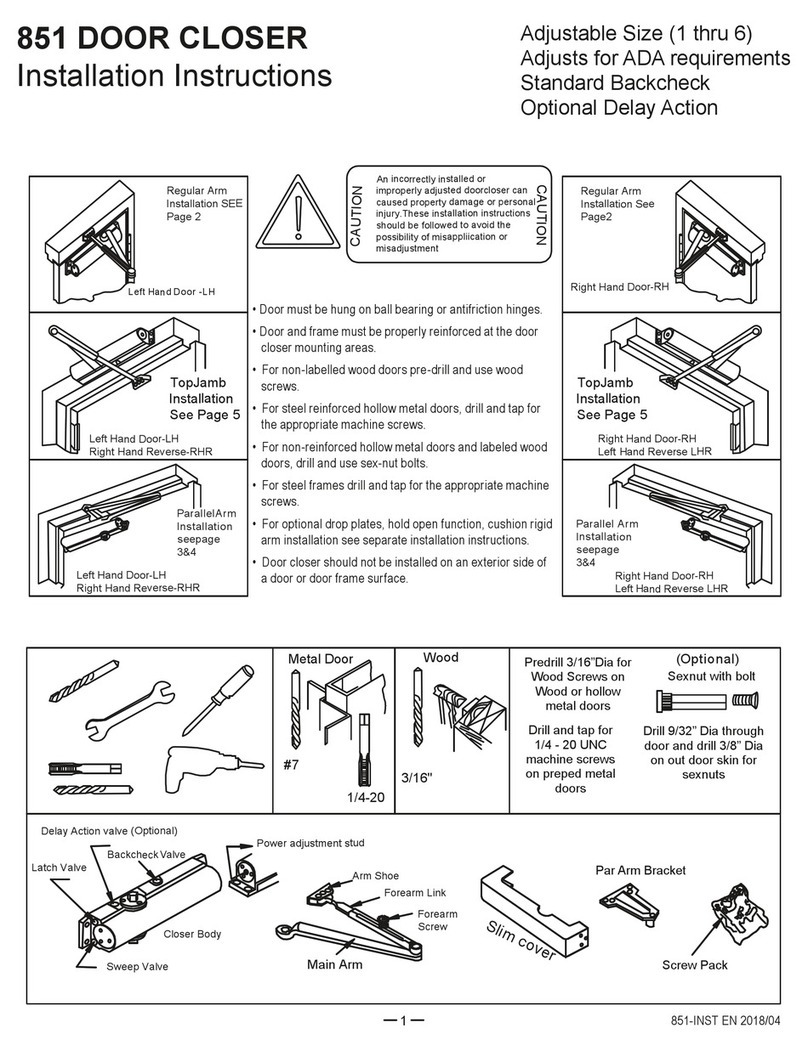
Canaropa 851 User manual

Canaropa

Canaropa 851 User manual

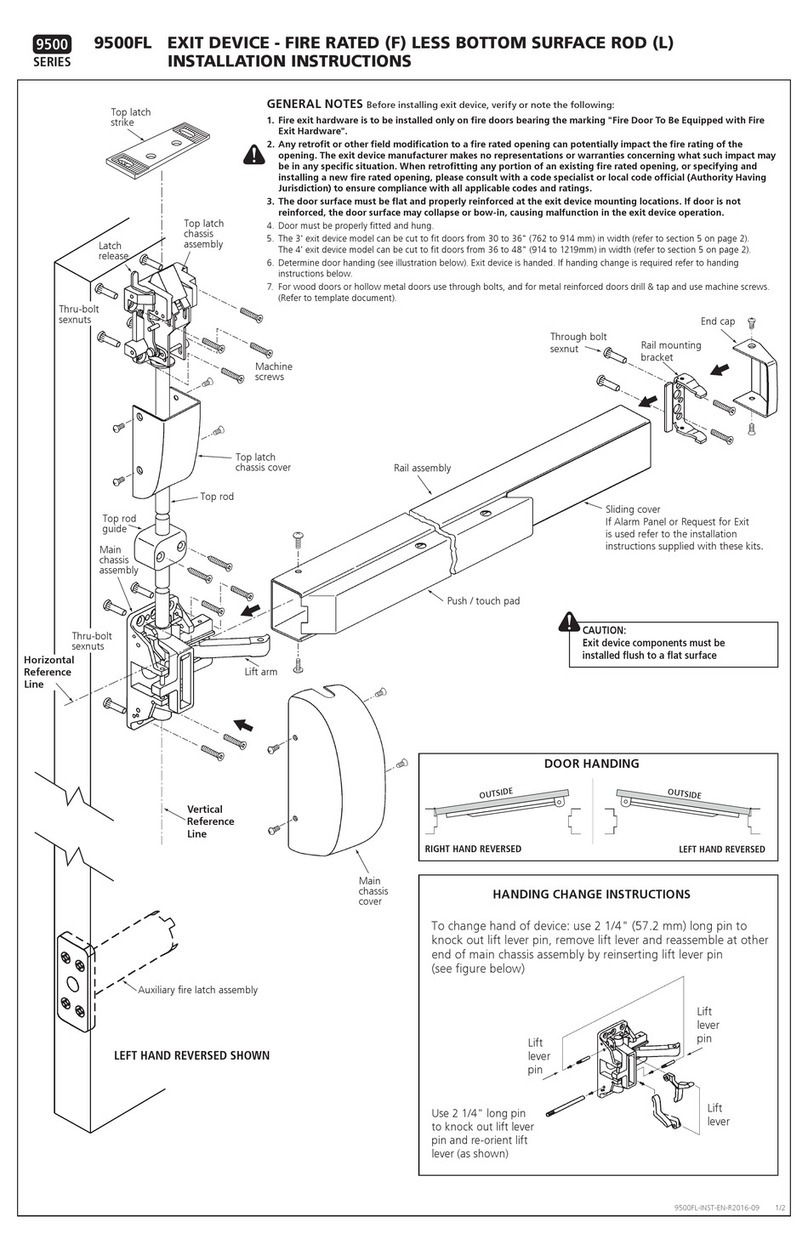
Canaropa 9500FL User manual

Canaropa

Canaropa 9500FL User manual

Canaropa 851 User manual

Canaropa

Canaropa 851 User manual

Popular Door Opening System manuals by other brands

FAAC 595 manual

FAAC

FAAC 595 manual

RIB KING FAST manual

RIB

RIB KING FAST manual

Assa Abloy RD150-3 user manual

Assa Abloy

Assa Abloy RD150-3 user manual

CDVI Digiway SR Easy start guide

CDVI

CDVI Digiway SR Easy start guide

ECO Schulte SR BG III Assembly instruction

ECO Schulte

ECO Schulte SR BG III Assembly instruction

Dorma COMFORTDRIVE Moveo Original Operating Instruction Manual

Dorma

Dorma COMFORTDRIVE Moveo Original Operating Instruction Manual

Dormakaba ED50 owner's manual

Dormakaba

Dormakaba ED50 owner's manual

Falcon Ferme-Porte SC60 series installation instructions

Falcon

Falcon Ferme-Porte SC60 series installation instructions

Omron D40Z instruction manual

Omron

Omron D40Z instruction manual

Detex AO19 Quick install guide

Detex

Detex AO19 Quick install guide

Nabco GT-710 installation manual

Nabco

Nabco GT-710 installation manual

Assa Abloy Corbin Russwin ED7400 Series installation instructions

Assa Abloy

Assa Abloy Corbin Russwin ED7400 Series installation instructions

Lamp Lapcon J160 installation instructions

Lamp

Lamp Lapcon J160 installation instructions

Brookfield Industries NB-500 manual

Brookfield Industries

Brookfield Industries NB-500 manual

Videofied Indoor Door Contact  IDC200 Product installation sheet

Videofied

Videofied Indoor Door Contact IDC200 Product installation sheet

hager 9850 Installation instructions manual

hager

hager 9850 Installation instructions manual

Dictator DIREKT 200 Installation instruction

Dictator

Dictator DIREKT 200 Installation instruction

GEZE Boxer EFS EN4 installation instructions

GEZE

GEZE Boxer EFS EN4 installation instructions

manuals.online logo
manuals.online logoBrands
  • About & Mission
  • Contact us
  • Privacy Policy
  • Terms and Conditions

Copyright 2025 Manuals.Online. All Rights Reserved.