manuals.online logo
Brands
  1. Home
  2. •
  3. Brands
  4. •
  5. Canaropa
  6. •
  7. Door Opening System
  8. •
  9. Canaropa 4000CNS Series User manual

Canaropa 4000CNS Series User manual

4000CNS & 4000HC SERIES DOOR CLOSER INSTALLATION
HEAVY DUTY ARM WITH STOP OR WITH HOLD-OPEN AND STOP
SHEET 1 OF 2 4000CSA-II-05/14
ARM STOP
FILLER PLUG
PARALLEL
BRACKET
STOP ALLEN KEY
STOP ALLEN KEY
PARALLEL ARM (PUSH SIDE) MOUNTING
LEFT HAND DOOR SHOWN
PARALLEL ARM (PUSH SIDE) MOUNTING
RIGHT HAND DOOR SHOWN
PARALLEL
BRACKET
FILLER PLUG
ARM STOP
BACK-CHECK
CLOSING
LATCHING
1
2
3
SPRING POWER ADJUSTMENT
SCREW-IN COMPLETELY THE VALVE AT
THE BACK OF THE DOOR CLOSER
POWER ADJUSTMENT CHART
1 11/16”
(43mm) 1 11/16”
(43mm)
5/16”
(8mm)
5 1/2” (139.7mm)
11/16”
(17.5mm)
3 3/16” (81mm)
2 3/8”
(60.3mm)
5 Holes for #14
all-purpose or 1/4-20
machine screws.
11-1/32” (280mm)=85˚
10-7/16” (265mm)=90˚
9-29/64” (240mm)=100˚
8-21/32” (220mm)=110˚
8-55/64” (225mm)=85˚
8-17/64” (210mm)=90˚
7-3/32” (180mm)=100˚
6-7/64” (155mm)=110˚
1”
(25.4 mm)
3”
(76.2mm)
1”
(25.4 mm)
4 Holes for #14 all-purpose
wood screws or 1/4-20
machine screws.
Closing speed control
screws
Backcheck control screw
2 3/16”
(55.6mm)
2 1/4”
(57mm)
1 11/16”
(43mm)
1 11/16”
(43mm)
5/16”
(8mm)
5 1/2” (139.7mm)
11/16”
(17.5mm)
3 3/16” (81mm)
2 3/8”
(60.3mm)
5 Holes for #14 all-purpose
wood screws or
1/4-20 machine screws.
11-1/32” (280mm)=85˚
10-7/16” (265mm)=90˚
9-29/64” (240mm)=100˚
8-21/32” (220mm)=110˚
8-55/64” (225mm)=85˚
8-17/64” (210mm)=90˚
7-3/32” (180mm)=100˚
6-7/64” (155mm)=110˚
1”
(25.4 mm)
3”
(76.2mm)
1”
(25.4 mm)
4 Holes for #14
all-purpose wood screws
or 1/4-20 machine screws.
Closing speed
screws
Backcheck control screw
2 3/16”
(55.6mm)
2 1/4”
(57mm)
BACK-CHECK
CLOSING
LATCHING
1
2
3
SPRING POWER ADJUSTMENT
SCREW-IN COMPLETELY THE VALVE AT
THE BACK OF THE DOOR CLOSER
POWER ADJUSTMENT CHART
1 1/16”
(27mm)
1 1/16”
(27mm)
8120 4 16 20
8120 4 16 20
IMPROPER INSTALLATION OR ADJUSTMENT
MAY RESULT IN PERSONAL INJURY
OR EQUIPMENT DAMAGE.
FOLLOW INSTRUCTIONS CAREFULLY
INSTALLATION INSTRUCTIONS
1. Determine door handing (refer to verso) and position door closer with spring tube end located away from the hinges centerline.
2. Before installing the door holder ensure that the backcheck is not engaged. Turn backcheck valve-screw counter-clockwise.
Also, ensure that the valve under the door closer is completely screwed-in.
3. Select the desired door degrees opening from the table (on sheet 1) and use the appropriate position of door closer and parallel arm bracket,
with respect to the hinge centreline. Mark the parallel arm bracket mounting holes on the frame door stop face using the actual parallel bracket
at the selected location (as illustrated on verso).
4. Mark the door closer mounting holes on the door at selected location.
a. For prep doors, drill and tap for ¼-20 UNC and attach door closer to door using provided machine screws.
b. For non-prep doors or wood doors, pre-drill and attach door closer to door using provided #14 wood screws.
c. For hollow metal doors and fire rated doors: drill 3/8” (9.5 mm) holes on exterior door surface and 5/16“ (8 mm) hole on door interior surface
and attach door closer to door using supplied through bolt sexnuts and machine screws.
5. Using a wrench on the door closer bottom shaft (refer to illustration below), turn the shaft towards the hinge about 30° (for pre-loading)
and place main arm on the closer’s top shaft. Insert the main arm screw into the top shaft and tighten.
6. Temporarily remove the stop from the parallel bracket and disengage the Hold-Open function with the Hold-Open control handle
(if arm with Hold-Open function is used).
7. Rotate the arm on the closer shaft so that the main arm is approximately parallel to the door and ensuring that the arm elbow clears the
door surface by about 1/2” to 1” (13mm to 25mm). Verify that the parallel arm bracket holes line-up with the marked-up holes.
Once the position of the holes has been verified, remove the arm with bracket and proceed in preparing the mounting holes
as instructed in note 8.
8. For prep frames or metal frames, drill and tap for ¼-20 UNC and use provided machine screws.
For non-prep frames or wood frames, pre-drill and install provided #14 wood screws.
9. To provide additional stiffness to the parallel bracket mounting, install an additional mounting screw on the parallel bracket using spacer block
between the door frame jamb ceiling face and the parallel bracket.
10. Install the deadstop on the parallel arm bracket and verify that the door opens to the approximate desired opening angle. Install supplied
spring plug on the other stop position hole that is not used.
11. Door Closer Control Adjustment: (refer also to instructions supplied with door closer)
a. Adjust the closer closing speeds using the closer regulating valves if required. Turn valves clockwise for a slower closing speed and
counter-clockwise for a faster closing speed. A normal closing time from 90° open position to door stop positions is 5-7 seconds,
evenly devided between door closing moving speed and latch speed.
b. Adjust spring power if required, depending on door size and weight.
c. Adjust the backcheck to slow down the door before the deadstop. Note that the backcheck is used only to provide damping and
prevent the door from opening too fast.
d. For arms with Hold-Open function, engage the spring loaded detent by turning the control handle 90° as shown below.
12. To install the door closer cover, first place insert in the appropriate cutout, place shaft insert over the lower shaft, then install cover
and secure with supplied mounting screws.
4000CNS & 4000HC SERIES DOOR CLOSER INSTALLATION
HEAVY DUTY ARM WITH STOP OR WITH HOLD-OPEN AND STOP
SHEET 2 OF 2 4000CSA-II-05/14
FOREARM
HOLD OPEN
ADJUSTMENT
MAIN ARM
PARALLEL
BRACKET
BACK-CHECK
SCREW
CLOSING SPEED
SCREW
LATCH SPEED
SCREW
BACK-CHECK
SELECTOR
VALVE SCREW
(AT BOTTOM)
WRENCH
MAIN ARM
MAIN ARM
ELBOW
1/2” to 1”
(13mm to 25mm)
CLEARANCE
30° PRELOAD
30° PRELOAD
DOOR

This manual suits for next models

1

Other Canaropa Door Opening System manuals

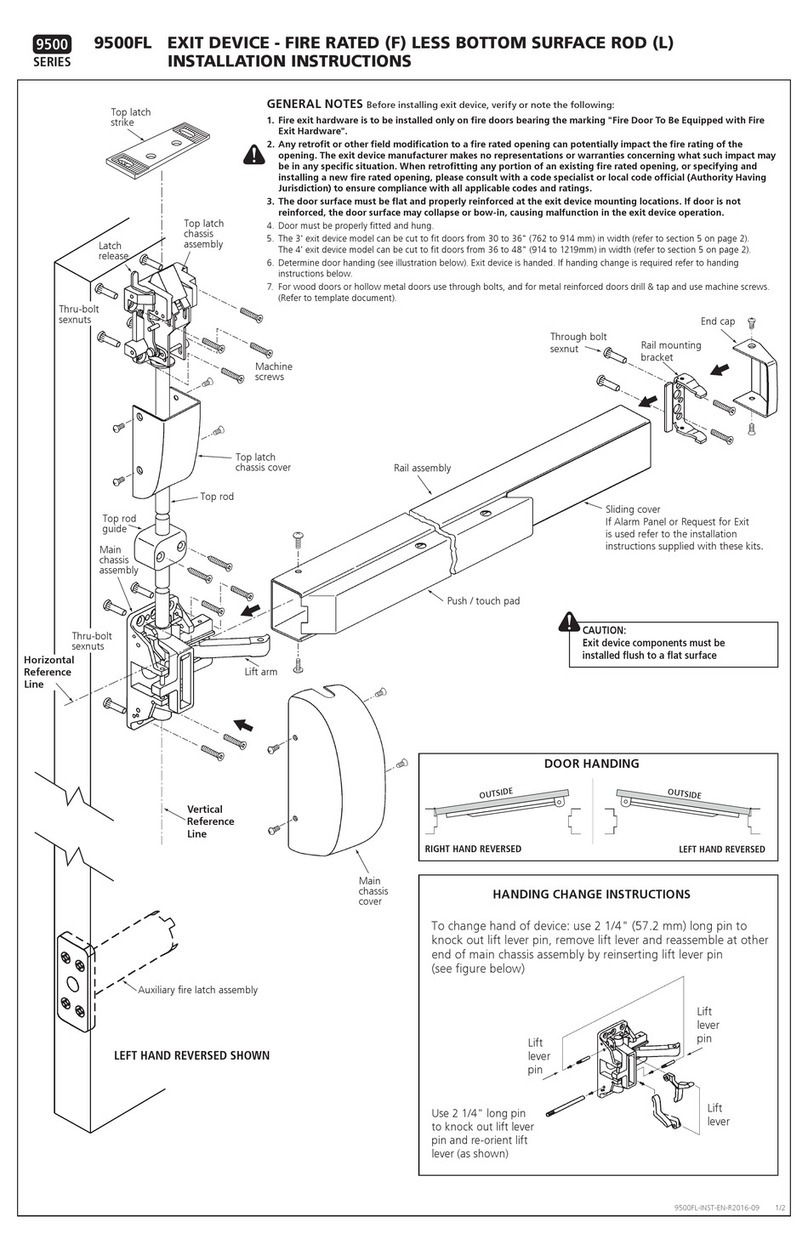
Canaropa 9500FL User manual

Canaropa

Canaropa 9500FL User manual

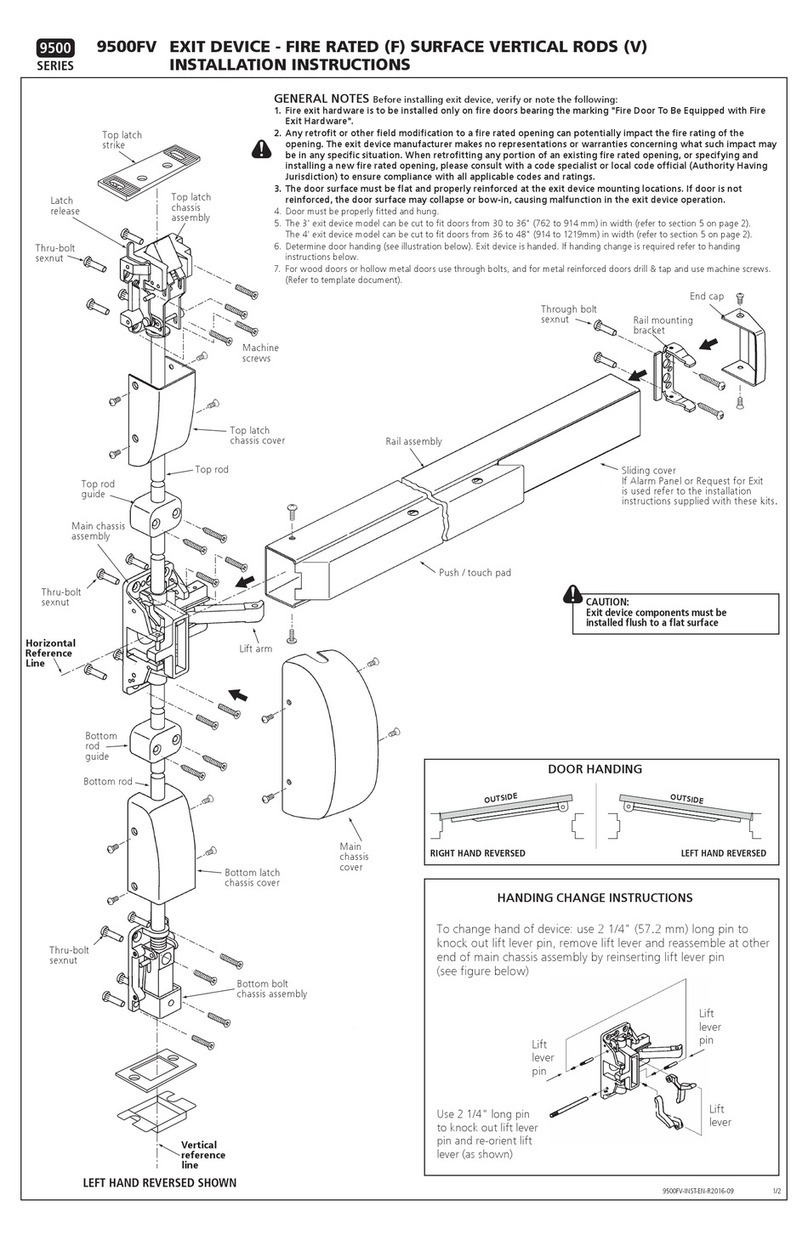
Canaropa 9500 Series User manual

Canaropa

Canaropa 9500 Series User manual

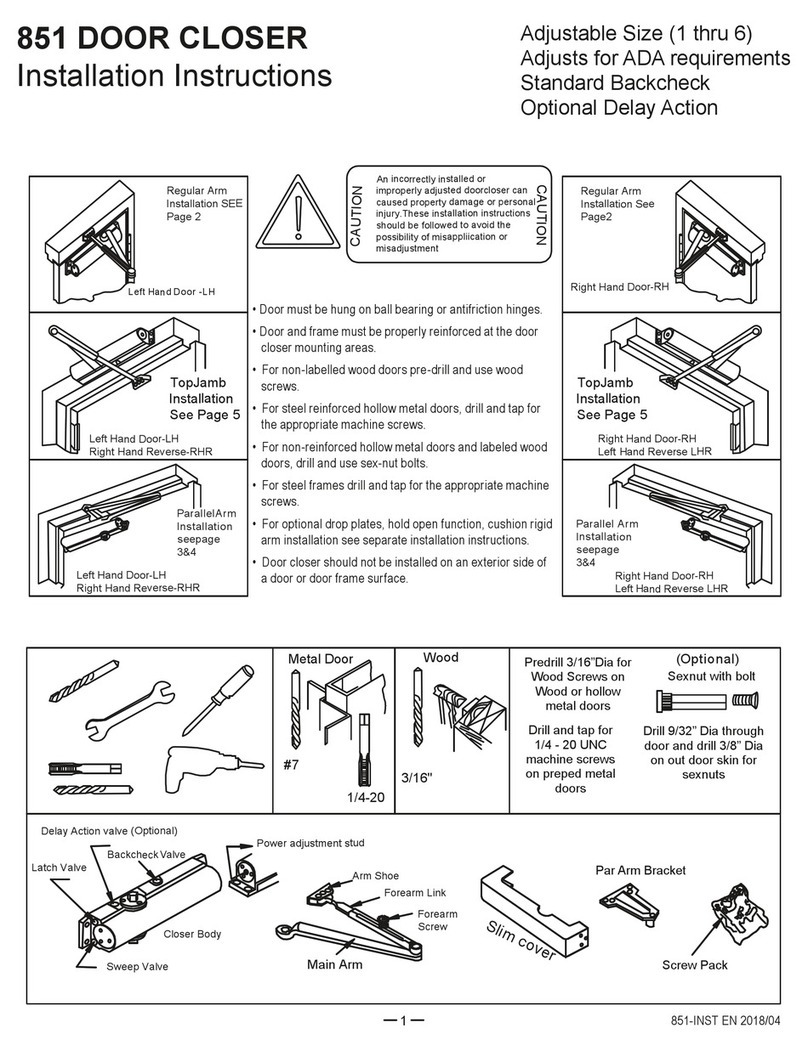
Canaropa 851 User manual

Canaropa

Canaropa 851 User manual

Canaropa 851 User manual

Canaropa

Canaropa 851 User manual

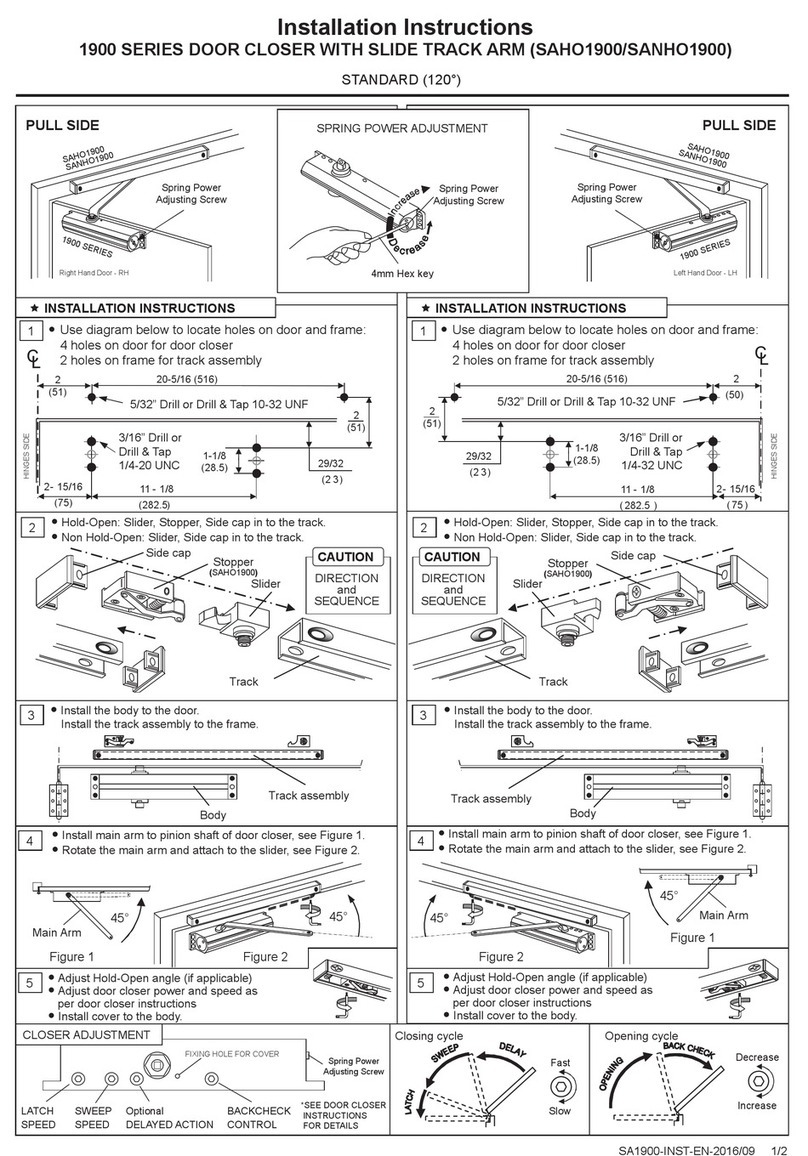
Canaropa 1900 Series User manual

Canaropa

Canaropa 1900 Series User manual

Popular Door Opening System manuals by other brands

Nabco GT20 Programming manual

Nabco

Nabco GT20 Programming manual

Dorex 441 Installation

Dorex

Dorex 441 Installation

GEZE TS1200 installation instructions

GEZE

GEZE TS1200 installation instructions

Nabco Acusensor 3 instruction manual

Nabco

Nabco Acusensor 3 instruction manual

Assa Abloy Adams Rite EX76W Preparation and installation guide

Assa Abloy

Assa Abloy Adams Rite EX76W Preparation and installation guide

GAL MOVFE 2500 MECHANICAL MANUAL

GAL

GAL MOVFE 2500 MECHANICAL MANUAL

Yale Tri-Pack 51 installation instructions

Yale

Yale Tri-Pack 51 installation instructions

RIB KING FAST manual

RIB

RIB KING FAST manual

GEZE Levolan 60 manual

GEZE

GEZE Levolan 60 manual

SUGATSUNE Aileron Lift-Assist manual

SUGATSUNE

SUGATSUNE Aileron Lift-Assist manual

B&D Roll-A-Door R1N installation instructions

B&D

B&D Roll-A-Door R1N installation instructions

BFT BOTTICELLI SMART BT A 850-1250 Installation and user manual

BFT

BFT BOTTICELLI SMART BT A 850-1250 Installation and user manual

Dormakaba 8900 IS installation instructions

Dormakaba

Dormakaba 8900 IS installation instructions

Assa Abloy Corbin Russwin DC3200 Series installation instructions

Assa Abloy

Assa Abloy Corbin Russwin DC3200 Series installation instructions

Chamberlain Liftmaster MT5011 owner's manual

Chamberlain

Chamberlain Liftmaster MT5011 owner's manual

Cavity Sliders SofStop installation instructions

Cavity Sliders

Cavity Sliders SofStop installation instructions

Assa Abloy Yale 3000 Series installation instructions

Assa Abloy

Assa Abloy Yale 3000 Series installation instructions

SUGATSUNE LAMP FD35EV installation manual

SUGATSUNE

SUGATSUNE LAMP FD35EV installation manual

manuals.online logo
manuals.online logoBrands
  • About & Mission
  • Contact us
  • Privacy Policy
  • Terms and Conditions

Copyright 2025 Manuals.Online. All Rights Reserved.