Cane Creek Cycling Components • 355 Cane Creek Road • Fletcher, NC 28732
ph:
828.684.3551 • fax: 828.684.1057 • web: www.canecreek.com • e-mail: [email protected]F) Installing Star Nut Into Fork Steerer Tube:
1. Position the star nut with the concave end facing upward over the top of the steerer tube.
2. Press the star nut into the steerer tube to a point 15 mm below the top. This should preferably be done using an installation
tool such as Cane Creek’s Star Nut Installation Tool Set (p/n TL0200). If this tool is unavailable, thread the compression bolt
into the star nut and lightly tap the assembly into position with a deadweight mallet or similar tool. Ensure that the threads of
the star nut are aligned with the steerer tube.
Notes:
1. When replacing a fork, it is necessary to use a new star nut.
2. Certain fork models, especially those with carbon steerers, use a special preload mechanism supplied with the fork.
When supplied,these should be installed per the instructions of the manufacturer of the fork or preload mechanism.
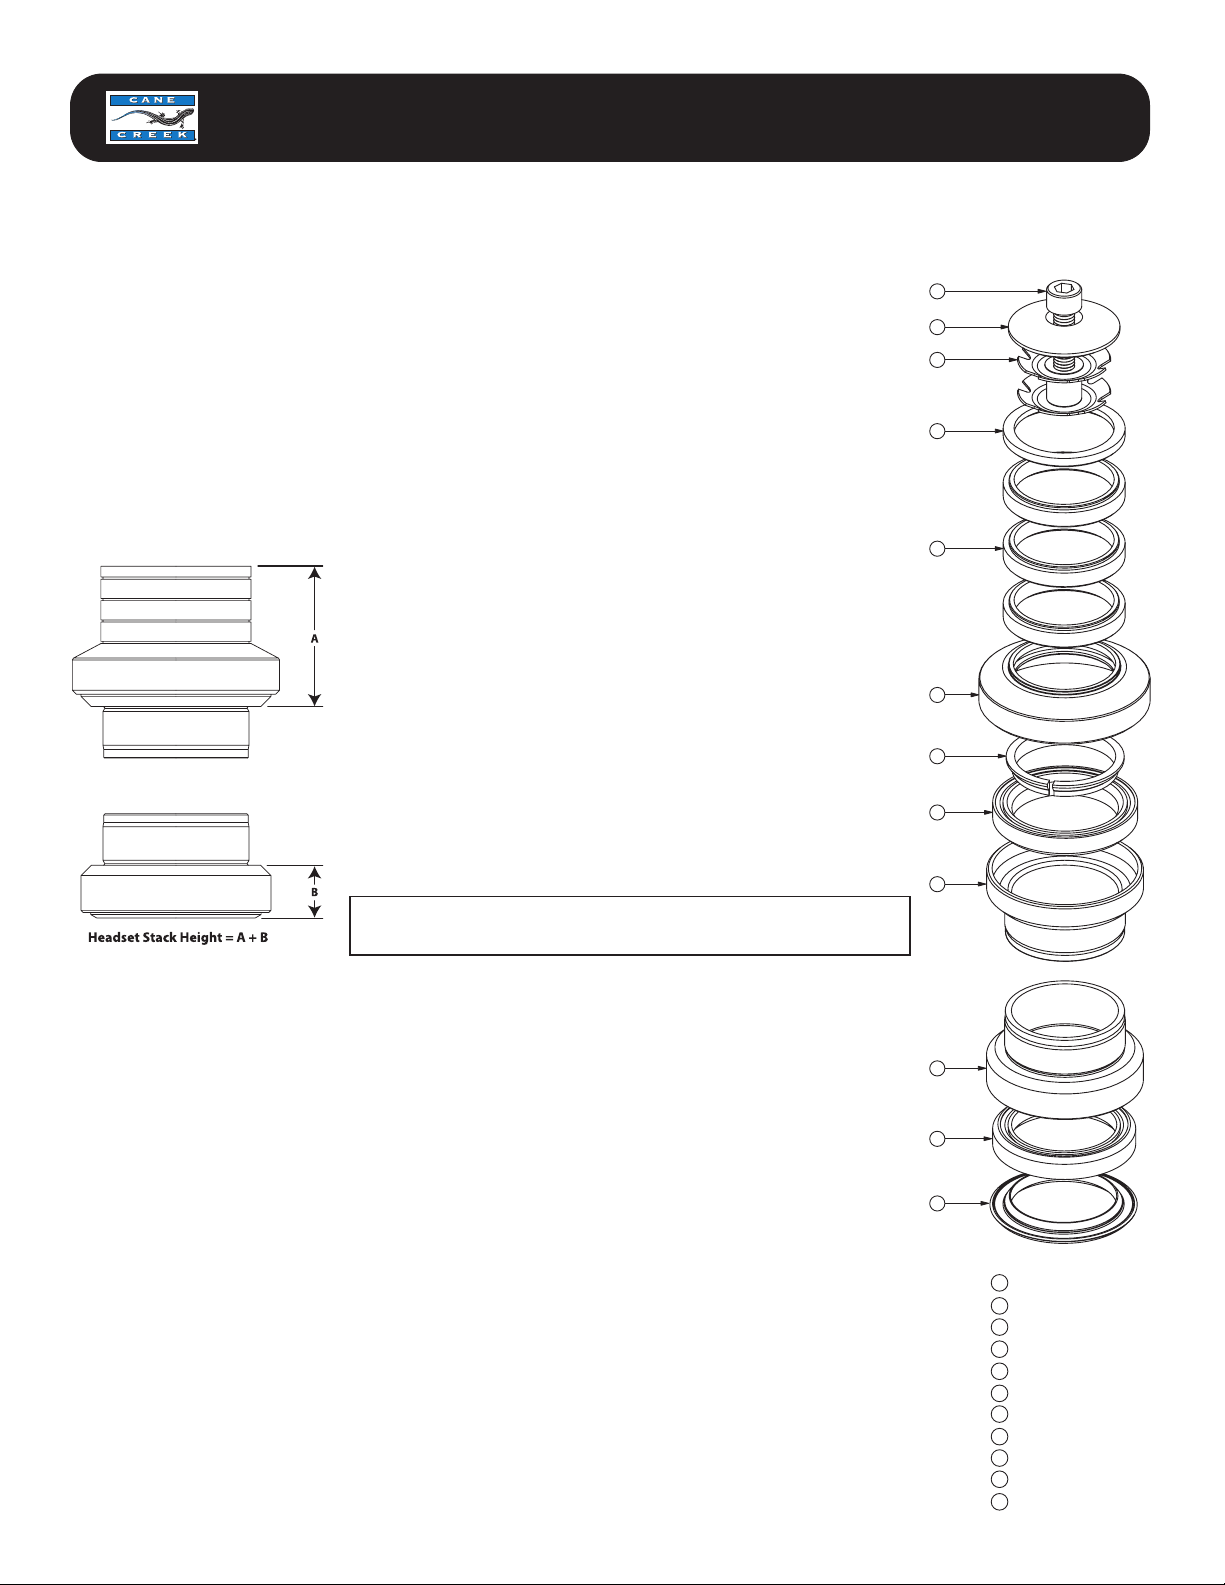
G) Assembling Headset:
1. Slide one bearing cartridge over the fork steerer tube while ensuring the angled surface at the inside diameter of the cartridge
is downward and mates with the crown race angle.
2. Insert the fork steerer tube into the head tube, holding it while completing the steps below.
3. Install the upper bearing cartridge over the steerer tube while ensuring the angled surface at the outside of the bearing
cartridge is downward and mates with the angle at the inside of the upper bearing cup.
4. Slide the compression ring over the steerer tube with the angled surface downward and the split facing one side or the other.
5. Install the upper bearing cover (It may be necessary to apply a small amount of grease to the o-ring to allow easy installation).
6. Install desired Interlok spacers (if used) and then the stem onto the steerer tube.
NOTE: The spacers provided with the headset (1-1/8”headsets only) are interlocking and should be assembled with the
protruding diameter upward. Cane Creek’s patent pending Interlok spacers minimize the undesirable relative radial motion
between spacers and make the assembly more rigid. Though less desirable, it is possible to invert spacers as desired to make
slight stack height adjustments or to accommodate stems with minimal interface at the top of the spacers.
7. Seat the steerer tube firmly upward in the head tube and the stem firmly downward against the spacer (or upper bearing
cover), leaving the clamp bolts loose.
CAUTION: The top of the steerer tube must be 3 mm below the top of the stem before the compression bolt is tightened. If the steerer tube
is too long,sufficient compression may not be possible and the headset will remain loose,risking rapid headset wear and possible damage
to the frame. If the steerer tube is too short, the stem may not have sufficient clamping surface against the steerer tube to be used safely.
H) Tightening/Preloading Headset Assembly:
1. Lubricate the compression bolt.
2. Insert the compression bolt through the recess in the top cap and begin threading the bolt into the star nut, while seating the
top cap into the top of the stem.
3. With the stem clamp bolts still loose, tighten the compression bolt with a 5 mm hex wrench to preload the bearings. Apply
only enough torque to remove all play from the headset while ensuring it still rotates freely.
CAUTION: Insufficient preload will result in a loose headset. Excessive preload will result in the headset binding. Either condition will
cause rapid headset wear and could adversely affect the steering characteristics of the bicycle.
4. With the stem aligned with the fork, secure the stem to the steerer tube and lock in the bearing preload by tightening the
stem clamp bolt/s. These should be tightened to the torque recommended by the stem manufacturer.
WARNING: Make sure the stem clamp bolts are sufficiently tight to prevent the stem and handlebars from turning relative to the steerer
tube. A loose stem can result in damage to the bike, loss of control, and severe injury or death to the rider.
5. If the headset needs readjusting after the initial break-in period: Loosen the stem clamp bolt/s, reset the preload with the
compression bolt (step 3) and retighten the stem clamp bolts (step 4). Note: It is essential that the stem is securely tightened
to the steerer tube.
WARRANTY
Cane Creek Cycling Components warrants its bicycle products for a period of 1 year from the original date of purchase. Any
product that is found to be defective in materials or workmanship will be repaired or replaced at the discretion of Cane Creek. This
warranty applies to the original owner only. This warranty does not cover damage or failure resulting from misuse, abuse, alter-
ation, neglect, wear and tear, crash or impact, lack of maintenance or other conditions judged by Cane Creek to be abnormal,
excessive, or improper. It is mandatory that a Return Authorization Number (RA#) be obtained by calling Cane Creek before any
product is returned. Additionally, a dated Proof of Purchase must accompany the product when returned. (Revised 7.15.2003)