Canon TZ-5300 User manual

QT6-4095-V01 PRINTED IN XXXXXXXXXXXXXXXX © CANON INC. 2021
Setup Guide
Read this manual before attempting to operate the printer. Keep this manual for future reference.
Furthermore, in order to ensure that this product is used safely, you should always also read the “Quick Guide” (separate
manual).
ENGLISH
安裝指南
請先閱讀本手冊再嘗試操作印表機。妥善保存本手冊供後續參考之用。
此外,為了確保安全使用本產品,您也應務必閱讀 "快速指南"(個別手冊)。
繁體中文
ค�ำแนะน�ำกำรติดตั้ง
ภำษำไทย
Petunjuk Pengesetan
Bacalah petunjuk ini sebelum mencoba mengoperasikan pencetak. Simpanlah petunjuk ini untuk rujukan di waktu
mendatang. Lebih lanjut, untuk memastikan bahwa produk ini digunakan dengan aman, Anda harus selalu membaca
"Petunjuk Ringkas" (petunjuk terpisah).
BAHASA INDONESIA
설치 가이드
프린터를 조작하기 전에 이설명서를 읽으십시오. 나중에 참조할 수있도록 이설명서를 잘보관해 두십시오.
또한 이제품을 안전하게 사용하려면 "퀵가이드"(별도 설명서)도읽어야 합니다.
한국어
RMC (Regulatory Model Code) : K10540


1
Overview of Setup Installation Space
Set up the printer using the following procedure. If an error message appears
during setup or other problems occur, refer to "Responding to Messages" on
p. 16.
1
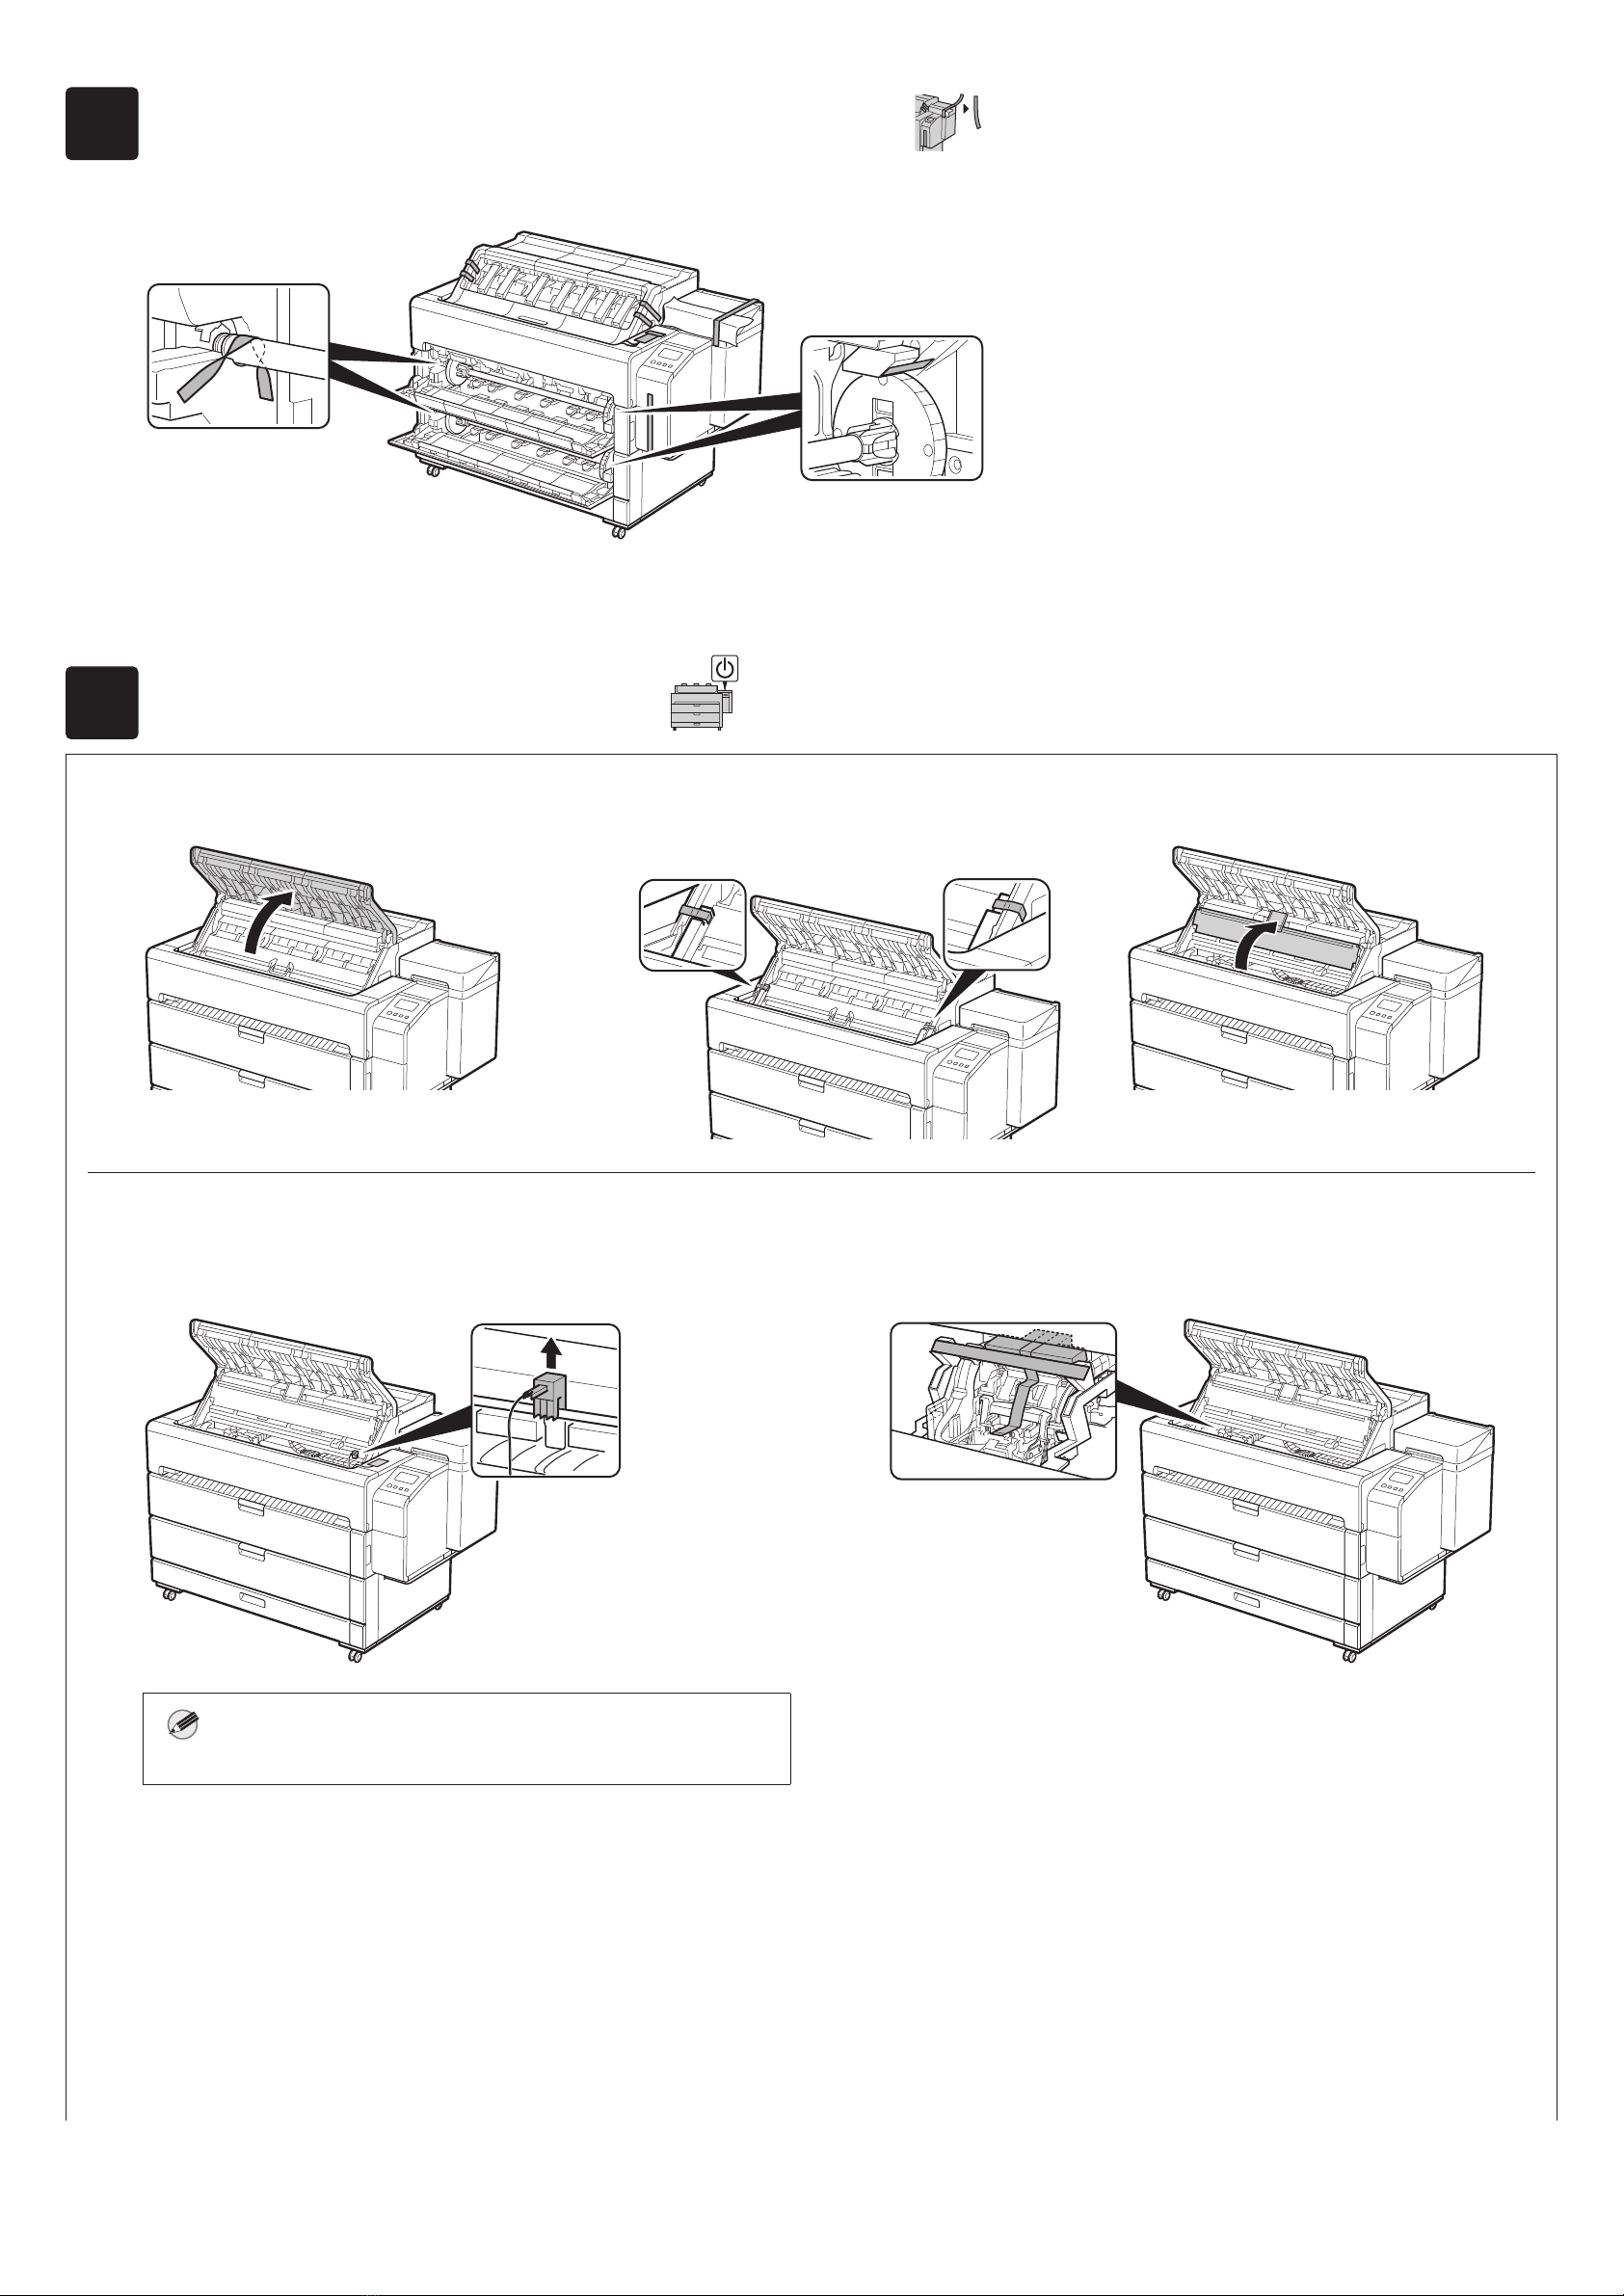
Removing the Packaging Material Page 4
2
Turning On the Printer Page 4
3
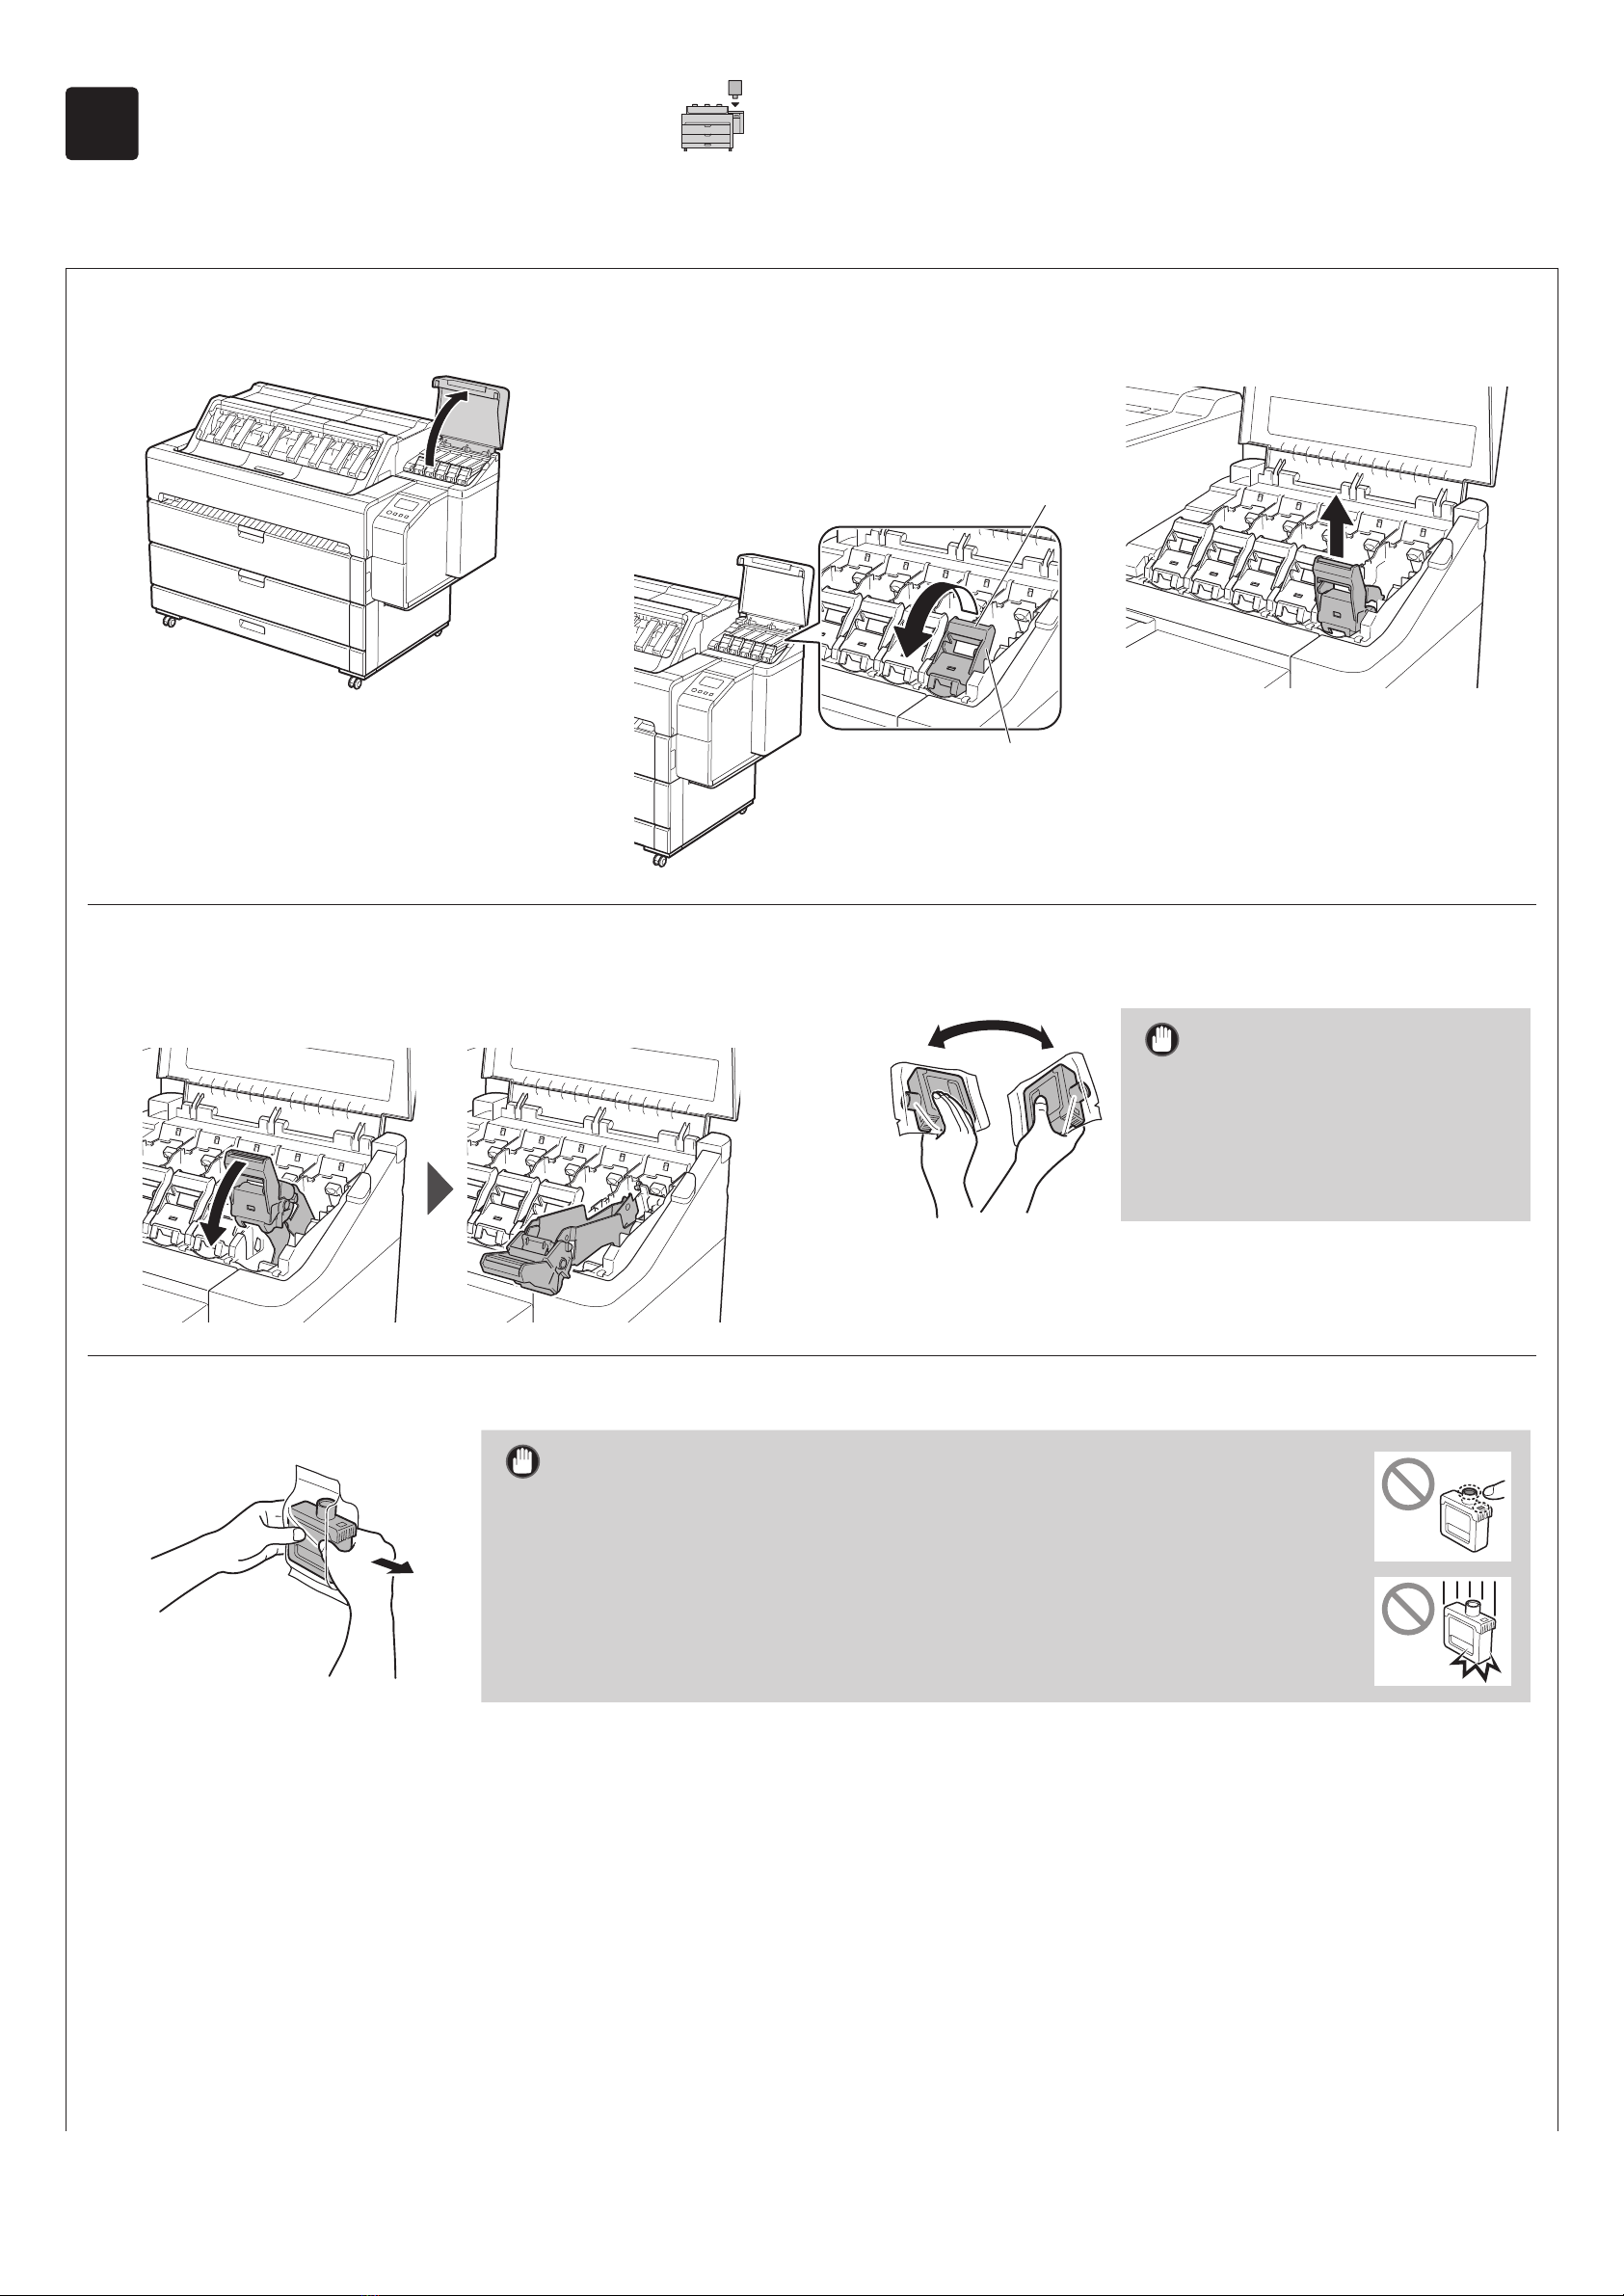
Installing the Ink Tanks Page 6
4
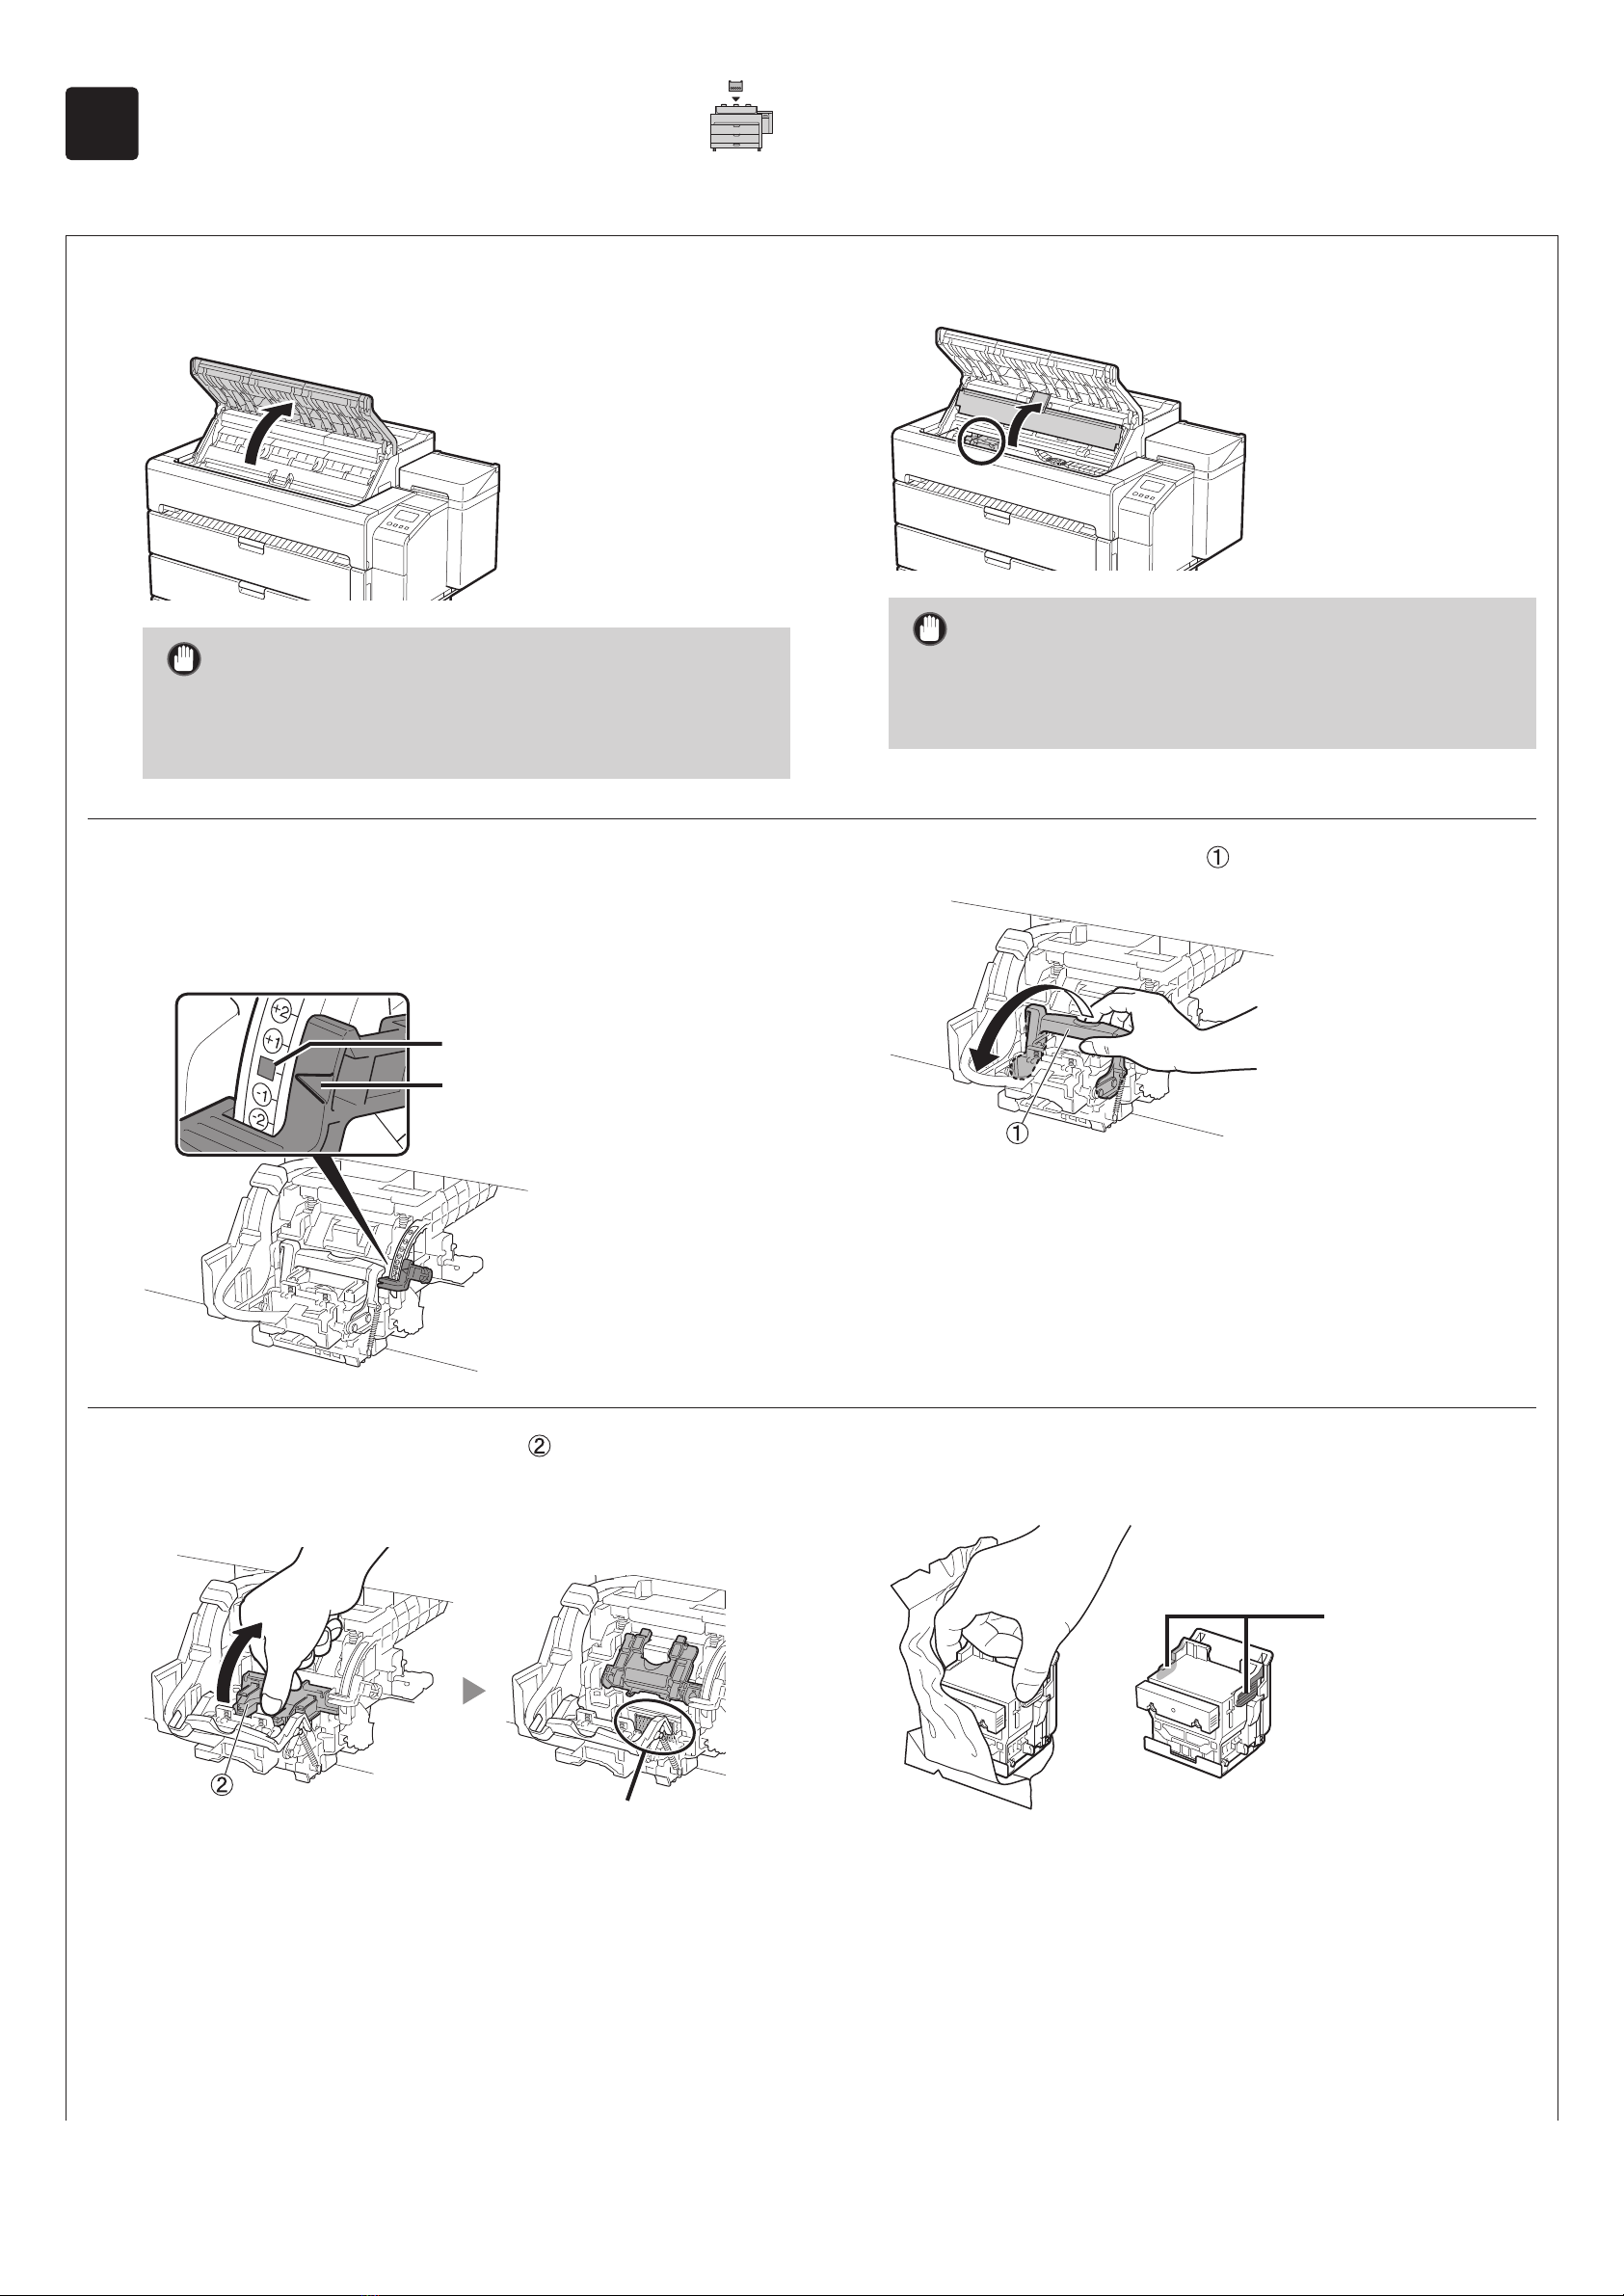
Installing the Print Head Page 8
5
Installing the Paper Output Supports
and Top Output Guides Page 10
6
Preparing the Basket Page 12
7
Selecting the Method of Connecting
to Your Computer Page 13
8
Installing the Software on Your
Computer Page 14
About the Paper Handling Label Page 15
Loading Paper Page 15
Storing Accessories Page 15
Printing From a Smartphone or Tablet Page 15
Displaying the Online Manual Page 15
Trademarks Page 15
Responding to Messages Page 16
When installing the printer, it is recommended that you secure the following
space around the printer.
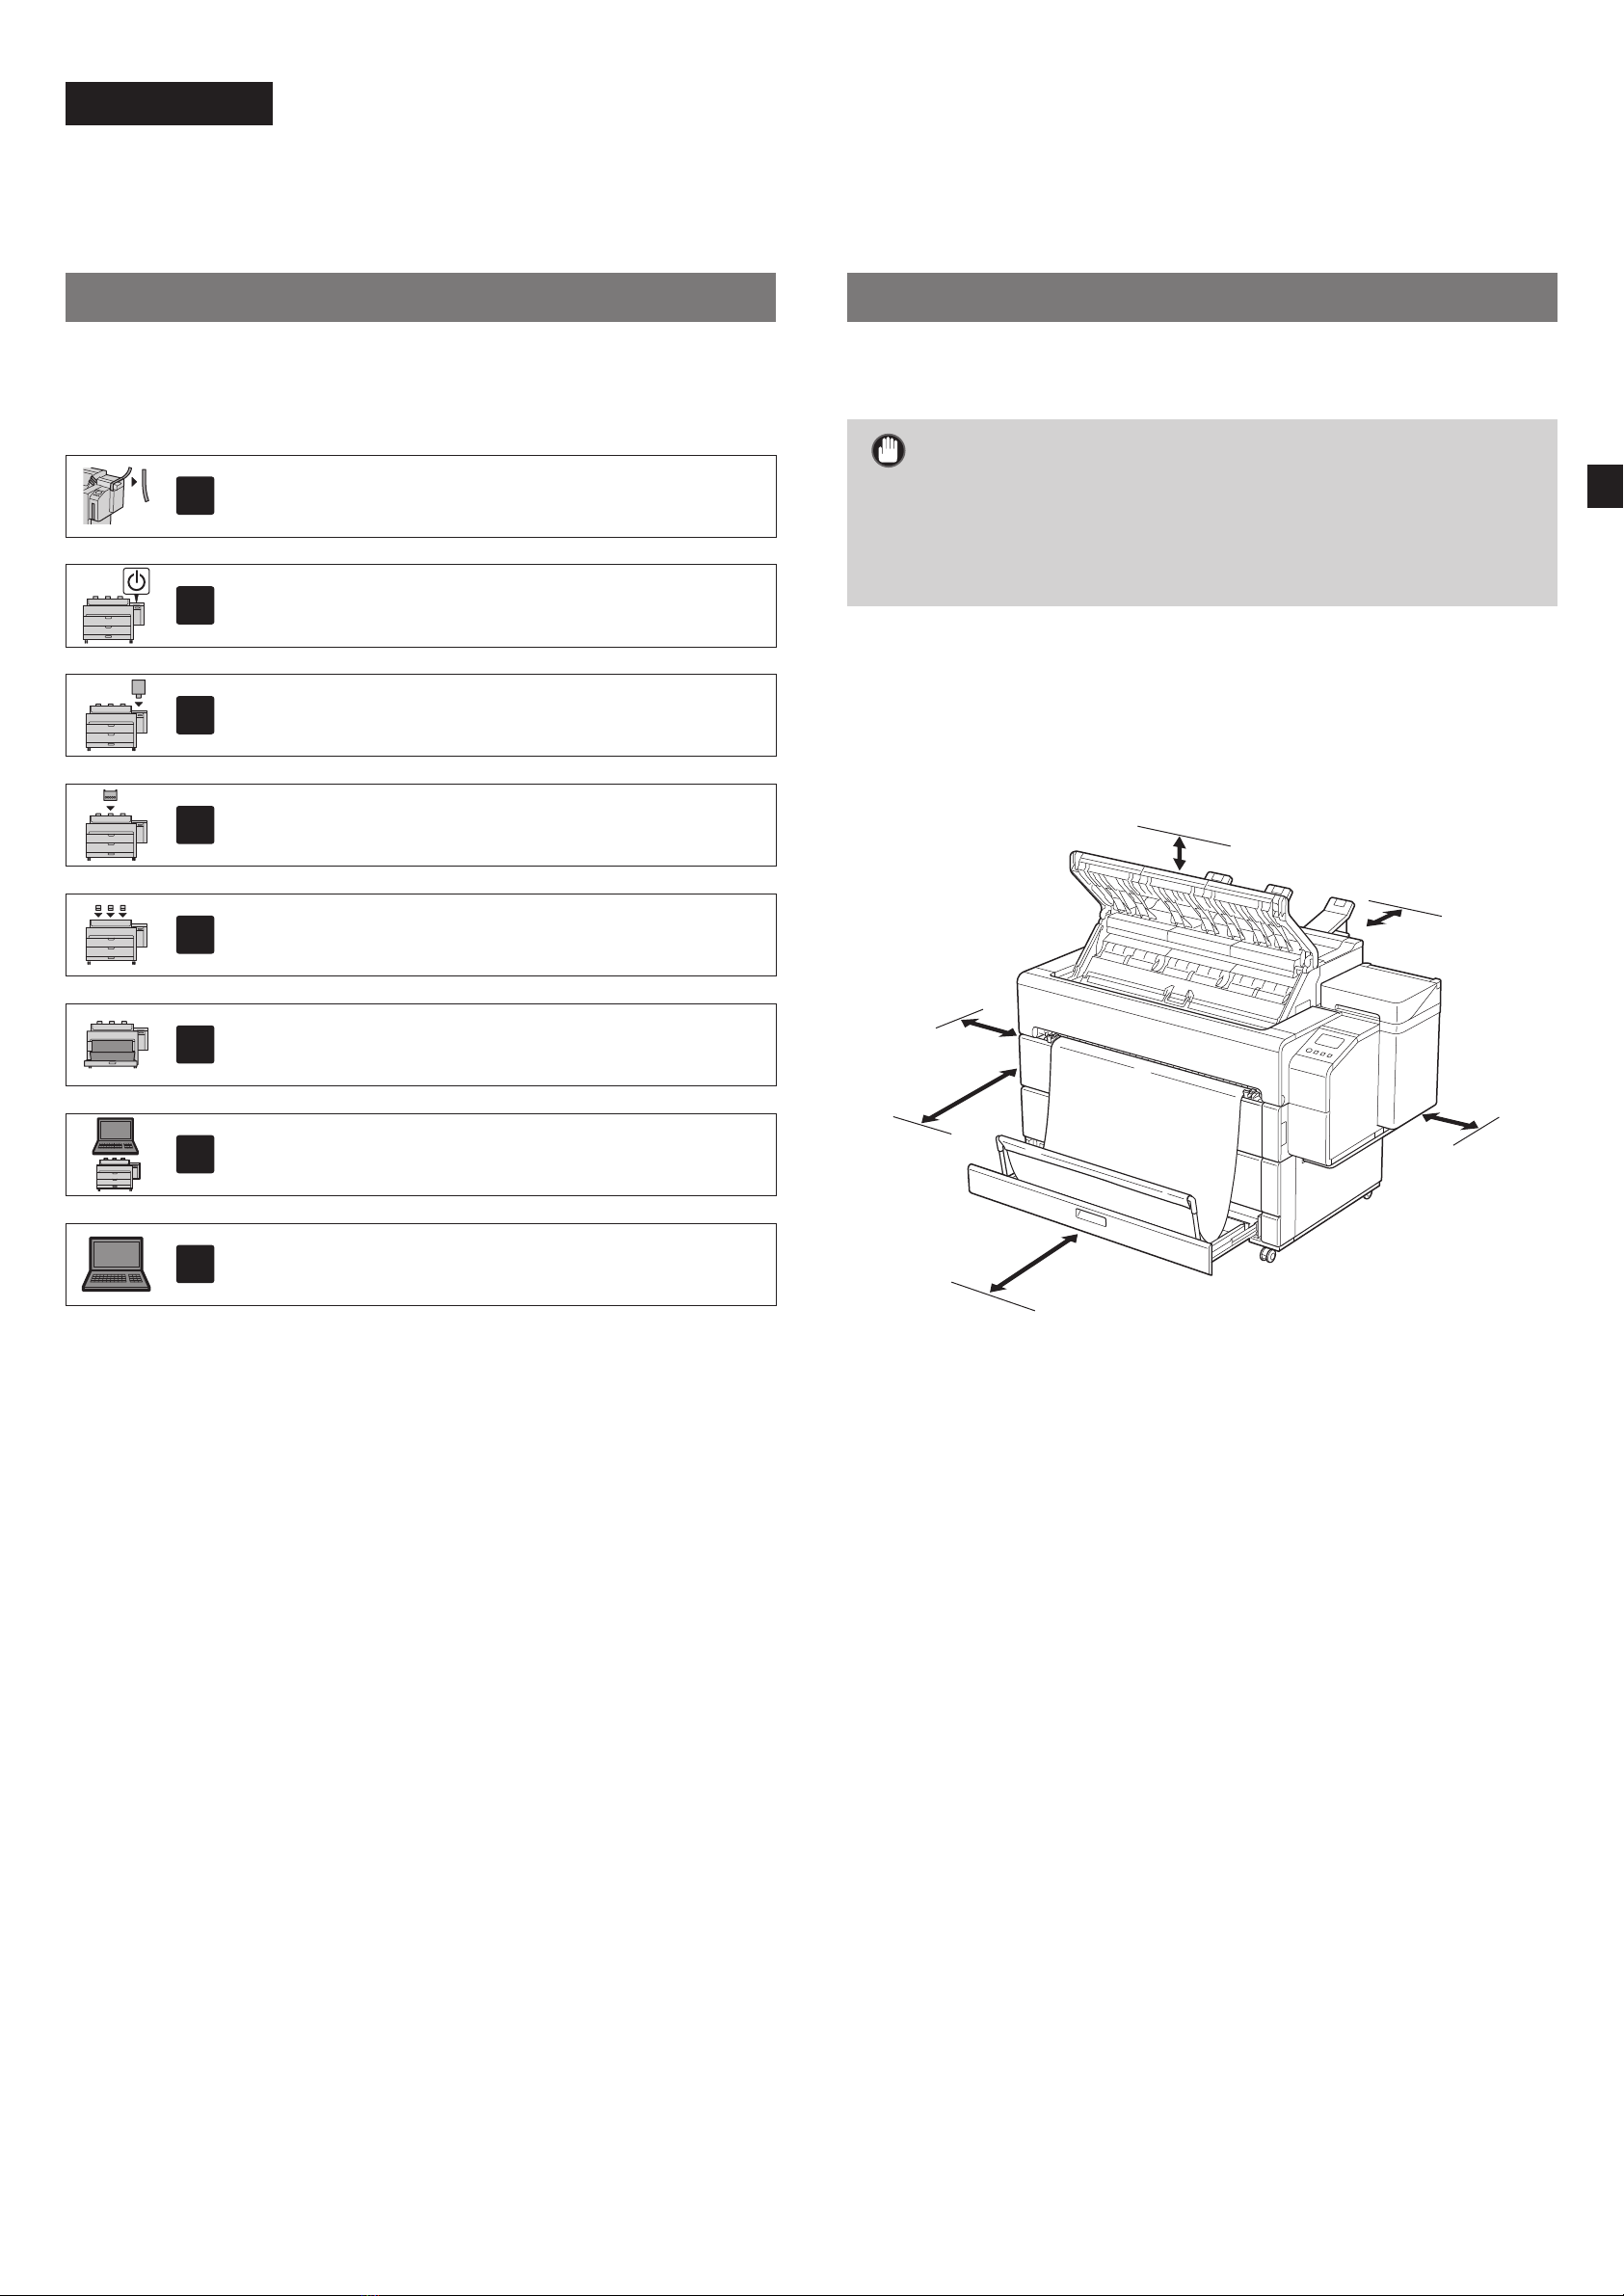
Important
●This is the space when using the paper output supports and top output
guides.
●The space required in front of the printer differs depending on whether
the basket is used.
■TZ-5300
Required space* (W x D x H)
1,948 × 2,013 × 1,478 mm
Required space** (W x D x H)
1,948 × 1,680 × 1,478 mm
600 mm**
600 mm*
200 mm
200 mm
50 mm
120 mm
* When using the basket
** When the basket is stored
ENGLISH

2
Package Contents
Check that the following included accessories are contained in the package. Note that a cable to connect the printer to a computer is not provided with the
printer.
Note
●Some of the included accessories are not described in this manual. Store them along with the other accessories as they are required for other functions.
●For instructions on the included items not described in this manual, refer to the Online Manual by following the instructions in "Displaying the Online Manual"
on p. 15.
g
h i j
e fc d
a
bo
p
k
l
bmn
m
n
aPrinter
bSetup Guide (this manual)
cInk tanks (5 pieces)
dPrint head
eQuick Guide
fSet of CD-ROMs
gPower cord
hBasket support bar
i3-inch paper core attachments (4 pieces)
jHolder stoppers (2 pieces)*
kPaper output supports (3 pieces)
lTop output guides (3 pieces)
mAllen wrench and screws (6 pieces) for attaching the top
output guides and paper output supports
nPaper handling label
oBasket cloth
pBasket arm
* This is used when loading roll paper. For details, refer to the Online Manual.
Manuals Included with This Printer
Setup Guide (this manual)
Describes how to setup the printer.
Quick Guide
Contains information related to warnings for using this printer safely and information related to replacing paper, ink tanks, and the print head.
Online Manual (Electronic Manuals)
This manual describes advanced usage of the printer such as paper saving tips, how to print a poster and banner with the supplied software and print quality
adjusting method, in addition to the basic instructions for printing on roll paper or cut sheet. To view the Online Manual, refer to "Displaying the Online Manual"
(p. 15).

3
Handling Cautions
Caution
●Move the printer to the installation location and begin the setup.
●When moving the printer, check that all of the printer covers and trays are closed before moving.
When Lifting the Printer
●When lifting the printer, have 4 people on each side firmly grasp the carrying grips (the area shown shaded in the diagram).
Holding any other areas may damage the printer. Take care when handling the printer as it is very heavy.
①
①
❶❷❸
❹
②
②
③
③
④
④
❶
❷
❸
❹
①
❶
②❷
③
❸
④❹
Gently support the front face
with your left hand.
Gently support the front face
with your right hand.

4
1
Removing the Packaging Material
Remove the tape and other packaging material. Remove the tape affixed to the roll holder.
2
Turning On the Printer
1
Open the top cover.
2
Remove the tape and cushioning
material affixed to the inner cover.
3
Open inner cover.
4
Pull up and remove the belt stopper.
●Keep the belt stopper for future use. You will need it in case you
move the printer to another location.
Note
●The belt stopper can be stored in the accessory drawer. (P.15)
5
Remove the tape.
●Peel off the tape affixed to the carriage, and then remove the
cushioning material.

5
6
Rotate the protective material in the A direction to
remove it.
A
7
Move the carriage in the direction of the arrow and
remove the protective material .
8
Close the inner cover.
9
Close the top cover.
10
Connect the power cord to the printer.
●Insert the power cord into the power connector on the rear of
the printer.
11
Plug the power cord into the outlet, and then turn on the
printer.
12
When the language selection screen appears on the
touch screen, select and gently tap a language with
your finger. Then, if the screen for selecting a time zone
appears, select and tap your region.
13
When a message prompting you to start the setup
appears on the touch screen, tap OK.

6
3
Installing the Ink Tanks
Instructions on ink tank installation are shown on the touch screen. Install the ink tanks as instructed. If the ink tank is cold, allow it to adjust to room temperature
before attaching it to the printer.
1
Open the ink tank cover.
2
Release the ink tank lock lever of the
color you are installing.
●While pressing the button at the
position (B), lift up the handle part (A)
towards you.
B
A
3
With it in this state, pull the ink tank
lock lever up.
4
Continue pulling until the entire ink tank lock lever is
tilted towards you.
●Make sure the ink tank lock lever stays in this position.
5
Shake each ink tank gently 7 or 8 times before opening its
pouch.
Important
●Failure to shake the ink tanks may
result in reduced print quality because
ink ingredients have settled on the
bottom of the tank.
6
Open the pouch and remove the ink tank.
Important
●Never touch the ink outlets or metal contacts (the area shown shaded in the diagram).
Touching these parts may cause stains, damage the ink tank, and affect print quality.
●Avoid dropping the ink tank after removing it from the pouch.
Otherwise, ink may leak and cause stains.
●Do not remove ink tanks to shake them after they have been mounted.
Doing so may cause ink to spill.

7
7
Check that the color of the ink tank is the same as the
color displayed on the label in the printer, and insert the
ink tank into the holder in the orientation shown in the
diagram.
●Insert with the ink tank label facing up and ensuring that the
text on the label is not upside-down.
Match the color of the ink tank label to
the color of the label in the printer
8
Lift up the ink tank lock lever once and then push it
down.
9
Firmly push down the handle part of the ink tank lock
lever all the way in.
10
Make sure the ink lamp lights red.
Important
●If the ink lamp does not light, repeat steps 2 to 4and 8to 9.
11
Repeat steps 2 to 10 to install each of the ink tanks.
12
Close the ink tank cover.
When the screen for confirming installation of the ink
tank appears, tap OK.
Important
●Do not open the top cover or inner cover. An error may occur. If
an error occurs, turn off the power, close the top cover and inner
cover, and then turn the power on.

8
4
Installing the Print Head
Instructions are now shown on the touch screen regarding print head installation. Install the print head by following the instructions.
1
When the Open the top cover. appears on the touch
screen, open the top cover.
Important
●If the top cover is opened before Open the top cover. appears
on the touch screen, an error may occur. If an error occurs, turn
off the power, close the top cover, then turn the power on.
2
Open the inner cover.
Important
●Do not move the carriage (the area enclosed by a circle in the
diagram). If you accidentally move it, temporarily close the inner
cover and top cover and it will return to its original position.
3
Check that the triangle mark on the angle adjustment
lever is aligned with the red ■. If they are not aligned,
move the angle adjustment lever up or down to align it
with the ■.
Triangle mark
Red ■
4
Tilt the print head lock lever towards you.
5
Open the print head locking cover
by following the
instructions on the screen and tap OK. Do not touch the
electrical contacts of the carriage.
Do not touch here
6
Grasp the print head as shown in the diagram and
remove it from the bag.
Hold here

9
7
Remove the orange protective caps in the order shown in
the diagram.
Hold here to
remove
Important
●Do not touch the part that was being
protected by the protective cap (part
shown shaded in the diagram) under any
circumstances. Touching it may cause damage
to the print head or printing problems.
●The print head is filled with ink. Be careful to
avoid getting your clothes and surrounding
items dirty when removing the protective
caps. It is recommended that you remove the
protective caps above the bag that contained
the print head.
●Do not reattach the protective caps after
removing them. Dispose of them according to
local regulations.
8
Install the print head.
●Align the print head so that the area enclosed by a circle in the
diagram is facing you, and carefully push the print head firmly
into the printer, ensuring that the part covered by the protective
caps does not touch the carriage.
9
Pull the print head locking cover down toward you to lock
the print head in place.
10
Push the print head lock lever all the way to the end.
11
Close the inner cover.
12
Close the top cover.

10
5
Installing the Paper Output Supports and Top Output Guides
1
Attach the paper output supports to the printer.
2
Affix using the screws.
3
Repeat steps 1 to 2 to install each of the paper output
supports.
5-1 Installing the Paper Output Supports

11
1
Attach the top output guides to the printer.
2
Affix using the screws.
3
Repeat steps 1 to 2 to install each of the top output
guides.
4
Open (A) in the direction of the arrow.
A
5-2 Installing the Top Output Guides

12
6
Preparing the Basket
1
Pull out the accessory drawer.
2
Remove the basket cloth from the bag.
3
Raise up the basket arms.
4
Affix the basket cloth to the basket arm in 3 locations.
5
Affix the basket cloth to the basket stopper bar in 3
locations.
6
Fold down the basket arm to store the basket cloth in the
accessory drawer.
7
Close the accessory drawer. Note
●Refer to Quick Guide for details on how to use the basket.

13
7
Selecting the Method of Connecting to Your Computer
When something like the following is displayed on the touch screen, tap the connection method.
Connect the printer to the network using a LAN cable.
Connect the printer to the network wirelessly.
Connect the printer to a computer using a USB cable.
Select this such as when connecting using a fixed IP address. The connection settings and software
installation will need to be performed separately. Start the settings from the touch screen of the printer.
Wired LAN connection
1
Select Wired LAN connection.
Check the message about the
connection method and select Yes if
there are no problems.
●A message prompting you to connect
the LAN cable appears.
2
Use the LAN cable to connect the
wired LAN connector on the rear of
the printer to the hub port.
3
Select OK and proceed to "Installing
the Software on Your Computer" (p. 14).
Wi-Fi connection
1
Select Wi-Fi connection. Check
the message about the connection
method and select Ye s if there are
no problems.
●A message prompting you to set up Wi-
Fi connection appears.
2
Select Yes and proceed to "Installing
the Software on Your Computer" (p. 14).
●To configure the settings from the
printer, select No and proceed to
"Configuring Wi-Fi Settings on the
Printer Touch Screen" (column below).
USB connection
1
Select USB connection. Check the
message about the connection
method and select Ye s if there are
no problems.
●Do not connect the USB cable yet.
2
Select OK and proceed to "Installing
the Software on Your Computer" (p. 14).
Important
●The printer starts charging the ink for the first time* and performs print head adjustment. This takes around 25 minutes. Do not open the covers of the
printer or turn the power off during this time.
* Charges ink between the ink tank and print head and performs cleaning to keep the printer in optimal condition. This may cause the remaining ink indicator and maintenance cartridge capacity indicator
to drop some amount. Since the included ink tanks are for initial installation, it is recommended that you purchase replacement ink tanks quickly.
Configuring Wi-Fi Settings on the Printer Touch Screen For Wi-Fi connection
1
Check that the following screen
appears and tap Yes .
Note
●If any of Checking the nozzle, Preparing
the ink system, or Cleaning... is displayed,
the printer initial settings are not finished.
Wait until the above screen appears.
2
Check that the following screen
appears and tap Yes .
3
Configure the settings by following
the instructions on the screen.
●When the home screen appears and
(network) appears, the Wi-Fi settings are
complete.
4
Proceed to "Installing the Software
on Your Computer" (p. 14).

14
8
Installing the Software on Your Computer
The printer connection settings and software installation are performed using a computer. You can download the setup file from our website. If you are using a
Windows PC, you can also run the file from the CD-ROM.
Downloading from the website
(Windows/macOS)
1
Go to the Canon website on your
computer.
https://ij.start.canon/TZ-5300
2
Click Download to download the
setup file and then run the file.
●If a warning screen about downloading
appears, select Do not block, Allow,
etc. and then proceed to the next step.
Booting up from the included CD-ROM (Windows)
■If you are using Windows 10 or
Windows 8.1
1
Insert the setup CD-ROM into the
computer.
2
Click the popup message for the
disk drive and click Run Msetup4.
exe on the screen that is displayed.
Note
If the message does not appear (or has
disappeared)
Click or File Explorer on the
taskbar.
Click This PC on the left side of the window
that opens.
Double-click the CD-ROM icon on the
right side of the window.
When the contents of the CD-ROM appear,
double-click
Msetup4.exe.
3
If the User Account Control dialog
box appears, click Ye s and proceed
to the next step.
■If you are using Windows 7
1
Insert the setup CD-ROM into the
computer.
2
When the AutoPlay screen appears,
click Run Msetup4.exe.
Note
If the AutoPlay screen does not appear
Click Computer from the start menu.
Double-click the CD-ROM icon in the
right side of the window that opens.
When the contents of the CD-ROM appear,
double-click
Msetup4.exe.
3
If the User Account Control dialog
box appears, click Ye s and proceed
to the next step.
4
Click Start Setup. Configure the settings by following the instructions on the screen.
Note
●A screen for selecting the printer connection method may be displayed in the middle of configuring the settings. If this happens, select the
method you selected on p. 13 and then click Next and continue with the rest of the settings.
●Connect the USB cable to the proper location by following the instructions on the screen.

15
About the Paper Handling Label
A label describing paper handling methods is included as an accessory.
Stick it in the location shown in the diagram and refer to it as necessary.
You can also access videos by using the QR code on the label.
Position for sticking the label
Loading Paper
1. Press (Load).
2. Select the paper.
3. Follow the on-screen instructions.
Storing Accessories
When you open the inner cover, a cleaning brush (for cleaning the interior) is
stored on the left side. The accessory drawer can be used to store accessories
such as the 3-inch paper core attachments, belt stoppers, and Allen
wrenches.
Printing From a Smartphone or Tablet
With the "Canon PRINT Inkjet/SELPHY" application software, you can easily,
wirelessly print photos stored on your smartphone or tablet (running iOS or
Android).
iOS Search for "Canon Print" in the App Store.
Android Search for "Canon Print" in Google Play.
Note
●You can also download the app by accessing the
Canon website from the QR code on the right.
Displaying the Online Manual
The Online Manual describes how to use the printer. It can be accessed from
the Canon website as shown below.
1
Access the Canon website by any of the following
methods.
●Enter the URL
https://ij.start.canon
Select the model number of the printer you are using.
●Scan the QR code
2
Select Read Online Manual.
●Perform the remaining operations by following the instructions
on the screen to display the Online Manual.
Trademarks
Windows is a trademark or registered trademark of Microsoft Corporation in
the U.S. and/or other countries.
macOS and App Store are trademarks of Apple Inc., registered in the U.S. and
other countries.
IOS is a trademark or registered trademark of Cisco in the U.S. and other
countries and is used under license.
Android is either a registered trademark or trademark of Google Inc.
Google Play and Google Play Logo are trademarks of Google LLC.
QR Code is a registered trademark of DENSO WAVE INCORPORATED in Japan
and in other countries.

16
Responding to Messages
Error messages may appear on the touch screen of the operation panel when setting up printer. It may not indicate a problem with the printer, and the issue may be
easily resolved. Common messages and the causes are listed here with corrective actions. For details on other messages, refer to the Online Manual.
Message Cause Corrective Action
The ink tank is not installed.
Install the ink tank properly.
There is no ink tank loaded. Install or reinstall the ink tank.
(Refer to steps 1to 12 on p. 6 and p. 7)
The ink tank is not firmly installed all the way in.
The print head cannot be recognized
correctly.
Open the top cover and the inner cover
and install the correct print head.
The print head is not installed. Install the print head.
(Refer to steps 1to 12 on p. 8 and p. 9)
Electrical contact failure in the print head. Remove the print head, make sure that no debris becomes adhered
to the electrical contacts on the print head and the carriage, and
then reinstall the print head.
Hardware error ECxx-xxxx (x represents a
letter or number)
A printer error has occurred.
Turn the printer off, wait a while, and then
turn it on again.
The belt stopper or the tape inside the top cover
has not been removed.
Turn off the power, open the top cover, and remove the tape and
the belt stopper, then turn the power on.
(Refer to steps 1to 9 on p. 4 and p. 5)
The inner cover was opened while charging the
ink.
Turn off the power, close the inner cover and top cover, prepare the
replacement ink tanks, and then turn the power on.
You may have encountered an error that cannot
be resolved.
Turn off the printer and wait at least 3 seconds before restoring the
power.
If the message appears again, write down the error code and
message, turn off the printer, and contact your Canon dealer for
assistance.
Error ECxx-xxxx (x represents a letter or
number)
A printer error has occurred.
Refer to the manual and contact the
service center.
You may have encountered an error that cannot
be resolved.
Write down the error code and message, turn off the printer, and
contact your Canon dealer for assistance.

1
安裝概觀 安裝空間
按下列程序安裝印表機。安裝時如出現錯誤訊息或發生其他問題,請參閱第
16 頁的「回應訊息」。
1
取下包裝材料 第4頁
2
開啟印表機 第4頁
3
安裝墨水盒 第6頁
4
安裝列印頭 第8頁
5
安裝出紙支架和上端出紙導引器 第10 頁
6
準備紙籃 第12 頁
7
選擇連接至您電腦的方法 第13 頁
8
在您的電腦上安裝軟體 第14 頁
關於紙張處理標籤 第15 頁
裝入紙張 第15 頁
存放位置 第15 頁
從智慧型手機或平板電腦列印 第15 頁
顯示線上手冊 第15 頁
商標 第15 頁
回應訊息 第16 頁
安裝印表機時,建議您保護以下印表機周圍的空間。
重要
●這是使用出紙支架和上端出紙導引器時所需的空間。
●印表機正面所需的空間取決於是否使用紙籃。
■TZ-5300
所需空間* (W x D x H)
1,948 ×2,013 ×1,478 mm
所需空間** (W x D x H)
1,948 ×1,680 ×1,478 mm
600 mm**
600 mm*
200 mm
200 mm
50 mm
120 mm
* 使用紙籃時
** 收起紙籃時
繁體中文

2
包裝內容
檢查包裝中是否包含以下配件。請注意印表機未提供將印表機連接至電腦的纜線。
注意
●
印表機隨附的某些配件在本手冊不作說明。請將它們與其他配件存放在一起以供日後需要時使用。
●如需關於本手冊未說明之附帶品項的說明,請按照第 15 頁「顯示線上手冊」中的說明參閱線上手冊。
g
h i j
e fc d
a
bo
p
k
l
bmn
m
n
a印表機
b安裝指南(本手冊)
c墨水盒(5 件)
d列印頭
e快速指南
fCD-ROM 集
g電源線
h紙籃支撐桿
i3in 紙軸安裝件(4 件)
j支架止動器(2 件)*
k出紙支架(3 件)
l上端出紙導引器(3 件)
m六角扳手和螺絲(6 件),用來固定上端出紙導引器和出
紙支架
n紙張處理標籤
o紙籃布
p紙籃臂
* 裝入捲紙時使用此項。如需詳細資訊,請參閱線上手冊。
本印表機附帶的手冊
安裝指南(本手冊)
說明如何安裝印表機。
快速指南
包含安全使用本印表機的相關警告資訊,以及更換紙張、墨水盒和列印頭的相關資訊。
線上手冊(電子手冊)
除提供使用捲紙或單張紙列印的基本操作說明外,本手冊亦說明印表機進階使用方式,例如省紙秘訣、使用隨附軟體列印海報和橫幅的方式,以及調整列印品質
的方式。欲查看線上手冊,請參閱「顯示線上手冊」(第 15 頁)。
Other manuals for TZ-5300
3
Table of contents
Languages:
Other Canon Plotter manuals

Canon
Canon iPF800 Series User manual

Canon
Canon imagePROGRAF TM-200 Setup guide

Canon
Canon iPF710 - imagePROGRAF Color Inkjet Printer User manual

Canon
Canon iPF8000S - imagePROGRAF Color Inkjet Printer User manual

Canon
Canon imagePROGRAF TM Series User manual

Canon
Canon iPF750 series User manual

Canon
Canon imagePROGRAF BU-03 User manual

Canon
Canon imagePROGRAF IPF9000S User manual

Canon
Canon iPF825 User manual

Canon
Canon image Prograf iPF780 Series User manual