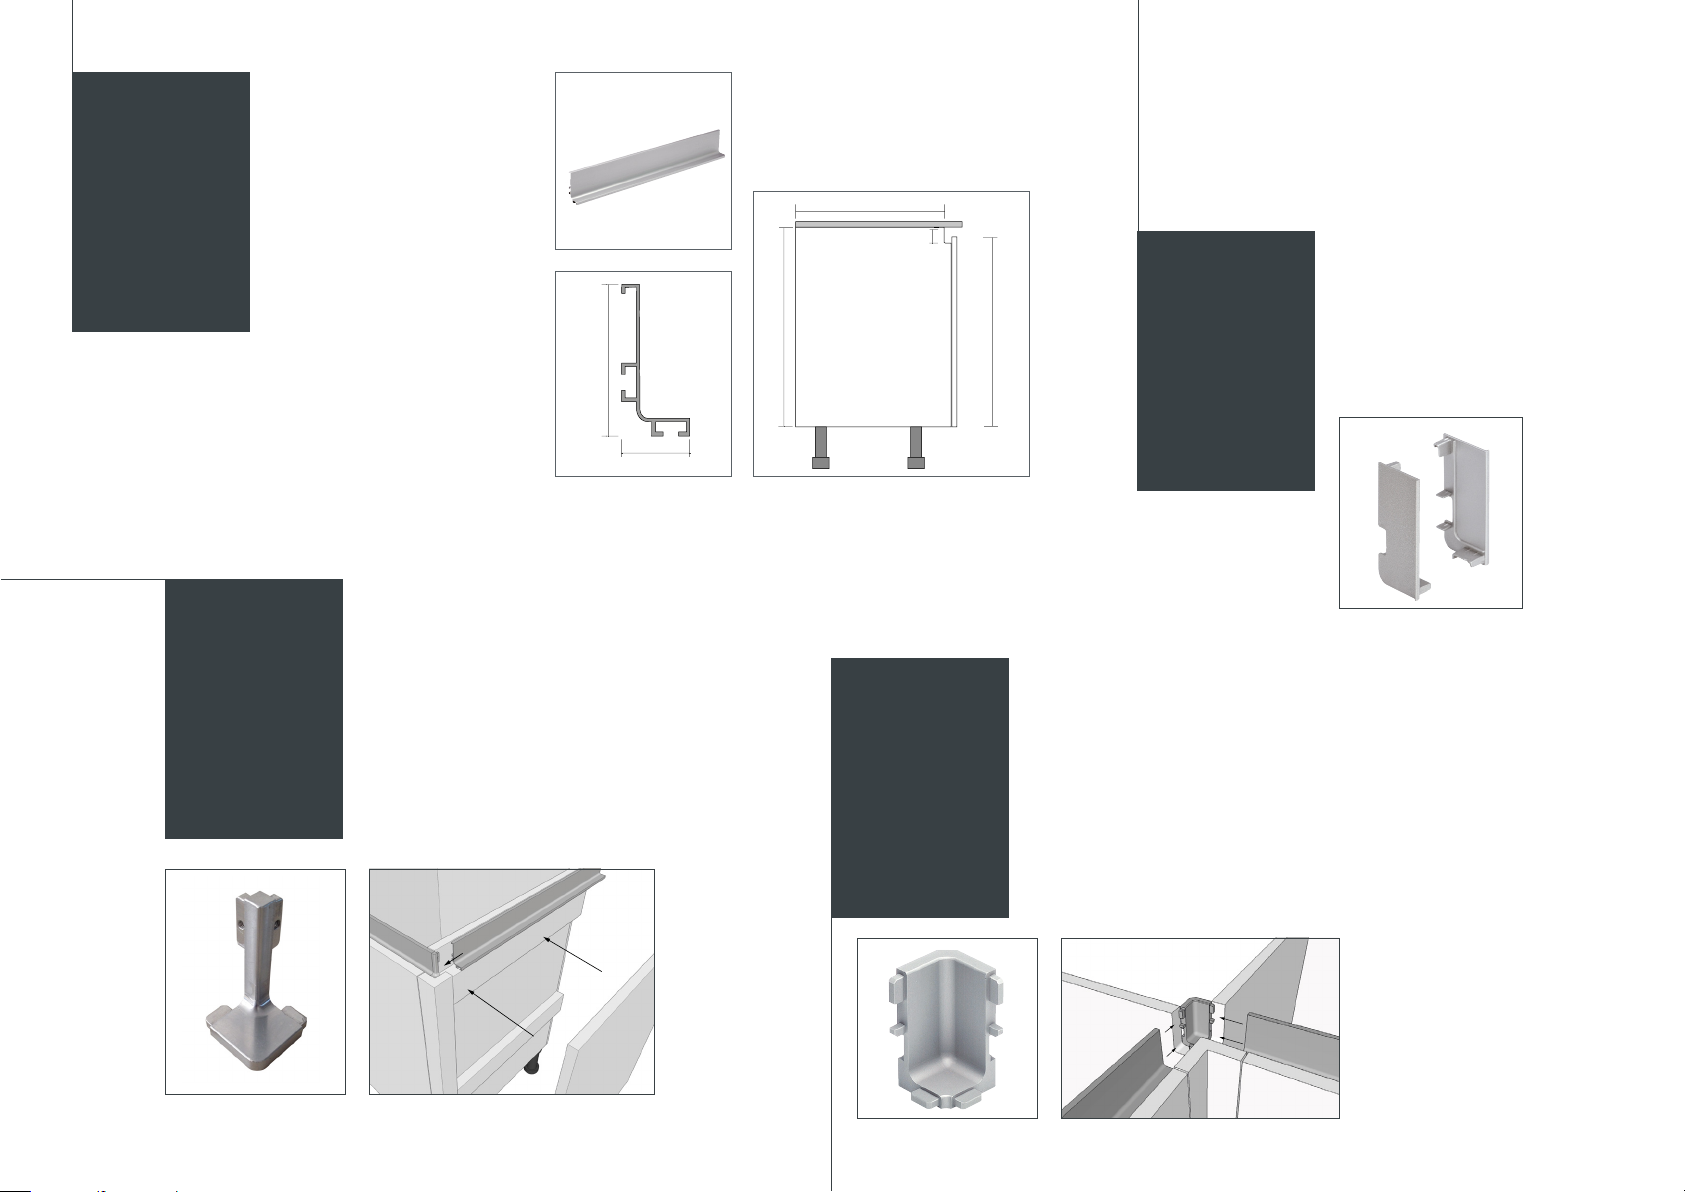
manuals.online logo
Brands
  1. Home
  2. •
  3. Brands
  4. •
  5. Caple
  6. •
  7. Kitchen Appliance
  8. •
  9. Caple VERSE Quick start guide

Caple VERSE Quick start guide

VERSE
TECHNICAL
GUIDE
VERSE TECHNICAL GUIDE
2
CONTENTS
Base Units 3
Undercounter Appliances 8
Base Units Fitting Guide 10
Wall Units 12
Tall Units Vertical Double Profile 14
Tall Units Vertical Single Profile 16
Vertical Rail Fitting Guide 18
Vertical Rail Appliance Fillers 20
Contact 22
3
01 BASE UNITS
01
BASE UNITS
IMAGE: JUKO MATT ASH & BRAVA BLACK MARBLE
VERSE TECHNICAL GUIDE
4
4
2
1
3
IMAGE: EPOS NATURAL OAK & ZETA MATT GRAPHITE
5
1
Top-rail
»Top-rail profile for base units
[GPTOP**]
»Length available;
4200mm for standard finishes,
3000mm for bespoke
painted finishes.
»Can be cut to size on site using
a circular chop saw.
»Secure to base units using fixing
brackets. Supplied in packs of
10 fixings [GPFIX10].
»Base cabinets are supplied
routered to accommodate
the rail.
534mm
720mm
Base Unit
57mm
684mm
26mm
57mm
NOTE: Distance behind top-rail to
back of carcase is 534mm, units
may need to be pulled forward to
accommodate sink and/or hob.
Top-rail External Corner
»Use with the top-rail when running
the rail around corners on the end
of a base unit run or on an island.
»For use in conjunction with
external corner posts or mitred
island end panels.
»Supplied singularly [GPTOPEXT**]
»Colour co-ordinated to the top
rail profile.
Top-rail Internal Corner
»Use with the top-rail to run the
rail around corner base units
[suitable with both conventional
and ‘L’ shape corner bases].
»Supplied singularly [GPTOPINT**]
»Colour co-ordinated to the top
rail profile.
34
Top-rail End Caps
»Caps to be used with the top-rail
to finish against a wall, end panel
or appliance.
»Supplied in pairs [GPTOPCAP**]
»Colour co-ordinated to top-rail.
2
IMAGE: EPOS NATURAL OAK & ZETA MATT GRAPHITE NOTE:
** Refers to rail colour.
VERSE TECHNICAL GUIDE
6
5
7
IMAGE: EPOS NATURAL OAK & ZETA MATT GRAPHITE
6
7
In-Line Connector
»Use to connect the top-rail or mid-
rail sections when the run exceeds
the maximum rail length.
Mid-rail
»Mid-rail profile for use with base
unit drawer packs [GPMID**].
»Lengths available;
4200mm for standard finishes,
3000mm for bespoke
painted finishes.
»Can be cut to size on site using a
circular shop saw.
»Secure to the base units using
fixing brackets. Supplied in pack of
10 fixings [GPFIX10].
»Base drawer cabinets supplied
routered to accommodate the rail.
7
5
72mm
26mm
Mid-rail End Caps
»Use with the mid-rail to finish
against a wall, end panel,
appliance or high-line base unit.
»Supplied in pairs [GPMIDCAP**]
»Colour co-ordinated to the
mid-rail profile.
6
2x Drawer Base 3x Drawer Base
720mm
35mm
325mm
35mm
325mm
720mm
35mm
160mm
160mm
35mm
325mm
IMAGE: EPOS NATURAL OAK & ZETA MATT GRAPHITE
NOTE:
** Refers to rail colour.
VERSE TECHNICAL GUIDE
8
01 BASE UNITS
02
UNDER-COUNTER
APPLIANCES
IMAGE: BRAVA RUSTIC IRON & ZETA MATT GRAPHITE
9
Single Oven Housing
»Top-rail cannot be fitted above a single oven in a base
unit, or above a built-under double oven.
»Use end caps [GPTOPCAP**] to finish the top-rail on
either side of the appliance.
»Use end caps [GPMIDCAP**] to finish the mid-rail on
either side of the appliance.
Dishwasher & Refrigeration Housing
»To fit appliances below the top-rail the appliance
height must be checked carefully before ordering.
»The distance below the top-rail to the floor is 812mm.
»Plinth height can be raised to 155mm in order to
accommodate appliances up to 817mm high.
»When appliances cannot fit below the top-rail
[including free-standing appliances] we recommend
fitting base panels either side of the appliance and
terminating the top-rail on each side.
[Note: a full height 715mm door will need to be
ordered when installing in this way].
1
2
IMAGE: BRAVA RUSTIC IRON & ZETA MATT GRAPHITE
NOTE:
** Refers to rail colour.
VERSE TECHNICAL GUIDE
10
01 BASE UNITS
03
BASE UNITS
FITTING GUIDE
IMAGE: JUKO MATT ASH & BRAVA BLACK MARBLE
11
1
4
Step One
Insert the dowelled fixing bracket
[GPFIX10] into the pre-drilled unit
side gable and screw into place.
2
5
Step Five
Fit end caps if required.
3
NOTE:
1mm spacing
must be taken
into account
when cutting
down the rail.
Step Four
The rail is now secured in place.
Step Two
Slide the locking devices onto the rail.
Step Three
Sit the rail onto the routered gable
end and slide the locking device into
the fixing bracket.
VERSE TECHNICAL GUIDE
12
01 BASE UNITS
04
WALL UNITS
IMAGE: ZETA GLOSS YALE & GREY
13
Wall Units
»Wall profile for all wall units [GPWALL**]
»Lengths available;
4200mm for standard finishes,
3000mm for bespoke painted finishes.
»Can be cut to size on site using a circular
chop saw.
»Wall carcases are supplied routered and notched
to accommodate the wall profile.
»No fixings required – profile slots directly into
the carcase [clear silicone adhesive should be
used to bind the rail with the panel].
»Note that wall profiles must be mitred for corner
wall units [no internal corner connectors are
available for wall profiles].
»Plant-on end panels must be fitted to all wall
unit end runs due to the carcase side gables
being notched for the rail.
35mm
25mm10mm
2.6mm
1
25mm
IMAGE: ZETA GLOSS YALE & GREY
Fitting details:
NOTE:
** Refers to rail colour.
VERSE TECHNICAL GUIDE
14
01 BASE UNITS
05
TALL UNITS
VERTICAL DOUBLE PROFILE
IMAGE: BRAVA CONCRETE & ZETA MATT GRAPHITE
15
Vertical Double Rail Profile
»Vertical double rail profile is used for fitting
onto tall units when two opening doors meet.
»Can be cut to size on site using a circular
chop saw.
»Secure to the tall units using fixing brackets.
Supplied in a pack of 10 fixings [GPVFIX10].
»Tall unit gables are supplied routered to accept
the vertical rail.
»Tall units must have a 30mm space between
each unit to allow for the vertical rail.
»Specify left-hand hinged [L] or right-hand hinged
[R] option when ordering tall units. If a vertical
profile is to be fitted on both sides of a tall
housing then a double-handed [D] option should
be specified [see illustration].
Available in various lengths:
Standard finishes: Bespoke finishes:
4200mm – GPVD** 3000mm – GPVD**
2180mm – GPVDET** 2180mm – GPVDET**
2005mm – GPVDT** 2005mm – GPVDT**
1
IMAGE: BRAVA CONCRETE & ZETA MATT GRAPHITE
Fitting details:
66.2mm
17mm 15.8mm
30mm Space
Single fixing plate
MDF fixing block
BIRDS EYE VIEW
Single fixing plate
MDF fixing block
30mm Space
30mm Space
Single fixing plate
30mm Space 30mm Space
BIRDS EYE VIEW
Left hand
hinged unit
Double
handed unit
Right handed
hinged unit
NOTE:
** Refers to rail colour.
VERSE TECHNICAL GUIDE
16
01 BASE UNITS
06
TALL UNITS
VERTICAL SINGLE PROFILE
IMAGE: ZETA MATT GRAPHITE & CASHMERE
17
BIRDS EYE VIEW
30mm Space
Single fixing plate
MDF fixing block
Vertical Single Rail Profile
»Vertical single rail profile is used for fitting
onto tall units when you have an opening door
on one side only. It can also be used to end a
run when an end panel is fitted.
»Can be cut to size on site using a circular
chop saw.
»Secure to the tall units using fixing brackets.
Supplied in a pack of 10 fixings [GPVFIX10].
»Tall unit gables are supplied routered to accept
the vertical rail.
»Tall units must have a 30mm space between
each unit or end panel to allow for the
vertical rail.
»Specify left-hand hinged [L] or right-hand
hinged [R] option when ordering tall units
[see illustration].
Available in various lengths:
Standard finishes: Bespoke finishes:
4200mm – GPVS** 3000mm – GPVS**
2180mm – GPVSET** 2180mm – GPVSET**
2005mm – GPVST** 2005mm – GPVST**
1
IMAGE: ZETA MATT GRAPHITE & CASHMERE
Fitting details:
48.2mm
17mm 15.8mm
NOTE:
The illustration above shows a
left-hand hinged tall unit.
BIRDS EYE VIEW 30mm Space
Single fixing plate
MDF fixing block
NOTE:
** Refers to rail colour.
VERSE TECHNICAL GUIDE
18
01 BASE UNITS
07
VERTICAL RAIL
FITTING GUIDE
IMAGE: EPOS SLATE & JUKO MATT CLOUD
19
Double Vertical Rail Fixing Positions:
1
Step One
Attach 4 fixings plates flush to the front of
the cabinet side gable. Position 1 fixing plate
towards the back to assist with spacing.
2
Step Two
Secure the units by positioning the MDF
fixing block [supplied with each vertical
rail] behind the fixing plate and screw the
cabinets together. The vertical profile is then
clipped into the fixing plates.
Use a single fixing plate to assist with spacing
Use MDF fixing block to join the cabinets together
30mm
BIRDS EYE VIEW
Cabinet door
Use a single fixing plate to assist with spacing
Use MDF fixing block to join the
cabinets or end panel together
Side panel
Cabinet door
BIRDS EYE VIEW
30mm
IMAGE: EPOS SLATE & JUKO MATT CLOUD
Single Vertical Rail Fixing Positions:
VERSE TECHNICAL GUIDE
20
01 BASE UNITS
08
VERTICAL RAIL
APPLIANCE FILLERS
IMAGE: ZETA MATT DUST GREY & WHITE

Other Caple Kitchen Appliance manuals

Caple W16135 User manual

Caple

Caple W16135 User manual

Caple WC6217 User manual

Caple

Caple WC6217 User manual

Caple Wi155 User manual

Caple

Caple Wi155 User manual

Caple WI6141 User manual

Caple

Caple WI6141 User manual

Caple WF1548 User manual

Caple

Caple WF1548 User manual

Caple WI3123GM User manual

Caple

Caple WI3123GM User manual

Caple WF1545 User manual

Caple

Caple WF1545 User manual

Caple Wi6122 User manual

Caple

Caple Wi6122 User manual

Caple WI3118 User manual

Caple

Caple WI3118 User manual

Caple Wi6228 User manual

Caple

Caple Wi6228 User manual

Caple WI3119 User manual

Caple

Caple WI3119 User manual

Caple WI6117 User manual

Caple

Caple WI6117 User manual

Caple WI6118 User manual

Caple

Caple WI6118 User manual

Caple WF1105 User manual

Caple

Caple WF1105 User manual

Caple WF1552 User manual

Caple

Caple WF1552 User manual

Caple WI6127 User manual

Caple

Caple WI6127 User manual

Caple WI156 User manual

Caple

Caple WI156 User manual

Caple WC6218 User manual

Caple

Caple WC6218 User manual

Caple WI3118 User manual

Caple

Caple WI3118 User manual

Caple C995 User manual

Caple

Caple C995 User manual

Caple WI6225 User manual

Caple

Caple WI6225 User manual

Caple WC1800 User manual

Caple

Caple WC1800 User manual

Caple WI3124 User manual

Caple

Caple WI3124 User manual

Caple WC6400 User manual

Caple

Caple WC6400 User manual

Popular Kitchen Appliance manuals by other brands

CTC Union CLATRONIC KM 3765 instruction manual

CTC Union

CTC Union CLATRONIC KM 3765 instruction manual

Scarlett SC-FD421005 instruction manual

Scarlett

Scarlett SC-FD421005 instruction manual

Steamfast SF-540 owner's guide

Steamfast

Steamfast SF-540 owner's guide

Thermador Pro Harmony PA30GLBH installation instructions

Thermador

Thermador Pro Harmony PA30GLBH installation instructions

AGA marvel ML24BCG0RS Installation, operation and maintenance instructions

AGA marvel

AGA marvel ML24BCG0RS Installation, operation and maintenance instructions

RONDELL RDE-1620 Manual instruction

RONDELL

RONDELL RDE-1620 Manual instruction

Philips HD9627 manual

Philips

Philips HD9627 manual

Linea 2000 DOMO DO499BL Instruction booklet

Linea 2000

Linea 2000 DOMO DO499BL Instruction booklet

Somogyi home HG EK 1000 instruction manual

Somogyi

Somogyi home HG EK 1000 instruction manual

Silvercrest SCM 1400 A1 operating instructions

Silvercrest

Silvercrest SCM 1400 A1 operating instructions

Weston 75-0401-W manual

Weston

Weston 75-0401-W manual

Basilico K704 Assembly instructions/Instructions for use

Basilico

Basilico K704 Assembly instructions/Instructions for use

Optimum ST-1412 operating instructions

Optimum

Optimum ST-1412 operating instructions

Univex 6509 instruction manual

Univex

Univex 6509 instruction manual

EasyLine SBS/300P Use and maintenance

EasyLine

EasyLine SBS/300P Use and maintenance

Dash D DPM100 Instruction and Care Manual

Dash D

Dash D DPM100 Instruction and Care Manual

Electrolux EHM4 Series Instruction book

Electrolux

Electrolux EHM4 Series Instruction book

Giani Cucina GCYD501 instruction manual

Giani

Giani Cucina GCYD501 instruction manual

manuals.online logo
manuals.online logoBrands
  • About & Mission
  • Contact us
  • Privacy Policy
  • Terms and Conditions

Copyright 2025 Manuals.Online. All Rights Reserved.