Carbatec WL-B440P User manual


M305
305mm
240mm
406mm
1/2HP, 230V/50Hz
6
360, 670, 1020, 1510, 2230, 3250
M33mm x 3.5p
M30mm x 3.5p
MT2
MT2
9.5
60mm
807(L)x457(W)x292(H)mm
48 kgs
Model Number
Swing Over Bed
Swing Over Tool Rest Base
Working Distance Between Centers
Motor
Speeds
Speed Ranges
Spindle Thread (Europe)
Spindel Thread (Australia)
Headstock Taper
Tailstock Taper
Hole Through Spindle
Tailstock spindle travel
Overall Dimensions
Net Weight
Table of Contents
Specifications
1
Table of Contents
Specifications..........................................................................................................................................1
Contents of Package...............................................................................................................................2
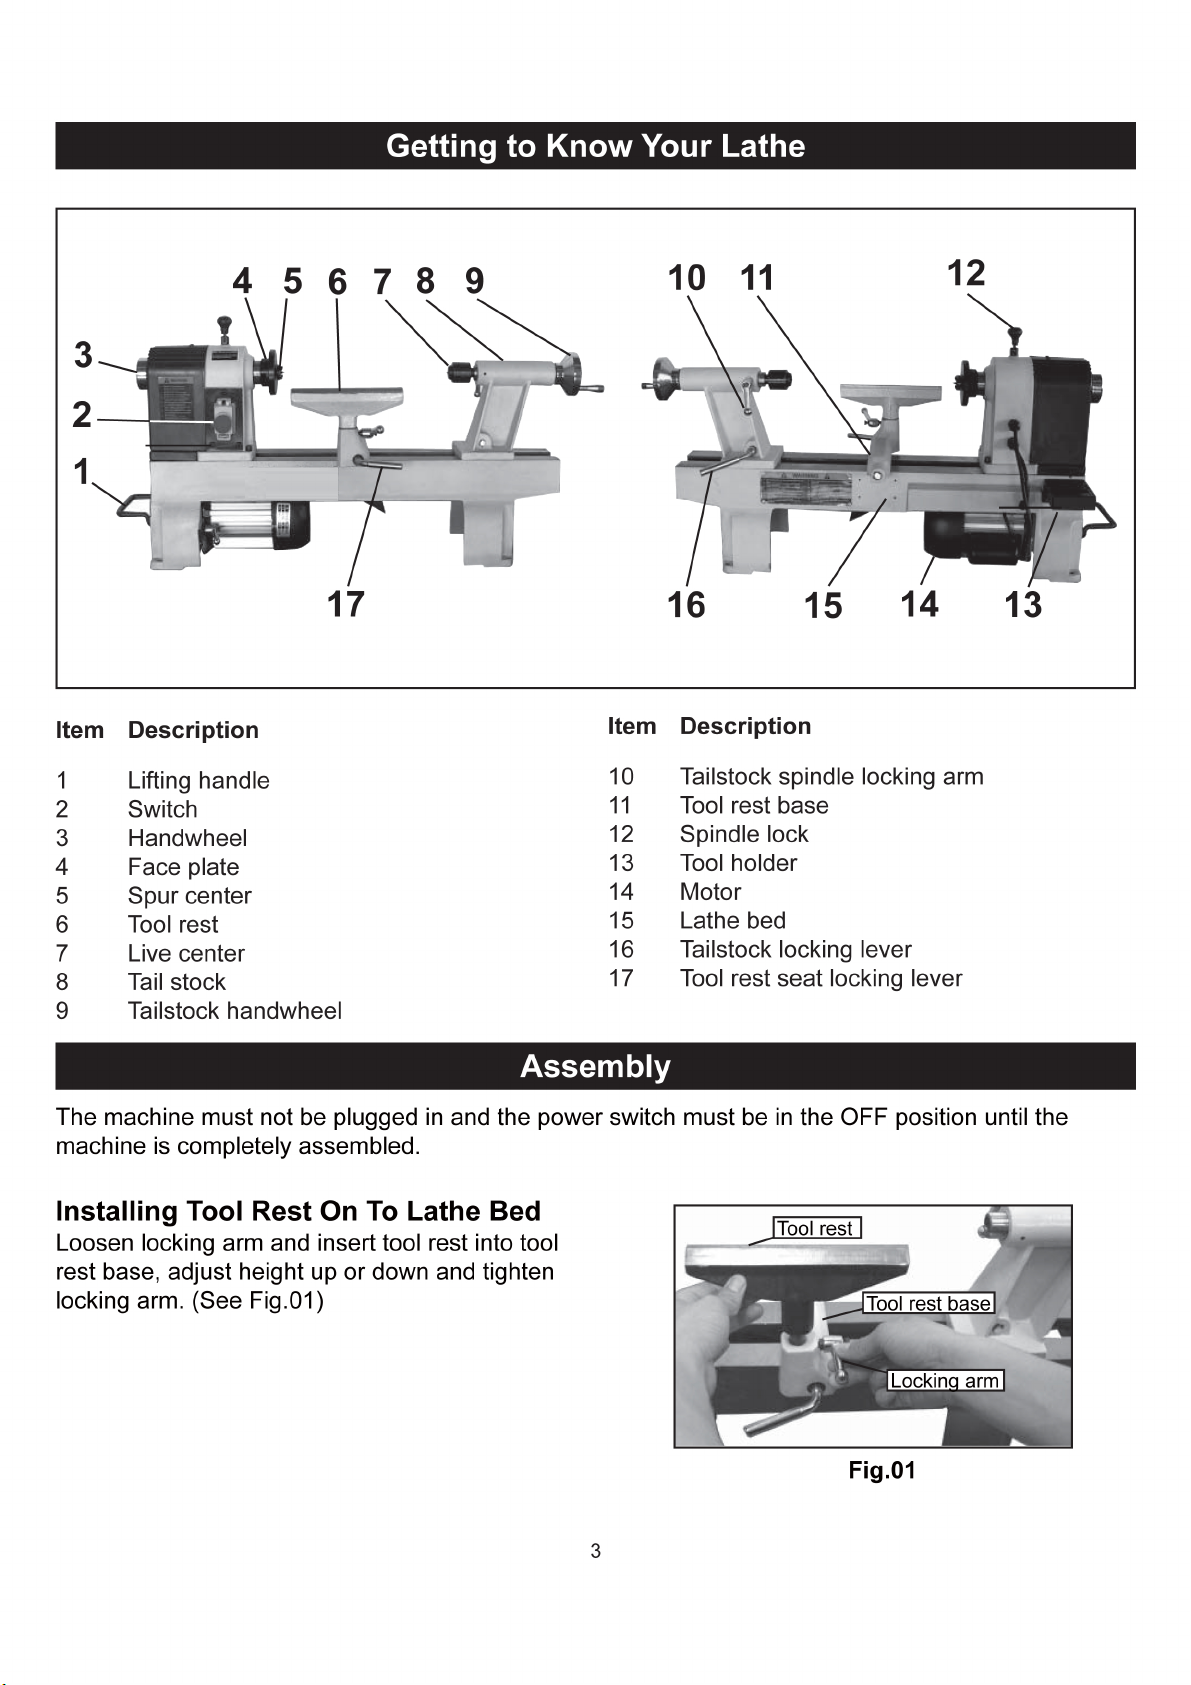
Getting to Know Your Lathe.....................................................................................................................3
Assembly................................................................................................................................................6
Installing the Tool Rest...........................................................................................................................6
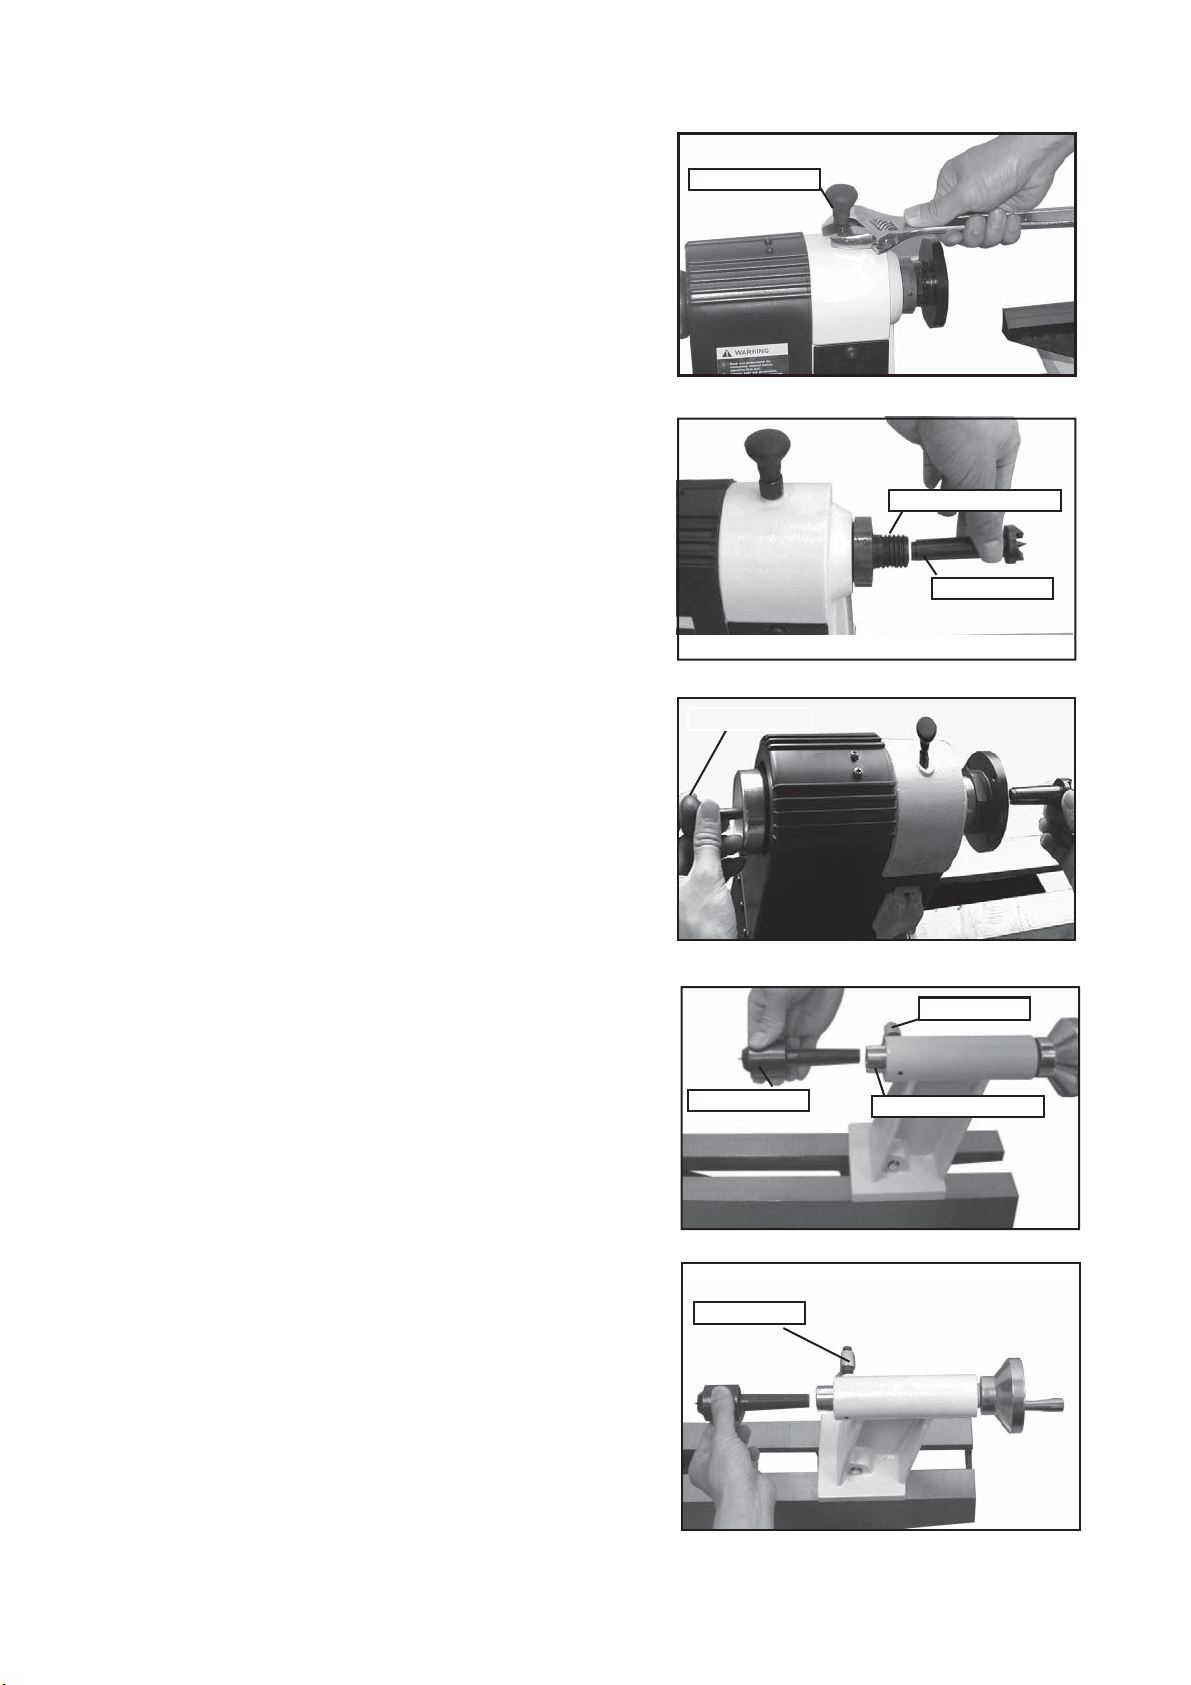
Installing Spindle Lock............................................................................................................................7
Attaching the Spur Center.......................................................................................................................7
Attaching the Live Center........................................................................................................................7
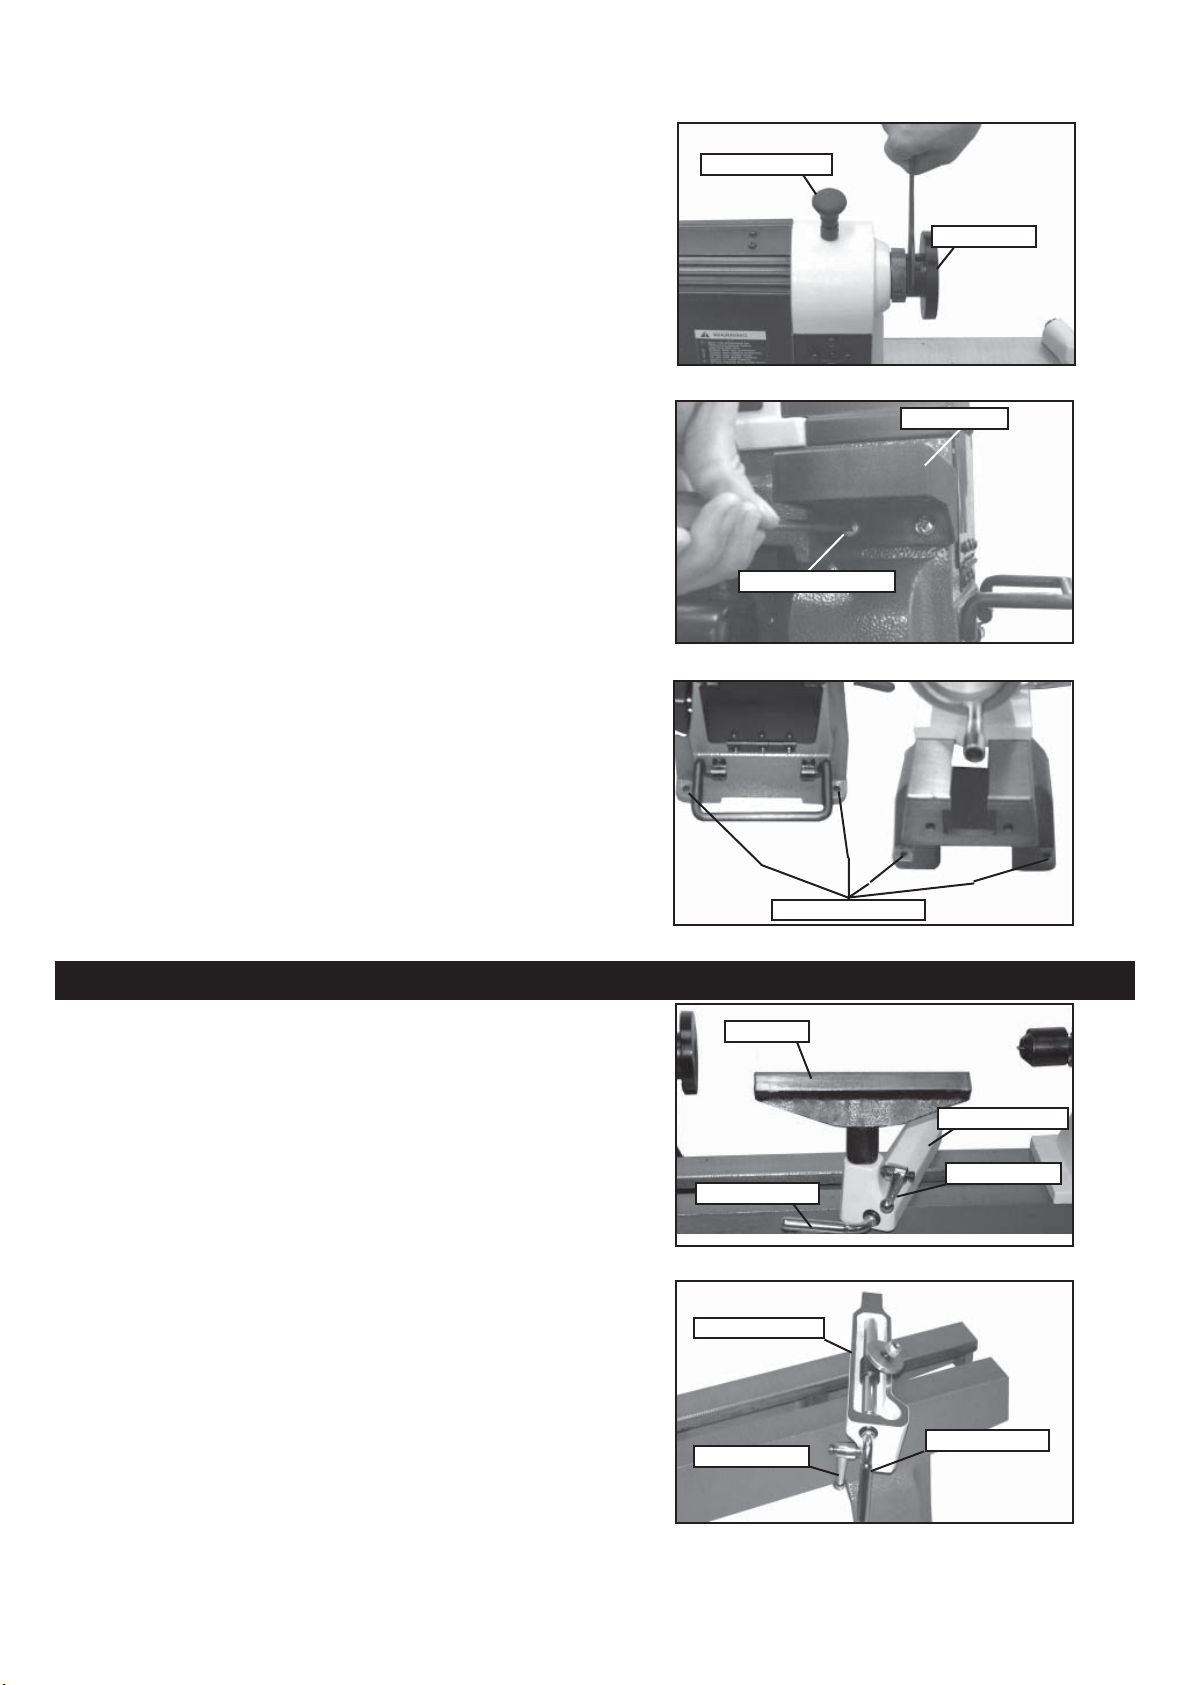
Installing the Faceplate...........................................................................................................................8
Installing the Tool Holder.........................................................................................................................8
Securing the Lathe to a Work surface or Stand........................................................................................8
Adjustments............................................................................................................................................8
Adjusting the Tool Rest............................................................................................................................8
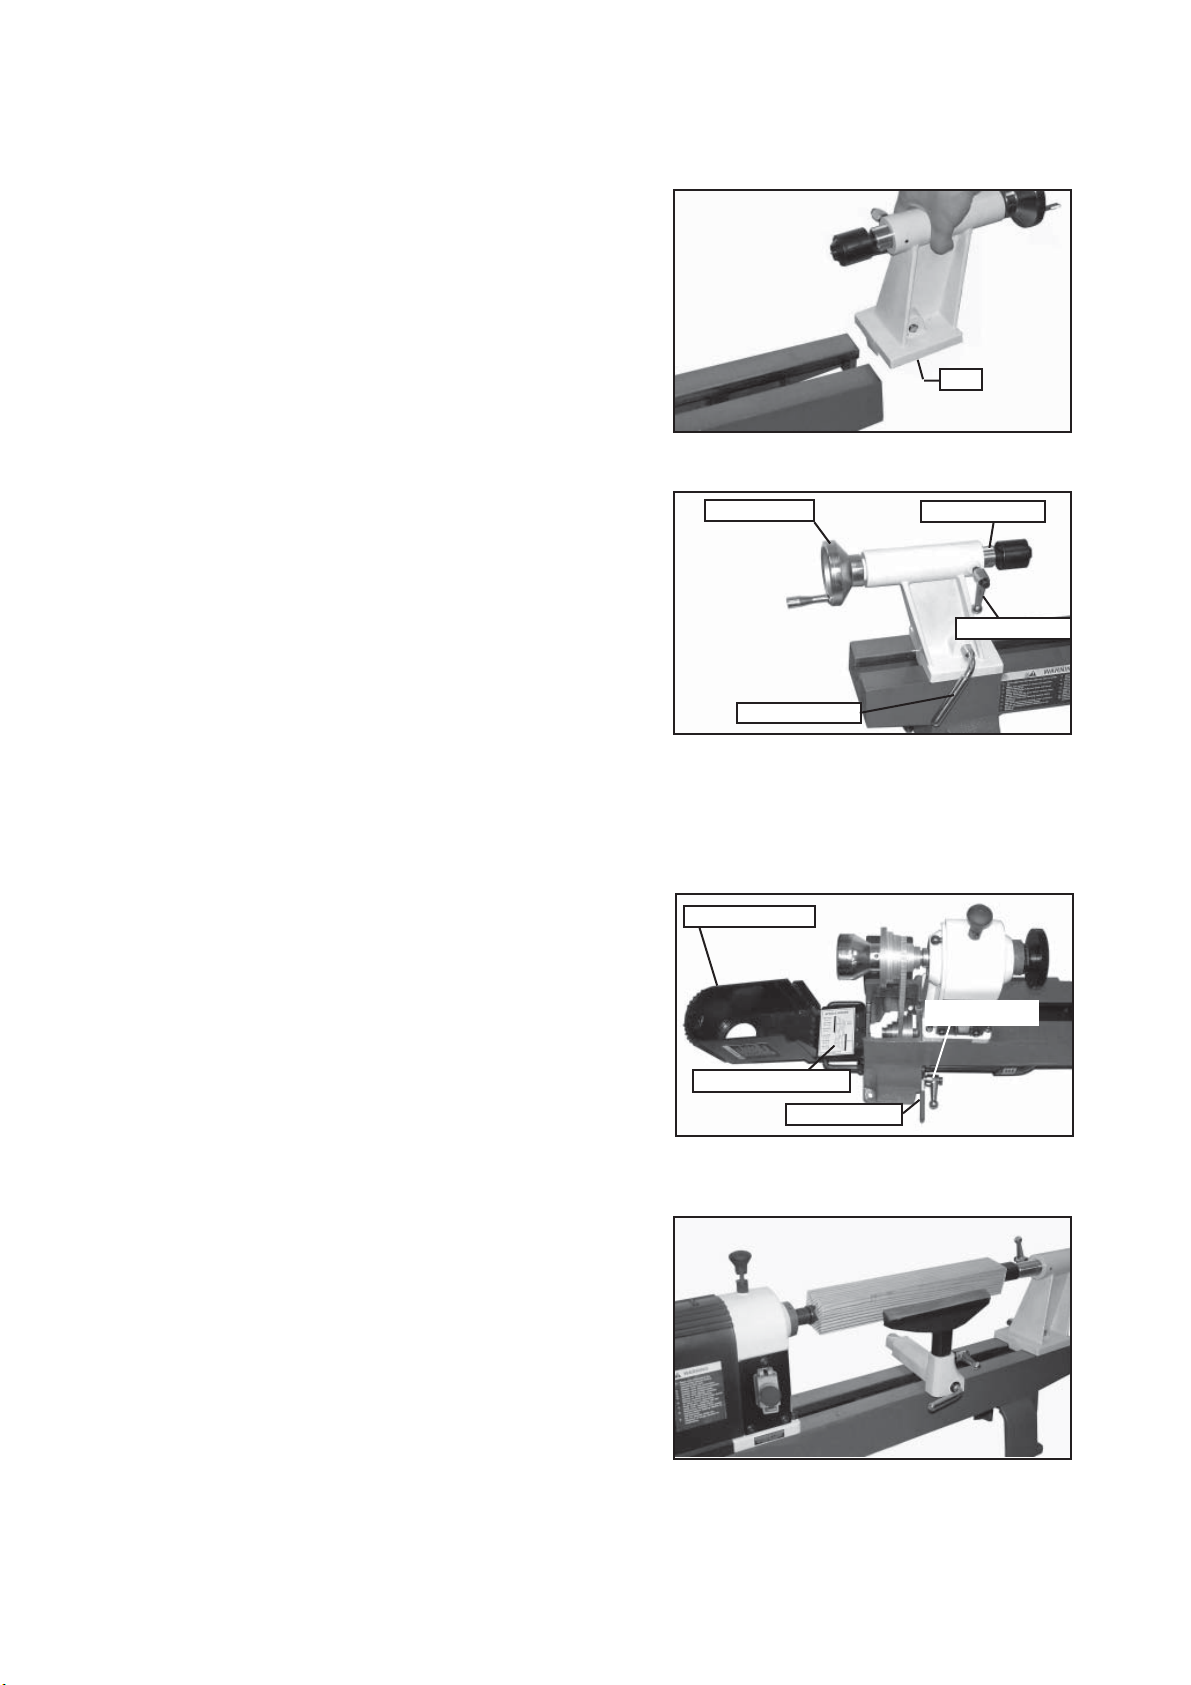
Adjusting the Tailstock.............................................................................................................................9
Changing Spindle Speeds.......................................................................................................................9
Typical Operations..................................................................................................................................9
Indexing /Spindle Lock..........................................................................................................................10
Maintenance.........................................................................................................................................10
Electrical Requirements........................................................................................................................11
Wiring Diagram.....................................................................................................................................12
Troubleshooting....................................................................................................................................13
Explosion Diagram................................................................................................................................14
Parts List...............................................................................................................................................15
WL-B440P


4
Installing Spindle Lock
Locate the spindle lock assembly from the
carton, and install it onto the headstock with an
adjustable wrench. (See Fig.02)
Warning: Disengage the spindle lock before
turning the machine on.
Spindle lock
Attaching Spur Center On The
Headstock
Insert spur center, with a No. 2 Morse Taper
shank, into the headstock spindle.(See Fig.03)
Fig.03
Spur center
Headstock spindle
Knockout Bar
The knockout bar is used to remove the spur
center from the headstock spindle. Insert
knockout bar into hole at opposite side from spur
center. (See Fig.04)
Fig.04
Knockout bar
Attaching Live Center On the Tailstock
Insert the live center, with a No. 2 Morse Taper
shank into the tailstock spindle. (See Fig.05)
Live center Tailstock spindle
Fig.06
To remove the live center from the tailstock
spindle, loosen locking arm and rotate the hand
wheel counter clockwise to retract spindle into
the body of the tailstock. The live center will be
pushed out of the spindle.
(See Fig.06)
Fig.02
Fig.05
Locking arm
Locking arm

5 Fig.11
Secure Lathe to a Solid Work Surface
The lathe must be attached to a solid work
surface or stand. Four mounting holes are easily
accessible at the base of the lathe. (See Fig.09)
Adjustments and Operations
Adjusting the Tool Rest
The tool rest base can be easily moved along
the lathe bed. Loosen the locking lever counter
clockwise, slide the tool rest base to new position,
and tighten the locking lever clockwise.
To adjust the height of the tool rest, loosen the
locking arm, raise or lower the tool rest, then
tighten the locking arm. (See Fig.10)
Note: Position the tool rest as close to the work
piece as possible.
To adjust the clamping action of the tool rest
base, remove the base and adjust the nut
clockwise to tighten and counterclockwise to
loosen.(See Fig.11)
Tool rest
Locking arm
Locking lever
Tool rest base
Locking arm Locking lever
Tool rest base
Fig.09
Mounting holes
Installing Tool Holder On the Lathe Bed
Located the tool holder from the carton, and
install it onto the lathe bed with two pan head
screws. (See Fig.08)
Pan head screw
Installing The Faceplate to the
Headstock
Thread the faceplate clockwise on to the
headstock spindle. Engage the spindle lock
and stop the spindle from turning. Tighten the
faceplate with the supplied wrench. (See Fig.07)
Fig.07
Faceplate
Spindle lock
Warning: Disengage spindle lock before turning
the machine on.
Fig.08
Fig.10
Tool holder

6
Adjusting Tailstock
Loosen the locking lever to move the tailstock
along the lathe bed to the desired position.
Tighten the lever.
To adjust clamping action of the tailstock, remove
it from the lathe bed and adjust the nut clockwise
to tighten and counterclockwise to loosen.(See
Fig.12)
To adjust the tailstock arm in or out, loosen the
locking arm and turn the handwheel. When the
tailstock arm is in a desired position, tighten
locking arm.
(See Fig.13)
Locking arm
Locking lever
Handwheel Tailstock arm
Nut
Changing Spindle Speeds
The lathe features a six step motor and spindle
pulleys to provide different spindle speeds. Open
access cover to change spindle speeds.
(See Fig.14)
With access cover open, loosen locking arm.
Raise lever to release tension on motor pulley
and tighten locking arm. Check speed and belt
position chart inside access cover to determine
spindle speed required.
Move drive belt to desired pulley combination.
Loosen locking arm, lower lever, and the motor
will provide proper tension on the drive belt.
Tighten locking arm and close access cover. (See
Fig.14)
Typical Operations
The lathe is set up for a typical spindle turning
operation.(See Fig.15)
Fig.12
Fig.13
Fig.15
Access cover
Belt position Chart
Locking arm
Tension lever
Fig.14

CAUTION! BEFORE CLEANING OR CARRYING OUT MAINTENANCE WORK, DISCONNECT
THE MACHINE FROM THE POWER SOURCE (WALL SOCKET). NEVER USE WATER OR
OTHER LIQUIDS TO CLEAN THE MACHINE. USE A BRUSH. REGULAR MAINTENANCE OF THE
MACHINE WILL PREVENT UNNECESSARY PROBLEMS.
Keep the lathe bed casting clean and lubricated.
Keep the outside of the machine clean to ensure accurate operation of all moving parts and prevent
excessive wear.
Keep the ventilation slots of the motor clean to prevent it from overheating.
Remove all saw dust and chips from the lathe after each use.
7
The lathe can be set up for a faceplate turning
operation. The work piece should be “rough cut”
as close as possible to finished shape before
mounting. (See Fig.16)
Indexing/Spindle Lock
The dual purpose indexing/spindle lock is
positioned on the top of the headstock for ease
of use. The headstock indexing feature has 12
equally spaced positions. The spring loaded
locking pin assembly is engaged by turning the
knob a half turn allowing it to drop into the desired
position. To disengage, lift the lock knob up and
turn a half turn either direction. (See Fig.17 &
Fig.18)
The 12 position indexing feature allows accurate
pattern work on projects such as straight
fluting, grooving, drilling, lay out and more. This
feature also allows the user to lock the spindle
for removing face plates, chucks and other
accessories without needing two tools.
To use the spindle lock, disengage the locking
pin by lifting up and rotating a half turn. The pin
will engage in the closest pin available. Once
locked an accessory such as a face plate can be
removed with the wrench supplied. Fig.18
Maintenance
Fig.16
Fig.17

In the event of a malfunction or breakdown, grounding provides a path of least resistance for electric
current to reduce the risk of electric shock. This tool is equipped with an electric cord having an
equipment-grounding conductor and a grounding plug. The plug must be plugged into a matching
outlet that is properly installed and grounded in accordance with all local codes and ordinances.
Do not modify the plug provided. If it will not fit the outlet, have the proper outlet installed by a
qualified electrician.
Improper connection of the equipment-grounding conductor can result in a risk of electric shock. The
conductor, with insulation having an outer surface that is green with or without yellow stripes, is the
equipment-grounding conductor. If repair or replacement of the electric cord or plug is necessary, do
not connect the equipment-grounding conductor to a live terminal.
Check with a qualified electrician or service personnel if the grounding instructions are not completely
understood, or if in doubt as to whether the tool is properly grounded.
Repair or replace a damaged or worn cord immediately.
Eletrical Requirements
8
WARNING:This machine must be grounded.
Replacement of the power supply cable should only be done by a qualified electrician.
Wiring Diagram

Troubleshooting
9
FOR YOUR OWN SAFETY, ALWAYS TURN OFF AND UNPLUG THE MACHINE BEFORE
CARRYING OUT ANY TROUBLESHOOTING.
Symptom Possible Cause Solution
Motor will not start Machine no plugged in Plug the machine in
Low voltage
Loose connection
Motor overheats Motor overloaded Reduce load on motor
Air flow restricted on motor Clean out motor to obtain normal air flow
Excessive motor noise Bad motor Have motor checked
Pulley set screw loose Tighten set screw
Motor will not develop Circuit overloaded with lights or Decrease the load on the circuit
full power or stalls other tools
Circuit too long or undersized wires Reduce the length of the wire or
increase the wire size
Voltage too low Have the voltage checked by an electrican
Circuit breakers do not have sufficient Have a licensed electrician install proper
capacity size breaker
Drive belt tension too high Adjust belt tension
Use of extension cord Use heavier guage extension cord or no
extension cord
Machine bogs down Excessive depth of cut Decrease depth of cut
during cutting Turning tools are dull Sharpen turning tools
***************WARNING***************
Do not make adjustments while the lathe is running! Ensure the switch is off, power is
disconnected and all moving parts have stopped before servicing. Failure to comply may
result in serious injury!
!WARNING

Explosion Diagram
10
Exploded Diagram

Parts List
Center point
Spur center
Faceplate
Spindle shaft
Bearing 6005-2Z
Ring retaining 47mm
Indexing gear
Headstock
Undee washer 47mm
Ring retaining 25mm
Poly-v-belt
Hex socket set screw M6x10
Spindle pulley
Ring retaining 19mm
Handwheel
Spindle lock knob
Spindle lock tube
Spindle lock shaft
Spindle lock spring
Pin roll 3x16
Rounded insert
Hexagon socket cap screw
Strain relief
Pan head screw M5
Locking washer
Switch box
Switch plate
NVR switch
Pan head screw M6x10
Cross recessed pan head screw
Pan head tapping screw
Pointer
Close-end connector
Hex. Socket head screw M6x35
Spring washer 6mm
Washer 6mm
Bed
Tool holder
Washer 6mm
Pan head screw M6x15
Cable tube
Dust chute
Special washer 5mm
Pan head screw M5x10
Tool rest
Tool rest bracket
Lock handle
Lock lever
Collar
Ring retaining 12mm
Part No. Description Part No. Description
52 Cam bolt
53 Clamp disc
54 Lock nut M10
55 Live center
56 Axle sleeve
58 Bolt
59 Ring retaining
60 Washer 14mm
61 Tailstock
62 Handwheel
63 Hex. Socket set screw M6x12
64 Handwheel handle
65 Screw
66 Lock handle
67 Lock lever
68 Hex. Socket set screw M5x8
69 Cam bolt - tailstock
70 Spring
71 Clamp disc
72 Lock nut M10
73 Ring retaining 10mm
74 Lifting handle
75 Lifting handle mounting bracket
75A Pan head screw M5x10
76 Hinge
77 Lock washer M4
78 Pan head screw M4x10
79 Motor pulley cover
80 Hex. Nut M4
81 Access cover
83 Lock housing bracket
84 Lock housing
85 Belt position chart
86 Acorn nut
88 Cross recessed pan head screw
89 Guard
90 Motor
92 Belt tension handle
93 Belt tension handle cover
94 Motor tension lock
95 Washer 8mm
96 Lock nut M8
97 Undee washer 6mm
98 Hex. Socket head screw M6x15
99 Motor pulley
100 Hex. Socket set screw M6x12
103 Power cable
104 Knockout bar
104A Knockout bar
105 Wrench
1
2
3
4
5
6
7
9
10
11
12
13
14
15
16
17
18
19
19A
19B
21
22
23
24
24A
25
26
27
28
29
30
31
34
35
36
37
40
40A
40B
40C
41
42
43
44
45
46
47
48
50
51
11
57 Lock shaft

Maxis Distribution Pty Ltd
ABN 93 605 273 989
info@maxis.com.au
Phone: 1300 767 366
International: +61 7 3292 0392
128 Ingleston Road, Wakerley
Queensland Australia 4154
www.maxis.com.au
©Maxis Distribution Pty Ltd 2016
Tools & Machinery
This manual suits for next models
1
Table of contents
Other Carbatec Lathe manuals